A workbook is not just an Excel file; it's also an object in Excel's Object model (a programming hierarchy that exposes parts of Excel to VBA). This means that you can reference workbooks through VBA to do cool things like automatically create new workbooks, prevent users from closing workbooks, automatically back up workbooks, and much more. We start our list of 101 macros here with a list of the most useful workbook macros.
 If you're brand-new to Excel VBA, we highly recommend that you first take a quick look at Part I. There, you will find the basic foundation you'll need to understand many of the concepts found in the macros in this Part.
The code for this Part can be found on this book's companion website. See this book's Introduction for more on the companion website.
Macro 1: Creating a New Workbook from Scratch
You may sometimes want or need to create a new workbook in an automated way. For instance, you may need to copy data from a table and paste it into a newly created workbook. The following macro copies a range of cells from the active sheet and pastes the data into a new workbook.
How it works
This macro is relatively intuitive as you read through the lines of the code.
Sub Macro1()
‘Step 1 Copy the data
Sheets(“Example 1”).Range(“B4:C15”).Copy
‘Step 2 Create a new workbook
Workbooks.Add
‘Step 3 Paste the data
ActiveSheet.Paste Destination:=Range(“A1”)
‘Step 4 Turn off application alerts
Application.DisplayAlerts = False
‘Step 5 Save the newly created workbook
ActiveWorkbook.SaveAs _
Filename:=”C:TempMyNewBook.xlsx”
‘Step 6 Turn application alerts back on
Application.DisplayAlerts = True
End Sub
Here's how this macro works:
1. In Step 1, we simply copy the data that ranges from cells B4 to C15.
The thing to note here is that you are specifying both the sheet and the range by name. This is a best practice when you are working with multiple workbooks open at one time.
2. We are using the Add method of the Workbook object to create a new workbook. This is equivalent to manually clicking File⇒New⇒Blank Document in the Excel Ribbon.
3. In this step, you use the Paste method to send the data you copied to cell A1 of the new workbook.
Pay attention to the fact that the code refers to the ActiveSheet object. When you add a workbook, the new workbook immediately gains focus, becoming the active workbook. This is the same behavior you would see if you were to add a workbook manually.
4. In Step 4 of the code, we set the DisplayAlerts method to False, effectively turning off Excel's warnings. We do this because in the next step of the code, we save the newly created workbook. We may run this macro multiple times, in which case Excel attempts to save the file multiple times.
What happens when you try to save a workbook multiple times? That's right — Excel warns you that there is already a file out there with that name and then asks if you want to overwrite the previously existing file. Because your goal is to automate the creation of the new workbook, you want to suppress that warning.
5. In Step 5, we save the file by using the SaveAs method. Note that we are entering the full path of the save location, including the final filename.
6. Because we turned application alters off in Step 4, we need to turn them back on. If we don't, Excel continues to suppress all warnings for the life of the current session.
How to use it
To implement this macro, you can copy and paste it into a standard module:
1. Activate the Visual Basic Editor by pressing ALT+F11.
2. Right-click the project/workbook name in the Project window.
3. Choose Insert⇒Module.
4. Type or paste the code in the newly created module. You will probably need to change the sheet name, the range address, and the save location.
Macro 2: Saving a Workbook When a Particular Cell Is Changed
Sometimes, you may be working on data that is so sensitive that you'll want to save every time a particular cell or range of cells is changed. This macro allows you to define the range of cells that, when changed, forces the workbook to save.
How it works
The secret to this code is the Intersect method. Because we don't want to save the worksheet when any old cell changes, we use the Intersect method to determine if the target cell (the cell that changed) intersects with the range we have specified to be the trigger range (C5:C16 in this case).
The Intersect method returns one of two things: either a Range object that defines the intersection between the two given ranges, or nothing. So in essence, we need to throw the target cell against the Intersect method to check for a value of Nothing. At that point, we can make the decision whether to save the workbook.
Private Sub Worksheet_Change(ByVal Target As Range)
‘Step 1: Does the changed range intersect specified range?
If Intersect(Target, Range(“C5:C16”)) Is Nothing Then
‘Step 2: If there is no intersection, exit procedure
Exit Sub
‘Step 3: If there is an intersection, save the workbook
Else
ActiveWorkbook.Save
‘Close out the If statement
End If
End Sub
1. In Step 1, we are simply checking to see if the target cell (the cell that has changed) is in the range specified by the Intersect method. A value of Nothing means the target cell falls outside the range specified.
2. Step 2 forces the macro to stop and exit the procedure if there is no intersection between the target cell and the specified range.
3. If there is an intersection, Step 3 fires the Save method of the active workbook, overwriting the previous version.
4. In Step 4, we simply close out the If statement. Every time you instantiate an If…Then…Else check, you must close it out with a corresponding End If.
How to use it
To implement this macro, you need to copy and paste it into the Worksheet_Change event code window. Placing the macro here allows it to run each time you make any change to the sheet.
1. Activate the Visual Basic Editor by pressing ALT+F11.
2. In the Project window, find your project/workbook name and click the plus sign next to it in order to see all the sheets.
3. Click in the sheet from which you want to trigger the code.
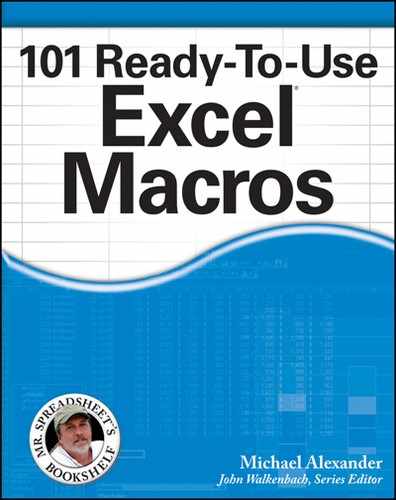
4. Select the Change event from the Event drop-down list (see Figure 2-1).
5. Type or paste the code in the newly created module, changing the range address to suit your needs.
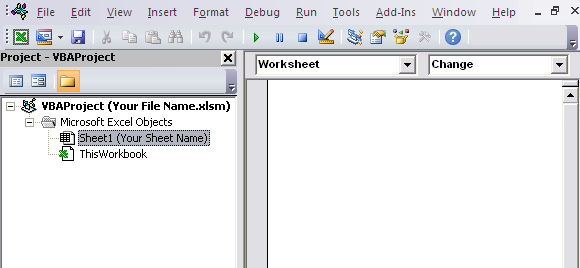
Figure 2-1: Enter or Paste your code in the Worksheet_Change event code window.
Macro 3: Saving a Workbook Before Closing
This macro is an excellent way to protect users from inadvertently closing their file before saving. When implemented, this macro ensures that Excel automatically saves before closing the workbook.
 Excel normally warns users who are attempting to close an unsaved workbook, giving them an option to save before closing. However, many users may blow past the warning and inadvertently click No, telling Excel to close without saving. With this macro, you are protecting against this by automatically saving before close.
How it works
This code is triggered by the workbook's BeforeClose event. When you try to close the workbook, this event fires, running the code within. The crux of the code is simple — it asks the user whether he really wants to close the workbook (see Figure 2-2). The macro then evaluates whether the user clicked OK or Cancel.
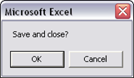
Figure 2-2: A message box activates when you attempt to close the workbook.
The evaluation is done with a Select Case statement. The Select Case statement is an alternative to the If…Then…Else statement, allowing you to perform condition checks in your macros. The basic construct of a Select Case statement is simple.
Select Case <some expression to check>
Case Is = <some value>
<do something>
Case Is=<some other value>
<do something else>
Case Is=<some 3rd value>
<do some 3rd thing>
End Select
With a Select Case statement, you can perform many conditional checks. In this case, we are simply checking for OK or Cancel. Take a look at the code.
Private Sub Workbook_BeforeClose(Cancel As Boolean)
‘Step 1: Activate the message box and start the check
Select Case MsgBox(“Save and close?”, vbOKCancel)
‘Step 2: Cancel button pressed, cancel the close
Case Is = vbCancel
Cancel = True
‘Step 3: OK button pressed, save the workbook and close
Case Is = vbOK
ActiveWorkbook.Save
‘Step 4: Close your Select Case statement
End Select
End Sub
1. In Step 1, we activate the message box as the condition check for the Select Case statement. Here, we use the vbOKCancel argument to ensure that the OK and Cancel buttons are presented as choices.
2. If the user clicked Cancel in the message box, the macro tells Excel to cancel the Workbook_Close event. This is done by passing True to the Cancel Boolean.
3. If the user clicked OK in the message box, Step 3 takes effect. Here, we tell Excel to save the workbook. And because we did not set the Cancel Boolean to True, Excel continues with the close.
4. In Step 4, we simply close out the Select Case statement. Every time you instantiate a Select Case, you must close it out with a corresponding End Select.
How to use it
To implement this macro, you need to copy and paste it into the Workbook_BeforeClose event code window. Placing the macro there allows it to run each time you try to close the workbook.
1. Activate the Visual Basic Editor by pressing ALT+F11 on your keyboard.
2. In the Project window, find your project/workbook name and click the plus sign next to it in order to see all the sheets.
3. Click ThisWorkbook.
4. Select the BeforeClose event in the Event drop-down list (see Figure 2-3).
5. Type or paste the code in the newly created module.

Figure 2-3: Type or paste your code in the Workbook_BeforeClose event code window.
Macro 4: Protect a Worksheet on Workbook Close
Sometimes you need to send your workbook out into the world with specific worksheets protected. If you find that you're constantly protecting and unprotecting sheets before distributing your workbooks, this macro can help you.
How it works
This code is triggered by the workbook's BeforeClose event. When you try to close the workbook, this event fires, running the code within. The macro automatically protects the specified sheet with the given password, and then saves the workbook.
Private Sub Workbook_BeforeClose(Cancel As Boolean)
‘Step 1: Protect the sheet with a password
Sheets(“Sheet1”).Protect Password:=”RED”
‘Step 2: Save the workbook
ActiveWorkbook.Save
End Sub
1. In Step 1, we are explicitly specifying which sheet we want to protect — Sheet1, in this case. We are also providing the password argument, Password:=RED. This defines the password needed to remove the protection.
This password argument is completely optional. If you omit this altogether, the sheet will still be protected, but you won't need a password to unprotect it. Also, be aware that Excel passwords are case-sensitive, so you'll want pay attention to the exact password and capitalization that you are using.
2. Step 2 tells Excel to save the workbook. If we don't save the workbook, the sheet protection we just applied won't be in effect the next time the workbook is opened.
How to use it
To implement this macro, you need to copy and paste it into the Workbook_BeforeClose event code window. Placing the macro here allows it to run each time you try to close the workbook.
1. Activate the Visual Basic Editor by pressing ALT+F11.
2. In the Project window, find your project/workbook name and click the plus sign next to it in order to see all the sheets.
3. Click ThisWorkbook.
4. Select the BeforeClose event in the Event drop-down list (see Figure 2-4).
5. Type or paste the code in the newly created module, modifying the sheet name (if necessary) and the password. Note that you can protect additional sheets by adding additional statements before the ActiveWorkbook.Save statement.
Figure 2-4: Type or paste your code in the Workbook_BeforeClose event code window.
Macro 5: Unprotect a Worksheet on Workbook Open
If you've distributed workbooks with protected sheets, you likely get the workbooks back with the sheets still protected. Often, you need to unprotect the worksheets in a workbook before continuing your work. If you find that you are continuously unprotecting worksheets, this macro may be just the ticket.
How it works
This code is triggered by the workbook's Open event. When you open a workbook, this event triggers, running the code within. This macro automatically unprotects the specified sheet with the given password when the workbook is opened.
Private Sub Workbook_Open()
‘Step 1: Protect the sheet with a password
Sheets(“Sheet1”).Unprotect Password:=”RED”
End Sub
The macro explicitly names the sheet we want to unprotect — Sheet1, in this case. Then it passes the password required to unprotect the sheet. Be aware that Excel passwords are case-sensitive, so pay attention to the exact password and capitalization that you are using.
How to use it
To implement this macro, you need to copy and paste it into the Workbook_Open event code window. Placing the macro here allows it to run each time the workbook opens.
1. Activate the Visual Basic Editor by pressing ALT+F11.
2. In the Project window, find your project/workbook name and click the plus sign next to it in order to see all the sheets.
3. Click ThisWorkbook.
4. Select the Open event in the Event drop-down list (see Figure 2-5).
5. Type or paste the code in the newly created module, modifying the sheet name (if necessary) and the password. Note that you can unprotect additional sheets by adding additional statements.
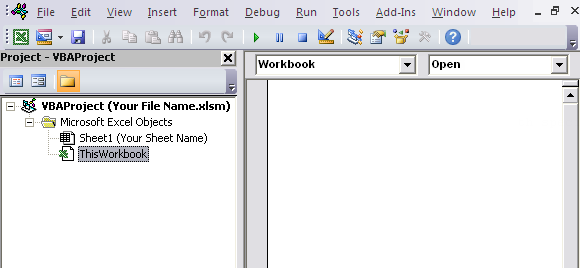
Figure 2-5: Type or paste your code in the Workbook_Open event code window.
Macro 6: Open a Workbook to a Specific Tab
In some situations, it's imperative that your workbook be started on a specific worksheet. With this macro, if a user is working with your workbook, they can't go astray because the workbook starts on the exact worksheet it needs to.
How it works
This macro uses the workbook's Open event to start the workbook on the specified sheet when the workbook is opened.
Private Sub Workbook_Open()
‘Step 1: Select the specified sheet
Sheets(“Sheet1”).Select
End Sub
The macro explicitly names the sheet the workbook should jump to when it's opened.
How to use it
To implement this macro, you need to copy and paste it into the Workbook_Open event code window. Placing the macro here allows it to run each time the workbook opens.
1. Activate the Visual Basic Editor by pressing ALT+F11 on your keyboard.
2. In the Project window, find your project/workbook name and click the plus sign next to it in order to see all the sheets.
3. Click ThisWorkbook.
4. Select the Open event in the Event drop-down list (see Figure 2-6).
5. Type or paste the code in the newly created module, changing the sheet name, if necessary.

Figure 2-6: Type or paste your code in the Workbook_Open event code window.
Macro 7: Opening a Specific Workbook Defined by the User
Want to give yourself or your users a quick way to search for and open a file? This macro uses a simple technique that opens a friendly dialog box, allowing you to browse for and open the Excel file of your choosing.
How it works
This macro opens the dialog box you see in Figure 2-7, allowing the user to browse for and open an Excel file.
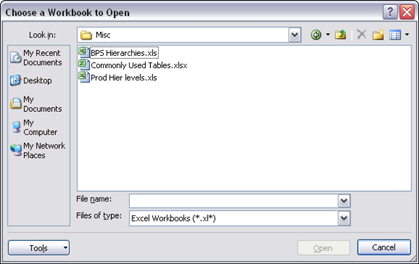
Figure 2-7: The Open dialog box activated by our macro.
Here's how this macro works:
Sub Macro7()
‘Step 1: Define a string variable.
Dim FName As Variant
‘Step 2: GetOpenFilename Method activates dialog box.
FName = Application.GetOpenFilename( _
FileFilter:=”Excel Workbooks,*.xl*”, _
Title:=”Choose a Workbook to Open”, _
MultiSelect:=False)
‘Step 3: If a file was chosen, open it!
If FName <> False Then
Workbooks.Open Filename:=FName
End If
End Sub
1. The first thing this macro does is to declare a variant variable that holds the filename that the user chooses. FName is the name of our variable.
2. In Step 2, we use the GetOpenFilename method to call up a dialog box that allows us to browse and select the file we need.
The GetOpenFilename method supports a few customizable parameters. The FileFilter parameter allows us to specify the type of file we are looking for. The Title parameter allows us to change the title that appears at the top of the dialog box. The MultiSelect parameter allows us to limit the selection to one file.
3. If the user selects a file from the dialog box, the FName variable is filled with the name of the file they have chosen. In Step 3, we check for an empty FName variable. If the variable is not empty, we use the Open method of the Workbooks object to open the file.
How to use it
To implement this macro, you can copy and paste it into a standard module:
1. Activate the Visual Basic Editor by pressing ALT+F11.
2. Right-click the project/workbook name in the Project window.
3. Choose Insert⇒Module.
4. Type or paste the code in the newly created module.
5. Optionally, you can assign the macro to a button (see the section “Assigning a macro to a button and other form controls” in Part I).
Macro 8: Determine Whether a Workbook Is Already Open
The previous macro automatically opened a workbook based on the user's selection. As we think about automatically opening workbooks, you must consider what may happen if you attempt to open a book that is already open. In the non-VBA world, Excel attempts to open the file again, with a warning that any unsaved changes will be lost. In VBA, it's a good idea to protect against such an occurrence by checking if a given file is already open before trying to open it again.
How it works
The first thing to notice about this macro is that it is a function, not a sub procedure. As you will see, making this macro a function enables us to pass any filename to it to test whether that file is already open.
The gist of this code is simple. We are testing a given filename to see if it can be assigned to an object variable. Only opened workbooks can be assigned to an object variable. When we try to assign a closed workbook to the variable, an error occurs.
So if the given workbook can be assigned, the workbook is open; if an error occurs, the workbook is closed.
Function FileIsOpenTest(TargetWorkbook As String) As Boolean
‘Step 1: Declare variables
Dim TestBook As Workbook
‘Step 2: Tell Excel to Resume on Error
On Error Resume Next
‘Step 3: Try to assign the target workbook to TestBook
Set TestBook = Workbooks(TargetWorkbook)
‘Step 4: If no error occurred then Workbook is already open
If Err.Number = 0 Then
FileIsOpenTest = True
Else
FileIsOpenTest = False
End If
End Function
1. The first thing the macro does is to declare a string variable that will hold the filename that the user chooses. TestBook is the name of our string variable.
2. In Step 2, we are telling Excel that there may be an error running this code. In the event of an error, resume the code. Without this line, the code would simply stop when an error occurs. Again, we are testing a given filename to see if it can be assigned to an object variable. So if the given workbook can be assigned, it's open; if an error occurs, it's closed. We need to have the code continue if an error occurs.
3. In Step 3, we are attempting to assign the given workbook to the TestBook object variable. The workbook we are trying to assign is itself a string variable called TargetWorkbook. TargetWorkbook is passed to the function in the function declarations (see the first line of the code). This structure eliminates the need to hard-code a workbook name, allowing us to pass it as a variable instead.
4. In Step 4, we simply check to see if an error occurred. If an error did not occur, the workbook is open, so we set the FileIsOpenTest to True. If an error occurred, that means the workbook is not open. In that case, we set the FileIsOpenTest to False.
Again, this is a function that can be used to evaluate any file you pass to it, via its TargetWorkbook argument. That is the beauty of putting this macro into a function.
The following macro demonstrates how to implement this function. Here, we are using the same macro you saw in the previous section, “Macro 7: Opening a Specific Workbook Defined by the User,” but this time, we are calling the new FileIsOpenTest function to make sure the user cannot open an already open file.
Sub Macro8()
‘Step 1: Define a string variable.
Dim FName As Variant
Dim FNFileOnly As String
‘Step 2: GetOpenFilename Method activates dialog box.
FName = Application.GetOpenFilename( _
FileFilter:=”Excel Workbooks,*.xl*”, _
Title:=”Choose a Workbook to Open”, _
MultiSelect:=False)
‘Step 3: Open the chosen file if not already opened.
If FName <> False Then
FNFileOnly = StrReverse(Left(StrReverse(FName), _
InStr(StrReverse(FName), “”) - 1))
If FileIsOpenTest(FNFileOnly) = True Then
MsgBox “The given file is already open”
Else
Workbooks.Open Filename:=FName
End If
End If
End Sub
How to use it
To implement this macro, you can copy and paste both pieces of code into a standard module:
1. Activate the Visual Basic Editor by pressing ALT+F11 on your keyboard.
2. Right-click the project/workbook name in the Project window.
3. Choose Insert⇒Module.
4. Type or paste the code in the newly created module.
5. Optionally, you can assign the macro to a button (see the section on “Assigning a macro to a button and other form controls” in Part I).
Macro 9: Determine Whether a Workbook Exists in a Directory
You may have a process that manipulates a file somewhere on your PC. For example, you may need to open an existing workbook to add new data to it on a daily basis. In these cases, you may need to test to see whether the file you need to manipulate actually exists. This macro allows you to pass a file path to evaluate whether the file is there.
How it works
The first thing to notice about this macro is that it is a function, not a sub procedure. Making this macro a function enables us to pass any file path to it.
In this macro, we use the Dir function. The Dir function returns a string that represents the name of the file that matches what you pass to it. This function can be used in lots of ways, but here, we are using it to check if the file path we pass to it exists.
Function FileExists(FPath As String) As Boolean
‘Step 1: Declare your variables.
Dim FName As String
‘Step 2: Use the Dir function to get the file name
FName = Dir(FPath)
‘Step 3: If file exists, return True else False
If FName <> “” Then FileExists = True _
Else: FileExists = False
End Function
1. Step 1 declares a string variable that holds the filename that returns from the Dir function. FName is the name of the string variable.
2. In Step 2, we attempt to set the FName variable. We do this by passing the FPath variable to the Dir function. This FPath variable is passed via the function declarations (see the first line of the code). This structure prevents us from having to hard-code a file path, passing it as a variable instead.
3. If the FName variable can't be set, this means the path we passed does not exist. Thus the FName variable is empty. Step 3 merely translates that result to a True or False expression.
Again, this is a function that can be used to evaluate any file path you pass to it. That's the beauty of writing this macro as a function.
The following macro demonstrates how to use this function:
Sub Macro9)
If FileExists(“C:TempMyNewBook.xlsx”) = True Then
MsgBox “File exists.”
Else
MsgBox “File does not exist.”
End If
End Sub
How to use it
To implement this macro, you can copy and paste both pieces of code into a standard module:
1. Activate the Visual Basic Editor by pressing ALT+F11 on your keyboard.
2. Right-click the project/workbook name in the Project window.
3. Choose Insert⇒Module.
4. Type or paste the code in the newly created module.
Macro 10: Refresh All Data Connections in Workbook on Open
Your workbook may have connections to external data sources such as web queries, MSQuery connections, PivotTable connections, and so on. In these cases, it may be helpful to refresh these data connections automatically when the workbook is opened. This macro does the trick.
How it works
This macro is an easy one-liner that uses the RefreshAll method. This method refreshes all the connections in a given workbook or worksheet. In this case, we are pointing it to the entire workbook.
Private Sub Workbook_Open()
‘Step 1: Use the RefreshAll method
Workbooks(ThisWorkbook.Name).RefreshAll
End Sub
The thing to note in this macro is that we are using the ThisWorkbook object. This object is an easy and safe way for you to point to the current workbook. The difference between ThisWorkbook and ActiveWorkbook is subtle but important. The ThisWorkbook object refers to the workbook that the code is contained in. The ActiveWorkbook object refers to the workbook that is currently active. They often return the same object, but if the workbook running the code is not the active workbook, they return different objects. In this case, you don't want to risk refreshing connections in other workbooks, so you use ThisWorkbook.
How to use it
To implement this macro, you need to copy and paste it into the Workbook_Open event code window. Placing the macro there allows it to run each time the workbook opens.
1. Activate the Visual Basic Editor by pressing ALT+F11.
2. In the Project window, find your project/workbook name and click the plus sign next to it in order to see all the sheets.
3. Click ThisWorkbook.
4. Select the Open event in the Event drop-down list (see Figure 2-8).
5. Type or paste the code in the newly created module.

Figure 2-8: Enter or Paste your code in the Workbook_Open event code window.
Macro 11: Close All Workbooks at Once
One of the more annoying things in Excel is closing many workbooks at once. For each workbook you have opened, you need to activate the work, close it, and confirm save changes. There is no easy way to close them all down at one time. This little macro takes care of that annoyance.
How it works
In this macro, the Workbooks collection loops through all the open workbooks. As the macro loops through each workbook, it saves and closes them down.
Sub Macro11()
‘Step 1: Declare your variables
Dim wb As Workbook
‘Step 2: Loop through workbooks, save and close
For Each wb In Workbooks
wb.Close SaveChanges:=True
Next wb
End Sub
1. Step 1 declares an object variable that represents a Workbook object. This allows us to enumerate through all the open workbooks, capturing their names as we go.
2. Step 2 simply loops through the open workbooks, saving and closing them. If you don't want to save them, change the SaveChanges argument from True to False.
How to use it
The best place to store this macro is in your Personal Macro Workbook. This way, the macro is always available to you. The Personal Macro Workbook is loaded whenever you start Excel. In the VBE Project window, it is named personal.xlsb.
1. Activate the Visual Basic Editor by pressing ALT+F11 on your keyboard.
2. Right-click personal.xlb in the Project window.
3. Choose Insert⇒Module.
4. Type or paste the code in the newly created module.
If you don't see personal.xlb in your project window, it doesn't exist yet. You'll have to record a macro, using Personal Macro Workbook as the destination.
To record the macro in your Personal Macro Workbook, select the Personal Macro Workbook option in the Record Macro dialog box before you start recording. This option is in the Store Macro In drop-down box. Simply record a couple of cell clicks and then stop recording. You can discard the recorded macro and replace it with this one.
Macro 12: Open All Workbooks in a Directory
Here's a scenario: You've written a cool macro that applies some automated processing to each workbook you open. Now the problem is that you need to go into your directory, open each workbook, run the macro, save it, close the workbook, and then open the next one. Opening each workbook in a directory is typically a time-consuming manual process. This macro solves that problem.
How it works
In this macro, we use the Dir function. The Dir function returns a string that represents the name of the file that matches what you pass to it.
In this code, we use the Dir function to enumerate through all the .xlsx files in a given directory, capturing each file's name. Then we open each file, run some code, and finally close the file after saving.
Sub Macro12()
‘Step 1:Declare your variables
Dim MyFiles As String
‘Step 2: Specify a target directory
MyFiles = Dir(“C:Temp*.xlsx”)
Do While MyFiles <> “”
‘Step 3: Open Workbooks one by one
Workbooks.Open “C:Temp” & MyFiles
‘run some code here
MsgBox ActiveWorkbook.Name
ActiveWorkbook.Close SaveChanges:=True
‘Step 4: Next File in the Directory
MyFiles = Dir
Loop
End Sub
1. Step 1 declares the MyFiles string variable that will capture each filename that is in the enumeration.
2. In Step 2, the macro uses the Dir function to specify the directory and file type we are looking for. Note that the code here is looking for *.xlsx. This means that only .xlsx files will be looped through. If you are looking for .xls files, you need to change that (along with the directory you need to search). This macro passes any filename it finds to the MyFiles string variable.
3. Step 3 opens the file, does some stuff (this is where you would put in any macro code to perform the desired actions), and then we save and close the file. In this simple example, we are calling a message box to show each filename as it opens.
4. The last step of the macro loops back to find more files. If there are no more files, the MyFiles variable will be blank. If that is the case, the loop and macro end.
How to use it
To implement this macro, you can copy and paste it into a standard module:
1. Activate the Visual Basic Editor by pressing ALT+F11.
2. Right-click the project/workbook name in the Project window.
3. Choose Insert⇒Module.
4. Type or paste the code in the newly created module.
Macro 13: Print All Workbooks in a Directory
If you need to print from multiple workbooks in a directory, you can use this macro.
How it works
In this macro, we use the Dir function to return a string that represents the name of the file that matches what you pass to it.
In this code, we use the Dir function to enumerate through all the .xlsx files in a given directory, capturing each file's name. Then we open each file, print, and close the file.
Sub Macro13()
‘Step 1:Declare your variables
Dim MyFiles As String
‘Step 2: Specify a target directory
MyFiles = Dir(“C:Temp*.xlsx”)
Do While MyFiles <> “”
‘Step 3: Open Workbooks one by one
Workbooks.Open “C:Temp” & MyFiles
ActiveWorkbook.Sheets(“Sheet1”).PrintOut Copies:=1
ActiveWorkbook.Close SaveChanges:=False
‘Step 4: Next File in the Directory
MyFiles = Dir
Loop
End Sub
1. Step 1 declares the MyFiles string variable that will capture each filename that is in the enumeration.
2. Step 2 uses the Dir function to specify the directory and file type we are looking for. Note that the code here is looking for *.xlsx. This means that only .xlsx files will be looped through. If you are looking for .xls files, you will need to specify that (along with the directory you need to search). The macro passes any filename it finds to the MyFiles string variable.
3. Step 3 opens the file and then prints out one copy of Sheet1. Needless to say, you will probably want to change which sheets to print. You can also change the number of copies to print.
4. Step 4 loops back to find more files. If there are no more files, the MyFiles variable is blank. If that is the case, the loop and macro end.
How to use it
To implement this macro, you can copy and paste it into a standard module:
1. Activate the Visual Basic Editor by pressing ALT+F11.
2. Right-click the project/workbook name in the Project window.
3. Choose Insert⇒Module.
4. Type or paste the code in the newly created module, modifying the print statement as needed.
Macro 14: Preventing the Workbook from Closing Until a Cell Is Populated
There are times when you don't want a user closing out a workbook without entering a specific piece of data. In these situations, you want Excel to deny the user the ability to close the workbook until the target cell is filled in. This is where this macro comes in.
How it works
This code is triggered by the workbook's BeforeClose event. When you try to close the workbook, this event fires, running the code within. This macro checks to see if the target cell (cell C7, in this case) is empty. If it is empty, the close process is cancelled. If C7 is not empty, the workbook saves and closes.
Private Sub Workbook_BeforeClose(Cancel As Boolean)
‘Step 1: Check to see if Cell C7 is blank
If Sheets(“Sheet1”).Range(“C7”).Value = “” Then
‘Step 2: Blank: cancel the Close and tell the user
Cancel = True
MsgBox “Cell C7 cannot be blank”
‘Step 3: Not Blank; Save and Close
Else
ActiveWorkbook.Close SaveChanges:=True
End If
End Sub
1. Step 1 checks to see whether C7 is blank.
2. If it is blank, Step 2 takes effect, cancelling the close process. This is done by passing True to the Cancel Boolean. Step 2 also activates a message box notifying the user of their stupidity (well, it's not quite that harsh, really).
3. If cell C7 is not blank, the workbook saves and closes.
How to use it
To implement this macro, you need to copy and paste it into the Workbook_BeforeClose event code window. Placing the macro here allows it to run each time you try to close the workbook.
1. Activate the Visual Basic Editor by pressing ALT+F11.
2. In the Project window, find your project/workbook name and click the plus sign next to it in order to see all the sheets.
3. Click ThisWorkbook.
4. Select the BeforeClose event in the Event drop-down list (see Figure 2-9).
5. Type or paste the code in the newly created module.

Figure 2-9: Type or paste your code in the Workbook_BeforeClose event code window.
Macro 15: Create a Backup of a Current Workbook with Today's Date
We all know that making backups of your work is important. Now you can have a macro do it for you. This simple macro saves your workbook to a new file with today's date as part of the name.
How it works
The trick to this macro is piecing together the new filename. The new filename has three pieces: the path, today's date, and the original filename.
The path is captured by using the Path property of the ThisWorkbook object. Today's date is grabbed with the Date function.
You'll notice that we are formatting the date (Format(Date, “mm-dd-yy”)). This is because by default, the Date function returns mm/dd/yyyy. We use hyphens instead of forward slashes because the forward slashes would cause the file save to fail. (Windows does not allow forward slashes in filenames.)
The last piece of the new filename is the original filename. We use the Name property of the ThisWorkbook object to capture that:
Sub Macro15()
‘Step 1: Save workbook with new filename
ThisWorkbook.SaveCopyAs _
Filename:=ThisWorkbook.Path & “” & _
Format(Date, “mm-dd-yy”) & “ “ & _
ThisWorkbook.Name
End Sub
In the one and only step, the macro builds a new filename and uses the SaveCopyAs method to save the file.
How to use it
To implement this macro, you can copy and paste it into a standard module:
1. Activate the Visual Basic Editor by pressing ALT+F11.
2. Right-click the project/workbook name in the Project window.
3. Choose Insert⇒Module.
4. Type or paste the code in the newly created module.