A multitude of tools are available for your use. You are probably familiar with breakouts, chat rooms, document sharing, polling, raised hand, whiteboards, and annotation tools. But have you also thought of using a meter poll or a course map? Have you used Pinterest or Evernote or Poll Everywhere? This section presents a broad variety of tools that you can use in many situations. For each there are suggestions for how to use them. Be creative and devise your own use for each.
26 Increase Interaction Using a Whiteboard
Participants
Depending on the activity, the number of participants can range from small to large. If you attempt something more complex, you should do so only with a smaller audience of 8–14 participants.
Procedures
Check your settings when you set up your session to ensure annotation is enabled. With some webinar providers, annotation functionality has to be turned on.
Prepare any images that you'll need on the whiteboard ahead of time. Depending on the activity you design, you can use a blank screen or show a visual, such as a grid or continuum.
Keep it simple. The “dynamic” you won't be able to control is one person typing over the top of another; however, if you use the entire screen and give the participants some instruction about where and how they should type their responses, you can avoid some of the type over.
Keep anticipated participant responses to one or two words, which will also help. In general, avoid asking a large audience to type in sentences, as it will get very messy, unless you limit responses or break up your screen into quadrants and direct participants where to type.
Give the participants a chance to practice using the whiteboard as part of a simple opening exercise at the beginning of the webinar. For example, have a “Welcome” screen where participants type in their first names as they join the call. Another option is to create an icebreaker in which the participants type in something fun about themselves, for example, the make and model of their first car. In this way, you teach the skill of using the text tool on a whiteboard up front so that you're not derailed by this when the actual teachable moment arrives.
If necessary, instruct participants to choose their preferred text color when you do the practice exercise. Ensure that they choose a dark enough color for the rest of the training exercises and explain how they can change text colors during the introduction as well.
Once participants are familiar with the text tool and whiteboard functions, you can introduce a variety of activities. A few ideas are listed below. Use them as a starting point for other approaches that you create on your own.
Variations
Word association: Ask participants to type in words that they think of when you bring up a certain subject. You can use a blank screen. (Optional: Have your question/instruction at the top, but leave most of the space for them to fill in. Compare and contrast the words by asking for explanations from participants.)
Individual application: Based on choices associated with several options, ask participants to type their names in the part of the screen that indicates how they see themselves and then ask them to explain. As mentioned above, prepare a visual ahead of time and have it on the screen, rather than a blank whiteboard.
Opinion polling: Whiteboards provide a simple, visual way to get participants' opinions regarding some type of choice. Again, prepare the visual you use ahead of time.
Case Examples
Word association: When facilitating a training session on the performance management process, start off with a word association for the word discipline. More than likely, you'll tend to get words that have more negative connotations. Use that as a way to point out how we tend to stereotype this process as “bad.” Then, help participants to see this word in a more positive light by explaining that the root of the word is actually disciple and that the focus of the discipline process is to improve the employee.
Word association: When facilitating a training session on leadership, divide your whiteboard into four quadrants. Write an A, B, C, and D at the corner of the four boxes. Ask for four volunteers. Ask the volunteers to type a short definition of “leadership” and assign each person a space (A, B, C, or D). Use these four definitions as a starting point for a discussion on leadership or another topic of your choice.
Individual application: When facilitating a training session on conflict styles, prepare a grid with each of the conflict styles you are presenting. Ask participants to enter their names in the box of the style they are most comfortable in, and then repeat this process for least comfortable. Make sure you announce ahead of time that you'll be calling on individuals for their insight based on which box their name appears in. Or, alternately, ask for a volunteer or two. This works out to be a great “team awareness” exercise as well, as members get to see where others land.
Individual application: When facilitating a training session on personal change management, bring up a reaction like fear and ask participants to type their name in the phase of change (denial, resistance, exploration, commitment) that they think that reaction will most likely be experienced. Ask for volunteers or choose a few participants to explain their thoughts. Erase and repeat the process for another reaction, like doubt, blame, energy, or creativity.
Simple polling: When facilitating a training session on documentation, develop two examples of the notes a manager would make to document an issue in an employee performance appraisal: one example reflecting the best practices you're about to teach; another one illustrating some pitfalls of poor documentation. Create a blank box next to each one. Ask participants to vote for the one that they feel is the better example by typing an “X” in the box by their choice. Hint: Don't make it too easy or they won't think critically.
Simple polling: When facilitating a training session on trust development within a team, create a line continuum for team trust: place passive agreement on the left and unhealthy confrontation on the right. Ask participants to type an “X” on the continuum where they believe their team, generally speaking, is presently located. Once all “Xs” are entered, ask for volunteers to comment, as they feel comfortable. The Xs are anonymous, so comments can be directed at where the majority of the Xs landed without implicating anyone.
_______
27 Meter Poll
Participants
Any participants who are learning critical thinking skills
Procedure
This procedure helps learners use deductive reasoning to discuss continuums or categorical concepts that have complex characteristics: for example, whether an action is ethical or not ethical, whether a comment is awkward/rude or harassing. In the exercise, learners are asked (via poll) to place a series of cases on the continuum, which is represented by a meter. These cases should not be easy calls; learners should have to think a bit to decide where the items fall.
The poll results draw out (via chat or open microphone) what led learners to place the items in specific areas of the continuum. The discussion can then generate the factors that led to items being pegged at each end of the continuum.
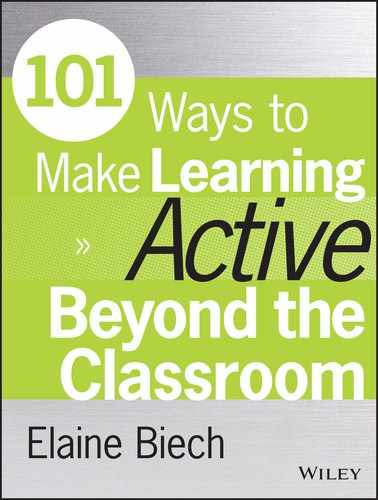
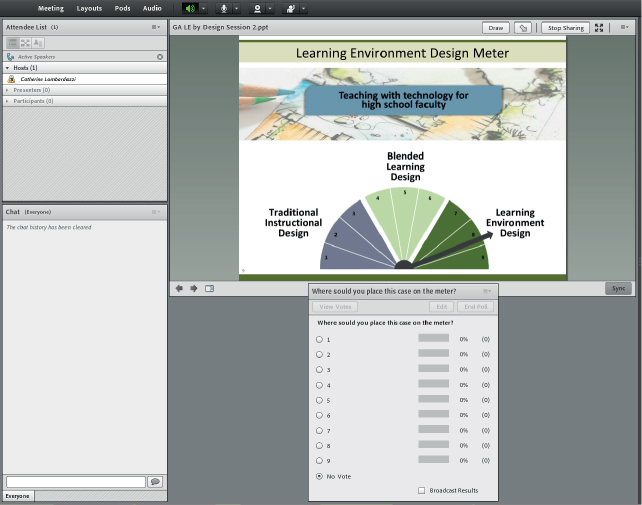
Set up the exercise before your webinar/VILT. Create a slide that shows a “meter” illustrating where a case example might be on the continuum. (See slide 4, the slide capture in the case example, to view what this might look like.)
Prepare a series of three to six cases or items that can be analyzed for placement somewhere on the meter's continuum. (You might have more if they are short.)
Create a poll that simply asks where the item belongs on the continuum, giving the numbers 1–9 as options. (Polls will be cleared between items, so you only need one poll.)
If you are using Adobe or similar VILT software, set up a new “view” that positions the meter slide at the top and the poll at the bottom. Your goal is for learners to be able to see the slide, the poll, AND the chat box all at once. (See screen capture, slide 4.)
Prepare to note where the case examples fall (e.g., on a notes pod in presenter view; on scrap paper in front of you).
When the exercise comes up in the webinar/VILT, explain the meter if necessary.
Switch to your polling view if you have created one.
Bring up a specific case, described in short sentences. If you have built your slides to do this, have key points in the case appear on the screen.
Open up your prepared 1–9 poll.
Make note of where each case is being pegged on the poll (on average, or majority rules). This can be done by your producer, if you have one. Repeat this procedure with each of the additional cases, clearing and reopening the poll in between.
Summarize which cases wound up on the left, right, and middle of the meter.
Ask debriefing questions for chat or open mike discussion:
What led you to categorize these cases on the left/right?
What made it difficult to decide where to place the cases?
Some people placed X case on the opposite end, as most others; if you were one of those folks, what led you to make that decision?
Summarize the key points that you want to make. It is sometimes possible to have these prepared on the screen.
Switch back to normal mode and continue the webinar/VILT.
Variations
Create text boxes with the essential elements/descriptors of each case example. Set up the slide so that these items appear and disappear in the order in which you will discuss them. This can be helpful online because learners are sometimes distracted and the text box reminds them what the question is. (Use slide animation tools to do this. If animation doesn't work in your webinar technology, you can create a series of slides instead.) The time you invest in setting this up may be beneficial, as it allows learners to hear the details, see the essential facts, and consider where they want to peg the case on the meter.
A similar exercise can be run for discussions with more clear-cut categories.
This exercise can be easily adapted for classroom use.
Case Example
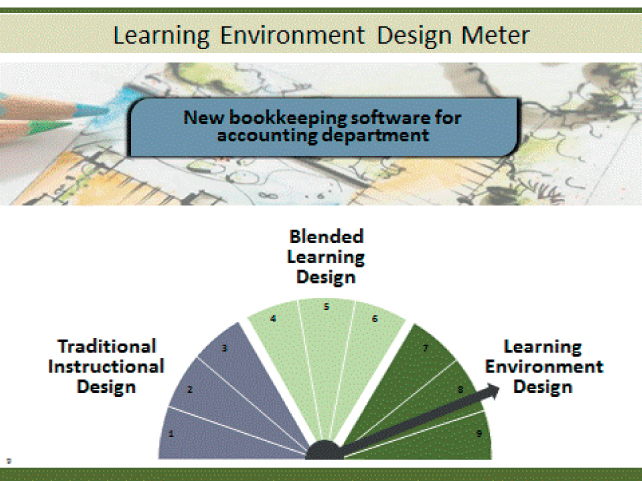
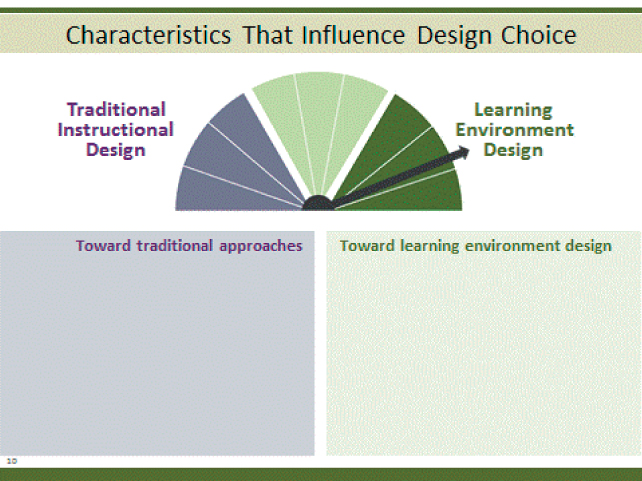
The strategy has been used to discuss whether certain learning needs are best addressed by traditional training or whether they can be addressed by a “learning environment” (curated material that learners can self-provision as needed).
In this case, we have already been discussing the trend to move from traditional courses to blended learning to more informal and collaborative strategies. The meter poll explored the kinds of training projects that call for the different types of designs. I bring up eight typical design projects in this exercise. They are displayed one at a time on-screen in a short description, although when I discuss the cases, I give a bit more detail. My goal in selecting the cases was to have ones that wind up in each of the three design models, but my learners consistently surprise me in where they place the projects (they bring different assumptions to the descriptions than I do). No matter; the debriefing works well regardless.
These slides illustrate the exercise. Slide 1 is used to run the poll. The cases at the top are animated to come in one at a time. Slide 2 is blank and displayed when I run the debriefing. Slide 3 summarizes much of what generally comes out in the discussion. I reference our discussion and add points when I summarize the activity. Slide 4 is the ultimate screen capture that participants see.
Design a theme that brings the various topics of the content together.
Create scenarios that represent each content's topic.
Design a visually appealing landing page that gives the learner a big picture of the entire course.
Enable the learner to use an exploratory approach to browse through different topics rather than using a sequential approach.
Variation
Instead of scenarios, analogies from different domains can be used to grab the learners' attention and enable them to comprehend the content, for example, analogies from sports, manufacturing, travel, or nature.
Case Example
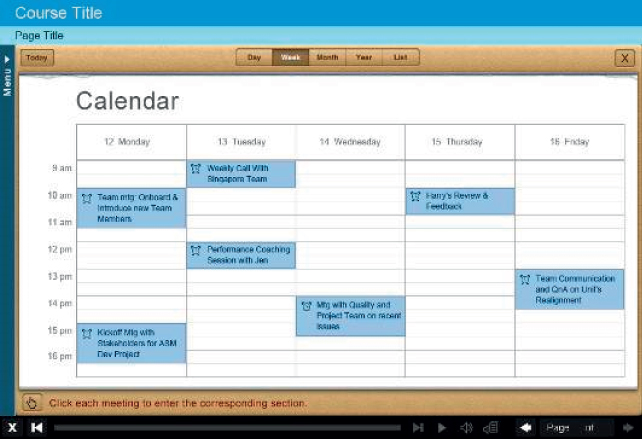
One such strategy was an e-learning course created for first-time supervisors to introduce them to their areas of responsibility. To give learners an idea of how a supervisor has to wear different hats and juggle different responsibilities, the course landing page represented a series of meetings on a supervisor's weekly calendar, as displayed here, where each meeting was mapped to one unique responsibility area.
The various supervisory responsibilities, such as team management, performance management, coaching, client relationship management, quality management, were all introduced through a series of meetings scheduled in one week on a supervisor's calendar.
The learner could click on any of the meetings on the weekly view of the Outlook calendar to begin the topic related to that particular responsibility.
Calendar
_______
29 Google Hangout Collaborations
Participants
Groups of four to five individuals are ideal to allow ample discussion and sharing of ideas. You can have as many groups discussing different (or the same) topic as breakouts
Procedure
With your welcome materials, send instructions on how to set up a Google+ account and how to use Google Hangouts, a great job aid.
Class participants should already have accounts in Google+. If possible, you can share the participant list so that participants can connect with the others in advance of the session.
Assign participants into groups of four to five. Assign a group leader.
Have each group leader start a hangout for the group.
Give each group a specific amount of time to discuss and answer a question. One person from each group will report to the class as a whole.
Bring the groups back to the main classroom to discuss their findings, using questions like these to prompt a discussion:
What did your group discuss as the key element to this question?
What solutions did your group generate?
What did your group agree was the key or most important item?
What insight did you have as a result of your group's discussion?
Variations
You can have the groups take screenshots or submit a summary of their key points to put on a class Pinterest pinboard or on Instagram. Don't forget to tell them what hashtag to use.
Post the questions on Twitter. (Don't forget to assign a hashtag for the questions.) Number the questions. Assign individuals to discuss specific questions on Twitter. Remind them to use the question number and hashtag to make it easy to follow the discussion.
_______
30 Pinboard Key Learning
Participants
You can have as many people contribute to a pinboard as you wish, but they must each be added as a pinner to the board before they can submit their posts
Procedure
Send each participant instructions on how to get started and create an account in Pinterest as well as a tutorial on hashtags.
Add class members to a pinboard that you'd like them to use. (If you have multiple pinboards that you'd like to share, then the class members must be added to each one.)
Introduce the pinboards to the class at the beginning of the activity or class session. You can break up the class into groups and ask specific participants to submit posts to specific pinboards, or you can allow everyone in the class to post to all of the pinboards.
If you are concerned about participants not posting, you can ask them to each post a certain number of resources, for example three pins.
Before the close of the activity, open the pinboards and point out examples of resources posted. The participants who posted specific pins can talk about their resources. Ask them the following questions:
What resources did you find on (topic) that we can use to add to our knowledge?
Did anyone find an infographic that helps illustrate (topic)?
Is there an article on (topic) that we can read to get a deeper understanding of it?
Variations
A similar activity can be created on Instagram or Twitter using a specific hashtag to catalog the content.
You can also use another social media platform, like a Group on Facebook, a Google+ Community, or LinkedIn Group by creating a discussion thread and allowing participants to post their resources within a thread.
At the conclusion of the activity, create a QR code to share, which links participants to the pinboard page.
Make the pinboard secret if you don't want others to view it (only authorized pinners will be able to see the content).
Use a planning process to collect ideas within a group.
Rather than having general pinboards, pinboards can be used to curate specific pieces of information, such as the following:
Boards for just blogs that are reflective of the topic
Boards for just a video
Boards for just images or quotes
Pinboards also can be used in face-to-face sessions as prework or in a class activity.
Case Examples
Leadership:
Gathering articles or videos published by or about specific people
Gathering pictures of people who have influenced the group as talking points
Gathering motivating quotes or blog posts
Customer service:
Examples of best practices by other companies
Customer service signs that reflect good customer service guidelines
Videos or published commercials of companies with good customer service reputations
Insert your Poll Everywhere question into your webinar. Be sure the question is text based, for example, “In one word, what does leadership mean to you?”
Ask a question at the appropriate time. A word cloud will be automatically created.
Create a screenshot of the poll results to send to participants at the conclusion of the session.
Variation
Poll questions are saved in your account. You can print out the word cloud and create posters or other items to enhance messaging.
Case Example
Use this tool for discussions surrounding the following topics (and more!):
Mission statement
Customer service
Strategic goals
Values statement
Branding/marketing
_______
32 Show Me
Participants
Nothing unique regarding participants
Procedure
Log in to Evernote or create a free Evernote account at www.evernote.com.
Create a new Evernote Notebook.
Make it the default Notebook.
Share the Evernote Notebook. (You can either share it with specific people via their email addresses or publish the Evernote Notebook as a public link.)
Ensure that participants have Edit permissions to the Notebook so that they can add media to it.
Evernote assigns a unique email address to every Evernote account, which can be used to email media into the default Notebook. Look up your Evernote account email address under “Email Notes to” in Account Settings. Send this email address to participants.
Invite participants to use their smartphones, tablets, or computers to email images to the Notebook, which illustrate their understanding of a specific word, phrase, or concept, for example, “leadership” or “teamwork.”
Encourage participants to search for relevant images on the Internet or create the images, and then submit photos or screenshots of the images they created. Participants can email the media by addressing their messages to the Evernote account email address. The emails and attachments will automatically post to the default folder.
Encourage participants to look at the media added by others to the Notebook. Do this by emailing the shared Notebook link to participants.
Debriefing: Review the resulting collection of images found in the shared Notebook with the class. For example: Does the variety of images reflect a common or diverse understanding of the word, phrase, or concept? How does this affect common comprehension and application of the subject matter? How do the contributions help the group see the similarities and differences in their consensus?
Variations
You may either download the Evernote software and install it on your computer, or you can set up and access your Evernote account through a standard Web browser (e.g., Internet Explorer, Mozilla Firefox, Safari, or others).
Practice with something easy first; ask participants to submit an image (from an Internet search) of their favorite food. This will help them learn the process and get a feel for the technology before you give them a more complex assignment.
In the classroom or online, you can share the contents of the folder via an LCD projector or desktop sharing tool.
Alternatively, you could use Pinterest. Although, what works great with Evernote is that participants do not need their own accounts in order to post media to the shared Notebook.
Case Example
This activity was used with a variety of groups to improve discussion of abstract topics, such as “leadership,” “teamwork,” and “ethics.” We all have different mental models and filters, based on our own personal experiences, of what these abstract concepts mean. Selecting an image that represents what we have in our heads provides clarity. Instead of pushing a definition from the lectern, this activity allows easy exploration (in the classroom or online) of the subject and gives us the ability to collaborate and cocreate meanings together. Participation builds buy-in.