Using the Organizer in Photoshop Elements 4.0 for Windows, you can create individual collections and categories of your entire image library.
Tools: Photoshop Elements
Materials: Your photos

Although it looks like a simple photo-display device, the Organizer is actually a powerful database that lets you see and find images from various drives, folders, and e-mail attachments all in one place. The Organizer allows you to then sort and catalog those images in a variety of ways.
In this project, we create a collection of photos similar to a traditional photo album. This is an easy project that you will probably use often to organize your photos. In the second part of the project, you learn how to categorize your photos using tags. Both collections and tags are fantastic tools for keeping track of all your images, and they allow you to find your images in a snap. They are also essential tools for using creations in Photoshop Elements, such as scrapbooks and slideshows.
Note: The photos you see in the Organizer are not actually stored there, but are still in their original folders. Be careful not to delete photos thinking that the Organizer will save them. If you delete a photo from its original folder, it will be gone and you won't be able to recover it.
Get started. If you have not already brought your photos into Photoshop Elements 4, now is the time. Go to the Organizer, and choose File > Get Photos > By Searching. Photoshop Elements will find all the photo files in your computer and open them in the Photo Browser. If you want, you can also bring in images from a variety of other sources, such as CDs, cameras, Flash cards, and even mobile phones by just clicking on the Get Photos button in the menubar.
Create a new collection. With all your images now in view, you can find those you want to put in your first collection. Select the Collections tab in the right pane of the Organizer. Click New > New Collection. In the Create Collection dialog box, type the subject name and any notes. Then click OK.


Add your photos. Repeat the process for all the photos you want to put in your collection. To make it easier, pull your images together into a single group and drag them to your new collection. Do this by either pressing the Shift key while selecting (if your images are contiguous) or by pressing the Ctrl key (if they are noncontiguous). Once your images are part of the collection, you will see the Collection icon under it.

Edit the Collection icon. By default each Collection icon will be the first image in the collection. If you want to use another one, click the Edit Collection(
 ). From there, click the Edit Icon button. Use the navigation buttons to select which photo you want, and then crop if desired. Click OK.
 Double-click the icon in the Collections pane to view your new collection. That's it!
When you are done, click Back to All Photos to view all your photos.
Tags let you mark photos and put them into categories and subcategories. Inside the Tags pane you'll find preexisting categories of people, places, and things where you can store your finished tags. For example, say you collect animal photos—lots of them. With tags you can tag all of your animal photos “Animals” and make subcategories, such as “Zoo,” “Farm,” “Forest,” “Birds,” and “Aquarium.” The possibilities are endless.
In this project you tag a set of photos and then create a subcategory.
Create a new tag. In the Organizer, click on the Tags tab and choose New > New Tag. In the Create Tag dialog box, fill in the name of the subject and any notes you have.

Add your photos. Follow the same steps as you did when creating your collection. The first image you add will become your icon. Again, if you want edit the icon, follow the same steps as you did with your collection.
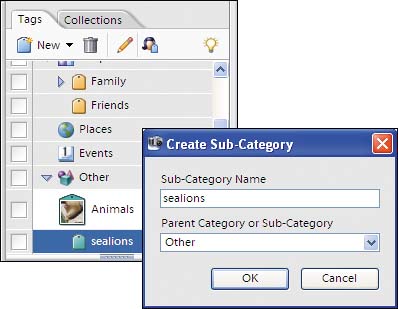
Create a subcategory. First, select the category you want to add to. In the Tags tab, select New > New Sub-Category. In the resulting dialog box, enter a name for your subcategory and click OK. Drag the new icon onto the photos you want to include in your new category.
Get organized! To further organize your photos, you can sort your tags into the icons for favorites, people, friends, places, and events. If you have photos you do not want displayed, tag them with the hidden icon.