A yearlong project is a wonderful excuse to add lots of new skills to your personal creative toolbox. The following are a few basic how-to’s for some of the crafts mentioned in the 365 journal prompts. Feel free to experiment and create your own unique variations on them.
QUILLING
The traditional craft of quilling has had a resurgence in recent years. Quillers use rolled strips of paper to create everything from simple decorations to highly complex sculptures. It’s an extremely easy craft to learn and probably one of the most inexpensive.
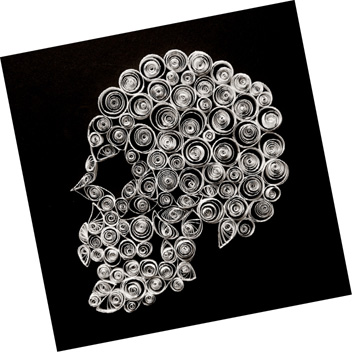
312. Quilled Skull
Supplies
Paper
Scissors or paper shredder
Improvised or purchased quilling tool, optional
Glue
Directions
1 Using a paper shredder or a pair of scissors, cut several long strips of paper that are the same width. Generally 1/8 to ¼ inch (.6 to .3 cm) is sufficient.
2 Roll each strip of paper so that you end up with a small, tight coil. Quilling tools are available to make this easier, but a hairpin or thin chopstick with a slit cut in the tapered end can be used just as easily.
3 Allow each coil to unroll slightly so that a spiral shape is visible when it is viewed from the side.
4 Close the coils with a small dot of glue—or leave them open if you want to attach two together to create other shapes. Coils that have been glued closed can then be pinched to create a variety of shapes (eye, teardrop, paisley, etc.).
5 Glue your coils together to create large shapes or patterns. Use different colors to distinguish different areas. Use unrolled coils to create lines or connect different pieces.
Tips
• There really are no steadfast rules with quilling—once you’ve made your coils, just experiment and see what happens. You can even incorporate other kinds of paper arts or nonpaper items.
• You can glue your finished creation to a board, have it be a freestanding item, or even make it on top of a dimensional base.
POP-UPS
Paper engineering is a complicated art form that requires a lot of skill to master. But there are lots of simple pop-up forms that can be created with just a few cuts and folds. And with a bit of decoration, they can seem far more complex than they actually are.

343. Pop-up Skull

Supplies
Paper (any size will work)
Scissors
Decorating materials
Directions
BEAKED MOUTH
1 Fold piece of paper in half.
2 Cut a small perpendicular slit in the center of the fold. Don’t cut more than halfway to the edge.
3 Starting at the corners of the cut part, fold the paper on either side of the slit against the main piece of paper so that it creates two triangular shapes. Fold them in the other direction to crease the triangles further.
4 Unfold the sheet of paper and then pull the triangle shapes toward you while simultaneously refolding the paper. This may take a bit of wiggling to get it to work; they can be done one at a time if need be. The end result will look like an open bird beak, which will close and open as the card is opened and closed.
Tips
• Use sturdier paper for larger or more complex pieces.
• Try cutting into the shapes you’ve made or attaching other pieces of paper to them to create variations on the pattern.
• To hide the pop-ups inside a card, fold a piece of paper in quarters and use only the interior two panels for your pop-up; the exterior two will give you a solid exterior to decorate as well. Or you can glue your pop-up panel onto another piece of folded paper or cardboard.
PIÑATA
The piñata is a traditional Mexican party decoration that has been a staple of children’s birthdays for years. The festive container is filled with treats, hung from a tree, and broken open with a stick. Piñatas can be created as unfilled decorative items—but it is a lot of fun to break them!
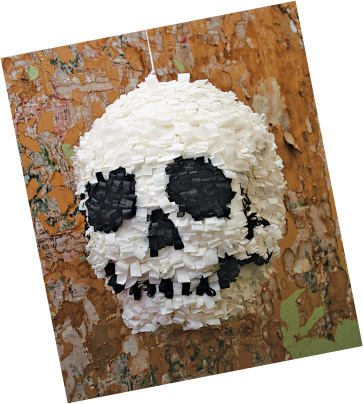
286. Piñata Skull
Supplies
Cardboard box or balloon
Newspaper
Masking tape
Bowl
Water
Flour
Paint and/or other decorating materials
Scissors or hobby knife
String
Tissue paper, optional
Candy or other nonbreakable items for filling, optional
Directions
1 Start with an inflated balloon or cardboard box as a base. (You don’t need to prefill your piñata, just don’t forget to make a door or opening so you can fill it later.) Add balled newspaper, paper tubes, and the like with masking tape to make the shape you want.
2 Use the simple papier-mâché instructions from page 234 to cover the entire structure.
3 Let dry and then pop the balloon, if you used one.
4 Use whatever art materials you like, such as tissue paper, to decorate the exterior.
5 Add a couple of holes and run a string through them so the piñata can be hung up.
6 Fill with candy or treats, close up any doors with a bit of tape and cover with more of your decorating materials, and it’s ready to use.
Tip
• Rather than using candy, try filling the piñata with other nonbreakable items for a real surprise when it’s opened.