This book assumes that you know a little about 3D printing already. However, if not, this appendix will get you started and give you resources to figure things out from here.
The 3D Printing Process
First, we should say that you do not just “hit print.” The amount of expertise and knowledge required is probably more analogous to cooking, or perhaps to using a sewing machine. 3D printing is rapidly evolving, too, so the details of what we say here may change, although we expect the basic ideas to stay the same for a while.
Having said all that, 3D printing requires three steps. Figure A-1 shows you the overall workflow for creating something with a 3D printer. In this appendix, we concentrate on two free progams that together cover the three parts of creating a 3D print: making a 3D model (in this case, with OpenSCAD), slicing that model into layers, and loading the sliced model onto a printer (with MatterControl for those latter two steps).

Figure A-1. 3D-printing workflow with OpenSCAD and MatterControl
Filament-based 3D Printing
3D prints are created by melting plastic filament and then laying up that melted filament a layer at a time. Layers are very thin—typically 0.2 mm or so. Some types of printers use powder or liquid resins instead of filament. However, the models in this book are intended to be as easy as possible to print on 3D printers that use filament, like the one in Figure A-2 (a Deezmaker Bukito).
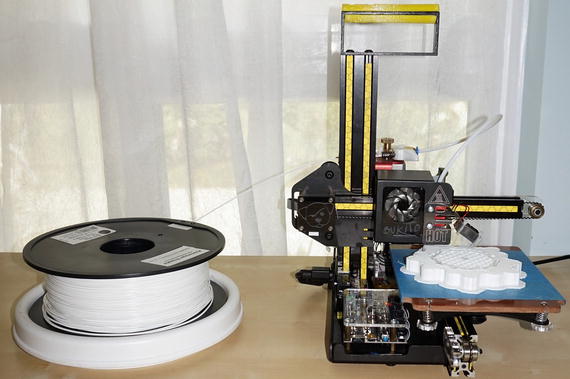
Figure A-2. A filament spool and 3D printer
The spool of white material next to the printer is PLA (polylactic acid) filament, like that used for the prints in this book. PLA is a corn-based, biodegradable plastic that is one of the commonest materials for 3D-printing filament. Other common filament plastics, like ABS, should work fine as well, but we only tested the prints in PLA. Filament is typically sold on spools of 1 kg or 1 lb of material. The one in Figure A-2 is a 1 kg spool.
File Types
The three steps required to create a 3D print correspond to three different types of file on your computer. In the case of the OpenSCAD 3D models in this book, the models are stored in files that end in .scad. When you are done working on the model in OpenSCAD, you save the final version in a .scad file and also export the file to one in the .stl format. The .stl format is a de facto standard for consumer 3D-printable models. Some vintages of Windows do not like the .stl suffix and think it is some sort of security file, but just ignore that and load the file into your slicing program.
For the next steps, MatterControl (or your printer’s equivalent software) takes in an .stl file and outputs a .gcode file. The .gcode format (or an equivalent format, such as a .x3g file) is what actually runs on your printer. If your printer uses proprietary software, that software may or may not reveal this file to the user.
Next will walk through OpenSCAD and MatterControl in turn and give you pointers on getting started with each one.
![]() Tip If you want more detail about 3D printing (including some discussion of post-processing your print or using 3D prints in the sand-casting process), you might consider Joan’s book Mastering 3D Printing (Apress, 2014). If you want to focus on using the MatterControl software in particular and want more of a detailed user guide, you can instead get Joan and Rich’s 3D Printing with MatterControl (Apress, 2015). Both books review how to get started in 3D printing. See the “MatterControl” section of this appendix to see how to tell whether MatterControl supports your 3D printer. If not, your 3D printer probably came with an equivalent proprietary program.
Tip If you want more detail about 3D printing (including some discussion of post-processing your print or using 3D prints in the sand-casting process), you might consider Joan’s book Mastering 3D Printing (Apress, 2014). If you want to focus on using the MatterControl software in particular and want more of a detailed user guide, you can instead get Joan and Rich’s 3D Printing with MatterControl (Apress, 2015). Both books review how to get started in 3D printing. See the “MatterControl” section of this appendix to see how to tell whether MatterControl supports your 3D printer. If not, your 3D printer probably came with an equivalent proprietary program.
OpenSCAD
The OpenSCAD program allows you to develop models in a style that sort of looks like the C/Java/Python family of programming languages. It is free and open source, and we want to acknowledge and thank Marius Kintel and the many other contributors and maintainers of the program. You can look at any of the models in this book to see the syntax.
Downloading OpenSCAD
You can download OpenSCAD from www.openscad.org, and an excellent user manual is available at www.openscad.org/documentation.html. Download OpenSCAD and install it per the instructions on the download site. OpenSCAD is available in versions for Linux/UNIX, Windows, and Mac OS X. The models in this book were tested with version 2015.03-3 for Mac OS X. If you are a longtime OpenSCAD user and have an older version than that, you may need to update to the current version to be able to run the models in this book, which take advantage of some recently added features.
Editing the Models
Briefly, to edit one of the models in this book, you would proceed as follows. First you would obtain the relevant .scad file for the model you are interested in. (See the “Repositories” note at the end of this appendix.)
Once you have the file and OpenSCAD is open, click File ![]() Open and open the .scad file. If you do not see the model listing, go to View and uncheck Hide Editor so you can see it. Now, make any changes you feel you need to make and click Design
Open and open the .scad file. If you do not see the model listing, go to View and uncheck Hide Editor so you can see it. Now, make any changes you feel you need to make and click Design ![]() Preview to see if you have created what you intended. Repeat until you think you are done.
Preview to see if you have created what you intended. Repeat until you think you are done.
![]() Tip In OpenSCAD, Design
Tip In OpenSCAD, Design ![]() Preview creates an object you can view but cannot export. It is a lot faster than a full render, which can take a long time for some of the models in this book. Use this to preview models as you are making changes.
Preview creates an object you can view but cannot export. It is a lot faster than a full render, which can take a long time for some of the models in this book. Use this to preview models as you are making changes.
When you have your final model, go to Design ![]() Render to create a model that can be exported for 3D printing. Once you have compiled a file, you can export an .stl file by clicking File
Render to create a model that can be exported for 3D printing. Once you have compiled a file, you can export an .stl file by clicking File ![]() Export
Export ![]() Export as STL. Figure A-3 is a screen shot of OpenSCAD with the flower from Chapter 6.
Export as STL. Figure A-3 is a screen shot of OpenSCAD with the flower from Chapter 6.

Figure A-3. Screen shot of OpenSCAD
Ideosyncracies of OpenSCAD
If you are a programmer, OpenSCAD can be a little disconcerting because its syntax looks like that of the C/Java/Python family of languages. But it is not a full programming language and has a few ideosyncracies. The biggest one is that OpenSCAD does not have true variables, as one would define them in other programming languages. The variables in our models are best thought of as constants. You can assign another value to a variable, but (as would be true in algebra) y = y + 1 is not a valid statement in OpenSCAD. See the manual section on variables for details and examples at https://en.wikibooks.org/wiki/OpenSCAD_User_Manual/General#Variables.
Functions in OpenSCAD are also functions in the mathematical sense. They return a value, but cannot perform other tasks beyond a single mathematical formula along the way. OpenSCAD has modules that are closer to what an experienced programmer will expect from a function.
MatterControl
Once you have exported your .stl file from OpenSCAD, you need to run a program that can convert the model into commands to drive your 3D printer. This section describes MatterControl, a free and open source program supported by our friends at MatterHackers. MatterControl is compatible with many types of 3D printer, though some proprietary ones do not use the same standard as others.
Printers MatterControl Supports
The list of printer models that MatterControl supports is at www.mattercontrol.com/#jumpSupportedModels. (If your printer is not listed there, MatterControl does not include settings for it, but you should be able to configure MatterControl to work with any printer that uses .gcode files). If your printer is not supported by MatterControl, your manufacturer likely has created a proprietary program that will also take an .stl file as its input. Check your manufacturer’s documentation, or contact MatterHackers to see if an existing 3D-printer profile can be used for your machine.
Downloading and Installing MatterControl
Assuming that your printer is supported, you can download MatterControl at mattercontrol.com, in versions for Mac OS X, Windows, and Linux. There is some documentation linked to the download page (as of this writing, through a link entitled Learn More).
Using MatterControl
MatterControl is a very capable and complex program. To take full advantage, you can use its online documentation or get a copy of our book on MatterControl that we noted earlier. This section is just a very quick guide to getting started.
First you will need to tell MatterControl what type of 3D printer you have. On the home screen, you can use the File ![]() Add A Printer item and its subsequent dialogs to set up your printer. Some printers need to be actively connected to a computer, and some can run off an SD card or wireless connection. See MatterHackers’ documentation and your manufacturer’s suggestions for this step.
Add A Printer item and its subsequent dialogs to set up your printer. Some printers need to be actively connected to a computer, and some can run off an SD card or wireless connection. See MatterHackers’ documentation and your manufacturer’s suggestions for this step.
Once you have your printer squared away, you will need to load in an .stl file. You can either use the +Add button, shown on the lower left of Figure A-1, or the menu by clicking File ![]() Add File to Queue (which imports an .stl file to be printed), as shown in Figure A-4.
Add File to Queue (which imports an .stl file to be printed), as shown in Figure A-4.

Figure A-4. The MatterControl home screen
If you mouse over an item in the queue (the lever from Chapter 5, in this case), you will see two options, View and Remove, as shown in Figure A-5. Remove removes the file from the queue (deletes it from MatterControl’s queue). View starts the process of preparing the file to print.
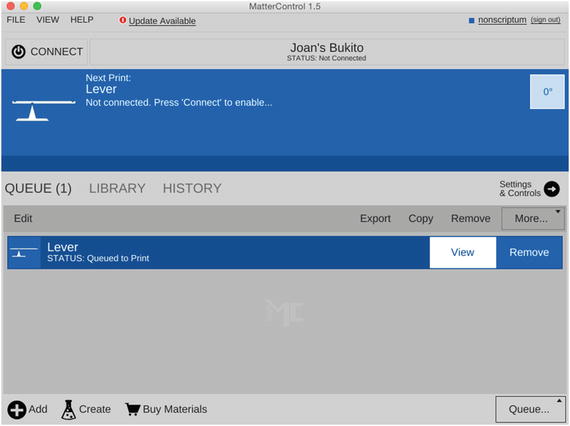
Figure A-5. The MatterControl home screen showing the View option
After you click View, you will see a screen like that in Figure A-6. The screen that comes up (3D VIEW) shows your print as it will lie on your 3D printer’s print bed. If it is hanging off the ends or otherwise problematic, there are tools you can use (after clicking Edit) to rectify the problems. When you are done, be sure to click Save to save your changes before the final creation of your printable file.
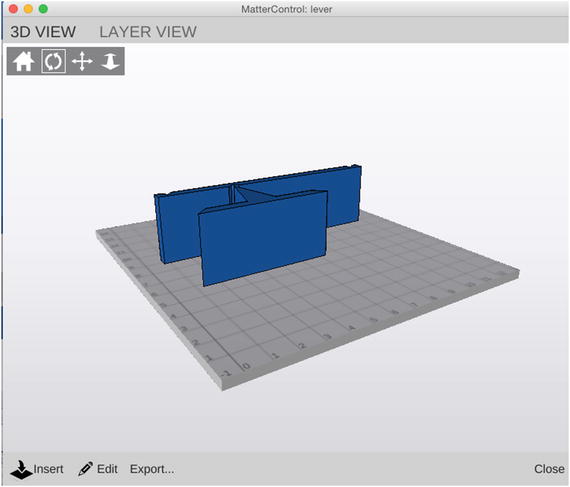
Figure A-6. The View screen, with 3D VIEW selected
Once you are done editing and are satisfied that the file is ready to 3D print, select LAYER VIEW. The program will ask you to click Generate if you have not generated your printable file yet. This step breaks the model into layers that can be printed and creates the commands that will move around the print head and push filament where it needs to be. You can see the LAYER VIEW screen in Figure A-7. The LAYER VIEW screen also tells you how long the print will take, more or less, and how much filament (3D-printing raw material) it will use up.
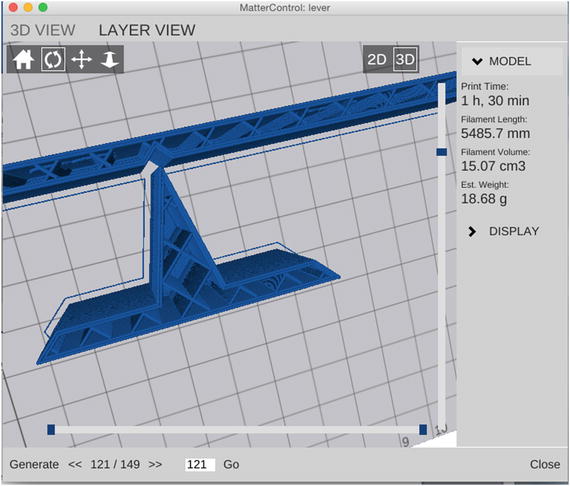
Figure A-7. The View screen, with LAYER VIEW selected
If this looks good, go back to the home screen (Figure A-4) and click Export (in the middle of the screen). Then select Export as Gcode. If your printer needs to be actively connected to a computer, at this point you could send the file to the printer.
Settings
Hypothetically, the discussion thus far should just work as stated, and you will have gone from a model in this book to a physical one in your hand. Real life with a 3D printer is not always that simple, though. 3D printers have a lot of different settings, because tweaking is needed sometimes. If you click the Settings&Controls button on the home screen (Figure A-4), you will find yourself at a page like the one in Figure A-8.

Figure A-8. The Settings&Controls screen
In Figure A-8 you see SETTINGS, CONTROLS, and OPTIONS. Probably as a beginner you will not touch anything in OPTIONS except for perhaps selecting MatterSlice as your Slice Engine, if it has not already defaulted there. CONTROLS are functions you will use to interact with your printer to solve a problem or set up your printer, which we will not explore here.
That leaves SETTINGS. The models in this book were, for the most part, designed to be as simple to print as possible. That means you should be able to get away with pretty generic settings. This section covers some that you might need to change, particularly General ![]() Support Material and General
Support Material and General ![]() Skirt and Raft.
Skirt and Raft.
Support
Since a filament-based 3D printer builds up prints from a platform, if a piece sticks out sideways higher up on a print, that part will just fall down if support material is not built ahead of time to support it. Most of the models in this book have been designed to avoid support. Some of the botanical models in Chapter 6 might require it, depending on your settings. You can look in the LAYER VIEW to see if it looks like the overhangs will be too large to manage without support.
There is a rule of thumb that a slope can overhang by about 45 degrees before support is necessary. However, sometimes you can push your luck. Figures A-9 through A-11 are the flower on the cover of this book (the model is in Chapter 6). It was printed without support. You can see that it overhangs pretty significantly, but we suspected the organic shape would survive without support. You can see a little raggedness on the farthest-out petals, particularly in the view from below. On the bottom, plastic would have been deposited partially in air without support, which is why it is particularly rough there.
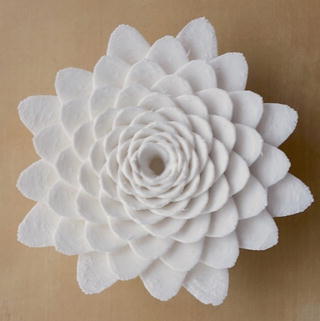
Figure A-9. The flower from Chapter 6 from above

Figure A-10. The flower from Chapter 6 from the side to show the extent of unsupported overhangs
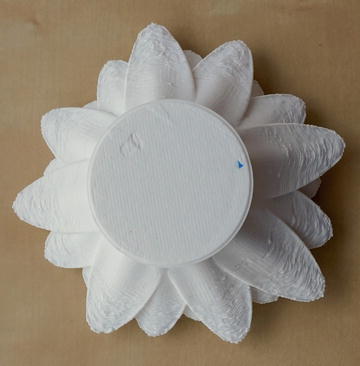
Figure A-11. The flower from Chapter 6 from below
If you do need to add support, check the Generate Support Material box under General ![]() Support Material. In general, the less support you have to generate (and then pick off), the better. If you have something really complex, you may have to check the Support Everywhere box. This creates support as needed, including in nooks and crannies of the model where it may be hard to remove. Be sure to preview your model in LAYER VIEW first to see how it looks.
Support Material. In general, the less support you have to generate (and then pick off), the better. If you have something really complex, you may have to check the Support Everywhere box. This creates support as needed, including in nooks and crannies of the model where it may be hard to remove. Be sure to preview your model in LAYER VIEW first to see how it looks.
Figure A-12 shows what the same flower model looks like with support everywhere plus a raft. You can see why you might try to avoid it, both in terms of using filament and also in print time. Figure A-13 shows the completed print with the support still attached. You can see that it will be difficult to pick off the support that landed between petals, or under the thinner parts of the outer petals. Figure A-2 was taken while the printer was partway through this print. You can see all the support around the periphery of the print.
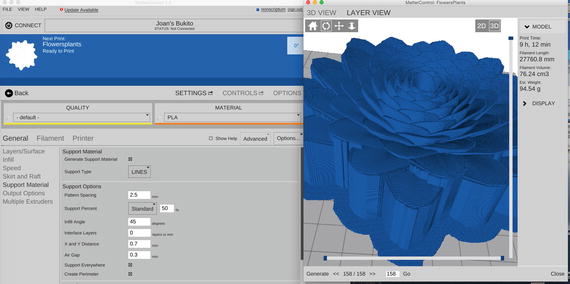
Figure A-12. MatterControl screen shot of the same print with Support Everywhere
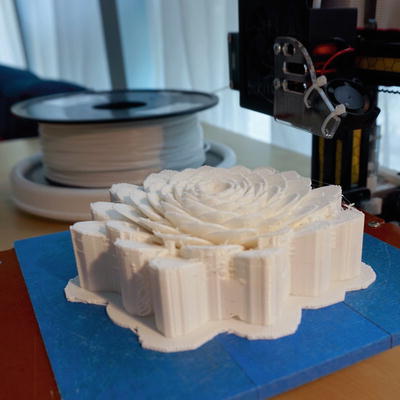
Figure A-13. The completed flower-with-support print, with the support still on it
![]() Note MatterControl will not show support in the 3D VIEW. It does not generate the support until layers are generated for the LAYER VIEW.
Note MatterControl will not show support in the 3D VIEW. It does not generate the support until layers are generated for the LAYER VIEW.
Raft
Some of the models in this book depend on your printer’s bed being pretty smooth and flat so that multiple pieces can be printed and then arranged flush with each other (like the airplane wing with the sting in Chapter 4, or the water molecule halves in Chapter 7).
If your printer’s bed is not very flat, you can print these parts on a raft. A raft is a thin layer that prints first on the platform, and then the model prints on top of it. If things are not fitting together well, adding a raft (General ![]() Skirt and Raft) is an option. You will need to remove the raft, though, which may be difficult to do cleanly if your raft settings have not been tuned to allow it to release from the print. You may want to test it with a smaller piece to make sure the raft will peel away in one piece before printing a larger model on a raft.
Skirt and Raft) is an option. You will need to remove the raft, though, which may be difficult to do cleanly if your raft settings have not been tuned to allow it to release from the print. You may want to test it with a smaller piece to make sure the raft will peel away in one piece before printing a larger model on a raft.
Figure A-14 shows the same item we have been showing through the appendix with a raft added. Note that you would not use a raft for this print—this is just to show what changes if you add a raft.
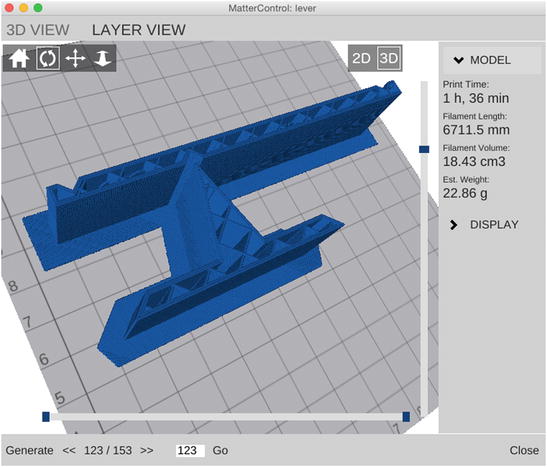
Figure A-14. A raft added to the lever
You will notice in the same grouping of settings some choices referring to a skirt. A skirt is a line drawn around the model’s first layer to prime the nozzle. If you make a skirt attached (or 0 mm away from the model), it is usually called a brim (as in hat brim). A brim can help hold prints onto the print bed, though it will not help flatten the bottom of a print the way a raft will.
![]() Caution If you change a setting, be sure to click SAVE in the SETTINGS window before going back to the LAYER VIEW window and generating a new printable file. Otherwise, it is easy to accidentally revert any unsaved settings.
Caution If you change a setting, be sure to click SAVE in the SETTINGS window before going back to the LAYER VIEW window and generating a new printable file. Otherwise, it is easy to accidentally revert any unsaved settings.
Other Considerations for These Models
For the most part, these models were printed in PLA with a layer height of 0.2 mm (General ![]() Layers/Surface) with 15% infill (General
Layers/Surface) with 15% infill (General ![]() Infill). Your printer defaults may be different than this, and you may want to do a few tests with one of our simpler prints (like the lever from Chapter 4) to establish your favorite basic settings.
Infill). Your printer defaults may be different than this, and you may want to do a few tests with one of our simpler prints (like the lever from Chapter 4) to establish your favorite basic settings.
Archives and Repositories
There is a link for the source for the OpenSCAD models on this book’s copyright page. The files archived there are the ones shown in the book. In addition, we have a repository which may have more current versions at https://github.com/whosawhatsis/3DP-Science-Projects.
If you develop any new models around these, we hope you will add them to the open source repositories and help build out a community of scientific learners.