4. Configuring the Software
Successfully building a 3D printer is an amazing accomplishment. If you’ve finished building your own Printrbot Simple (or have just received a preassembled unit), you’re ready to move forward with the next step of the 3D printing process. It’s all about the software now, and as you’ll discover in this chapter, you need to know a few things about the specialized software used by hobbyists to print in plastic.
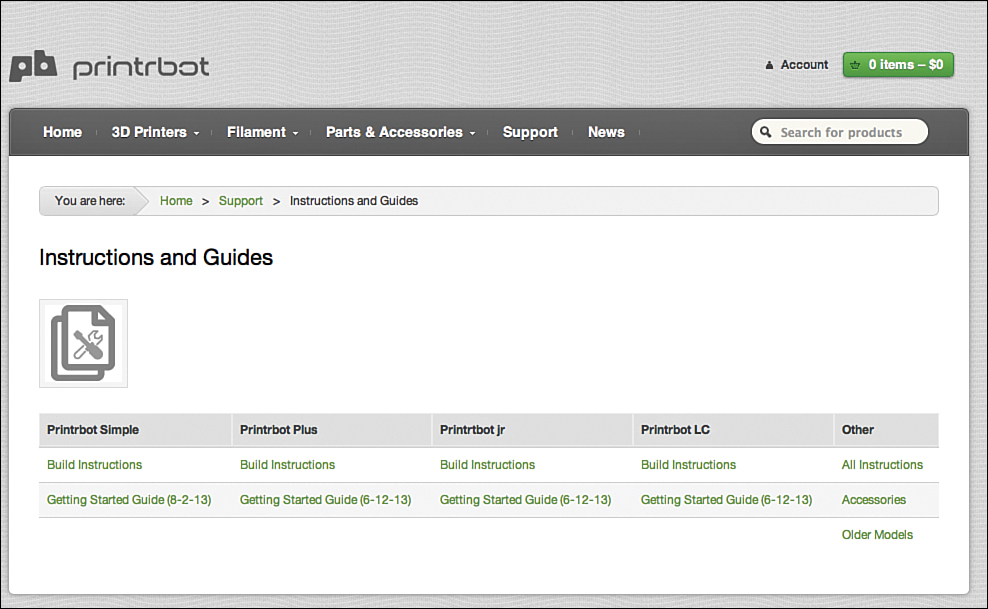
If you’re ready to get started with the software part of the process, you should download and read over the “Simple Getting Started Guide” that the Printrbot team has created just for the Simple. It’s a PDF file that explains which software to download and install and how to test your Simple to make sure everything is working properly. I cannot stress enough that it’s important to read through the “Simple Getting Started Guide” completely before you download and install the software. To grab the guide, open a web browser and point it to the following web address, as shown in Figure 4.1:
http://printrbot.com/support/instructions-and-guides/
Types of 3D Printing Software
I promised you early in the book that I would keep the technical discussions as easy to follow as possible, so first I want to reduce as many of the acronyms and strange terminology as possible. You’ll pick up on this stuff anyway, after you get more confident in using your 3D printer, but when you’re just beginning, this is what you need to understand:
• You’ll use special software to create 3D objects. This software is sometimes called CAD software; CAD stands for Computer Aided Design. It is software that helps you do the complicated stuff, such as creating straight edges, curves, and ensuring dimensions are correct (such as the length of the side of a cube) and all the other tasks involved in taking an idea in your head and making it appear on the screen of your computer.
• You also use special software to slice up that 3D object into layers—remember layers from Chapter 1, “The Big Question—What is a 3D Printer?” Your 3D object will be printed one layer at a time, with molten plastic coming out of the hot end. A special bit of software is needed to cut that 3D object into the various layers that, when stacked, make up the physical 3D object you’ll be able to hold in your hands. This software takes each slice and converts it into special data (called g-code) that tells the hot end where to move as it lays down a bead of molten plastic.
• Another type of special software controls the electronics in your 3D printer. The three motors that control movement along the X, Y, and Z axes must have instructions given to them that control the direction that the motor axles rotate. The hot end must be instructed to heat up to a specific temperature that starts melting the plastic. And there’s much more. This controlling software is sometimes referred to as Computer Aided Manufacturing, or CAM. It sounds complicated (and it can be), but all you need to know is that CAM software takes the g-code generated for each slice of your 3D object and uses that code to instruct the axes’ motors how to move.
I’ve simplified the software explanation greatly, but honestly, it doesn’t need to be complicated. In a nutshell you need software that lets you create a 3D object model, software that takes that 3D object model and slices it into layers and converts those layers into code, and software that takes that code and “talks” to the 3D printer so it knows how and where to move.
For me, the complicated part of the software is finding the software you can use with your particular 3D printer. Dozens of options are available for software that can slice up objects and “talk” to 3D printers, and hundreds of CAD applications let users create 3D objects.
The simplest route is to start with what the 3D printer manufacturer suggests for software. In some instances, you may be referred to a web page that lists all the compatible applications that will work with your brand of 3D printer. In other instances, some 3D printers use proprietary software created by the manufacturer, so the choice may already be made for you.
When it comes to the Printrbot Simple, you aren’t locked in to any one type of software, but what’s nice is that Printrbot suggests one particular application in the “Simple Getting Started Guide” and walks you through all the configuration settings that are specific to the Simple. So that’s what I’m going to do for this chapter; I’m going to download Repetier and show you how I go about connecting my computer to the Simple, and testing and configuring it before I begin printing.
Downloading the Repetier Software
I use a MacBook Air, but if you use a PC, you’ll be happy to know that the software recommended by Printrbot is available for both Windows and Linux. Most of the figures you’ll be seeing in this chapter are from my Mac, but you’ll find that the software looks similar in most, if not all, of the configuration screens. Again, if you hit a snag, contact Printrbot or Repetier with your question or post it on a forum.
Note
The Repetier software is free to use, but if you really like it and enjoy it, you might want to consider making a donation to the company. You can visit http://www.repetier.com/donate-or-support/ to make a donation. The amount is up to you, but keep in mind that financial support means updates for the software and continued technical support.
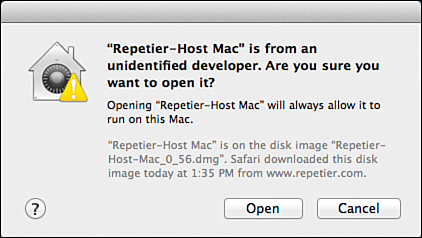
I’ve downloaded the software to my Mac and double-clicked the icon to install it. If you’re a Mac owner, you’ll probably find that the software is from an “unidentified developer” and cannot be installed. Don’t worry—the software is fine if you’ve downloaded it directly from Repetier. All you need to do is hold down the Control key and click the installation icon (and your login user account must be of the admin type that allows for installing software). A menu appears, and you should click the Open option at the very top. You’ll see a window appear like the one in Figure 4.2. Click the Open button to run the Repetier application.
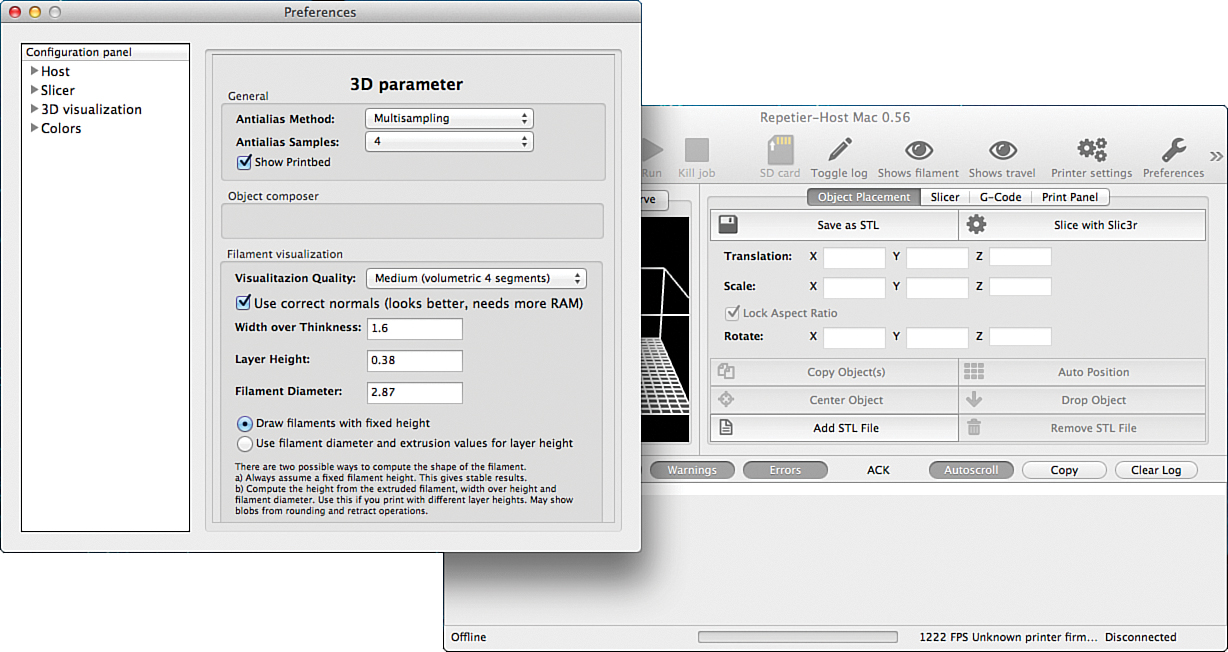
When Repetier first opens, you’ll most likely see two open windows like the ones in Figure 4.3. One is the Preferences window for the Repetier software, and the other is the Repetier software user interface. Go ahead and close the Preferences window; in the rest of this chapter I focus on the settings you must make in the basic user interface.
Note
There are dozens and dozens of items to configure in Repetier, and Printrbot’s “Simple Getting Started Guide” for the Simple shows you the most important ones to configure. However, you may want to consult the official Repetier configuration instructions by visiting http://www.repetier.com/documentation/ and clicking the link that corresponds to your operating system.
Because there are so few configuration settings to make prior to printing with the Simple, I’m going to go over most of them and share with you some details about these settings so you’ll understand a bit more about their values and when you might have to change some of them.
Repetier Settings
The first Repetier configuration starts when you click the Printer Settings button, which opens the Printer Setting window shown in Figure 4.4.

Click the Add button and a small window appears, like the one in Figure 4.5. Type in Simple and click Create.

Make certain you have the Connection tab selected on the Printer Settings window, and then make the following configurations as indicated in Figure 4.6.

1. Select the port from the drop-down menu that corresponds to the USB port you’re using to connect the Simple to your computer.
2. Set the Baud Rate to 250,000 from the drop-down menu.
3. Change the Cache Size to 127.
Change to the Behavior tab next and make the following configurations indicated in Figure 4.7.
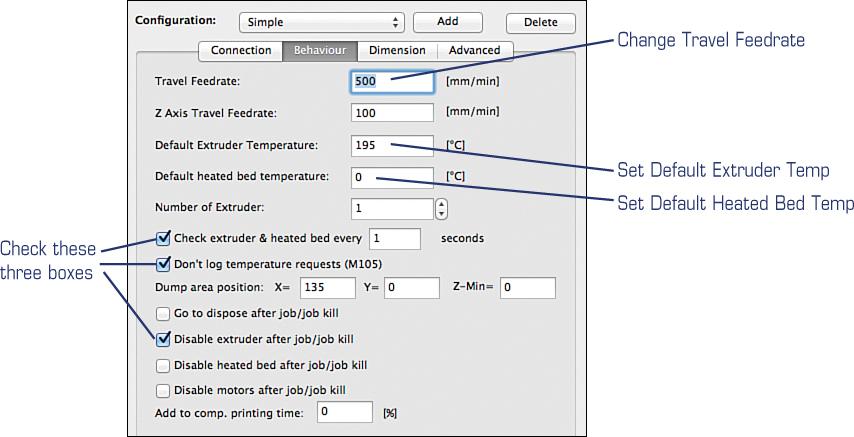
1. Change the Travel Feedrate to 500.
2. Set the Default Extruder Temperature to 195.
3. Set the Default Heated Bed Temperature to 0.
4. Make certain the three boxes are checked for Check Extruder and Heated Bed, Don’t Log Temperature Requests, and Disable Extruder After Job/Job Kill.
If you choose to later add a heated bed to your Simple, you should return to this setting and change the Default Heated Bed Temperature to the temperature recommended for that particular heated bed.
Note
A heated bed helps to ensure that the molten plastic cools at a slower rate, helping to prevent shrinking and warping. As of this writing, no heated bed is currently being sold by Printrbot for the Simple, but check the printrbot.com website to see if one is available if you are interested.
Switch to the Dimensions tab and set the configurations indicated in Figure 4.8.

1. Set the X Max and Y Max values to 100 (mm).
2. Set the Print Area Width to 100 (mm).
3. Set the Print Area Depth to 100 (mm).
4. Set the Print Area Height to 100 (mm).
These values (100mm) define the boundaries of the area where the Simple’s hot end can deposit melted plastic. Picture a cube sitting on the print bed that’s 100mm on each side, and you’ll have a better idea of the maximum size for any object you want to print with the Simple. If an upgrade kit is ever offered by Printrbot that allows you to increase the width of the print bed (the X axis), this is where you’d go to change the value for the X Max and the Print Area Width.
Likewise, if longer metal rods and lead screws were made available for the Z axis, you could increase the maximum height of any object you could print.
When you’re done with the Dimensions tab, click the Apply button and then click the OK button to save your configurations.
Slic3r
The Repetier software can also perform the slicing calculations required to take a 3D object, slice it up into layers, and then convert those layers to g-code. Again, the “Getting Started Guide” walks you through the proper settings for use with the Simple.
It all starts with clicking the Slic3r tab shown in Figure 4.9 and clicking the Configure button.
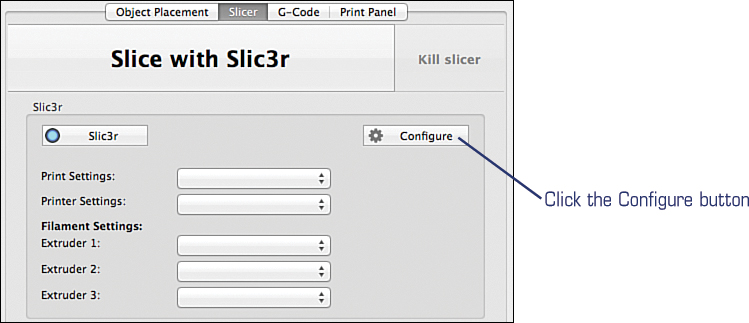
A configuration wizard screen will open; click the Cancel button—the “Simple Getting Started Guide” shows you all you need to do to configure Slic3r.
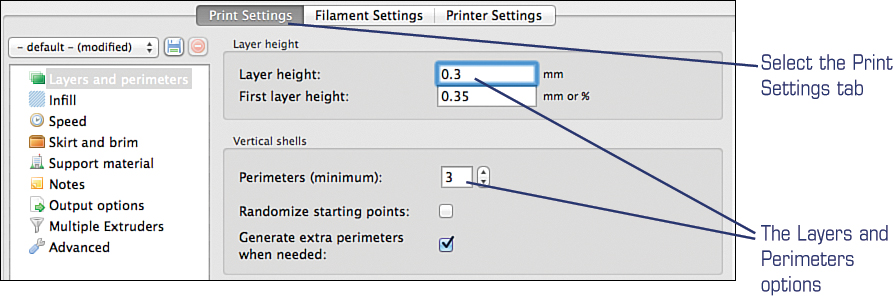
On the Print Settings tab, select the Layers and Perimeters option from the left-side list and set the Layer Height to 0.3 (mm), as shown in Figure 4.10. Leave all other settings alone, and click the Infill option.
For the Fill Density, change the value to 0.3. Click the Fill Pattern drop-down menu and select Rectilinear from the various options, as shown in Figure 4.11. Make no other changes and then click the Skirt and Brim option.

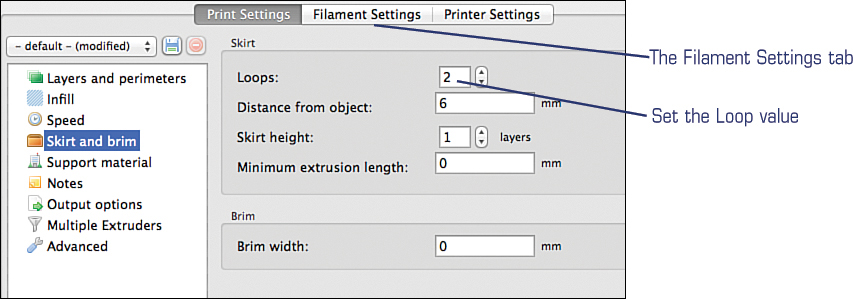
On the Skirt and Brim screen, set the Loops option to a value of 2, as shown in Figure 4.12. (These will force a number of test loops to be printed around your object on the print bed before the actual printing of the object begins. It’s a great way to make certain the molten plastic is coming out of the nozzle and adhering to the print bed.) Make no other changes and then click the Filament Settings tab.
Make sure the Filaments option is selected on the left side of the screen, and then change the Diameter value to 1.70 (mm), as shown in Figure 4.13. Make no other changes and then click the Cooling option.

The Simple has no fan, so you should uncheck the Enable Cooling box, as shown in Figure 4.14. Make no other changes and then click the Printer Settings tab to the right of the Filament Settings tab.

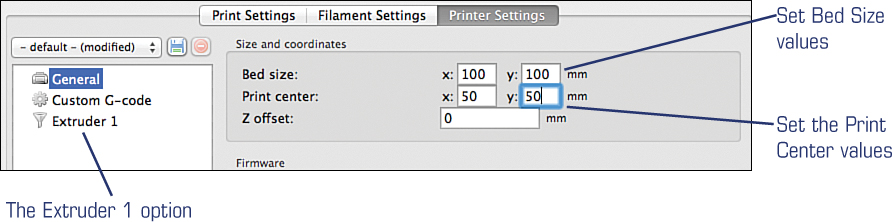
On the Printer Settings tab, select the General option on the left side of the screen and set the Bed Size X and Y values each to 100 (mm). Set the Print Center X and Y values each to 50 (mm), as shown in Figure 4.15. Make no other changes and then click the Extruder 1 option.
On the Extruder 1 option page, change the Nozzle Diameter value to 0.4 (mm), as shown in Figure 4.16. Make no additional setting changes.

You’ve made a handful of configuration settings on three tabs: Print Settings, Filament Settings, and Printer Settings. Before you begin using the Simple, you must save the changes as the default settings. To do this, go back to each tab and click the Save Current Printer Settings button. Select the Default option from the drop-down menu for all three tabs, as shown in Figure 4.17.

That’s it! You have successfully configured the settings for the Simple 3D printer and are ready to test the Simple and print something. In Chapter 5, “First Print with the Simple,” I show you how to put the Simple through a few basic tests to make certain the motors are working and the hot end is reaching the correct temperature to melt the PLA plastic filament that will be fed in by the extruder.
Note
You’ve probably noticed a lot of strange terms are found in Repetier. Most of these items (such as Density or Skirt Height) can simply be configured based on Printrbot’s recommendations, but if you’re really wanting to delve deeper into 3D printing, you’ll want to spend some time reading over the Repetier Help files for a better understanding of the terms and how they apply to your 3D printer. This is a beginner level book, and a complete understanding of all of these strange settings isn’t required to use your 3D printer, but it will help as you gain skills and seek to print more advanced objects, so take some time to start your own research into all of the settings offered by Repetier (or the software you choose to control your 3D printer).