![]()
Downloading and Configuring MatterControl
As discussed in the last chapter, MatterControl is a free, open source software package. To download it, go to and click the Download link, http://www.mattercontrol.com/#jumpMatterControlDownloads. Once you are on the Download page, select the Windows, Mac, or Linux installer version as appropriate for your computer (the type of 3D printer you have does not affect what you download). MatterControl is supported on Mac OS X 10.7 and higher, Windows Vista and higher, and either Ubuntu or Mint Linux. MatterControl now also supports touchscreen interaction on its tablet, the MatterControl Touch.
![]() Note In this book we show screenshots of MatterControl running on a Mac using the version of OS X that is current as we write the book (10.10 or higher). There may be small variations in the Windows and LINUX versions.
Note In this book we show screenshots of MatterControl running on a Mac using the version of OS X that is current as we write the book (10.10 or higher). There may be small variations in the Windows and LINUX versions.
Once you have downloaded the MatterControl installer, locate it in your download folder and run the installer. Follow the onscreen instructions. At the end of the installation, you will be prompted to run your new installation of MatterControl.
![]() Tip As mentioned in Chapter 1, your 3D printer may use a number of different controller boards. MatterControl works transparently with controller boards that run standard G-code (explained in Chapter 6) and that communicate over a serial port with the printer. In order to communicate with the printer, your computer needs the appropriate serial driver. Many boards now work with built-in drivers on most operating systems, but if yours does not, you may need to install a driver before you can establish communication. Notably, the RAMBo controller requires a driver to be installed under Windows, so if your printer has a RAMBo, and you are on a host computer running Windows, you may need the instructions found at www.matterhackers.com/articles/installing-rambo-driver.
Tip As mentioned in Chapter 1, your 3D printer may use a number of different controller boards. MatterControl works transparently with controller boards that run standard G-code (explained in Chapter 6) and that communicate over a serial port with the printer. In order to communicate with the printer, your computer needs the appropriate serial driver. Many boards now work with built-in drivers on most operating systems, but if yours does not, you may need to install a driver before you can establish communication. Notably, the RAMBo controller requires a driver to be installed under Windows, so if your printer has a RAMBo, and you are on a host computer running Windows, you may need the instructions found at www.matterhackers.com/articles/installing-rambo-driver.
Getting Started Using MatterControl
Once you have installed the software, you can start it up. You should see a screen like the one in Figure 3-1. This section walks you through the key options on this home screen, starting with connecting your printer and configuring the software. We call this view the home screen or main menu.

Figure 3-1. The MatterControl home screen
MatterControl Home Screen
In the upper left, you see the Select Printer box. Click that, and the dialog box shown in Figure 3-2 will pop up. Give your printer a name (like “Joan’s Printer” or “Bukobot #5”) that will let you know which one you are referring to. Select the make and then the model of your printer from the dropdown menus and follow the instructions to connect.
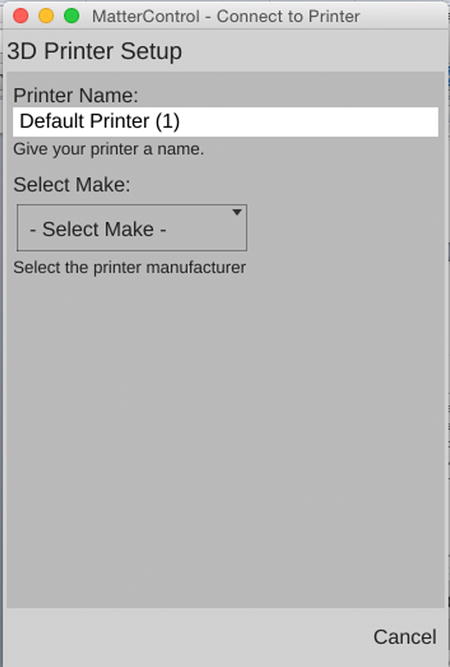
Figure 3-2. Select Printer dialog
If your printer is not listed, you will need to tell MatterControl a few important pieces of information about your printer. Select Other ![]() Other and you will be asked to select a baud rate so that MatterControl can establish a serial connection. If your printer fails to connect, try the other options until one connects. Then (being sure you have selected a printer) go to the Settings & Controls
Other and you will be asked to select a baud rate so that MatterControl can establish a serial connection. If your printer fails to connect, try the other options until one connects. Then (being sure you have selected a printer) go to the Settings & Controls ![]() SETTINGS
SETTINGS ![]() Printer item to bring up the settings shown in Figure 3-3 and 3-3b. The examples here show the manufacturer’s settings for one particular printer; if your manufacturer supplies nothing, enter the dimensions of the usable area of the print bed, coordinates of the center of the bed (usually half of each dimension), and the maximum usable build height, all in millimeters. If you are using a Cartesian 3D printer, the bed shape is almost certainly rectangular. With a delta or polar printer, your platform should be circular, and you should use (0,0) as the print center.
Printer item to bring up the settings shown in Figure 3-3 and 3-3b. The examples here show the manufacturer’s settings for one particular printer; if your manufacturer supplies nothing, enter the dimensions of the usable area of the print bed, coordinates of the center of the bed (usually half of each dimension), and the maximum usable build height, all in millimeters. If you are using a Cartesian 3D printer, the bed shape is almost certainly rectangular. With a delta or polar printer, your platform should be circular, and you should use (0,0) as the print center.

Figure 3-3a. SETTINGS ![]() Printer
Printer ![]() Print Area screen
Print Area screen

Figure 3-3b. SETTINGS ![]() Printer
Printer ![]() Features screen
Features screen
For the rest of this list, check any boxes that apply to your printer and leave them unchecked if they do not apply or if you are not sure. Leave RepRap selected in the Gcode Output menu unless your printer matches one of the other types listed in that menu (for example, if you have a Makerbot clone, such as one of the FlashForge machines, choose Makerbot). Next, click Extruder on the left and enter the diameter of your nozzle in the first box (typically 0.3–0.5 mm).
Whether MatterControl came with settings for your printer or not, you also need to switch to the Filament section and enter the diameter of your filament in the first box. Your extruder is designed either for 1.75 mm or for 3 mm filament, but due to an accident of history, most “3 mm” filament should actually be closer to 2.85 mm in diameter, and MatterControl needs to know the correct value in order to properly print your object. The default temperatures are for PLA, (polylactic acid, one of the common printing materials) but if you’re starting with something else, you can set the temperatures for that here as well. Chapter 7 goes into materials selection in detail.
![]() Note There are a lot of other knobs to fiddle with in the slicing settings, which Chapter 5 discusses in more detail, but the rest of MatterControl’s defaults should be sensible for most machines. If the Custom G-Code section is blank, leave it that way for now and revisit it after you read Chapters 5 and 6. Meanwhile, there is a check box at the top of the SETTINGS panels labeled “Show Help.” By clicking the box, you can get short descriptions of the functions of each slicing setting displayed directly.
Note There are a lot of other knobs to fiddle with in the slicing settings, which Chapter 5 discusses in more detail, but the rest of MatterControl’s defaults should be sensible for most machines. If the Custom G-Code section is blank, leave it that way for now and revisit it after you read Chapters 5 and 6. Meanwhile, there is a check box at the top of the SETTINGS panels labeled “Show Help.” By clicking the box, you can get short descriptions of the functions of each slicing setting displayed directly.
OPTIONS Menus
Now that you have told MatterControl which printer you will be using, there are a few other things for you to set up. You will see three clickable headings across the top: SETTINGS, CONTROLS, and OPTIONS. We talk about the first two later in the book, particularly in Chapters 5 (for SETTINGS) and 6 (CONTROLS). This section walks you through the variables listed under OPTIONS. Figure 3-4 shows the OPTIONS screen.
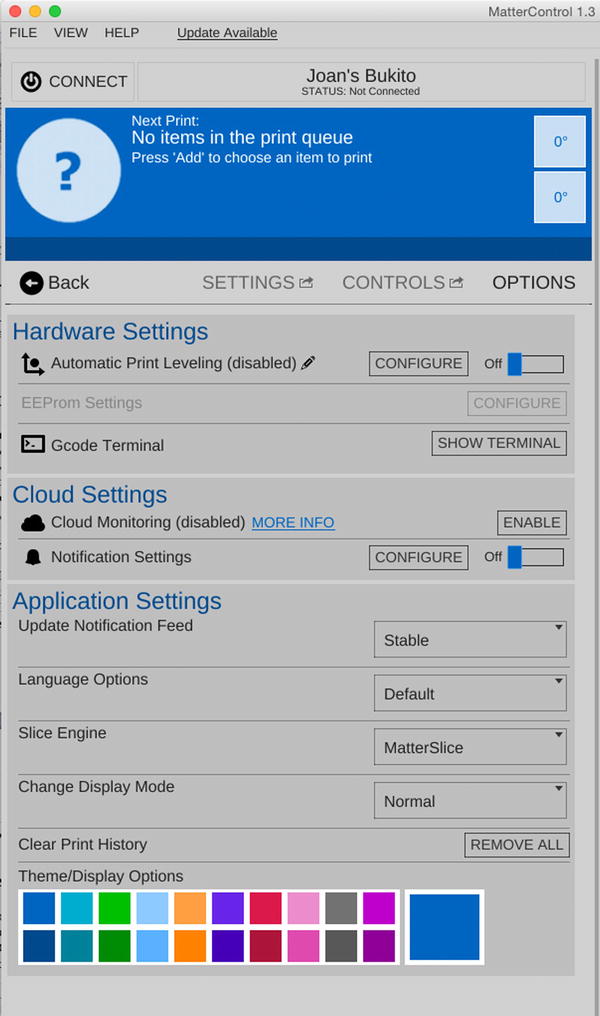
Figure 3-4. The OPTIONS screen
Hardware Settings
The first group of settings affects how MatterControl interacts with your printer hardware and provides a way to look at the detailed commands that are sent to the printer to aid in debugging if things are not going well.
Automatic Print Leveling
When using any printer, it is critical that your first layer is parallel to the build platform so that the plastic will stick. Automatic Print Leveling, also known as Automatic Bed Leveling or simply auto-leveling, is an unfortunately named feature that aims to bypass the process of physically adjusting your platform to achieve this. It has nothing to do with leveling, and most printers will work perfectly well on a slight incline, or even turned upside-down, as long as the movement of the axes is parallel to the build platform.
When the required adjustment is done mechanically, it is called tramming (a term borrowed from CNC machining), though it is also common to see the term leveling used erroneously for this purpose. Trying to use tools that would normally be used for leveling for this purpose will cause endless frustration, and the term paralleling has been proposed to avoid confusion with leveling while having a more obvious meaning than tramming.
Rather than adjusting the platform to be parallel to the machine’s axes of movement, Automatic Print Leveling adjusts the coordinate system of the print to make the axes parallel to the platform. So if your platform is tilted, your print will be tilted to match. Some printers include sensors that are used to probe the height of the platform, and these perform auto-leveling internally, so they do not need this MatterControl feature. For printers that do not have sensors for auto-leveling, MatterControl is able to perform this compensation before sending G-code to the printer.
EEPROM Settings
EEPROM stands for Electronically Erasable Programmable Read-Only Memory. This is a small area of memory within the microcontroller that can be used by the firmware to store variables that will not be lost when power is removed. On 3D printers, EEPROM is used to store values that may need to change if hardware is upgraded, but that you are unlikely to need to change otherwise. In other words, leave it alone unless you know what you are doing.
Gcode Terminal
Chapter 6 covers G-code, the detailed commands that actually run on your printer. Clicking the Show Terminal button opens up a window that allows you to see the commands as they execute on the printer, and, for expert users, to type in individual commands and send them to your printer. This can be useful to do things like just heat the extruder so that you can get filament into or out of it, or to move the print head if it got stuck in something.
Cloud Settings
Chapter 9 explores MatterControl’s cloud capabilities in detail. Briefly, you can sign up for the cloud service, which allows you to monitor a print in progress from the web and also transfer files between your desktop computer and MatterControl Touch tablet.
Cloud Monitoring
To sign up for a cloud account, click ENABLE (when you are connected to the Internet on the device running MatterControl) and follow the online instructions to create an account.
Notification Settings
These settings allow you to select what MatterControl does when a print is finished.
Application Settings
These settings control some of the inner workings of MatterControl. We describe each one in turn here.
Update Notification Feed
This option allows you to get one of three levels of update for MatterControl: the stable one (the normal production version), the beta one (test users), or the alpha one (for fearless experts who do not mind being one of the first to try something). Unless you are an expert or know you need a feature not in the stable build, stick to the stable selection for now.
Language Options
These options allow you to decide which of several available languages will be used in your version.
Slice Engine
Slicing, the process of converting a 3D model into commands that can be executed on the printer is referred to as slicing, is described in detail in Chapter 5. As a default choice, select MatterSlice for now (which also is only option available for the tablet version).
Change Display Mode
This allows you to select Normal (computer screen) views in Matter Control, or the Touchscreen mode (with the MatterControl tablet).
Clear Print History
This clears the list of completed prints that you would otherwise get under HISTORY, on the page that displays the queue. (For more on file management, see Chapter 9.)
Theme/Display Options
This option allows you to select the background and accent colors for MatterControl screens. The top row is for the light background (used in this book’s screenshots for clarity), and the bottom row is for the dark background.
The MatterControl Touch Tablet
The MatterControl Touch tablet (pictured back in Figure 2-7) comes with MatterControl already loaded. It also is wifi-capable, which is how you will get files onto it. When you have signed into MatterControl on both a desktop or laptop computer and on the MatterControl tablet, you will be able to send files to the tablet from the desktop version of MatterControl. Chapter 9 has more details on tablet operations and cloud options.
![]() Tip Because MatterControl is open source software, MatterHackers maintains a wiki (user-supplied helpful instructions) and user forums where you may get help with any issues you may face. The wiki can be found at http://wiki.mattercontrol.com, and MatterHackers’ forums can be found at www.matterhackers.com/community/forum. The MatterControl website (www.mattercontrol.com) has a lot of material and examples of using the software.
Tip Because MatterControl is open source software, MatterHackers maintains a wiki (user-supplied helpful instructions) and user forums where you may get help with any issues you may face. The wiki can be found at http://wiki.mattercontrol.com, and MatterHackers’ forums can be found at www.matterhackers.com/community/forum. The MatterControl website (www.mattercontrol.com) has a lot of material and examples of using the software.
Summary
This chapter reviewed the basics of downloading and setting up the MatterControl software. The following chapters discuss how the software fits into the 3D-printing workflow and how to use it to create prints.