
Chapter 7
Data Acquisition
As discussed in Chapter 5, data acquisition is a fundamental stage of the control loop of HiTL processes, and this is why we will dedicate the whole of the current chapter to it. With this objective in mind, we will start by presenting and describing the class that will handle most of the emotion-related tasks in our sample HappyWalk Android app, in Section 7.1. Next, in Section 7.2, we will explore the processing of sensory data.
More often than not, the burden of data acquisition and processing is too much for the application's user interface thread. Concurrently performing heavy computational tasks generally results in an application with usability issues. For example, in the HappyWalk's case, the usage of map-related functionality could suffer from stuttering if the user interface thread were not freed from heavy tasks such as data acquisition. This is, thus, the main reason why in HappyWalk we have opted for performing data acquisition in a background thread, leaving the main thread purely to user interface operation. This also has advantages from a modularity point of view, allowing to perform data acquisition as a background task through the HappyWalk Service, which is decoupled from the main application.
7.1 Creating the EmotionTasker
In this section, we will introduce the EmotionTasker. This class represents the core of our emotional inference mechanism; it will be responsible for things such as controlling when to perform emotion recognition, presenting suggestive notifications, and training the neural network. In fact, it is so important that we will continuously work on it throughout most of this tutorial.
For now, we will focus on its basic creation, setting up a constructor and some of its class variables, instantiating an object of it in our background service, and defining a method for data collection.
Right click on the service folder of our HappyWalk AS project, select New ![]() Java Class, and name it EmotionTasker, as shown in Figure 7.1.
Java Class, and name it EmotionTasker, as shown in Figure 7.1.
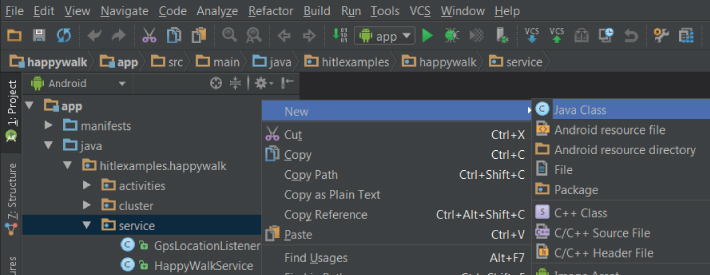
Figure 7.1 Creating a new class.
We can begin by setting up some class variables and a simple constructor. To start with, we will need a reference to our HappyWalkService and our HappyWalkServiceHandler (see lines 6 and 7 of the code below):

Additionally, we should also add a reference and instantiate an EmotionTasker object within our HappyWalkService. To do so, double-click the service/HappyWalkService file and edit it as shown below:


During this tutorial, we will often deal with classes that are very large; such as is the case of HappyWalkService above. Therefore, we will often abbreviate parts of code that are not relevant to the explanation at hand by using the (...) characters. This means that the line numbers shown on the left side of code snippets contained in this book are often not representative of the line numbers in the original code (which we fetched during Chapter 6). Nevertheless, we will make an effort to clearly identify the sections of the code we are working with by displaying several of the original lines around the area of interest. This should allow the reader to easily find the corresponding locations in the original code.
Returning to HappyWalkService's code snippet above, notice that we first added a reference to an EmotionTasker object, named emotionTasker, in line 13. We then added a getter function for this object in line 30. Finally, we instantiated it after a for loop, in line 56).
The EmotionTasker will make use of the ES Sensor Manager, a library for Android developed as part of the EPSRC Ubhave (Ubiquitous and Social Computing for Positive Behaviour Change) project that makes accessing and polling of smartphone sensor data an easy, highly configurable, and battery-friendly task1 [142]. The ES Sensor Manager library is already available as part of the HappyWalk project, within the com.ubhave.sensormanager module. Using this library, we will write a collectInputs() method that will be responsible for fetching information from the Location services, the Microphone, and the Accelerometer.


Notice that we need to declare an ESSensorManager esSensorManager class variable, at the beginning of EmotionTasker (line 18). This variable is initialized through the EmotionTasker's constructor, in line 25 (where we also deactivate its debug messages, in line 26, for a cleaner output). The ESSensorManager class requires us to do all of these tasks inside a try/catch block, to handle possible exceptions.
The collectInputs() method begins at line 38. It first declares two variables: a double array named inputs, where data will be stored, and a LatLng actualPosition object, which will store the user's current location in terms of latitude and longitude.
The if clause in line 44 makes use of the HwLocationListener supported by HappyWalk's background service (as the reader may remember from Figure 5.5 back on page ??). It simply checks if the HwLocationListener has position information and, if it does, uses a HwLocationProcessor to normalize it, in line 47.
It then retrieves data from the microphone (MicrophoneData, in line 49) and the accelerometer (AccelerometerData, in line 53), storing this information within the micData and accData objects. It also uses an HwMicrophoneProcessor, in lines 50 and 51, and a HwAccelerometerProcessor, in line 54, to process microphone and accelerometer data, storing the results, together with the normalized location, into inputs (lines 58–61). Finally, it returns inputs.
Notice that the size of inputs (line 57) and its array indexes (lines 58–61) are clearly defined. We have previously discussed in Section 5.3 that we would handle four types of inputs, and that information is stored on the GlobalVariables.NN_INPUTS variable. Knowing the array indexes where we stored the results is also important, as we will need to distinguish them later on when feeding information to our neural network. Thus, it is a good idea to define where each type of data is stored through global variables, which can be accessed from anywhere within our application. For convenience, these should be already defined within the hitlexamples.happywalk/utilities/GlobalVariables class:
As the reader writes the collectInputs() method into their own copy of the project, AS will notify that it “cannot resolve” certain “symbols”, highlighting certain words with a red color (see how AS cannot resolve LatLng, as the popup warns in Figure 7.2). This means that it cannot identify what those words mean and that it is necessary to add the appropriate import declarations. One easy way of doing so is by placing the writing cursor on the highlighted word and pressing the Alt + Enter keys simultaneously. A small pop-up will appear, where you can tell AS to import the appropriate class, as shown in Figure 7.3. As we delve into our project in the next sections, do not forget to add the appropriate import declarations whenever necessary.

Figure 7.2 AS cannot resolve symbol issue.

Figure 7.3 Importing the appropriate class.
Notice that, in case there is no location information, collectInputs() throws a NoCurrentPosition exception (see lines 38 and 68 of the code snippet on page ???). This exception cannot be imported using the method above because we not implemented it yet. As we have discussed in Section 5.3.2 and showned in Figure 5.10, our neural network will require position information for its processing. Thus, it does not make sense to gather other types of data if our HwLocationListener cannot provide us with location information.
Let us first create a new package to hold the exception. To do so, follow the steps shown in Figure 7.4: use the project tab's Android view, navigate into hitlexamples.happywalk, right-click on it, and select New ![]() Package. Name this new package as exceptions.
Package. Name this new package as exceptions.
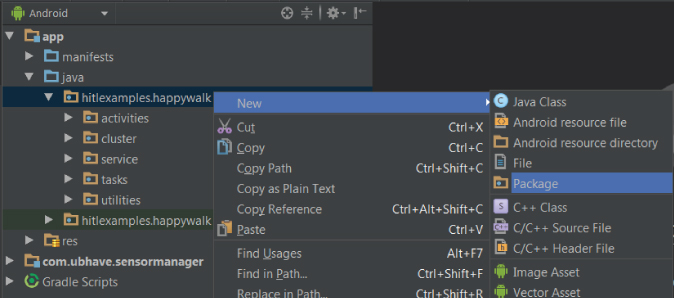
Figure 7.4 Creating a new package.
Now, let us right-click this new package, select New ![]() Java Class, and name it NoCurrentPosition. The class shall extend the Exception Java class, as shown by the code below:
Java Class, and name it NoCurrentPosition. The class shall extend the Exception Java class, as shown by the code below:
This exception serves as a last-resort safety net. As we will see in Section 9.2, we should ensure that location information is available before attempting to use the collectInputs() method. Do not forget to import the new NoCurrentPosition class into EmotionTasker.
As the reader might have noticed, the HwLocationProcessor, the HwMicrophoneProcessor, and the HwAccelerometerProcessor classes, used to process data, also need to be implemented. Let us look into how these processors can be created.
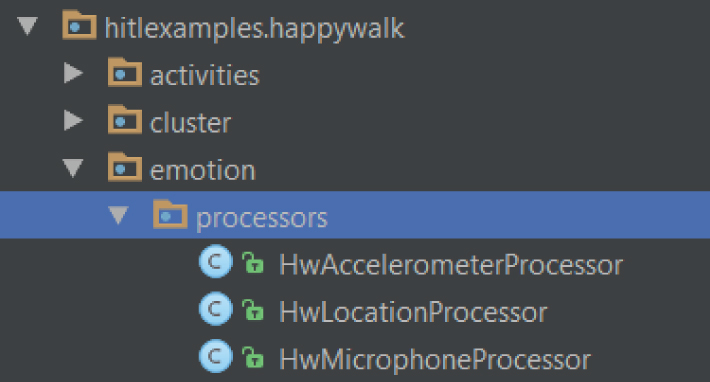
Figure 7.5 Creating the sensor processors.
7.2 Processing Sensory Data
In this section we shall prepare a package and several classes specifically dedicated to processing sensory data. In particular, we will focus on creating the HwLocationProcessor, HwMicrophoneProcessor, and HwAccelerometerProcessor, to process location, sound, and movement, respectively. These classes will normalize the inputs and implement very simple signal processing techniques, which we will also explain.
Let us first create a new package to hold emotion-related classes. Follow the steps shown in Figure 7.4: navigate into hitlexamples.happywalk, right-click on it, and select New ![]() Package. Name this new package emotion.
Package. Name this new package emotion.
Under this new package hitlexamples.happywalk.emotion let us create yet another package, named processors, where three new classes should be created: HwLocationProcessor, HwAccelerometerProcessor, and HwMicrophoneProcessor (see Figure 7.5).
Since signal processing is not the main focus of this book, and for the sake of brevity, our approach will be very simplistic. Figure 7.6 gives an overview of how the location, microphone, and accelerometer processors will be implemented.
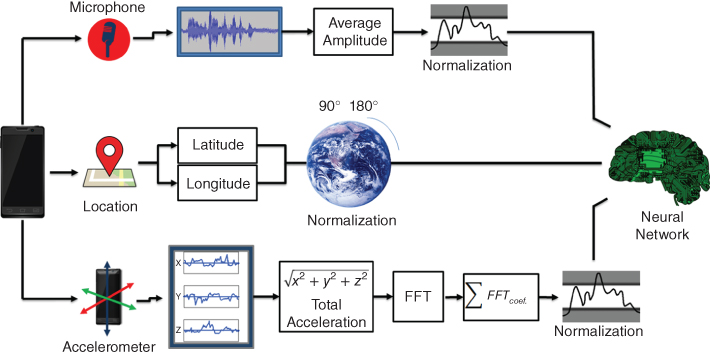
Figure 7.6 Signal processing overview.
When working with neural networks, it is good practice to normalize the data before using it. This is because normalization may reduce the training effort and increase the efficiency of the network. As Figure 7.6 shows, the simplest type of processing we will perform is on location. We will merely normalize latitude and longitude values on a [0,1] range by considering their maximum and minimum possible values. The processing of microphone data will also be rather straightforward. We shall acquire the signal, average its amplitude, and normalize this value on a [0,1] scale through empirically derived minimum and a maximum thresholds. The processing of movement, however, shall be slightly more complex. We will first attempt to calculate the total acceleration (independent of direction), perform frequency analysis of the signal, and, finally, normalize the result.
Let us begin with the processing of location. Normalizing latitude and longitude values is trivial, since latitude ranges from -90 to 90 degrees, while longitude ranges from -180 to 180. As such, we simply have to employ feature scaling, through the formula:

Where ![]() is the normalized result,
is the normalized result, ![]() is the original value, and
is the original value, and ![]() and
and ![]() are the minimum and maximum values of the variable, respectively. The following code implements the formula above:
are the minimum and maximum values of the variable, respectively. The following code implements the formula above:
This processor implements a single method, normalizeLatLng() (line 21), which returns an array of doubles containing the normalized latitude and longitude values from a LatLng object (the standard object used by the Google Maps Android API to represent latitude/longitude coordinates). The minimum and maximum values for latitude and longitude are defined in lines 8–11. The indexes used by HwLocationProcessor are defined by the LATITUDE_INDEX (line 13) and LONGITUDE_INDEX (line 14) variables, which are thereafter used by collectInputs() as we have seen back on page ???.
Now, let us move on to the microphone signal. Here, as suggested in Figure 7.6, we will calculate the average amplitude of the signal and normalize this value within certain limits:
The code is rather self-explanatory, with the threshold values resting on the variables MAX_AVG (line 10) and MIN_AVG (line 11), meaning Maximum average and Minimum average, respectively. The suggested values are merely indicative. In fact, we encourage the reader to experiment empirically and determine more appropriate values.
The method getAverageAmplitude() (line 20) iterates over the amplitude array present in a MicrophoneData object and calculates its average. On the other hand, the method normalizeAvgAmplitude() (line 39) normalizes the average amplitude to a [NORM_LOW, NORM_HIGH] range (in this case, it is [0,1]). First, it compares the average amplitude with its thresholds. If the average amplitude is outside the [MIN_AVG, MAX_AVG] range, its value is set to NORM_LOW or NORM_HIGH, accordingly. However, if the thresholds are respected, Encog's NormalizedField utility is used. A new NormalizedField object is set up in line 47 by using Encog's NormalizationAction.Normalized field, as well as MAX_AVG, MIN_AVG, NORM_HIGH, and NORM_LOW, to properly define the range.
As mentioned, we will attempt something slightly more complex for the accelerometer signal. Since we simply want to have an idea of the amount of movement of the smartphone, independently of its orientation, we need to first calculate the total acceleration from all axes (x, y, z). To do so, we can define new helper methods within our HwAccelerometerProcessor class to calculate the square root of the sum of their squared values, as suggested by Figure 7.6. This provides us with a value representing the general acceleration of the device:
As discussed in Section 5.3.2, we will now attempt to perform a simple Fourier analysis of the transformed signal. This type of signal processing technique involves decomposing a signal into oscillatory components (frequencies). In HappyWalk, we will use a basic form of Fourier analysis. More complex approaches are outside the scope of this book. In particular, we will use the fast cosine transform (FCT), a type of Fourier transformation that only uses real values (as opposed to using complex numbers). Since we are only interested in the real component of our signal, we can use the FCT for our frequency analysis.
The Apache Commons Mathematics Library (org.apache.commons.math3) allows us to access methods that calculate the FCT of a signal. To use this library we will need to reference it in the app/build.gradle file, under dependencies, as indicated in line 19 of the following code snippet:
However, the present implementation of FCT requires the length of the data set to be a power of two plus one (N = 2n + 1). There are several methods to handle this limitation. In this example, we will simply “zero-pad” our signal (add zero values at the end of the signal) until we achieve the necessary length. While this method is not optimal (it has some side effects in the resulting Fourier transformation), it is sufficient for our purposes. The resulting array contains a series of “FCT coefficients”, which represent the frequency components contained within the original signal. These coefficients can be normalized. They are divided by a value corresponding to the original signal's length.
The method calculateFCT() (line 15) begins by calling zeroPadData() (line 30) which, as the name indicates, zero-pads the data. To do so, zeroPadData() calls, in turn, closestUpperPowerOfTwoPlusOne() (line 41) which, when given an integer, finds its closest upper value that is a power of two plus one. The Fourier transformation is performed through a FastCosineTransformer (line 17), which is part of the Apache Commons Mathematics Library2 .
To achieve a value that represents the overall movement of the device, we sum the FCT coefficients and normalize the result between two empirically derived minimum and maximum values. Below is the full implementation of our HwAccelerometerProcessor class:


This class is, in some ways, similar to HwMicrophoneProcessor. Between the lines 18 and 21 we can find the threshold values MAX_AVG and MIN_AVG. The reader is, once again, encouraged to experiment with these values to fine-tune the application. We can also find that NORM_HIGH and NORM_LOW define a [0,1] range once more. Between lines 23 and 25 we find the indexes used by getTotalAcceleration() to read the acceleration values in the x, y, and z axes from within an AccelerometerData object.
In line 99 we find the getNormalizedFCTCoeffSum() method. It first calculates the FCT coefficients (line 100) and then determines the sum of their absolute values (line 103). This sum is then normalized in a manner very similar to what was done for HwMicrophoneProcessor (line 107).
Now that they are implemented, do not forget to add the appropriate imports for the HwLocationProcessor, the HwAccelerometerProcessor, and the HwMicrophoneProcessor to EmotionTasker.
7.3 In Summary..
In this section we began our work in the EmotionTasker class, which represents the core of our emotional inference mechanism. In particular, we handled its creation, set up a constructor and some of its class variables, made our background service aware of its existence, and defined its first method, collectInputs(), for data collection.
We then developed the HwLocationProcessor, HwMicrophoneProcessor, and HwAccelerometerProcessor classes, which are specifically dedicated to processing sensory data. We studied how to acquire and normalize the inputs, and also implemented some simple signal processing techniques for sound and movement.
With these tasks completed, we have finished the process of Data Acquisition. Figure 7.7 shows an overview of what we have achieved and how it fits into the larger picture of our HiTLCPS.
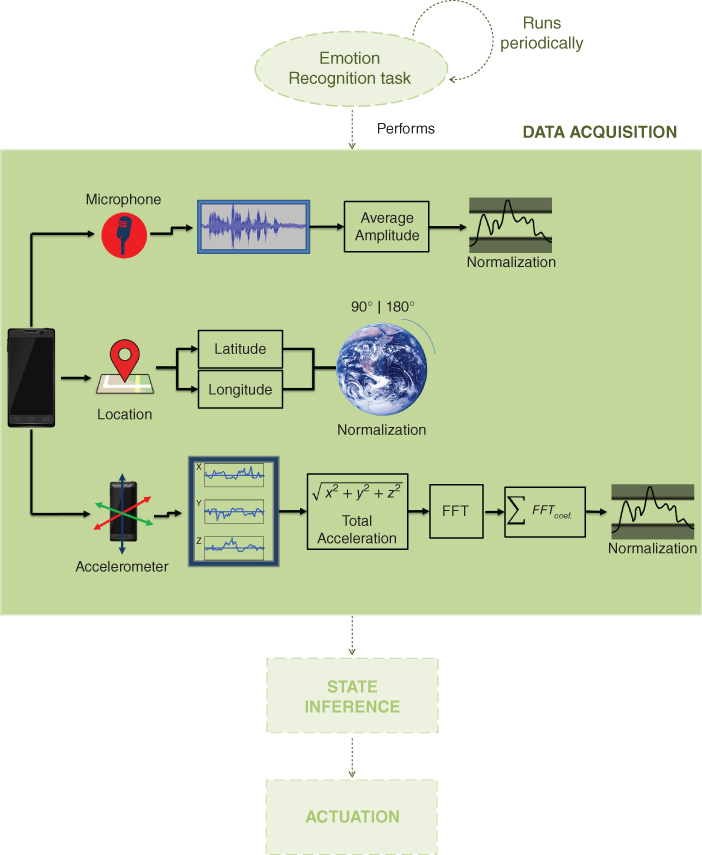
Figure 7.7 Current state of our HiTLCPS at the end of Chapter 7.
Several parts of Figure 7.7 are dimmed out and composed of dashed arrows and squares. These identify the tasks that we have yet to address. At the top we have an Emotion Recognition Task, which should be responsible for periodically beginning a new emotion recognition. We also need to address the major processes of State Inference and Actuation.
In the next chapter we will focus on State Inference and also partially address the periodicity of emotion recognition. We shall define the core of our machine learning, which will make use of the processed inputs that we created in this chapter. Eventually, we will be one step closer to the creation of our emotional inference mechanism.