


LDAP
This chapter examines the Lightweight Directory Access Protocol (LDAP) as implemented on z/OS.
6.1 What is LDAP
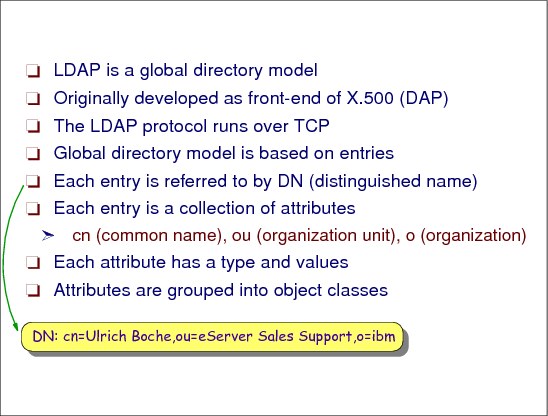
Figure 6-1 What is LDAP
What is LDAP
Today people and businesses rely on networked computer systems to support distributed applications. These distributed applications might interact with computers on the same local area network, within a corporate intranet, within extranets linking up partners and suppliers, or anywhere on the worldwide Internet. To improve functionality and ease-of-use, and to enable cost-effective administration of distributed applications, information about the services, resources, users, and other objects accessible from the applications needs to be organized in a clear and consistent manner. Much of this information can be shared among many applications, but it must also be protected in order to prevent unauthorized modification or the disclosure of private information.
Information describing the various users, applications, files, printers, and other resources accessible from a network is often collected into a special database that is sometimes called a directory. As the number of different networks and applications has grown, the number of specialized directories of information has also grown, resulting in islands of information that are difficult to share and manage. If all of this information could be maintained and accessed in a consistent and controlled manner, it would provide a focal point for integrating a distributed environment into a consistent and seamless system.
The LDAP is an open industry standard that has evolved to meet these needs. LDAP defines a standard method for accessing and updating information in a directory.
6.2 What is a directory service

Figure 6-2 What is a directory service
Directory service
A directory is a listing of information about objects arranged in some order that gives details about each object. Common examples are a city telephone directory and a library card catalog. For a telephone directory, the objects listed are people—the names are arranged alphabetically, and the details given about each person are address and telephone number. Books in a library card catalog are ordered by author or by title, and information such as the ISBN number of the book and other publication information is given.
In computer terms, a directory is a specialized database, also called a data repository, that stores typed and ordered information about objects. A particular directory might list information about printers (the objects) consisting of typed information such as location (a formatted character string), speed in pages per minute (numeric), print streams supported (for example PostScript® or ASCII), and so on.
Directories allow users or applications to find resources that have the characteristics needed for a particular task. For example, a directory of users can be used to look up a person's e-mail address or fax number. A directory can be searched to find a nearby PostScript color printer, or a directory of application servers can be searched to find a server that can access customer billing information.
The information in a directory is generally read much more often than it is written. As a consequence, directories do not usually implement the complicated transaction or rollback schemes that relational databases use for doing high-volume complex updates. Directory updates are typically simple all-or-nothing changes, if they are allowed at all. Directories are tuned to give quick-response to high-volume lookup or search operations. They might have the ability to replicate information widely to increase availability and reliability, while reducing response time. When directory information is replicated, temporary inconsistencies between the replicas are considered acceptable, as long as they get in sync eventually.
|
Remember:
Directory is a hierarchy of entries:
•Entries contain attributes.
•Attributes have one or more values.
•An entry’s attributes (not their values) are defined by the entry’s object class.
•Each entry has a name relative to its parent. This is a relative distinguished name (RDN™).
•All RDNs from root to entry put together form of distinguished name (DN).
|
6.3 LDAP directory structure
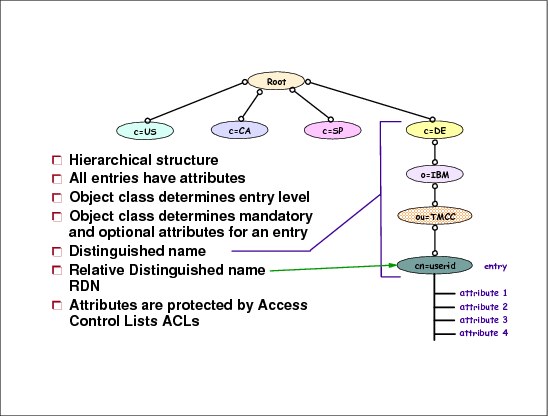
Figure 6-3 LDAP directory structure
LDAP directory structure
LDAP was originally developed as a front end to X.500, the OSI directory service. X.500 defines the Directory Access Protocol (DAP) for clients to use when contacting directory servers. DAP has been characterized as a heavyweight protocol that runs over a full OSI stack and requires a significant amount of computing resources to run. LDAP runs directly over TCP and provides most of the functionality of DAP at a much lower cost. An LDAP server is meant to remove much of the burden from the server side just as LDAP itself removed much of the burden from clients.
What kind of information can be stored in the directory
The LDAP directory service model is based on entries. An entry is a collection of attributes that has a name, called a distinguished name (DN). The DN is used to refer to the entry unambiguously. Each of the entry’s attributes has a type and one or more values. The types are typically mnemonic strings, such as cn for common name, or mail for e-mail address. The values depend on what type of attribute it is. For example, a mail attribute might contain an e-mail address with an attribute value of [email protected]. A jpegPhoto attribute would contain a photograph in binary JPEG format.
6.4 How LDAP works

Figure 6-4 How it works
How the information is arranged
In LDAP, directory entries are arranged in a hierarchical tree-like structure that sometimes reflects political, geographic or organizational boundaries. Entries representing countries appear at the top of the tree. Below them are entries representing states or national organizations. Below them might be entries representing people, organizational units, printers, documents, or just about anything else you can think of. Figure 10-4 shows an example LDAP directory tree.
In addition, LDAP allows you to control which attributes are required and allowed in an entry through the use of a special attribute called objectClass. The values of the objectClass attribute determine the attributes that can be specified in the entry.
How the information is referenced
An entry is referenced by its distinguished name, which is constructed by taking the name of the entry itself (called the relative distinguished name or RDN) and concatenating the names of its ancestor entries. For example, the entry for Tim Hahn in Figure 6-4 has an RDN of cn=Tim Hahn and a DN of cn=Tim Hahn,o=IBM,c=US. The full DN format is described in IETF RFC 2253, LDAP (V3): UTF-8 String Representation of Distinguished Names.
The z/OS LDAP server supports different naming formats. While naming based on country, organization, and organizational unit is one method, another method is to name entries based on an organization’s registered DNS domain name.
Names of this form look similar to this:
cn=Tim Hahn,dc=vnet,dc=ibm,dc=com
These naming formats can be mixed as well, for example cn=Tim Hahn,ou=Sales,dc=ibm,dc=com.
How the information is accessed
LDAP defines operations for interrogating and updating the directory. Operations are provided for adding or deleting an entry to/from the directory, changing an existing entry, and changing the name of an entry. Most of the time, however, LDAP is used to search for information in the directory. The LDAP search operation allows some portion of the directory to be searched for entries that match some criteria specified by a search filter. Information can be requested from each entry that matches the criteria. The LDAP compare operation allows a value to be tested in an entry without returning that value to the client.
An example of search is, you might want to search the entire directory subtree below IBM for people with the name Tim Hahn, retrieving the e-mail address of each entry found. LDAP lets you do this easily. Or you might want to search the entries directly below the c=US entry for organizations with the string Acme in their name and that have a FAX number. LDAP lets you do this also.
The LDAP bind operation is used to indicate to the LDAP server who is going to be making add/modify/search/compare or delete requests. The LDAP bind operation is an authentication process. This authentication process can be used by distributed applications which need to implement some form of authentication.
How the information is protected from unauthorized access
An Access Control List (ACL) provides a means to protect information stored in an LDAP directory. ACLs are used to restrict access to different portions of the directory, specific directory entries, or information within an entry. Access control can be specified for individual users or groups.
6.5 LDAP functional model
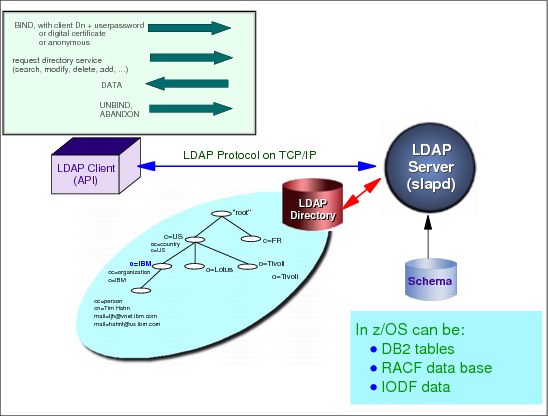
Figure 6-5 LDAP functional model
LDAP functional model
The DAP Server communication stack was too large to run on most system so the industry standards removed some protocols that were not used. As the DAP stack was reduced the new industry standard stack was referred to as Lightweight DAP (LDAP). The new LDAP stack was very similar to the standard TCP/IP stack, therefore most implementations of LDAP use what is referred to as a Stand-Alone LDAP Environment with the TCP/IP stack. Thus the LDAP Server and the X.500 Server have been combined. Figure 6-5 represents the most common LDAP industry solutions including the IBM solution.
Overview of LDAP architecture
LDAP defines the content of messages exchanged between an LDAP client and an LDAP server. The messages specify the operations requested by the client (that is search, modify, and delete), the responses from the server, and the format of data carried in the messages. LDAP messages are carried over TCP/IP, a connection-oriented protocol, so there are also operations to establish and disconnect a session between the client and server.
However, for the designer of an LDAP directory, it is not so much the structure of the messages being sent and received over the wire that is of interest. What is important is the logical model that is defined by these messages and data types, how the directory is organized, what operations are possible, how information is protected, and so forth.
The general interaction between an LDAP client and an LDAP server takes the following form:
1. The client establishes a session with an LDAP server, which is known as binding to the server. The client specifies the host name or IP address and TCP/IP port number where the LDAP server is listening.
2. The client can provide a user name and a password to properly authenticate with the server, or the client can establish an anonymous session with default access rights. The client and server can also establish a session that uses stronger security methods such as encryption of data.
3. The client then performs operations on directory data. LDAP offers both read and update capabilities. This allows directory information to be managed as well as queried. LDAP also supports searching the directory for data meeting arbitrary user-specified criteria. Searching is a very common operation in LDAP. A user can specify what part of the directory to search and what information to return. A search filter that uses Boolean conditions specifies what directory data matches the search.
4. When the client is finished making requests, it closes the session with the server, which is also known as unbinding.
6.6 LDAP servers on z/OS (Integrated Security Server LDAP
plus IBM Tivoli Directory Server)
plus IBM Tivoli Directory Server)

Figure 6-6 LDAP servers on z/OS
LDAP servers on z/OS
The z/OS LDAP is provided in two different flavours. The Integrated Security Server LDAP is stabilized on z/OS 1.6 level. The IBM Tivoli Directory Server was introduced in z/OS 1.8. The only reason to choose the old LDAP server is if you choose to store IODF or RMF in LDAP. Both servers are based on a client/server model that provides client access to an LDAP server. An LDAP directory provides an easy way to maintain directory information in a central location for storage, update, retrieval, and exchange.
6.7 LDAP server back ends
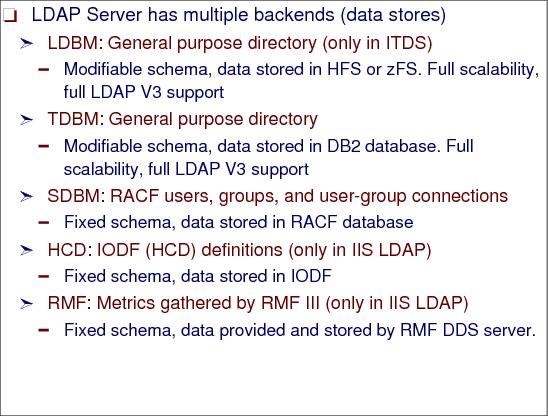
Figure 6-7 LDAP server back ends
LDAP server back ends
LDAP data is stored in the directory which is nothing more than a hierarchical database. LDAP is not the directory but the defined APIs to gain access to the data within the directory (or database). The directory is also referred to as the back-end store. Each LDAP solution supports its own back-end store. The data in the directory must have a schema (that is, a data definition or layout) according to the LDAP standards.
Schemas are another important part of LDAP. Schemas define the type of objects that can be stored in the directory. Schemas also list the attributes of each object type and wether these attributes are required or optional.
6.8 Capabilities of the Tivoli Directory Server LDAP server (1/2)
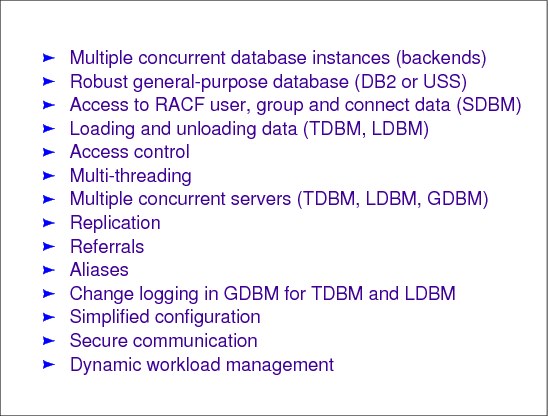
Figure 6-8 Capabilities of the Tivoli Directory Server LDAP server
Capabilities of the Tivoli Directory Server LDAP server
You can use the z/OS LDAP server to provide a directory service of your very own. Your directory can contain just about anything you want to put in it. Note that the IIS LDAP Server is alone to support IODF and RMF data and the Tivoli Directory Server is the only one to support LDBM and data store in UNIX System Services file system. The remainder of the back ends are supported by both servers.
Features and capabilities of the z/OS LDAP server include:
•Multiple concurrent database instances (referred to as back ends): The LDAP server can be configured to serve multiple databases at the same time. This means that a single z/OS LDAP server can respond to requests for many logically different portions of the LDAP tree. A z/OS LDAP server can be configured to provide access to RACF, as well as store application-specific information.
•Robust database: The LDAP server comes with a TDBM back-end database based on DB2. The TDBM database is a highly scalable database implementation. To use TDBM, DB2 is required.
•Access to RACF data: The LDAP server can be configured to provide read/write access to RACF user, group, and connection profiles using the LDAP protocol. (RACF is a component of the Security Server for z/OS.) If the RACF data is shared across the sysplex, then users, groups, and connections in the sysplex can be managed using LDAP. The LDAP server’s access to RACF is managed by an additional configurable back end called SDBM. To use SDBM for only authentication (LDAP bind processing), any security manager implementing the SAF service required by the __passwd() function call can be used. To use SDBM for accessing and updating USER and GROUP profile information, RACF is required.
•Loading and unloading data: The LDAP server can load a large number of entries into a TDBM DB2 database using the ldif2tdbm utility. The LDAP server can also unload a large number of entries from a TDBM DB2 database using the tdbm2ldif utility.
•Access control: The LDAP server provides a rich and powerful access control facility, allowing you to control access to the information in your database or databases. You can control access to entries based on LDAP authentication information, including users and groups. Group membership can be either static, dynamic, or nested. Access control is configurable down to individual attributes within entries. Also, access controls can be set up to explicitly deny access to information.
•Threads: The LDAP server is threaded for high performance. A single multi-threaded z/OS LDAP server process handles all incoming requests, reducing the amount of system overhead required.
•Replication: The LDAP server can be configured to maintain replica copies of its database. This master/subordinate replication scheme is vital in high-volume environments where a single LDAP server just does not provide the necessary availability or reliability. Peer to peer replication is also supported. This feature is contrasted with multiple concurrent servers.
•Referrals: The LDAP server provides the ability to refer clients to additional directory servers. Using referrals you can distribute processing overhead, distribute administration of data along organizational boundaries, and provide potential for widespread interconnection beyond an organization’s own boundaries.
•Aliases: An alias entry can be created in the directory to point to another entry in the directory. During search operations, an alias entry can provide a convenient public name for an entry or subtree, hiding the more complex actual name of the entry or subtree. It can also avoid the need to duplicate an entry in multiple subtrees.
•Change Logging: The LDAP server can be configured to create change log entries in the GDBM or LDBM back end. Each change log entry contains information about a change to an entry in a TDBM back end or to a RACF user profile.
•Configuration: The LDAP server configuration process can be simplified by using the ldapcnf configuration utility. This utility requires minimal user interaction and allows novice LDAP users to configure an LDAP server quickly. If you do not use the dsconfig utility, the LDAP server is highly configurable through a single configuration file which allows you to change just about everything you would ever want to change. Configuration options have reasonable defaults, making your job much easier.
•Secure communications: The LDAP server can be configured to encrypt data to and from LDAP clients using the z/OS Cryptographic Services System SSL. The LDAP server supports the Start TLS extended operation to switch a non-secure connection to a secure connection. It has a variety of ciphers for encryption to choose from, all of which provide server and optionally client authentication through the use of X.509 certificates.
•Multiple concurrent servers: The LDAP server can be configured to permit multiple instances to serve the same DB2-based backing store at the same time. The multiple server instances can run on the same z/OS image, and they can run on multiple z/OS images in a Parallel Sysplex. This support is available for the TDBM and GDBM back ends, improves availability, and can offer improved performance in certain configurations.
•Dynamic workload management: The LDAP server can be configured to participate in dynamic workload management in a Parallel Sysplex by exploiting TCP/IP connection optimization. With multiple concurrent server instances configured in this way, availability is improved, as is resource utilization. In addition, performance improvements can be experienced as sysplex resource utilization is more evenly balanced across z/OS systems in the sysplex.
6.9 Capabilities of the Tivoli Directory Server LDAP server (2/2)
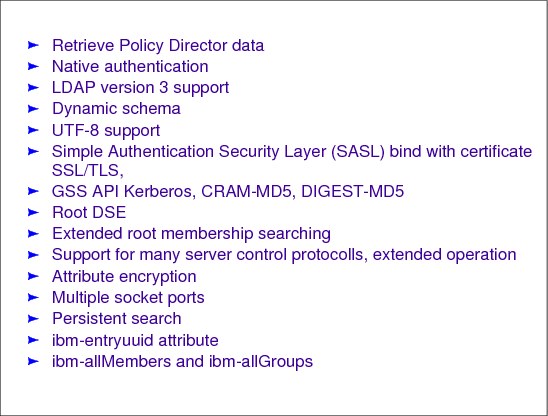
Figure 6-9 Capabilities of the ITDS LDAP server
Capabilities of the LDAP server
Features and capabilities of the LDAP server include:
•Retrieve Policy Director data: The z/OS LDAP server, when using the EXOP back end, supports two LDAP extended operations, GetDnForUserid and GetPrivileges, that retrieve Policy Director data from any LDAP server.
•Native authentication: The z/OS LDAP server allows clients to bind to entries in a TDBM back end by using the system for verifying the authentication attempt. The client can perform a simple bind supplying an LDAP DN of an entry in a TDBM back end along with a security manager-maintained password. Password authentication is then performed by the security manager. To use native authentication, any security manager implementing the SAF service required by the __passwd() function call can be used.
•LDAP Version 3 protocol support: The LDAP server provides support for Version 3 of the LDAP protocol, which includes:
– All protocol operations
– Implicit bind
– Certificate (or Simple Authentication and Security Layer) bind
– Version 3 referrals
– Aliases
– Controls
– Root DSE support
– Internationalization (UTF-8) support
– Modify name supported for all entries including subtree move
– Schema publication (TDBM, SDBM, and GDBM)
– Additional syntax support (TDBM and GDBM)
•Dynamic schema: The LDAP server, when using the TDBM or GDBM back end, allows the schema to be changed dynamically through the LDAP protocol.
•Internationalization (UTF-8) support: The LDAP server allows storage, update and retrieval, through LDAP operations, of national language data using LDAP Version 3 protocol.
•SASL external bind and client and server authentication: The LDAP server allows client applications to use a certificate when communicating with the server using SSL/TLS communications. To use a certificate on bind, the server must be configured to perform both client and server authentication. This ensures both entities are who they claim to be.
•SASL GSS API Kerberos bind with mutual authentication: The LDAP server allows clients to bind to the server using Kerberos credentials. Mutual authentication is used to verify both the client and server identities.
•SASL CRAM-MD5 and DIGEST-MD5 authentication: The LDAP server allows clients to bind to the server using DIGEST-MD5 (RFC 2831) and Challenge-Response Authentication Method - RFC 2195 (CRAM-MD5) authentication bind methods.
•Support for root DSE: The LDAP server supports search operations against the Root of the Directory tree as described in IETF RFC 2251, The Lightweight Directory Access Protocol (V3). The so-called Root DSE can be accessed using LDAP V3 search operations.
•Extended group membership searching: The LDAP server supports extended group membership searching which allows the LDAP server to find a DN that can be a member of static and nested groups in a back end (TDBM) where the DN does not reside. The LDAP server can find the group memberships for the DNs in the other back ends that are configured.
•Supported server controls: The LDAP server supports the manageDsaIT, authenticateOnly, IBMLDAPProxyControl, IBMModifyDNTimelimitControl, IBMModifyDNRealignDNAttributesControl, persistentSearch, and schemaReplaceByValueControl.
•Supported extended operations: The LDAP server supports the GetDnForUserid, GetPrivileges, and changeLogAddEntryRequest extended operations.
•Password encryption: The LDAP server allows prevention of unauthorized access to user passwords stored in the TDBM back ends.
•Multiple socket ports: The LDAP server can be configured to listen for secure and non-secure connections from clients on one or more IPv4 or IPv6 interfaces on a system. With the listen configuration option on the LDAP server, the host name or the IPv4 or IPv6 address, along with the port number, can target one or multiple IPv4 or IPv6 interfaces on a system.
•Persistent search: The LDAP server provides an event notification mechanism for applications, directories, and meta directories that need to maintain a cache of directory information or to synchronize directories when changes are made to an LDAP directory. Persistent search will allow these applications to be notified when a change has occurred.
•Ibm-entryuuid attribute: The LDAP server now generates a unique identifier for any entry that is created or modified and does not already have a unique identifier assigned. The unique identifier is stored in the ibm-entryuuid attribute. The ibm-entryuuid attribute is replicated to servers that support the ibm-entryuuid attribute. A utility is provided to create the ibm-entryuuids for existing entries when migrating from previous releases.
•ibm-allMembers and ibm-allGroups: The LDAP server now supports the querying of the members of static, dynamic, and nested groups in a TDBM back end through the ibm-allMembers operational attribute. The LDAP server also supports the querying of the static, dynamic, and nested groups that a user belongs to with the ibm-allGroups operational attributes.
6.10 LDAP configuration by utility

Figure 6-10 LDAP configuration utility
LDAP configuration utility
Each of the LDAP servers, Integrated Security Server LDAP and IBM Tivoli Directory Server, has its own configuration program. The input, output, and process is very similar but there are some differences.
The LDAP configuration utility helps you configure new LDAP server instances with minimal user interaction.
The LDAP configuration utility takes a profile file as input and generates a set of output members in a data set to facilitate an LDAP server configuration. The profile file is targeted for the System Administrator (or System Programmer) and the LDAP Administrator and it contains statements that must be updated with appropriate values. The LDAP configuration utility generates a series of JCL members, configuration files, and a procedure to start the LDAP server. The JCL jobs are segregated based on typical administrative roles in a z/OS installation and contain the required commands to configure the z/OS components used by the LDAP server. Each administrator is responsible for reviewing and submitting their JCL job. After all JCL jobs are submitted, each administrator is responsible for reviewing their job’s output and addressing any errors that might have occurred. When all JCL jobs have completed successfully, the LDAP server can be started.
The minimal user interaction with the utility and the jobs it produces to update the required z/OS components results in a simplified approach to LDAP configuration. This approach allows novice LDAP users and administrators and even novice z/OS users to quickly deploy an LDAP server. In addition, the utility does not restrict the configuration of advanced LDAP features, such as referrals, replication, password encryption, and sysplex setup.
Capabilities of the LDAP configuration utility
Features and capabilities of the LDAP configuration utility include:
•Allows for the configuration of a TDBM (DB2-based), LDBM (file-based), SDBM (RACF-based), Extended operations (EXOP) and change log GDBM (DB2-based) back ends.
•Generates JCL jobs to accomplish the updates of all the z/OS components that are required for an LDAP server.
•Can configure advanced LDAP server features, including:
– Password encryption (dsconfig does not generate certificates or passwords)
– Referrals
– Replication
– Change logging
– Secure Sockets Layer (SSL) or Transport Layer Security (TLS) (dsconfig does not generate certificates or passwords)
– Kerberos authentication
– Native authentication
– Extended operations (EXOP) back end (used for accessing Policy Directory information)
6.11 Utility ldapcnf restrictions

Figure 6-11 List of ldapcnf restrictions
Restrictions of the LDAP configuration utility
Restrictions of the LDAP configuration utility include:
•Generates a procedure; therefore, the LDAP server must run as a started task.
•Assumes that RACF is the security server in use. However, if RACF is not the security server in use, ldapcnf could still be used. The resulting RACF JCL job needs to be converted to properly update the security server in use.
•Does not handle multiple TDBM (DB2-based) or LDBM (file-based) back ends.
•All values in the input files must be less than 66 bytes in length and must contain only printable characters in the IBM-1047 code page.
•Cannot extend or enhance an existing LDAP server configuration. Furthermore, any manual updates to the output that the utility produces will be lost if you run the utility again with the same output data set.
•Does not support configuration for an LDAP server to listen on more than one secure port.
•Does not support configuration for an LDAP server to listen on more than one non-secure port.
6.12 Utility dsconfig restrictions
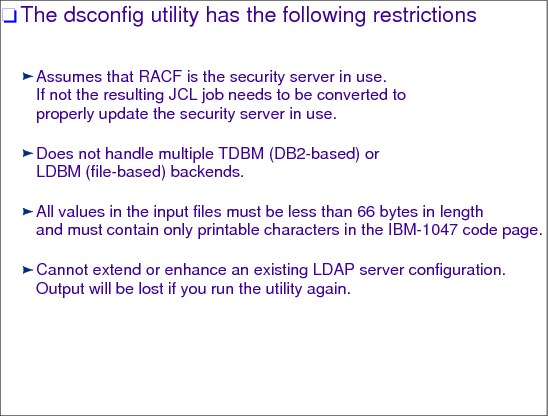
Figure 6-12 List of dsconfig restrictions
LDAP dsconfig restrictions
The dsconfig utility has the following restrictions:
•Assumes that RACF is the security server in use. If not, the resulting JCL job needs to be converted to properly update the security server in use.
•Does not handle multiple TDBM (DB2-based) or LDBM (file-based) back ends.
•All values in the input files must be less than 66 bytes in length and must contain only printable characters in the IBM-1047 code page.
•Cannot extend or enhance an existing LDAP server configuration.
•Output is lost if you run the utility again.
6.13 Utility invocation and outputs
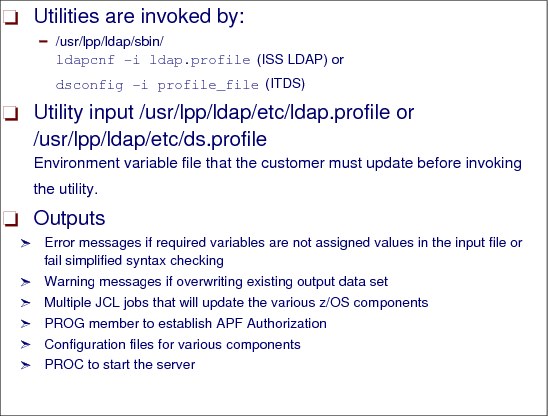
Figure 6-13 Utility invocations and outputs
Using the ldapcnf or dsconfig utility
The ldapcnf and dsconfig utilities are used to generate jobs to set up the system environment and configuration for a new LDAP server. This utility is installed into the /usr/lpp/ldap/sbin directory.
Format
The format of this command is as follows:
ldapcnf -i profile_file or dsconfig -i profile_file
where:
profile_file specifies the input file that contains statements necessary to configure the LDAP server.
Example 6-1 Using the ldapcnf command
ldapcnf -i /home/u/ldap.profile
Input file description
The input file, ldap.profile, shipped in the /usr/lpp/ldap/etc directory, contains the settings that are necessary to set up an LDAP server. You must copy the ldap.profile file and then modify it before you can run the LDAP configuration utility, ldapcnf.
In this file there are statements containing a keyword and value which must have the appropriate value for the target system being configured.
Example 6-2 shows a sample portion of the ldap.profile file. The LDAPUSRID statement, as shown in the example, has a pre-assigned value of GLDSRV. Above the statement there is some commentary that describes the statement and its usage.
Example 6-2 Sample portion of the ldap.profile file
# LDAPUSRID <user_id>
#
# Description:
# User ID for the LDAP server to run under.
#
# Note:
# This variable’s value must be capitalized.
# ---------------------------------------
LDAPUSRID=’GLDSRV’
Most of the statements in the ldap.profile are required and those that are not required are labelled as optional. Some statements in the ldap.profile have pre-assigned values; however, they might not be valid on the target system being configured. Values must be provided for all required statements in the ldap.profile file.
The ldap.profile file embeds three other advanced input files.All of the input files are in the same format as an environment variable file.
The output from ldapcnf is written to an output data set that you specify in ldap.profile. If the data set does not exist, the utility allocates the output data set for you.
6.14 Configuration roles and responsibilities
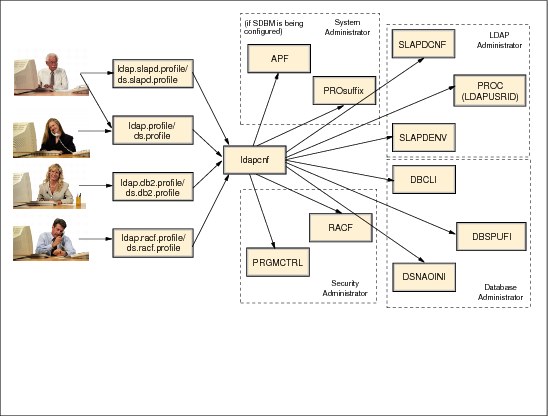
Figure 6-14 Configuration roles and responsibilities
Configuration roles and responsibilities
Use ldapcnf for IIS LDAP and dsconfig for the Tivoli Directory Server LDAP server. The output from the LDAP configuration utility consists of jobs and configuration files that finalize the LDAP server configuration. These jobs segregate z/OS updates based on typical administrative roles, allowing each administrator to control their component’s updates. The typical administrative roles that are assumed to exist to configure an LDAP server are:
•System Administrator (or System Programmer)
•Database Administrator
•LDAP Administrator
•Security Administrator
Each administrator is responsible for updating input files in addition to reviewing and submitting jobs in the output members that the LDAP configuration utility produces for their component.
Consult the reference manuals for a detailed description.
|
Note: If configuring SDBM and password encryption, the Security Administrator must have read/write authority on all files in the /usr/lpp/ocsf/lib and /usr/lpp/ocsf/addins directories.
|
6.15 The LDAP schema
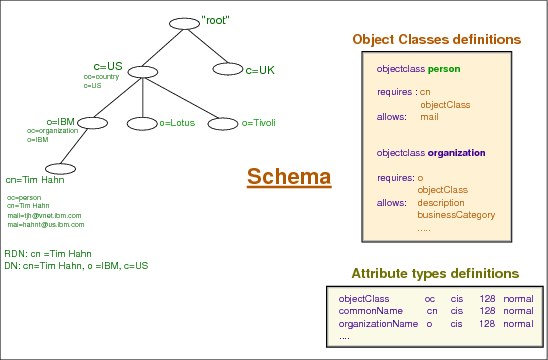
Figure 6-15 The LDAP schema
What is the schema
A schema is a set of rules that governs the way that data can be stored in the directory. The schema defines the type of entries that are allowed, their attribute structure, and the syntax of the attributes.
Data is stored in the directory using directory entries. An entry consists of an object class, which is required, and its attributes. Attributes can be either required or optional. The object class specifies the kind of information that the entry describes and defines the set of attributes it contains. Each attribute has one or more associated values.
The schema is published as part of the directory information, and is available in the Subschema entry (DN="cn=schema").
The schema has more configuration information than that included in the LDAP Version 3 Request For Comments (RFCs) or standard specifications. For example, for a given attribute, you can state which indexes must be maintained. This additional configuration information is maintained in the subschema entry as appropriate. An additional object class is defined for the subschema entry IBMsubschema, which has MAY attributes that hold the extended schema information.
Tivoli Directory Server requires that the schema that is defined for a naming context be stored in a special directory entry, "cn=schema". The entry contains all of the schema defined for the server. To retrieve schema information, you can perform an ldap_search using the following:
DN: "cn=schema", search scope: base, filter: objectclass=subschema
or
DN: "cn=schema", search scope: base, filter: objectclass=*
6.16 Schema attribute types
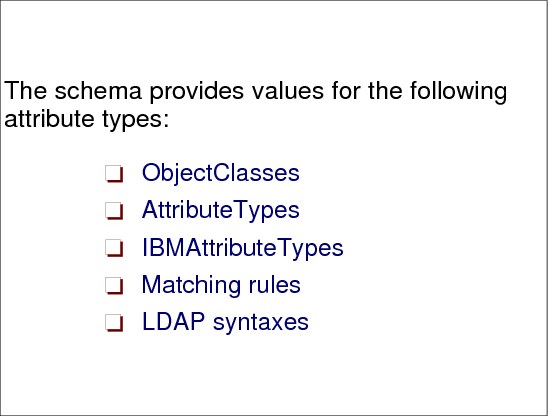
Figure 6-16 Schema attribute types
Schema attribute types
Entries in the directory are made up of attributes that consist of an attribute type and one or more attribute values. These are referred to as attribute=value pairs. Every entry contains one or more objectClass attribute=value pairs that identify the type of information that the entry contains. The object classes that are associated with the entry determine the set of attributes that must or can be present in the entry.
The schema is represented and stored as another entry in the directory. Example 6-3 shows a portion of the schema entry.
Example 6-3 Portion of the schema entry
cn=SCHEMA,o=Your Company,c=US subtreespecification=NULL
objectclass=TOP objectclass=SUBSCHEMA
objectclass=SUBENTRY objectclass=IBMSUBSCHEMA
...
attributetypes= ( 2.5.4.3 NAME ( ’cn’ ’commonName’ ) SUP name )
...
ibmattributetypes = ( 2.5.4.3 ACCESS-CLASS normal )
...
objectclasses = ( 2.5.6.0 NAME ’top’ ABSTRACT MUST objectclass )
...
ldapsyntaxes = ( 1.3.6.1.4.1.1466.115.121.1.15 DESC ’directory string’ )
...
matchingrules = ( 2.5.13.5 NAME ’caseExactMatch’ SYNTAX 1.3.6.1.4.1.1466.115.121.1.15 )
...
The objectClass values specified for the schema entry are top, subEntry, subSchema, and ibmSubschema. This set of object classes result in the objectClass, cn, and subtreeSpecification attributes being required for a schema entry and the attributeTypes, objectClasses, ldapSyntaxes, matchingRules, and ibmAttributeTypes attributes being allowed in a schema entry.
|
Note: The ditContentRules, ditStructureRules, nameforms, and matchingRuleUse attributes are allowed in a schema entry, but usage of these directives is not implemented by the z/OS LDAP server.
|
Attribute types
Attribute types define the characteristics of the data values stored in the directory. Each attribute type defined in a schema must contain a unique numeric object identifier and optionally contain a textual name, zero or more alias names, and a description of the attribute type. The characteristics defined for each attribute type include the syntax, length, and matching rules.
Matching rules
Matching rules allow entries to be selected from the database based on the evaluation of the matching rule assertion. Matching rule assertions are propositions that might evaluate to true, false, or undefined concerning the presence of the attribute value or values in an entry.
The z/OS LDAP server is shipped with predefined supported matching rules. The set of matching rules cannot be changed, added to, obsoleted, or deleted by users.
IBM attribute types
Additional information required by IBM LDAP servers for each attribute type defined in the schema is specified using the ibmAttributeTypes schema attribute. The ibmAttributeTypes schema attribute is an extension of the attributeTypes schema attribute. If the attributeTypes value is not defined, then the corresponding ibmAttributeTypes value cannot be defined. For the z/OS LDAP server, the additional information defined using this attribute is the ACCESS-CLASS of the associated attribute type.
Object classes
Object classes define the characteristics of individual directory entries. The object classes listed in a directory entry determine the set of required and optional attributes for the entry. Each object class defined in a schema must contain a unique numeric object identifier and optionally contain a textual name, zero or more alias names, a description of the object class, and lists of required (MUST) or optional (MAY) attribute types.
LDAP syntaxes
Each attribute type definition includes the LDAP syntax which applies to the values for the attribute. The LDAP syntax defines the set of characters which are allowed when entering data into the directory. The z/OS LDAP server is shipped with predefined supported syntaxes. The set of syntaxes cannot be changed, added to, or deleted by users.
6.17 LDAP directory schema
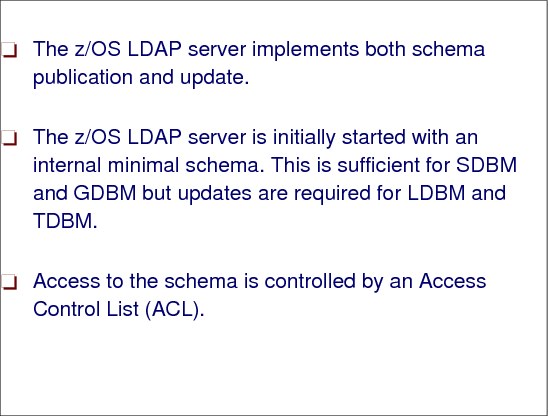
Figure 6-17 LDAP directory schema
LDAP directory schema
Schema publication provides the ability to query the active directory schema through the use of the LDAP search function. Schema update is the ability to change the schema while the directory server is running.
Setting up the schema for LDBM and TDBM new users
The LDAP server is shipped with two predefined schema files representing schema definitions which the user might want to load as the LDAP schema LDBM or TDBM. These files are schema.user.ldif and schema.IBM.ldif. The schema.IBM.ldif schema definitions require that the definitions that are contained in schema.user.ldif are loaded prior to loading schema.IBM.ldif. Determine which schema files will be used to represent the data that is stored in the LDBM and TDBM directory. Copy the files from the /usr/lpp/ldap/etc directory to a working directory, for example the /home/myuser directory.
For each file, find the following line and replace <suffix> with one of the suffixes defined for the back end in the LDAP server configuration file:
“dn: cn=schema, <suffix>”
Make your updates, and then run the ldapmodify command from the z/OS shell specifying the host, port, bind DN, password, and schema file for each schema file to load the schema into the directory.
6.18 Authentication with an LDAP server
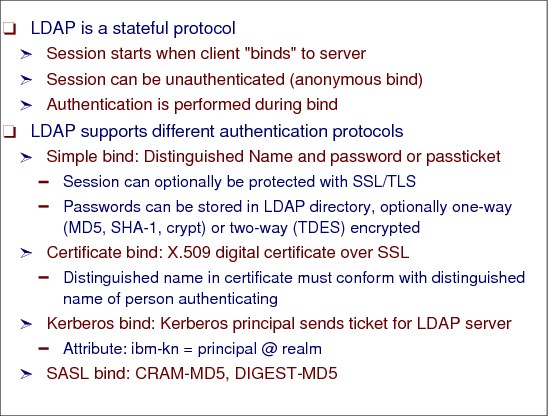
Figure 6-18 Authentication with an LDAP server
Authentication with an LDAP server
Authentication operations are used to establish and end a session between an LDAP client and an LDAP server. The session can be secured at various levels ranging from an insecure anonymous session, an authenticated session in which the client identifies itself by providing a password, to a secure, encrypted session using SASL mechanisms. SASL was added in LDAP Version 3 to overcome the weak authentication in LDAP Version 2.
Authentication operations:
•Bind: Initiates an LDAP session between a client and a server. Allows the client to prove its identity by authenticating itself to the server.
•Unbind: Terminates a client/server session.
•Abandon: Allows a client to request that the server abandon an outstanding operation.
Security model
The security model is based on the bind operation. There are several different bind operations possible, and thus the security mechanism applied is different as well. One possibility is when a client requesting access supplies a DN identifying itself along with a simple clear-text password. If no DN and password is declared, an anonymous session is assumed by the LDAP server. The use of clear text passwords is strongly discouraged when the underlying transport service cannot guarantee confidentiality and can, therefore, result in disclosure of the password to unauthorized parties.
LDAP V3 comes along with a bind command that supports the Simple Authentication and Security Layer (SASL) mechanism. SASL is a general authentication framework, where several different authentication methods are available for authenticating the client to the server. One authentication method is Kerberos.
Furthermore, extended protocol operations are available in LDAP V3. An extension related to security is the Extension for Transport Layer Security (TLS) for LDAPv3. This allow operations too use TLS as a means to encrypt an LDAP session and protect against spoofing. TLS has a mechanism which enables it to communicate to an SSL server so that it is backwards compatible. The basic principles of SSL and TLS are the same.
6.19 LDAP authentication with RACF

Figure 6-19 LDAP authentication with RACF
LDAP authentication with RACF
RACF provides definitions of users and groups, as well as access control for resources. The LDAP server can provide LDAP access to the user and group information stored in RACF.
Using SDBM, the RACF database back end of the LDAP server, you can:
•Add new users and groups to RACF
•Add users to groups (connections)
•Modify RACF information for users and groups
•Retrieve RACF information for users and groups
•Delete users and groups from RACF
•Remove users from groups (connections)
•Retrieve RACF user password envelope
The SDBM database of the LDAP server implements portions of the adduser, addgroup, altuser, altgroup, deluser, delgroup, listuser, listgrp, connect, remove, and search RACF commands. An individual user has the same authority through SDBM as with normal RACF commands. The SDBM database of the LDAP server makes use of the R_Admin run command interface to accomplish its access to RACF data. As a result, this support is subject to the restrictions of the R_Admin interface. One restriction in particular affects return of search results.
The SDBM database allows for directory authentication (or bind) using the RACF user ID and password. The RACF user ID must have an OMVS segment defined and an OMVS UID present. The RACF user and group information that make up an identity can be used to establish access control on other LDAP directory entities. This expands use of the RACF identity to the rest of the LDAP-managed namespace. Note the following information when using RACF access:
•An LDAP simple bind to a z/OS LDAP server using RACF access support but having a non-RACF security manager will succeed as long as the __passwd() call made by the LDAP server is successful. However, no group membership information will be available for the bound distinguished name if the security manager is not RACF.
•An LDAP simple bind made to a z/OS LDAP server using RACF access support continues to provide a successful or unsuccessful LDAP return code. In addition, if the LDAP return code being returned is LDAP_INVALID_CREDENTIALS, additional information is provided in the “message” portion of the LDAP result. The additional information is an LDAP-unique reason code and reason code text in the following format:
Rnnnnnn text
If the SDBM database is to be used for authentication purposes only, consider having your clients use the authenticateOnly server control, to streamline bind processing. This supported control overrides any extended group membership searching and default group membership gathering and is supported for Version 3 clients.
|
Note: The SDBM back end only updates the default RACF on a given system. That is, the AT and ONLYAT clauses of the RACF commands, used to redirect RACF commands, are not exploited by SDBM.
|
|
Note: The use of RACF passtickets is supported by the z/OS LDAP server. It is recommended that the LDAP server be run as a started task if RACF passticket support will be used. The job name that is associated with the LDAP Server started task should be used as the application name when generating RACF passtickets.
|
6.20 z/OS LDAP server native authentication
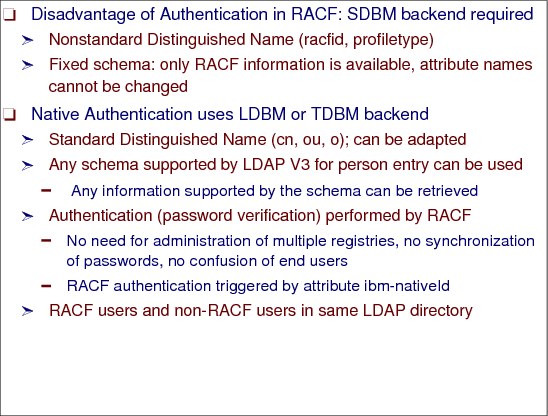
Figure 6-20 LDAP server native authentication
LDAP server native authentication
LDAP has the ability to authenticate to the Security Server through LDBM or TDBM by supplying a Security Server password on a simple bind to a LDBM or TDBM back end. Authorization information is still gathered by the LDAP server based on the DN that performed the bind operation. The LDAP entry that contains the bind DN should contain either the ibm-nativeId attribute or uid attribute to specify the ID that is associated with this entry. Note that the SDBM back end does not have to be configured. The ID and password are passed to the Security Server and the verification of the password is performed by the Security Server. Another feature of native authentication is the ability to change your Security Server’s password by issuing an LDAP modify command.
6.21 Enabling LDAP native authentication

Figure 6-21 Enabling LDAP native authentication
Initializing native authentication
To enable native authentication, perform the following steps:
1. Install and configure RACF or another Security Server.
2. Configure an LDAP server to run LDBM or TDBM and start the server. Specify the native authentication options in your configuration file. For example:
TDBM Section
useNativeAuth SELECTED
nativeAuthSubtree o=IBM,c=US
nativeAuthSubtree o=Lotus,c=US
nativeUpdateAllowed YES
3. Load the native authentication related schema elements into the TDBM back end.
4. Be sure that the entries that are to perform native authentication contain either the ibm-nativeId attribute or a single-valued uid attribute with the appropriate Security Server ID as its value. It is important to note that a multi-valued uid without an ibm-nativeId causes the bind to fail because the LDAP server does not know which ID to use.
Updating the schema for native authentication
To enable native authentication, the directory schema must contain the native authentication related schema elements which are defined in schema.IBM.ldif.
The native authentication attribute type is as follows:
•ibm-nativeId: Allows you to specify the ID that is to be associated with this entry.
The native authentication object class is as follows:
•ibm-nativeAuthentication: Allows you to specify the ibm-nativeId attribute in entries.
|
Note: Entries that are added and subject to Native Authentication cannot contain the userpassword attribute.
|
|
Note: RACF group gathering is not performed as a part of authentication.
|
6.22 Native authentication configuration options
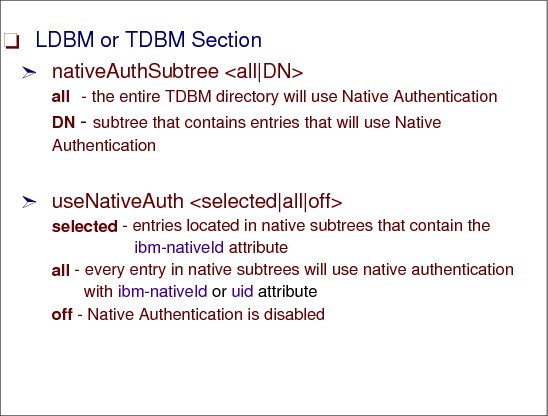
Figure 6-22 Native authentication configuration options
Native authentication configuration options
There are many different configuration options for native authentication. The main configuration option, useNativeAuth, can be set to selected, all, or off. If you want all entries in a certain subtree to participate in native authentication then you would choose all for this option. However, if you want specific entries in the specific subtrees to be subject to native authentication, then choose selected for the useNativeAuth option. When selected is used, only entries with the ibm-nativeId attribute will be subject to native authentication.
In order for an entry to bind natively or perform a native password modify, that entry must contain a mapping to the Security Server identity that is associated with the user. This can be accomplished by using either the ibm-nativeId attribute or the uid attribute that is defined in schema.user.ldif. If your directory entries already contain a single-valued uid attribute (which holds the Security Server user ID), then these entries are already configured for native authentication if you plan on using the useNativeAuth all option. If you do not plan on using uids for mapping, then you can specify the ibm-nativeId attribute for your Security Server ID associations and this attribute is used with selected or all specified for the useNativeAuth option. If both the ibm-nativeId and uid attributes exist in an entry, the ibm-nativeId value is used. The user ID specified by either the uid or ibm-nativeId attributes must contain a valid OMVS segment in the Security Server.
If you use the useNativeAuth option, also specify the nativeUpdateAllowed option to enable native password changes in the Security Server to occur through the TDBM back end.
Next, consider what portions of your directory should have the ability to participate in native authentication. If the entire directory should participate, then set the nativeAuthSubtree configuration option to all. If there are different subtrees in your directory which contain entries that need to bind natively or perform native password modifications, then you need to list all the subtrees with the nativeAuthSubtree configuration option.
As mentioned, there are two LDAP operations affected: bind and password modify. There is a set of criteria that is used to determine if an entry actually participates in native authentication. This criteria changes depending on the configuration options that have been selected.
|
Note: If the DN that is listed in the nativeAuthSubtree option contains a space character in it, then the entire DN must be enclosed in quotation marks in the configuration file.
|
6.23 More native authentication configuration options
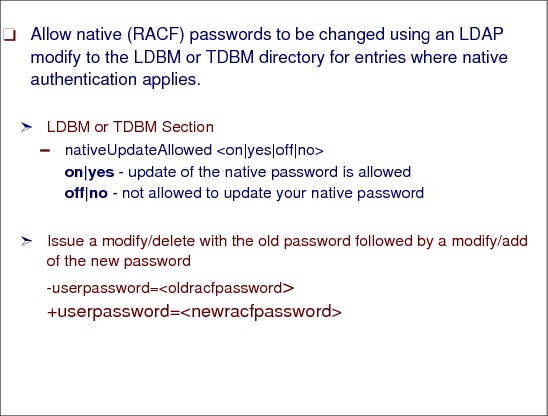
Figure 6-23 More native authentication configuration options
More native authentication configuration options
Performing a native password modify is as simple as issuing an ldapmodify command to perform a delete followed by an add of the userpassword attribute. Specify the current password on the delete statement followed by the new password on the add statement. The delete must occur before the add for native password modify. In Example 6-4, the bind DN has the authority to do this.
Example 6-4 Native password modify
If file pw.mod contains:
cn=You,o=IBM,c=US
-userpassword=oldpassword
+userpassword=newpassword
Then the following command modifies the native password:
ldapmodify ... -D cn=You,o=IBM,c=US -w oldpassword -f pw.mod
If the ldapmodify command fails with LDAP return code LDAP_INVALID_CREDENTIALS and the following LDAP reason code, then it is possible to change the RACF password of a TDBM entry participating in native authentication by doing an LDAP simple bind:
R004109 The password has expired.
The simple bind can occur as part of an LDAP function such as search, add, or modify. The password change is provided in the password portion of the LDAP simple bind. The password must be in the following format:
password/newpassword
The forward slash (/) is used as the indication of a password change during the LDAP simple bind. Password changes made using the LDAP simple bind to a TDBM entry participating in native authentication are subject to the system password rules. A password change will fail with LDAP return code LDAP_INVALID_CREDENTIALS and LDAP reason code of:
R004128 Native authentication password change failed: The new password is not valid, or does not meet requirements.
if the new password does not pass the rules established on the system.
Note that when the bind succeeds, the password is changed even if the LDAP function eventually fails.
Assuming TDBM entry cn=User1,ou=END,o=IBM,c=US is participating in native authentication, the following command changes the RACF password for user USER1 from abc to def:
ldapsearch -h ldaphost -p ldapport -D "cn=User1,ou=END,o=IBM,c=US" -w abc/def -b "ou=END,o=IBM,c=US" "objectclass=*"
|
Note: LDAP ACLs must be set properly to allow update of the userpassword attribute for the password modification to complete successfully. The distinguished name provided on the -D parameter of the ldapmodify command must have authority to update the userpassword attribute. To allow each individual user to update their own password, an LDAP ACL should be established to permit them to write userpassword attribute values.
|
You can also use the special cn=this identity entry to establish the LDAP ACL.
Run the following ldapmodify command to establish the LDAP ACL:
ldapmodify -D adminDN -w adminPW -f /tmp/aclmod.ldif
In this command, the file /tmp/aclmod.ldif looks similar to:
dn: o=Your Company
changetype: modify
add: x
aclEntry: access-id:cn=this:critical:rwsc
aclPropagate: TRUE
You should substitute the root of your directory tree for the dn: o=Your Company line in the LDIF file to allow each user who is defined for native authentication to update the RACF password through LDAP.
6.24 LDAP server-side Kerberos bind
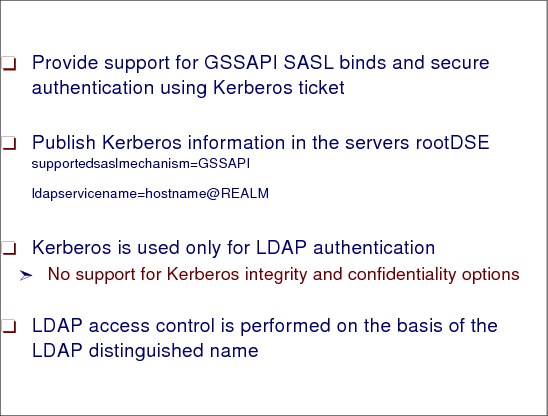
Figure 6-24 LDAP server-side Kerberos bind
LDAP server-side Kerberos bind
The z/OS LDAP server allows clients to authenticate to the server by using IBM Network Authentication and Privacy Service which is better known as Kerberos Version 5. Kerberos is a trusted third party, private-key, network authentication system. In Kerberos, a ticket, a packet of information used by a client to prove its identity, is passed to a server in place of a user name and password. This ticket is encrypted and cannot be duplicated. After the server verifies the client ticket, it sends its own ticket to the client in order for the client to authenticate it. Once the mutual authentication process is complete, the client and server have authenticated each other.
In the z/OS LDAP server, Kerberos is used for authentication only. The Kerberos options for integrity and confidentiality are not supported. Authorization information for ACLs is gathered by the LDAP server after the authentication process has completed and is based on the Kerberos identity of the bound client.
6.25 LDAP Kerberos configuration
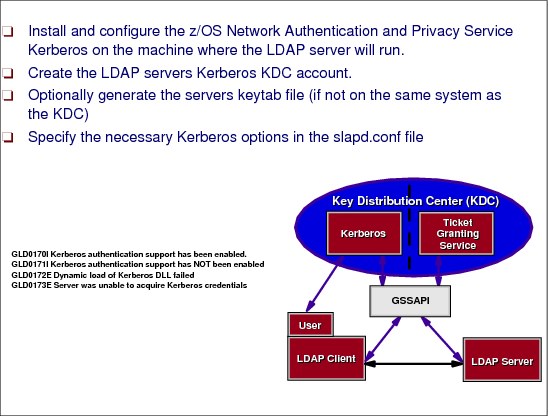
Figure 6-25 LDAP Kerberos configuration
LDAP Kerberos configuration
Kerberos Version 5 binds, defined in IETF RFC 2222, are performed using the Generic Security Services Application Programming Interface (GSS API) that is defined in IETF RFCs 2743 and 2744.
|
Note: From this point forward in this discussion, we use the phrase GSS API bind to refer to Kerberos Version 5 binds.
|
Before you attempt to perform a Kerberos GSS API bind, be sure to:
1. Have the Network Authentication and Privacy Service (Kerberos 5) installed and configured and the service started.
2. Create a Kerberos identity for the user ID that will start the LDAP server. For example:
ALTUSER LDAPSRV PASSWORD(password) NOEXPIRED KERB(KERBNAME(ldap_prefix/hostname))
In this command, ldap_prefix is either “LDAP” or “ldap” and hostname is the primary host name for the system in DNS.
3. If the Key Distribution Center (KDC) is not located on the same machine as the LDAP server, you have to generate a keytab file for the server. To generate a keytab for the server, issue the following commands:
a. First check the version of the server’s Kerberos key because the version is updated every time the password is changed:
LISTUSER LDAPSRV NORACF KERB
b. Now, issue the keytab command from the z/OS shell with the version from the LISTUSER command:
keytab add LDAP/hostname -p password -v 001
You can also use the -k filename option if you want to use your own keytab file rather than the Kerberos default keytab file.
|
Important: When issuing Kerberos commands all passwords must be in uppercase.
|
If the KDC and LDAP server are on the same system, you do not need a keytab file. If the ID which starts the LDAP server has READ access to the IRR.RUSERMAP facility class in RACF, then you can use this instead of a keytab file as follows:
RDEFINE FACILITY IRR.RUSERMAP UACC(NONE)
PERMIT IRR.RUSERMAP CLASS(FACILITY) ID(LDAPSRV) ACCESS(READ)
SETR RACLIST(FACILITY) REFRESH
4. Enable your configuration file for Kerberos authentication.
# Global Section
supportKrb5 yes
serverKrbPrinc LDAP/[email protected]
krbLDAPAdmin [email protected]
krbKeytab none
# TDBM Section
krbIdentityMap on
# SDBM Section krbIdentityMap on
5. Start your server. Your LDAP server is now configured with Kerberos support.
|
Note: The “LDAP” portion of the serverKrbPrinc identity can either be “ldap” or “LDAP” in the configuration file and in the Kerberos segment of the RACF ID where it is defined. Check your KDC for case requirements.
|
6.26 LDAP Kerberos directory schema
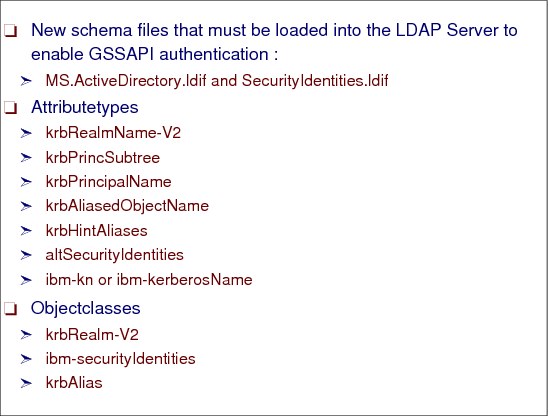
Figure 6-26 LDAP Kerberos directory schema
LDAP Kerberos directory schema
To enable Kerberos GSS API Authentication, the directory schema must contain the Kerberos related schema elements which are defined in schema.user.ldif. Table 6-1 lists the Kerberos related schema elements.
Table 6-1 Kerberos related schema elements
|
Attribute
|
Object class
|
Description
|
|
krbRealmName-V2
|
krbRealm-V2
|
This attribute represents the Kerberos Realms of which entries in the LDAP server are members. The entry that contains this attribute also contains the krbPrincSubtree attribute.
|
|
krbPrincSubtree
|
krbRealm-V2
|
This attribute is in the same entry as the krbRealmName-V2 attribute and it identifies the directory subtrees where entries can contain Kerberos information.
|
|
krbPrincipalName
|
(no object class)
|
The attribute is used to define the entry’s Kerberos identity. This attribute is used for identity mapping. Currently this attribute is not associated with an object class. This means that for an entry to contain this attribute you can add the object class extensibleObject or define and add your own object class.
|
|
krbAliasedObjectName
|
krbAlias
|
This attribute allows an entry to be mapped to another entry’s DN.
|
|
krbHintAliases
|
krbAlias
|
This attribute is used as an authorization list. If another entry’s DN is in this list and that entry specified this entry as a krbAliasedObjectName then the mapping is allowed.
|
|
altSecurityIdentities
|
ibm-securityIdentities
|
If a user is defined to a case-insensitive Kerberos server, then the Kerberos identity associated with this entry is stored as an altSecurityIdentity rather than a krbPrincipalName.
|
|
ibm-kn
|
(no object class)
|
This attribute is a pseudo-DN so that Kerberos identities can be represented as DNs for access control. Currently this attribute is not associated with an object class. This means that for an entry to contain this attribute you can add the object class extensibleObject or define and add your own object class.
|
6.27 LDAP Kerberos: Mapping algorithms
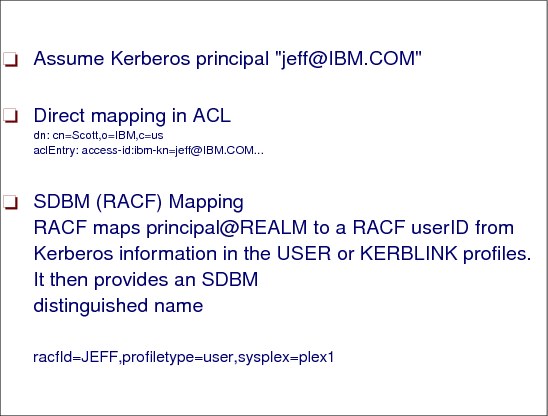
Figure 6-27 LDAP Kerberos: Mapping algorithms
Default mapping
The GSS API bind operation passes a Kerberos identity to the LDAP server which in its initial form cannot be used for access control in the server. This Kerberos identity known as <principal>@<REALM> is converted to a DN of the form ibm-kn=<principal>@<REALM>. Now this Kerberos DN can be used in access control lists.
For example, if you performed a Kerberos bind as [email protected], you are mapped to [email protected] and this DN is added to a list of DNs that are used for access control throughout the server. This process is known as the default mapping and is always performed when a SASL bind with a mechanism of GSS API is performed.
SDBM mapping
If an SDBM back end is configured and the krbIdentityMap configuration is on, then the SDBM back end tries to map the Kerberos identity to the appropriate RACF ID. If a RACF ID is found, then the SDBM DN that represents the RACF ID is added to the list of DNs.
6.28 LDAP Kerberos: LDBM and TDBM mapping
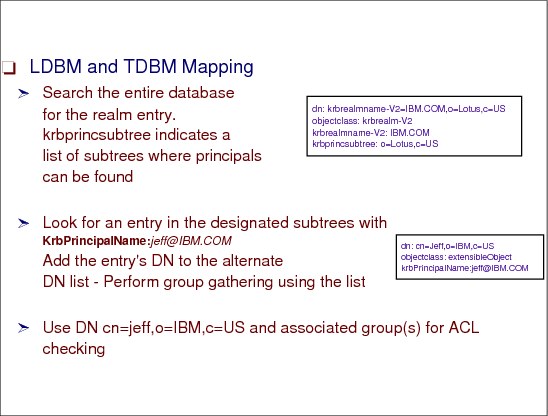
Figure 6-28 LDBM and TDBM mapping
LDBM and TDBM mapping
Another form of mapping is to map the Kerberos identity to LDBM or TDBM DNs. The following algorithm is used to perform this type of identity mapping if the krbIdentityMap configuration option is on for this back end:
1. Search the entire TDBM back end for the realm entry that corresponds to the Kerberos identity by searching for objectclass=krbRealm and krbRealmName-V2=<REALM>, where <REALM> is the realm portion of the bound Kerberos identity. If the realm is found in the directory, then all of its krbPrincSubtree values are gathered for use in the next part of this algorithm.
2. If krbPrincSubtree values exist, then each subtree is searched for the entry or entries that contain the following attribute, where <principal>@<REALM> is the bound Kerberos identity:
krbPrincipalName = <principal>@<REALM>
3. If an entry or entries are found in the previous step with the correct krbPrincipalName, their DNs are added to the DN list. If the krbAliasedObjectName attribute exists in the entry that is found, then more work needs to be done. The entry specified as a krbAliasedObjectName must allow this entry to use its DN. So, the entry that is specified in the krbAliasedObjectName must have the DN of the entry in its list of krbHintAliases. If it does, then the krbAliasedObjectName value is added to the DN list.
4. Finally, the entire database is searched for entries that have an object class objectclass=ibm-securityIdentities and the following attribute:
altSecurityIdentities = KERBEROS:<principal>@<REALM>
In this command, <principal>@<REALM> is the bound Kerberos identity.
6.29 Configuring access control
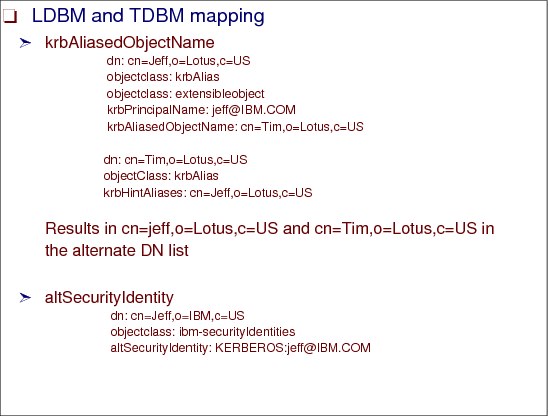
Figure 6-29 Configuring access control
Configuring access control
Because we now have a list of alternate DNs, access control has been changed to operate on the list of DNs rather than just a single DN. Group gathering is also performed on all of the DNs in the list. The following examples show how access control can be configured for Kerberos binds.
1. To set up new ACLs in your directory, use ibm-kn=<principal>@<REALM> for your aclEntry values, as shown in the following example:
dn: cn=Scott,o=IBM,c=US aclEntry: access-id:[email protected]:normal:r
If [email protected] performed a Kerberos bind to the server, this user is mapped to [email protected] and gets read access to normal data in the Scott entry.
2. Use existing ACLs (Method 1) for Kerberos identities that are defined to IBM KDCs or case-sensitive KDCs.
a. Set up and add the realm entry in the database as shown in the following example:
dn: krbRealmName-V2=IBM.COM,o=IBM,c=US
objectclass: krbRealm
krbRealmName-V2: IBM.COM
krbPrincSubtree: o=IBM,c=US
This example states that if a bound Kerberos identity has a realm of IBM.COM, then identity mapping is performed in the o=IBM,c=US subtree.
b. Add the krbPrincipalName attribute to your entries as shown in the following example:
dn: cn=Jeff,o=IBM,c=US
objectclass: extensibleObject
krbPrincipalName: [email protected]
In this example, the realm object for [email protected] is found and the o=IBM,c=US subtree is searched for [email protected]. Because there is no krbAliasedObjectName attribute in the Jeff entry, only the DN cn=Jeff,o=IBM,c=US is added to the DN list along with the default mapping of [email protected].
Therefore, if cn=Jeff,o=IBM,c=US was already defined in another entry’s aclEntry, then [email protected] still has that access to the entry as shown in the following example:
dn: cn=Ken,o=IBM,c=US
aclEntry: access-id:cn=Jeff,o=IBM,c=US:normal:w
In this example, [email protected] still maintains access to the cn=Ken,o=IBM,c=US entry since TDBM mapping was performed.
c. The krbAliasedObjectName attribute can also be used for identity mapping as shown in the following example:
dn: cn=Jeff,o=IBM,c=US
objectclass: extensibleObject
objectClass: krbAlias
krbPrincipalName: [email protected]
krbAliasedObjectName: cn=Tim,o=IBM,c=US
In this example, the realm object for [email protected] is found and the o=IBM,c=US subtree is searched for [email protected]. The search results in cn=Jeff,o=IBM,c=US being added to the DN list. Because there is a krbAliasedObjectName attribute in the Jeff entry, we need to look at the Tim entry before we add cn=Tim,o=IBM,c=US to the DN list. To use Tim’s DN for access control, the user must authorize Jeff to do so. Tim’s entry must look similar to the following:
dn: cn=Tim,o=IBM,c=US
objectclass: krbAlias
krbHintAliases: cn=Jeff,o=IBM,c=US
Because Tim listed Jeff as a krbHintAliases, the value of krbAliasedObjectName cn=Tim,o=IBM,c=US can be added to the DN list. If the Tim entry did not contain the krbHintAliases with Jeff as its value, then Tim’s DN is not added to the DN list. Therefore, if cn=Tim,o=IBM,c=US was already defined in another entry’s aclEntry then [email protected] still has that access to the entry. For example:
dn: cn=Kim,o=IBM,c=US
aclEntry: access-id:cn=Tim,o=IBM,c=US:normal:w
In this example, [email protected] maintains write access to the Kim entry because TDBM mapping was performed and Jeff was aliased to Tim.
3. Use existing ACLs (Method 2). Use this method for case-insensitive KDCs. Set up your TDBM entries with the altSecurityIdentities attribute.
Example:
dn: cn=Jeff,o=IBM,c=US
objectclass: ibm-securityIdentities
altSecurityIdentity: KERBEROS:[email protected]
Now if [email protected] performs a Kerberos bind, he is mapped to [email protected] as well as cn=Jeff,o=IBM,c=US.
4. Therefore, if cn=Jeff,o=IBM,c=US is already defined in another entry’s aclEntry, then [email protected] still has that access to the entry.
For example:
dn: cn=Ken,o=IBM,c=US
aclEntry: access-id:cn=Jeff,o=IBM,c=US:normal:w
In this example, [email protected] still maintains write access to the Ken entry because TDBM mapping was performed.
6.30 How to set up a Kerberos directory
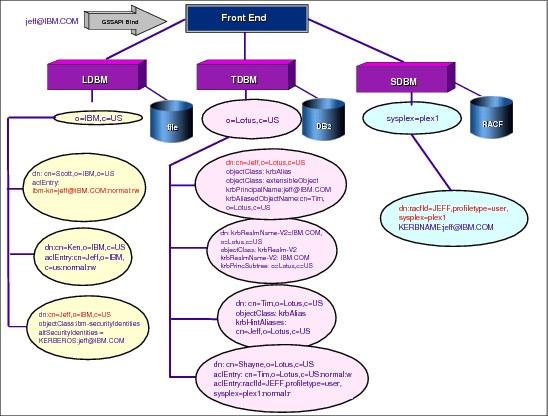
Figure 6-30 How to set up a Kerberos directory
How to set up a Kerberos directory
Assume that Kerberos support has been enabled for this server, all back ends have set krbIdentityMap to on, and the JEFF user ID has performed a kinit to acquire a Kerberos ticket before issuing the GSS API Kerberos bind.
The user Jeff with a Kerberos identity of [email protected] is performing a Kerberos GSS API bind to an LDAP server that is configured with an LDBM, a TDBM, and a SDBM back end.
During the bind process, the Kerberos identity [email protected] by default is mapped to [email protected], and this value is added to the list of DNs that is used for access control.
After default mapping is performed, each of the back ends attempt to perform identity mapping:
1. The LDBM back end first looks for the Kerberos realm object with a krbRealmName-V2=IBM.COM and does not find one. Then, the back end attempts to find the entry that contains altSecurityIdentities=KERBEROS:[email protected]. The entry with the DN cn=Jeff,o=IBM,c=US matches this criteria, and the DN is added to the alternate DN list.
2. Next, the server moves to the TDBM back end and tries to find the Kerberos realm object with a krbRealmName-V2=IBM.COM. This time, the realm object is found so all of the krbPrincSubtree values of the realm object are collected. Then, the server searches each of these subtrees (in this example, only the o=Lotus,c=US subtree) for entries that contain [email protected]. In this back end, the entry cn=Jeff,o=Lotus,c=US is found and is added to the DN list.
Next, the Jeff entry is checked for the krbAliasedObjectName attribute. There is a krbAliasedObjectName specified, so authorization of the alias needs to be performed. The alias is cn=Tim,o=Lotus,c=US so the Tim entry must be checked for the attribute krbHintAliases with a value of cn=Jeff,o=Lotus,c=US. This value does exist so the DN cn=Tim,o=Lotus,c=US is added to the access control DN list.
|
Note: If the value cn=Jeff,o=Lotus,c=US did not exist in Tim’s krbHintAliases, then Tim did not want you to alias him. So, the DN cn=Tim,o=Lotus,c=US is not added to the DN list.
|
3. Finally, the server gets to the SDBM back end and invokes a RACF API that attempts to map the Kerberos identity [email protected] to its associated RACF ID. In this example, the API returns the Jeff user ID, and the DN racfid=JEFF,profiletype=user,sysplex=plex1 is constructed and added to the list of access control DNs.
At this point, the bind has completed and the list of DNs that is used for access control is as follows:
cn=Jeff,o=IBM,c=Us
cn=Jeff,o=Lotus,c=Us
cn=Tim,o=Lotus,c=US
racfid=JEFF,profiletype=user,sysplex=plex1
Group gathering can now be performed on the entire list of DNs.
Now that [email protected] is bound to the server and the list of alternate DNs has been generated, Jeff now has authority to perform other operations as follows:
•Because [email protected] was mapped to [email protected], Jeff has read and write permission to normal data in the cn=Scott,o=IBM,c=US entry.
•The Kerberos identity [email protected] also has read and write permission to the normal data in the cn=Ken,o=IBM,c=US entry because his identity is also mapped to cn=Jeff,o=IBM,c=US.
•Modify operations are permitted on the cn=Shayne,o=IBM,c=US entry because [email protected] is also mapped to cn=Tim,o=Lotus,c=US and Tim has write access to Shayne.
•Read access is also permitted on the cn=Shayne,o=IBM,c=US entry because [email protected] is mapped to the SDBM DN racfid=JEFF,profiletype=user,sysplex=plex1 who has read permission to the cn=Shayne,o=IBM,c=US entry.
This example shows that access control is based on the combination of all the mapped DN’s access control permissions.
6.31 Access control lists
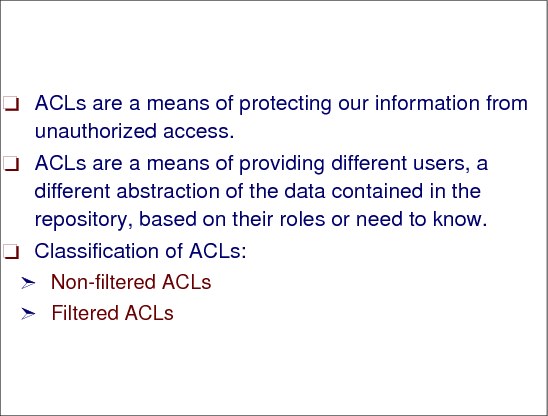
Figure 6-31 Access control lists
Access control lists
Access control of information in the LDAP server is specified by setting up access control lists (ACLs). LDBM, TDBM, and GDBM ACLs provide a means to protect information that is stored in an LDAP directory. Administrators use ACLs to restrict access to different portions of the directory, or specific directory entries. LDAP directory entries are related to each other by a hierarchical tree structure. Each directory entry (or object), contains the entry’s distinguished name, a set of attributes, and their corresponding values. When using the LDBM, TDBM, or GDBM back end, ACLs are created and managed using the ldap_add and ldap_modify APIs. ACLs can also be entered using the ldif2ds and ds2ldif utilities (TDBM load and unload, and LDBM unload only).
ACLs are represented by a set of attributes that appear to be a part of the entry. The attributes that are associated with access control, such as entryOwner, ownerPropagate, aclEntry, and aclPropagate, are unusual in that they are associated logically with each entry but can have values that depend upon other entries that are higher in the directory hierarchy. Depending upon how they are established, these attribute values can be explicit to an entry or can be inherited from an ancestor entry.
Use of LDAP’s SDBM back end allows a user to be authenticated to the directory namespace using the RACF ID and password. The RACF identity becomes associated with the user’s RACF-style distinguished name that was used on the LDAP bind operation. It is then possible to set up ACLs for entries managed by the LDBM, TDBM, or GDBM back end using RACF-style user and group DNs. This controls access to LDBM, TDBM, or GDBM database directory entries using the RACF user or group identities.
ACL model
Let us begin with looking at the ACL model. The ACL model is based on two sets of attributes:
•The entryOwner information
•The Access Control Information (ACI)
In conformance with the LDAP model, the ACI and the entryOwner information both are represented as attribute-value pairs. You use the LDIF syntax to administer these values.
entryOwner information
The entry owners have complete permissions to perform any operation on the object regardless of the aclEntry. Additionally, the entry owners are the only ones who are permitted to administer the aclEntries for that object. entryOwner is an access control subject, it can be defined as individuals, groups or roles. The attributes that define the entry ownership are as follows:
•entryOwner: Defines an entry owner
•ownerPropagate: Specifies whether the owner set is propagated to the children.
|
Note: The directory administrator and administration group members are the entry owners for all objects in the directory by default, and this entry ownership cannot be removed from any object.
|
Access control information
The ACI specifies a subject’s (user’s) permission to perform a given operation against a LDAP object. Do not confuse this with ACL. ACL is basically a cumulative set of the entry owners and the ACI.
ACI is further split, depending upon the way intended to specify the ACLs. We can specify the ACLs, whereby we specify a set of rights to the user cn=user1,o=IBM,c=US over the current object. The descendants also might be impacted depending upon the setting of the aclPropagate attribute. Such ACLs are known as non-filtered ACLs.
Alternatively, you can also specify the set of rights to the user cn=user1,o=IBM,c=US over a set of objects conforming to the filter cn=a*, which is a more generalized way of setting ACLs. Such ACLs are called filtered ACLs. It is as easy as that. Below is the classification in more detail.
Non-filtered ACLs
This type of ACL applies explicitly to the directory entry that contains them but can be propagated to none or all of its descendant entries. The default behavior of the non-filtered ACL is to propagate. The attributes that define non-filtered ACLs are:
•aclEntry: Defines a permission set
aclentry=access-id:CN=USER1,O=IBM,C=US:normal:rsc:normal:deny:w
•aclPropagate: Specifies whether the permission set is propagated to the descendant entries
aclpropagate=TRUE
Filtered ACLs
Filter based ACLs employ a search, using a specified object filter, such as cn=user* to select the directory entries to which they apply. The directory entry that contains the filter ACL serves as the base of the search. The scope of the search is subtree, which includes the entry that contains the filter, as well as, zero, one, or more of its descendant entries.
Filter-based ACLs do not propagate in the same way that non-filter-based ACLs currently do. By nature, they inherently propagate to any comparison matched objects in the associated subtree. For this reason, the aclPropagate attribute, which is used to stop propagation of non-filter ACLs, does not apply to the new filter-based ACLs.
Filter based ACLs are maintained using the following attributes:
•ibm-filterAclEntry: It is the same form as the aclEntry attribute but has an additional component called object filter.
•ibm-filterAclInherit: When set to False, it terminates ACL accumulation. Its default value is True.
|
Note: The key thing to remember in the case of filtered ACLs is that the filter that you specify is for the objects that are impacted and not the subject. This filter is often misread as the set of subjects, rather than objects.
|
Initializing ACLs with TDBM
The TDBM back end adds an ACL to the suffix entry if no aclEntry value is specified during the add of this entry (whether the add was done using ldapadd or ldif2tdbm). This improves performance of future ACL modifications made to an ACL placed on the suffix entry. The ACL that is used is:
aclEntry: cn=anybody:normal:rsc:system:rsc
aclPropagate: TRUE
Similarly, if no entry owner is specified when the suffix entry is created, entryOwner is added to the entry with a value set to the administrator DN, along with ownerPropagate TRUE.
Default ACLs with TDBM
Every entry must have an ACL. If there is no ACL explicitly specified in the entry and if no parent entry is propagating its ACL, then a default ACL is assigned to the entry. The default ACL is treated differently than a normal aclEntry value. The default value cannot be deleted. If an aclEntry value is later added to the entry, explicitly or by inheritance, the entire default aclEntry value is replaced. The LDAP server sets the value of the aclSource attribute to default when the entry is using the default ACL. The default ACL is:
aclEntry:access-id:CN=ADMIN:normal:rwsc:sensitive:rwsc:critical:rwsc:restricted:rwsc:system: rwsc
aclEntry: group:CN=ANYBODY:normal:rsc:system:rsc
aclEntry: group:CN=AUTHENTICATED:normal:rsc:system:rsc
Similarly, every entry must have an entry owner. If none is specified or inherited, a default entryOwner value set to the administrator DN is assigned to the entry. The default value cannot be deleted. If an entryOwner value is later added to the entry, explicitly or by inheritance, the entire default entryOwner value is replaced. The LDAP server sets the value of the ownerSource attribute to default when the entry is using the default owner.
Initializing ACLs with GDBM
When the LDAP sever is started with GDBM configured for the first time, the LDAP server creates the change log suffix entry, cn=changelog. The suffix entry is created with an aclEntry and entryOwner value that allows access only to the LDAP administrator and propagates the aclEntry and entryOwner values. The aclEntry and entryOwner values in the suffix can be modified, but these attributes cannot be entirely removed from the suffix entry and they cannot be changed to be non-propagating. In other words, the change log suffix entry always contains propagating aclEntry and entryOwner values. If desired, different ACL values can be placed on specific change log entries to override the inherited values from the change log suffix entry.
6.32 Access evaluation
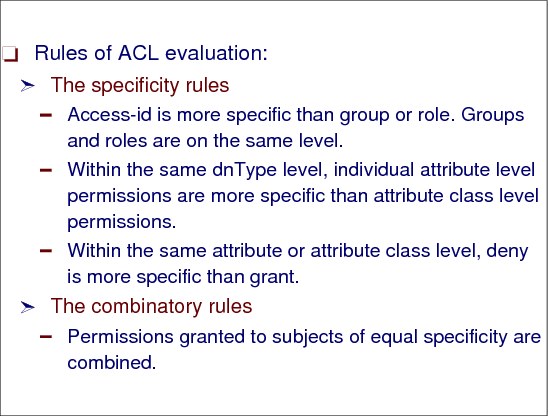
Figure 6-32 Access evaluation
Access evaluation
Access for a particular operation is granted or denied based on the subject’s bind DN for that operation on the target object. Processing stops as soon as access can be determined.
The checks for access are done by first determining the entry ownership and then evaluating the object’s Access Control Information (ACI) values.
Filter-based ACLs accumulate from the lowest containing entry, upward along the ancestor entry chain, to the highest containing entry in the DIT. The effective access is calculated as the union of the access rights granted, or denied, by the constituent ancestor entries. The existing set of specificity and combinatory rules are used to evaluate effective access for filter based ACLs.
Filter-based and non-filter-based attributes are mutually exclusive within a single containing directory entry. Placing both types of attributes into the same entry is not allowed, and is a constraint violation. Operations that are associated with the creation of, or updates to, a directory entry fail if this condition is detected.
When calculating effective access, the first ACL type to be detected in the ancestor chain of the target object entry sets the mode of calculation. In filter-based mode, non-filter-based ACLs are ignored in effective access calculation. Likewise, in non-filter-based mode, filter-based ACLs are ignored in effective access calculation.
To limit the accumulation of filter-based ACLs in the calculation of effective access, an ibm-filterAclInherit attribute set to a value of FALSE can be placed in any entry between the highest and lowest occurrence of ibm-filterAclEntry in a given subtree. This causes the subset of ibm-filterAclEntry attributes above it in the target object’s ancestor chain to be ignored. The resulting access resolves to the default filter ACL value.
By default, the directory administrator, administration group members, and the master server (or peer server for replication, that is, ibm-slapdMasterDN) get full access rights to all objects in the directory except write access to system attributes. Other entry owners get full access rights to the objects under their ownership except write access to system attributes. By default all users have read access rights to normal, system, and restricted attributes. If the requesting subject has entry ownership, access is determined by the above default settings and access processing stops.
If the requesting subject is not an entryOwner, then the ACI values for the object entries are checked. The access rights as defined in the ACLs for the target object are calculated by the specificity and combinatory rules.
Specificity rule
The most specific aclEntry definitions are ones that are used in the evaluation of permissions that are granted or denied to a user. The levels of specificity are:
•The access-id is more specific than group or role. Groups and roles are on the same level.
•Within the same dnType level, individual attribute level permissions are more specific than attribute class level permissions.
•Within the same attribute or attribute class level, deny is more specific than grant.
For example, if a defined ACI entry contains an access-id subject DN that matches the bind DN, then the permissions are first evaluated based on that aclEntry. Under the same subject DN, if matching attribute level permissions are defined, they supersede any permissions defined under the attribute classes. Under the same attribute or attribute class level definition, if conflicting permissions are present, denied permissions override granted permissions.
Combinatory rule
Permissions granted to subjects of equal specificity are combined. If the access cannot be determined within the same specificity level, the access definitions of lesser specific level are used. If the access is not determined after all defined ACIs are applied, the access is denied.
For example, consider the following two cases of ACIs defined on cn=user1,o=IBM,c=US:
•Case 1:
access-id: cn=this: at.attribute1:grant:rws
access-id: cn=user1,o=IBM,c=US:at.attribute1:grant:rs:at.attribute1:deny:w
In this example, the (w)rite permission on attribute1 is denied to the user cn=user1,o=IBM,c=US because access cannot be explicitly determined.
•Case 2:
(cn=user1,o=IBM,c=US belongs to group cn=group1)
access-id: cn=this: at.attribute1:grant:rws
access-id: cn=user1,o=IBM,c=US:at.attribute1:grant:rs:at.attribute1:deny:w
group:cn=group1:at.attribute1:grant:w
In this case, after failing to determine access at the specificity level of access-id, the access definitions of lesser specific levels (group) is determined. Because the group has write permissions on attribute1, write permission will be granted to cn=user1,o=IBM,c=US.
6.33 Managing ACLs
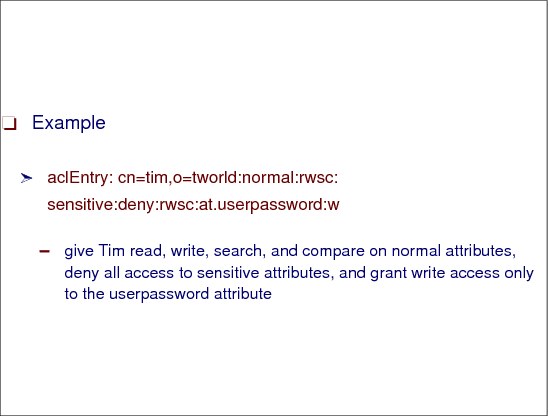
Figure 6-33 Managing ACLS
Adding ACIs and entry owners
This example shows how to add an entryOwner(cn=owner,o=IBM,c=US) for a given entry (cn=person1,o=IBM,c=US). Create an LDIF file (acl.ldif) with the following contents:
dn: cn=person1,o=IBM,c=US
objectclass: person
cn: person1
sn: person1
entryowner: access-id:cn=owner,o=IBM,c=US
ownerPropagate: True
Then, add the this LDIF file using the following syntax:
# ldapadd -D <admin dn> -w <admin password> -f acl.ldif
In a similar manner, you can add a group or role as an entry owner. The example is for an (access-id) as the entry owner. The other examples that we show in this section follow a similar method for the additions.
The next example shows how an access ID cn=Person 1, o=IBM,c=US is given permissions to read, search, and compare the attribute attribute1. The permissions apply to any node in the entire subtree that is at or below the node containing this ACI, that matches the (objectclass=groupOfNames) comparison filter. The accumulation of matching ibm-filterAclEntry attributes in any ancestor nodes has been terminated at this entry by using our ceiling attribute. That attribute is the ibm-filterAclInherit attribute. It is been set to FALSE.
dn: cn=person1,o=IBM,c=US
objectclass: person
cn: person1
sn: person1
ibm-filterAclEntry:
access-id:cn=Person1,o=IBM,c=US:(objectclass=groupOfNames):at.attribute1:grant:rsc
ibm-filterAclInherit: false
The next example shows how a role cn=System Admins,o=IBM,c=US is given permissions to add objects below the node o=IBM,c=US, and read, search, and compare attribute attribute2 and the (critical) attribute class. The permission applies only to the node containing this ACI. This is achieved by setting the aclPropagate attribute to FALSE.
dn: o=IBM,c=US
objectlass: organization
o: ibm
aclEntry: role:cn=System
Admins,o=IBM:object:grant:a:at.attribute2:grant:rsc:critical:grant:rsc
aclPropagate: false
Modifying ACI and entryOwner values
Similar to other attributes, you can modify the ACL attributes (except the system attributes) using ldapmodify using the following general syntax:
dn: some entry
changetype: modify
<action>: <acl-attribute>
<acl-attribute>: <value>
Where:
• action is one of the following values:
– replace: If the attribute value does not exist, create the value. If the attribute value exists, replace the value.
– add: If the ACI or entryOwner does not exist, the ACI or entryOwner with the specific values is created. If the ACI or entryOwner exists, then add the specified values to the given ACI or entryOwner.
– delete: Deletes an ACL entry with a given value.
•acl-attribute is one of entryOwner, ownerPropagate, aclEntry, aclPropagate, ibm-filterAclEntry, or ibm-filterAclInherit.
•value is the value of the given attribute.
For example, consider any entry cn=person1,o=IBM,c=US with the following ACL definition:
aclentry=access-id:CN=ABC:object:deny:d:object:a
aclentry=access-id:CN=P1,O=IBM,C=US:normal:rwsc:object:a
To remove the ACL entry cn=ABC, the syntax of ldapmodify is as follows:
ldapmodify -D <admindn> -w <adminpw>
dn: ou=person1,o=IBM,c=US
changetype: modify
delete: aclentry
aclentry: access-id:CN=ABC:object:deny:d:object:a
|
Note: You can put the four lines after the line of ldapmodify in this example in an LDIF file and pass the file to ldapmodify using the -f option. Remember that ldapmodify and ldapadd ultimately function as the same utility.
|
After the command in the example above, only the second aclEntry remains as follows:
aclentry=access-id:CN=P1,O=IBM,C=US:normal:rwsc:object:a
In this ldapmodify operation, the value of ACL entry to be removed is given as:
ldapmodify -D <admindn> -w <adminpw>
dn: ou=person1,o=IBM,c=US
changetype: modify
delete: aclentry
aclentry: access-id:CN=ABC:object:deny:d
|
Note: We have not given the object add (object:a) permission in the aclEntry value.
|
In such a scenario, both the ACL entries remain, but the deny permissions on object delete (object:deny:d) is removed from the first ACL entry. The value of the delete entry in the ACL entry is changed from deny to unspecified.
Searching ACI and entryOwner values
Suppose that we have an entry ou=payroll,o=IBM,c=US, and we want to see all the information that pertains to ACLs for that entry. We use the following commands to accomplish this task:
E:>ldapsearch -D <admin dn> -w <admin pw> -b ou=payroll,o=IBM,c=US
objectclass=* aclEntry aclPropagate entryOwner ibm-filterAclEntry
ibm-filterAclInherit ownerPropagate
ou=payroll,o=IBM,c=US
ownerPropagate=TRUE
aclPropagate=FALSE
entryOwner=access-id:CN=ROOT
aclEntry=access-id:CN=USER1,O=IBM,C=US:system:deny:rsc:critical:deny:rwsc:sensi
tive:deny:rwsc:normal:rwsc:restricted:deny:rwsc
cn=accountant,ou=payroll,o=IBM,c=US
ownerPropagate=TRUE
aclPropagate=TRUE
entryOwner=access-id:CN=ROOT
aclEntry=access-id:CN=USER1,O=IBM,C=US:object:ad:normal:r
In this example, two entries are returned with the ACL showing that these are non-filtered ACLs.
We run the same search against an entry with filtered ACLs as follows:
E:>ldapsearch -D cn=root -w root -b ou=hr,o=IBM,c=US objectclass=* aclEntry
aclPropagate entryOwner ibm-filterAclEntry ibm-filterAclInherit ownerPropagate
ou=hr,o=IBM,c=US
ownerPropagate=TRUE
ibm-filterAclInherit=TRUE
entryOwner=access-id:CN=ROOT
ibm-filterAclEntry=access-id:CN=USER1,O=IBM,C=US:(uid=*):object:deny:ad:normal:
rwsc
6.34 Running the LDAP server in z/OS
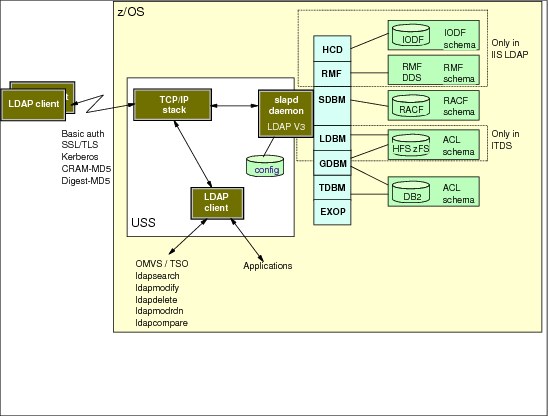
Figure 6-34 Running the LDAP server in z/OS
Setting up the PDSE for the LDAP server DLLs
The LDAP server searches for and loads a number of DLLs during its startup processing. All DLLs for the LDAP server are shipped in PDSE format only. For these DLLs to be located by the LDAP server at runtime, the PDS that contains these DLLs (SYS1.SIEALNKE) must either be in the LINKLIST (the default installation), referenced in a STEPLIB DD card if the LDAP server is started from JCL, or listed in the STEPLIB environment variable if the LDAP server is started from the z/OS UNIX System Services command prompt. You can use any of these methods, and the best method depends upon the way that you will most often be running the LDAP server. If you put SYS1.SIEALNKE in LINKLIST, STEPLIB is not necessary.
The LDAP server also depends on the SCEERUN and SCEERUN2 data sets. Add these to your LINKLIST or, if that is not possible, add it to STEPLIB.
Setting up and running the LDAP server as a started task
To run the LDAP server as a started task, you must define the started task for the LDAP server and then you can run the LDAP server using JCL.
Defining the started task for the LDAP server
After you create the LDAPSRV user ID, you must define the LDAPSRV started task. The examples and the sample startup procedure use the name LDAPSRV for this task, but you can use any name for it.
To define the started task for the user ID you just created, use the following RACF commands.
RDEFINE STARTED DSSRV.** STDATA(USER(LDAPSRV))
SETROPTS RACLIST(STARTED) REFRESH
Running the LDAP server using the sample JCL
The JCL that is needed to run the LDAP server as a started task is provided with the product as a procedure. This JCL can be found in GLDHLQ.SGLDSAMP on the system where the LDAP server is installed. If you have a ServerPac installation, GLDHLQ will be GLD. This JCL procedure can be started in the System Display and Search Facility (SDSF) or from the operator’s console, after the sample JCL has been placed into the installation-specific library for procedures. This JCL must be tailored before it can be run.
To start the LDAP server in SDSF, enter:
/s dssrv
To start the LDAP server from the operator’s console, enter:
s dssrv
Running the LDAP server using data sets
The LDAP server, when run as a started task, accepts several of its files as data sets. Data set versions of the configuration files and envvars file are not shipped with the LDAP server, but can be created using the OGET command to copy the HFS versions of the files into data sets.
The default data set characteristics for record format and record length (V 255) which OGET will use when creating a new data set are not acceptable for JCL when submitting for batch processing. In order to avoid this, allocate the MYUSER.DSNTIJCL sequential data set to be fixed block 80 prior to performing the OGET operation.
A data set version of the DSNAOINI file needed for the TDBM back end can be created by copying and editing the default file provided by DB2. The DSNAOINI file can be specified either in the configuration file or in a DSNAOINI DD statement, or a DSNAOINI environment variable can be used. The DD statement takes precedence.
|
Note: Be sure to turn off the use of sequence numbers when editing this data set.
|
When the data set versions of these files are available, they can be specified in the LDAPSRV procedure. The configuration file can be specified using the CONFIG DD statement, the envvars file can be specified using the ENVVAR DD statement, and the DSNAOINI file can be specified using the DSNAOINI DD statement.
|
Note: Using the LDAP configuration utility (ldapcnf or dsconfig) to configure your server creates all the necessary files in a partitioned data set.
|
Verifying the LDAP server
|
Note: You can use any LDAP client to verify the LDAP server.
|
The following examples show how to verify the LDAP server using the ldapsearch tool:
•Verifying LDBM and TDBM
In this example, substitute the suffix value from your configuration file for the -b parameter. You can run the command multiple times to verify that each suffix is defined in the configuration file.
ldapsearch -h 127.0.0.1 -s base -b "o=Your Company" "objectclass=*"
The LDAP search returns the message No such object if the suffix entries are not loaded into the directory.
•Verifying SDBM
For SDBM, you must bind with a valid RACF-style DN to perform the search. Substitute a RACF ID of your choice in the racfid portion of the DN on the -D and the -b parameters in this example. Also, substitute your SDBM suffix in the DN on the -D and -b parameters. The RACF password for the user ID used in the -D parameter must be specified in the -w parameter.
ldapsearch -h 127.0.0.1 -D racfid=IBMUSER,profiletype=user,cn=myRacf
-w password_for_IBMUSER -b racfid=IBMUSER,profiletype=user,cn=myRacf "objectclass=*"
•Verifying GDBM
For GDBM, you must bind with the LDAP administrator DN or another DN authorized to search the change log as follows:
ldapsearch -h 127.0.0.1 -D bindDn -w bindPw -s base -b cn=changelog "objectclass=*"
The previous ldapsearch examples assume a default port of 389. If your port is not 389, use the -p parameter to specify the correct port.
Be sure to substitute the correct TCP/IP host name or TCP/IP address for the 127.0.0.1 after the -h parameter. The -b parameter specifies the starting point for the search. The use of the quotation marks around the filter prevents the asterisk (*) from being interpreted by the shell.
Note that you can verify the LDAP server from TSO as well by substituting LDAPSRCH for ldapsearch.
6.35 Referrals and replication

Figure 6-35 Referrals and replication
Replication
After the z/OS LDAP server is installed and configured, users can access the directory, add objects, delete objects, or perform search operations to retrieve particular sets of information.
Replication is a process that keeps multiple databases in synchronization. Through replication, a change made to one database is propagated to one or more additional databases. In effect, a change to one database shows up on multiple different databases.
There are several benefits realized through replication. The single greatest benefit is providing a means of faster searches. Instead of having all search requests directed at a single server, the search requests can be spread among several different servers. This improves the response time for the request completion.
Additionally, the replica provides a backup to the replicating server. Even if the replicating server crashes, or is unreadable, the replica still fulfills search requests and provides access to the data.
There are two types of replication:
•In peer-to-peer replication, each LDAP peer server is a read-write server. Updates processed on one peer server are replicated to all the other peer servers. Peer servers are read-write to all users.
•In read-only replication, a single read-write LDAP server (the master) replicates the updates it processes to a set of read-only replica servers.
– Master: All changes to the database are made to the master server. The master server is then responsible for propagating the changes to all other databases. It is important to note that while there can be multiple databases representing the same information, only one of those databases can be the master.
– Read-only replica: Each of the additional servers which contain a database replica. These replica databases are identical to the master database. These servers are read-only to all users and will only accept updates from their master server.
|
Note: The z/OS support for peer-to-peer replication is provided for failover support purposes. There is no support for resolving conflicting simultaneous updates on multiple peer servers, which can cause a failure of replication. As a result, you need to target updates to one peer server at a time.
|
A replication network can contain both peer replica servers and read-only replica servers. In this case, each peer server must act as a master to each read-only replica (in addition to being a peer to all the peer servers), so that updates that occur on any peer server are replicated to all the other peer and read-only replicas in the network.
Replication is only supported when the servers involved are running in single-server mode. Although replication is not supported when operating multiple concurrent server instances against the same database (multi-server operating mode), similar benefits are afforded when operating in this mode.
Replicating server
For the replication process to occur, the following tasks must happen:
•The replicating server (master or peer) must be aware of each replica that is to receive the change information.
•Each read-only replica must be aware of the replicating server for the database that it serves.
The replicating server becomes aware of the existence of the replica servers when objects (entries) of type replicaObject are added to the directory. Each of these objects represents a particular replica server. The attribute/value pairs within the replica object provide the information the replicating server needs in order to find the replica server and send any updates to that server.
|
Note: The replicaObject object class is provided in the system schema file schema.user.ldif.
|
Adding replica objects in TDBM
In TDBM, replica objects can be placed anywhere within the directory tree. This also implies that the suffix cn=localhost can be removed from the LDAP server configuration file. Placing replica objects in the directory tree then requires that any parent entries of the replicaObject entry is added to the directory prior to adding the replicaObject entry. These entries must be added to both the replicating server and replica server before addition of the replicaObject. This is needed on the replica server because these entries are being added at the replicating server without replication being active. If a replica object is not placed as a leaf node in the directory tree, the only entries allowed below the replica object are other replica objects. The LDAP server will allow non-replica entries to be placed below replica entries; however, these entries will not be replicated to the replica servers. The following example shows a replica object definition using LDIF format:
dn: cn=myReplica,o=YourCompany
objectclass: replicaObject
cn: myReplica
replicaHost: myMachine.ibm.com
replicaBindDn: cn=Master
replicaCredentials: secret
replicaPort: 400
replicaUseSSL: FALSE
description: "Replica machine in the fourth floor lab"
Replica server
Initialization, or population, of a replica database requires several steps.
|
Special Note: If the replicating server is configured with TDBM, changes to the schema entry on the replicating server are not replicated. The schema on the replica must be modified by a user bound as the masterServerDN or peerServerDN. A separate update of the replica schema is required each time the schema is updated on the replicating server.
If you are modifying the schema on a TDBM read-only replica and are not bound as the masterServerDN, the masterServer configuration option causes the modification to be redirected to the replicating server, which causes the schema on the replica and replicating servers to be out of synchronization. No error message occurs.
|
To populate a replica, follow these steps:
1. Stop the LDAP replicating server.
2. Unload the replicating server’s directory contents if there are any entries. For TDBM, use the tdbm2ldif utility.
3. Make sure the schema for the replica server is the same as the schema for the replicating server. If the replica and replicating server are both z/OS servers configured with TDBM, the schema can be unloaded from the replicating server using tdbm2ldif and reloaded into the replica using either the ldif2tdbm -s option or ldapmodify with the replica server started.
4. Run a load utility with a single added directory entry which defines a replicaObject entry into the replicating server’s directory contents. For TDBM, use either the ldif2tdbm utility or ldapadd with the replicating server running.
|
Note: To load the replicaObject entry, you must also load any parent entries in the directory hierarchy in hierarchy order.
|
5. If the replicating server does not contain any entries, no further action must be taken to ensure that the replica and replicating server are in synchronization and the replicating server can now be restarted; otherwise, continue to the next step.
6. Transport the LDIF file created in step 2 to the replica server’s location.
7. Run a load utility on the replica server using the LDIF file from step 6. For TDBM, stop the replica server if it is running and use ldif2tdbm.
8. Configure the replica.
9. Start the replica server. If this is a peer server, ensure that it does not contain a replica object that defines this server as a replica of itself.
10. Start the replicating server.
Configuring the replica
The key to a successful replica configuration rests in ensuring that the values in the replicaObject on the replicating server (master or peer) accurately represent the relevant values on the replica server (read-only or peer). Configuring the replica involves specifying appropriate configuration file option values to identify:
•The IP address and port on which the replica server should listen for communication from the replicating server.
•The type of connection expected by the replicating server when it communicates to the replica server, either over a non-secure or secure connection.
•The DN and password used by the replicating server.
|
Note: The ldif2tdbm utility does not replicate changes when adding entries to the replicating server. So, if you are using ldif2tdbm to add entries to a replicating server you must also use it to add entries to each replica, with no intervening updates on the replicating server before the replica is loaded.
|
Referrals
Referrals provide a way for servers to refer clients to additional directory servers. With referrals you can:
•Distribute namespace information among multiple servers
•Provide knowledge of where data resides within a set of interrelated servers
•Route client requests to the appropriate server
Following are some of the advantages of using referrals:
•Distribute processing overhead, providing primitive load balancing
•Distribute administration of data along organizational boundaries
•Provide potential for widespread interconnection, beyond an organization’s own boundaries.
In z/OS LDAP, referral entries are only supported in the TDBM (DB2-based) back end. The default referral can be used with any type of back end.
Using the referral object class and the ref attribute
The referral object class and the ref attribute are used to facilitate distributed name resolution or to search across multiple servers. The ref attribute appears in an entry named in the referencing server. The value of the ref attribute points to the corresponding entry maintained in the referenced server. While the distinguished name (DN) in a value of the ref attribute is typically that of an entry in a naming context below the naming context held by the referencing server, it is permitted to be the distinguished name of any entry. A multi-valued ref attribute can be used to indicate different locations for the same resource. If the ref attribute is multi-valued, all the DNs in the values of the ref attribute should have the same value.
The recommended setup of referrals is to structure the servers into a hierarchy based on the subtrees they manage. Then, provide “forward” referrals from servers that hold higher information and set the default referral to point back to its parent server.
Associating servers with referrals
To associate servers through referrals:
•Use referral objects to point to other servers for subordinate references.
•Define the default referral to point somewhere else, typically to the parent server.
Pointing to other servers
You can use referral objects to point to the other servers for subordinate references (that is, portions of the namespace below this server that the server does not service directly). Referral objects, similar to other objects, go in the TDBM back end. Table 6-2 lists referral objects.
Table 6-2 Referral objects
|
Objects
|
Specification
|
|
dn
|
Specifies the distinguished name. It is the portion of the namespace served by the referenced server.
|
|
objectclass
|
Specifies referral. For entries in TDBM, also include the object class extensibleObject.
|
|
ref
|
Specifies the LDAP URL of the server. This URL should consist of the ldap:// or ldaps:// identifier, the hostname:port, and a DN. The DN requires a slash (/) before it to delimit it from the hostname:port, and should match the DN of the referral object. The ref attribute can be multi-valued, with each value specifying the LDAP URL of a different server. When multiple values are used, each LDAP URL should contain the same DN, and each server should hold equivalent information for the portion of the namespace represented by the DN.
|
Example 6-5 shows a sample definition of a referral object.
Example 6-5 Sample referral object
dn: o=IBM,c=US
objectclass: referral
objectclass: extensibleObject
ref: ldap://Host1:389/o=IBM,c=US
ref: ldap://Host2:389/o=IBM,c=US
ref: ldap://Host3:1389/o=IBM,c=US
The server can have any number of referral objects within its database. However, the objects must essentially be descendents of its suffix.
Defining the default referral
Define the default referral to point to another server which services other portions of the namespace unknown to the referencing server. The default referral can be used to point to:
•The immediate parent of this server (in a hierarchy)
•A “more knowledgeable” server, such as the uppermost server in the hierarchy
•A “more knowledgeable” server which possibly serves a disjoint portion of the namespace
The default referral goes in the configuration file and not the back end. The default referral is described in the configuration file with the referral keyword and an LDAP URL. Multiple default referrals can be specified. However, each one specified is considered equivalent; that is, each server referenced by a default referral should present the same view of the namespace to its clients.
The default referral LDAP URL does not include the DN portion. It needs just the ldap:// identifier and the hostname:port. For example:
referral ldap://host3.ibm.com:999
|
SSL/TLS note: A non-secure client referral to a secure port is not supported. Also, a secure client referral to a non-secure port is not supported.
|
6.36 LDAP change logging
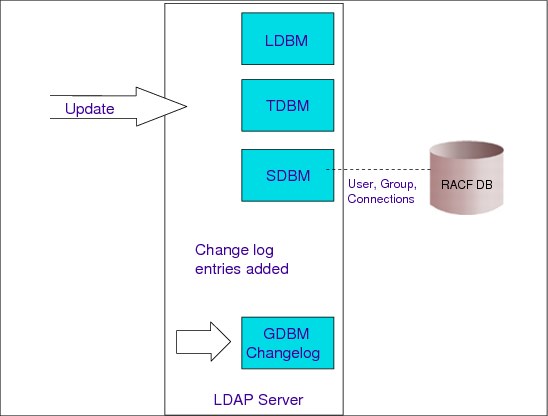
Figure 6-36 LDAP change logging
LDAP change logging
The change log is a set of entries in the directory that contain information about changes to objects. Depending on configuration options, information about a change to a TDBM or LDBM entry, to the LDAP server schema entry (cn=schema), or to an object controlled by an application (for example, a RACF user, group, or user-group connection profile) can be saved in a change log entry.
You can use an LDAP search operation to retrieve change log entries to obtain information about what changes have taken place. Each LDAP server contains one change log. The change log entries are created in the same order as the changes are made and each change log entry is identified by a change number value, beginning with 1, that is incremented each time a change number is assigned to a change log entry. Therefore, the change number of a new change log entry is always greater than all the change numbers in the existing change log entries.
The change log is implemented in the GDBM back end. The change log uses a hard-coded suffix, cn=changelog. This suffix is a semi-reserved name. When the GDBM back end is configured, the change log root (cn=changelog) must not overlap any suffix in any TDBM, SDBM, or LDBM back end, and the change log suffix cannot be the source or target of a rename operation. If GDBM is not configured, the user can use cn=changelog as a normal suffix in a TDBM, SDBM, or LDBM back end. However, we do not recommend this method because you will have to rename that suffix to avoid an overlap if GDBM is configured in the future. Change logging is enabled by configuring GDBM in the LDAP server configuration file. Change log processing is controlled by configuration options in the GDBM back end.
The changeLoggingParticipant configuration option can be used to specify if an LDBM or TDBM back end wants change log entries to be created for changes to entries in the LDBM or TDBM back end. Similarly, the configuration option can be specified in the GDBM back end to determine if a change log entry should be created for a change to the LDAP server schema. If the option is not specified for a TDBM, LDBM, or GDBM back end, the default is to create change log entries for changes to that TDBM or LDBM back end or to the LDAP server schema. If the GDBM back end is configured and the cn=changelog root entry does not exist in the GDBM back end when the server is started, the LDAP server generates the root entry. The root entry is created with an ACL that allows only the administrator to access the change log. The ACL is propagated to the change log entries. The user needs to use an LDAP modify operation to change this ACL to an appropriate ACL for his usage of the change log.
Configuring the GDBM back end
You can use the LDAP configuration utility, dsconfig, to configure GDBM.
The GDBM back end is configured in one of two ways: DB2-based (such as TDBM) or file-based (such as LDBM). In either configuration:
1. There can be at most one GDBM back end in the configuration file.
2. The suffix option cannot be specified in the GDBM back end.
3. If the changeLoggingParticipant option is specified, it controls whether a change log entry is created for a change to the LDAP server schema. Change log entries are never created for any changes to GDBM entries, including the suffix entry.
Configuring a DB2-based GDBM back end
When using DB2 to store its entries, the GDBM database is identical to a TDBM database and is created in the same way using the same SPUFI script. A DB2-based GDBM back end cannot share a database with a TDBM back end. Similar to TDBM, a DB2-based GDBM back end cannot run in 64-bit mode.
Configuring a file-based GDBM back end
When using files to store its entries, the GDBM database is identical to an LDBM database and is created in the same way. Similar to LDBM, a file-based GDBM back end can run in 64-bit mode.
Additional required configuration
Additional configuration is required for RACF to be able to log changes to a RACF user, group, or connection:
•The SDBM back end must be configured. The SDBM suffix is needed to create a DN for the change log entry for a modification to a RACF user, group, or connection. SDBM is also needed to retrieve the RACF user’s new password or other changed fields.
•Program Callable support must be enabled in the LDAP server containing the change log. To do this, add the following option to either the global section of the configuration file or use the following command used to start the LDAP server:
listen ldap://:pc
..................Content has been hidden....................
You can't read the all page of ebook, please click here login for view all page.