


Digital certificates and PKI
This chapter discusses the Security Server Public Key Infrastructure (PKI) Services. We discuss the following topics:
•Overview of digital certificates
•PKIX standards
•z/OS PKI Services
3.1 The authentication problem

Figure 3-1 Authentication
Authentication
Authentication is one of the primary requirements to establish trust in e-business transactions. The industry is looking for strong authentication and for standardization of the authentication mechanisms. Strong authentication uses cryptography. Two prevalently mechanisms exist today for strong authentication in a distributed environment. They differ by the kind of cryptographic algorithms that they use, which is also their domain of application.
In this chapter, we explain digital certificates, which have a potentially unlimited scalability but which need a PKI in place.
Cryptography
Security in communications over a non-secure network requires the use of cryptographic procedures. If you send data in the clear over a network that is not completely under your control from the receiver to the sender, you cannot assure the following security functions:
•Privacy: Anyone who is able to intercept your data might be able to read it.
•Integrity: An intermediary might be able to alter your data.
•Accountability or non-repudiation: It might be impossible to determine the originator of a message with confidence, and the person who sent the message can disclaim being the originator.
Security functions such as Identification and Authentication are also impacted because if authentication data such as passwords are sent without integrity and privacy, they can be intercepted in transit between sender and receiver, making the authentication compromised and worthless.
To ensure privacy, integrity, and accountability in non-secure networks, cryptographic procedures need to be used.
Symmetric encryption algorithms
An encryption algorithm is called symmetric because the same key that is used to encrypt the data is also used to decrypt the data and to recover the plain text. The cipher and decipher processes are usually mathematically complex non-linear permutations.
Most symmetric ciphers that are used are block ciphers, which operate on a fixed number of characters at a time.
With these ciphers, it can be assumed that a brute-force attack is the only means of breaking the cipher. Therefore, the work factor depends on the length of the key. If the key length is n bits, the work factor is proportional to 2**(n-1).
Asymmetric encryption algorithms
An encryption algorithm is called asymmetric because the key that is used to encrypt the data cannot be used to decrypt the data. A different key is needed to recover the plain text. This key pair is called a public key and a private key. If the public key is used to encrypt the data, the private key must be used to recover the plain text. If data is encrypted with the private key, it can only be decrypted with the public key.
Asymmetric encryption algorithms, commonly called Public Key Cryptosystems (PKCS), are based on mathematical algorithms. The basic idea is to find a mathematical problem that is very hard to solve.
Digital signatures
Digital signatures are an extension to data integrity. While data integrity only ensures that the data received is identical to the data sent, digital signatures go a step further. Digital signatures provide non-repudiation, which means that the sender of a message (or the signer of a document) cannot deny authorship, similar to signatures on paper.
Digital certificates
The application of public-key technology requires the user of a public key to be confident that the public key belongs to the correct remote person or system with which an encryption or digital signature mechanism is used. This confidence is obtained through the use of public-key certificates. A digital certificate is analogous to a passport—the passport certifies the bearer’s identity, address and citizenship. The concepts behind passports and other identification documents, such as drivers licenses, are very similar to those that are used for digital certificates.
Identification documents are issued by a trusted authority, such as the Government passport office or a Department of Motor Vehicles. A passport is not issued unless the person who requests it can prove identity and citizenship to the authority. Specialized equipment is used in the creation of passports to make it very difficult to alter the information in it or to forge a passport altogether. Other authorities, for example the border police in other countries, can verify a passport’s authenticity. If they trust the authority that issued the document, the information contained in it is accepted as true.
A digital certificate serves two purposes:
•It establishes the owner’s identity
•It makes the owner’s public key available
Similar to a passport, a certificate must be issued by a trusted authority, a Certification Authority (CA) and, similar to a passport, it is issued only for a limited time. When its expiration date has passed, it must be replaced.
The digital signature of the certification authority serves the same purpose as the special measures taken for the security of passports, such as laminating pages with plastic material, which allows others to verify the authenticity of the certificate. Using the public key of the certification authority, the MIC can be decrypted. The message digest can be recreated. if it is identical to the decrypted MIC, the certificate is authentic.
Trust is a very important concept in passports as well as in digital certificates. In the same way as, for example, a passport that is issued by some governments, even if recognized to be authentic, might not be trusted by U.S. authorities, so each organization or user has to determine which certification authorities can be accepted as trustworthy.
3.2 Overview of digital certificate
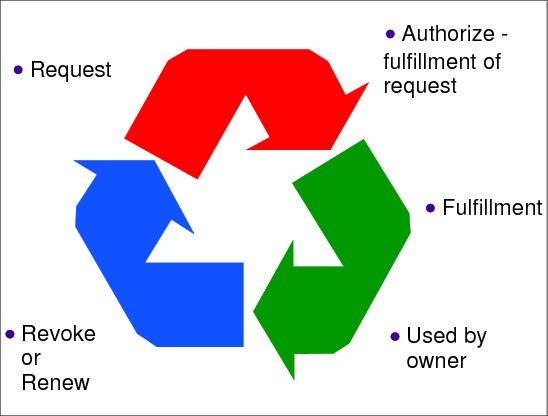
Figure 3-2 Overview of digital certificate
When compared to other known means of strong authentication, digital certificates (and the underlying public key cryptography algorithm) appear to be probably the best solution to the current authentication and encryption problem involving a very large population of users over a non-secure network such as the Internet.
However, the use of digital certificates, over the Internet or in an intranet environment, requires a supporting Public Key Infrastructure (PKI), which is the set of services, tools, and policies that enable the use of public key cryptography and management of keys and certificates in a PKI domain. The certificates and the associated key pairs are expected to have a life cycle as described in Example 3-2 on page 146.
Life cycle stages of a digital certificate
The life cycle stages of a digital certificate are as follows:
1. Request phase
First there is the generation of an asymmetric algorithm key pair. Usually, this generation is performed locally by the entity that requests the certificate, although some PKI implementations can perform the key generation on behalf of the certificate requestor. In that case, the PKI has to be able to deliver the generated private key securely to the certificate’s owner.
The generation of a certificate request usually contains the following elements, which are signed by the requestor’s private key as a proof of origin of the certificate request:
– The distinct name of the requestor
– The value of the public key
– Miscellaneous additional fields
2. Authorize fulfillment of request and fulfillment phases
Generation and signature of the certificate itself by a CA. The CA, which can be assisted by a Registration Authority (RA) in charge of verifying the validity and integrity of the certificate request and approving it, is the pivotal entity in a PKI. The CA is in charge of digitally signing the certificate (that is, vouching for the binding of the public key value to the name of the certificate’s owner), thus making the certificate usable for strong authentication or other cryptographic processes. Strictly speaking, the RA provides for the Authorize fulfillment of request phase, and the CA performs the Fulfillment.
These two phases heavily engage the responsibility, and in many cases the liability, of the CA, which is to use the proper administrative procedures and highly secure technologies to ensure the integrity of its digital signature and of the signed contents.
Note that a certificate, as delivered by a CA, is granted a validity period determined by the CA policy. Usually, a user certificate is valid for one year.
3. Used by owner phase
The certificate can now be used by the owner for the purpose of authentication, which works as long as the requestor can demonstrate possession of the corresponding private key or any other cryptographic process where the value of one’s public key is required. Note that the recipient of a certificate must have the public key of the CA that signed this certificate.
This public key itself is delivered in a CA’s certificate because, by the PKI principle, a CA is the only entity delivering certificates in a PKI domain.
4. Revocation or renewal phase
The validity of a certificate can be denied in two ways:
– The validity period of the certificate is over
– The certificate is part of a Certificate Revocation List (CRL), which is issued by the CA that initially issued the certificate, usually on request from the certificate’s owner
The owner can request the revocation of a certificate for many reasons, including:
– Change of name of the owner
– Change of association between the owner and the CA (for example, when an employee leaves a company that is its own CA)
– Compromise or suspected compromise of the corresponding private key
The entity receiving a certificate checks for its expiration based on the receiver’s local time and date. Verifying that a certificate is not part of a Certificate Revocation List requires the receiving entity to fetch the CRL from its repository, which usually is an LDAP directory (although some PKI implementations provide access to a CRL through the HTTP protocol). A certificate becomes part of a CRL at the completion of the Revocation phase.
During its normal life cycle, a certificate is set to expire after a certain validity period that is indicated in the certificate at its creation. The supporting PKI must then provide a way to renew the certificate, keeping the same certificate but with a new validity period and a new certificate serial number. This is the renewal phase.
3.3 The public key cryptography trust model
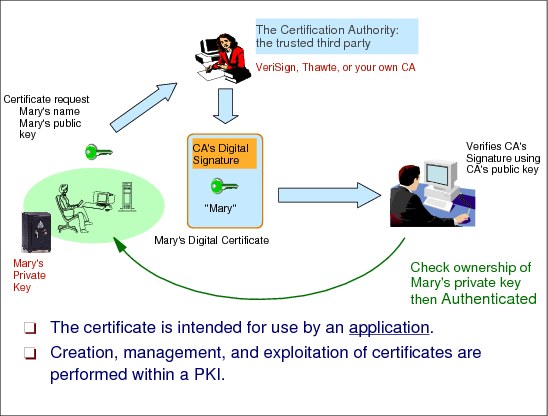
Figure 3-3 Public key cryptography trust model
Public key cryptography trust model
With public key cryptography, you rely on a CA. The CA provides a file that contains your public key and your name digitally signed by the CA. You never give your public key value. You give a digital certificate. The content of a certificate is public information, it is not encrypted.
A CA is just a piece in a bigger organization, that you need to put in place, or use an already existing organization that we are calling a PKI.
3.4 Elements of PKI in z/OS

Figure 3-4 Elements of PKI in z/OS
PKI Services
PKI Services allow you to establish a PKI infrastructure and serve as a certificate authority for internal and external users, issuing and administering digital certificates in accordance with the organization’s policies. Users can use a PKI Services application to request and obtain certificates through their own Web browsers, while authorized PKI administrators approve, modify, or reject these requests through their own Web browsers. The Web applications that are provided with PKI Services are highly customizable, and a programming exit is also included for advanced customization. You can allow automatic approval for certificate requests from certain users and, to provide additional authentication, add host IDs, such as RACF user IDs, to certificates you issue for certain users. You can also issue certificates for browsers, servers, and other purposes, such as virtual private network (VPN) devices, smart cards, and secure e-mail.
PKI Services supports Public Key Infrastructure for X.509 version 3 (PKIX) and Common Data Security Architecture (CDSA) cryptographic standards. It also supports:
•The delivery of certificates through the SSL for use with applications that are accessed from a Web browser or Web server.
•The delivery of certificates that support the Internet Protocol Security standard (IPSEC) for use with secure VPN applications or IPSEC-enabled devices.
•The delivery of certificates that support Secure Multipurpose Internet Mail Extensions (S/MIME) for use with secure e-mail applications.
Certificate authority (CA)
The CA acts as a trusted third party to ensure that users who engage in e-business can trust each other. A certificate authority vouches for the identity of each party through the certificates it issues. In addition to proving the identity of the user, each certificate includes a public key that enables the user to verify and encrypt communications.
The trustworthiness of the parties depends on the trust that is placed in the CA that issued the certificates. To ensure the integrity of a certificate, the CA digitally signs the certificate as part of creating it, using its signing private key. Trying to alter a certificate invalidates the signature and renders it unusable.
Protecting the CA’s signing private key is critical to the integrity of the CA. For this reason, consider using ICSF to store PKI Services CA’s private key securely. As a CA using PKI Services, you can:
•Track certificates that you issue with an issued certificate list (ICL) that contains a copy of each certificate, indexed by serial number
•Track revoked certificates using certificate revocation lists (CRLs). When a certificate is revoked, PKI Services updates the CRL during the next periodic update. Just as it signs certificates, the CA digitally signs all CRLs to vouch for their integrity.
PKI
The PKI provides applications with a framework for performing the following types of security-related activities:
•Authenticate all parties that engage in electronic transactions
•Authorize access to sensitive systems and repositories
•Verify the author of each message through its digital signature
•Encrypt the content of all communications
The PKIX standard evolved from PKI to support the interoperability of applications that engage in e-business. Its main advantage is that it enables organizations to conduct secure electronic transactions without regard for operating platform or application software package.
The PKIX implementation in PKI Services is based on the Common Data Security Architecture (CDSA) from Intel Corporation. CDSA supports multiple trust models, certificate formats, cryptographic algorithms, and certificate repositories. Its main advantage is that it enables organizations to write PKI-compliant applications that support their business policies.
Basic components of PKI services and related products
Table 3-1 lists the basic components of PKI services and related products.
Table 3-1 Basic components of PKI services and related products
|
Components
|
Description
|
|
Administration Web application
|
Assists authorized administrators to review requests for certificates, approve or reject requests, renew certificates, or revoke certificates through their own Web browsers. The application consists of sample screens that you can easily customize to display your organization’s logo. It also supports the following tasks:
•Reviewing pending certificate requests
•Querying pending requests to process those that meet certain criteria
•Displaying detailed information about a certificate or request
•Monitoring certificate information, such as validity period
•Annotating the reason for an administrative action
|
|
User Web application
|
Guides users to request, obtain, and renew certificates through their Web browsers. The application consists of sample screens that you can easily customize to meet your organization’s needs for certificate content and standards for appearance. It offers several certificate templates that you can use to create requests for a variety of certificate types, based on the certificate’s intended purpose and validity period, and supports certificate requests that are automatically approved.
|
|
Exit
|
Provides advanced customization for additional authorization checking, validating, and changing parameters on calls to the R_PKIServ callable service (IRRSPX00), and capturing certificates for further processing. You can call this exit from the PKIServ CGIs and use its IRRSPX00 pre-processing and post-processing functions. A code sample in C language code is included.
|
|
ICSF (optional)
|
Securely stores the PKI Services certificate authority’s private signing key.
|
|
LDAP
|
The directory that maintains information about the valid and revoked certificates that PKI Services issues in an LDAP-compliant format. You can use an LDAP server such as z/OS Security Server LDAP.
|
|
PKI Services daemon
|
The server daemon that acts as your certificate authority, confirming the identities of users and servers, verifying that they are entitled to certificates with the requested attributes, and approving and rejecting requests to issue and renew certificates. It includes support for:
•An issued certificate list (ICL) to track issued certificates
•Certificate revocation lists (CRLs) to track revoked certificates
|
|
R_PKIServ callable service (IRRSPX00)
|
The application programming interface (API) that allows authorized applications, such as servers, to programmatically request the functions of PKI Services to generate, retrieve and administer certificates.
|
|
RACF (or equivalent)
|
Controls who can use the functions of the R_PKIServ callable service and protects the components of your PKI Services system. RACF creates your certificate authority’s certificate, key ring and private key. You can also use it to store the private key, if ICSF is not available.
|
|
z/OS HTTP Server
|
PKI Services uses the Web server to encrypt messages, authenticate requests, and transfer certificates to intended recipients.
|
Supported certificate types
Table 3-2 lists the types of certificates that you can request, based on the certificate templates that are included with PKI Services. Certificate templates are samples of the most commonly requested certificate types. You can add, modify, and remove certificate templates to customize the variety of certificate types that you offer to users.
Table 3-2 Supported certificate types
|
Type of certificate
|
Use
|
|
One-year PKI SSL browser certificate
|
User client authentication using SSL
|
|
One-year PKI S/MIME browser certificate
|
Browser-based e-mail encryption
|
|
Two-year PKI browser certificate for authenticating to z/OS
|
User client authorization using SSL when logging onto z/OS
|
|
Two-year PKI Authenticode–code signing server certificate
|
Software signing
|
|
Five-year PKI SSL server certificate
|
SSL Web server certification
|
|
Five-year PKI IPSEC server (firewall) certificate
|
Firewall server identification and key exchange
|
|
Five-year PKI intermediate CA certificate
|
Subordinate (non-self-signed) certificate-authority certification
|
|
One-year SAF browser certificate
|
User client authentication where the security product (RACF, not PKI Services) is the certificate provider
|
|
One-year SAF server certificate
|
Web server SSL certification where the security product (RACF, not PKI Services) is the certificate provider
|
3.5 The PKIX standards
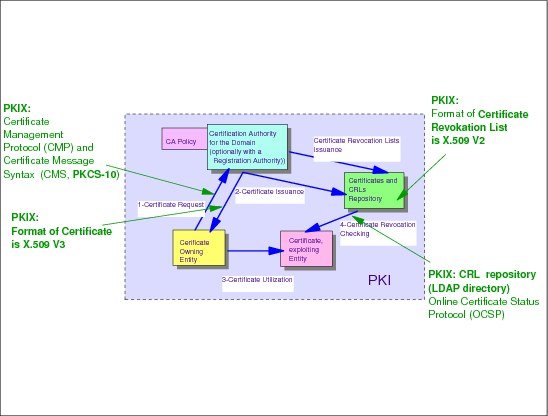
Figure 3-5 PKIX standards
The digital certificate life cycle as described previously is well documented and has been well understood in the industry since the late 1980s. However, the design and implementation of supporting technologies proved to vary from vendor to vendor. One of the early issues encountered when attempting to implement a PKI was the lack of interoperability between PKI products, hence the lack of potential scalability or capability to aggregate different PKI domains. This issue proved to be a severe impediment to the development of PKI use in the industry.
To address this issue, the Internet Engineering Task Force (IETF) launched the Public-Key Infrastructure (X.509) Working Group (PKIX) in 1995.
A simplified graphical view of a PKIX-compliant PKI is shown in Example 3-5 on page 151. The example does not fully representing all of the items that are addressed by the PKIX Working Group but only the following items that are relevant to this book:
• The PKCS#10 format for the certificate request
• The X.509 V3 format for the signed certificate
• The X.509 V2 format for the CRL
• The LDAP protocol to reach the CRL residing in an LDAP directory
• The OCSP protocol for real-time access to revocation information
In the this section, we discuss the set of definitions that the PKIX Working Group compiled.
Certification Authority (CA)
A CA is an authority trusted by one or more users to create and assign public key certificates. Optionally, the CA can create the user’s keys. Note that the CA is responsible for public key certificates during their lifetime, not just for issuing them, meaning that the CA also provides certificate revocation information.
Public Key Certificate (PKC)
A PKC is a data structure that contains the public key of an end entity, and other information, that is signed digitally with the private key of the CA that issued it. PKC should not be confused with other types of certificates that the PKIX group is working on, such as the Attribute Certificate (AC).
End Entity (EE)
The End Entity is the user of PKI certificates or the user system that is the subject of a certificate.
Subject
The Subject is the entity named in a Public Key certificate. Subjects can be human users, computers (represented by Domain Name Service [DNS] names or Internet Protocol [IP] addresses), or even software agents. The subject is often referred to as the owner of the certificate.
Registration Authority (RA)
The Registration Authority is an optional entity that is associated with the CA and that is responsible for performing some of the administrative tasks that are necessary for registering subjects, such as confirming the subject’s identity, validating that the subject is entitled to have the values that are requested in a PKC, and verifying that the subject has possession of the private key associated with the public key in the PKC request.
Public Key Infrastructure (PKI)
The PKI is a set of hardware, software, people, policies, and procedures that are needed to create, manage, store, distribute, and revoke PKCs based on public-key cryptography.
Certificate Policy (CP)
The Certificate Policy is a named set of rules that indicates the applicability of a public key certificate to a particular community or class of application with common security requirements. For example, a particular certificate policy might indicate applicability of a type of public key certificate to the authentication of electronic data interchange transactions for the trading of goods within a given price range.
Certification Practice Statement (CPS)
The CPS is a statement of the practices that a CA employs in issuing public key certificates.
Top CA, or root CA
The Top CA (root CA) is a CA that is at the top of a PKI hierarchy.
3.6 The RSA public key cryptography standards (PKCS)

Figure 3-6 PKCS standards
PKCS standards
We mentioned the interoperability through commonly adopted standards. A set of standards, actually exists—informal standards as RSA calls them. These standards are widely used in current PKI products, but they do not cover all the aspects of PKIs and are only partially cover the addressed aspects. However, most of the new PKI standards will integrate these standards because of their de facto status.
3.7 The PKCS-10 certificate request
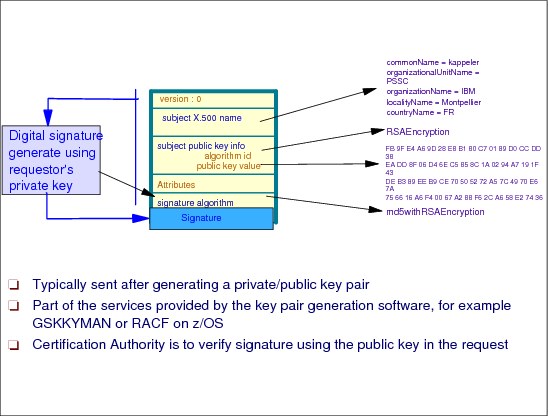
Figure 3-7 PKCS-10 certificate request
Let us have a look now at the inside of a digital certificate, starting with PKCS-10 request.
After the key pair is generated, the public key and personal information are sent in a file that is signed digitally with the private key that corresponds to the public key in the certificate. The CA is going to use the information that is contained in the certificate request to build the final certificate but will verify the digital signature as soon as it can using the public key in the certificate request.
The PKCS#10 format is used for certificate requests only. It cannot be used for signed certificates. It was created to allow for a certificate request format with a minimum of data to be transferred.
3.8 The X.509 certificate
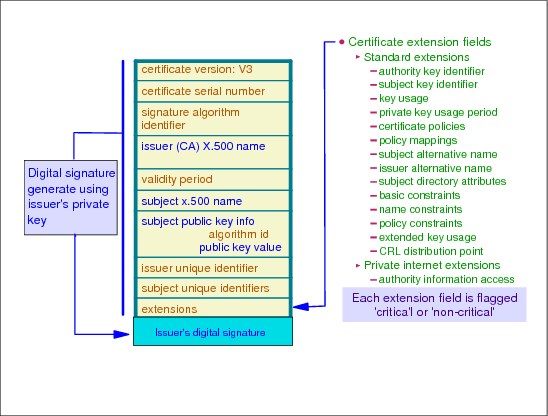
Figure 3-8 X.509 certificate
X.509 certificate
The PKIX documents emphasize the following basic principles when it comes to using a digital certificate:
•Recipients of digital certificates must be confident that any time they rely on a public key, the subject that they are communicating with owns the associated private key. This concept applies whether an encryption or digital signature mechanism is used. This confidence is obtained through the use of protocols (for example, SSL/TLS) that cannot carry forward the communication if this condition is not fulfilled.
•A certificate has a limited valid lifetime, which is indicated in its signed contents. Because a PKC’s signature and timeliness can be checked independently by a certificate-using client, certificates can be distributed through untrusted communications and server systems and can be cached in unsecured storage in certificate-using systems.
•Certificates are used in the process of validating signed data or securely transmitting encryption keys. Specifics vary according to which algorithm is used, but the general process works as follows:
a. The recipient of signed data verifies that the claimed identity of the user is in accordance with the identity contained in the certificate.
b. The recipient validates that no certificate in the path is revoked (for example, by retrieving a suitably current CRL or querying an online certificate status responder) and that all certificates are within their validity periods at the time the data was signed.
c. The recipient verifies that the data is not claimed to have any values for which the certificate indicates that the signer is not authorized.
d. The recipient verifies that the data has not been altered since signing, by using the public key in the certificate.
If all of these checks pass, the recipient can accept that the data was signed by the purported signer. As these basic principles always stand true, it appeared also during practical experimentation of digital certificates that they had to be supported by more sophisticated structures than initially planned. Actually, the X.509 digital certificate format had to go through different evolutions, as explained in the following sections.
X.509 certificate version 1
The X.509 certificate version 1 was the initial version of 1988. The specified fields, which are still in use today in the version 3 format, are:
•Version number (1).
•Serial number: The serial number assigned by the CA at signature time.
•Signature algorithm ID: An indication from the CA of which algorithm has been used to signed the certificate.
•Issuer’s name: The name of the certification authority. The name appears as a distinguished name in the X.500 syntax.
•Validity period: The CA imposes a limited validity period to the certificate, usually one year from its signing date.
•Subject’s name: The owner of the public key, hence owner of the certificate as well. The name appears as a distinguished name in the X.500 syntax.
•Subject’s public key information: The numeric, non-secret value of the certificate owner’s public key, along with information about the algorithm this key is intended for.
|
Note: It takes only two pieces of information to uniquely identify a digital certificate:
•The Certification Authority’s (issuer’s) name
•The serial number assigned to the certificate by the CA
|
X.509 certificate version 2 (1993)
The X.509 certificate version 2 added two new fields to accommodate the fact that no one can really expect that in the real word x.500 distinguished names will ever be unique:
•Issuer Unique Identifier: This optional field enables specifying a complementary unique identifier to the Certification Authority in case the Issuer’s distinguished name could already be in use by another entity.
•Subject Unique Identifier: This optional field enables specifying a complementary unique identifier to the certificate owner in case the Subject’s distinguished name could be in use already by another entity.
X.509 certificate version 3 (1995)
Still facing real-life facts, it appeared that new certificate fields were needed that could be implemented and used as needed by specific applications. These extension fields appeared in version 3, yielding a certificate format as shown in Example 3-13 on page 170. The intent of version 3 was to address some of the security concerns and limited flexibility from versions 1 and 2.
3.9 X.509 certificate revocation list
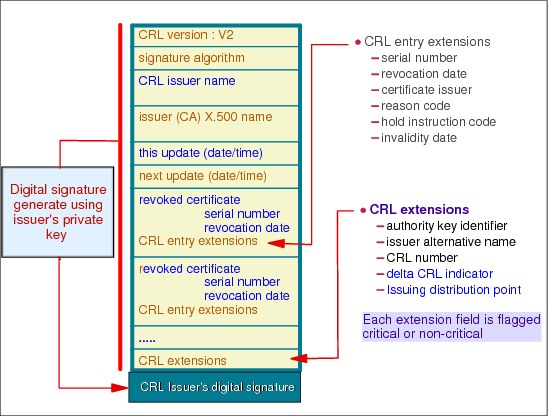
Figure 3-9 X.509 certificate revocation list
X.509 certificate revocation list
The certificate revocation list went under its own evolution. It is now at version 2, and it contains the fields shown in Figure 3-9. Note that a CRL is intended to be stored in an LDAP directory, from which it can be fetched, and because the CRL is signed by the issuing certification authority, the CRL repository is not required to be secure. A CA uses the same repository to make new certificates available and to publish CRLs.
More about the certificate revocation list
The following list provides more information about the certificate revocation list:
•The CRL is intended to be published. That is, it is updated regularly in the LDAP directory by the CA. It is up to the CA to indicate the frequency of these updates in the CA revocation policy.
•The implication of these periodic updates is that the revoked status of a certificate will be known from potential recipients only after the CRL update that follows the revocation has been issued, which can be several hours or days after the revocation request has been successfully processed. To help circumvent this timeliness problem, another protocol has been proposed by IETF, the Online Certificate Status Protocol (OCSP), through which the revocation status of a certificate can be obtained in real time. However, the use of the CRL (instead of OCSP) prevails in PKIs.
•The CRL can be located in the LDAP directory:
– As an attribute in the CA entry (that is, the entry with the CA’s distinguished name). This is known as the global CRL. The global CRL is added any new revoked certificate information, whereas previously revoked certificate can be deleted, if appropriate, from the list at each update. For large PKI domains, the global CRL can grow very large.
– As a directory entry by itself, called a distribution point. The distribution point approach is intended to break down the complete CRL into smaller pieces, each one being a separate directory entry easier to access than the whole global CRL. The distinguished name of the distribution point entry to look into is indicated in an extension field of the published certificate. The distribution point entries are leaf nodes in the directory that is below the CA entry.
3.10 X.509 V3 certificate: Standard extensions
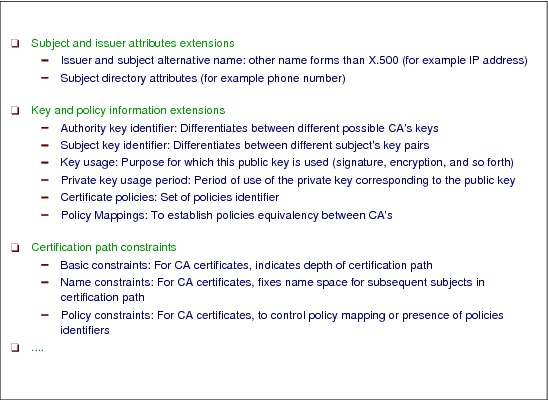
Figure 3-10 X.509 V3 certificate: Standard extensions
X.509 V3 certificate
PKI Services certificates support most of the fields and extensions that defined in the X.509 version 3 (X.509 v3) standard. This support lets you use these certificates for most cryptographic purposes, such as SSL, IPSEC, VPN, and S/MIME.
This section discusses the types of extensions that PKI Services certificates can include.
Standard extensions
The standard X.509 v3 certificate extensions include:
•Authority information access
•Authority key identifier
•Basic constraints
•Certificate policies
•Certificate revocation list (CRL) distribution points
•Extended key usage
•Key usage
•Subject alternate name
•Subject key identifier
Other extensions
Other extensions are unique to PKI Services, such as host identity mapping. This extension associates the subject of a certificate with a corresponding identity on a host system, such as with a RACF user ID.
3.11 Contents of the digital certificate
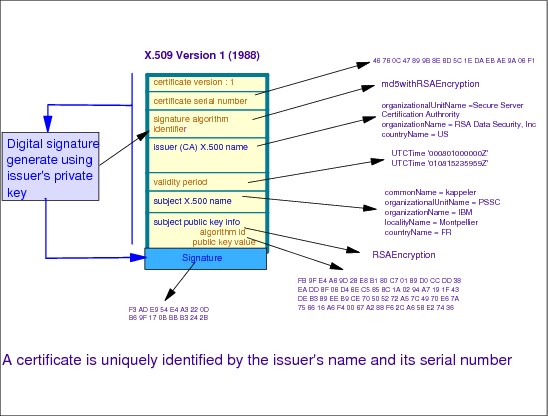
Figure 3-11 Contents of the digital certificate
Contents of the digital certificate
A digital certificate, by nature, is intended to be public knowledge. That is, the enclosed information appears unencrypted and the only piece of encrypted data is actually the CA’s digital signature (of which content does not bring any additional functional information). A simplified graphical view of a certificate and its contents is shown in Figure 3-11, where fields contain numeric or alphanumeric values.
However, for interoperability reasons, the contents of a certificate must go through specific syntax and encoding (not encryption) transformations that render a certificate readable by software only.
The certification authority builds the certificate file based on the information in the certificate request and offline checkings, which can done on your personal information.
The CA basically gives the certificate:
•A serial number
•The CA DN indication
•A validity period: not before / not after
The CA also signs the contents with its CA private key.
The couple CA DN + serial number identifies uniquely the certificate.
3.12 Browser certificates
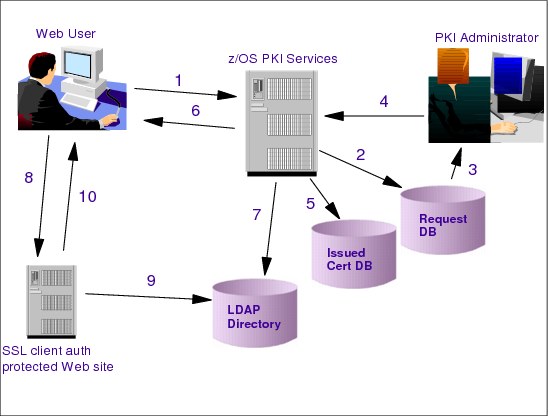
Figure 3-12 Browser certificates
Browser certificates
With a browser certificate, a certificate is requested to and obtained from the z/OS PKI Services only using the HTTP/HTTPS protocol. This is a very straightforward process when obtaining a browser (client) certificate, but it is more complicated to request, obtain, and install a server certificate.
Browser (client) certificate process flow
Figure 3-12 shows the typical process flow for browser certificates:
•The Web user submits the PKCS#10 certificate request (1).
•The request is queued for approval by the administrator (2).
•The administrator reviews the request and approves or rejects it (3).
•If approved (4) it is issued and stored (5).
•The certificate is returned to the Web user when queried (6).
•It is also published to an LDAP directory (7). The certificate revocation list (CRL) is also published to LDAP on a continuous basis.
•The Web user uses the certificate to authenticate to an SSL client authentication protected Web site (8).
•The SSL handshake validates the certificate and checks the CRL (9).
•If everything is valid, the user gains access (10).
3.13 Server certificates

Figure 3-13 Server certificates
Server certificates
Figure 3-13 shows the typical process flow for Web server certificates:
•The Web server administrator uses server-specific software to generate a PKCS#10 request (1a).
•This is copied (1b) and pasted (1c) into the certificate request Web page and submitted.
•Steps for queuing, approving, issuing, and retrieving the certificate are identical to the preceding browser flow (2 through 7).
•The Web server administrator installs the certificate into the Web server (8) and brings it online.
•Web users can now visit the SSL-protected Web site (9).
•If client authentication is enabled, the client's certificate is validated using the CRL in LDAP (10).
•If all is valid, the user gains access (11).
3.14 z/OS PKI services architecture

Figure 3-14 z/OS PKI services architecture
z/OS PKI services architecture
The z/OS HTTP server provides the user and administrator interface.The customizable Web page makes use of CGI routines (also provided), and their contents are defined explicitly in a template file that can be edited if necessary. The information in the template file is directly related to each type of request that the PKI supports, and it is exploited by the Web application (CGIs) to interface with the user or the administrator and to submit requests to R_PKIServ SAF callable services interface when appropriate. CGIs are written in REXX, thus requiring a RACF glue routine because REXX cannot create the structure parameters required by the callable service. Optionally, you can use PKI exit if more customization is needed.
The user administrative interface requires two instances of the z/OS Web server sharing the same certificate and private key:
•Instance one: Supports HTTP and HTTPS for users and PKI administrator. It is set up to prompt for SAF user ID and password depending on the requested URL.
•Instance two: Supports only HTTPS with client authentication. It is required for authenticating a client certificate revocation request.
Any request for users and administrators is always directed to instance one of the HTTP server first and can be redirected automatically to instance two depending on the type of request.
R_PKIServ is a problem program service backed by RACF. Requests are verified by RACF and submitted to the PKI Services daemon, the core UNIX application in the z/OS PKI Services. Additionally, RACF can create SMF auditing records.
User functions of the service are:
•Request
•Retrieve
•Verify
•Revoke
•Renew a certificate
Administrator functions of the service are:
•Query
•Approve
•Modify and reject certificate requests
•Query and revoke issued certificates
The PKI Services daemon is a multi-threaded server. It has service threads for incoming requests and background threads for housekeeping tasks such as the periodic issuance of a CRL and deletion of inactive requests. It maintains two VSAM data sets, one for storing all requests it receives (ObjectStore) and the other for keeping a list of issued certificates (ICL).
3.15 Get PKI up and running
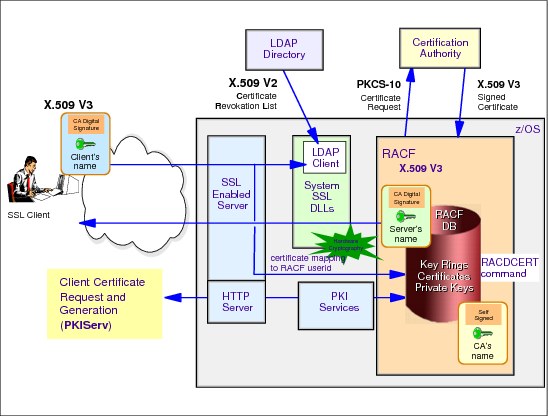
Figure 3-15 Get PKI up and running
Preparing the PKI Server installation
Security Services PKI Server has several requirements for running on the system:
•Two Web servers, the PKI server task, and one or more LDAP servers
•The first Web server runs on port 80 and 443
•The second Web server runs on port 1433
In a z/OS environment, you will most likely run the PKI Web servers that are already available in your production LPAR. Because this LPAR can already host existing Web servers on port 80 and 443, we recommend that you set up TCP/IP environment additional domain names for PKI Services. This setup enables the use of a hidden proxy server configuration on the default ports to forward to the appropriate servers.
Steps to set up the PKI server
Take the following steps to set up your PKI server:
1. Create and adjust the appropriate security environment (RACF).
2. Prepare and configure the UNIX environment.
3. Set up the Web servers.
4. Configure the LDAP server.
5. Set up the PKI server task.
6. Configure OCSF and OCEP to work with PKI Services.
7. Configure the PKI Services.
3.16 Setting up RACF environment for PKI prerequisites
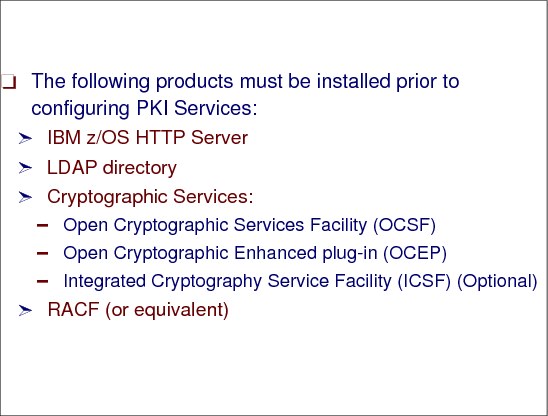
Figure 3-16 Setting up RACF for PKI
Setting up RACF for PKI
The implementation of PKI Services requires that z/OS UNIX System Services is active. Therefore, we expect that most of the UNIX System Services RACF controls are in place as per the content of member BPXISEC1 in SYS1.SAMPLIB.
The prerequisite products for PKI Services are z/OS HTTP Server or Web server, Lightweight Directory Access Protocol (LDAP) server, Open Cryptographic Services Facility (OCSF), and Open Cryptographic Enhanced Plug-ins (OCEP).
Integrated Cryptographic Services Facility (ICSF) and z/OS Communications Server’s sendmail utility are optional.
z/OS UNIX level security
We recommend that you have z/OS level of UNIX security on your system. The RACF controls necessary to establish the z/OS UNIX level of security are:
•Program control
•Daemon and server control
Program control
For program control you have to create profile (** in class PROGRAM) and then ADDMEM the following libraries:
RDEF PROGRAM ** OWNER(MVSMNT) UACC(READ)
RALT PROGRAM ** ADDMEM(‘CEE.SCEERUN’//NOPADCHK +
‘CBC.SCLBDLL’//NOPADCHK +
‘GLD.SGLDLNK’//NOPADCHK +
‘GSK.SGSKLOAD’//NOPADCHK +
‘SYS1.CSSLIB’//NOPADCHK +
‘TCPIP.SEZALOAD’//NOPADCHK +
‘SYS1.LINKLIB’//NOPADCHK +
‘CSF.SCSFMOD0’//NOPADCHK +
‘CSF.SCSFMOD1’//NOPADCHK)
|
Note: You might want to convert from an existing profile * to profile ** to prevent the output of RLIST PROGRAM * ALL from displaying all profiles that are created in class PROGRAM and displaying only the content of profile ** instead. However, be careful. You have to ADDMEM to profile ** all already-ADDMEMed libraries to profile * (if additional to the ones above) before issuing RDEL PROGRAM * and SETR WHEN(PROGRAM) REFRESH.
|
You also might ADDMEM the following libraries to profile ** in PROGRAM, replacing the italic text (hlq) with HLQs that are used at your site, most likely SYS1:
• If using the Resource Measurement Facility (RMF), hlq.SERBLINK
• If using DB2, hlq.SDSNLOAD and hlq.SDSNEXIT
• If using MQSeries®, hlq.SESQLINK
• If using Run-Time Library Services (RTLS), hlq.SCEERTLS
• If you are obtaining an IEATDUMP by setting the SysDumpName directive and setting the Recovery directive to Msg/Dump, Normal, or Full, hlq.MIGLIB
Daemon and server control
The command to create a profile for restricting your daemons from being able to change their identity is:
RDEF FACILITY BPX.DAEMON UACC(NONE) OWNER(SECADM)
Place on the access list only daemons that are allowed to change their identity:
PE BPX.DAEMON CL(FACILITY) ID(daemon1 daemon2) ACC(READ)
|
Note: Replace daemon1, daemon2, and so forth with RACF user IDs for your respective daemons.
|
The command to create a profile to set the scope of z/OS resources that the server can access when acting as a surrogate for its clients is:
RDEF FACILITY BPX.SERVER UACC(NONE) OWNER(SECADM)
Then place on the access list only daemons that might act as surrogates:
PE BPX.SERVER CL(FACILITY) ID(daemon1 etc) ACC(READ)
PE BPX.SERVER CL(FACILITY) ID(daemon2 etc) ACC(UPDATE)
In this command:
•READ: Both the server ID and the RACF ID of the client must be authorized to access resources and the client must supply a password.
•UPDATE: The server acts as a surrogate of the client (uses the identity and access granted to the client without the client’s password being specified).
RACF for Web server
Started task user ID
The command to create a started task user ID for your Web server is:
ADDUSER WEBSTU DFLTGRP(STG) OMVS(UID(0) HOME(’/usr/lpp/internet’) PROGRAM(’/bin/sh’))
|
Note: To define your Web server user ID with a non-zero UID and according to your naming standard for STUs, give this user ID appropriate permissions to directories and files:
SETFACL -m u:WEBSTU:r-x /usr/lpp/internet/sbin/httpd_V5R3M0
SETFACL -m u:WEBSTU:r-x /web/pki1/httpd.conf
SETFACL -m u:WEBSTU:rwx /web/pki1/logs
SETFACL -m d:u:WEBSTU:rwx /web/pki1/logs
SETFACL -m f:u:WEBSTU:rwx /web/pki1/logs
SETFACL -m u:WEBSTU:rw- /web/pki1/httpd-pid
The Web server’s non-zero user ID must be given read/execute access to the security DLLs, read/write access to the key database file, and read access to the stash file.
|
Profile in class STARTED
To create a profile in class STARTED for your Web server procedure, use:
RDEF STARTED WEB*.** STDATA(USER(WEBSTU) GROUP(STG))
Daemon and server control
The commands to control your Web server started task user ID are:
PERMIT BPX.DAEMON CLASS(FACILITY) ID(WEBSTU) ACCESS(READ)
PERMIT BPX.SERVER CLASS(FACILITY) ID(WEBSTU) ACCESS(READ)
SETROPTS RACLIST(FACILITY) REFRESH
Access to profiles in class CSFSERV
Use the following access only if ICSF is active:
PE CSF* CL(CSFSERV) ID(WEBSTU) ACC(R)
RACF for OCSF and OCEP
The use of Open Cryptographic Services Facility (OCSF) and Open Cryptographic Enhanced Plug-ins (OCEP) is controlled by fixed-name profiles in class FACILITY:
CDS.CSSM Authorizes access to OCSF
CDS.CSSM.CRYPTO Authorizes access to Cryptographic Service Provider
CDS.CSSM.DATALIB Authorizes access to Data Library (DL) Service Provider
All of these resources probably have the same access list, so only one profile can be defined as follows:
RDEF FACILITY CDS.** UACC(NONE) OWNER(SECADM)
RACF for LDAP
The RACF setup for the LDAP server consists of the following commands:
1. Started task user ID:
ADDUSER LDAPSTU DFLTGRP(STG) NAME(LDAP Started Task User’) +
OMVS(AUTOUID) HOME(‘/’) PROG('/bin/sh'))
2. Profile in class STARTED:
RDEF STARTED LDAP*.** STDATA(USER(LDAPSTU) GROUP(STG))
SETR RACLIST(STARTED) REFR
3. Access to DB2 from TSO and BATCH:
PE DB2subsystem.BATCH ID(LDAPSTU) ACC(R)
4. Daemon and server control:
PE BPX.DAEMON CL(FACILITY) ID(LDAPSTU) ACC(R)
PE BPX.SERVER CL(FACILITY) ID(LDAPSTU) ACC(U)
SETR RACLIST(FACILITY) REFR
5. Access to OCSF:
PE CDS.** CL(FACILITY) ID(LDAPSTU) ACC(R)
6. Access to profiles in class CSFSERV:
PE CSF* CL(CSFSERV) ID(LDAPSTU) ACC(R)
This access is needed only if ICSF is active.
RACF for ICSF
Using ICSF is recommended, but not a prerequisite, for PKI Services. You can install and configure ICSF before or after setting up PKI Services using these commands:
1. Started task user ID:
ADDUSER ICSFSTU DFLTGRP(STG) NOPASSWORD NAME(‘ICSF Started task user’)
2. ICSF data sets contain Cryptographic Keys (CKDS) and Public Keys (PKDS):
– ICSF.CKDS
– ICSF.PKDS
Use these commands:
AG ICSF SUPGROUP(DATA) OWNER(DATA)
AD ‘ICSF.** OWNER(SECADM) UACC(NONE)
3. Profile in class STARTED:
RDEF STARTED ICSF.** STDATA(USER(ICSFSTU) GROUP(STG))
4. Profiles in the General Resource Class CSFKEYS class protect labels for keys in the format:
RDEF CSFKEYS label UACC(NONE) AUDIT(ALL)
PE label CL(CSFKEYS) ID(SECADM) ACC(R)
RDEF CSFKEYS ** UACC(NONE) OWNER(SECADM) AUDIT(ALL)
They permit one or several job role groups access.
5. Profiles in the General Resource Class CSFSERV class protect cryptographic services in fixed-name format:
RDEF CSFSERV service-name UACC(NONE) OWNER(SECADM) AUDIT(ALL)
PE service-name CL(CSFSERV) ID(SECADM) ACC(R)
Similar to CSFKEYS, you can define a common generic profile:
RDEF CSFSERV ** UACC(NONE) OWNER(SECADM) AUDIT(ALL) or
RDEF CSFSERV CSF* UACC(NONE) OWNER(SECADM) AUDIT(ALL)
If you have not activated CSFKEYS and CSFSERV, issue the commands:
SETR CLASSACT(CSFKEYS CSFSERV)
SETR RACLIST(CSFKEYS CSFSERV)
SETR RACLIST(CSFKEYS CSFSERV) REFR
3.17 Add RACF groups for PKI services
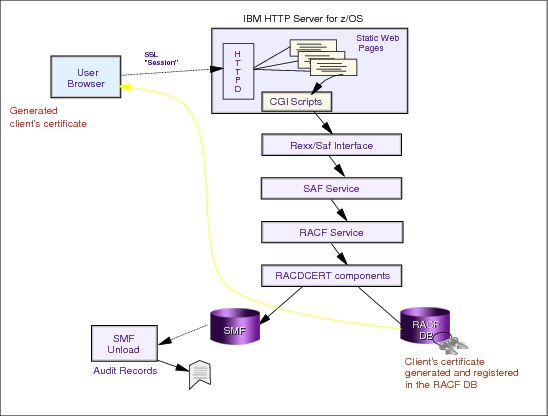
Figure 3-17 RACF groups for PKI services
PKI administrator group
PKI Services administrators play a very powerful role in your organization. The decisions they make when managing certificates and certificate requests determine who will access your computer systems and what privileges they will have when doing so. We recommend that you appoint as PKI administrators one or more of your RACF administrators after some training, mostly on the use of the RACDCERT command.
All RACF user IDs and groups used in PKI Services must have OMVS segments. The command to add a specific job role group for PKI administrators is:
AG PKIADM SUPGROUP(JOBROLE) OMVS(AUTOGID)
CO (userid1 userid2 etc) GROUP(PKIADM)
If you need to assign an OMVS segment to your existing RACF admin group, issue the following command:
ALG SECADM GID(AUTOGID)
PKI started task user ID group
If you need to assign an OMVS segment to your existing RACF default group for started task user IDs, issue the following command:
ALG STG GID(AUTOGID)
Adding RACF user IDs for PKI Services
PKI started task user ID
The command to create the user ID who runs the PKI procedure (see the PKI procedure in SYS1.PROCLIB) is as follows:
AU PKISTU NAME(‘PKI SRVS DAEMON’) DFLTGRP(STG) OWNER(STG) + NOPASSWORD OMVS(AUTOUID HOME(‘/web/pki1/’) PROG(‘/bin/sh’) + ASSIZE(256000000) THREADS(512))
The ASSIZE and THREADS values are recommended, but you have to increase them if they are not enough for your workload. The full list of keywords specifying various limits in the OMVS segment is:
•ASSIZEMAX Maximum address space size
•CPUTIMEMAX Maximum CPU time
•FILEPROCMAX Maximum number of files per process
•MMAPAREAMAX Maximum memory map size
•PROCUSERMAX Maximum number of processes per UID
•THREADSMAX Maximum number of threads per process
After you have set individual user limits for users who require higher resource limits, consider removing their superuser authority. You should also reevaluate your installation’s BPXPRMxx limits and consider reducing them.
Surrogate user ID
A surrogate user ID is the identity assigned to client processes when they request PKI Services. A surrogate user ID is required for external clients. For simplicity, we recommend using surrogate user IDs for internal clients as well, rather than allowing them to access PKI Services under their own identities. Our chosen name for surrogate user ID is PKISRV, and the command to create it is:
AU PKISRV NAME ('PKI SRVS SURROG') DFLTGRP(MISC) OWNER(MISC) +
OMVS(AUTOUID HOME('/') PROG('/bin/sh') ASSIZE(256000000) +
THREADS(512)) NOPASSWORD RESTRICTED
We recommend that this user ID be RESTRICTED with the consequences that the user must be explicitly permitted with READ to several resources having UACC(READ) or ID(*) with access READ. The most obvious are:
•Profile ** in class PROGRAM
•A few profiles starting with IRR.DIGTCERT in class FACILITY
•Profile ** in class APPL
(If it has UACC(READ), this equivalent to not having this profile at all).
Adding PKI data set profiles
We recommend that data sets needed for PKI data be named yourprefix.PKI. Replace yourprefix with a term of your choosing.
Alternatively, if you do not use prefixing, then use an HLQ of PKI.
To define a RACF profile for your PKI data sets, use:
AD ‘PKI.**’ OWNER (PKIADM) AUDIT(ALL)
We used PKI as HLQ.
|
Note: In the command, we assume that you have turned EGN on, and we omitted UACC. We recommend UACC(NONE), which is the default. We believe that by using AUDIT(ALL) auditors will be happy if SMF records for SUCCESS READ and higher are made available.
|
The recommended permissions are:
PE ‘PKI.**’ ID(MVSMNT) ACC(ALTER)
Usually the MVSMNT group is required to create data sets (VSAM in the case of PKI Services). Do not forget to place your group with ALTER if you plan to create these data sets and you do not have OPERATIONS.
To allow your PKI administrators access to PKI data sets, issue this command:
PE ‘PKI.**’ ID(PKIADM) ACC(CONTROL)
Be aware also that the started task user ID for PKI Services (PKISTU) must be able to write into the PKI data sets:
PE ‘PKI.**’ ID(PKISTU) ACC(CONTROL)
Using RACF to create certificates
The CA acts as a trusted party to ensure that users who engage in e-business can trust each other. A CA vouches for the identity of each party through the certificates it issues. In addition to proving the identity of the user, each certificate includes a public key that enables the user to verify and encrypt communications.
You can use RACF to create, register, store, and administer digital certificates and their associated private keys, and to build certificate requests that can be sent to a certificate authority for signing. You can also use RACF to manage key rings of stored digital certificates. Digital certificates and key rings are managed in RACF primarily by using the RACDCERT command.
RACF enables you to manage three types of digital certificates:
•User certificate: Associated with a RACF user ID and is used to authenticate the user’s identity.
•CA certificate: Associated with a certificate authority and is used to verify signatures in other certificates.
•Site certificate: Associated with a server or network entity other than a user or certificate authority.
Your organization might already have rules for creating certificates. If not, such rules should be discussed and established.
The RACDCERT command enables a RACF-defined user ID to use a digital certificate as identification. The certificate must be one of the supported formats contained in an MVS data set.
RACDCERT is used to store and maintain digital certificates in RACF and should be used for all maintenance of the DIGTCERT class profiles and related USER profile fields. However, USER-related record type 0207 (User Certificate Name Record) provides user ID, certificate name, and certificate label.
The RACDCERT command is your primary administrative tool for managing digital certificates using RACF. Granular authorities for use of the RACDCERT command by users not having SYSTEM SPECIAL are controlled through profiles in the FACILITY class of the type IRR.DIGTCERT.function.
The RACDCERT command is used to manage resources in these classes:
•DIGTCERT: Profiles contain information about digital certificates as well as the certificate itself. The user ID associated with the certificate can be found in the APPLDATA field of the profile.
•DIGTRING: Profiles contain information about key rings and the certificates that are part of each key ring. Key rings are named collections of the personal, site, and CA certificates associated with a specific user.
•DIGTNMAP: Profiles contain information about certificate name filters.
|
Note: Profiles in the DIGTCERT, DIGTRING, and DIGTNMAP classes are maintained automatically through RACDCERT command processing. You cannot administer profiles in these classes using the RDEFINE, RALTER, and RDELETE commands. These commands do not operate with profiles in the DIGTCERT, DIGTRING, and DIGTNMAP classes.
|
Create the CA certificate
We recommend that you set up a job to use the RACDCERT command when a long string of keywords and their values is needed Example 3-1.
Example 3-1 Creating the CA certificate
//your job card
//STEP1 EXEC PGM=IKJEFT01
//SYSLBS DD DSN=SYS1.BRODCAST,DISP=SHR
//SYSTSPRT DD SYSOUT=*
//SYSTSIN DD *
RACDCERT GENCERT CERTAUTH SUBJECTSDN(OU('ITSO PSIE CA') +
O('IBM') C('US')) WITHLABEL('IBM ITSO PSIE PKI1') +
NOTAFTER(DATE(2020/01/01))
You can use the following keywords and values:
•GENCERT: Creates a digital certificate and, potentially, a public or private key pair.
•CERTAUTH: Relates to certificate of a Certificate Authority (CA).
•SUBJECTSDN: Specifies the subject’s distinguished name.
•WITHLABEL(label-name): Specifies the label assigned to this certificate. If specified, this must be unique to the user ID with which the certificate is associated.
•NOTAFTER: Specifies the local date and time after which the certificate is no longer valid.
Making the CA Certificate HIGHTRUST
The subkeywords TRUST, NOTRUST, and HIGHTRUST indicate whether the status of the certificate is trusted, not trusted, or highly trusted. Whether the certificate is not trusted or trusted depends on whether the certificate is valid and whether the private key has been compromised. Because highly trusted certificates are by definition trusted certificates, any certificate usage that was enabled by marking the certificate trusted is also enabled by marking the certificate highly trusted.
However, only CA certificates can be highly trusted. The keyword ALTER is used to change the status to HIGHTRUST as follows:
RACDCERT CERTAUTH ALTER(LABEL(‘IBM ITSO POK PKI1’)) HIGHTRUST
Backup to a data set
It is absolutely critical to back up the certificate into a data set with the PKCS12DER format. The keyword is EXPORT:
RACDCERT CERTAUTH EXPORT(LABEL(‘IBM ITSO PSIE PKI1’)) +
DSN(‘PKI.CAPKI1.BACKUP.P12BIN’) +
FORMAT(PKCS12DER) PASSWORD(‘xxxxxxx’)
|
Note: Be careful when you issue this command because the password is unencrypted, so you have to remember or find a secure place to store the password for future use. If the password is lost, this backup becomes useless. Also the password value is case-sensitive.
|
Save the CA certificate to a data set for import to a UNIX file
Place the CA certificate in an MVS data set in the DER format and then copy it to the HFS file, as shown in Example 3-2.
Example 3-2 Saving the CA certificate to a data set
RACDCERT CERTAUTH EXPORT(LABEL(‘IBM ITSO POK PKI1’)) +
DSN(‘PKI.CAPKI1.DERBIN’) FORMAT(CERTDER)
chown PKISTU /var/pkiserv
oput 'pki.capki1.derbin' '/var/pkiserv/pkiserv1/cacert.der' binary
chmod 755 /var/pkiserv/cacert.der
chown pkistu /var/pkiserv/*
Create PKI Services key ring
The RACDCERT command to create a key ring for the CA certificate is:
RACDCERT ADDRING(CARING) ID(PKISTU)
In this command:
•ADDRING(‘ring name’): Creates a key ring. Only users can have a key ring. Key ring names become names of RACF profiles in the DIGTRING class and can contain only characters that are allowed in RACF profile names. Although asterisks are allowed in ring names, a single asterisk (*) is not allowed. For a CA certificate, the user who owns the ring is the PKI daemon. Lowercase characters are permitted. A key ring name can be up to 237 characters in length. Because only user IDs can have key rings, neither CERTAUTH nor SITE can be specified with ADDRING.
After creating the key ring, add the certificate to the key ring, as shown in Example 3-3.
Example 3-3 Creating PKI Services key ring
RACDCERT ID(PKISTU)
CONNECT(CERTAUTH LABEL(‘IBM ITSO PSIE PKI1’) +
RING(CARING) USAGE(PERSONAL) DEFAULT)
•ID(userid): Indicates that the certificate added to the key ring is a user certificate, and userid is the user ID that is associated with this certificate. If the ID keyword is not specified, it defaults to the value specified or the default value on the RACDCERT command.
– CONNECT: Specifies that a digital certificate is being added to a key ring.
– CERTAUTH: Indicates that the certificate being added to the key ring is a CA certificate.
– USAGE: Allows the altering of the trust policy within the confines of a specific key ring.
– DEFAULT: Specifies that the certificate is the default certificate for the ring. Only one certificate within the key ring can be the default certificate. If a default certificate already exists, its default status is removed, and the specified certificate becomes the default certificate. If you want the specified certificate to be the default, DEFAULT must be explicitly specified.
Create the Web server SSL certificate
After creating the CA certificate, you can issue other types of certificates, such as an SSL certificate for the Web server started task user ID that is needed to process handshakes with upcoming client certificates belonging to external or internal users. See Example 3-4.
Example 3-4 Creating the Web server SSL certificate
RACDCERT GENCERT ID(WEBSTU) +
SIGNWITH(CERTAUTH LABEL(‘IBM ITSO PSIE PKI1’)) +
SUBJECTSDN(CN('wtsc64oe.itso.ibm.com’) +
O('IBM') L(‘POUGHKEEPSIE’) SP(‘NEW YORK) C('US')) WITHLABEL('SSL PKI1’) +
NOTAFTER(DATE(2020/01/01))
In this example SIGNWITH(CERTAUTH(LABEL(‘label-name’)) specifies the certificate with a private key that is signing the certificate. In this example, the private key certificate is the CA certificate. If SIGNWITH is not specified, the default is to sign the certificate with the private key of the certificate that is being generated.
Create the Web server key ring
Similar to the CA, you need to create a key ring for the certificates of the Web server with the following command:
RACDCERT ADDRING(SSLRING) ID(WEBSTU)
Now, connect the CA certificate to the ring that belongs to the Web server:
RACDCERT ID(WEBSTU) CONNECT(CERTAUTH LABEL(‘IBM ITSO PSIE PKI1’) +
RING(SSLRING))
|
Note: In this example, we did not specify USAGE because the default value of USAGE is the same as in the added certificate; That is, we preserved USAGE(CERTAUTH). We also omitted DEFAULT, because we did not want to make the CA certificate be the DEFAULT in this key ring.
|
Next, connect the Web server certificate to the Web server ring with this command:
RACDCERT ID(WEBSTU) CONNECT(ID(WEBSTU) LABEL(‘SSL PKI1’) + RING(SSLRING) USAGE(PERSONAL) DEFAULT)
LIST the CA certificate
To list the CA certificate, use this command:
RACDCERT CERTAUTH LIST(LABEL('IBM ITSO PSIE PKI1'))
|
Note: You must use the keyword CERTAUTH when listing a CA certificate. The value of LABEL is case sensitive, so type IBM and not ibm. Also, CERTAUTH can be placed after list(label( ’ ‘)).
|
LIST the Web server (SSL) certificate
The command to display the Web server certificate is as follows:
RACDCERT ID(WEBSTU) LIST(LABEL('SSL PKI1'))
|
Note: You must use the keyword ID( ) when listing a user certificate. Also, ID( ) can be placed after list(label( ’ ‘)). Remember that the value of LABEL is case sensitive.
|
Now, we list our Web server certificate issued by our CA:
RL DIGTCERT 01.OU=ITSO¢PSIE¢CA.O=IBM.C=US ALL
|
Note: The only difference between the profile for our Web server certificate and the profile for our CA certificate is the serial number. The APPLDATA field contains the user ID associated with certificate: the Web server started task user ID: WEBSTU.
|
LIST key ring for user ID PKISTU
The command to list the key ring is:
RACDCERT ID(PKISTU) LISTRING(CARING)
|
Note: You must always use the keyword ID( ) to list any key ring. Also, ID( ) can be placed after LISTRING( ). Again, the key ring name is case sensitive.
|
Daemon and server control for PKI user ID and surrogate user ID
We permit PKISTU read access to BPX.DAEMON and BPX.SERVER in the RACF class FACILITY, and PKISRV read access to BPX.SERVER in the RACF class FACILITY:
PE BPX.DAEMON CL(FACILITY) ID(PKISTU) ACC(R)
PE BPX.SERVER CL(FACILITY) ID(PKISTU) ACC(R)
PE BPX.SERVER CL(FACILITY) ID(PKISRV) ACC(R)
Allow PKI user ID to act as CA
The following commands enable a PKI user ID to act as a CA:
RDEF FACILITY IRR.DIGTCERT.GENCERT UACC(NONE) OWNER(PKIADM)+
AUDIT(ALL)
RDEF FACILITY IRR.DIGTCERT.LIST UACC(NONE) OWNER(PKIADM)
RDEF FACILITY IRR.DIGTCERT.LISTRING UACC(NONE) OWNER(PKIADM)
PE IRR.DIGTCERT.GENCERT CL(FACILITY) ID(PKISTU) ACC(CONTROL)
PE IRR.DIGTCERT.LIST CL(FACILITY) ID(PKISTU) ACC(R)
PE IRR.DIGTCERT.LISTRING CL(FACILITY) ID(PKISTU) ACC(R)
|
Note: User IDs having SPECIAL can issue the RACDCERT command with all keywords and parameters.
|
Allow a Web server to access its own key ring
To allow a Web server to access its own key ring, use this command:
PE IRR.DIGTCERT.LIST CL(FACILITY) ID(WEBSTU) ACC(R)
PE IRR.DIGTCERT.LISTRING CL(FACILITY) ID(WEBSTU) ACC(R)
Allow Web server user ID to switch identity to surrogate user ID
The commands to enable the Web server user ID to act on behalf of the surrogate user ID PKISRV (or switch identity to surrogate user ID) are:
RDEF SURROGAT BPX.SRV.PKISRV
PE BPX.SRV.PKISRV CL(SURROGAT) ID(WEBSTU) ACC(R)
Profile for PKI Services procedure in class STARTED
To use a profile for PKI Services procedure in the class STARTED, use this command:
RDEF STARTED PKISRV*.** STDATA(USER(PKISTU) GROUP(STG)) + OWNER(PKIADM)
This command covers more than one PKI server (for example, if you want a few members in SYS1.PROCLIB named PKISRV1, PKISRV2, and so on). However, you can run only one PKI server per LPAR at a time.
Allow access for PKISTU to OCSF
For the PKI Services procedure to start, the PKI Services user ID must have access to the OCSF services. This access is provided by issuing this command:
PE CDS.** CL(FACILITY) ID(PKISTU) ACC(R)
ICSF
With this command, we assume that ICSF is active. To store a certificate into ICSF, use:
RACDCERT CERTAUTH ADD('PKI.CAPKI1.BACKUP.P12BIN') +
PASSWORD('xxxxxxx') ICSF
In this command:
•ADD(data-set-name): Specifies that a digital certificate is to be defined. The specified data set must contain the digital certificate. The data set containing the digital certificate or certificate package must be cataloged and cannot be a PDS or a PDS member. The RECFM expected by RACDCERT is VB. When the ADD keyword is specified, RACDCERT allocates and opens the specified data set dynamically and reads the certificate from it as binary data.
•PASSWORD(‘pkcs12-password’): Specifies the password that is associated with the PKCS#12 certificate package. This keyword is required if the data set is PKCS#12, and it must not be specified if the data set is not PKCS#12. The ‘pkcs12-password’ can be up to 255 characters in length, is case sensitive, and can contain blanks.
|
Note: The specified password is visible. So, take care to prevent it from being viewed when entered. Because PKCS#12 passwords do not follow the normal TSO/E rules for password content, they cannot be suppressed as they normally would be.
|
ICSF specifies that RACF attempts to store the private key that is associated with this certificate in the ICSF PKDS. This attempt applies when the key is introduced to RACF by issuing the ADD keyword for PKCS#12 certificate packages and when an existing certificate profile containing a non-ICSF private key is replaced by issuing the ADD keyword.
If the GENCERT keyword creates a public/private key pair and if ICSF is used to store private keys, then GENCERT creates an ICSF key label in the format IRR.DIGTCERT.userid.CVTSNAME.ebcdic-stck-value, where userid is the owning user ID, CVTSNAME is the system name as taken from the CVT, and ebcdic-stck-value is an EBCDIC version of the current store clock value. If the key is associated with a CA certificate, then user ID is set to CERTIFAUTH. If the key is associated with a site certificate, then user ID is set to SITECERTIF.
Ensure that you have created a profile in class CSFKEYS as follows:
RDEF CSFKEYS IRR.DIGTCERT.** OWNER(PKIADM)
PE IRR.DIGTCERT.** CL(CSFKEYS) ID(PKIADM) ACC(R)
Protect certificate functions
You have to allow the surrogate PKI user ID to use user certificate functions with the following commands:
RDEF FACILITY IRR.RPKISERV.** OWNER(PKIADM)
PE IRR.RPKISERV.** CL(FACILITY) ID(PKISRV) ACC(CONTROL)
A single profile IRR.RPKISERV.PKIADMIN in class FACILITY can protect all six administrative-user functions. To disallow access to the administrative-user functions of PKI Services for the surrogate PKI user ID, place PKISRV on its access list with NONE:
RDEF FACILITY IRR.RPKISERV.PKIADMIN OWNER(PKIADM)
PE IRR.RPKISERV.PKIADMIN ID(PKISRV) ACC(NONE)
We assume that all members of your PKIADM group have SYSTEM SPECIAL. If this is not the case, then members without SYSTEM SPECIAL must have UPDATE to profile IRR.RPKISERV.PKIADMIN.
3.18 RACF for PKI Services
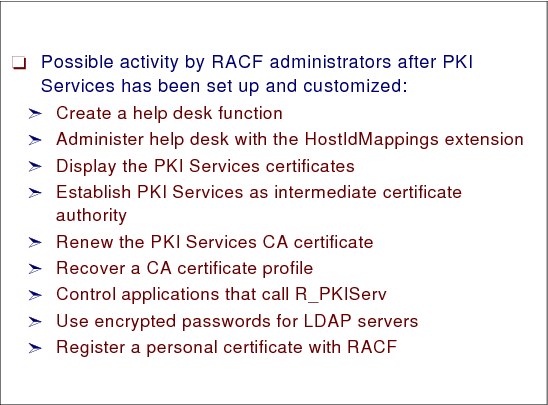
Figure 3-18 RACK for PKI Services
RACF for PKI Services
This section describes the possible activity by RACF administrators after PKI Services has been set up and customized.
Creating a help desk function
Access CONTROL to the last two profiles ensures that help desk members can list anybody’s certificates or key rings by issuing the following commands. See Example 3-5.
Example 3-5 Creating a help desk function
AG HELPDESK SUPGROUP(JOBROLE) OWNER(JOBROLE) + OMVS(AUTOGID)
AU HDUSR1 DFLTGRP(EMPL) OWNER(EMPL) OMVS(AUTOUID)
CO HDUSR1 GROUP(HELPDESK)
PE ‘PKI.**’ ID(HELPDESK) ACC(R)
PE IRR.RPKISERV.PKIADMIN CL(FACILITY) ID(HELPDESK) ACC(R)
PE IRR.DIGTCERT.LIST CL(FACILITY) ID(HELPDESK) ACC(C)
PE IRR.DIGTCERT.LISTRING CLASS(FACILITY) ID(HELPDESK) ACC(C)
For any user ID having certificates registered in RACF, use the following command:
RACDCERT ID(userid) LIST
If they want to find all CA certificates, use the following command:
RACDCERT CERTAUTH LIST
Alternatively, the last two profiles in Example 3-5 must have UACC(READ) or ID(*) on their access list with READ. Thus every user ID can display certificates or key rings by issuing:
•RACDCERT LIST: Obtains detailed information for each certificate
•RACDCERT LISTRING(*): Obtains detailed information for each key ring
|
Note: Help desk can use RACDCERT ID(userid) LISTRING(*) to find all rings that are associated with a user ID, but a similar command, RACDCERT LIST(*), fails with the following message:
IKJ56712I INVALID KEYWORD, *
IKJ56703A REENTER THIS OPERAND - .
|
Administering certificates with the HostIdMappings extension
You can add a HostIdMappings extension to certificates that you create for certain users, enabling you to specify the user IDs for logging on to particular servers (or hosts). Controlling an identity used for logon purposes is a very important security objective. Therefore, you must exercise administrative control in the following areas by authorizing:
•PKI Services as a highly trusted certificate authority whose certificates are honored when they contain HostIdMappings extensions
•Particular servers to accept logons from clients whose certificates contain HostIdMappings extensions
To enable the Web server to accept logons from clients who have been issued PKI Services certificates with HostIdMapping extensions, you must create profiles in the RACF class SERVAUTH.
|
Note: Ensure that your CA certificate is altered to HIGHTRUST if it was not HIGHTRUST when you created it.
|
Define a profile in class SERVAUTH for each server (host) name that you want your Web server to honor when accepting logons for certificates containing HostIdMapping extensions. The profile has the format IRR.HOST.hostname where the value of hostname usually is a domain name, such as wtsc63oe.itso.ibm.com. This domain name must be entered in the entry for HostIdMap in /web/pki1/pkiserv/pkiserv.tmpl but without the subject ID portion in the APPL section.
RDEF SERVAUTH IRR.HOST.WTSC63OE.ITSO.IBM.COM UACC(NONE)
Permit your Web server started task user ID with READ with the following command:
PE IRR.HOST.WTSC63OE.ITSO.IBM.COM CL(SERVAUTH) ID(WEBSTU) ACC(R)
Now activate and raclist class SERVAUTH using the following commands:
SETR CLASSACT(SERVAUTH)
SETR RACLIST(SERVAUTH)
SETR RACLIST(SETRAUTH) REFR
|
Note: On a z/OS system, a HostIdMapping is not honored if the target user ID was created after the start of the validity period for the certificate containing the HostIdMappings extension. Therefore, if you are creating user IDs specifically for certificates with HostIdMappings extensions, ensure that you create the user IDs before the certificate requests are submitted.
|
Display your PKI Services certificates
Often you might want to display your CA certificate or key ring, possibly to diagnose error conditions.
Display CA certificate
You can display the CA certificate by using two RACF commands. The first is:
RACDCERT CHECKCERT(‘PKI.CAPKI1.DERBIN’)
In this command, PKI.CAPKI1.DERBIN is the data set to which we saved the CA certificate in DER format.
It is important to note, when diagnosing errors, that:
•The first line must indicate that this is a CERTAUTH certificate.
•The Private Key Type and Size must be present.
•If the Serial Number is not equal to 00, this indicates that the certificate has been renewed or was issued by another certificate authority.
The second RACF command to display the CA certificate uses the LIST keyword of RACDCERT:
RACDCERT CERTAUTH LIST(LABEL(‘ITSO IBM PSIE PKI1’))
Display CA key ring
To display the CA key ring, enter the following command:
RACDCERT ID(PKISTU) LISTRING(CARING)
The ring information must have USAGE = PERSONAL and DEFAULT = YES.
Display certificates using utilities iclview and vosview
Sometimes you might want to display your Issued Certificates List (ICL) or your Certificates Request List (CRL). These lists are kept respectively in VSAM data sets PKI.WEBPKI1.ICL and PKI.WEBPKI1.OST. These lists are independent of RACF, although ICL may contain certificates registered in RACF. To display ICL and CRL, two utilities can be used: iclview and vosview, respectively. Issue the OMVS command and do the following to display all certificates issued by PKI Services:
cd /usr/lpp/pkiswerv/lib
/usr/lpp/pkiserv/bin/iclview/ ’pki.webpki1.icl’
To display all certificate requests received by PKI Services after issuing OMVS:
cd /usr/lpp/pkiswerv/lib
/usr/lpp/pkiserv/bin/vosview/ ’pki.webpki1.ost’
|
Note: Records starting with Object key=1 and Object key =2 contain only system data.Records starting with Object key=108 is a request sent by user ta for a 1-Year PKI SSL Browser certificate. (The type of certificate is represented by appldata =1YBSSL).
|
Establishing PKI Services as intermediate certificate authority
The default setup for PKI Services establishes the PKI Services certificate authority as a root CA, also known as a self-signed CA. Because there is no established trust hierarchy leading to a self-signed certificate, it is impossible to verify that a self-signed certificate is genuine. Accordingly, any person or application that wants to process certificates issued by a root authority must explicitly trust the authenticity of the self-signed CA certificate.
Alternately, you can establish the PKI Services certificate authority as an intermediate (subordinate) certificate authority. An intermediate certificate authority is one whose certificate is signed by another higher certificate authority.
Perform the following steps to establish PKI Services as an intermediate certificate authority:
1. Determine which certificate authority will be acting as a higher authority for your PKI Services, which can be a public CA such as VeriSign.
2. Create a new certificate request from your self-signed CA certificate by entering the following RACF command:
RACDCERT CERTAUTH GENREQ(LABEL(‘IBM ITSO PSIE PKI1’)) +
DSN(‘PKI.CAPKI1.BACKUP.P12BIN’)
3. Send the certificate request to the higher certificate authority, following its required procedures.
4. After the certificate has been issued, receive the certificate back into the certificate data set (PKI.CAPKI1.BACKUP.P12BIN).
|
Note: The procedure for receiving the certificate back into the certificate data set can vary greatly depending on how the higher certificate authority delivers the new certificate: If the certificate is delivered as base64 encoded text, the easiest way to deposit the certificate into the data set is to copy and paste the certificate into the empty data set. If the certificate is delivered as binary data (also called DER-encoded), the easiest way to deposit the certificate into the data set is to use binary FTP.
|
5. Receive the certificate back into the RACF database by entering the following RACF command:
RACDCERT CERTAUTH ADD(‘PKI.CAPKI1.BACKUP.P12BIN’)
6. Export the certificate in DER format to the export data set by entering the following RACF command:
RACDCERT CERTAUTH EXPORT(LABEL(‘IBM ITSO PSIE PKI1‘))
DSN(‘PKI.CAPKI1.DERBIN’) FORMAT(CERTDER)
7. To make your new certificate available to your clients, set up the /var/pkiserv/ directory by performing step 2 through step 4 in “Steps for setting up the /var/pkiserv directory” from z/OS Security Server PKI Services Guide and Reference, SA22-7693.
Renewing your PKI Services CA certificate
Eventually, your PKI Services CA certificate will expire. To avoid complications related to its expiration, you should renew the certificate before it actually expires.
|
Note: You will receive MVS console message IKYP026E as the expiration date approaches.
|
Perform the following steps to renew your PKI Services CA certificate:
1. Create a new certificate request from your self-signed CA certificate by entering the following RACF command:
RACDCERT CERTAUTH GENREQ(LABEL(‘IBM ITSO PSIE PKI1‘)) +
DSN(‘PKI.CAPKI1.BACKUP.P12BIN’)
2. If your PKI Services certificate authority is a root CA (that is, it has a self-signed certificate, which is the default), then generate the self-signed renewal certificate by entering the following RACF command:
RACDCERT CERTAUTH GENCERT(‘PKI.CAPKI1.BACKUP.P12BIN’) + SIGNWITH(CERTAUTH + LABEL(‘IBM ITSO PSIE PKI1‘))
3. Alternately, if your PKI Services certificate authority is an intermediate certificate authority, repeat step 2 to step 4 in “Steps for setting up the /var/pkiserv directory” from z/OS Security Server PKI Services Guide and Reference, SA22-7693.
Recovering a CA certificate profile
If the CA certificate profile in RACF is deleted accidentally, you can recover it from the backup data set.
Perform the following steps to recover a CA certificate profile:
1. Enter the following RACF commands:
RACDCERT CERTAUTH ADD(‘PKI.CAPKI1.BACKUP.P12BIN’) + PASSWORD(your-passphrase)
WITHLABEL(‘IBM ITSO PSIE PKI1‘) ICSF
RACDCERT CERTAUTH ADD(‘PKI.CAPKI1.DERBIN’)
RACDCERT ID(PKISTU) CONNECT(CERTAUTH LABEL(‘IBM ITSO PSIE PKI1‘)
RING(CARING) USAGE(PERSONAL) DEFAULT)
2. Perform the following steps to update the RACF profile with the serial number of the last CA certificate PKI Services issued. (You must restore the certificate serial number incrementer value that is stored in the profile because otherwise PKI Services resumes issuing certificates starting from serial number 1.)
a. Ensure that PKI Services is stopped.
b. Enter the following command from the UNIX command line to change your directory:
cd /usr/lpp/pkiserv/lib
3. Now run the iclview utility:
/usr/lpp/pkiserv/bin/iclview ’pki.webpki1.icl’
4. Record the serial number displayed (in hex) of the CA certificate listed under Cert 1. The serial number (in hex) of our CA certificate was 0.
a. To determine your CA certificate’s profile name, issue the following command to perform an unsuccessful add:
RACDCERT CERTAUTH ADD(’PKI.CAPKI1.DERBIN’) +
WITHLABEL(’*** Bad Label***’)
The unsuccessful add displays this error message:
IRRD109I The certificate cannot be added. Profile 00.OU=ITSO’PSIE’CA.O=IBM.C=US is already defined.
b. Record the profile name:
Our profile name was: 00.OU=ITSO’PSIE’CA.O=IBM.C=US
5. Create the ICHEINTY ALTER job in your JCL data set, replacing the highlighted values based on the information you recorded in the previous steps.
Controlling applications that call R_PKIServ
Authorized applications, such as servers, that invoke the R_PKIServ callable service (IRRSPX00) can request the generation, retrieval, and administration of PKIX-compliant X.509 Version 3 certificates and certificate requests.
Applications can request user functions or administrative functions related to these requests. See z/OS Security Server RACF Callable Services, SA22-7691, for details of invoking IRRSPX00. Authorize these applications by administering RACF profiles in the FACILITY class, based on whether the application requests user functions or administrative functions.
R_PKIServ user functions
The user functions are:
•EXPORT: Retrieves (exports) a previously requested certificate.
•GENCERT: Generates an auto-approved certificate.
•GENRENEW: Generates an auto-approved renewal certificate.
•REQCERT: Requests a certificate that an administrator must approve before it is created.
•REQRENEW: Requests certificate renewal. The administrator must approve the request before the certificate is renewed.
•REVOKE: Revokes a certificate that was issued previously.
•VERIFY: Confirms that a given user certificate was issued by this CA and, if so, returns the certificate fields.
For user functions, FACILITY class profiles protect this interface. The form of the FACILITY class profiles is:
IRR.RPKISERV.function
Here, function is one of the following user function names in the preceding list. The user ID for the application (userid from the ACEE associated with the address space) is used to determine access:
•NONE: Access is denied.
•READ: Access is permitted based on subsequent access checks against the caller’s user ID. To determine the caller, the current TCB is checked for an ACEE. If one is found, the authority of that user is checked. If there is no ACEE associated with the current TCB, the ACEE associated with the address space is used to locate the user ID.
•UPDATE: Access is permitted based on subsequent access checks against the applicant’s user ID.
•CONTROL (or user ID is RACF SPECIAL): Access is permitted, and no subsequent access checks are made.
For SAF GENCERT and EXPORT requests where the application has READ and UPDATE access, subsequent access checks are performed against the IRR.DIGTCERT.function FACILITY profiles. These are identical to the checks the RACDCERT TSO command makes. See z/OS Security Server RACF Command Language Reference, SA22-7867, for more information.
For PKI Services EXPORT, GENCERT, GENRENEW, REQCERT, REQRENEW, REVOKE, and VERIFY requests in which the application has READ and UPDATE access, subsequent access checks are performed against the IRR.DIGTCERT.function FACILITY profiles.
R_PKIServ administrative functions
The administrative functions are:
•CERTDETAILS: Get detailed information about one PKI Services issued certificate.
•MODIFYCERTS: Change PKI Services issued certificates.
•MODIFYREQS: Change PKI Services certificate requests.
•QUERYCERTS: Query PKI Services issued certificates.
•QUERYREQS: Query PKI Services about certificate requests.
•REQDETAILS: Get detail information about one PKI Services certificate request.
For the administrative functions, a single FACILITY class profile—IRR.RPKISERV.PKIADMIN—protects this interface:
•If the caller is RACF SPECIAL, no further access is necessary.
•Otherwise, the caller needs:
– READ access to perform read operations (QUERYREQS, QUERYCERTS, REQDETAILS, and CERTDETAILS)
– UPDATE access for the action operations, (MODIFYREQS and MODIFYCERTS)
To determine the appropriate access level of the caller, the current TCB is checked for an ACEE. If one is found, the authority of that user is checked. If there is no ACEE associated with the current TCB, the ACEE associated with the address space is used to locate the user ID.
|
Attention: UPDATE access to the IRR.RPKISERV.PKIADMIN resource also controls who can act as PKI Services administrators.
|
|
Recommendation: Give UPDATE authority only to those individuals whom you would trust with the RACF SPECIAL attribute. If you do assign PKI Services administrators who do not have the RACF SPECIAL attribute, do not also give these individuals direct access to the user functions of the R_PKIServ callable service as described in “R_PKIServ user functions” on page 156.
|
Using encrypted passwords for LDAP servers
PKI Services uses an LDAP directory to store certificates. LDAP requires authenticating (binding) to the directory. You can do this by using a distinguished name and passwords. Passwords for binding (to multiple LDAP directories) can be encrypted or in unencrypted text. Your security policy should stipulate whether to use encrypted LDAP bind passwords. You store information about passwords in the PKI Services configuration file, pkiserv.conf. If you do not need the bind password for the LDAP server to be encrypted, you specify the values for Server1, AuthName1 and AuthPwd1 in the pkiserv.conf configuration file, otherwise you should comment them out.
Perform the following steps to use encrypted LDAP bind passwords:
1. Define a fixed-name profile LDAP.BINDPW.KEY in RACF class KEYSMSTR by entering the following command, replacing the highlighted value with your own key selected randomly using hexadecimal values from 0 to F:
RDEFINE KEYSMSTR LDAP.BINDPW.KEY SSIGNON(KEYENCRYPTED(A7D8E09ACDEF35AC))
The SSIGNON segment has two possible keywords:
– KEYMASKED: Used when ICSF is not active
– KEYENCRYPTED: Used when ICSF is active
A7D8E09ACDEF35AC is the value of the key. (Replace this with your own key.)
2. Activate the KEYSMSTR class by entering the following command:
SETROPTS CLASSACT(KEYSMSTR)
Now, you have two alternatives:
•Use profiles in RACF class LDAPBIND for each LDAP directory.
•Use fixed-name profile IRR.PROXY.DEFAULTS in class FACILITY instead of LDAPBIND class.
Profiles in class LDAPBIND
For each LDAP directory, create your own profile (in our case LDAPKI) in RACF class LDAPBIND by entering the following command:
RDEFINE LDAPBIND LDAPKI + PROXY(LDAPHOST(ldap://wtsc64.itso.ibm.com:3389) BINDDN('CN=LDAPADMIN') + BINDPW(LDAPADMIN))
Now you have to update the pkiserv.conf file as follows:
# Server1=wtsc64.itso.ibm.com:3389
# AuthName1=CN=LDAPADMIN
# AuthPwd1=LDAPADMIN
-------
BindProfile1=LDAPKI
Profile in Class FACILITY
If you intend to use profile IRR.PROXY.DEFAULTS in class FACILITY instead of the LDAPBIND class for encrypted LDAP bind passwords, enter the following command to create the profile:
RDEFINE FACILITY IRR.PROXY.DEFAULTS +
PROXY(LDAPHOST(ldap://wtsc64.itso.ibm.com:3389) +
BINDDN('CN=LDAPADMIN') +
BINDPW(LDAPADMIN))
You have to update pkiserv.conf by commenting out all four statements:
# Server1=wtsc64.itso.ibm.com:3389
# AuthName1=CN=LDAPADMIN
# AuthPwd1=LDAPADMIN
-------
#BindProfile1=LDAPKI
Using LDAPBIND is more flexible because it enables the creation of as many profiles for LDAP servers to which you need to authenticate. (Using FACILITY provides only one LDAP server.)
You might want to list the segment PROXY to check your work with the RLIST command. If you are using the LDAPBIND class, enter the following:
RLIST LDAPBIND LDAPKI PROXY NORACF
Register a Personal Certificate with RACF
This function is documented in member RACINSTL of SYS1.SAMPLIB under name SELFREG number 33. The application consists of three HTML pages and a REXX routine.
To be able to use this application, you must:
•Have one or more Personal Certificates installed in your browser.
•Have a valid user ID in RACF.
This application enables you to register a Personal Certificate with RACF, which means that you associate the certificate with your RACF user ID.
You can also deregister a previously registered Personal Certificate. When you do this, the information about your certificate is removed from RACF.
To install this application into your two Web servers’ httpd.conf file:
1. Add into /web/pki1/pub/index.html and /web/pki1a/index.html reference to the application:
This is the <a href="selfreg.html"> RACF Selfreg Appl</a>
2. Create two new directories in /web/pki1 and /web/pki1a (ocgi and rar):
mkdir /web/pki1/ocgi and mkdir /web/pki1a/ocgi
mkdir /webpki1/rar and mkdir /web/pki1a/rar
3. Copy the three HTML pages from SYS1.SAMPLIB(RACFINSTL) - selfreg.html, selfrgft.html, and selfrghd - as files of directory rar. Copy selfreg.rexx into directory ocgi.
4. Add the following into the /web/pki1/httpd.conf file:
Redirect /PKIServ/clientauth-cgi/* https://wtsc64oe.itso.ibm.com:8013/ +
PKIServ/clientauth-cgi/*
5. Add the following into the /web/pki1a/httpd.conf file:
Exec /ocgi/* /web/pki1a/ocgi/*
Pass /rar/* /web/pki1a/rar/*
Now start your browser and find your Web server address by typing:
http://wtsc64oe.itso.ibm.com:8010
The application requests a valid certificate to use it. Click the RACF Selfreg Appl.
When you click the Verify Personal Certificate button, you are presented with a list of the personal certificates installed into your browser. After you have made a selection, you will be prompted for your RACF user ID and password and after entering them, a confirmation panel shows information from the certificate you selected and your RACF user ID.
If the data is correct, click Register Personal Certificate to associate your user ID with your certificate. If you want to delete a previously registered certificate from RACF, go back, select the certificate from the list kept in your browser, and click Deregister Personal Certificate.
Now you might want to use RACDCERT LIST to see your new certificate in RACF. It displays last in the list of your certificates.
3.19 Prepare and configure the UNIX System Services environment

Figure 3-19 Prepare and configure the UNIX System Services environment
As you prepare the environment, decide where to place your configuration files for the location of additional run-time and configuration file directories for backup or failover reasons.
IBM z/OS Security Server PKI Services Guide and Reference, SA22-7693 defines the following default locations for directories:
•PKI Services installation directory /usr/lpp/pkiserv
•PKI Services run-time directory /etc/pkiserv
In our setup, we used the corresponding Web server run-time directory /web/server1 to host the PKI server configuration and run-time files.
•PKI Services variable directory /var/pkiserv
This is the place where you store your CA certificate for public download.
Other products’ default directories are:
•Web server run-time directory /etc
As indicated in several other publications, you should define a schema that supports a parallel run-time for many Web servers. We recommend using /web/server1, web/server2, and more.
•OCSF and OCEP variables directory /var/ocsf
•LDAP server run-time /etc/ldap
You may set up several LDAP servers, so you might consider placing these config files into a certain structure similar to the Web server config files.
This can be /ldap/ldap1, /ldap/ldap2, and so on.
Standard LDAP configuration is looking for a slapd.conf file or ldap.slapd.profile in this directory.
•PKI object store (OST) PKISRVD.VSAM OST
•PKI issued certificate list (ICL) PKISRVD.VSAM.ICL
|
Note: In a single z/OS environment there can only be one active PKI server.
|
3.20 Setting up the Web servers for PKI
Figure 3-20 Setting up the Web servers for PKI
Setting up the Web servers for PKI
In this chapter, we make the assumption that you have already set up the IBM HTTP Server for z/OS (Web server) to run as a standard Web server on port 80. The setup of this Web server can be cloned to a second one because PKI Services must run at least two Web servers.
We used the following names for our Web server run-time library in HFS:
•/web/pki1
•/web/pki1a
Benefit of using two Web servers
The first Web server is running normal mode (port 80) and standard secure mode (port 443). It is used to request, administer, and obtain certificates.
The second Web server is running SSL mode only (normalmode off) on a special port (port 1443) and is used for client authentication. It is set up to authenticate client certificates by using an X500 server (LDAP server). This Web server is used for renew and revoke certificate actions.
Setting up the Web server as a secure Web server
To enable the Web server for SSL, use a server certificate. This certificate could be obtained from Certification Authorities (CAs) such as VeriSign. You can also generate a self-signed certificate.
There are several ways to generate these certificates. On z/OS you could use either the gskkyman utility or RACF services. In the next sections, we describe the RACF services method of generating a self-signed certificate.
Customizing the Web server for SSL
If you have already created a self-signed certificate using RACF, then you have this certificate in a key ring. If you obtained a certificate from an external source, ensure that it is received into a key ring.
In IBM z/OS Security Server PKI Services Guide and Reference, SA22-7693, the RACF key ring is named SSLring. We suggest giving this a more specific name, because there can be more key rings for different purposes. We named our key ring webpki2, which is similar to the Web server that we used to run the PKI Services.
To finalize your secure Web server setup, you must customize the Web server configuration file /web/pki2/httpd.conf with the configuration directives shown in Example 3-6.
Example 3-6 Customizing the Web server configuration file
# keyfile key.kdb <- default
keyfile webpki2 SAF <- changed to RACF keyring
sslmode on <- default
sslport 443 <- default
normalmode on <- default
When you have made the changes to the httpd.conf file, restart the Web server to pick up the changes. Then, you can test the secure Web server from a browser as follows:
•If you used the default SSL port 443:
https://<web-server-domain-name>
•If you are using a port number other than the default
https://<web-server-domain-name>:<SSL port number>
Set up the second Web server serving SSL only on port 1443 (or a different port such as 8443). In this case, the definitions in Example 3-7 must be customized in /web/pki2/httpd.conf.
Example 3-7 Customizing the second Web server configuration file
# keyfile ley.kdb <- default
keyfile webpki2 CLINETAUTH <- changed to RACF keyring
sslmode on <- default
sslport 1443 <- changed to the another SSL port
normalmode off <- changed - no unencrypted mode
Customizing the first Web server for PKI
All of the customization parameters for PKI Services are defined in a sample httpd.conf that resides in /usr/lpp/pkiserv/samples.
We suggest that you split the file in several pieces and attach them in certain locations to your existing httpd.conf.
In the following sequence, we assume the following:
•Web server runs on ports 80 and 443.
•The other Web server runs on port 1443.
•The domain name for our PKI servers is pki.itso.ibm.com.
•SSL setup is finished.
•PKI surrogate user ID is PKISRV.
•Web server config files are in /web/server1.
•The location of the CA certificate is /var/pkiserv.
For performance reasons, we changed the location of the redirect statements in httpd.conf so that they appear before the protection statements. The following sequence illustrates how to update your httpd.conf:
1. Search for the following lines in httpd.conf:
# =================================================================== #
#
# User authentication and document protection
#
# ================================================================== #
2. Scroll a little farther, then add the Protection statements just as shown here:
# The following rules allow anyone who knows your WEBADM
# password to use the Web Server remote configuration application.
#
Protection IMW_Admin {
ServerId IMWEBSRV_Administration
AuthType Basic
PasswdFile %%SAF%%
Mask WEBADM,webadm
}
Protect /admin-bin/* IMW_Admin WEBADM
Protect /Docs/admin-bin/* IMW_Admin WEBADM
Protect /reports/* IMW_Admin WEBADM
Protect /Usage* IMW_Admin WEBADM
3. Add the statements to your httpd.conf as shown in Example 3-8.
Example 3-8 Adding statements to httpd.conf
#-----------------------------------------------------------------
# Redirection directives for the PKI server
#-----------------------------------------------------------------
# make sure all requests come in through SSL
Redirect /PKIServ/ssl-cgi/* https://pki.itso.ibm.com:443/PKIServ/ssl-cgi-bin/*
#
# redirect client auth requests to the other Web server on port 1443
Redirect /PKIServ/clientauth-cgi/* https://pki.itso.ibm.com:1443/PKIServ/clientauth-cgi/*
#-----------------------------------------------------------------
# End of Redirection directives for the PKI server
#-----------------------------------------------------------------
#-----------------------------------------------------------------
# Protection directives for the PKI server
#-----------------------------------------------------------------
Protection PublicUser {
ServerId PublicUser
UserID PKISRV
Mask Anyone
}
Protect /PKIServ/public-cgi/* PublicUser
Protect /PKIServ/ssl-cgi-bin/* PublicUser
Protect /PKIServ/* PublicUser
Protection AuthenticatedUser {
ServerId AuthenticatedUser
AuthType Basic
PasswdFile %%SAF%%
UserID %%CLIENT%%
Mask All
}
Protect /PKIServ/ssl-cgi-bin/auth/* AuthenticatedUser
Protection SurrogateUser {
ServerId SurrogateUser
AuthType Basic
PasswdFile %%SAF%%
UserID PKISRV # <-check for your actual PKI Surrogate user ID
Mask All
}
Protect /PKIServ/ssl-cgi-bin/surrogateauth/* SurrogateUser
#-----------------------------------------------------------------
# End of protection directives for the PKI server
#-----------------------------------------------------------------
4. Now search for the following lines in httpd.conf:
# =================================================================== #
#
# Mapping rules
#
# =================================================================== #
5. Scroll a little farther, then add the mapping rules as shown Example 3-9.
Example 3-9 Add mapping rules
# *** ADD NEW PASS RULES HERE ***
#-----------------------------------------------------------------
# Mapping rules for the PKI server
#-----------------------------------------------------------------
Exec /PKIServ/public-cgi/* /usr/lpp/pkiserv/PKIServ/public-cgi/*
Exec /PKIServ/ssl-cgi-bin/* /usr/lpp/pkiserv/PKIServ/ssl-cgi-bin/*
Pass /PKIServ/cacerts/* /var/pkiserv/*
#
#-----------------------------------------------------------------
# End of mapping rules for the PKI server
#-----------------------------------------------------------------
# Note that we have set up the public Web pages to reside in
/web/server1/pub
#
Pass /* /web/server1/pub/*
6. The rest of the configuration directives mentioned in /usr/lpp/pkiserv/samples/httpd.conf are already configured in the default setup for the Web server. You might want to check them as follows:
AddType .cer application/x-x509-user-cert ebcdic 0.5 # Browser Certificate
AddType .der application/x-x509-ca-cert binary 1.0 # CA Certificate
7. Now add the additional variables to the httpd.envvars file as indicated in the sample httpd.envvars file.
We suggest adding the following two variables to the end of the httpd.envvars:
_PKISERV_CONFIG_PATH=/etc/pkiserv
#_PKISERV_EXIT=/<full-path-to-pkiexit>/pkiexit
Here, _PKISERV_CONFIG_PATH should be the Web server run-time directory (/web/pki2) where the PKI server configuration files reside.
Customizing the second Web server for PKI
This is the setup for the second Web server that runs in SSL mode only on port 1443. It is set up to do client authentication and check the CRL against LDAP.
All the customization parameters for PKI Services are defined in a sample httpd.conf that resides in /usr/lpp/pkiserv/samples.
We suggest that you to split the file into several pieces and add them in certain locations to your existing httpd.conf.
In the following example, we assume the following:
•Web server runs on port 1443.
•The other Web server runs on ports 80 and 443.
•The domain name for our PKI servers is pki.itso.ibm.com.
•SSL setup is finished.
•PKI surrogate user ID is PKISRV.
•Web server config files are in /web/server2.
The following text illustrates how to update your httpd.conf. To update httpd.conf:
1. Search for the following lines in httpd.conf:
# =================================================================== #
#
# User authentication and document protection
#
# =================================================================== #
2. Scroll a little farther, and add the Protection statements as shown in Example 3-10.
Example 3-10 Add the Protection statements
# The following rules will allow anyone that knows your WEBADM
# password to use the Web Server remote configuration application.
#
Protection IMW_Admin {
ServerId IMWEBSRV_Administration
AuthType Basic
PasswdFile %%SAF%%
Mask WEBADM,webadm
}
Protect /admin-bin/* IMW_Admin WEBADM
Protect /Docs/admin-bin/* IMW_Admin WEBADM
Protect /reports/* IMW_Admin WEBADM
Protect /Usage* IMW_Admin WEBADM
#-----------------------------------------------------------------
# Redirect directives for the PKI server
#-----------------------------------------------------------------
#
# redirects the public requests to the non SSL Web server
Redirect /PKIServ/public-cgi/* http://pki.itso.ibm.com:80/PKIServ/public-cgi/*
# redirects the non client auth SSL reuests to the Web server on port 443 *
Redirect /PKIServ/ssl-cgi/* https://pki.itso.ibm.com:443/PKIServ/ssl-cgi-bin/*
#-----------------------------------------------------------------
# End of Redirect directives for the PKI server
#-----------------------------------------------------------------
#-----------------------------------------------------------------
# Protection directives for the PKI server
#-----------------------------------------------------------------
Protection RenewRevokeUser {
ServerId RenewRevokeUser
AuthType Basic
UserID PKISRV
SSL_CLIENTAUTH Client
Mask Anyone
}
Protect /PKIServ/clientauth-cgi/* RenewRevokeUser
Protection AuthenticatedAdmin {
ServerId AuthenticatedAdmin
AuthType Basic
UserID %%CERTIF%%
SSL_CLIENTAUTH Client
Mask Anyone
}
Protect /PKIServ/clientauth-cgi/auth/* AuthenticatedAdmin
#-----------------------------------------------------------------
# End of protection directives for the PKI server
#-----------------------------------------------------------------
3. Now search for the following lines in httpd.conf:
# =================================================================== #
#
# Mapping rules
#
# =================================================================== #
4. Scroll a little farther, then add the mapping rules as shown Example 3-11.
Example 3-11 Add mapping rules
# *** ADD NEW PASS RULES HERE ***
#-----------------------------------------------------------------
# Mapping rules for the PKI server
#-----------------------------------------------------------------
Exec /PKIServ/clientauth-cgi/* /usr/lpp/pkiserv/PKIServ/clientauth-cgi-bin/*
#-----------------------------------------------------------------
# End of mapping rules for the PKI server
#-----------------------------------------------------------------
# Note that we have set up the public Web pages to reside in
/web/server2/pub
Pass /* /web/server2/pub/*
5. Now search for the following lines in httpd.conf:
# SSLClientAuth directive:
#
6. Scroll a little farther, then add the SSLClientAuth statements as shown Example 3-12.
Example 3-12 Add the SSLClientAuth statements
...
# SSLClientAuth off
SSLClientAuth strong
...
# SSLX500CARoots local_only
SSLX500CARoots local_and_x500
...
# SSLX500Host my.x500host.com
# SSLX500Host <ldap-server-name>
SSLX500Host wtsc63.itso.ibm.com
...
# SSLX500Port 22343
# SSLX500Port <ldap-port-number>
SSLX500Port 22343
...
# SSLX500UserID myUserId
# SSLX500Password myPassword
# SSLX500UserID <ldap-distinguished-name>
# SSLX500Password <ldap-password>
SSLX500UserID ADMIN
SSLX500Password secret
Set up the httpd.envvars exactly as described in “Customizing the first Web server for PKI” on page 164, but set the _PKISERV_CONFIG_PATH= variable to point to the second Web server run-time /web/pki2.
3.21 Setting up the LDAP server for PKI
Figure 3-21 Setting up the LDAP server for PKI
Setting up the LDAP server for PKI
We suggest that you set up more than one LDAP server for availability purposes. The first one can be local on the same image as PLI services, the other somewhere in the network. In the PKI configuration you can define several LDAP servers. The first one that is found active is the one that PKI Services uses to replicate the CA certificate and the CRL (Certificate Revocation List).
For the PKI Services LDAP environment, you might set up a special LDAP database in the TDBM back-end store. We called ours LDAPPKI.
Other information needed from the LDAP environment for PKI Services is:
•LDAP domain name and port number:
wtsc63.itso.ibm.com:3389
•An admin user ID and password:
ADMINDN='cn=Admin'
ADMINPW='secret'
Instead of setting up domain name, user ID, and port, as hard coded and in unencrypted text as described here, you might choose to use a RACF definition instead.
The other consideration for LDAP for PKI Services is how you set up your LDAP tree. We decided to set up a tree based on the suffix cn=US, which allowed us to use just one suffix. cn=US is the country definition for our CA setup.
The setup for the LDAP server follows the basic installation procedures for the TDBM as described in z/OS Security Server LDAP Server Administration and Use, SC24-5923. Your environment influences the way you set up your LDAP server, so we offer the base requirements for the installation of the PKI LDAP server.
LDAP setup: Running the ldapcnf utility
The LDAP files are installed into the UNIX subdirectory /usr/lpp/ldap. To build the LDAP server using the ldapcnf utility, copy the following files into a work directory from the /usr/lpp/ldap/etc directory:
•ldap.profile
•ldap.db2.profile
•ldap.slapd.profile
•ldap.racf.profile
This section describes the DB2 and TCP/IP interfaces with the LDAP server. For a complete explanation of these files and the use of ldapcnf, read z/OS Security Server LDAP Server Administration and Use, SC24-5923. In the ldap.profile file, the important parameters that must be set and matched with the PKI templates and your system environment are:
•TDBM_SUFFIX, which is the suffix that is created within the LDAP configuration file. It should match the suffix with the PKI templates.
•LDAPUSRID and LDAPUSRGRP, which are the LDAP server’s RACF user ID and group. These should match what was defined previously.
•ADMINDN and ADMINPW, which are the LDAP server’s administrator. This must match what is in the PKI templates unless you are going to access controls within LDAP. The ADMINPW is used for the initial installation of the LDAP server and will be changed when the LDAP administrator is defined within the LDAP directory. Either the changed password must match what is coded into the PKI templates, or you could use a RACF user ID if the SDBM is set up, or you could use the new LDAPBIND features.
•The remainder of the parameters are HLQ for system data sets, locations of required information for the ldapcnf utility, and so on. All of these must match what is in your system environment for the ldapcnf utility to work correctly.
•One last important parameter is the location of the output from the ldapcnf utility. The output is placed in the data set indicated by the OUTPUT_DATASET parameter.
In our case, the important part of the ldap.profile file appeared as shown in Example 3-13.
Example 3-13 The ldap.profile file
OUTPUT_DATASET='JJONES.LDAPOUT'
LDAPUSRID='LDAPSRV'
LDAPUSRGRP='LDAPGRP'
TDBM_SUFFIX='c=US'
ADMINDN='cn=Admin'
ADMINPW='secret'
Within the ldap.slapd.profile file, the following parameters must be set appropriately:
•LDAP_HOSTNAME, which is the IP address of your LDAP server.
•PORT, which is the unsecure port on which the LDAP server is listening.
•There are other parameters that you can set if you are using SSL, replication, SDBM, multiserver mode, password encryption, and so on. Because these parameters are not required, we do not discuss them here.
In our case, the important part of the ldap.slapd.profile appeared as in Example 3-14.
Example 3-14 The ldap.slapd.profile
LDAP_HOSTNAME='wtsc63.itso.ibm.com'
PORT='3389'
Nothing within the ldap.db2.profile is required to match the PKI environment, but the LDAP server and DB2 must communicate correctly for the LDAP server to be useful. If you are not responsible for DB2 at your installation or if you do not have DBA authority, then the easiest way to handle the ldap.db2.profile is to set the following parameters and run the rest with the defaults:
•TDBM_DB2_LOCATION, which is the DDF location name. Run with the default of LOC1.
•TDBM_DB2_USERID, which is the HLQ of your DB2 tables. Set this the same as your LDAP server RACF user ID.
•TDBM_DB2_DBNAME, which is the name of your DB2 database. Set this to the appropriate value for your installation or something that is meaningful, such as PKILDAP.
In our case, the ldap.db2.profile looked similar to Example 3-15.
Example 3-15 The ldap.db2.profile
TDBM_DB2_LOCATION='DB2H'
TDBM_DB2_USERID='LDAPSRV'
TDBM_DB2_DBNAME='LDAPPKI'
Then, run the ldapcnf utility using the command from your work directory to create several members in the output data set that you specified in the ldap.profile file:
/usr/lpp/ldap/sbin/ldapcnf -i ldap.profile
DB2 (TDBM) for LDAP setup
To build the DB2 environment, first you must have DBA authority. If you do not have the authority to create and maintain databases, then hand over the DBCLI, DBSPUFI, and DSNAOINI members to your DBA to create the appropriate databases. In return, you need:
•The data set with the DSNAOINI file
•The DB2 data source or location name
•The user ID that own or created the DB2 tables
•The database name
•The DB2 subsystem ID
The only authority that is required within the DB2 environment is that the LDAP server’s RACF user ID must have DBADM authority to the newly created database, EXECUTE authority on the CLI plan, and SELECT authority on SYSIBM.SYSCOLUMNS.
If you are the DBA for your installation, then review the DBSPUFI member of the output data set. Ensure that the buffer pool and storegroup are set the way that you want them. Also, review the sizes of the table spaces for your environment.
The defaults are pretty good for a medium-size PKI environment if you are not sharing the LDAP server with any other applications. Then run the DBSPUFI member using the SPUFI application. This should get a zero return code on the COMMIT. If you have not run a CLI plan, then run the DBCLI plan and ensure that the LDAP server’s RACF user ID has EXECUTE authority to the plan name.
Finally, check the DSNAOINI file. It is critical that the DB1 subsystem name, location name, and CLI plan name are correct. Also indicate whether you are using CAF or RRSAF in DB2.
LDAP PROC and the configuration file
When the DB2 environment is complete, review the JCL in the LDAP PROC. This is placed in the output data set under the name you specified. Review this member to ensure that the JCL is correct, and move it into the appropriate system proclib. As all of our system data sets are in LINKLST but our DB2 data sets are not, a couple of changes were made to the default PROC, and our final run-time LDAP PROC appeared as in Example 3-16.
Example 3-16 Our final run-time LDAP PROC
//LDAPCRL PROC REGSIZE=0M,
//*----------------------------------------------------------
// PARMS='',
// PCNFOUT='JJONES.LDAPOUT',
// OUTCLASS='H'
//*----------------------------------------------------------
//GO EXEC PGM=GLDSLAPD,REGION=®SIZE,TIME=1440,
// PARM=('/&PARMS >DD:SLAPDOUT 2>&1')
//*----------------------------------------------------------
//STEPLIB DD DSN=DB2H7.SDSNLOAD,DISP=SHR
//CONFIG DD DSN=&PCNFOUT.(SLAPDCNF),DISP=SHR
//ENVVAR DD DSN=&PCNFOUT.(SLAPDENV),DISP=SHR
//SLAPDOUT DD SYSOUT=&OUTCLASS
//SYSOUT DD SYSOUT=&OUTCLASS
//SYSUDUMP DD SYSOUT=&OUTCLASS
//CEEDUMP DD SYSOUT=&OUTCLASS
The other item to check here is the configuration and the environment variables files. The environment variables file (envvars) are in the SLAPDENV member of the output data set. There is nothing to change here at this time, but as you install OCSF and ICSF you might add a LIBPATH parameter in this file. The other way to tell the LDAP server where these executables are is using the PARM parameter within the PROC.
The LDAP configuration file is in the SLAPDCNF member of the output data set. The important global parameters are:
•LISTEN, which defines the IP address and port of the LDAP server.
•ADMINDN, which defines the LDAP server’s administrator. On the initial installation of the LDAP server, you also have to set up the adminPW parameter, which is the LDAP server’s administrator’s password. This password is only needed for the administrator as defined within the LDAP directory.
The important TDBM parameters are:
•SUFFIX, which is the beginning of this portion of the LDAP directory. There can be more than one of these.
•SERVERNAME, which is the DB2 location.
•DBUSERID, which is the name of the creator of the DB2 tables.
•DATABASENAME, which is the name of the DB2 database.
•DSNAOINI, which indicates where the CLI interface definition file is.
Our SLAPDCNF member appeared as in Example 3-17.
Example 3-17 SLAPDCNF member
maxConnections 200
listen ldap://wtsc63.itso.ibm.com:3389
adminDN cn=Admin
adminPW passon
# logfile //DD:LOGOUT
# ---------------------------------------
database tdbm GLDBTDBM
suffix "c=US"
dsnaoini JJONES.LDAPOUT(DSNAOINI)
servername DB2H
dbuserid JJONES
databasename LDAPPKI
Starting the LDAP server and loading the schema
With the RACF, TCP/IP, PROC, and DB2 features set up for LDAP, the server is now ready to be started. Go into SDSF and issue the following command (assuming that ldapcrl is the LDAP member within your proclib):
/s ldapcrl
As you watch the LDAP server come up, you should see the following message in either the SYSLOG or the JES messages for the PROC:
GLD0122I Slapd is ready for requests.
Ensure that there were now DB2 error messages in the JES messages within the PROC. Then go into OMVS and change directories to your work directory. Now issue the following command:
ldapsearch -h wtsc63.itso.ibm.com -p 3389 -V 3 -b ““ -s base -L “objectclass=*”
If your LDAP server is set up and communicating correctly, then the output looks similar to that shown Example 3-18.
Example 3-18 Output from the LDAP server
dn:
supportedcontrol: 2.16.840.1.113730.3.4.2
supportedcontrol: 1.3.18.0.2.10.2
supportedcontrol: 1.3.18.0.2.10.10
supportedextension: 1.3.6.1.4.1.1466.20037
namingcontexts: c=US
subschemasubentry: CN=SCHEMA,c=US
supportedsaslmechanisms: EXTERNAL
supportedsaslmechanisms: CRAM-MD5
supportedsaslmechanisms: DIGEST-MD5
supportedldapversion: 2
supportedldapversion: 3
ibmdirectoryversion: z/OS V1R4
ibm-sasldigestrealmname: wtsc63oe.itso.ibm.com
At this point the schema must be loaded into the LDAP directory. First, copy schema.user.ldif and schema.IBM.ldif from the /usr/lpp/ldap/etc directory into your working directory. You really only need the schema.user.ldif file to support the PKI environment, but in case you ever want to use this LDAP server for anything else that requires a more extensive schema, you could include both files. Edit each one of these files, changing <suffix> at the front of these files to match the suffix in your configuration file. In our case, we issued this command while we were editing the files:
c ‘<suffix>’ ‘c=US’
The top non-comment line in both files should be ‘cn=schema, c=US’. Save the files, then from your working directory, issue the following commands (where cn=admin and secret match up with your configuration file and /u/jjones/ldapprod is your working directory):
ldapmodify -h wtsc63.itso.ibm.com -p 3389 -D cn=admin -w secret
-f /u/jjones/ldapprod/schema.user.ldif
ldapmodify -h wtsc63.itso.ibm.com -p 3389 -D cn=admin -w secret
-f /u/jjoones/ldapprod/schema.IBM.ldif
The output from these commands is only one line, indicating that the LDAP server is being modified. Any other message means that there is some sort of problem and it should be fixed. You can view the schema that you have just loaded by issuing the following command:
ldapsearch -h wtsc63.itso.ibm.com -p 3389 -s base -b “cn=schema,c=US”
“objectclass=subschema”
Be prepared for several screens of output.
Defining the suffix and administrator
The final step in making the LDAP server ready for PKI Services is to define the suffix. (This is the suffix that was indicated in the PKI template.) To define the suffix and the administrator that we are using in our examples, issue the following command from your OMVS environment (where /u/jjones/ldapprod is your working directory):
ldapadd -h wtsc63.itso.ibm.com -p 3389 -D cn=admin -w secret
-f /u/jjones/ldapprod/suffix_admin.ldif
The LDIF data in the suffix_admin.ldif file is as shown in Example 3-19.
Example 3-19 The LDIF data in the suffix_admin.ldif file
dn: c=US
objectclass: top
objectclass: country
c: us
dn: cn=admin,c=US
objectclass: top
objectclass: person
objectclass: inetorgperson
objectclass: organizationalPerson
cn: admin
sn: admin
userPassword: secret
This defines the suffix and the LDAP administrator, with its password, in the LDAP directory. When you issue the command to add this data to the LDAP server you will get messages, outside of the message that you are adding data, from the LDAP server if there are errors. To list the data and verify that your data has been added correctly, issue this command from the OMVS environment (where ‘’ is the UNIX continuation symbol):
ldapsearch -h wtsc63.itso.ibm.com -p 3389 -D cn=admin -w secret -b c=US
“objectclass=*”
This command produces output that looks similar to that shown in Example 3-20.
Example 3-20 Output from the ldapsearch -h command
c=US
objectclass=top
objectclass=country
c=US
cn=admin,c=US
objectclass=top
objectclass=inetorgperson
objectclass=person
objectclass=organizationalPerson
cn=admin
sn=admin
userpassword=secret
Now we are ready to make the LDAP server production-ready. First, in SDSF, stop the LDAP server with the /p ldapcrl command. When the LDAP server is stopped, edit the SLAPDCNF member of your output data set to remove the adminPW parameter, and adjust the adminDN to add the suffix to the DN. Now your SLAPDCNF member should look similar to Example 3-21.
Example 3-21 The modified SLAPDCNF member
maxConnections 200
listen ldap://wtsc63.itso.ibm.com:3389
adminDN cn=Admin,c=US
# logfile //DD:LOGOUT
# ---------------------------------------
database tdbm GLDBTDBM
suffix "c=US"
dsnaoini JJONES.LDAPOUT(DSNAOINI)
servername DB2H
dbuserid JJONES
databasename LDAPPKI
After you restart the LDAP server, it has the basic requirements to work with PKI Services.
3.22 Setting up the PKI Services task
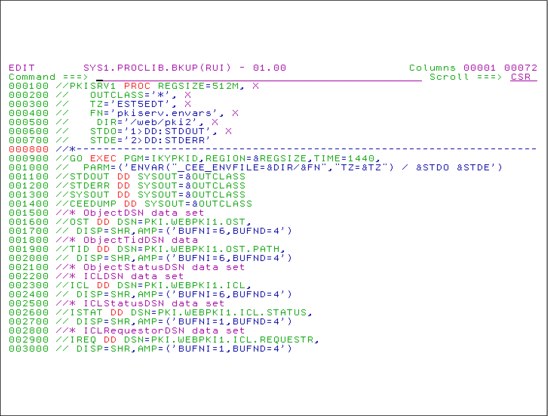
Figure 3-22 Setting up the PKI services task
Setting up the PKI Services task
PKI Services use VSAM data sets for object store (OST) and issued certification list (ICL). The PKISTU started task is used to manage these data bases.
To create these data sets, use the IKYCVSAM sample job in SYS1.SAMPLIB.
We changed the default VSAM data set names to fit our site standards. For this test, we decided to prefix the data sets with PKI, using WEBPKI2 as the second qualifier.
After these data sets are created, set up the PKISRV2 started task.
We recommend that you copy PKISRVD to a started task procedure name that fits your environment. In our case, we copied it to PKISRV1, PKISRV2.
Edit the appropriate PKISRVD procedure to configure the data set names such as those shown in Figure 3-22.
3.23 Configure OCSF and OCEP to work with PKI Services
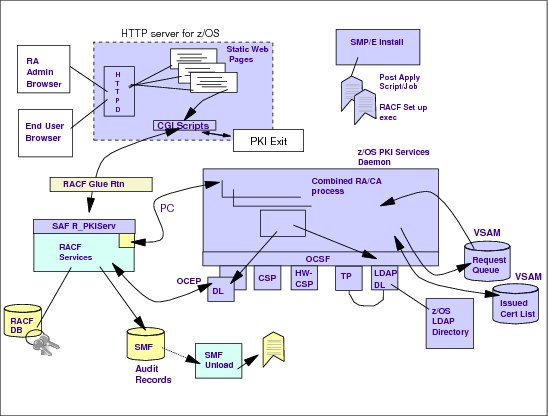
Figure 3-23 Configure OCSF and OCEP to work with PKI Services
In this section, we assume that you have set up OCSF. So, ensure that the files in /var/ocsf exist.
To run PKI Services with OCSF, you must set up the PKI Services Trust Policy (PKITP) plug-in for OCSF. The PKITP performs certificate validation.
There are two shell scripts in /usr/lpp/pkiserv/bin that perform the installation and verification of the PKITP setup. To install PKITP:
1. Run the PKITP installation routine:
su
cd /usr/lpp/pkiserv/lib
/usr/lpp/pkiserv/bin/install_pkitp
2. It returns some questions:
addin directory?
/usr/lpp/pkiserv/lib
addin filename?
pkitp.so
action? “install|uninstall¨
install
3. After this is complete, you can run the verification:
TRAUNER:/Z04RC1/usr/lpp/pkiserv/lib: >/usr/lpp/pkiserv/bin/pkitp_ivp
Starting pkitp IVP
Initializing CSSM
CSSM Initialized
Attaching pkitp
Attach successful, Detaching pkitp
Detach of pkitp successful
Completed pkitp IVP
TRAUNER:/Z04RC1/usr/lpp/pkiserv/lib: >
3.24 Configure the PKI Services
Figure 3-24 Configure the PKI Services
Copy some of the sample files that are provided with PKI Services from the installation directory /usr/lpp/pkiserv/samples to the run-time directory. We set this directory to be the same as the Web server Cryptographic Coprocessor /web/pki2.
Be careful because the samples directory contains some files that will overwrite your Web server configuration files if you copied all files. Therefore, we suggest:
1. In the UNIX shell, ensure that you have superuser authority (or at least authority to rename and move files).
2. Copy all of the necessary files to your Cryptographic Coprocessor:
cd /usr/lpp/pkiserv/samples
cp pkis*.* /web/server1
The httpd configuration files are unnecessary because the Web servers are already configured.
You copy the forms files later when needed.
Now set up the directory that hosts your CA certificate.
Set up the environment variables for PKI Services
Now, configure the PKI environment variables file.
|
Note: The PKI environment variables file is called pki.envars instead of httpd.envvars, which is the environment variables file for the Web server.
|
Verify or change the _PKISERV_CONFIG_PATH and the OCSFREGDIR directory information (Example 3-22).
The variable _PKISERV_MSG_LEVEL defines the debug level for PKI Services. We recommend using debug level D for all components when you install PKI Services for the first time. The default level for all components is W.
You might change these values while the PKI server is running by using a modify command to the PKI server.
Example 3-22 Verify or change the path and directory
#-------------------------------------------------------------------#
# #
# PKI Services sample environment variable file #
# #
# Licensed Materials - Property of IBM #
# 5694-A01 #
# (C) Copyright IBM Corp. 2001, 2002 #
# Status = HKY7707 #
# #
#-------------------------------------------------------------------#
#
# Language and Path configurations
#
LANG=En_US.IBM-1047
PATH=/usr/sbin
LIBPATH=/usr/lpp/pkiserv/lib:/usr/lib
NLSPATH=/usr/lib/nls/msg/%L/%N:/usr/lpp/pkiserv/lib/nls/msg/%L/%N
#
# Configuration File location and Message configuration Options
#
#_PKISERV_CONFIG_PATH=/etc/pkiserv
_PKISERV_CONFIG_PATH=/web/server1 <- Change to the actual runtime directory
_PKISERV_MSG_LOGGING=stdout_logging
#_PKISERV_MSG_LEVEL=*.w
_PKISERV_MSG_LEVEL=*.d
#
# Location of the OCSF Registry (/var/ocsf is the default location)
#
OCSFREGDIR=/var/ocsf
Customizing the PKI Services configuration file
In this section, we describe the configuration directives that must be customized in order to get PKI Services up and running.
The first directives to look at in the pkiserv.conf file are the VSAM file names that were prepared in “Setting up the PKI Services task” on page 176 for the OST and the ICL. The default for these data sets is PKISRVD.VSAM.OST and PKISRVD.VSAM.ICL, which we changed to PKI.WEBPKI(n). If you changed these names, then you must change the configuration directives accordingly. If you defined the DD names of the VSAM data sets in the procedure, then we recommend that you refer to the DD names:
[ObjectStore]
# Data set name of the VSAM request (object store) base CLUSTER
# ObjectDSN='pkisrvd.vsam.ost'
ObjectDSN=DD:OST
# Data set name of the VSAM object store PATH for the transaction ID (TID)
alternate index
# ObjectTidDSN='pkisrvd.vsam.ost.path'
ObjectTidDSN=DD:TID
# Data set name of the VSAM issued certificate list (ICL) base CLUSTER
# ICLDSN='pkisrvd.vsam.icl'
ICLDSN=DD:ICL
# Data set name of the VSAM ICL PATH for the status alternate index
# ICLStatusDSN='pkisrvd.vsam.icl.status'
ICLStatusDSN=DD:ISTAT
# Data set name of the VSAM ICL PATH for the requestor alternate index
# ICLRequestorDSN='pkisrvd.vsam.icl.requestr'
ICLRequestorDSN=DD:IREQ
In the [SAF] section of pkiserv.conf, define the right key ring to be used. This certificate had been added to the key ring by the RACF setup using the RACDCERT ADDRING(CARING) ID(PKISTU) command. In our example, we used the label ITSOCASC63 for our CA certificate:
RACDCERT ADDRING(ITSOCASC63) ID(PKISTU)
Now this information must be defined in pkiserv.conf:
[SAF]
#KeyRing=PKISRVD/CAring
KeyRing=PKISTU/ITSOCASC63
In the [LDAP] section, define the LDAP server information such as server-domain-name, port name, admin user ID, and password. Ensure that this is consistent with the LDAP definition in “Customizing the second Web server for PKI” on page 166.
[LDAP]
NumServers=1
PostInterval=5m
# Server1=myldapserver.mycompany.com:389
Server1=wtsc63.itso.ibm.com:3389 <- domain name and port of LDAP
AuthName1=CN=admin <- Authentification name
AuthPwd1=secret <- Password
CreateOUValue= Created by PKI Services
RetryMissingSuffix=T
# Name of the LDAPBIND Class profile containing the bind information for
LDAP server 1. This key is optional. Used in place of keys Server1,
AuthName1. and AuthPwd1
#BindProfile1=LOCALPKI.BINDINFO.LDAP1
For a more secure environment, we recommend using the LDAPBIND class instead of having user IDs and passwords floating around unencrypted. Another parameter you might change in this section is the number of LDAP servers, NumServers=1. For availability reasons, you should refer to at least two LDAP servers.
If you want to post the information to LDAP in a time frame other than every five minutes, then change PostInterval=5m to another value, such as PostInterval=3m (3 minutes).
You can also configure the [General] section, even if you do not use its function for now, as follows:
[General]
InitialThreadCount=10
# full pathname or data set name containing the 'your certificate is ready'
# message form. Defaults to no message issued
# ReadyMessageForm=/etc/pkiserv/readymsg.form
ReadyMessageForm=/web/pki2/readymsg.form <- runtime
# full pathname or data set name containing the 'your certificate request
# has been rejected' message form. Defaults to no message issued
# RejectMessageForm=/etc/pkiserv/rejectmsg.form
RejectMessageForm=/web/pki2/rejectmsg.form
# full pathname or data set name containing the 'your certificate is about
# to expire' message form. Defaults to no message issued
# ExpiringMessageForm=/etc/pkiserv/expiringmsg.form
ExpiringMessageForm=/web/pki2/expiringmsg.form
Customizing the PKI template
The PKI template file is used by the various REXX CGI programs to obtain variables and to set up the HTML output for the Web pages.
PKI Services can create certificates through different ways. One way is purely through RACF and is called a SAF certificate. It is approved automatically after host user ID and password verification. This is the historic way versus the PKI certificates that can be issued and administered now using PKI Services.
To enable SAF certificates, customize the %%SignWith=SAF:CERTAUTH/taca%% parameters in pkiserv.tmpl. Change the taca parameter RACF label of your CA certificate. This parameter is found two times in <CONSTANT> sections, as follows:
<CONSTANT>
%%KeyUsage=handshake%%
%%NotAfter=365%%
#%%SignWith=SAF:CERTAUTH/taca%%
%%SignWith=SAF:CERTAUTH/ITSO CA SC63%%
</CONSTANT>
<CONSTANT>
%%KeyUsage=handshake%%
%%NotAfter=365%%
%%OrgUnit=SAF template certificate%%
#%%OrgUnit=Nuts and Bolts Division%%
%%OrgUnit=ITSO Poughkeepsie, NY%%
#%%Org=The Firm%%
%%Org=IBM%%
%%Country=US%%
#%%SignWith=SAF:CERTAUTH/taca%%
%%SignWith=SAF:CERTAUTH/ITSO CA SC63%%
%%CommonName=%%
</CONSTANT>
This label points to the CA in RACF that is needed to sign the certificates. The example also shows the following modifications that you need to make:
•Change the Org parameter from The Firm to the name of your company or organization.
•Change the OrgUnit parameter in the same way, unless your organizational unit’s name really is Nuts and Bolts Division.
•Change the Country parameter to the country you are located, or add a Country parameter if it does not exist
There is no country definition for PKI certificates in the sample template file. We recommend that you one and using this country (C=US) as the tree entry point in LDAP.
|
Note: Be aware that changes in these fields change the content of your certificates. This is also sensitive to LDAP.
|
Search pkiserv.tmpl for <CONSTANT>. There are several places to modify:
<CONSTANT>
%%KeyUsage=handshake%%
%%NotAfter=365%%
%%OrgUnit=SAF template certificate%%
#%%OrgUnit=Nuts and Bolts Division%%
%%OrgUnit=ITSO Poughkeepsie, NY%%
#%%Org=The Firm%%
%%Org=IBM%%
%%Country=US%%
#%%SignWith=SAF:CERTAUTH/taca%%
%%SignWith=SAF:CERTAUTH/ITSO CA SC63%%
%%CommonName=%%
</CONSTANT>
<CONSTANT>
%%NotBefore=0%%
%%NotAfter=365%%
%%KeyUsage=handshake%%
#%%OrgUnit=Class 1 Internet Certificate CA%%
%%OrgUnit=ITSO Poughkeepsie, Class 1 Internet Certificate CA%%
#%%Org=The Firm%%
%%Org=IBM%%
%%Country=US%%
%%SignWith=PKI:%%
</CONSTANT>
Other customizations in pkiserv.temp can be done to add fields or to change the look.
3.25 PKI exit
Figure 3-25 PKI exit
PKI exit
The PKI exit provides advanced customization for additional authorization checking, validating, and changing parameters on calls to the R_PKIServ callable service (IRRSPX00), as well as capturing certificates for further processing.
You can call this exit from the PKIServ CGIs and use its IRRSPX00 user preprocessing and post-processing functions, except the VERIFY function.
PKI exit main routine
The main routine of the program determines which subroutine to call, based on the R_PKIServ function being called and whether this is a preprocessing or post-processing call. The individual subroutines in the program handle the following scenarios:
•Scenario 1: Allow only selected users to request PKI browser certificates for authenticating to z/OS.
•Scenario 2: Maintain a customized certificate repository (DB2 database or file) independent of PKI Services.
•Scenario 3: Mandate a policy for certificate renewal only within 30 days of expiration.
You can write your own exit to further customize your PKI Services as you see fit. For example, you may imbed SQL statements in your C code to do additional checking when users request certificates. This checking can be based on comparison between user-supplied values for mother’s maiden name, birthplace, date of birth, or other criteria with values pre-stored in a DB2 table.
Steps for installing and modifying the exit code sample
The C source code for the sample exit and a file containing the UNIX make command reside in the system-supplied directory /usr/lpp/pkiserv/samples. The steps to install and modify the exit sample after issuing the TSO OMVS command and becoming a superuser (you also can use the ISHELL command) are:
1. Copy the sample exit (pkiexit.c) and makefile (Makefile.pkiexit) to your first Web server directory:
cd /web/pki1/
cp /usr/lpp/pkiserv/samples/pkiexit.c pkiexit.c
cp /usr/lpp/pkiserv/samples/Makefile.pkiexit Makefile.pkiexit
2. Copy the source code to another file for later reference and modify the source code according to your needs:
cp pkiexit.c pkiexit.original
oedit pkiexit.c
3. Compile and link to produce the executable module pkiexit by issuing the following command:
make pkiexit
The resulting UNIX command creates two files:
– The executable module pkiexit
– The object module pkiexit
The command is as follows:
c89 -O -o pkiexit pkiexit.c
4. Set the permission bits for the module pkiexit:
chmod 755 pkiexit
5. Make the module program-controlled:
extattr +p pkiexit
|
Note: If you omit this step, the following messages display in the syslog when you restart the PKI Services to use the exit:
BPXP015I HFS PROGRAM /web/pki1/pkiexit IS NOT MARKED PROGRAM CONTROLLED.
BPXP014I ENVIRONMENT MUST BE CONTROLLED FOR SERVER (BPX.SERVER) PROCESSING.
|
6. Edit both Web servers’ environment variables files by issuing the following commands:
oedit /web/pki1/htppd.envvars
oedit /web/pki1a/httpd.envvars
At the end of both files, add:
_PKISERV_EXIT=/web/pki1/pkiexit
7. Edit the PKI Services environment variable file:
oedit pkiserv.envars
At the end of the file, add:
#
# Pki Exit
#
_PKISERV_EXIT=/web/pki1/pkiexit
Now check the permission bits and the extended attributes by issuing:
ls -E pkiexit
The output is:
-rwxr-xr-x -ps- 1 HAIMO SYS1 94208 May 19 16:15 pkiexit
3.26 Test for scenario one
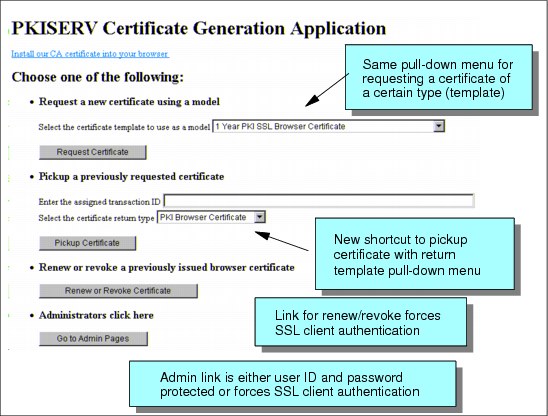
Figure 3-26 Test for scenario one
Test for scenario one
This scenario is for allowing only selected local z/OS users to request PKI browser certificates for authenticating to z/OS. Such a scenario might be useful to allow selected user IDs to authenticate themselves from the Internet to log on remotely to z/OS LPARs.
Additionally, this scenario provides a customized TITLE value for the subject’s distinguished name based on the user’s role in the organization. Permission and the user’s role in the organization are indicated by the user’s level of access to profiles PROJ.MEMBER and PROJ.PARTNER in RACF class FACILITY. The access values are shown in Table 3-3.
Table 3-3 Access values for scenario one
|
Access values
|
Description
|
|
NONE
|
No access for either resource. The user is not permitted to request this type of certificate. The certificate request is denied.
|
|
READ to PROJ.MEMBER
|
The user is a team member and is permitted to request the certificate. TITLE value is set to Team Member. Certificate requests for team members are automatically approved. (No administrator approval is required.)
|
|
UPDATE to PROJ.MEMBER
|
The user is the team’s leader and is permitted to request the certificate. TITLE value is set to Team Leader. A certificate request by the team leader is automatically approved. (No administrator approval is required.)
|
|
READ to PROJ.PARTNER
|
The user is considered to be a general partner of the team, not an active team member. The user is allowed to request certificates, but the requests require administrator approval before being issued. TITLE value is set to Team Partner.
|
|
UPDATE to PROJ.PARTNER
|
The user is considered to be a trusted partner of the team, not an active team member. The user is allowed to request certificates, and unlike requests of the general partner, the certificate requests are approved automatically. TITLE value is set to Team Trusted Partner.
|
The preprocessing exit call for the GENCERT and REQCERT functions (subroutine preProcessGenReqCertExit) handles the previously described logic as follows:
1. The request values are passed into the exit through argv in field-name=fieldvalue pairs, and the subroutine looks for Template= and Userid= in the input parameters.
2. When the exit code finds a Template= value containing PKI Browser Certificate For Authenticating To z/OS, the _check_resource_auth_np() system function (refer to 3.8.59 in z/OS C/C++ Run-Time Library Reference, SA22-7821) examines the user ID to determine the user’s access to the preceding profiles as follows:
– If the user has no access to either of these resources, return code 8 is set, causing the request to be denied.
– Otherwise, the user’s TITLE is set by imbedding the TITLE=title-value string into the certificate.
By default, administrator approval is not required for the PKI browser certificate for authenticating to z/OS. When the user has only READ access to PROJ.PARTNER, the function must be changed to require administrator approval. This is done by setting return code 4. For all other accesses, the function does not have to be changed.
In this example, we did not make any changes to the exit code. To test its functionality, we created the profiles in class FACILITY:
RDEF FACILITY PROJ.MEMBER OWNER(PKIADM)
RDEF FACILITY PROJ.PARTNER OWNER(PKIADM)
We started testing with nobody on the access list of the profiles. Then, we permitted user ID ANTOFF gradually with READ and UPDATE to each of the profiles.
Because user ID has the value ANTOFF and is not on the access list of either profile, we requested 1 Year PKI Browser Certificate for Authenticating, as shown in Figure 3-27.
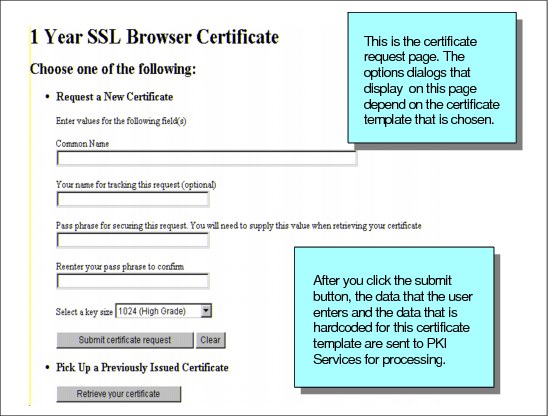
Figure 3-27 Browser Certificate request
After clicking Submit certificate request, then clicking OK on the authentication insert, the message in Figure 3-28 displays.
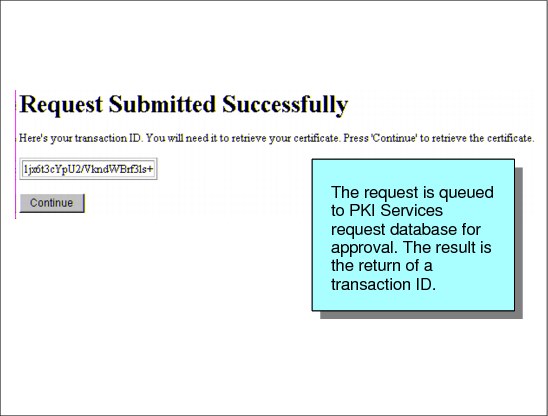
Figure 3-28 Request submitted successfully
Finally, click Continue.
3.27 Starting and stopping PKI Services
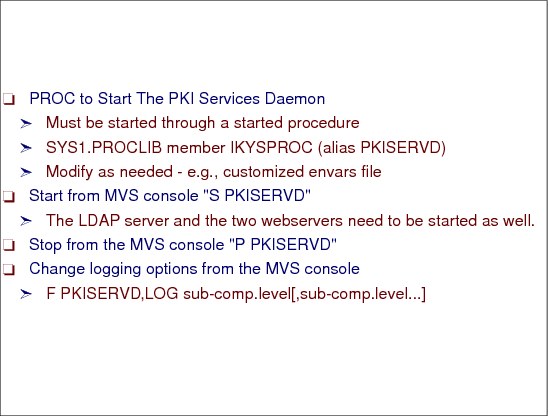
Figure 3-29 Starting and stopping PKI Services
Starting and stopping PKI Services
You start the PKI Services daemon or daemons the first time that you configure PKI Services or if you add sysplex support to run multiple independent instances of PKI Services (one per image) on a sysplex. The MVS programmer performs these tasks.
Steps for starting the PKI Services daemon
You need to start the PKI Services daemon if:
•You are configuring PKI Services for the first time.
•You want to use parallel sysplex support and need to run another instance of the PKI Services on a different image in the sysplex.
•You stopped PKI Services and need to restart it.
Before you begin:
•Your z/OS HTTP Server should be SSL-enabled and the uncustomized PKISERV application ready for use.
•If you are starting PKI Services for the first time, you need to know the runtime directory, called runtime-dir, in the command that follows. The default is /etc/pkiserv/. The MVS programmer is asked to record any changes to the default.
Perform the following steps to start the PKI Services daemon and view your Web pages:
1. If you have not done so already, start the Web server and the LDAP server.
2. If you want to test the configuration to this point before customizing PKI Services (recommended), you need to temporarily prevent PKI Services from posting issued certificates to LDAP because posting to LDAP will not be successful. Have the UNIX programmer perform the following steps to prevent PKI Services from posting issued certificates to LDAP:
a. Edit the PKI Services configuration file (by default, this is: /etc/pkiserv/pkiserv.conf).
b. Set NumServers=0 in the LDAP section of the file.
c. Exit to save your changes.
|
Note: After testing the configuration, you need to stop PKI Services, undo the change in this step, and then restart PKI Services.
|
3. Start the PKI Services daemon from the MVS console by entering the following command:
S PKISERVD
|
Note: You must start the PKI Services daemon only from a started procedure. PKI Services rejects all other methods of starting the daemon (including INETD, /etc/rc, UNIX shell, or submitted JCL job).
|
4. Go to your Web pages by entering the following URL from your browser:
http://webserver-fully-qualified-domain-name/PKIServ/public-cgi/camain.rexx
The webserver-fully-qualified-domain-name is the common name (CN) portion of the Web server’s distinguished name. You should be able to go through your Web pages to request, retrieve, and revoke a certificate of type PKI browser certificate for authenticating to z/OS. Ensure that you can do this before trying to customize the application.
5. If you elected to test the configuration, you need to stop PKI Services (see “Steps for stopping the PKI services daemon” next), undo the change in step 2, and then restart PKI Services.
Steps for stopping the PKI services daemon
Perform the following steps to stop the PKI Services daemon:
1. To stop the PKI Services daemon, enter one of the following two commands.
You can use either the following MODIFY (or F) console command:
F PKISERVD,STOP
Alternatively, you can use the STOP (P) command:
P PKISERVD
2. If you changed the PKI Services configuration file, have the UNIX programmer undo that change now by performing the following steps:
a. Edit the PKI Services configuration file (by default /etc/pkiserv/pkiserv.conf).
b. Set NumServers=n in the LDAP section of the file, where n is the same number of LDAP servers.
c. Exit to save your changes.
..................Content has been hidden....................
You can't read the all page of ebook, please click here login for view all page.