Chapter 12. Dragging and dropping
In this chapter:
- The drag-and-drop engine
- The IDragSource and IDropTarget interfaces
- Building a client-centric drag-and-drop shopping cart
- Building an ASP.NET server-centric drag-and-drop shopping cart
How many times a day do you move files from one folder to another, between windows, or even directly into the recycle bin, using only your mouse and one of your fingers? Every time you perform these actions, you complete a drag-and-drop operation, which is the visual representation of a set of commands. For example, if you move (or drag) a file icon from your desktop and release (drop) it over the recycle-bin icon, you’re visually “throwing away” the file and marking it for deletion (but remember to restore it if you aren’t going to delete it!).
Drag and drop is a powerful mechanism that enhances UIs. The introduction of the browser’s DOM gave JavaScript developers a chance to implement drag and drop in web pages using CSS and dynamic HTML.
In this chapter, we’ll analyze the drag-and-drop engine included in the ASP.NET Futures package. Your goal is to master the client classes used to add drag-and-drop capabilities to DOM elements of web pages. By the end of the chapter, you’ll have the skills to develop a drag-and-drop shopping cart using both the client-centric and the server-centric development models. As part of the ASP.NET Futures package, the features illustrated in this chapter aren’t currently documented or supported by Microsoft.
12.1. The drag-and-drop engine
The drag-and-drop engine is a set of client classes and interfaces for performing drag and drop in web pages. When we say drag and drop in web pages, we mean moving DOM elements around the page. You can also simulate the events and effects typical of drag and drop in the operating system. What you can’t do with the drag-and-drop engine is interact with external applications or move data between them. But adding drag-and-drop capabilities to DOM elements can improve the user experience and take the web application to the next level.
Before we look at the drag-and-drop engine provided by the Microsoft Ajax Library, you need to enable it in a page. The JavaScript code is located in the PreviewScript.js and PreviewDragDrop.js files, both embedded as web resources in the Microsoft.Web.Preview.dll assembly. Listing 12.1 shows how the ScriptManager control looks after the script files are referenced in the Scripts section.
Listing 12.1. Enabling drag and drop in an ASP.NET page
<asp:ScriptManager ID="TheScriptManager" runat="server">
  <Scripts>
    <asp:ScriptReference Assembly="Microsoft.Web.Preview"
                         Name="PreviewScript.js"/>

    <asp:ScriptReference Assembly="Microsoft.Web.Preview"
                         Name="PreviewDragDrop.js"/>
  </Scripts>
</asp:ScriptManager>
The PreviewScript.js file contains the base components needed to use the features of the ASP.NET Futures package. The PreviewDragDrop.js file is the script file that contains the components of the drag-and-drop engine. Once the script files are properly referenced, you’re ready to code against the drag-and-drop API.
The elements involved in drag and drop have specific names, depending on their role in a drag-and-drop operation. In general, you have the following:
- Draggable items— DOM elements that can be dragged around the page
- Drop zones (or drop targets)—DOM elements that allow draggable items—that is, other DOM elements—to be dropped onto their area
For example, think of dragging a file over a folder in order to copy or move it. The file icon is the draggable item, and the folder icon is the drop target. Now, let’s focus on the architecture of the drag-and-drop engine.
12.1.1. How the engine works
Enabling the drag-and-drop engine is just the first step. The engine is responsible for coordinating a drag-and-drop operation and providing information about the elements involved, but you must write part of the logic needed to interact with it. For example, you must inform the engine which elements act as the draggable items and where the drop zones are on the page. You’re also responsible for detecting the start of a drag-and-drop operation and taking actions when it ends.
Have no fear: We’ll guide you through the process to successfully set up a drag-and-drop–enabled UI. The first step is to represent the draggable items and the drop targets with client components. These components encapsulate the logic needed to deal with the drag-and-drop engine. You associate them with the DOM elements involved in the drag-and-drop operation; so, we’ll use the terms draggable item and drop target to refer to the client components (either controls or behaviors) as well as to the associated DOM elements.
All the components involved in drag and drop must deal with the DragDropManager, a global JavaScript object that is created during the loading of the page and stored in a global variable called Sys.Preview.UI.DragDropManager. Although you access the DragDropManager through the same variable, the underlying instance is different depending on the browser that is rendering the page. In Internet Explorer, the DragDropManager is an instance of the Sys.Preview.UI.IEDragDropManager class; in the other supported browsers, you get an instance of the Sys.Preview.UI.GenericDragDropManager class. The reason for this difference is that Internet Explorer for Windows, starting with version 5.0, includes a group of drag-and-drop events in its DOM implementation. The IEDragDropManager class takes advantage of this API to implement the drag-and-drop engine. Does this mean you face new incompatibilities on the road to drag and drop? No. Despite the browser-specific implementations, the drag-and-drop engine offers the same features on all the browsers supported by ASP.NET AJAX.
Engine overview
To perform a drag-and-drop operation, you need at least a draggable item and a drop target. As we said before, both are DOM elements of a web page. They’re also both associated with a client component that encapsulates the logic needed to deal with the DragDropManager.
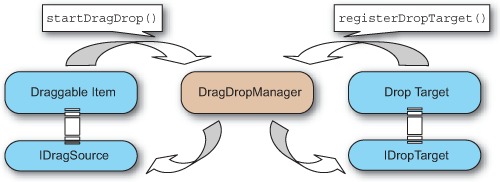
The first thing a drop target does is register itself with the DragDropManager. It does so by invoking the registerDropTarget method of the DragDropManager instance. This way, the drop target tells the DragDropManager that it must consider the associated element a valid drop zone.
Usually, drag and drop in a web page starts when the user holds down the left button (Click on a Mac) on a DOM element and starts moving the mouse. When this happens, the draggable item invokes the startDragDrop method of the DragDropManager, signalling that a drag-and-drop operation has started and that the associated element is the source of the operation. This communication is illustrated in figure 12.1.
Figure 12.1. Draggable items and drop targets communicate with the DragDropManager to participate in a drag-and-drop operation.

When the DragDropManager recognizes the draggable items and drop targets involved in drag and drop, it opens a communication channel with them. The purpose is to provide feedback about the progress of the operation. Receivers can use this feedback to determine the status of the operation and to enhance the user experience based on the current state. For example, a draggable item may want to display a semitransparent copy of the element being dragged, near the mouse pointer. A drop target may decide to highlight its area when an element is dragged over it.
To receive feedback from the DragDropManager, draggable items must implement the Sys.Preview.UI.IDragSource interface. Drop targets have to implement the Sys.Preview.UI.IDropTarget interface. Figure 12.2 shows the bidirectional communication established between the DragDropManager, draggable items, and drop targets.
Figure 12.2. Draggable items and drop targets can receive feedback from the DragDropManager through the IDragSource and IDropTarget interfaces.
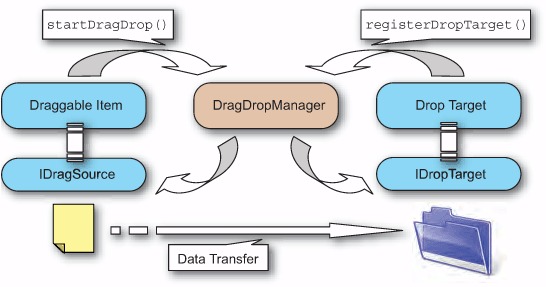
Without the ability to access data, a drag-and-drop operation would remain just a visual effect. The goal is to obtain a visual representation of a particular elaboration. The IDragSource and IDropTarget interfaces define methods to process the data associated with a drag-and-drop operation, so you can process the data during the phases of the operation. For example, if you drag a file icon over the recycle-bin icon, you want the file marked for deletion. Similarly, if you drag a file over a folder, you expect the file to be copied or moved in that particular folder. You must be able to access and process the file involved in the drag-and-drop operation. The possibility of accessing data during a drag-and-drop operation gives you the entire picture of the drag-and-drop engine, illustrated in figure 12.3.
Figure 12.3. Diagram of the Microsoft Ajax drag-and-drop engine
Now that you know the overall workings of the drag-and-drop engine, it’s time to sit at a keyboard and start writing some code. In the next section, you’ll implement your first drag-and-drop operation by simulating a basic drag-and-drop shopping cart.
12.1.2. A simple scenario for drag and drop
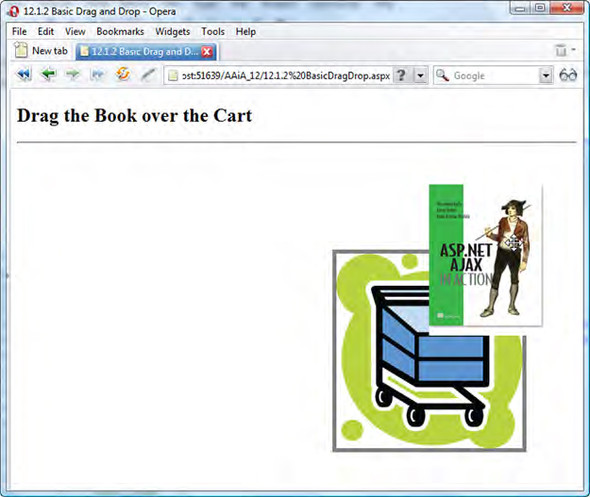
Suppose that recently you were promoted to IT Director at your company (it’s about time!). As new developers come aboard, you want to make sure they have access to the right tools. To start, you create a shopping list of essential books that each individual needs. This concept is illustrated in figure 12.4, which shows images of a book and a shopping cart. You want to be able to drag the book over the cart to have it added to the list of books to buy. The data transferred can be represented by the book’s ISBN code, which is its unique identification number.
Figure 12.4. Example of a drag-and-drop operation that involves adding a book to a shopping cart
Needless to say, you want to implement this scenario with the Microsoft Ajax drag-and-drop engine. To reach this objective, you have to apply what you learned in the previous section about the drag-and-drop engine. You need to code the following:
- A client control that represents the draggable item, in this case a book— The associated DOM element can be either the book image or a div element that contains the image. The control implements the logic needed to deal with the DragDropManager and receives its feedback by implementing the IDragSource interface. The control also encapsulates the data that you need to access: the ISBN number.
- A client control that represents the drop target, in this case the shopping cart— Again, the associated DOM element can be either the cart image or a div element that contains the image. By implementing the IDropTarget interface, you can receive the feedback provided by the DragDropManager.
In the following sections, we’ll show you how to build these controls and explain the nuts and bolts of the drag-and-drop engine. In the process, you’ll write the code in a manner in which it can be reused for different scenarios. Let’s start learning how to create a draggable item.
12.1.3. Creating a draggable item
When you want to perform drag and drop, you always click an item onscreen—for example, an icon—with the left mouse button (Click on a Mac). Then, you move the mouse and begin dragging. This behavior is also reasonable for DOM elements, and it’s the reason you always trigger a drag-and-drop operation by hooking the mousedown event of the draggable DOM element. A draggable item triggers a drag-and-drop operation in the following way:
- It hooks up the mousedown event of the associated DOM element.
- In the event handler, it calls the startDragDrop method on the DragDropManager.
In the following example, you’ll create a client control whose associated element can be dragged around the page. The control is called BookItem, and it represents the book in the scenario outlined in the previous section. The code in listing 12.2 contains the logic that every draggable item must implement to deal with the DragDropManager.
Listing 12.2. Code for the BookItem control, which represents a draggable item

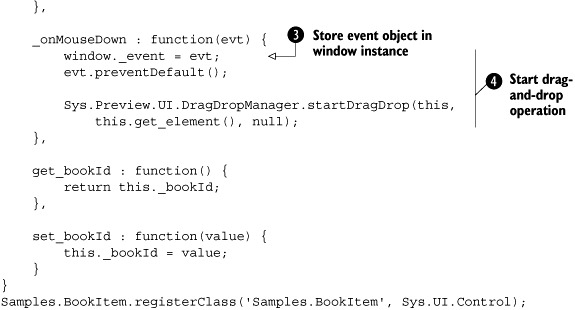
The mousedown event of the associated element is hooked up ![]() in the initialize method. In the event handler
in the initialize method. In the event handler ![]() , _onMouseDown, you call the startDragDrop method of the DragDropManager, passing a reference to the current instance and the associated element as arguments. Note
that you store the event object in the window._event property
, _onMouseDown, you call the startDragDrop method of the DragDropManager, passing a reference to the current instance and the associated element as arguments. Note
that you store the event object in the window._event property ![]() . This is required by the DragDropManager in order to access the event object for the mousedown event.
. This is required by the DragDropManager in order to access the event object for the mousedown event.
The _dragStartLocation field ![]() stores the x and y coordinates of the location of the associated element before it starts being dragged. You save the original
location of the element because you may need to restore it if the drag-and-drop operation fails. Later, you’ll see how you
can establish whether a drag-and-drop operation succeeded or failed.
stores the x and y coordinates of the location of the associated element before it starts being dragged. You save the original
location of the element because you may need to restore it if the drag-and-drop operation fails. Later, you’ll see how you
can establish whether a drag-and-drop operation succeeded or failed.
The key to start a drag-and-drop operation is to call the DragDropManager’s startDragDrop method. For this reason, it’s important to understand the various parameters accepted by this method.
12.1.4. The startDragDrop method
The first argument passed to the startDragDrop method is the drag source, which is the draggable item itself. You’ll pass the this keyword, which always points to the current instance of the control.
The second argument is called the drag visual, and it’s the element that follows the mouse pointer during the drag phase. In the Microsoft Ajax Library, you implement the drag movement by dynamically changing the element’s location so it follows the mouse pointer as soon as it’s moved in the page area. Typically, the draggable element follows the mouse; this way, you can simulate a dragging effect. It’s also possible to specify a different element as the drag visual; this approach is useful if you don’t want to drag the associated element but instead drag a semitransparent clone. This happens, for instance, when you start dragging one of the icons in your desktop. The icon remains at its original location, and an alpha-blended copy is used during the dragging phase. To keep things simple, in listing 12.1 you pass the associated element as the drag visual; this is the element dragged around the page.
The last argument accepted by the startDragDrop method is a context object. This object is shared by the draggable item and all the registered drop targets. It’s supposed to contain references that can be accessed by all the objects involved in a drag-and-drop operation.
Once you make the call to the startDragDrop method, the control officially acquires the role of draggable item. If all goes well, this is all you need to do to drag the associated element around the page. But you want some feedback from the DragDropManager, because it’s fundamental to determine the current status of the drag-and-drop operation. Therefore, you need to introduce the IDragSource interface. In the next section, you’ll implement the interface in the BookItem control.
12.1.5. The IDragSource interface
Draggable items implement the Sys.Preview.UI.IDragSource interface to receive feedback—from the DragDropManager—about the status of a drag-and-drop operation. Table 12.1 lists the methods it defines, along with their descriptions.
Table 12.1. Methods defined in the IDragSource interface
|
Method |
Description |
|---|---|
| get_dragDataType | Returns the type of data associated with the drag-and-drop operation |
| getDragData | Returns the data associated with the drag-and-drop operation |
| get_dragMode | Returns the drag mode |
| onDragStart | Called when the drag-and-drop operation begins |
| onDrag | Called whenever the drag visual is dragged |
| onDragEnd | Called when the drag phase ends |
The first method, get_dragDataType, returns an identifier for the type of data you’re carrying. When a draggable item is dragged over a drop target, the identifier is passed to the drop target. Based on its value, the drop target can decide whether the draggable item can be dropped. If the dropped item isn’t allowed, the drag-and-drop operation fails.
The second method, getDragData, returns the carried data. Usually, the data is encapsulated by the control. As a consequence, a draggable item can return a reference to itself or to its associated element. You can access the component associated with a DOM element through the properties of the element, as we explained in chapter 8. Note that the getDragData method receives the context object that the draggable item passed to the startDragDrop method of the DragDropManager, as illustrated in section 12.1.4.
Note
In the Windows drag-and-drop engine, as well as in the IE’s DOM API, drag-and-drop data is stored in a special data object called dataTransfer, which accepts only certain types of data. The Microsoft Ajax drag-and-drop engine mimics this behavior with the concept of data type, although the data object can be a generic JavaScript object. To learn more about the dataTransfer object, browse to: http://msdn2.microsoft.com/en-us/library/ms535861.aspx.
The get_dragMode method returns one of the values of the Sys.Preview.UI.DragMode enumeration: Move or Copy. These values define the current mode of the drag-and-drop operation, but they aren’t associated with a default behavior. It’s up to you to write the custom code needed to take concrete actions based on the current mode. As an example, let’s consider again a file being dragged over a folder icon. When you drop the file over the folder, the file can be moved or copied depending on the drag mode. In Windows, you can make a choice by using the right mouse button to perform the drag and drop.
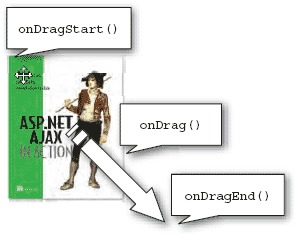
The remaining methods, onDragStart, onDrag, and onDragEnd, take actions during the drag phase. Figure 12.5 shows that the onDragStart method is invoked as soon as an element begins being dragged. The onDrag method is called repeatedly every time the element moves. Finally, the onDragEnd method is invoked when the user releases the mouse button. As we’ll explain in section 12.1.6, the onDragEnd method is the right place to determine whether the drag-and-drop operation succeeded or failed.
Figure 12.5. You can override the onDragStart, onDrag, and onDragEnd methods of the IDragSource interface to take actions during the drag phase.
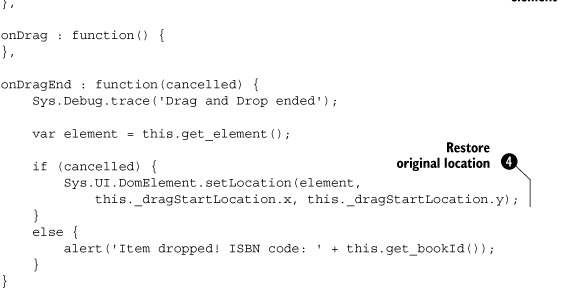
Listing 12.3 shows an implementation of the IDragSource interface. Add the code to the prototype object of the BookItem control created in listing 12.1. This way, you can participate in the drag-and-drop operation and customize the behavior of the draggable item.
Listing 12.3. IDragSource interface implementation
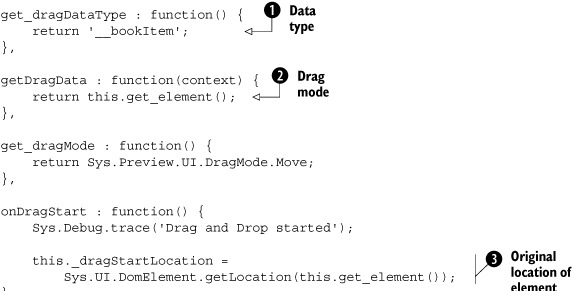
You return __bookItem ![]() as the data type exposed by the BookItem control. You also return the associated element
as the data type exposed by the BookItem control. You also return the associated element ![]() as the drag data. Because the element is associated with a BookItem instance, you need to access the control property of the DOM element to retrieve a reference to the client control.
as the drag data. Because the element is associated with a BookItem instance, you need to access the control property of the DOM element to retrieve a reference to the client control.
In the onDragStart method, you store the original location of the associated element ![]() in the _dragStartLocation field that you declared in the BookItem class. This way, you can restore the original position
in the _dragStartLocation field that you declared in the BookItem class. This way, you can restore the original position ![]() if the drag-and-drop operation fails.
if the drag-and-drop operation fails.
The onDragEnd method is the right place to determine the status of the operation. The DragDropManager calls the method with a cancelled parameter that tells you whether the drag-and-drop operation failed. If it did, the cancelled parameter is set to true; otherwise, it’s set to false. Based on the value of the cancelled parameter, you can take the appropriate actions. In the example, you display a message with the book’s ISBN code if the drag-and-drop operation succeeds. In real-life scenarios, you’ll probably invoke a web service or a page method that takes the book’s ISBN code and adds the article to the user’s shopping cart. In section 12.2, you’ll take a similar approach to build a more complex drag-and-drop shopping cart with ASP.NET.
As soon as you embed the code in listing 12.3 in the BookItem’s prototype, you must remember to register the IDragSource interface by modifying the call to the registerClass method in the following way:
Samples.BookItem.registerClass('Samples.BookItem', Sys.UI.Control,
     Sys.Preview.UI.IDragSource);
We’re halfway done, so feel free to take a pause before proceeding. The next step is to create a client control that behaves as a drop target. This will be the shopping cart, and it will give us the chance to talk about drop zones and the IDropTarget interface.
12.1.6. Creating a drop target
Having a draggable item would be useless without a place to drop it. To complete the implementation of the basic drag-and-drop shopping cart example outlined in section 12.1.2, you need a drop zone. The next task is to create a control that turns the associated DOM element into a drop target. To do that, the control must accomplish a simple task: registering itself as a drop target with the DragDropManager. The registration is usually done in the initialize method, with a call to the DragDropManager’s registerDropTarget method. This method accepts a reference to the drop target as an argument and adds it to an internal list held by the DragDropManager.
In the drag-and-drop scenario, the shopping cart will be the drop target. In figure 12.4, the cart is represented by an image element. The client control associated with the image element is called CartZone, and its code is shown in listing 12.4.
Listing 12.4. Code for the CartZone class, which represents a drop zone
Type.registerNamespace('Samples'),

Samples.CartZone = function(element) {
    Samples.CartZone.initializeBase(this, [element]);
}
Samples.CartZone.prototype = {
    initialize : function() {
        Samples.CartZone.callBaseMethod(this, 'initialize'),

        Sys.Preview.UI.DragDropManager.registerDropTarget(this);
    },

    dispose : function() {
        Sys.Preview.UI.DragDropManager.unregisterDropTarget(this);

        Samples.CartZone.callBaseMethod(this, 'dispose'),
    }
}
Samples.CartZone.registerClass('Samples.CartZone', Sys.UI.Control);
As anticipated, the registerDropTarget method is called in the initialize method, where you perform the control’s initial setup. Its counterpart is the unregisterDropTarget method, which is used to remove the control from the list of drop targets held by the DragDropManager. It’s usually invoked in the dispose method, where the cleanup of the current instance is performed.
To receive feedback from the DragDropManager, a drop target must implement the IDropTarget interface. Following the same approach we took with the BookItem control, we’ll first introduce the interface and then implement it in the CartZone control.
12.1.7. The IDropTarget interface
The Sys.Preview.UI.IDropTarget interface is implemented by drop targets to receive feedback from the DragDropManager. By implementing this interface, a drop target can determine whether a draggable item can be dropped over its area. You can also take actions based on the position of the draggable item with respect to the drop zone. Table 12.2 lists the methods defined by the IDropTarget interface along with their descriptions.
Table 12.2. Methods defined in the IDropTarget interface, which is implemented by drop targets to receive feedback from the DragDropManager
|
Method |
Description |
|---|---|
| get_dropTargetElement | Returns the DOM element that acts as the drop zone |
| canDrop | Returns a Boolean value that tells whether a draggable item can be dropped over the drop zone |
| drop | Called when an element is dropped over the drop zone |
| onDragEnterTarget | Called when an element enters the drop zone |
| onDragLeaveTarget | Called when an element leaves the drop zone |
| onDragInTarget | Called whenever an element is dragged over the drop zone |
The get_dropTargetElement method returns the DOM element that acts as the drop zone. Usually, this is the associated element of the client component that represents the drop target. When an element is being dragged, the DragDropManager calls this method on every registered drop targets. Then, it performs some calculations to determine whether the element being dragged is overlapping the area occupied by a drop-zone element.
If there is overlap with a drop zone, the DragDropManager calls the canDrop method on the drop target to determine whether the draggable item can be dropped over it. The canDrop method returns true if the drop operation is permitted; otherwise it return false. Typically, the drop target checks whether the data-type identifier passed by the DragDropManager to the canDrop method is one of its accepted data types. The value returned by the canDrop method affects the status of the drag-and-drop operation. The operation succeeds if the canDrop method returns true. In turn, this information is propagated to the draggable item through the cancelled parameter, as we discussed in section 12.1.5.
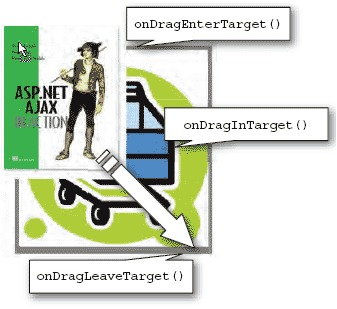
As shown in figure 12.6, the onDragEnterTarget, onDragInTarget, and onDragLeaveTarget methods are called when a draggable item enters a drop zone, is dragged in a drop zone, or leaves it, respectively. The drop method is called when an element is dropped over the drop zone, in a manner independent of whether the drag-and-drop operation succeeded or failed.
Figure 12.6. The onDragEnterTarget, onDragInTarget, and onDragLeaveTarget methods of the IDropTarget interface are called by the DragDropManager when a draggable item overlaps with a drop target.
Listing 12.5 shows an implementation of the IDropTarget interface. As you did for the BookItem class, insert the following code in the prototype object of the CartZone control that you created in listing 12.3.
Listing 12.5. IDropTarget interface implementation
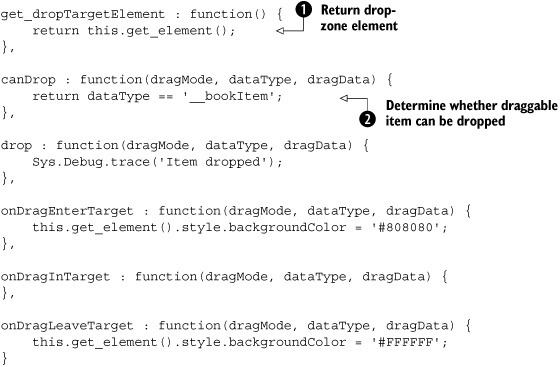
In the previous code, the drop zone is the associated DOM element of the CartZone control ![]() . A valid drop also happens when a draggable item carries data of type __bookItem. In this case, the canDrop method returns true
. A valid drop also happens when a draggable item carries data of type __bookItem. In this case, the canDrop method returns true ![]() , and the drag-and-drop operation succeeds.
, and the drag-and-drop operation succeeds.
In the implementation, you also change the background color of the drop zone element as soon as a draggable item enters it. In a similar way, you change the background color to white when the draggable item leaves the drop zone.
When you embed the code in listing 12.5 in the CartZone prototype, don’t forget to register the IDropTarget interface by modifying the call to the registerClass method as follows:
Samples.CartZone.registerClass('Samples.CartZone, Sys.UI.Control,
    Sys.Preview.UI.IDropTarget);
You’re nearly done. Implementing drag and drop requires some effort, but in the end you’ll have written code that can be easily modified and adapted to the majority of drag-and-drop scenarios. The final step is to wire together DOM elements and client controls to obtain a working example. That’s what you’ll do in the next section.
12.1.8. Putting together the pieces
Drum roll, please: You’re ready to test the shopping-cart example. In the code downloadable at http://www.manning.com/gallo, we created an ASP.NET AJAX CTP-enabled website and copied the code for the BookItem and CartZone controls in two separate JavaScript files stored in the ScriptLibrary folder. Then, we created a new ASP.NET page named BasicDragDrop.aspx and referenced the two script files in the Scripts section of the ScriptManager control. Finally, we copied the code shown in listing 12.6 in the page’s form tag.
Listing 12.6. ASP.NET page for testing the drag-and-drop example
<img id="imgBook" src="Images/book.gif" alt="" />

<div id="cartZone" class="dropzone">
    <img src="Images/shopping_cart.jpg" alt="" />
</div>

<script type="text/javascript">
<!--
    Sys.Application.add_init(pageInit);

    function pageInit(sender, e)
        $create(Samples.BookItem, {bookId: '1-933988-14-2'}, null,
            null, $get('imgBook'));
        $create(Samples.CartZone, null, null,
            null, $get('cartZone'));
    }
//-->
</script>
The code consists of some HTML markup and a JavaScript code block. The markup code contains the DOM elements used to represent the book and the shopping cart. The JavaScript code block contains the $create statements needed to instantiate the BookItem and CartZone controls. As you can see, the two controls are wired to the HTML elements that represent the book and the shopping cart. You also set the bookId property of the BookItem instance to the ISBN code of the book.
As soon as the page is run, you can drag the book image over the shopping cart. If you try to drop the book outside the cart, it returns to its original position. If, on the other hand, you drop the book over the shopping cart, the operation succeeds, and you get a message box displaying the drag data.
You now possess the necessary skills—and code—to add drag-and-drop capabilities to web pages using ASP.NET AJAX. Let’s take the drag-and-drop scenario a step further. In the next section, you’ll see how to leverage it to take advantage of the ASP.NET server-centric model and data-binding capabilities.
12.2. A drag-and-drop shopping cart
In the previous section, you built the client controls needed to perform drag and drop with DOM elements in a web page. Now, you need to put together client components and server controls to leverage the server-centric development model offered by ASP.NET. With the server-centric model, you can build server controls that are associated with client components. This way, you obtain ASP.NET controls with rich client capabilities. With the techniques studied in chapter 9, it’s easy to create an extender or a script control that programmatically instantiates in the page the client component it needs and loads the necessary script files.
In this section, you’ll combine server controls and client components to leverage the drag-and-drop scenario introduced in the previous section. The result, shown in figure 12.7, will be a shopping cart system with drag-and-drop support, built with the ASP.NET AJAX Extensions.
Figure 12.7. The drag-and-drop shopping cart running in Internet Explorer
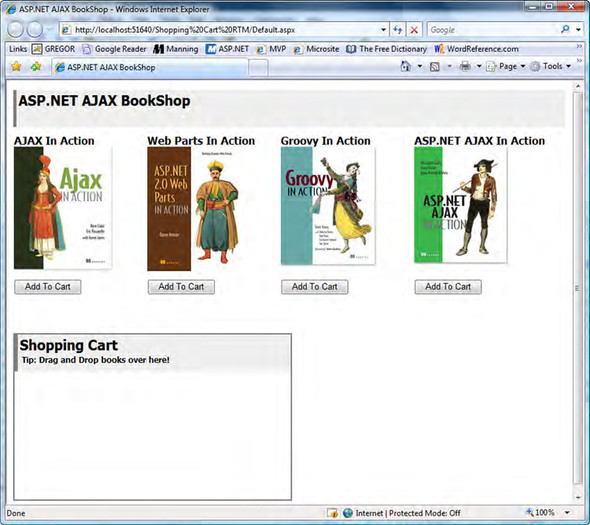
The shopping-cart application features a catalog control that lists the books available and a shopping cart control that displays information about the articles you add. The user can add a book to the cart by clicking the Add To Cart button displayed under the corresponding article. The button causes the shopping cart to be updated and to display the title and quantity of each article. You can also drag books from the catalog and drop them in the shopping cart. Once an article is dropped, the shopping cart is updated accordingly. The final touch is using an UpdatePanel control to update the shopping cart asynchronously, without needing to reload the whole page.
The full source code for the example is available for download at http://www.manning.com/gallo, and it’s provided as an ASP.NET AJAX-enabled website. We recommend that you look at it and, even better, follow the discussion with the solution opened in Visual Studio. In the following sections, we’ll focus on the application design strategies and the drag-and-drop implementation. For these reasons, the listings contain only the relevant portions of the code.
Let’s start with an overview of the logical layers that make up the ASP.NET web application. Then, we’ll focus on some modifications you need to make to the BookItem and the CartZone controls in order to take advantage of the server-centric model. Finally, we’ll concentrate on the Ajax-enabled controls that you’ll use to represent the catalog and the shopping cart.
12.2.1. Server-side design
The shopping-cart application is designed as a three-tier application. This means server objects are organized into three logical layers that communicate with one another, as shown in figure 12.8. The presentation layer, at the top, contains the controls responsible for rendering the UI and handling the user’s input and interactions. The business layer consists of the server classes that represent the entities involved in the application. In the shopping-cart application, for example, you have a Book class that represents a book article. The business objects manipulate and process the data obtained through the data access layer.
Figure 12.8. Structure of a typical layered application. Layers form a chain and can communicate with one another.

Finally, the data access layer is used to access the data store and to query, retrieve, and update the data. In the example, the data store is an XML file, and the data access layer is responsible for building business objects from the raw XML data. These layers have a uniform view of the data.
Note
Designing an application using layers allows for modularity and code reuse. You can find more information about this design pattern by browsing the following URL: http://msdn2.microsoft.com/en-us/library/ms978496.aspx.
Let’s see in more detail how we decided to implement the three layers that make up the shopping-cart web application. We made some design decisions with simplicity in mind, because our main goal is to focus on concepts. In real life, production-quality code might require different and more complex strategies.
Data access layer
To keep things simple, we decided to use an XML file as the data store. The XML file contains the catalog’s data as a set of book nodes contained into a root book element. Listing 12.7 shows an excerpt from the BookCatalog.xml file, contained in the App_Data folder of the sample website.
Listing 12.7. The XML file used as the data store
<?xml version="1.0" encoding="utf-8" ?>
<books>
  <book>
    <id>0001</id>
    <title>AJAX In Action</title>
    <imageUrl>~/Images/crane_3d.gif</imageUrl>
  </book>
  <book>
    <id>0002</id>
    <title>iBATIS In Action</title>
    <imageUrl>~/Images/begin_3d.gif</imageUrl>
  </book>
</books>
Each book node contains an id element with the book ID, a title element that contains the book’s title, and an imageUrl element with the path to the image used in the catalog. Pretty simple, but it’s enough for our purposes.
Business layer
The business objects used in the example are a Book class and a ShoppingCart class. The Book class implements an interface called IArticle, which defines a set of properties common to generic articles or the catalog. The ShoppingCart class implements the IShoppingCart interface, which defines a single method called Add, used to add an article to the cart. Figure 12.9 shows the hierarchy of business objects used in the example.
Figure 12.9. Hierarchy of business objects used in the drag-and-drop shopping cart example

To keep things simple, the business objects provider is implemented with a class called BusinessLayer that exposes some static methods for accessing the XML file. The GetBooks methods returns all the books in the catalog, and the GetBooksById method returns the Book object corresponding to the given book’s ID.
Presentation layer
The presentation layer consists of two web user controls called Shopping-Cart.ascx and BooksCatalog.ascx. The first control encapsulates the HTML and the logic for the shopping cart. In it, a Repeater is bound to a collection of IArticle objects to display the articles in the user’s shopping cart. The Shopping-Cart.ascx control is an Ajax-enabled control because it’s associated with a client component, the CartZone control that you coded in section 12.1.6. It implements the IScriptControl interface.
The other control, BooksCatalog.ascx, encapsulates the logic for the catalog. It contains a DataList control bound to the catalog through the BusinessLayer class. It’s also an Ajax-enabled control because it associates an instance of the client BookItem control built in section 12.1.4 with each item of the DataList. Each item in the catalog becomes a draggable item. For this reason, the BooksCatalog control implements the IScriptControl interface.
The application design on the server side is completed, and the next step is to work on the client side. You need to modify the JavaScript code for the BookItem and CartZone controls to take advantage of the ASP.NET data-binding capabilities.
12.2.2. Client-side design
The client components used in this example are the BookItem and CartZone controls you built in the first part of the chapter. To take advantage of ASP.NET’s data-binding capabilities, we slightly modified the source for the BookItem control and removed the bookId property. Because the book’s data can be bound to the DataList control that renders the catalog, there’s no need to propagate it to the client side. Instead, you need only a reference to the Add To Cart button. Then, all you have to do is click the button programmatically using JavaScript. You don’t need to duplicate the code needed to update the shopping cart.
In the BookItem.js file contained in the ScriptLibrary folder, we replaced the bookId property with a _addToCartElement member that stores a reference to the Add To Cart button. Then, we exposed its value through an addToCartElement property:
get_addToCartElement : function() {
    return this._addToCartElement;
},

set_addToCartElement : function(value) {
    this._addToCartElement = value;
}
The implementation of the onDragEnd method changes slightly because you want to programmatically click the Add To Cart button as soon as a book image is dropped over the shopping cart area. The new implementation of the onDragEnd method always restores the original location of the book image, because you don’t need to leave it over the shopping cart area. The code becomes the following:
onDragEnd : function(cancelled) {
    var element = this.get_element();
    Sys.UI.DomElement.setLocation(element,
       this._dragStartLocation.x, this._dragStartLocation.y);

    if (!cancelled) {
        this._addToCartElement.onclick();
    }
}
Now that we’ve discussed the design strategies for the shopping-cart application, it’s time to go deep into the code and focus on the server controls and on the data-binding logic. The main objective of the following discussion is to help you understand how the BookItem and CartZone client controls are wired to the catalog and the shopping-cart controls in order to enable drag-and-drop support.
12.2.3. The ShoppingCart control
The ShoppingCart control represents a shopping cart. Its purpose is to display a list of the articles added by the user during shopping. This is done with a Repeater control that is bound to a list of IArticle objects, each one representing an article added to the shopping cart. To provide drag-and-drop support, the shopping cart control is wired to an instance of the CartZone client control. It becomes a drop zone where you can drop books dragged from the catalog. Listing 12.8 shows the markup code for the control, stored in the ShoppingCart.ascx template file.
Listing 12.8. Code for the ShoppingCart.ascx file
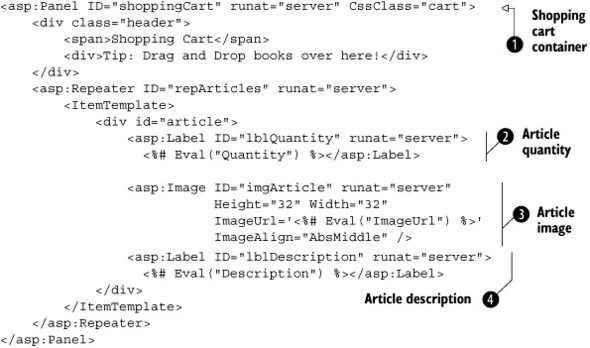
The ItemTemplate of the Repeater contains a Label ![]() that displays the quantity of each book, an Image control
that displays the quantity of each book, an Image control ![]() with a thumbnail of the book, and another Label
with a thumbnail of the book, and another Label ![]() with the book’s title. The containing control, a Panel
with the book’s title. The containing control, a Panel ![]() , defines the layout of the shopping-cart control.
, defines the layout of the shopping-cart control.
As we said previously, the Repeater is bound to a list of IArticle objects, specifically instances of the Book class. The list is stored in a Session variable which is accessible from the Cart property declared in the ShoppingCart.ascx.cs code-behind file, as shown in listing 12.9. For simplicity, we decided to use a Session variable to store the articles in the shopping cart. In a production scenario, a more robust approach would be to serialize the collection and store it in a database. Nonetheless, using a public property is a good choice to encapsulate the logic that accesses the shopping-cart list, because it can be changed at any time without affecting other parts of the code.
Listing 12.9. Storing shopping-cart articles in a Session variable
private List<IArticle> Cart
{
    get
    {
        List<IArticle> cart = Session["Cart"] as List<IArticle>;

        if (cart == null)
        {
            cart = new List<IArticle>();
            Session["Cart"] = cart;
        }

        return cart;
     }
}
As we anticipated in section 12.2.2, the ShoppingCart class implements the IShoppingCart interface, which defines a single method, Add. This method is used to add an item to the cart, and its implementation is shown in listing 12.10.
Listing 12.10. IShoppingCart interface implementation
public void Add(IArticle article)
{
    foreach (IArticle art in this.Cart)
    {
        if (art.Id == article.Id)
        {
            art.Quantity++;
            this.DataBind();
            OnArticleAdd(this, EventArgs.Empty);
            return;
        }
    }

    article.Quantity++;
    this.Cart.Add(article);
    this.DataBind();

    OnArticleAdd(this, EventArgs.Empty);
}
The Add method is called with an instance of IArticle as an argument (a Book object in the example). If an article with the same ID is found, the article’s quantity is incremented by one. Otherwise, the new article is added to the list and the Repeater control is databound again to reflect the latest changes. In the last statement, you call the OnArticleAdd method, which fires an event called ArticleAdd. As you’ll discover later, this event is useful when you want to use an UpdatePanel control to refresh the shopping cart without having to embed it in the user control.
IScriptControl implementation
Being an Ajax-enabled control, the ShoppingCart control implements the IScriptControl interface. In chapter 9, we explained that this is required in order to provide a list of script descriptors and script references to the ScriptManager control. In turn, the ScriptManager uses them to load the necessary script files and to generate the $create statement that instantiates the client components associated with the server control. In listing 12.11, you can see how the IScriptControl interface is implemented by the ShoppingCart control.
Listing 12.11. ShoppingCart: IScriptControl interface implementation
public System.Collections.Generic.IEnumerable<ScriptDescriptor>
     GetScriptDescriptors()
{
    ScriptBehaviorDescriptor desc = new
      ScriptBehaviorDescriptor("Samples.CartZone",
         shoppingCart.ClientID);

    yield return desc;
}

public System.Collections.Generic.IEnumerable<ScriptReference>
     GetScriptReferences()
{
    ScriptReference scriptRef = new
       ScriptReference(Page.ResolveClientUrl("~/ScriptLibrary/CartZone.js"));

    yield return scriptRef;
}
In the GetScriptDescriptors method, you return a single ScriptControlDescriptor instance. This instance generates the $create statement that wires an instance of the client CartZone control to the shopping cart’s container element. The ID of the container element is returned by the control’s ClientID property. Then, the ID is passed as an argument to the constructor of the ScriptControlDescriptor class.
The GetScriptReferences method returns an instance of the ScriptReference class that points to the CartZone.js file, located in the ScriptLibrary folder of the sample website. This file contains the code for the CartZone client control and is loaded in the page by the ScriptManager without the need to reference it manually in the markup code.
Now, let’s focus on the remaining control: the BooksCatalog user control. The BooksCatalog control is the web user control responsible for rendering the catalog with the available books. You code it as a user control because you can define a template for the UI using declarative code.
12.2.4. The BooksCatalog control
The catalog is represented by a Repeater control bound to a collection of Book objects. The list of books is extracted from the XML file that acts as the local data store. As we’ll explain in a moment, every item rendered by the Repeater is associated with an instance of the client BookItem control. As a consequence, every catalog item becomes a draggable item and can be dropped over the shopping cart. Listing 12.12 shows the markup code for the control, stored in the BooksCatalog.ascx template file.
Listing 12.12. Markup code for the BooksCatalog user control
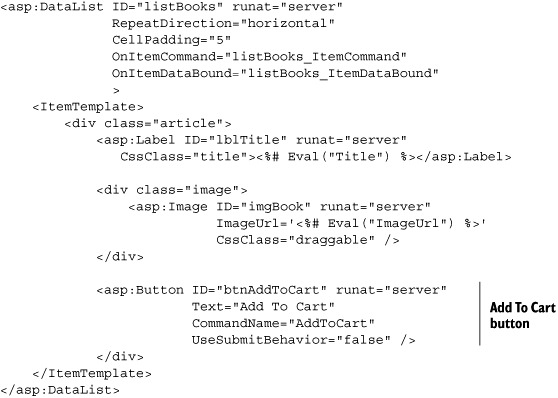
The Add To Cart button’s CommandName property is set to AddToCart. By subscribing to the ItemCommand event of the Datalist, you can intercept the Click event of the button and execute the logic for adding the corresponding article to the shopping cart. To retrieve the book’s ID, you store it in the CommandArgument property of the Button control. This lets you retrieve the information about the book on the server side, in the event handler for the ItemCommand event, as shown in listing 12.13.
Listing 12.13. Handling the ItemCommand event
protected void listBooks_ItemCommand(object sender,
      DataListCommandEventArgs e)
{
    if (e.CommandName == "AddToCart")
    {
        Button btnAddToCart =
          e.Item.FindControl("btnAddToCart") as Button;

        Book book =
          BusinessLayer.GetBookById(btnAddToCart.CommandArgument);

        shoppingCart.Add(book);
     }
}
The GetBookById method returns the Book object corresponding to the book with the given ID. The book’s ID is stored in the CommandArgument property of the Add To Cart button.
Note that the BooksCatalog control encapsulates an instance of the Shopping-Cart control. Because the ShoppingCart control implements the IShoppingCart interface, the BooksCatalog knows how to call the Add method of the shopping cart instance when a book must be added to the cart.
The BooksCatalog control is an Ajax-enabled user control. Therefore, it implements the IScriptControl interface. The implementation in listing 12.14 shows how you wire an instance of the client BookItem control to each one of the book images rendered by the DataList encapsulated in the BooksCatalog control.
Listing 12.14. BooksCatalog: IScriptControl interface implementation


The GetScriptDescriptors method wires an instance of the BookItem control to each of the DataList’s items, through a ScriptBehaviorDescriptor object ![]() . The book image becomes the associated element of the client control, and the client ID of the Add To Cart button
. The book image becomes the associated element of the client control, and the client ID of the Add To Cart button ![]() is set as the value of the addToCartElement property of the BookItem instance. As usual, the GetScriptReferences method returns the URL of the BookItem.js file, which is saved in the ScriptLibrary folder of the sample website and holds
the code for the BookItem client control.
is set as the value of the addToCartElement property of the BookItem instance. As usual, the GetScriptReferences method returns the URL of the BookItem.js file, which is saved in the ScriptLibrary folder of the sample website and holds
the code for the BookItem client control.
With the BooksCatalog control, we’ve completed our overview of the shopping-cart application. We examined its architecture and the client components that provide the support for drag and drop. Then, we explained how to Ajax-enable the catalog and the shopping-cart user controls to wire them to the BookItem and CartZone client controls. What remains is putting it all together in an ASP.NET page in order to obtain a full working example.
12.2.5. Piecing it together
The Default.aspx page of the sample website is where all the server controls are wired together. The page hosts the BooksCatalog and ShoppingCart user controls. Notably, the controls are wrapped by two UpdatePanels declared in the page. This way, the partial rendering can be controlled globally from the hosting page.
Furthermore, you have a central place to enable or disable the partial-rendering feature. Even if partial rendering is disabled, the shopping cart continues to work by making full postbacks instead of partial ones. The relevant code is contained in the Default.aspx.cs code-behind file and is shown in listing 12.15.
Listing 12.15. Code for the Default.aspx page, which hosts the Ajax-enabled controls
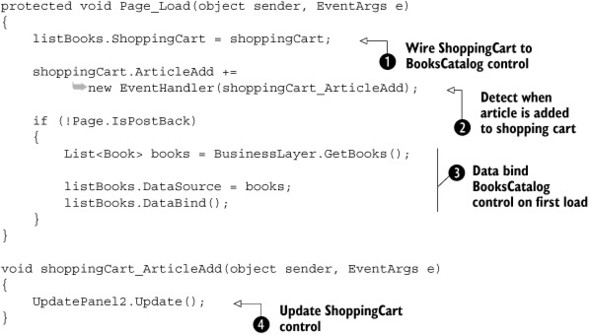
In the Page_Load method, you wire the BooksCatalog control ![]() with the ShoppingCart control. This enables the BooksCatalog control to call the Add method of the ShoppingCart instance when needed. Then, you subscribe to the ArticleAdd event
with the ShoppingCart control. This enables the BooksCatalog control to call the Add method of the ShoppingCart instance when needed. Then, you subscribe to the ArticleAdd event ![]() raised by the ShoppingCart control whenever an article is added to the cart, as shown in listing 12.8. In the event handler
raised by the ShoppingCart control whenever an article is added to the cart, as shown in listing 12.8. In the event handler ![]() , you manually update the UpdatePanel that wraps the ShoppingCart control, to display the updated cart. This is necessary
because the Repeater in the ShoppingCart control is automatically data bound every time an article is added to the shopping
cart. Finally, when the page is loaded for the first time, you initialize the catalog by getting the list of books and binding
it to the BooksCatalog control
, you manually update the UpdatePanel that wraps the ShoppingCart control, to display the updated cart. This is necessary
because the Repeater in the ShoppingCart control is automatically data bound every time an article is added to the shopping
cart. Finally, when the page is loaded for the first time, you initialize the catalog by getting the list of books and binding
it to the BooksCatalog control ![]() .
.
12.3. Summary
The ASP.NET Futures CTP provides a drag-and-drop engine that you can use to add drag and drop to web pages. Typically, drag and drop in web pages is implemented with draggable items (DOM elements that can be dragged around the page) and drop targets (elements that allow draggable items to be dropped onto their area).
You can easily implement draggable items and drop targets as Microsoft Ajax components that implement the IDragSource or IDropTarget interface in order to receive feedback from the DragDropManager, a global JavaScript object that coordinates a drag-and-drop operation.
In this chapter, you’ve seen how to implement a scenario involving a drag-and-drop shopping cart. In the first example, you implemented it using a pure client-centric model. Then, you took advantage of the data-binding capabilities of ASP.NET server controls and implemented the scenario using a server-centric model.
In the next chapter, you’ll see how to implement common Ajax patterns with ASP.NET AJAX.
