Chapter 8. ASP.NET AJAX client components
In this chapter:
- The client component model
- Nonvisual components
- Client behaviors
- Client controls
A widely used technique for developing applications uses components as building blocks. Components encapsulate the application’s functionality and can be reused across different projects. A component is a special object that implements a well-defined set of interfaces. These interfaces define the base functionality that every component provides and specify how components interact with one another. Components that implement the same interfaces can be interchanged and can change their internal implementation without affecting other components that deal with their interfaces.
We gave a quick overview of client components in chapter 2, where we discussed the application model. In this chapter, we’ll talk about the client component model provided by the Microsoft Ajax Library. This model lets you create components on the client side using JavaScript. We’ll also explain the techniques used to create and access client components at runtime. To understand the material presented in this chapter, you need to know how to program in JavaScript using the object-oriented techniques presented in chapter 3.
8.1. The client component model
The Microsoft Ajax Library provides a client component model that closely resembles the one used in the .NET framework. As components on the server side derive from the System.ComponentModel.Component class, ASP.NET AJAX client components derive from the client Sys.Component class. In the MicrosoftAjax.js file, the Sys.Component class is registered as follows:
Sys.Component.registerClass('Sys.Component', null, Sys.IDisposable,
   Sys.INotifyPropertyChange, Sys.INotifyDisposing);
As we said, one of the main characteristics of components is that they implement a definite set of interfaces. Knowing which interfaces are implemented by the Sys.Component class is useful, so you’re aware of the base features that components can leverage. It’s also fundamental in order to understand how components can interact with one another.
A closer look at the registerClass statement shown in the previous code snippet tells you that the Sys.Component class implements the following interfaces:
- IDisposable— Defines a dispose method, whose purpose is to free the resources used by the component. Usually, components can initialize and dispose the resources they use; this mechanism is also available to client components created with the Microsoft Ajax Library.
- INotifyPropertyChange— Allows a component to raise an event when the value exposed by a property changes. As you’ll see later, and then in chapter 11, you can take advantage of features like bindings to synchronize the values of two properties of the same or different components.
- INotifyDisposing— Makes a component able to raise a dispose event to notify external objects that it’s releasing its resources. Client components can raise events; they follow the model illustrated in chapter 3 to expose and raise multicast events.
The set of interfaces supported by a client component is shown in figure 8.1. The diagram also shows a group of methods exposed by the Sys.Component class. These are the methods you’ll most often use when dealing with client components.
Figure 8.1. Every client component derives from the base Sys.Component class, which implements a well-defined set of interfaces.

Web developers use JavaScript mainly to program against the browser’s DOM. For this reason, the client component model offers specialized components that can be associated with DOM elements in a web page. You can take advantage of the features provided by the client component model and, at the same time, create components that provide a UI.
We make a distinction between visual and nonvisual components. Although both the categories have access to the same base features, visual components are best suited when you need to work with the DOM.
Note
The System.ComponentModel namespace contains the component model classes used in the .NET framework. To learn more about component model namespaces, go to http://msdn2.microsoft.com/en-us/library/ah4293af(VS.71).aspx.
8.1.1. Visual and nonvisual components
Client components are classified as nonvisual or visual. A nonvisual component doesn’t provide a UI. For example, a Collection component that manages access to an array of objects is a nonvisual component. Another example of a nonvisual component is the Application object, stored in the global Sys.Application variable. A visual component provides a UI. In a web page, the UI is defined using HTML code. For this reason, a client visual component is typically associated with a portion of markup code. A menu is an example of a visual component: It manages a list of URLs and lets you navigate those URLs through hierarchical panels. Another example is a slider, which lets you select from a range of values by dragging a graphical handle.
In the .NET framework, visual components are called controls. On the client side, you can create either a control or a behavior. We’ll discuss the differences between controls and behaviors shortly. Figure 8.2 shows the hierarchy of client components as defined in the client component model.
Figure 8.2. Hierarchy of components in the Microsoft Ajax Library. Nonvisual components provide generic component functionality and derive from Sys.Component. Visual components can be associated with DOM elements and can derive from Sys.UI.Behavior or Sys.UI.Control.
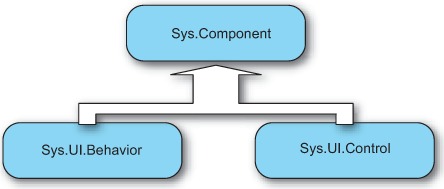
The base Sys.Component class is used to create nonvisual components. The Sys.UI.Behavior and Sys.UI.Control classes, which represent behaviors and controls, respectively, are used to create visual components and are declared under the Sys.UI namespace.
8.1.2. Controls and behaviors
The differences between controls and behaviors are mostly semantic. Both are components associated with DOM elements in the page, and they offer a similar set of features. Behaviors enhance DOM elements without changing the base functionality they provide. If you associate a behavior with a text box element, the text field continues to accept the user’s text input. But you can use the behavior to add client functionality to the text box and, for example, upgrade it to an auto-complete text box.
The chief purpose of client controls is creating element wrappers. For example, you can create a TextBox control that wraps an input element of type text. You can create a Label control that wraps a span element, and so on. This is similar to what happens with the ASP.NET TextBox and Label server controls. The difference is that they wrap DOM elements on the server side rather than on the client side. An element wrapper can be useful to enhance the way you program against a DOM element. For example, you can use controls as a way to program against DOM elements using declarative code. We’ll discuss the XML Script declarative code in chapter 11.
A fundamental difference between behaviors and controls is that a DOM element can have multiple behaviors, but it can be associated with one and only one control. For this reason, behaviors are best suited to add client capabilities to a DOM element in an incremental way. On the other hand, a control is supposed to provide the whole client functionality to its associated element.
We’ll go deep into controls and behaviors later in this chapter. Now, let’s examine the general features offered by client components. The following section clarifies the concept of component lifecycle.
8.1.3. Component lifecycle
Components are complex objects capable of encapsulating other objects and child components.
For example, a nonvisual component may need to encapsulate child objects and even instantiate them programmatically. A visual component, being associated with a DOM element, typically needs to attach and detach event handlers, or may create dynamic elements. Having a centralized location for initializing and disposing an instance is critical.
The lifecycle of a component consists of two stages: initialize and dispose. The initialize stage begins when a component is created, and the dispose stage is reached before a component instance is removed from the memory. To accomplish the initialization routine, client components expose a method called initialize. The dispose method cleans up the current instance before it’s garbage collected. Soon, you’ll discover that participating in the lifecycle of a client component is about overriding the initialize and dispose methods of the Sys.Component class.
Before you start to work with components, you need to understand the relationship that exists between the lifecycle of a component and the client page lifecycle. As you’ll see, components interact with the Application object during the whole page lifecycle. This is possible because the Application object hosts the components instantiated in the page.
8.1.4. Containers
A container is an object that holds a collection of child components and provides services to those components. Typically, a container exposes methods for adding, removing, and accessing the child components. The Microsoft Ajax Library defines the Sys.IContainer interface for implementing containers. The methods exposed by this interface are shown in figure 8.3.
Figure 8.3. Methods defined by the Sys.IContainer interface. The Sys._Application class is an example of a client class that is a container.
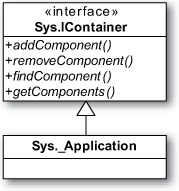
Figure 8.3 shows that the Sys._Application class, the single instance of which is the Application object, is a container. One of the goals of the Application object is to host and keep track of the client components instantiated in the page. As you’ll discover in the following sections, hosting client components in a container has various advantages. For example, you can retrieve references to client components through the container, instead of storing them in global JavaScript variables. Another benefit of hosting components in the Application object is that they’re automatically disposed by the container when the page is unloaded by the browser. This means you don’t have to manually call the dispose method on each component instance. Client components become children of the Application object during their creation process, which is illustrated in section 8.2.1.
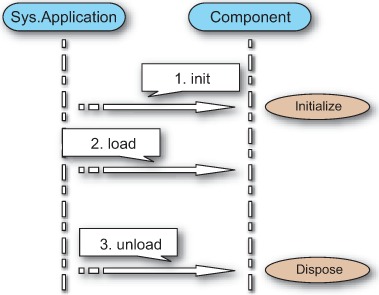
Figure 8.4 shows the interaction between the Application object and one of its child components. Client components are usually instantiated in the init stage of the client page lifecycle and initialized before the load stage is entered. This means that when the load event is raised, client components are already initialized and ready for use. Finally, components are disposed during the unload stage by the Application object.
Figure 8.4. Client page lifecycle and component’s internal lifecycle: client components are hosted by the Application object during their creation and are automatically disposed when the page is unloaded by the browser.
Note
Interaction with client components shouldn’t happen until the load event of the client page lifecycle is raised. Only when the load event is raised is everything hooked up and ready.
We discussed the client lifecycle of an ASP.NET AJAX page in chapter 2. Be sure you understood the material presented there before you proceed. After this overview of the client component model, you’re ready to start working with client components; let’s shift from theory to practice by creating your first trivial component.
8.2. Working with client components
The best thing for growing confidence in manipulating client components is creating a trivial component. All this component does is display a greet message on the screen and notify you each time a stage in its internal lifecycle is reached. Our goal is to show you how a component is created and how you can participate in its lifecycle. Look at the code shown in listing 8.1.
Listing 8.1. Code for the trivial component
Type.registerNamespace('Samples'),

Samples.TrivialComponent = function() {
    Samples.TrivialComponent.initializeBase(this);
}
Samples.TrivialComponent.prototype = {
    initialize : function() {
        Samples.TrivialComponent.callBaseMethod(this, 'initialize'),

        alert("I've been initialized!");
    },

    dispose : function() {
        alert("I'm being disposed!");

        Samples.TrivialComponent.callBaseMethod(this, 'dispose'),
    },

    greet : function() {
        alert("Hello, I'm your first component!");
    }
}
Samples.TrivialComponent.registerClass('Samples.TrivialComponent',
    Sys.Component);
Looking at the call to registerClass in the previous listing, you see that the trivial component is a client class that derives from Sys.Component. To participate in the lifecycle of a component, you need to override the initialize and dispose methods in the constructor’s prototype object. Method overriding was explained in chapter 3, when we talked about inheritance in the Microsoft Ajax Library. In the example, you override both methods to display a message box using the JavaScript alert function.
Note
Don’t forget to call the base implementations of the initialize and dispose methods using the callBaseMethod method, as in listing 8.1. They perform important processing steps during the initialization and disposing phases of the component’s lifecycle. Calling the base implementations ensures that a component is properly initialized and disposed.
The trivial component also defines a method called greet. This method displays a greeting message using the alert function. Its purpose is to demonstrate that you can declare methods in a component the same way as in a client class created with the Microsoft Ajax Library.
Let’s see what it takes to create an instance of the trivial component. In chapter 3, you learned that you can create custom JavaScript objects by using a function—the constructor—in conjunction with the new operator. Unlike with custom JavaScript objects, using the new operator isn’t enough to properly instantiate a client component. It’s your responsibility to initialize the new instance and host it in the Application object. For this purpose, you must rely on a special method called $create, which is provided by the Microsoft Ajax Library. Listing 8.2 shows how that is done.
Listing 8.2. Code for testing the trivial component
Sys.Application.add_init(pageInit);

function pageInit() {
    $create(Samples.TrivialComponent, {'id':'trivialComponent'});
}

function pageLoad() {
    var trivialComponent = $find('trivialComponent'),

    trivialComponent.greet();
}
This listing introduces the methods you’ll most often use when dealing with client components. These methods create an instance of a client component and access it when needed.
$create is an alias or shortcut for the Sys.Component.create method. The advantage of this method is that it performs all the tasks related to the component-creation process. We’ll look under the hood of the creation process in the next section; but note that $create is called in the init stage of the client page lifecycle. As you may recall from our discussion of the client component model, the init stage is the point at which client components are instantiated.
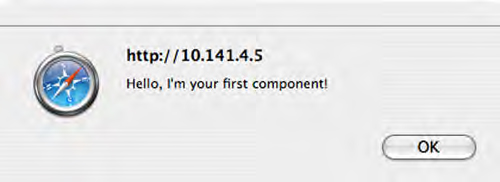
The other method introduced in listing 8.2 is $find. This method, an alias for the Sys.Application.findComponent method, accesses a child component of the Application object. This is possible because Sys.Application becomes the container of all the client components instantiated using $create. If you pass the ID of a component to $find, you get back the corresponding instance. We’ll talk more about IDs and the $find method in section 8.2.2. In the meantime, look at figure 8.5 to see the component in action.
Figure 8.5. The trivial component greets you.
Before we discuss in detail how client components are instantiated, let’s review the aliases you’ll use in the code that follows. Table 8.1 lists them along with the full method names and the tasks they accomplish.
Table 8.1. Some of the aliases defined by the Microsoft Ajax Library
|
Shortcut |
Full method name |
What it does |
|---|---|---|
| $get | Sys.UI.DomElement.getElementById | Returns a reference to a DOM element |
| $create | Sys.Component.create | Creates, configures, and initializes an instance of an ASP.NET AJAX client component |
| $find | Sys.Application.findComponent | Returns a reference to a component |
Now, you need to become familiar with the process of instantiating client components. By understanding this procedure, you’ll be able to use every kind of client components in web pages.
8.2.1. Creating components
At first glance, a component may appear to be a simple class that derives from Sys.Component. Why do you call $create rather than use the new operator to create an instance? The answer is that creating an instance isn’t enough because a component needs to be initialized and added as a child component of the Application object. The following code shows how to create a new instance of the trivial component:
var trivialComponent = new Samples.TrivialComponent();
trivialComponent.set_id('trivialComponent'),
trivialComponent.initialize();

Sys.Application.addComponent(trivialComponent);
Creating a TrivialComponent instance with the new operator is just the first step. The next (optional) thing to do is configure the instance by setting client properties. For example, the id property lets you retrieve a reference to the new instance using the $find method.
Once the initial configuration is complete, you must do the following:
1. Call the initialize method to let the component perform its internal setup.
2. Invoke the addComponent method of Sys.Application to add the new instance as a child component of the Application object.
Now you can safely say that the component is ready for use. The $create method is a lifesaver because it performs the entire procedure automatically. You can use $create to instantiate, configure, and initialize any client component in a single statement. You can also add event handlers and event references to child components.
$create is a powerful method that accepts various arguments. Figure 8.6 shows an example $create statement and points out the arguments passed to the method.
Figure 8.6. Syntax for the $create method. This method is responsible for creating, configuring, and initializing a client component instance.

The first argument passed to $create is always the fully qualified name of the component to instantiate. The client component class must derive from Sys.Component; otherwise, a client exception will be thrown.
The last argument is the associated DOM element, which is mandatory for visual components (behaviors or controls). A nonvisual component like the trivial component doesn’t need an associated element; a client error will occur if one is specified.
The remaining arguments are objects, passed as objects literals, used to configure the component after instantiation and before initialization. As an alternative to passing empty objects, as in figure 8.5, you can pass null. In the subsequent listings, we’ll pass the empty object {} to evidentiate the type of the parameter. To explain the remaining arguments, let’s return to the $create statement used in listing 8.1 to create an instance of the trivial component:
$create(Samples.TrivialComponent, {'id':'trivialComponent'});
In this statement, the second argument passed to $create is an object that assigns a value to the component’s id property. To assign values to other properties, you must expand the object by adding a name/value pair. Each pair consists of a string with the name of the property to set and its value.
In a similar way, you can attach an event handler to one of the events exposed by a component. The following code shows you how:
$create(Samples.TrivialComponent, {'id':'trivialComponent'},
    {'disposing':onDisposing});
The third argument passed to $create is an object that maps the name of an event to its handler. The previous statement assumes that a JavaScript function called onDisposing is defined somewhere in the page or in a loaded script file. The name of the event, disposing, refers to the event defined in the Sys.INotifyDisposing interface. Whenever you pass the name of an event to $create, it calls the add_eventName method on the component instance—where eventName is the actual name of the event—passing the handler as an argument.
In figure 8.6, the fourth argument passed to $create is a dictionary of references. In this object, the name of a property exposed by the component is mapped to the ID of another component. At runtime, when the component is instantiated, the ID is used to retrieve a reference to the corresponding instance. Consequently, the reference is assigned to the specified property.
$create has its advantages and weaknesses. Here are some of them:
- $create offers a concise notation for performing the entire job related to component instantiation, configuration, and initialization. You avoid the risk of forgetting a call or making the steps in the wrong order.
- If you use $create, you pay a little overhead at runtime. A series of checks is performed to verify that you’re trying to instantiate a component and that you aren’t trying to set nonexistent or read-only properties. These checks are helpful in ensuring that a component is correctly instantiated and configured before initialization.
- $create is the method used by ASP.NET AJAX to wire client components to server controls. Chapter 9 is dedicated to Ajax-enabled controls.
The $create method works in conjunction with $find to help manage client components instantiated in a web page. In the following section, we’ll provide more insight on the $find method.
8.2.2. Accessing components
Once a client component has been correctly instantiated and added to a container, you can access it by passing its ID to the $find method. Recall that every component exposes a property named id, which is defined in the base Sys.Component class, as shown in figure 8.1. The ID of a component can be passed to $find to retrieve a reference to the component itself, as shown in figure 8.7.
Figure 8.7. $find lets you access a component created with the $create method by passing its ID and an instance of a class that implements the Sys.IContainer interface. If the second argument is omitted, the component is searched for in Sys.Application.

$find works only if the component has been assigned an ID and if it’s been added to a container. If you use $create, the component is automatically added as a child component of the Application object, and you only need to remember to set the value of the id property.
Note that $find can also accept a Sys.IContainer instance as the second argument. This lets you search for components in other containers while continuing to use the $find alias. If you omit the container, the component is searched for in Sys.Application by default.
The trivial example component was an ice-breaker and a pretext to illustrate the methods you’ll use most when working with instances of client components. It’s time to go deeper and continue our exploration of the client component model. In the next section, you’ll see how client components can expose events, and we’ll introduce the property change notification mechanism.
8.2.3. Events and property change notification
In chapter 3, we explained how to expose and raise events in JavaScript objects, using a model that closely resembles that used in the .NET framework. Before proceeding, let’s recap the three steps necessary to expose an event in a client class created with the Microsoft Ajax Library:
2. Create a method that removes a handler for the event.
3. Create a method that is responsible for raising the event.
The same process applies to client components that want to expose events. The only difference is that you don’t need to store an instance of the Sys.EventHandlersList class in the constructor, because every component inherits it from the base Sys.Component class. You also inherit the get_events method that you declared in listing 3.15 to access the Sys.EventHandlersList instance. Taking these differences into account, the entire process for exposing and handling events described in chapter 3 can be applied to client components without additional modifications.
Components reward you with a special mechanism for tracking changes in the values exposed by properties defined with the Microsoft Ajax Library. Client components expose an event called propertyChanged that can be raised whenever the value of a property changes. This mechanism is practical because you don’t have to expose and raise a custom event for each value you want to monitor. Instead, you rely on the propertyChanged event—defined in the Sys.INotifyPropertyChange interface—that you can subscribe to, to know which property changes its value and when.
But why do you need to monitor property changes? In chapter 11, we’ll introduce bindings, which are objects that leverage the property-change notification mechanism to keep the values of two properties synchronized. They do this by updating the value of one property as soon as the other is modified, without your having to manually write the logic to perform this task. Bindings reveal their power when used in declarative languages. (We’ll discuss the XML Script declarative language in chapter 11.)
Using the property-change notification mechanism is straightforward. Whenever the value exposed by a property changes, all you have to do is call the raisePropertyChanged method. This method accepts a string with the name of the property whose value has changed. To detect the change, you usually perform a check in the setter of the property. As an example, listing 8.3 shows a simple Customer component that raises the propertyChanged event whenever the value of the fullName property is modified.
Listing 8.3. Property-change notification applied to a property of a client class
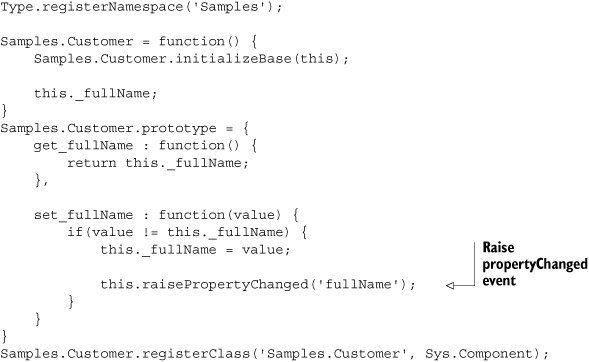
Note that in the set_fullName method—just before you call the raisePropertyChanged method—you do a check to ensure that the new value is different from the one that was stored previously. At this point, an external object can subscribe to the propertyChanged event and retrieve a string with the name of the property. This is done through an instance of the Sys.PropertyChangedEventArgs class, which is passed as an argument to the event handler. The instance has a get_propertyName method that returns the name of the property whose value has changed. Listing 8.4 shows how event subscription works by testing the Customer component in a web page.
Listing 8.4. Subscribing to the propertyChanged event
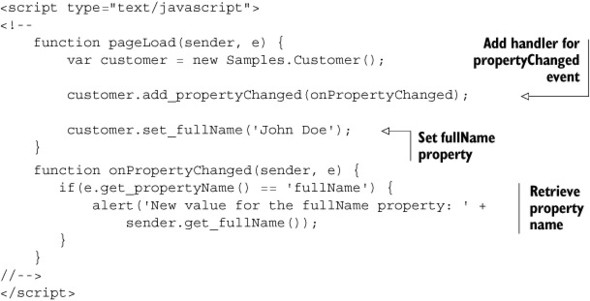
Following the naming convention for client events established by the Microsoft Ajax Library, you can add an event handler for the propertyChanged event by passing the handler to the add_propertyChanged method. In the event handler, you test against the string returned by the get_propertyName method to determine which property has changed its value.
With the property-change notification mechanism, we’ve completed our discussion of the features that can be leveraged by nonvisual client components. Some topics remain, because you have a whole UI to take care of. The rest of the chapter is dedicated to the additional features provided by visual components. By understanding the nuts and bolts of behaviors and controls, you’ll have a complete understanding of the client component model.
8.3. Behaviors
The name behaviors won’t sound new to web developers experienced with programming in Internet Explorer. If you browse the documentation on the Microsoft Developer Network (MSDN) website, located at http://msdn.microsoft.com, you’ll find the following definition: “Element behaviors are encapsulated components, so they can add new and interesting functionality to a Web page while improving the organization of content, functionality, and style.”
Although the ASP.NET AJAX implementation is radically different—and cross-browser—the concept is much the same: You use behaviors to enhance the functionality of DOM elements. In this section, we’ll introduce client behaviors and explain how to create them. By the end, you’ll apply your new skills to create a behavior that uses CSS and the DOM to add client functionality to a text box element.
Note
You can find an introduction to DHTML behaviors in Internet Explorer at http://msdn.microsoft.com/library/default.asp?url=/workshop/author/behaviors/behaviors_node_entry.asp.
8.3.1. Sys.UI.Behavior
A behavior is a client class that derives from the base Sys.UI.Behavior class. In turn, Sys.UI.Behavior inherits from Sys.Component, as shown earlier in figure 8.1. As we stated during the overview of the client component model, behaviors are visual components because they’re always associated with a DOM element. This element—the associated element—is passed to the constructor when you create a new instance of the behavior.
Being components, behaviors take advantage of all the features illustrated in the previous sections. These include the ability to raise events and use $create and $find to create instances and access them. The creation process is almost the same as that of nonvisual components. To better understand the few differences, let’s start by creating the simplest behavior: an empty behavior. Listing 8.5 shows the code for the EmptyBehavior class.
Listing 8.5. The simplest behavior is an empty behavior.
Type.registerNamespace('Samples'),

Samples.EmptyBehavior = function(element) {
    Samples.EmptyBehavior.initializeBase(this, [element]);
}
Samples.EmptyBehavior.prototype = {
    initialize : function() {
        Samples.EmptyBehavior.callBaseMethod(this, 'initialize'),
    },

    dispose : function() {
        Samples.EmptyBehavior.callBaseMethod(this, 'dispose'),
    }
}
Samples.EmptyBehavior.registerClass('Samples.EmptyBehavior',
    Sys.UI.Behavior);
The previous code acts as a skeleton class for client behaviors. The constructor of a behavior takes the associated DOM element as an argument. Then, it calls the initializeBase method to pass the element to the base class’s constructor. Whenever you need to access the associated element from the class, you can retrieve it by calling the get_element method.
In the prototype object of the constructor, you typically override the initialize and dispose methods to participate in the component lifecycle. As explained in section 8.2, you must not forget to call the implementations of the base class, as you do in listing 8.5. Finally, the call to registerClass in the last statement turns the constructor into an ASP.NET AJAX client class that derives from Sys.UI.Behavior.
We need to talk about how to create and access instances of client behaviors. As you’ll see, there are no major differences except an additional argument passed to the $create method and a special syntax used for accessing instances.
8.3.2. Creating behaviors
Behaviors are created the same way as nonvisual components: by calling the $create method during the init stage of the client page lifecycle. The only difference is that you must always pass the associated DOM element as the last argument to $create; otherwise, an error will be thrown. The following code shows how to create an instance of the EmptyBehavior behavior and set the value of its name property:
$create(Samples.EmptyBehavior, {'name':'myEmptyBehavior'}, {}, {},
    $get('elementID'));
Note that you set the value of the name property instead of setting the id property as you did with nonvisual components. Although there’s no risk in assigning an ID, client behaviors expose the name property to easily access instances from the associated element, as the next section explains.
8.3.3. Accessing behaviors
You can access behavior instances by assigning them an ID—through the id property—and then passing it to the $find method, as with nonvisual components. By setting the name property of a client behavior, you can access it through its associated element. All you have to do is call $find with a string that contains the ID of the associated element concatenated to the value of the name property through a $ character.
Figure 8.8 clarifies this syntax. In the diagram, you set the name property of an instance of the EmptyBehavior behavior to myEmptyBehavior—and the associated element has an ID of someElement.
Figure 8.8. You can use the $find method to retrieve a reference to an instance of a client behavior by knowing the ID of the associated DOM element and the value of the behavior’s name property.

If you set the name property, you can also access the behavior through a property added to the associated element. This property, added by the base class during the initialization of a new instance of the behavior, has the same “name” as the behavior. The following statement clarifies what we just said:
var emptyBehaviorInstance = $get('someElement').myEmptyBehavior;
Having covered the syntactic sugar, it’s time to design a real and more complex behavior. The FormattingBehavior that you’ll build in the next section will let you manage the style of a text box element in a programmatic way, based on the events raised by the DOM element. Once you have the behavior up and running, you’ll learn how to use it in conjunction with CSS to simulate an effect called in-place edit.
8.3.4. Enhancing a text box element
We’ll guide you step by step through the creation of a client behavior that is able to programmatically change the CSS class associated with a DOM element in response to its events. The following example focuses on a specific scenario: the emulation of the in-place edit functionality.
“Allow input wherever you have output” is one of the axioms of Alan Cooper, a famous advocate of UI design. Following his axiom, you’ll implement a form where the input fields are styled as labels. When the user hovers over a text box, its style changes to visually suggest that a text field is present—and it effectively appears as soon as the user gives focus to the text box. When the user tabs away from the text box or clicks outside it, the text box will be styled to again look like a label. This kind of functionality is called in-place editing, and it can enhance the appearance and usability of a web form. If you’re unsure about the final result, figure 8.9 shows the example up and running. Let’s open Visual Studio and start writing some code.
Figure 8.9. The FormattingBehavior lets you implement the in-place-edit functionality in a web form. By using CSS, you can simulate a visual effect that turns a label into a text field.
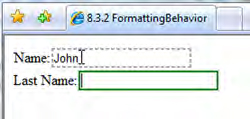
Based on what you’ve learned in the previous sections, your mission is to encapsulate the client logic into a behavior. In the class’s prototype, you handle the behavior’s lifecycle as well as the events raised by the associated DOM element. The complete code for the FormattingBehavior behavior is shown in listing 8.6.
Listing 8.6. Code for the FormattingBehavior class


The code in listing 8.6 shows how a client behavior is typically structured. In the constructor, you declare the class fields ![]() . For example, _focusCssClass and _hoverCssClass store strings with the names of the CSS classes you want to assign when the associated element is hovered over or focused
on. The other fields keep track of the current state of the associated element. For example, _focus and _mouseOver are Boolean values that tell whether you gave focus to the text box or you’re hovering over it with the mouse.
. For example, _focusCssClass and _hoverCssClass store strings with the names of the CSS classes you want to assign when the associated element is hovered over or focused
on. The other fields keep track of the current state of the associated element. For example, _focus and _mouseOver are Boolean values that tell whether you gave focus to the text box or you’re hovering over it with the mouse.
In the prototype object, you find the overrides of the initialize and dispose methods ![]() . FormattingBehavior uses the $addHandlers method to hook up the mouseover, mouseout, focus, and blur events of the associated DOM element. Then, the same handlers are detached in the dispose method, using the $clearHandlers shortcut. Both the $addHandlers and $clearHandlers shortcuts were discussed in section 2.3.
. FormattingBehavior uses the $addHandlers method to hook up the mouseover, mouseout, focus, and blur events of the associated DOM element. Then, the same handlers are detached in the dispose method, using the $clearHandlers shortcut. Both the $addHandlers and $clearHandlers shortcuts were discussed in section 2.3.
Next, you find the event handlers ![]() , which you use to set the state of the element based on the event that it raised. Each event handler calls the _setCssClass method, which takes care of switching the element’s CSS class based on the event raised. Finally, a relevant portion of the
code is used to declare the client properties
, which you use to set the state of the element based on the event that it raised. Each event handler calls the _setCssClass method, which takes care of switching the element’s CSS class based on the event raised. Finally, a relevant portion of the
code is used to declare the client properties ![]() , which are needed if you want to take advantage of the $create method to configure a new instance of the client behavior.
, which are needed if you want to take advantage of the $create method to configure a new instance of the client behavior.
Let’s take time to copy the code for the client behavior to a JavaScript file and then reference it in an ASP.NET page through the ScriptManager control. This should be the easiest part if you read the previous chapters of the book. Listing 8.7 shows the code for simulating the in-place-edit effect in a simple form; embed this code in the form tag of the ASP.NET page.
Listing 8.7. Simulating the in-place edit functionality with the FormattingBehavior
<div class="form">
    <div>
        <span>Name:</span>
        <asp:TextBox ID="Name" runat="server"></asp:TextBox>
    </div>
    <div>
        <span>Last Name:</span>
        <asp:TextBox ID="LastName" runat="server"></asp:TextBox>
    </div>
</div>

<script type="text/javascript">
<!--
    Sys.Application.add_init(pageInit);
    function pageInit(sender, e) {
        $create(Samples.FormattingBehavior,
          {
           'hoverCssClass':'field_hover',
           'focusCssClass':'field_focus'
          },
          {}, {}, $get('Name'));

        $create(Samples.FormattingBehavior,
          {
           'hoverCssClass':'field_hover',
           'focusCssClass':'field_focus'
          },
          {}, {}, $get('LastName'));
    }
//-->
</script>
The simple form declared in listing 8.7 consists of two text boxes. With a little imagination, you can think of it as a simplified version of a more complex form used for collecting user data. Note that the pageInit function—which handles the init event of the Application object—includes two $create statements. Each statement is used to create an instance of the FormattingBehavior behavior and wire it to the corresponding text box element. The values of the hoverCssClass and focusCssClass properties supplied in the $create statement are the names of the CSS classes used to obtain the in-place-edit effect. The CSS file used in the example is as follows; you should reference it in the ASP.NET page before running the example:
input {
    border: solid 2px #ffffff;
    margin: -2px;
}

.form div
{
    margin-bottom: 5px;
}

.field_hover {
    border: dashed 2px #ababab;
}

.field_focus {
    border: solid 2px Green;
}
Behaviors let you encapsulate a portion of client logic and plug it into a DOM element. Multiple behaviors can be associated with a single element, so a DOM element can acquire, at the same time, the client functionality provided by your behavior and, say, a third-party behavior. The client functionality of the element is the sum of the client capabilities provided by each behavior.
In the next section, we’ll experiment with controls, the other category of visual components. We’ll follow an approach similar to that used for behaviors. You’ll start by creating a simple control, and then we’ll explain how to create instances of controls and how to access them in the application code. Finally, you’ll see how to create custom controls. This will give you full control over ASP.NET AJAX client components.
8.4. Controls
Just like behaviors, controls are visual components associated with DOM elements. Conceptually, a control differs from a behavior in the sense that instead of just providing client functionality, a control usually represents—or wraps—the element, to provide additional properties and methods that extend its programming interface. In ASP.NET, for example, a text box element is represented on the server side by the TextBox control. You can program against a TextBox object to specify how the element’s markup is rendered in the page. In the same manner, you can have a Text-Box control on the client side and program against it using JavaScript.
In the following sections, we’ll explore client controls and focus on a couple of scenarios where they’re useful. We’ll show you how to create an element wrapper and how to use a control to program against a block of structured markup code, instead of a single DOM element. In chapter 11, we’ll explain how you can use a control to program against a DOM element using the XML Script declarative language.
8.4.1. Sys.UI.Control
A control is a client class that derives from the base Sys.UI.Control class. In turn, Sys.UI.Control is a child class of Sys.Component. Controls have an associated DOM element that is passed to the constructor during instantiation and returned by the get_element method. In the same manner as with behaviors, let’s start by looking at the simplest control—an empty control. The code for the EmptyControl class is shown in listing 8.8.
Listing 8.8. The simplest control is an empty control.
Type.registerNamespace('Samples'),

Samples.EmptyControl = function(element) {
    Samples.EmptyControl.initializeBase(this, [element]);
}
Samples.EmptyControl.prototype = {
    initialize : function() {
        Samples.EmptyControl.callBaseMethod(this, 'initialize'),
    },

    dispose : function() {
        Samples.EmptyControl.callBaseMethod(this, 'dispose'),
    }
}
Samples.EmptyControl.registerClass('Samples.EmptyControl',
    Sys.UI.Control);
An empty control is identical to an empty behavior, except that you derive from the Sys.UI.Control class. As usual, both the initialize and dispose methods are typically overridden to perform the initialization and cleanup of an instance.
The rules for creating and accessing controls, outlined in the next section, are simple, and the differences from behaviors are minimal. Let’s examine them before you begin coding custom controls.
8.4.2. Creating controls
Being client components, controls are created with a $create statement during the init stage of the client page lifecycle. A control must always be associated with a DOM element; otherwise, an error will be thrown at runtime by the Microsoft Ajax Library. The following code shows how to create an instance of the EmptyControl control, which you coded in listing 8.8, using the $create method:
$create(Samples.EmptyControl, {}, {}, {}, $get('elementID'));
As usual, the last argument passed to $create is the associated DOM element, retrieved with a call to the $get method. The argument passed to $get is the ID of the DOM element. A control is instantiated in the same manner as a nonvisual component, as we explained in section 8.2.1. Now, let’s peek at how controls are accessed in web pages.
8.4.3. Accessing controls
Because controls are client components, you can access them with the $find method, passing the ID of the control as an argument.
Note
The ID of a control can’t be set programmatically. It’s automatically set by the Sys.UI.Control class to the same ID as the associated element. You can get a reference to the control by passing the ID of the associated DOM element to $find.
Another way to access a control is through the associated element. Because an element can have one and only one associated control, a property called control—which stores the reference to the control—is created on the DOM element when the control is initialized. Supposing that you have a DOM element stored in the someElement variable, the following statement accesses the associated control (if it exists, of course) and stores a reference in the controlInstance variable:
var controlInstance = someElement.control;
Next, we’ll examine two examples of custom controls created with the Microsoft Ajax Library. The first example is relative to an element wrapper: a control called TextBox that wraps a text box element on the client side. The second example illustrates how to use client controls to work on a block of structured markup code.
8.4.4. Creating an element wrapper: text box
The first client control you’ll create is an element wrapper: a control that represents a DOM element on the client side. Your mission is to wrap a text box element with a client TextBox control. The reasons for using an element wrapper are varied. In this case, you want to be able to prevent the web form from being submitted when the Enter key is pressed in the text field, as normally happens in a web page. The logic needed to accomplish this task is controlled through a public property called ignoreEnterKey, which is exposed by the control. If you set the property to true, a press of the Enter key in the text field is ignored. If the property is set to false, the form is submitted to the server. Listing 8.9 shows the code for the Samples.TextBox control.
Listing 8.9. Code for the Samples.TextBox control

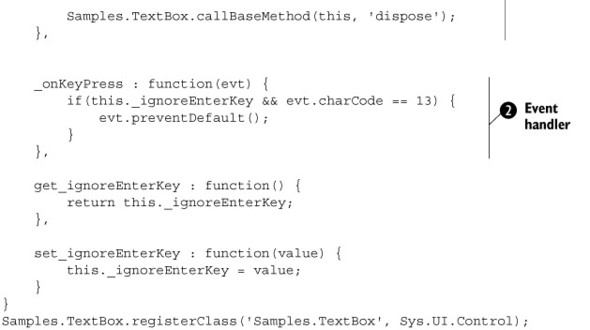
The structure of a control is similar to that of a behavior. As always, you see the overrides of the initialize and dispose methods ![]() , where you attach and detach handlers for the events raised by the associated element. In this example, you’re interested
in handling the text box’s keypress event, which notifies you of any key pressed by the user in the text field. The corresponding event handler
, where you attach and detach handlers for the events raised by the associated element. In this example, you’re interested
in handling the text box’s keypress event, which notifies you of any key pressed by the user in the text field. The corresponding event handler ![]() —_onKeyPress—does a check to determine if the ignoreEnterKey property is set to true and if the user pressed the Enter key. If the check is positive, it calls the preventDefault method on the event object to prevent execution of the event’s default action. This, in turn, prevents the form from being
submitted to the server. This functionality can be enabled or disabled through the ignoreEnterKey property.
—_onKeyPress—does a check to determine if the ignoreEnterKey property is set to true and if the user pressed the Enter key. If the check is positive, it calls the preventDefault method on the event object to prevent execution of the event’s default action. This, in turn, prevents the form from being
submitted to the server. This functionality can be enabled or disabled through the ignoreEnterKey property.
To test the control, create a new ASP.NET AJAX page, declare a text box element, and associate it with a new instance of the TextBox control, as shown in listing 8.10.
Listing 8.10. Code for testing the Samples.TextBox control
<input type="text" id="myTextBox" />

<script type="text/javascript">
Sys.Application.add_init(pageInit);

function pageInit() {
    $create(Samples.TextBox, {'ignoreEnterKey':true}, {}, {},
        $get('myTextBox'));
}
</script>
It’s no surprise that you instantiate the component with a $create statement during the init stage of the page lifecycle. The $create method sets the value of the ignoreEnterKey property to true. This activates the custom functionality and executes its logic every time the user presses a key in the text field.
Tip
The ASP.NET Futures package contains more examples of element wrappers, such as Label, HyperLink, and Button controls. They’re defined in the PreviewScript.js file; you’ll use them in chapter 11, when we discuss the XML Script declarative language. Appendix A contains instructions for how to install the ASP.NET Futures package.
So far, you’ve seen examples of visual components (both behaviors and controls) that target a single DOM element. In many situations, you have to deal with complex UIs that consist of a hierarchy of DOM elements—a DOM subtree.
For example, the UI of a menu is composed by many different elements—labels, hyperlinks, panels—and the same is true for complex controls such as the ASP.NET GridView or the TreeView. Is it possible to associate a client control with the complex markup code rendered by a GridView or—in general—to a portion of structured markup code? Are you restricted to developing only simple element wrappers?
The good news is that you can develop client controls associated with complex markup code. The trick is easy: You embed the markup in a container element (for example, a div or a span element), and you use the container as the associated element of the client control. Then, you access the child elements in the control. To clarify this concept, the following section explains how you can create a client control that relies on multiple DOM elements to implement a photo gallery.
8.4.5. Creating a PhotoGallery control
The goal of the following example is to show you how to build a client control with a complex UI. By complex, we mean the UI can consist of as many elements as you need, although you’ll use only a few in order to keep things simple. The result of the work will be a dynamic photo gallery control that you can use to browse a set of photos saved on the website. The URLs of the photos are stored in an array passed to the control. Figure 8.10 shows the result.
Figure 8.10. A simple photo gallery control realized by associating a client control to a portion of structured markup code.
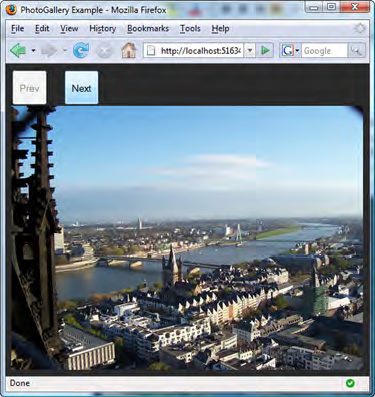
The block of static HTML that you use for the PhotoGallery control is contained in a div element. As you can see by looking at the code in listing 8.11, the UI is represented by two buttons—used for browsing the previous or next photo in the sequence—and an img element with an ID of gal_image that displays the current photo. A second img element—gal_progress—displays an indicator during the loading of the next photo.
Listing 8.11. HTML code for the UI of the PhotoGallery control
<div id="photoGallery">
  <div>
    <input type="button" id="gal_prevButton" value="Prev" />
    <input type="button" id="gal_nextButton" value="Next" />
    <img id="gal_progress" src="Images/progress.gif"
         alt="" style="visibility:hidden" />
   </div>
   <div>
     <img src="Images/placeholder.png" id="gal_image" alt="" />
   </div>
</div>
For simplicity, the HTML code doesn’t take into account the control’s style, which is available in the code you can download from the Manning website at http://www.manning.com/gallo.
Let’s examine the code for the client control. Because you want to develop a custom client control, you create a class called Samples.PhotoGallery that inherits from the base Sys.UI.Control class. To help you better understand what’s going on, we’ve split the code into two listings. The first contains the code for the constructor and the call to the registerClass method. The second shows the code for the prototype object of the Samples.PhotoGallery class. You must merge the two listings to obtain the complete code for the PhotoGallery control. Let’s start by exploring the code in the constructor, shown in listing 8.12.
Listing 8.12. Code for the PhotoGallery class’s constructor
Type.registerNamespace('Samples'),

Samples.PhotoGallery = function(element) {
    Samples.PhotoGallery.initializeBase(this, [element]);

    this._imageElement = null;
    this._nextElement = null;
    this._prevElement = null;
    this._progressElement = null;
    this._images = [];
    this._index = -1;
    this._imgPreload = null;
}
Samples.ImageGallery.registerClass('Samples.PhotoGallery',
    Sys.UI.Control);
The constructor, as usual, contains the class fields. The first four fields, whose names end with the word Element, hold references to the child nodes of the associated DOM element. Although the containing div element becomes the associated element of the PhotoGallery control, the child elements that you need to access are stored in some of the control’s fields.
The _images array holds the URLs of the photos to display, and the _index variable keeps track of the index of the URL in the array. Finally, _imgPreload holds a dynamic img element that is responsible for loading the next photo while the current one is still displayed. As you’ll see in chapter 10, this lets you play cool transitions between photos in the sequence.
The prototype object of the PhotoGallery control contains all the logic needed to load and browse the photos; see listing 8.13.
Listing 8.13. Prototype of the PhotoGallery control
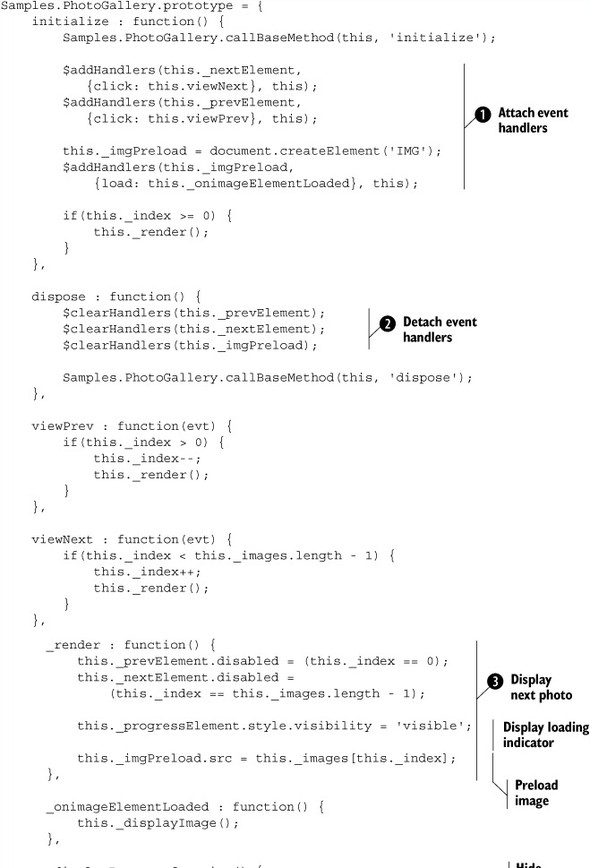

As usual, the initialize method is used to set up the control and to wire the events of the encapsulated DOM elements ![]() . In this case, you’re interested in the click events of the two buttons. During the initialize phase, you also create the dynamic img element used to preload the next photo. In the dispose method
. In this case, you’re interested in the click events of the two buttons. During the initialize phase, you also create the dynamic img element used to preload the next photo. In the dispose method ![]() , you perform the inverse job: You detach the event handlers and dispose the dynamic img element.
, you perform the inverse job: You detach the event handlers and dispose the dynamic img element.
All of the control’s logic is encapsulated in the methods defined in the prototype. As soon as one of the buttons is clicked, the corresponding handler—view-Prev or viewNext, respectively—is invoked. In turn, the handler calls the _render method, which is responsible for displaying the previous or next photo based on the button clicked. To display a photo, the
_render method ![]() performs the following steps:
performs the following steps:
4. It determines if you’ve reached the beginning or the end of the collection. If so, it disables or enables the buttons accordingly to avoid going out of the bounds of the _images array.
5. It displays the (previously hidden) indicator to suggest that the next photo is being loaded.
6. It preloads the next photo by taking its URL from the _images array and assigning it to the src attribute of the dynamic img element, stored in the _imgPreload variable.
As soon as the next photo is loaded, the load event of the dynamic img element is fired, and the corresponding handler—_onImageLoaded—is invoked. The handler calls the _displayImage method, which displays the photo by assigning its URL to the static img element. If you want to use the PhotoGallery control, you need to configure a new instance by passing the references to the DOM elements that it needs to access in the $create statement. This is shown in listing 8.14.
Listing 8.14. Creating an instance of the PhotoGallery control
<script type="text/javascript">
<!--
    Sys.Application.add_init(pageInit);

    function pageInit(sender, e) {
        $create(Samples.PhotoGallery,
          {
           'imageElement': $get('gal_image'),
           'prevElement': $get('gal_prevButton'),
           'nextElement': $get('gal_nextButton'),
           'progressElement': $get('gal_progress'),
           'images': ['Album/photo1.jpg', 'Album/photo2.jpg',
                      'Album/photo3.jpg']
          },
          {},
          {},
          $get('photoGallery')
        );
    }
//-->
</script>
The configuration of the new instance through the $create method is possible thanks to the client properties exposed by the PhotoGallery control. The control exposes a property for each child element it wants to access, as you can verify by looking again at the code in listing 8.14 Note how, in the previous listing, the images property is set to a JavaScript array that contains the URLs of the photos to display.
With this example, our discussion of client controls and the client component model is complete. Now that you know how to create client components and access them at runtime, we’ll concentrate on the server-side capabilities of ASP.NET. The next chapter—a fundamental one—will teach you how to wire client components to ASP.NET server controls by automating the generation of $create statements on the server side.
8.5. Summary
The Microsoft Ajax Library leverages a model for creating client components that closely resembles the one used to create server components with the .NET framework. In this chapter, we introduced the Sys.Component class and discussed the features provided by the client component model. Then, we talked about visual and nonvisual components—so called depending on whether they have a UI—and explained how instances of client components are created and accessed at runtime.
Visual components can be behaviors or controls, and they’re always associated with a DOM element. Behaviors are components that add client capabilities to a DOM element without changing its basic functionality. Controls are used to represent DOM elements on the client side; they can also provide specific client functionality to a block of structured markup code.
Now that you possess the skills required to create client components, you’re ready to learn how to wire them to ASP.NET server controls in order to create powerful Ajax-enabled controls.
