
5 Unvalidated data
- Understanding which parts of HTTP may be manipulated
- Using model validation in ASP.NET Core
- Preventing mass assignment
In 2012, Russian developer Egor Homakov started a discussion on the GitHub issue tracker for the Ruby on Rails framework (if you’re interested, here is the whole thread: https://github.com/rails/rails/issues/5228). He was worried about a specific attack called mass assignment, and whether Ruby on Rails should change its default behavior to prevent developers from falling into this trap. Not happy with the arguably stern replies he got, he searched and found a mass assignment security issue in GitHub (which, in turn, has been developed in Ruby on Rails). As a result, he managed to grant himself full privileges for the Ruby on Rails project on GitHub. To make it obvious to others that he was indeed able to exploit such a vulnerability, he created a very interesting issue in the bug tracker. The issue has since been updated, but figure 5.1 shows an archived version (the URL of the issue is https://github.com/rails/rails/issues/5239, and the screenshot shows a version from 2013, using Internet Archive’s Wayback Machine: http://web.archive.org/web/20130818070952/https://github.com/rails/rails/issues/5239).

Figure 5.1 Bug reports from the future
It looks like the issue was created in 3012, about 1,000 years in the future. The bug title and description refer to the Futurama TV series, which is set in the 31st century.
We will discuss the specific attack behind this later in the chapter, but let’s look at the larger picture first. As with most attacks, the basic mistake was that input was not properly validated. Since HTTP is the dominant protocol used in web applications, we should look at it first.
5.1 Looking at HTTP
HTTP is the glue between web application frontends and backends, so that is where many attacks happen. Let’s look what the browser is actually sending and whether this may be manipulated. Here is a typical HTTP GET request when loading manning.com into a browser:
GET / HTTP/1.1
Host: www.manning.com
Connection: keep-alive
Accept: text/html,application/xhtml+xml,application/xml;q=0.9,image/avif,image/webp,image/apng,*/*;q=0.8,application/signed-exchange;v=b3;q=0.9
Accept-Encoding: gzip, deflate, br
Accept-Language: en-US,en;q=0.9
Cache-Control: max-age=0
User-Agent: Mozilla/5.0 (Windows NT 10.0; Win64; x64) AppleWebKit/537.36 (KHTML, like Gecko) Chrome/96.0.4664.110 Safari/537.36
And this is a typical HTTP POST request that the browser sends when trying to log into a Manning account:
POST /login HTTP/1.1
Host: login.manning.com
Connection: keep-alive
Accept: text/html,application/xhtml+xml,application/xml;q=0.9,image/avif,image/webp,image/apng,*/*;q=0.8,application/signed-exchange;v=b3;q=0.9
Accept-Encoding: gzip, deflate, br
Accept-Language: en-US,en;q=0.9
Cache-Control: max-age=0
Content-Length: 5650
Content-Type: application/x-www-form-urlencoded
Cookie: c_i=8b7d22e5-6297-4a72-a8c4-da4b349f7ea8;
     __cf_bm=796aaf6f8505ce143732cb0bf5fe5570704f9b70-1624959363-1800-AXD+HXmAXJF166DRun4wgMAN0pH32mzn/VVgFkyoNQNN3AlioVtMdTNbrx419oEGvHIGFH+TdpC1NW9Px6vtCqDsKKVl3zrISkXNEXKHp
     0ExULqnil0Y1ZfH+k7/G4KW4Gl1rxCcaksfxIVxA+cJ3KWTus8nZ/qxiKh1WK3P/iBNxb+IWbu7ggb03dWPj8tJPQ==
Origin: https://login.manning.com
Referer: https://login.manning.com/login?service=https%3A%2F%2Fwww.manning.com%2Flogin%2Fcas
User-Agent: Mozilla/5.0 (Windows NT 10.0; Win64; x64) AppleWebKit/537.36 (KHTML, like Gecko) Chrome/96.0.4664.110 Safari/537.36
Note Both HTTP requests were edited for brevity; irrelevant HTTP headers were filtered out, some values were shortened, and the order of the HTTP headers was changed.
When a browser sends a request to https://example.com/page?param=value, the client and the server first negotiate encryption, if applicable (when using HTTPS, it is), and then the following headers are sent (assuming that GET is used; otherwise, the request starts with another method):
GET /page?param=value HTTP/1.1
Host: example.com
Even if other HTTP versions are used, for instance, HTTP 2.0, the basic approach remains the same. The Host header, required since HTTP 1.1, plus the actual URL of the page, are the bare minimum of information required for the server to handle the request. Most of the remaining HTTP headers provide metadata about the request, the client, or additional information.
Bad news: since all of these headers are sent by the client, any client, they all can be manipulated. An attacker does not need a browser to send such a request, but could even use telnet! (In practice, specialized tools with better usability are used.) Consequently, the application must never trust any data that comes as part of the request.
Let’s look at some of the headers from the preceding requests and analyze when manipulation might take place and why.
-
Accept—This header contains a list of MIME (Multipurpose Internet Mail Extensions) types that the browser accepts. In general, it contains HTML, some image formats, and (at the end of the list and less prioritized), “anything” (*/*). Some APIs use the value in this header to decide in which format to return the data. As you’ll recall from chapter 2, an API might be prone to cross-site scripting if it is returning thetext/htmlcontent type, so you’d better be explicit as to which formats you are returning. -
Cookie—As we discussed in chapter 3, cookies are stored on the client, are trivial to manipulate there, and will then be sent back in this HTTP header. The value in it is not trustworthy, so it either must be validated or changing it must make it invalid (e.g., session IDs). -
Origin—Especially when doing cross-domain requests, the browser automatically adds theOriginheader. Chapter 4 covered CORS and how this header works. As we already stated there, this HTTP header is a security feature that is protecting the third-party domain. However, a malicious request can set this header to a different value. Do not trust theOriginheader, and especially do not use it for authorization. -
Referer—This header contains the page the user is coming from (e.g., by clicking on a link or submitting a form). Also, when loading an image, the page referencing (“referring”) the image is contained here. The application must not rely on this header since it can be manipulated, so don’t use it for any kind of authorization. Also, modern browsers may shorten or skip this header (see chapter 9). (If you’re wondering why this header is not spelled Referrer, there was a typo in the first HTTP specification, and for backward compatibility reasons, this was never changed.) -
User-Agent—The identification string of the client is put into this HTTP header. The format grew historically and is far from optimal. For instance, the user agents in the two example HTTP requests are from Chrome, but also contain “Mozilla” (the Netscape code name), “KHTML” (the rendering engine from the KDE project), “Gecko” (the Firefox rendering engine), “WebKit” (Apple’s browser engine), and “Safari” (Apple’s web browser). This was supposedly done to appease as many browser-detection scripts as possible. Do not expect anything from those user agent strings; they could be missing or contain random data or unexpected special characters (hint: XSS).
And while all of the preceding headers may (and will!) be manipulated, most of the attacks just tamper with the most obvious pieces of data: query string parameters and POST parameters.
No matter which HTTP method you are using, there might be parameters in the query string. Depending on which flavor of ASP.NET Core you are using, there are different approaches to access it:
POST data does not show up in the URL but is sent after all HTTP headers, separated from them by a blank line. The formatting of the POST data depends on the Content-Type HTTP request header (not the response header of the same name!). The default value for POST requests is application/x-www-form-urlencoded and uses the same format as query string parameters (name-value pairs, separated by an ampersand). If file uploads are included, multipart/form-data is commonly used.
From an ASP.NET Core perspective, we do not care much, since the framework gives us access exactly as when using GET. The replacement for HttpContext .Request.Query is HttpContext.Request.Form, which is of type FormCollection and holds the name-value pairs. Other values in HttpContext.Request are also prone to manipulation, such as HTTP headers, including cookies.
Note Session data cannot be as easily manipulated as data from the HTTP request. The only thing the client sends to the server that is related to sessions is the cookie with the session ID. That information may be manipulated, but it’s virtually impossible to guess an existing session identifier unless it has been previously stolen (see chapter 3). If you are storing user-supplied data in a session, then yes, session data may also be manipulated and is not to be trusted.
Here’s an easy rule of thumb: everything from HttpContext.Request is not trustworthy, and everything that is model-bound (action method parameters, page model parameters) is not trustworthy. Follow these two rules with all untrusted data:
-
Validate input—If you can, check whether the input fits. You may check the data type, for instance.
-
Escape output—When processing the data and stuffing it into an output format, escape special characters. Otherwise, you might fall victim to cross-site scripting when outputting HTML or JavaScript (see chapter 2), or to SQL injection (see chapter 6) or other attacks.
We will focus on input validation for now and look at what ASP.NET Core has in store for us.
5.2 ASP.NET Core validation
One of the central aspects of development with ASP.NET Core is model binding. Instead of manually plucking through GET and POST data, action methods may accept specific data types. The framework takes care of properly translating the request data into these types.
Once such a system is in place, validation may be declaratively added to the model. In other words, the model knows its validation rules; the application does not but is automatically using this information. Among other things, this decoupling facilitates reusing the model. The following listing shows a typical model class.
Listing 5.1 The issues model class
using System.ComponentModel.DataAnnotations;

namespace AspNetCoreSecurity.MvcSamples.Models
{
    public class Issue
    {
        public Issue()
        {
            this.CreationDate = DateTime.Now;    ❶
        }

        public int Id { get; set; }              ❷
        public string Title { get; set; } = string.Empty;
        public string Description { get; set; } = string.Empty;
        [Display(Name = "Creation Date")]
        public DateTime CreationDate { get; set; }
    }
}
❶ Sets creation date upon class instantiation
❷ The ID field is required for Entity Framework Core use later.
The class already contains information about validation: the data types. The creation date must be DateTime, and the ID, if set, must be an integer. It is a common mistake to create action methods (or Razor handler methods) like this:
[HttpPost]
[ValidateAntiForgeryToken]
public async Task<IActionResult> Create(Issue issue)
{
    _context.Add(issue);
    await _context.SaveChangesAsync();
    return RedirectToAction(nameof(Index));
}
The model validation does take place, right after model binding and before the action method is called. However, our code is not handling the result of the model validation and will try to save the incorrect or incomplete data to the data context. The database will hopefully catch the error, but it is clearly preferable that we take care of the error handling. Here is a better approach:
[HttpPost]
[ValidateAntiForgeryToken]
public async Task<IActionResult> Create(Issue issue)
{
    if (ModelState.IsValid)
    {
        _context.Add(issue);
        await _context.SaveChangesAsync();
        return RedirectToAction(nameof(Index));
    }
    return View(issue);
}
The ModelState.IsValid property contains the Boolean result of the model validation and allows us to react properly. If validation failed, we can go back to the view and show error messages there. (The asp-validation-for and asp-validation-summary tag helpers come to mind, but that’s beyond the scope of this chapter.)
You can add additional validation rules to the model via attributes. They are defined in the System.ComponentModel.DataAnnotations namespace—which is conveniently already present in the class, since we are already using the [Display] attribute that is defined in the same place—and can be associated with individual fields in the model. Table 5.1 contains a list of the most relevant issues (more exotic features such as credit card format validation or phone number formats that are not internationally recognized are omitted).
Table 5.1 ASP.NET Core validation attributes
All of these attributes (and all other missing validation attributes) support the ErrorMessage property where the error message may be defined and will then be picked up by the UI.
There are more advanced features available that we want to mention for the sake of completeness. From a security standpoint, it’s more important that validation does takes place than how the implementation details look:
-
Custom validation with custom attributes—A class that inherits from
ValidationAttributebasically needs to override theIsValid()method and handle the validation there. -
Custom validation with a custom method—The model class needs to implement
IValidateObjectand then put the custom validation in theValidate()method.
Finally, if for some reason you do not want any validation at all for a property, the [ValidateNever] attribute has you covered.
To reiterate the main point of this chapter: validate any user data the application receives. If you have a URL scheme like /Issues/42, where 42 is the ID of the issue to show, make sure that the current user has access to this ID (and did not guess it). If your UI has a selection list with three entries, verify that upon form submit, you do receive one of those three entries (or no entry at all), and not something the user made up. If you expect a certain input format, a data type, or a range, use the model validation features to have a simple yet effective validation mechanism in place.
TIP The Fluent Validation library (https://fluentvalidation.net/) is a popular open source project that provides a nice, fluent API to implement custom validation in a .NET application.
Unfortunately, just validating the properties you are expecting is not always enough. One specific attack will send you more than you asked for.
5.3 Mass assignment
We will now reproduce the attack that this chapter started with, this time using our stack of choice. Remember the Issue class from listing 5.1? Once this was implemented in an ASP.NET Core MVC app, I ran the Visual Studio controller scaffolder (figure 5.2) to create controller actions and views using Entity Framework (for that to work, I had to install the Microsoft.EntityFrameworkCore.SqlServer NuGet package first—your mileage may vary).

Figure 5.2 A few clicks, and the application is finished.
In the end, Visual Studio creates a controller with several action methods and associated views for CRUD (create, read, update, delete) operations based on the Issue model class. The following two commands, when run in Visual Studio’s Package Manager Console, set up a matching database:
Add-Migration Initial
Update-Database
When the code is using the generated views to work with Issue values, the data is written to and read from a database.
Among the views generated, the Create.cshtml file provides a form to add a new issue to the system (see the following listing).
Listing 5.2 The view to add an issue to the database
@model AspNetCoreSecurity.MvcSamples.Models.Issue

@{
    ViewData["Title"] = "Create";
}

<h1>Create</h1>

<h4>Issue</h4>
<hr />
<div class="row">
    <div class="col-md-4">
        <form asp-action="Create">
            <div asp-validation-summary="ModelOnly" class="text-danger"></div>
            <div class="form-group">
                <label asp-for="Title" class="control-label"></label>
                <input asp-for="Title"
                ➥class="form-control" />                                  ❶
                <span asp-validation-for="Title" class="text-danger"></span>
            </div>
            <div class="form-group">
                <label asp-for="Description" class=”control-label”></label>
                <input asp-for="Description"
                ➥class="form-control" />                                  ❷
                <span asp-validation-for="Description" class="text-danger">
                ➥</span>
            </div>
            <!--                                                           ❸
            <div class="form-group">
                <label asp-for="CreationDate" class="control-label"></label>
                <input asp-for="CreationDate" class="form-control" />
                <span asp-validation-for="CreationDate" class="text-danger">
                ➥</span>
            </div>
            -->                                                            ❸
            <div class="form-group">
                <input type="submit" value="Create" class="btn btn-primary" />
            </div>
        </form>
    </div>
</div>

<div>
    <a asp-action="Index">Back to List</a>
</div>

@section Scripts {
    @{await Html.RenderPartialAsync("_ValidationScriptsPartial");}
}
❶ Shows the input field for the issue title
❷ Shows the input field for the issue description
❸ The input field for the creation date is commented out.
Note that I put the creation date field within an HTML comment, since this value is filled automatically in the model’s constructor (see listing 5.1). Once the form is submitted, the IssuesController class kicks in, and the Create() action method handles the request. The next listing shows the relevant excerpt of that class.
Listing 5.3 The methods for the create issue view
#nullable disable
using AspNetCoreSecurity.MvcSamples.Data;
using AspNetCoreSecurity.MvcSamples.Models;
using Microsoft.AspNetCore.Mvc;
using Microsoft.EntityFrameworkCore;

namespace AspNetCoreSecurity.MvcSamples.Controllers
{
    public class IssuesController : Controller
    {
        private readonly AspNetCoreSecurityMvcSamplesContext _context;

        public IssuesController(AspNetCoreSecurityMvcSamplesContext context)
        {
            _context = context;
        }

...

        // GET: Issues/Create
        public IActionResult Create()                          ❶
        {
            return View();
        }

        // POST: Issues/Create
        [HttpPost]
        [ValidateAntiForgeryToken]
        public async Task<IActionResult> Create(Issue issue)   ❷
        {
            if (ModelState.IsValid)
            {
                _context.Add(issue);
                await _context.SaveChangesAsync();
                return RedirectToAction(nameof(Index));
            }
            return View(issue);
        }

...

}
❶ Shows the action method for the GET request
❷ Shows the action method for the POST request
When the form is submitted to the server, the POST request is taken care of by the second Create() method. The data from the HTTP request is automatically converted into an instance of the Issue class (model binding, of course) and then added to the database. Figure 5.3 shows the input form in the browser.

Figure 5.3 The issue input form
As you can see, there is no field for the CreationDate property. This value is automatically set in the model, as figure 5.4 shows.

Figure 5.4 The page lists all issues in the database.
The overview page (Index.cshtml file and Index() action method) iterates over all issues in the database and displays them in a table-like format.
In theory, the application looks solid. Users cannot set the creation date themselves, since there is no UI for it. But aren’t we using model binding? Let’s look at the signature of the Create() POST method again:
It expects something of type Issue. Everything coming in from the HTTP request—in this case, POST data—will be converted into an instance of Issue if possible. The form contains input fields with their name attributes set to "Title" and "Description", respectively, so internally, the following code is executed (in reality it works in a more sophisticated fashion, so this is pseudocode for illustration purposes only):
var issue = new Issue();                          ❶
issue.Title = HttpContext.Request.Form["Title"];
issue.Description = HttpContext.Request.Form["Description"];
❶ Constructor sets the creation date to the current date
But what if the HTTP request would additionally contain a field called "CreationDate"? Then this pseudocode would run:
var issue = new Issue();
issue.Title = HttpContext.Request.Form["Title"];
issue.Description = HttpContext.Request.Form["Description"];
issue.CreationDate = Convert.ToDateTime(HttpContext.Request.Form["CreationDate"]);
The creation date is set, and that happens after the Issue constructor has run. Consequently, the user-supplied creation date is stored in the database. In order to replicate this, we could manually craft a suitable HTTP request. Since we did comment out the UI for the creation date, we can just comment it in, using the browser developer tools. Figure 5.5 shows how.
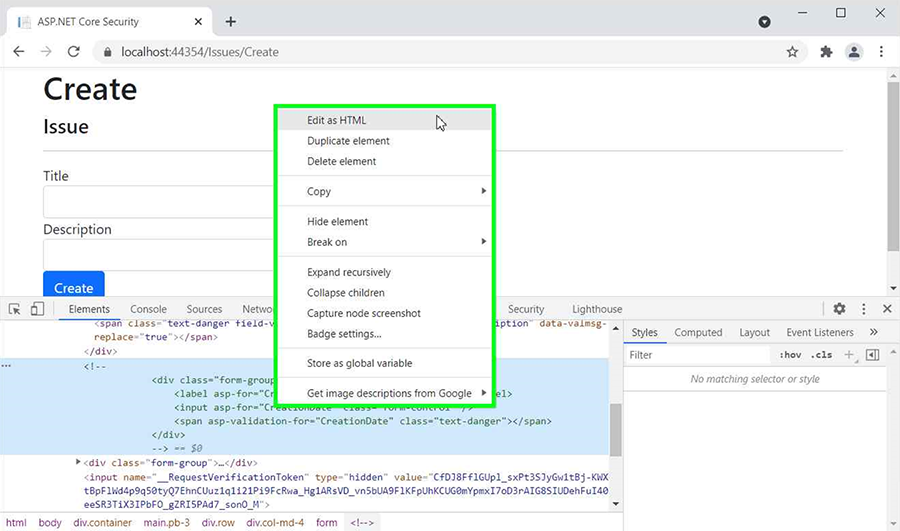
Figure 5.5 Reinstating the creation date input field
When editing the HTML within the browser, removing <!-- and --> and adding name="CreationDate" to the input field does the trick. You may now enter a date and submit the form, and you will be presented with something like figure 5.6.
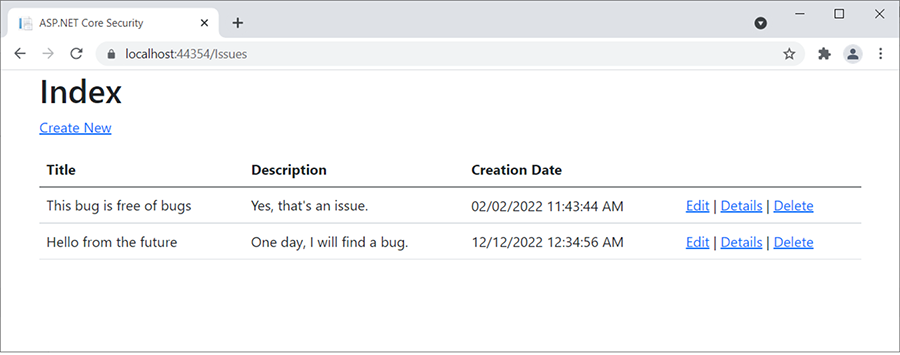
Figure 5.6 Hello from the future.
The issue was now created in the future (this screenshot was taken well before December 2022), quite similar to what happened on GitHub some years ago. The name of this attack is mass assignment—that explains pretty well what has happened. Thanks to model binding, all applicable data from the HTTP request was assigned to model properties. Essentially, we were able to set the creation date, which should not be available for users to write. Another term sometimes used for this attack is overposting—an attacker sends more POST data than expected.
In our example, finding this attack was rather trivial, since we knew the code and there was even commented-out markup showing us the name of the field. Yet the wording we used for the model property, CreationDate, is not very imaginative and could have been guessed rather easily by an attacker.
There are several ways to solve this. From an architectural point of view, a view model might come in handy. That’s a model that’s solely responsible for the view, and contains only properties for that view. For the Create.cshtml page, such a model class would require only a title and a description, but not a creation date. Here is how that could look:
public class CreateIssueViewModel
{
    public string Title { get; set; }
    public string Description { get; set; }
}
The class contains only the Title and Description properties. The action method then, in turn, expects this view model:
[HttpPost]
[ValidateAntiForgeryToken]
public async Task<IActionResult> Create(CreateIssueViewModel issueVm)
{
    if (ModelState.IsValid)
    {
        var issue = new Issue()
        {
            Title = issueVm.Title,
            Description = issueVm.Description,
        };
        _context.Add(issue);
        await _context.SaveChangesAsync();
        return RedirectToAction(nameof(Index));
    }
    return View(issue);
}
A new instance of the Issue class is generated and filled with the data from the view model—so title and description only! This effectively prevents mass assignment.
In fairness to the teams for ASP.NET Core and Visual Studio, I need to mention that recent versions add a comment to the template when views are scaffolded. Here is how the Create action method really looked before I tampered with it:
// POST: Issues/Create
// To protect from overposting attacks, enable the specific properties you
➥want to bind to.
// For more details, see http://go.microsoft.com/fwlink/?LinkId=317598.
[HttpPost]
[ValidateAntiForgeryToken]
public async Task<IActionResult>
➥Create([Bind("Id,Title,Description,CreationDate")] Issue issue)
{
...
}
The [Bind] attribute provides an explicit list of properties that may be bound, and a comment reiterates that you must select which of the model members you want to allow users to write. In our case, this may be limited to Title and Description (for the action method responsible for editing existing issues, you also need to allow the Id property).
This is basically an allow list—everything not on the list is not allowed. From a security perspective, that’s the best approach, because if something is missing from that list, we may have a usability issue but not a security problem.
The [Bind("Title,Description")] syntax is actually a shorthand form for this more explicit option:
This makes it absolutely clear that the list contains properties that shall be included by the model binder. You can also use the opposite approach and disallow certain properties you do not want to be bound:
This is a deny list. While it works here (and also on other very rare occasions, like the list of HTML special characters in chapter 2), we generally advise against going that route. If there is an element missing in the exclude list, we won’t have a usability problem, but we will potentially have a security issue.
Note An attacker might also try to change the Id value in the request, trying to edit an item they do not have access to. You need to make sure that you authorize each request and validate that the current user does have access to the current item.
We cannot always easily parse formatted user input in our code, but defer that to .NET Core. When it comes to deserialization, this might become a problem.
5.4 Secure deserialization
Let’s look at an attack that abuses deserialization. Many ASP.NET Core applications deserialize data all the time: HTTP POST data is transformed from the application/x-www-form-urlencoded MIME type into a list of values, and JSON data is accepted by API endpoints and is converted in the type provided. This mechanism is trusted and vetted and works well, and in a secure fashion.
When manually deserializing user-supplied data, though, there is a hypothetical chance that an attacker might find an opening in our defense. Due to the modular nature of the “new” .NET (previously called .NET Core) in comparison to the monolithic .NET Framework, these exploits are very rare. I would still like to demonstrate an attack and to deduce best practices from it.
The following Razor Page model is working with (predefined) JSON data and deserializing it, using the Newtonsoft.Json package.
Listing 5.4 Deserializing JSON data
using Microsoft.AspNetCore.Mvc.RazorPages;
using Newtonsoft.Json;

namespace AspNetCoreSecurity.RazorSamples.Pages
{
    public class DeserializationModel : PageModel
    {
        public void OnGet()
        {
            var payload = @"{
    '$type':'System.Windows.Data.ObjectDataProvider, PresentationFramework, Version=4.0.0.0, Culture=neutral, PublicKeyToken=31bf3856ad364e35',
    'MethodName':'Start',
    'MethodParameters':{
        '$type':'System.Collections.ArrayList, mscorlib, Version=4.0.0.0, Culture=neutral, PublicKeyToken=b77a5c561934e089',
        '$values':['cmd', '/c notepad']
    },
    'ObjectInstance':{'$type':'System.Diagnostics.Process, System, Version=4.0.0.0, Culture=neutral, PublicKeyToken=b77a5c561934e089'}
}";
            var data = JsonConvert.DeserializeObject(          ❶
                payload,
                new JsonSerializerSettings()
                {
                    TypeNameHandling = TypeNameHandling.All    ❷
                });
        }
    }
}
❶ Deserializes the JSON string into an object
Figure 5.7 shows what happens when you run this code in the browser.

Figure 5.7 What is PresentationFramework?
The exception states that an assembly called PresentationFramework could not be loaded. That is part of Windows Presentation Foundation (WPF) and—of course—not part of a standard ASP.NET Core app. That’s why the exception is triggered. But where does this PresentationFramework call come from? All we are doing is serializing data! Let’s look at the payload string again:
{
    '$type':'System.Windows.Data.ObjectDataProvider, PresentationFramework, Version=4.0.0.0, Culture=neutral, PublicKeyToken=31bf3856ad364e35',
    'MethodName':'Start',
    'MethodParameters':{
        '$type':'System.Collections.ArrayList, mscorlib, Version=4.0.0.0, Culture=neutral, PublicKeyToken=b77a5c561934e089',
        '$values':['cmd', '/c notepad']
    },
    'ObjectInstance':{'$type':'System.Diagnostics.Process, System, Version=4.0.0.0, Culture=neutral, PublicKeyToken=b77a5c561934e089'}
}
The properties called '$type' provide the data type that is serialized. The ObjectDataProvider class is responsible for creating the target object: PresentationFramework. Unfortunately (for us), a WPF application may instantiate a class and call a method once it is initialized. The payload is using System.Diagnostics.Process for the class and Start() as its method. In the MethodParameters key, you can see which parameters are used in that call: cmd and /c notepad.
In a nutshell, once the data is serialized, Notepad is launched (if this is run under Windows—and you have a Windows version where this powerful IDE is still installed). In our specific scenario, that attack was futile, since PresentationFramework was not at our disposal. It would work, though, with a .NET Framework application on the command line. The previous payload was created using the YSoSerial.Net project from https://github.com/pwntester/ysoserial.net. The following command line call creates a cmd /c notepad payload for Json.NET and is deserializing it, causing the text editor to be launched (figure 5.8 shows the result):
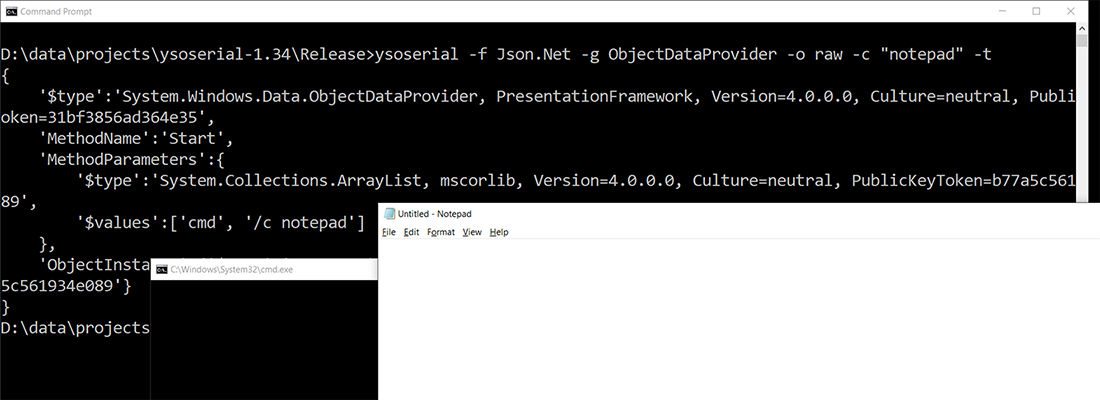
Figure 5.8 The text editor appears from out of nowhere.
Notepad pops up—the deserialization caused code injection. This is nice for demos, but in the real world, an attacker would call other commands, obviously, to create more harm.
When deserializing the string, we were allowing Json.NET to create any type that is contained in the JSON payload:
var data = JsonConvert.DeserializeObject(
    payload,
    new JsonSerializerSettings()
    {
        TypeNameHandling = TypeNameHandling.All
    });
A simple yet effective remedy is to disallow exactly that (and that’s also the default value for that property):
var data = JsonConvert.DeserializeObject(
    payload,
    new JsonSerializerSettings()
    {
        TypeNameHandling = TypeNameHandling.None
    });
In that case, the '$type' values in the JSON string will not be used as the target type name, preventing the attack. .NET comes with its own JSON deserializer: the namespace System.Text.Json holds all functionality. The JsonSerializer.Deserialize() method takes care of deserialization. If you want to create a specific type, you can refer to the generic version of the method:
You have to explicitly provide the type. It is not inferred from the JSON string itself, rendering the attack toothless. As with many other aspects of .NET and ASP.NET Core, you are pretty secure by default. If you are doing any type of manual deserialization, always make sure that you define what kind of structure you are expecting, and verify that that’s what you got.
Summary
Let’s review what we have learned so far:
-
Validate input and escape output to protect a web application against most attacks by being paranoid about any data that is sent to the application.
-
ASP.NET Core comes with built-in data verification features, using model-based validation. Use data model attributes to put restrictions on the data, and don’t forget verifying the
Model.IsValidproperty. -
Model binding is an extremely convenient feature, but mass assignment attacks require that the list of properties that may be bound to must be at a minimum. Use
[Bind(Include=...)]for an allow list, or[Bind(Exclude=...)]for a deny list. -
JSON deserialization may lead to code injection, but mainly in older versions of .NET. It is relatively trivial to defend against this attack by specifically setting the data type expected from deserialization.
The next attacks we will discuss are those against databases—effective countermeasures included, of course.