
13 Securing APIs and single page applications
- Securing an API with a token
- Exploring how OAuth 2.0 and OpenID Connect are related
- Explaining which OAuth flow is applicable for which scenario
- Using IdentityServer to protect APIs
- Using the BFF pattern to protect single-page applications
Chapter 12 explained ASP.NET Core Identity, which includes full user and sign-in management. This works really well for traditional, page-based web applications. The server issues an authentication cookie, which is automatically returned to the server with each subsequent HTTP request—that’s just how cookies work. For APIs or single-page applications (SPAs), this approach is still viable, but rather uncommon. Let’s take an API, for instance. It may have clients that are not web browsers (e.g., console applications, desktop applications, or other servers) and as such might not even support cookies. Things get even more complicated if the server doing the authentication (e.g., validating credentials) is different from the one doing the authorization. One server cannot reliably issue cookies for another server, and SameSite cookie settings make things even harder.
This chapter will describe several approaches to provide solid authentication and authorization solutions for APIs and SPAs. We will use tokens and look at standards for single sign-on scenarios. Everything will be implemented for ASP.NET Core, relying on .NET features and reliable third-party packages with an excellent track record.
One important note: the main goal of this chapter is to give you an excellent understanding of the security aspects involved and to provide relevant code samples in ASP.NET Core. This chapter will not be able to detail all features available or every third-party library or product. We have selected those which a great user base and an excellent reputation. There are always other options, of course, but we are basically talking about implementation details here. The general approaches are more or less the same, independent of the software components used.
13.1 Securing APIs with tokens
Many applications work with claims—information about users (see also chapter 12, where this concept was first explained). An example of a claim could be the name of the user, their email address, or just the information that they are “currently logged in as a user with administrative privileges.” So, how about storing claims in a kind of token and sending that to an API endpoint? In theory, that sounds like a good idea, but to make it work in practice, some additional concerns need to be handled. For example, can you ensure that no one forges a token or tampers with the data in it? A signature would be a good idea, one that only the server that issues the token can verify.
As usual when talking about common security-related problems, researchers and industry practitioners have already found a solution that we can piggyback on. The most common token format for web applications is JWT (JSON Web Token; often pronounced “jot”). The IETF lists JWT as a “proposed standard” under RFC 7519 (https://datatracker.ietf.org/doc/html/rfc7519). A JWT represents a list of claims and uses the JSON syntax. The data in the JSON structure can be signed or encrypted to enable verification and privacy of such a token.
With regard to claims, the JWT token may contain an arbitrary number of them with arbitrary names (as long as there’s no collision). However, there are a few registered claim names that are defined in the standard (and commonly used in practice). All of these claims are optional:
Let’s add JWT support to the application from chapter 12 (where we scaffolded ASP.NET Core Identity). This is a bare-bones approach to demonstrate vital concepts (using OAuth, as described later in this chapter, is the preferred option). Still, the implementation requires quite a lot of additions, which we will describe step by step:
The sample code from chapter 12 uses Razor Pages and is not prepared for API controllers. This requires supplements to Program.cs. In addition to the AddRazorPages() call that’s already there, the AddControllers() method is required:
builder.Services.AddRazorPages();
builder.Services.AddControllers();
The call to MapRazorPages() sets up the default routing for the application. We should do the same for API controllers. The MapControllers() method does the trick:
app.UseEndpoints(endpoints =>
{
    endpoints.MapRazorPages();
    endpoints.MapControllers();
});
We now have all we need to create a new API controller and will call it TokenAuthController. This will be the base structure of that controller, which will contain two endpoints—one for login and one for retrieving data:
using Microsoft.AspNetCore.Mvc;
using static
➥AspNetCoreSecurity.IdentitySamples.Areas.Identity.Pages.Account.LoginModel;

namespace AspNetCoreSecurity.IdentitySamples.Controllers
{
    [Route("api/[controller]")]
    [ApiController]
    public class TokenAuthController : ControllerBase
    {
        [HttpPost]
        [Route("login")]
        public async Task<IActionResult> Login(
        ➥[FromBody] InputModel model)           ❶
        {
        }

        [Route("data")]
        public IActionResult Data()              ❷
        {
        }
    }
}
❶ Login endpoint (HTTP POST, /api/tokenauth/login)
❷ Data endpoint (HTTP GET, /api/tokenauth/data)
Note how the Login() method is reusing the InputModel class that was scaffolded by ASP.NET Core Identity (it basically contains a username, a password, and the Boolean “remember me” value).
Next, JWT support is added to the application. .NET comes with a suitable implementation. The Microsoft.AspNetCore.Authentication.JwtBearer NuGet package provides a middleware that will later help the application accept the token in a specific way (more about that soon). Why do we start with that package? Because it comes with several other dependencies, as figure 13.1 shows.
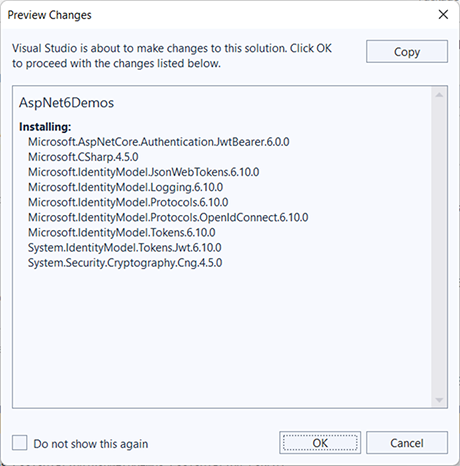
Figure 13.1 The Microsoft.AspNetCore.Authentication.JwtBearer dependencies
The System.IdentityModel.Tokens.Jwt package, for instance, does not just allow parsing of JWT tokens, but it also creates them. And that’s what the application needs to do next. First, the UserManager and IConfiguration classes are made available to the controller class via dependency injection:
private readonly IConfiguration _configuration;
private readonly UserManager<IdentityUser> userManager;

public TokenAuthController(UserManager<IdentityUser> userManager, IConfiguration configuration)
{
    this.userManager = userManager;
    _configuration = configuration;
}
We will also need a secret—a password or passphrase—that will be stored in appsettings.json (or, alternatively, in another secure location; see chapter 7 for options). We will use a symmetric key here for the sake of simplicity:
{
  "JWT": {
    "Key": "correct horse battery staple"
  },
  ...
}
The name and the value are arbitrary, but make sure that you apply all changes here to the rest of the code as well. With this passphrase, the JWT signature will be created and will later be validated.
Next, remember the signature of the Login() method:
The InputModel class will contain a username and password, which will be validated first, courtesy of the injected UserManager class:
var user = await userManager.FindByNameAsync(model.Email);
if (user == null || !await userManager.CheckPasswordAsync(user, model.Password))
{
    return Unauthorized();
}
The FindByNameAsync() method first checks whether the user exists (remember that the scaffolded ASP.NET Core Identity template uses the user’s email address as their username). Then the CheckPasswordAsync() method validates the password. If it’s incorrect, the API endpoint immediately returns HTTP 401—Unauthorized. Otherwise, the code may proceed.
Since we want to store claims in the token, we start collecting our information. The JwtRegisteredClaimNames enumeration contains the registered claim names from the JWT standard, as well as a few others (such as email). We will set that claim, as well as the sub (subject) and jti (JWT ID):
var authClaims = new List<Claim>
{
    new Claim(JwtRegisteredClaimNames.Sub, user.UserName),
    new Claim(JwtRegisteredClaimNames.Email, user.Email),
    new Claim(JwtRegisteredClaimNames.Jti, Guid.NewGuid().ToString())
};
If the user has roles, we can create claims for those roles as well:
var roles = await userManager.GetRolesAsync(user);
foreach (var role in roles)
{
    authClaims.Add(
        new Claim(ClaimTypes.Role, role));
}
Note The sample application does not use roles (yet), so be aware that you will not see any (yet).
We are almost done! All that’s left is issuing the token. This requires a few classes, starting with SecurityTokenDescriptor, which basically describes the token. We set three properties: the list of claims, the token’s expiration date (we use 10 minutes from now), and the signature, which in turn uses the passphrase from our appsettings .json file:
var tokenDescriptor = new SecurityTokenDescriptor()
{
    Subject = new ClaimsIdentity(authClaims),
    Expires = DateTime.Now.AddMinutes(10),
    SigningCredentials = new SigningCredentials(
        key, SecurityAlgorithms.HmacSha512Signature)
};
Tip You can also set the token’s issuer and audience here (and validate it later). We will take a shortcut here, skip those two values for now, and skip validating them.
To finally create the token, a JwtSecurityTokenHandler comes into play:
var tokenHandler = new JwtSecurityTokenHandler();
var token = tokenHandler.CreateToken(tokenDescriptor);
The API endpoint returns this token (as a Base64-encoded string, thanks to the token handler’s CreateToken() method), along with its expiration date, which is optional here but may be useful for some client applications:
return Ok(new
{
    token = tokenHandler.WriteToken(token),
    expires = token.ValidTo
});
An excellent tool for testing APIs is the Postman application that we used in chapter 10 (available at https://www.postman.com/downloads/ as a desktop app for Windows, macOS, and Linux, and as an in-browser tool). Postman is not a hard requirement—any other tool that allows creating HTTP requests is just fine.
In Postman (or the tool of your choice), configure an HTTP POST request to the login endpoint—in our setup, the URL is https://localhost:5001/api/tokenauth/login, but this may vary on your system. In the Headers tab, add the Content-Type header and set it to application/json. Then, in the Body tab, set the input type to raw, and provide the email address and password of a user that already exists in the application. Here is an example, but you obviously need to use credentials you have previously used when registering that user in your application:
{
    "Email": "[email protected]",
    "Password": "Secret+123"
}
Sending that request should lead to output similar to figure 13.2.

Figure 13.2 The login endpoint returns a JSON Web Token.
The token is a pretty long string. If you look at it closely (or, even better, create your own token), you will see that it’s actually three strings, separated by dots. They contain these three pieces of information:
-
A header with information about the token type (spoiler: JWT) and the algorithm used for the signature
-
The actual payload (the claims, as well as metadata such as creation and expiration dates)
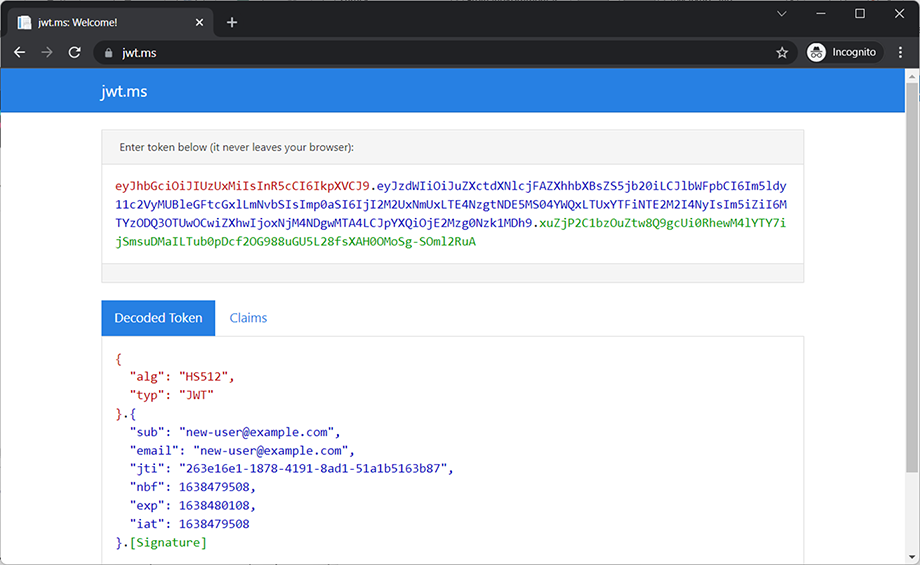
The token itself is hard to decipher, unless you are fluent in Base64 (just kidding), but can easily be deconstructed. A very convenient way is by using the online tool from https://jwt.ms, which decodes JWT tokens (figure 13.3).
In the payload section, you can make out the email address (aka username), the GUID that serves as the JWT ID, and the start, expiration, and creation timestamps of the token.
Warning A real token may grant access to a secured web application, so it is not a good idea to paste it into a web application you do not know.
We finally reveal why the Microsoft.AspNetCore.Authentication.JwtBearer NuGet package was added to the project: not only will JWTs be used, but so will so-called bearer tokens (their background will be covered later in this chapter; it is not important at the moment). They basically work like this—the HTTP header contains an HTTP header and value that looks similar to this:
More configuration is required so that this works in the ASP.NET Core application. The Program.cs file already has an AddAuthorization() call. The middleware supporting JWT bearer tokens needs to be added afterward and needs to be configured properly:
builder.Services.AddAuthentication()
    .AddJwtBearer(options =>                                             ❶
    {
        var key = new SymmetricSecurityKey(                              ❷
            Encoding.UTF8.GetBytes(builder.Configuration["JWT:Key"]));   ❷

        options.SaveToken = true;                                        ❸
        options.RequireHttpsMetadata = false;                            ❸
        options.TokenValidationParameters =
            new TokenValidationParameters()                              ❹
        {
            ValidateAudience = false,
            ValidateIssuer = false,
            IssuerSigningKey = key
        };
})❷ Loads the passphrase from the application settings
❹ Sets token validation options
There is quite a bit happening in this brief code snippet. When the JWT bearer middleware is added, a few options are set:
-
SaveToken—The token will be stored in theAuthenticationProperties. -
RequireHttpsMetadata—If set tofalse, the application works with plain HTTP as well, which might be useful for some testing scenarios but should be avoided on production systems, of course.
The TokenValidationParameters() class then configures the key used for the signature—the application is using the one from the appsettings.json file, which was also the one used when creating the token. Since the issuer and audience of the JWT were not set, these two values cannot be validated, so ValidateIssuer and ValidateAudience are set to false.
It’s time to enter the final stage of the implementation: creating the secured endpoint. The actual logic within the method is pretty straightforward and returns all current claims:
[Route("data")]
public IActionResult Data()
{
    var user = User.Identity as ClaimsIdentity;
    var claims = new Dictionary<string, string>();
    foreach (var claim in user?.Claims ?? Array.Empty<Claim>())
    {
        claims.Add(claim.Type, claim.Value);
    }
    return Ok(claims);
}
The code accesses the User.Identity property and casts it to ClaimsIdentity to be able to access all the claims, and then iterates over them. But how can we make sure that only authenticated users may access this endpoint so that User.Identity is properly set?
The [Authorize] attribute might come to mind. We just have to configure it so that the application knows that a JWT bearer token is expected (and not, for instance, the cookie-based authentication from chapter 12). Here is how this may be achieved:
[Authorize(AuthenticationSchemes = JwtBearerDefaults.AuthenticationScheme)]
[Route("data")]
public IActionResult Data()
{
...
}
Protecting the API required several steps. On the positive side, if you have executed those steps once, you can apply those experiences to all other applications that follow. Let’s reiterate what we have done by looking once again at the code of the API controller.
Listing 13.1 The protected API controller
using Microsoft.AspNetCore.Authentication.JwtBearer;
using Microsoft.AspNetCore.Authorization;
using Microsoft.AspNetCore.Identity;
using Microsoft.AspNetCore.Mvc;
using Microsoft.IdentityModel.Tokens;
using System.IdentityModel.Tokens.Jwt;
using System.Security.Claims;
using System.Text;
using static
➥AspNetCoreSecurity.IdentitySamples.Areas.Identity.Pages.Account.LoginModel;

namespace AspNetCoreSecurity.IdentitySamples.Controllers
{
    [Route("api/[controller]")]
    [ApiController]
    public class TokenAuthController : ControllerBase
    {
        private readonly IConfiguration _configuration;
        private readonly UserManager<IdentityUser> userManager;

        public TokenAuthController(                               ❶
                UserManager<IdentityUser> userManager,            ❶
                ➥IConfiguration configuration)                   ❶
        {
            this.userManager = userManager;
            _configuration = configuration;
        }

        [HttpPost]
        [Route("login")]
        public async Task<IActionResult> Login(                   ❷
            [FromBody] InputModel model)                          ❷
        {
            var user = await userManager.FindByNameAsync(model.Email);
            if (user == null ||
                !await userManager.CheckPasswordAsync(
                    user, model.Password))
            {
                return Unauthorized();
            }
            var authClaims = new List<Claim>
            {
                new Claim(JwtRegisteredClaimNames.Sub, user.UserName),
                new Claim(JwtRegisteredClaimNames.Email, user.Email),
                new Claim(JwtRegisteredClaimNames.Jti,
                ➥Guid.NewGuid().ToString())
            };

            var roles = await userManager.GetRolesAsync(user);
            foreach (var role in roles)
            {
                authClaims.Add(
                    new Claim(ClaimTypes.Role, role));
            }

            var key = new SymmetricSecurityKey(Encoding.UTF8.GetBytes
            ➥(_configuration["JWT:Key"]));

            var tokenDescriptor = new SecurityTokenDescriptor()
            {
                Subject = new ClaimsIdentity(authClaims),
                Expires = DateTime.Now.AddMinutes(10),
                SigningCredentials = new SigningCredentials(
                    key, SecurityAlgorithms.HmacSha512Signature)
            };

            var tokenHandler = new JwtSecurityTokenHandler();
            var token = tokenHandler.CreateToken(tokenDescriptor);

            return Ok(new
            {
                token = tokenHandler.WriteToken(token),
                expires = token.ValidTo
            });
        }

        [Authorize(AuthenticationSchemes =
        ➥JwtBearerDefaults.AuthenticationScheme)]
        [Route("data")]
        public IActionResult Data()                               ❸
        {
            var user = User.Identity as ClaimsIdentity;
            var claims = new Dictionary<string, string>();
            foreach (var claim in user?.Claims ?? Array.Empty<Claim>())
            {
                claims.Add(claim.Type, claim.Value);
            }
            return Ok(claims);
        }
    }
}
❶ Shows the class constructor with dependency injection
❷ The login endpoint verifies credentials and issues the JSON Web Token.
❸ This is the protected endpoint, expecting a bearer token.
The login endpoint verifies the email address and password provided and issues a JWT with several claims when correct. When this token is sent to the protected data endpoint, the API returns a list of all claims in the token.
Back to Postman (or the HTTP request tool of your choice). Create an HTTP GET request to the data endpoint. The URL will be https://localhost:5001/api/token auth/data or similar. Switch to the Authorization tab, change the authorization type to Bearer Token, and paste the JWT. If it’s correct, you will get a result similar to that shown in figure 13.4.
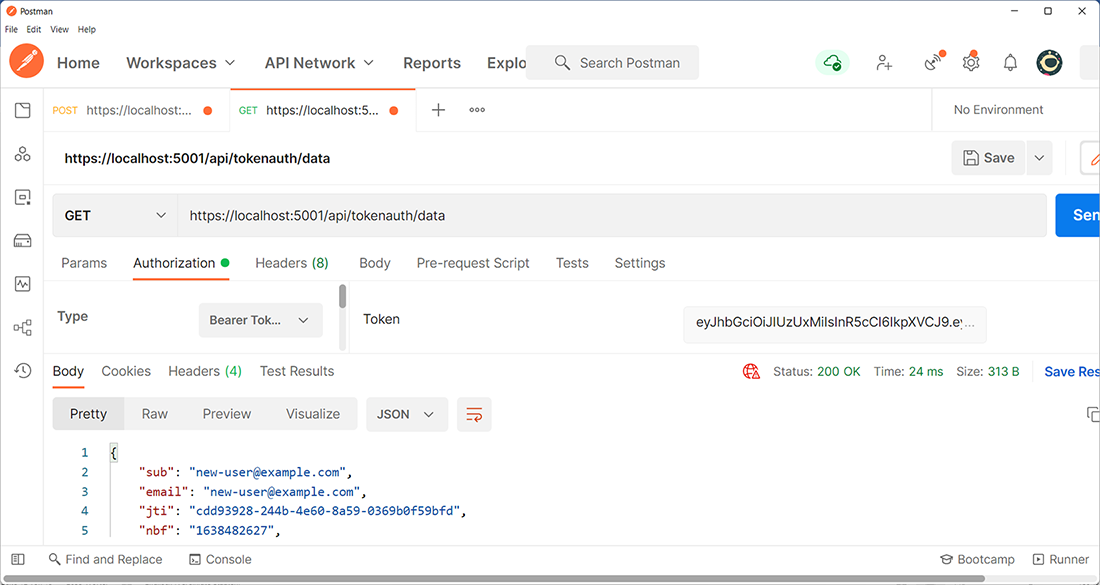
Figure 13.4 The token is valid, and the endpoint returns data.
The claims from the token are returned, proving that the application accepted the JWT. When sending an invalid token (this category also includes expired ones), the API returns HTTP 401 Unauthorized.
This works well, but the approach has flaws. If the client is a regular web browser, it needs to store the token somewhere, which opens up potential security risks such as token theft (similar to session hijacking from chapter 3) and more. In a nutshell: don’t use it. Instead, let’s look at established standards that can help here.
13.2 OAuth and OpenID Connect
We will be describing OAuth and OpenID Connect (OIDC), two standards or protocols that are related, yet a bit different. After a brief description of what these two terms are all about, we will look at use cases and, of course, ASP.NET Core implementations for them.
13.2.1 OAuth vs. OpenID Connect
The main idea behind OAuth is that users want to give web applications (and other apps as well, but we focus on web technologies here) a way to grant them access to their data, but without providing them with their credentials. Instead of having two parties involved, a client and a server, there is now a third protagonist: an authorization server. The new piece of the puzzle can authenticate the user and issue a token, which is then accepted by the web application. JSON Web Tokens come in handy here, but OAuth does a bit more. It is essentially a framework that allows a delegated access to a resource, providing different mechanisms for issuing and using the token (so-called flows—we will cover several of them shortly).
Logging into a web application with a third-party account (as shown in chapter 12—using the Microsoft account there) uses exactly this approach: the third-party site accepts credentials and issues the token, and the actual web application grants access based on the token alone, without knowing the user’s password for the external service. When you can sign into several applications with the same set of credentials (and a central external login service), you are talking about single sign-on. Figure 13.5 shows how an authorization server comes into play in a simplified diagram.
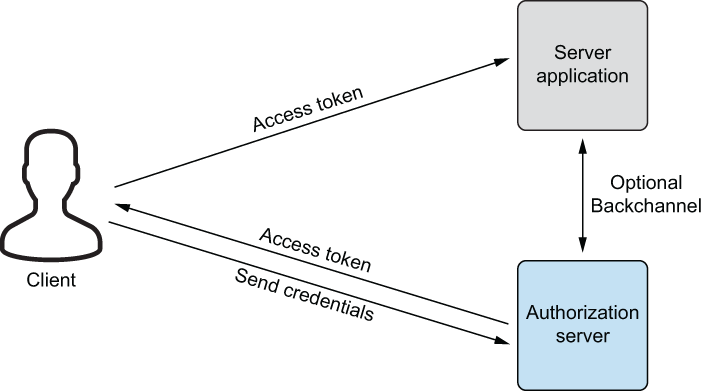
Figure 13.5 Using an authorization server
OAuth 1.0 became IETF RFC 5849 in 2010, and OAuth 2.0 followed two years later, in the form of several individual RFCs. The two most common ones are RFC 6749 for the standard itself (https://datatracker.ietf.org/doc/html/rfc6749) and RFC 6750 for bearer-token handling (https://datatracker.ietf.org/doc/html/rfc6750). At the time of this writing, OAuth 2.1 is in the works (the latest version is at https://datatracker.ietf.org/doc/html/draft-ietf-oauth-v2-1-04), merging several RFCs into one. These RFCs include the 6749 and 6750, as well as additional OAuth-related RFCs created afterward.
A common misconception is that OAuth is an authentication framework—it only handles access token requests. Since authentication is a related topic when authorization is required, many different flavors exist as to how to handle identity. Enter OpenID Connect 1.0 (OIDC 1.0), a layer on top of OAuth 2.0, described at the OpenID Foundation website at https://openid.net/connect/. Whereas OAuth is working with access tokens (“What is the user allowed to access?”), OIDC uses identity tokens (“Who is the user?”).
Feel free to look closely at the specifications for these protocols. But then follow the recommendation already given in this book: don’t roll your own security; use vetted, high-quality libraries and products to implement. For signing in with the external service in chapter 12, ASP.NET Core Identity provided all we needed. For implementing an authorization server or identity server, we need to use third-party tools. The OpenID website has a list of all certified OpenID Connect implementations (https://openid.net/developers/certified/), which means that those libraries and servers have passed an official test suite and should be reliable to use. As always, verify the license terms for whatever you are using, since this may change after this book is published. OIDC sits on top of OAuth 2.0, so let’s go back to the latter and discuss the different available flows.
13.2.2 OAuth flows
The OAuth 2.0 framework defines several flows for different scenarios. Let’s look at a few of them and see when when (or whether!) to use them!
For years, the most widely used flow for SPAs was probably implicit flow or implicit grant, defined in section 4.2 of OAuth 2.0, which basically gave JavaScript a simple API to retrieve a token from an authorization server via a URL. Figure 13.6 shows the process.
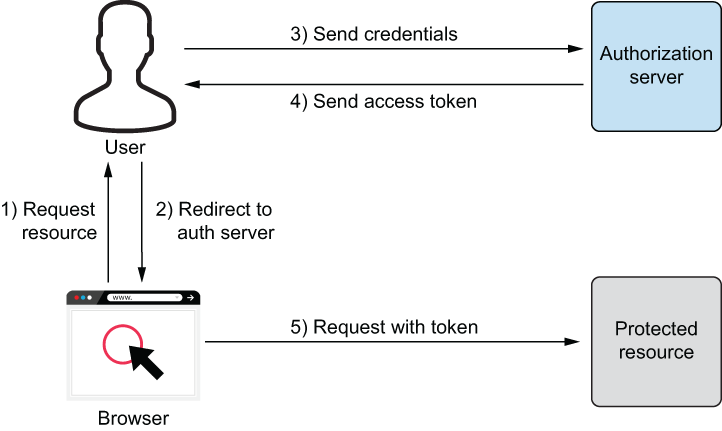
Figure 13.6 Implicit Flow: too simple to be secure
The client would send a request to the authorization server asking for a token. The server would usually show a login form, accept credentials, and—if valid—generate a token. This token would be appended to a callback URL so that JavaScript could read this information and then use the token on any subsequent requests to an API, for instance. At first this sounds like a good and intuitive idea, but beware: usage of this flow is discouraged. The tokens are part of the URL and thus might leak via a variety of ways:
Another flow that’s part of OAuth 2.0 but should not be used is password flow, or the password grant. You directly send credentials to the authorization server, which not only teaches users to type in their credentials anywhere (and desensitizes them to phishing attacks), but it just does not work with 2FA and other advanced scenarios.
The authorization code flow (or authorization code grant) from section 4.1 of OAuth 2.0 tries to provide a more secure approach than the implicit flow by first receiving an authorization code from the authorization server and then using that code to retrieve an access token for the actual application. Figure 13.7 shows this concept in more detail.
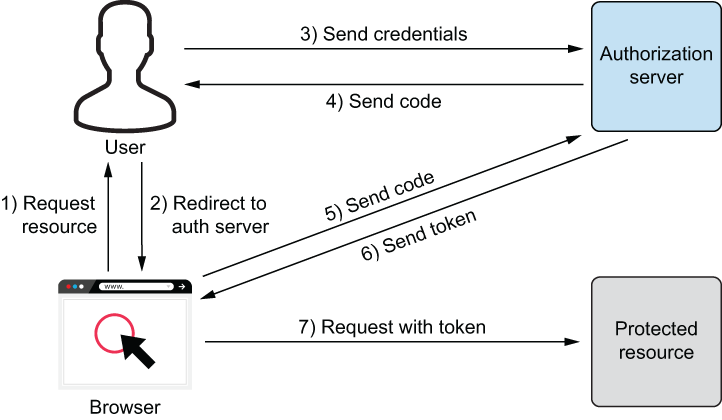
Figure 13.7 Authorization code flow—good but not good enough
The client application requests the authorization code from the authorization server and will probably be prompted with a login screen. After entering (correct) credentials, the authorization server redirects the browser to a URL where the authorization code is appended. With this authorization code, a second call to the authorization server will return an access token. This works pretty well in practice, but there are several potential attack vectors:
-
The authorization code might leak via the
RefererHTTP header, an open network, or other means. -
The web application might have an open redirect (an endpoint that redirects to an arbitrary URL), so the attacker could use that to redirect the authorization code to an endpoint of their choosing.
-
A specific attack called authorization code injection or replay attack tries to inject an authorization code into a victim’s client. When the client then retrieves an access token based on the stolen authorization code, the attacker can do the same and potentially impersonate their victim. The attack uses a comparable approach to cross-site request forgery (CSRF), discussed in chapter 4.
There is a better alternative: authorization code + PKCE (Proof Key for Code Exchange; pronounced “pixie”). Figure 13.8 shows that this approach adds an additional secret to the flow.

Figure 13.8 Authorization code flow with PKCE
The client first generates a secret and sends that (or, to be precise, its hash) to the authorization server when requesting the authorization code. Then, when exchanging the code with an access token, the client secret is sent alongside that request. That way, the authorization server knows exactly whether the same user sent both requests. Also, an attacker stealing the authorization code cannot use it because they do not know the secret. Even eavesdropping on both the authorization code request and response does not work, since the attacker then only knows the hash of the secret, not the secret itself. The latter is required to retrieve an access token, though.
Note To prevent CSRF attack vectors, the request for the authorization code can also contain secret information (think of an anti-CSRF token). Only if the authorization server returns this value can the client be sure that the code has not been tampered with.
There is one more flow worth noting, the client credentials flow. Here, the client sends a secret to the authorization server and retrieves an access token. This is obviously only used for machine-to-machine communication.
With all the theory now out of the way, it’s time to secure ASP.NET Core applications with OAuth 2.0 and OpenID Connect!
13.3 Securing applications
When the ASP.NET Core application is the consumer of a protected API or service, the framework comes with everything required out of the box. However, an identity server is not part of the package—third-party support is required here. Let’s look at a few widely used options.
13.3.1 Third-party tools
There are several services and products to choose from: some free, some commercial, and some in the middle. The options provided here are not an exhaustive list but should give you a good idea of how to evaluate and use them in your own projects.
OpenIddict (https://documentation.openiddict.com/), the self-proclaimed “OpenID Connect stack you’ll be addicted to,” is an open source OpenID Connect server by Kévin Chalet. It works with ASP.NET Core and even supports ASP.NET 4.x. The associated GitHub page (https://github.com/openiddict) contains repositories for the server code, samples, and documentation. The OpenID Connect module of CMS, Orchard Core (https://orchardcore.net/), is based on OpenIddict and is ready to use.
While OpenIddict is free and has a specific feature set, Auth0 (https://auth0.com) is probably on the opposite side of the spectrum. This commercial offering (which also has a free tier) provides a full platform for identity, including single sign-on, multifactor authentication, social identity providers, and more. In 2021, Auth0 was acquired by Okta (https://www.okta.com) and turned into a product unit.
The best-known identity server back when ASP.NET was still a thing, and also for ASP.NET Core, is aptly called IdentityServer. Created by Dominick Baier and Brock Allen, it is an OpenID Connect and OAuth 2.0 framework—not a turnkey solution, but a highly flexible set of components that can be used to implement any kind of identity solution for ASP.NET Core. IdentityServer was so popular that Microsoft mentions the product in their documentation and ships IdentityServer templates with Visual Studio.
However, there were some changes when .NET 5 came out, and they continue to impact .NET 6 (and future versions) as well. The IdentityServer authors found out that running the open source project was not sustainable, so in 2020, they founded a product company called Duende Software (https://duendesoftware.com) to be able to continue working on the product. This also changed the license for the software. The source code and issue tracker are still available transparently and openly on GitHub, but depending on the size of the company, a license fee is required. The IdentityServer pricing page (http://mng.bz/Qv76) will have the most up-to-date information. IdentityServer is free for development and testing (so basically, nonproduction environments), as is a Community Edition for smaller companies or for individuals.
To give you a good assessment of how you can implement OAuth and OpenID Connect in your ASP.NET Core application, we use IdentityServer for the sample code, in part due to the good templates that ship with Visual Studio or can be installed separately. They will get you up and running in no time, with relatively little extra work to be done.
At the time of this writing, IdentityServer 6 was the latest stable version. We expect the source code to be upward-compatible and will update the code examples online if there are any breaking changes.
Before we proceed, it’s a good idea to install the IdentityServer templates. Run the following command:
This will add six new templates, as figure 13.9 shows.

Figure 13.9 Installing IdentityServer templates via the command line
If you are using Visual Studio, you will then see some of those IdentityServer templates, as shown in figure 13.10 (look for “Duende” if you don’t see them right away). These serve as a good starting point for the next examples.

Figure 13.10 IdentityServer templates in Visual Studio
We will use the Duende IdentityServer Empty project to implement one instance of IdentityServer. Then we will add several clients to the solution, showcasing various OAuth and OpenID Connect approaches.
Note When starting the IdentityServer project, the browser will try to load https://localhost:5001 and will show HTTP 404—File Not Found. This is expected, since we do not have a UI for IdentityServer—yet.
13.3.2 Client credentials
The first resource we would like to protect using IdentityServer is an API that is called from another application (think of a website where the backend calls the API, or a Blazor Server application). In that case, using client credentials is a good mechanism, since the communication takes place on the server and is usually at less risk than when a web browser is handling secrets.
Make sure you have created a new solution based on the Duende IdentityServer Empty project template (when using the CLI, the template name is isempty). Add a new project to the current solution, and pick the ASP.NET Core Web API template. Uncheck the Use Controllers checkbox so that you are using a minimal API; you also do not need OpenAPI support.
One important piece of housekeeping comes first. The IdentityServer project uses 5001 as the HTTPS port when using Kestrel (and we will not be using IIS or IIS Express here). The API will have another, random HTTPS port. For the sake of simplicity, we will assign specific ports for the API. In the Propertieslaunchsettings.json file, search for the line that looks like this:
Change it to use the following port:
When you want to use different ports on your system, just make sure that you replace 5001 and 5011 (and the ports in the following code samples) with your ports for the IdentityServer instance and the API.
The API template already comes with the usual random temperature-generating code. Since the project is using a minimal API, the whole implementation resides in Program.cs (look for the app.MapGet("/weatherforecast") call). This serves as a good starting point. To protect the API endpoint, add the [Authorize] tag to this method call:
Note You could also add .RequireAuthorization() directly after the call to .MapGet(), which would have the same effect.
Now it’s time to add the Microsoft.AspNetCore.Authentication.JwtBearer NuGet package that we have used before, including all of its dependencies. This allows us to set up the JWT handling in Program.cs. Add the code printed in bold:
var builder = WebApplication.CreateBuilder(args);

// Add services to the container.
builder.Services.AddControllers();
builder.Services.AddAuthentication("Bearer")
    .AddJwtBearer("Bearer", options =>
    {
        options.Authority = "https://localhost:5001";           ❶
        options.TokenValidationParameters = new TokenValidationParameters()
        {
            ValidateAudience = false                            ❷
        };
    });

var app = builder.Build();
❶ Displays the IdentityServer URL
❷ Skips audience validation (we will not use this)
We will use a bearer token again, and IdentityServer running at https://localhost:5001 serves as the authority to issue that token.
To finish our additions to the API’s Program.cs file, we will need to configure the HTTP pipeline a little more by adding authentication and authorization support, for instance. The following listing shows the complete code for that file, with remaining additions marked in bold.
Listing 13.2 The protected minimal API
using Microsoft.AspNetCore.Authorization;
using Microsoft.IdentityModel.Tokens;

var builder = WebApplication.CreateBuilder(args);

// Add services to the container.
builder.Services.AddControllers();
builder.Services.AddAuthentication("Bearer")              ❶
    .AddJwtBearer("Bearer", options =>
    {
        options.Authority = "https://localhost:5001";
        options.TokenValidationParameters = new TokenValidationParameters()
        {
            ValidateAudience = false
        };
    });

var app = builder.Build();

// Configure the HTTP request pipeline.

app.UseHttpsRedirection();
app.UseRouting();
app.UseAuthentication();
app.UseAuthorization();

app.UseEndpoints(endpoints =>
{
    endpoints.MapControllers();
});

var summaries = new[]
{
    "Freezing", "Bracing", "Chilly", "Cool", "Mild", "Warm", "Balmy", "Hot",
    ➥"Sweltering", "Scorching"
};

app.MapGet("/weatherforecast", [Authorize] () =>         ❷
{
    var forecast = Enumerable.Range(1, 5).Select(index =>
       new WeatherForecast
       (
           DateTime.Now.AddDays(index),
           Random.Shared.Next(-20, 55),
           summaries[Random.Shared.Next(summaries.Length)]
       ))
        .ToArray();
    return forecast;
});

app.Run();

internal record WeatherForecast(DateTime Date, int TemperatureC, string?
➥Summary)
{
    public int TemperatureF => 32 + (int)(TemperatureC / 0.5556);
}
❶ Configures authentication and the bearer token handling
Calling https://localhost:5011/weatherforecast returns exactly what is expected now—HTTP 401—Unauthorized. Time to build a client for machine-to-machine communication that receives a token and can properly call the API!
For the sake of simplicity, we will create a console client in the current solution for this; of course, you could also implement a, say, WinForms or web application where the server issues HTTP requests, using the patterns detailed here. The console client will need to do two things:
First, the IdentityModel NuGet package needs to be added to that console application; a using statement makes one of its namespaces available to the code in Program.cs:
We will use the HttpClient class twice: once to call IdentityServer and once to call the API. We commence with the former to retrieve the token. The instance of Identity- Server provides a “discovery document” with information about its configuration. You can look at it yourself by loading the https://localhost:5001/.well-known/openid -configuration URL in the browser. The IdentityModel package can read the information from there to know exactly what to do when; for instance, requesting an access token. The following code shows how this works (for the sake of simplicity, the secret is directly within the code and not externalized):
var tokenClient = new HttpClient();

var doc = await tokenClient.GetDiscoveryDocumentAsync(
    "https://localhost:5001");                                       ❶
var token = await tokenClient.RequestClientCredentialsTokenAsync(    ❷
    new ClientCredentialsTokenRequest
    {
        Address = doc.TokenEndpoint,                                 ❸
        ClientId = "api-client",                                     ❸
        ClientSecret = "correct horse battery staple",               ❸
        Scope = "api"                                                ❸
    });
❶ Retrieves discovery document
The GetDiscoveryDocumentAsync() method retrieves, well, the discovery document. This document contains, among other things, the URL of the endpoint to request the access token from (TokenEndpoint property). The RequestClientCredentialsTokenAsync() method then issues a request for such a token by using client credentials. These client credentials are configured in the ClientCredentialsTokenRequest instance. Three pieces of information help identify the client and the request:
-
The client secret (sent in cleartext but stored as an SHA-256 hash on the server). The server can authorize the request based on that.
-
The scope of access requested by the client. When working with a more complex application, we might define different scopes (the client may request read access and write access, and there could be different scopes for that). In our application, there is just one uniform scope for API access, called
api.
The AccessToken property of the awaited RequestClientCredentialsTokenAsync() return value contains the access token. This may then be used to call the API, using the second HttpClient:
var apiClient = new HttpClient();
apiClient.SetBearerToken(token.AccessToken);           ❶

var response = await apiClient.GetAsync(               ❷
    "https://localhost:5011/weatherforecast");         ❷
var data = await response.Content.ReadAsStringAsync();
Console.WriteLine(data);
❶ Sets the bearer token for the HTTP request
After setting the access token as a bearer token (with the SetBearerToken() method), the console application may directly call the API. Well, almost. So far, IdentityServer does not know anything about the console client, the client secret, or the api scope. All of this needs to be configured. The IdentityServer project template already created the Config class in the Config.cs file. This class contains, among others, two properties: ApiScopes and Clients. Update them so that the api scope and the new client are known to IdentityServer:
using Duende.IdentityServer;
using Duende.IdentityServer.Models;
using System.Collections.Generic;

namespace AspNetCoreSecurity.IdentityServer
{
    public static class Config
    {
...
        public static IEnumerable<ApiScope> ApiScopes =>
            new ApiScope[]
            {
                new ApiScope("api", "API")    ❶
            };

        public static IEnumerable<Client> Clients =>
            new Client[]
            {
                new Client()                  ❷
                {
                    ClientId = "api-client",
                    ClientSecrets =
                    {
                        new Secret("correct horse battery staple".Sha256())
                    },
                    AllowedScopes = { "api" },
                    AllowedGrantTypes = GrantTypes.ClientCredentials
                }
            };
    }
}Note how the client definition mirrors the setting we’ve previously added to the console client—the client ID, the client secret, and the scope.
One final step remains: the API needs to enforce the policy—so far, it is only requiring authentication, so any access token will do. In Program.cs, add a call to AddAuthorization(), and add the policy that contains a claim for the api scope:
builder.Services.AddAuthorization(options =>        ❶
{
    options.AddPolicy("ApiScopePolicy", policy =>   ❷
    {
        policy.RequireAuthenticatedUser();          ❸
        policy.RequireClaim("scope", "api");        ❹
    });
});
❸ Users need to be authenticated.
❹ The api scope needs to be present.
Finally, enforce this policy for all API endpoints by extending the MapControllers() call:
app.UseEndpoints(endpoints =>
{
    endpoints.MapControllers()
        .RequireAuthorization("ApiScopePolicy");
});
You can now run the IdentityServer, API, and console apps at the same time (Visual Studio allows setting several startup projects at once). See figure 13.11 for a possible output—the console application does receive a return value from the API, proving that authentication and authorization work as expected.

Figure 13.11 The console app authenticates against IdentityServer and calls the API.
13.3.3 Authorization code + PKCE
For browser applications, the authorization code + PKCE flow is arguably the best choice. With IdentityServer, it can be set up relatively easily (and with most alternative projects as well). We will add a project based on the ASP.NET Core Web App template to the solution, so Razor Pages will be used. No need to pick an authentication type in the project-creation wizard—that’s IdentityServer’s job now. First, go to the Properties launchSettings.json file, and change the randomly assigned ports for the application to use only a specific one for HTTPS, 5021:
{
...
  "profiles": {
    "AspNetCoreSecurity.RazorPagesUI": {
      "commandName": "Project",
      "dotnetRunMessages": true,
      "launchBrowser": true,
      "applicationUrl": "https://localhost:5021",
...
    },
...
}
Next, add the Microsoft.AspNetCore.Authentication.OpenIdConnect NuGet package to the application, which implements OpenID Connect functionality. This allows us to configure authentication in the project’s Program class. We basically want to do three things:
-
Set configuration to use OpenID Connect for authentication against IdentityServer and to use cookies in the web application.
-
Configure OpenID Connect so that it matches the IdentityServer configuration.
-
Configure the application so that only authorized users may have access to it.
The following listing shows the complete code of Program.cs after implementing this, with additions in bold.
Listing 13.3 The protected Razor Pages application
using System.IdentityModel.Tokens.Jwt;

var builder = WebApplication.CreateBuilder(args);

// Add services to the container.
builder.Services.AddAuthentication(options =>
{
    options.DefaultScheme = "Cookies";
    options.DefaultChallengeScheme = "oidc";
})
    .AddCookie("Cookies")
    .AddOpenIdConnect("oidc", options =>
    {
        options.Authority = "https://localhost:5001";
        options.ClientId = "web";
        options.ClientSecret = "correct horse battery staple";
        options.ResponseType = "code";
        options.ResponseMode = "query";
        options.SaveTokens = true;
        options.Scope.Add("profile");
        options.GetClaimsFromUserInfoEndpoint = true;
        options.MapInboundClaims = false;
    });
builder.Services.AddRazorPages();

var app = builder.Build();

// Configure the HTTP request pipeline.
if (!app.Environment.IsDevelopment())
{
    app.UseExceptionHandler("/Error");
    app.UseHsts();
}

app.UseHttpsRedirection();
app.UseStaticFiles();
app.UseRouting();
app.UseAuthentication();
app.UseAuthorization();

app.UseEndpoints(endpoints =>
{
    endpoints.MapRazorPages().RequireAuthorization();
});

app.Run();
There are quite a few implementation aspects to be seen here, so let’s wade through them bit by bit. First of all, the application configures both the authentication in general (cookies for the web app, OIDC for IdentityServer) and the parameters for talking to IdentityServer:
builder.Services.AddAuthentication(options =>
{
    options.DefaultScheme = "Cookies";
    options.DefaultChallengeScheme = "oidc";
})
    .AddCookie("Cookies")
    .AddOpenIdConnect("oidc", options =>                 ❶
    {
        options.Authority = "https://localhost:5001";
        options.ClientId = "web";
        options.ClientSecret = "correct horse battery staple";
        options.ResponseType = "code";
        options.ResponseMode = "query";
        options.SaveTokens = true;

        options.Scope.Add("profile");                    ❷
        options.GetClaimsFromUserInfoEndpoint = true;    ❷
        options.MapInboundClaims = false;                ❷
    });
❶ Shows the OpenID Connect settings
Note how the OpenID Connect settings once again use a client ID and client secret. However, the ResponseType option is set to code, so an authorization code via query string (ResponseMode set to query) will be used. The last two options make sure that the application gets access to the user’s profile and therefore to information such as the username (which will be output in the web application later).
Farther down in the Program.cs file, the call to app.UseAuthentication() needs to be added right before app.UseAuthorization(). The existing call to app.MapRazorPages() will be replaced by a properly configured UseEndpoints() call; this allows us to append .RequireAuthorization() so that the whole application is accessible only for authenticated and authorized users. The Index.cshtml Razor Page can therefore safely assume that a user is present and can output all of its claims. The next listing shows the complete markup and code.
Listing 13.4 The Razor Page outputs all user claims
@page
@model IndexModel
@{
    ViewData["Title"] = "Claims";
}

<div class="row">
    <div class="col-md-6">
        <p>
            <ul>
                @{
                    foreach (var claim in User.Claims)
                    {
                        <li>@claim.Type: @claim.Value</li>
                    }
                }
            </ul>
        </p>
    </div>
</div>
The web application is ready for action, but IdentityServer still doesn’t know about it yet. This is about to change. Using the authorization code grant requires that you can sign into the application that issues the code and later the token. IdentityServer is capable and ready to do that, but you have to scaffold the UI first (similar to scaffolding the UI for ASP.NET Core Identity, as seen in chapter 12). This also allows you to tweak both how that UI looks and how it behaves. Open a command prompt in the root directory of the IdentityServer project, and issue the following command:
This requires that you have previously installed the IdentityServer templates, as described earlier in this chapter. The command adds the IdentityServer UI to the project. When looking in the project folder, you will find the Quickstart and Views folders, which are new.
The remaining configuration will again take place in the Config.cs file by adding information about the new application. In the Clients property, add a new entry to the list:
public static IEnumerable<Client> Clients =>
    new Client[]
    {
        new Client()
        {
            ClientId = "api-client",
            ClientSecrets =
            {
                new Secret("correct horse battery staple".Sha256())
            },
            AllowedScopes = { "api" },
            AllowedGrantTypes = GrantTypes.ClientCredentials
        },
        new Client()
        {
            ClientId = "web",
            ClientSecrets =
            {
                new Secret("correct horse battery staple".Sha256())
            },
            AllowedScopes = new List<string>                         ❶
            {
                IdentityServerConstants.StandardScopes.OpenId,
                IdentityServerConstants.StandardScopes.Profile
            },
            AllowedGrantTypes = GrantTypes.Code,                     ❷
            RedirectUris = { "https://localhost:5021/signin-oidc" }, ❸
            PostLogoutRedirectUris = {
            ➥"https://localhost:5021/signout-callback-oidc" }       ❹
        }
};❷ Uses authorization code grant type
❸ Shows the URIs to redirect to after authenticating in IdentityServer
❹ Shows the URIs to redirect to after logging out
Apart from setting the usual options (client ID, client secret, grant type), also note the list of redirect URIs. The protocol allows clients to provide a URI to redirect to after authentication, and another one for after logging out. However, this would facilitate open redirects, web applications that allow the forwarding of users users to arbitrary sites, facilitating some phishing and other attacks. Therefore, IdentityServer requires you to specifically provide a list of these URIs. The ones we are setting in the options are those that are automatically enabled in the web application when adding OIDC support. Just make sure that the base URI, including the port number, is correct for your setup.
We are not done yet, though. The IdentityResources property in the Config class does not support profiles yet, but the application wants to access profile information, such as the user’s name. Therefore, add an entry to that property as follows:
public static IEnumerable<IdentityResource> IdentityResources =>
    new IdentityResource[]
    {
        new IdentityResources.OpenId(),
        new IdentityResources.Profile()
    };
In the last step, we need to make sure that users can actually log in—which means we need users in the first place! Go to the Startup.cs file in the IdentityServer project. As you can see in the ConfigureServices() method, the Config.IdentityResources property (as well as ApiScopes and Clients) are already used to configure IdentityServer. Add a call to the .AddTestUsers() method, because that will add two users to the system, alice and bob. Also, add a call to AddControllersWithViews() so that the login UI of IdentityServer can be shown (the code for that is already there, but as a comment):
public void ConfigureServices(IServiceCollection services)
{
    services.AddControllersWithViews();

    var builder = services.AddIdentityServer(options =>
    {
        options.EmitStaticAudienceClaim = true;
    })
        .AddInMemoryIdentityResources(Config.IdentityResources)
        .AddInMemoryApiScopes(Config.ApiScopes)
        .AddInMemoryClients(Config.Clients)
        .AddTestUsers(TestUsers.Users);
}
In the Configure() method of the same class, we need to enable a few more things—static files, routing, authorization, and the default controller route. Again, the code is already present, but commented out, since it is only required when the UI is being used. Here is the complete Configure() method, with new code in bold:
public void Configure(IApplicationBuilder app)
{
    if (Environment.IsDevelopment())
    {
        app.UseDeveloperExceptionPage();
    }

    app.UseStaticFiles();
    app.UseRouting();

    app.UseIdentityServer();

    app.UseAuthorization();
    app.UseEndpoints(endpoints =>
    {
        endpoints.MapDefaultControllerRoute();
    });
}
We have reached the end of our journey—at least in terms of getting authorization code to work. Run the Razor Pages project and the IdentityServer project concurrently. First note that the IdentityServer start page at https://localhost:5001 now actually shows a UI (figure 13.12).
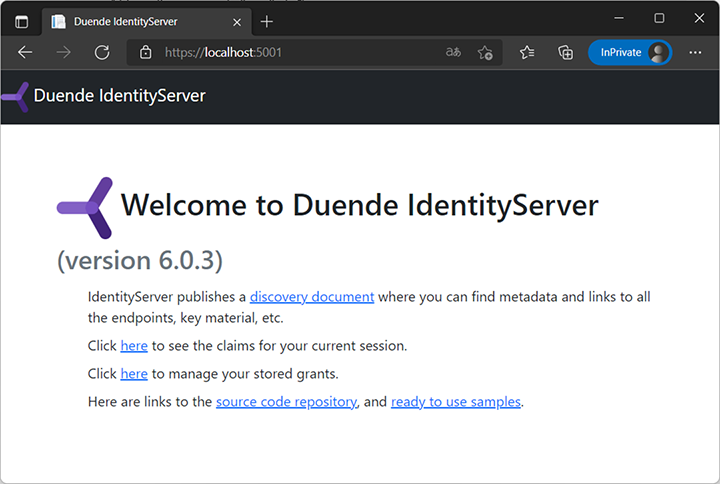
Figure 13.12 The start page of IdentityServer, thanks to scaffolding the UI
The web application, on the other hand, will immediately redirect to IdentityServer, where you are prompted to log in (figure 13.13). Log in as alice or bob, using the username as the password.
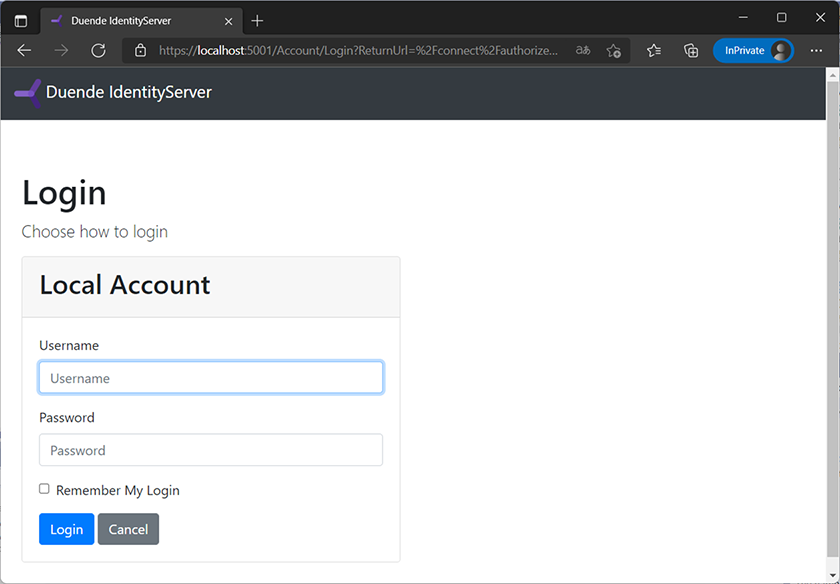
Figure 13.13 IdentityServer’s login screen (use alice/alice or bob/bob)
IdentityServer will automatically redirect the browser back to the Razor Pages web application, and the OIDC middleware will validate the token, grant the user access, and output all the claims (figure 13.14).

Figure 13.14 The user’s claims after authenticating against IdentityServer
A valuable resource for debugging is the IdentityServer console window, which shows debug output, as seen in figure 13.15.

Figure 13.15 Debug output in the IdentityServer console
To add logout functionality to the application, we need to add a logout page to the Razor Pages project. To prevent cross-site request forgery, the logout will happen upon an HTTP POST call; the logout page provides a button for that, as shown in the next listing.
Listing 13.5 The logout page UI
@page
@model AspNetCoreSecurity.RazorPagesUI.Pages.LogoutModel
<form method="post">
    <input type="submit" class="btn btn-primary" value="Logout">
</form>
The associated page model basically calls the SignOut() method. Its parameters must match the authentication strings from Program.cs (in our case, Cookies and oidc). The next listing contains the complete code.
Listing 13.6 The logout page logic
using Microsoft.AspNetCore.Mvc;
using Microsoft.AspNetCore.Mvc.RazorPages;

namespace AspNetCoreSecurity.RazorPagesUI.Pages
{
    [ValidateAntiForgeryToken]                    ❶
    public class LogoutModel : PageModel
    {
        public IActionResult OnPost()
        {
            return SignOut("Cookies", "oidc");    ❷
        }
    }
}
❶ Validates the anti-CSRF token
This logs the user out of the web application (by clearing the authentication cookie) and IdentityServer.
13.3.4 SPAs and BFF
We have not covered single-page applications yet. Since they are usually implemented in JavaScript, they are not within the focus of this (ASP.NET Core-centric) book. But Blazor applications count as SPAs, so they are relevant. Not only does IdentityServer offer support for that, but it also comes with an easy-to-use implementation of a pattern that has become increasingly popular: BFF.
According to Merriam-Webster, BFF stands for “best friends forever” and dates back to 1987 (www.merriam-webster.com/dictionary/BFF). The BFF we are referring to here is a bit more recent. In 2015, developer Phil Calçado described an architecture pattern credited to his former coworker, Nick Fisher (if you are interested in the original article, it’s at http://mng.bz/VM6X). According to him, BFF stands for “backend for frontend.”
APIs (which, in the case of SPAs, serve as their backends) are often very generic and all-purpose. However, different frontends need very specific pieces of information from the backend. In 2015, Calçado was working at SoundCloud and noticed that the profile pages of bands with a reasonably large discography issued more than 150 API calls per page load. He therefore devised a mechanism to implement frontend-specific backends (so that a profile page had to use significantly fewer but more-targeted HTTP requests). BFF was born.
In the SPA world, this approach may have other advantages. We have already discussed the fact that authorization code + PKCE is considered the best OAuth flow for interactive applications such as a website. But still, the web application eventually has to remember a token (to use it in subsequent API calls as a bearer token). If, say, cross-site scripting is possible, the access token may still be stolen. We, of course, covered in chapter 2 how to avoid XSS as much as possible, but there just is no guarantee of protection from all attacks.
With BFF, this risk may be further mitigated. When each frontend has a dedicated backend, that backend could then store the token(s). The backend is therefore also responsible for communicating with the API. The frontend and backend share the same session, so the backend remembers the frontend. As we saw in chapters 3 and 4, protecting sessions works relatively well with modern browsers and various cookie flags such as secure, HttpOnly, and SameSite. Figure 13.16 illustrates the concept.
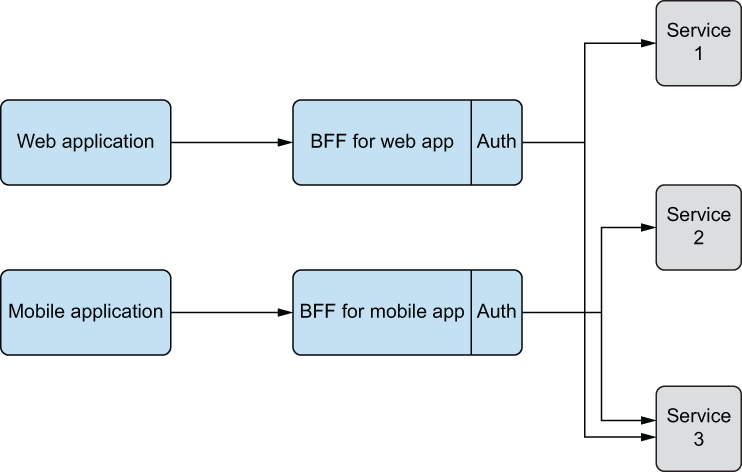
Figure 13.16 BFF: backend for frontend
Back to IdentityServer: the team from Duende Software has implemented the BFF security framework, which integrates with IdentityServer. It works well with JavaScript applications and Blazor WebAssembly (Blazor Server requires a different approach that we will briefly cover at the end of this chapter). The BFF framework is also part of the IdentityServer Community Edition, so it is free to use during development and testing and for small companies.
There are several samples available at https://docs.duendesoftware.com/identityserver/v6/samples/bff/ (if, at the time of reading this, there’s a newer IdentityServer version out, change the URL appropriately). The following example will use Blazor WebAssembly, but the same principles apply to other SPA technologies as well.
Start by adding a new Blazor WebAssembly app to the current solution, and select the ASP.NET hosting option (or, when using the .NET CLI, the --hosted switch). You will end up with three new projects: a client project, a server project, and a shared project. We will need to work on the first two.
In the PropertieslaunchSettings.json file of the server project, change the Kestrel configuration option so that only HTTPS and the fixed port 5031 are used:
As usual, if you have a different setup, feel free to use that, as long as you update the URLs in the IdentityServer configuration accordingly.
Next, install the Duende.BFF and Duende.BFF.Yarp NuGet packages to the server project. There are a few things that need to be changed or added to the Program.cs file of the Blazor project:
-
Authentication needs to be configured similarly to before (cookies and OIDC).
-
BFF-specific endpoints need to be registered with the application.
The following listing shows the updated version of Program.cs, with all additions in bold.
Listing 13.7 The Program class of the Blazor Server app
using Duende.BFF;
using Duende.BFF.Yarp;

var builder = WebApplication.CreateBuilder(args);

builder.Services.AddControllersWithViews();
builder.Services.AddRazorPages();

builder.Services.AddBff().AddRemoteApis();                      ❶

builder.Services.AddAuthentication(options =>                   ❷
{
    options.DefaultScheme = "cookie";
    options.DefaultChallengeScheme = "oidc";
    options.DefaultSignOutScheme = "oidc";
})
    .AddCookie("cookie", options =>                             ❸
    {
        options.Cookie.Name = "__Host-bff";
        options.Cookie.SameSite = SameSiteMode.Strict;
    })
    .AddOpenIdConnect("oidc", options =>                        ❹
    {
        options.Authority = "https://localhost:5001";
        options.ClientId = "blazorwasm";
        options.ClientSecret = "correct horse battery staple";
        options.ResponseType = "code";
        options.ResponseMode = "query";

        options.GetClaimsFromUserInfoEndpoint = true;
        options.MapInboundClaims = false;
        options.SaveTokens = true;

        options.Scope.Clear();
        options.Scope.Add("openid");
        options.Scope.Add("profile");
        options.Scope.Add("offline_access");
        options.Scope.Add("api");
    });

var app = builder.Build();

if (app.Environment.IsDevelopment())
{
    app.UseWebAssemblyDebugging();
}
else
{
    app.UseExceptionHandler("/Error");
    app.UseHsts();
}

app.UseHttpsRedirection();

app.UseBlazorFrameworkFiles();
app.UseStaticFiles();

app.UseRouting();

app.UseAuthentication();                                       ❺
app.UseBff();                                                  ❺
app.UseAuthorization();                                        ❺

app.UseEndpoints(endpoints =>
{
    endpoints.MapBffManagementEndpoints();                     ❻
    endpoints.MapRemoteBffApiEndpoint(                         ❼
        "/api/WeatherForecast", "https://localhost:5031/weatherforecast")
        .RequireAccessToken(TokenType.UserOrClient);
    endpoints.MapRazorPages();
    endpoints.MapControllers();
    endpoints.MapFallbackToFile("index.html");
});

app.Run();
❸ Configures cookie options (with focus on CSRF protection)
❺ Activates authentication, authorization, and BFF
❻ Registers BFF-specific endpoints
❼ Creates a local endpoint for the remote API
The Duende.BFF.Yarp package deserves some extra explanation: YARP (Yet Another Reverse Proxy) is a very powerful tool for high-performance reverse proxies. With BFF, we want to avoid having the web browser directly call the API (and thus needing to know the user’s token); instead, the server issues the HTTP request. YARP allows us to route a call from the Blazor app to the Blazor server directly to the remote API. The Blazor server, however, adds the required bearer token. That’s exactly what this part of Program.cs is doing:
endpoints.MapRemoteBffApiEndpoint(
    "/api/WeatherForecast", "https://localhost:5031/weatherforecast")
    .RequireAccessToken(TokenType.UserOrClient);
The endpoint /api/WeatherForecast on the Blazor server will issue a call to the remote API. In the Blazor client project, in the FetchData.razor file (in the Pages directory), the [Authorize] attribute prevents unauthorized access to the component.
So far, the forecast service is part of the Blazor server project; we would like to use the functionality from the API project instead. All that needs to be done is to change the URL of the API call to the local endpoint we configured in Program.cs (/api/WeatherForecast). The following listing contains the full FetchData.razor file, with all changes and additions in bold.
Listing 13.8 Calling the protected API
@page "/fetchdata"
@using AspNetCoreSecurity.BlazorWasmClient.Shared
@using Microsoft.AspNetCore.Authorization
@attribute [Authorize]
@inject HttpClient Http

<PageTitle>Weather forecast</PageTitle>

<h1>Weather forecast</h1>

<p>This component demonstrates fetching data from the server.</p>

@if (forecasts == null)
{
    <p><em>Loading...</em></p>
}
else
{
    <table class="table">
        <thead>
            <tr>
                <th>Date</th>
                <th>Temp. (C)</th>
                <th>Temp. (F)</th>
                <th>Summary</th>
            </tr>
        </thead>
        <tbody>
            @foreach (var forecast in forecasts)
            {
                <tr>
                    <td>@forecast.Date.ToShortDateString()</td>
                    <td>@forecast.TemperatureC</td>
                    <td>@forecast.TemperatureF</td>
                    <td>@forecast.Summary</td>
                </tr>
            }
        </tbody>
    </table>
}

@code {
    private WeatherForecast[]? forecasts;

    protected override async Task OnInitializedAsync()
    {
        forecasts = await Http.GetFromJsonAsync<WeatherForecast[]>
        ➥("api/WeatherForecast");
    }
}
The host of the Blazor application is ready for BFF, and the FetchData page is ready for BFF, but the Blazor client parts need some more plumbing. Start by installing the Microsoft.AspNetCore.Components.WebAssembly.Authentication NuGet package, as we will need it shortly.
The AuthorizeView Blazor component outputs different content for authorized and unauthorized users, so we can actually address users by their names. The following listing shows an accordingly updated SharedMainLayout.razor file.
Listing 13.9 Showing the user’s name, if available
@using Microsoft.AspNetCore.Components.Authorization
@inherits LayoutComponentBase

<div class="page">
    <div class="sidebar">
        <NavMenu />
    </div>

    <main>
        <div class="top-row px-4">
            <AuthorizeView>
                <Authorized>
                    <strong>Hello, @context.User?.Identity?.Name!</strong>
                    <a href="@context.User?.FindFirst
                    ➥("bff:logout_url")?.Value">Logout</a>
                </Authorized>
                <NotAuthorized>
                    <a href="bff/login">Login</a>
                </NotAuthorized>
            </AuthorizeView>
        </div>

        <article class="content px-4">
            @Body
        </article>
    </main>
</div>
Next, the main App.razor file in the Blazor client project needs to be updated as well. The AuthorizeRouteView makes sure that authorized users get access to a resource. If they are not authorized, an error message (in our case, a convenient link to the login page) will be shown. To make this work, we have to wrap the contents of the App component into a CascadingAuthenticationState element. The following listing contains the complete code.
Listing 13.10 The updated App component
@using Microsoft.AspNetCore.Components.Authorization
<CascadingAuthenticationState>
    <Router AppAssembly="@typeof(App).Assembly">
        <Found Context="routeData">
            <AuthorizeRouteView RouteData="@routeData"
            ➥DefaultLayout="@typeof(MainLayout)">
                <NotAuthorized>
                   @if (!context.User.Identity.IsAuthenticated)
                    {
                        <p><a href="bff/login">Login</a></p>
                    }
                    else
                    {
                        <p>You are not authorized to access this resource.</p>
                    }
                </NotAuthorized>
            </AuthorizeRouteView>
        </Found>
        <NotFound>
            <PageTitle>Not found</PageTitle>
            <LayoutView Layout="@typeof(MainLayout)">
                <p role="alert">Sorry, there's nothing at this address.</p>
            </LayoutView>
        </NotFound>
    </Router>
</CascadingAuthenticationState>
It might not look like it, but that was the easy part. The application needs to determine the authentication state. .NET has the AuthenticationStateProvider for that, but for BFF, some custom implementation is required. The BFF framework sets up an endpoint to retrieve the user information (bff/user), and our custom provider needs to call that. There’s a very elaborate implementation for that in the BFF samples (http://mng.bz/rJMg), where the user information is cached and periodically updated, but for our plans, a simpler approach that just calls the BFF user endpoint upon request is good enough. The next listing implements a custom AuthenticationStateProvider.
Listing 13.11 The AuthenticationStateProvider for BFF
using Microsoft.AspNetCore.Components.Authorization;
using System.Net;
using System.Net.Http.Json;
using System.Security.Claims;

namespace AspNetCoreSecurity.BlazorWasmClient.Client;

public class BffAuthenticationStateProvider : AuthenticationStateProvider
{
    private readonly HttpClient _client;

    public BffAuthenticationStateProvider(
        HttpClient client)
    {
        _client = client;
    }

    public override async Task<AuthenticationState>
    ➥GetAuthenticationStateAsync()
    {
        var user = await FetchUser();
        var state = new AuthenticationState(user);

        return state;
    }

    record ClaimRecord(string Type, object Value);

    private async Task<ClaimsPrincipal> FetchUser()
    {
        try
        {
            var response = await _client.GetAsync(     ❶
                "bff/user?slide=false");               ❶

            if (response.StatusCode == HttpStatusCode.OK)
            {
                var claims = await
                ➥response.Content.ReadFromJsonAsync<List<ClaimRecord>>();

                var identity = new ClaimsIdentity(
                    nameof(BffAuthenticationStateProvider),
                    "name",
                    "role");

                foreach (var claim in claims ??        ❷
                    new List<ClaimRecord>())           ❷
                {
                    identity.AddClaim(new Claim(claim.Type,
                    ➥claim.Value.ToString() ?? string.Empty));
                }

                return new ClaimsPrincipal(identity);
            }
        }
        catch (Exception ex)
        {
        }

        return new ClaimsPrincipal(new ClaimsIdentity());
    }
}❷ Stores all claims in the ClaimsIdentity
We will also need to add yet another class to the Blazor client application. The BFF framework comes with built-in CSRF protection, and the endpoint expects the X-CSRF: 1 HTTP header. The DelegatingHandler from the next listing adds this header:
Listing 13.12 The DelegatingHandler for BFF’s CSRF protection
namespace AspNetCoreSecurity.BlazorWasmClient.Client;

public class AntiforgeryHandler : DelegatingHandler
{
    protected override Task<HttpResponseMessage> SendAsync(
        HttpRequestMessage request, CancellationToken cancellationToken)
    {
        request.Headers.Add("X-CSRF", "1");
        return base.SendAsync(request, cancellationToken);
    }
}
Finally, both the AuthenticationStateProvider and the DelegatingHandler need to be configured in the Blazor client project’s Program.cs file so that the communication with the BFF endpoint works as expected. The following listing shows what needs to be added.
Listing 13.13 The Program.cs file of the Blazor client project
using AspNetCoreSecurity.BlazorWasmClient.Client;
using Microsoft.AspNetCore.Components.Authorization;
using Microsoft.AspNetCore.Components.Web;
using Microsoft.AspNetCore.Components.WebAssembly.Hosting;
using System.Net.Http;

var builder = WebAssemblyHostBuilder.CreateDefault(args);
builder.RootComponents.Add<App>("#app");
builder.RootComponents.Add<HeadOutlet>("head::after");

builder.Services.AddAuthorizationCore();
builder.Services.AddScoped<AuthenticationStateProvider,
➥BffAuthenticationStateProvider>();

builder.Services.AddTransient<AntiforgeryHandler>();
builder.Services.AddHttpClient(
    "backend",
    client => client.BaseAddress =
    ➥new Uri(builder.HostEnvironment.BaseAddress))
    .AddHttpMessageHandler<AntiforgeryHandler>();
builder.Services.AddTransient(sp =>
➥sp.GetRequiredService<IHttpClientFactory>().CreateClient("backend"));

await builder.Build().RunAsync();
From a Blazor point of view, the application is done; however, IdentityServer does not know about the new client yet. By now, you should know the drill: go to the Config.cs file and add the configuration options of the new client there. These settings will do in our scenario:
public static IEnumerable<Client> Clients =>
    new Client[]
    {
...
        new Client()
        {
            ClientId = "blazorwasm",
            ClientSecrets =
            {
                new Secret("correct horse battery staple".Sha256())
            },
            AllowedScopes = new List<string>
            {
                IdentityServerConstants.StandardScopes.OpenId,
                IdentityServerConstants.StandardScopes.Profile,
                IdentityServerConstants.StandardScopes.OfflineAccess,
                "api"
            },
            AllowOfflineAccess = true,
            AllowedGrantTypes = GrantTypes.Code,
            RedirectUris = { "https://localhost:5031/signin-oidc" },
            PostLogoutRedirectUris =
            ➥{ "https://localhost:5031/signout-callback-oidc" }
        }
    };
One minor, yet important piece of the puzzle is missing. The API may not be compatible with BFF yet; it needs to return HTTP 401 instead of a potential redirect to an OIDC provider. This can be done by adding a call to AsBffApiEndpoint() in the API’s Program.cs file as follows:
app.UseEndpoints(endpoints =>
{
    endpoints.MapControllers()
        .RequireAuthorization("ApiScopePolicy")
        .AsBffApiEndpoint();
});
And that’s it! When you run the Blazor application in the browser (and launch the API and IdentityServer at the same time), you will be prompted to log in once you access the Fetch data page (figure 13.17).
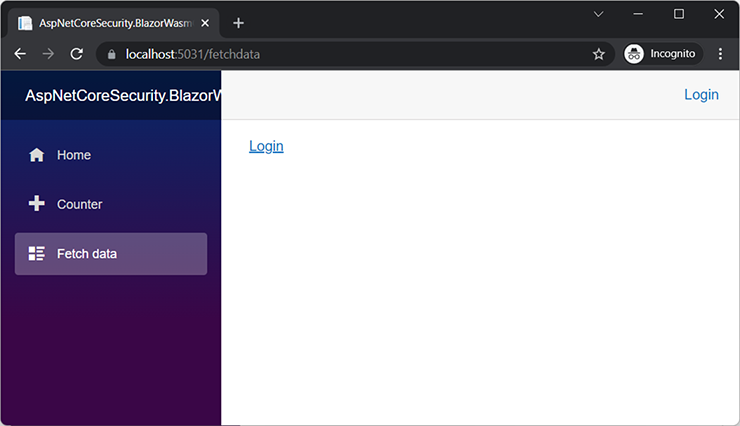
Figure 13.17 Blazor requires the user to log in.
Clicking the login link redirects the browser to IdentityServer; after the user successfully logs in, the browser returns to the Blazor application. The username correctly shows up in the top-right corner. When going to the Fetch data page again, the random temperature values are shown after a short delay (figure 13.18).
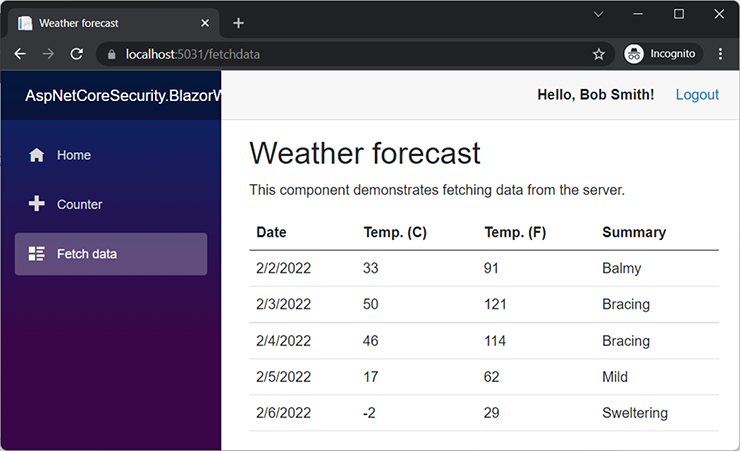
Figure 13.18 Blazor recognizes the user and may call the protected API.
These are just a few common scenarios where OAuth and OpenID Connect come in handy. There are several more—you could implement these standards in desktop applications, or you could use multifactor authentication to allow users to easily sign into an application on the TV’s (hard to remotely control) screen. With frameworks and libraries like OpenIddict, Auth0, IdentityServer, and others, you should be covered. OAuth is hard—so don’t attempt to reinvent the wheel; use established solutions and implementations instead.
Summary
Let’s review what we have learned so far:
-
JWT (JSON Web Token) is a token format that can be signed and optionally encrypted.
-
ASP.NET Core Web APIs can be conveniently protected with JWTs from unauthorized access.
-
OAuth 2.0 is a framework and protocol for authorization for web (and other) applications.
-
OpenID Connect is an authentication layer on top of OAuth 2.0.
-
There are several established libraries and frameworks for OAuth 2.0 and OpenID Connect in the .NET ecosystem.
-
OAuth’s client credentials flow is useful for machine-to-machine communication, whereas the authorization code + PKCE flow is used for interactive applications (usually a web browser is involved).
-
The BFF pattern is a fine choice to protect APIs so that they may be called from a variety of clients, including SPAs.
-
In this chapter, IdentityServer was used to protect APIs in a variety of scenarios; this would, of course, also have been possible in similar fashion with the other options.