
Chapter 7: CQRS in Action
Having learned what the CQRS pattern, the Mediator pattern, and the MediatR NuGet package are, it's time to apply them in the ASP.NET Core 5 Web API that we are building. The patterns and package mentioned will bring value to our application by making it very scalable, testable, and readable.
In this chapter, we will cover the following topics while writing code in our application:
- Implementing CQRS
- Adding the MediatR package
- Creating MediatR pipeline behaviors
- Using FluentValidation
- Using AutoMapper
- Writing queries
- Writing commands
- Writing IServiceCollection
Technical requirements
Here is what you need to complete this chapter:
- Visual Studio 2019, Visual Studio for Mac, or Rider
- The .NET CLI
You can go to the following link to see the finished source code for this chapter: https://github.com/PacktPublishing/ASP.NET-Core-and-Vue.js/tree/master/Chapter07.
Implementing CQRS
Here are the steps on how to use the MediatR package in the ASP.NET Core application. The task of the MediatR package is to help you implement both the CQRS and Mediator patterns with ease.
Let's clean up our solution first by deleting all the Class1.cs files you can find in the application. The Class1.cs files were generated when we created the projects.
Adding the MediatR package
We are now going to install the MediatR package:
- Navigate to your Travel.Application project using the dotnet CLI. Then we need to install some NuGet packages by running the following commands:
dotnet add package MediatR
The preceding command installs the mediator implementation in .NET into the Travel.Application project.
The following command installs the MediatR extensions for ASP.NET Core:
dotnet add package MediatR.Extensions.Microsoft.DependencyInjection
The following command installs the logging abstractions for Microsoft.Extensions.Logging:
dotnet add package Microsoft.Extensions.Logging.Abstractions
The preceding command installs Microsoft.Extensions.Logging.Abstractions, a package for creating loggers in a .NET application.
- While in the Travel.Application project, create a directory and name it Common. Then, create a directory in the Common folder, and name it Behaviors.
Now, let's create four C# files and name them LoggingBehavior.cs, PerformanceBehavior.cs, UnhandledExeptionBehavior.cs, and ValidationBehavior.cs. All of them will be inside the Behaviors folder, which will be a pipeline for pre-processing and post-processing of any requests that go to our handlers.
Note
I am going to truncate any unnecessary code here. Please go to the GitHub repository of this chapter and refer to see each file's whole source code.
Creating MediatR pipeline behaviors
A pipeline behavior in MediatR acts like middleware between the requests and the handlers. An excellent example of this is validation, so that the handlers will only deal with necessary and valid requests. You can also do your logging and other stuff here, depending on the problem you are solving.
We will write our first MediatR pipeline behavior here:
// LoggingBehavior.cs
using MediatR.Pipeline;
…
namespace Travel.Application.Common.Behaviors
{
public class LoggingBehavior<TRequest> :
IRequestPreProcessor<TRequest>
{
…
public async Task Process(TRequest request,
CancellationToken cancellationToken)
{
var requestName = typeof(TRequest).Name;
_logger.LogInformation("Travel Request: {@Request}",
requestName, request);
}
}
}
The code for LoggingBehavior.cs is for logging requests using the Microsoft.Extensions.Logging and MediatR.Pipeline namespaces.
The IRequestPreProcessor is an interface for a defined request to be pre-processed for a handler, while IRequest is a marker to represent a request with a response that you will also find in the commands and queries for mapping later.
The following code logs the responses' elapsed time in milliseconds of PipelineBehavior. PipelineBehavior wraps the inner handler and adds an implementation for additional behavior in the request:
// PerformanceBehavior.cs
using MediatR;
…
namespace Travel.Application.Common.Behaviors
{
internal class PerformanceBehavior<TRequest, TResponse> :
IPipelineBehavior<TRequest, TResponse>
{
…
public async Task<TResponse> Handle(TRequest request,
CancellationToken cancellationToken,
RequestHandlerDelegate<TResponse> next)
{
…
_logger.LogWarning("Travel Long Running Request:
{Name} ({ElapsedMilliseconds} milliseconds)
{@Request}",
requestName, elapsedMilliseconds, request);
return response;
}
}
}
You will also find here RequestHandlerDelegate next, which calls the next thing in the pipeline. The next keyword is common in a middleware implementation that means go to the next function that modifies the request:
// UnhandledExceptionBehavior.cs
using MediatR;
…
namespace Travel.Application.Common.Behaviors
{
public class UnhandledExceptionBehavior<TRequest,
TResponse> : IPipelineBehavior<TRequest, TResponse>
{
private readonly ILogger<TRequest> _logger;
…
public async Task<TResponse> Handle(TRequest request,
CancellationToken cancellationToken,
RequestHandlerDelegate<TResponse> next)
{
Try { return await next(); }
catch (Exception ex)
{
var requestName = typeof(TRequest).Name;
_logger.LogError(ex, "Travel Request: Unhandled
Exception for Request {Name} {@Request}",
requestName, request);
throw;
}
}
}
}
There is one more thing that is missing in PipelineBehavior. That is a validation mechanism, ValidationBehavior.cs, which we will add next.
We are still in the Travel.Application project. Let's add two more NuGet packages, which involve FluentValidation.
Using FluentValidation
FluentValidation gives you full control when creating data validation. Hence, it is very useful for all validation scenarios:
- Let's add the FluentValidation package to our application:
dotnet add package FluentValidation
This preceding command installs the popular validation library for .NET. The package uses a fluent interface to build strongly typed rules.
- The following command installs the dependency injection extensions for FluentValidation:
dotnet add package FluentValidation.DependencyInjectionExtensions
Now we can create another behavior, and this will be for validation. The following code validates the requests inside PipeLineBehavior by using IValidator, which defines a validator for a specific type, and ValidationContext, which creates an instance of the new validation context, from the FluentValidation namespace:
// ValidationBehavior.cs
using FluentValidation;
using MediatR;
using ValidationException = Travel.Application.Common.Exceptions.ValidationException;
…
namespace Travel.Application.Common.Behaviors
{
public class ValidationBehavior<TRequest, TResponse> :
IPipelineBehavior<TRequest, TResponse>
where TRequest : IRequest<TResponse>
{
private readonly IEnumerable<IValidator<TRequest>>
_validators;
public ValidationBehavior
(IEnumerable<IValidator<TRequest>> validators)
{ _validators = validators; }
public async Task<TResponse> Handle(TRequest request,
CancellationToken cancellationToken,
RequestHandlerDelegate<TResponse> next)
{
if (!_validators.Any()) return await next();
var context = new
ValidationContext<TRequest>(request);
var validationResults = await Task.WhenAll
(_validators.Select(v => v.ValidateAsync(context,
cancellationToken)));
var failures = validationResults.SelectMany(r =>
r.Errors).Where(f => f != null).ToList();
…
return await next();
}
}
}
Let's now create another directory and name it Exceptions inside the Common directory of the Travel.Application project because this folder will be the location for our not-found and validation exceptions.
After creating the Exceptions folder, create two C# files – NotFoundException.cs and ValidationException.cs:
// NotFoundException.cs
using System;
namespace Travel.Application.Common.Exceptions
{
public class NotFoundException : Exception
{
public NotFoundException()
: base() { }
public NotFoundException(string message)
: base(message) { }
public NotFoundException(string message, Exception
innerException)
: base(message, innerException) { }
public NotFoundException(string name, object key)
: base($"Entity "{name}" ({key}) was not found.") { }
}
}
The preceding code is an overloading method for throwing NotFoundException with the meaning inside the commands. You will do this shortly.
The following code is for the exception of one or more validation failures that have occurred:
// ValidationException.cs
using FluentValidation.Results;
…
namespace Travel.Application.Common.Exceptions
{
public class ValidationException : Exception
{
public ValidationException()
: base("One or more validation failures have
occurred.")
{
Errors = new Dictionary<string, string[]>();
}
public ValidationException
(IEnumerable<ValidationFailure> failures)
: this()
{
var failureGroups = failures
.GroupBy(e => e.PropertyName, e => e.ErrorMessage);
foreach (var failureGroup in failureGroups)
{ … }
}
public IDictionary<string, string[]> Errors { get; }
}
}
Let's also create an Interfaces directory inside the Common folder. This directory will be the location of the interfaces for our two simple services.
After creating the Interfaces folder, let's create the two C# files: IDateTime.cs and IEmailService.cs:
// IDateTime.cs
using System;
namespace Travel.Application.Common.Interfaces
{
public interface IDateTime
{
DateTime NowUtc { get; }
}
}
The preceding code is a contract of the DateTime service that we will create later:
// IEmailService.cs
…
namespace Travel.Application.Common.Interfaces
{
public interface IEmailService
{
Task SendAsync(EmailDto emailRequest);
}
}
The preceding code is a contract of the EmailService service that we will create later.
Now, let's create an interface in the Common folder of Travel.Application for DbContext, but first we need to install the EntityFrameworkCore package:
dotnet add package Microsoft.EntityFrameworkCore
The preceding dotnet CLI command will install the Entity Framework Core NuGet package.
Now let's create the interface in IapplicationDbContext:
…
namespace Travel.Application.Common.Interfaces
{
public interface IApplicationDbContext
{
DbSet<TourList> TourLists { get; set; }
DbSet<TourPackage> TourPackages { get; set; }
Task<int> SaveChangesAsync(CancellationToken
cancellationToken);
}
}
The preceding code is a contract for TravelDbContext, which we created in Chapter 5, Setting Up DbContext and Controllers. We will update TravelDbContext later once we are going to implement the contract.
We just finished setting up validations using Fluent API, now let's proceed with mapping data transfer objects to entities and vice versa.
Using AutoMapper
AutoMapper is a popular library that uses a convention-based, object-to-object mapper. Hence, AutoMapper lets you map objects without writing a ton of code, which you will see in a bit.
Now we need to set up our mapping of objects to objects automatically using the AutoMapper NuGet package, which is authored by the same person who wrote the MediatR library. I love AutoMapper because it simplifies mapping and projections.
The following command installs AutoMapper:
dotnet add package AutoMapper
The following command installs the AutoMapper extensions for ASP.NET Core:
dotnet add package AutoMapper.Extensions.Microsoft.DependencyInjection
Now let's create the files for the mapper. Create a new directory and name it Mappings inside Common of the Travel.Application project.
After creating the Mappings folder, create two C# files: ImapFrom.cs and MappingProfile.cs:
// IMapFrom.cs
using AutoMapper;
namespace Travel.Application.Common.Mappings
{
public interface IMapFrom<T>
{
void Mapping(Profile profile) =>
profile.CreateMap(typeof(T), GetType());
}
}
The preceding code is an interface for applying mappings from the assembly. You will notice that there is a Profile type that is being passed here from AutoMapper. Profile is a configuration that will do the mapping for you based on naming conventions.
The preceding code allows us to group mapping configurations:
// MappingProfile.cs
using AutoMapper;
…
namespace Travel.Application.Common.Mappings
{
public class MappingProfile : Profile
{
public MappingProfile()
{
ApplyMappingsFromAssembly
(Assembly.GetExecutingAssembly());
}
private void ApplyMappingsFromAssembly(Assembly
assembly)
{
var types = assembly.GetExportedTypes()
.Where(t => t.GetInterfaces().Any(i =>
i.IsGenericType && i.GetGenericTypeDefinition()
== typeof(IMapFrom<>)))
.ToList();
foreach (var type in types)
{
var instance = Activator.CreateInstance(type);
var methodInfo = type.GetMethod("Mapping")
??
type.GetInterface("IMapFrom`1").GetMethod
("Mapping");
methodInfo?.Invoke(instance, new object[] { this
});
}
}
}
}
Next, we create a directory named TourLists inside the Travel.Application project. Then, create another directory with the name Queries inside the TourLists folder. Finally, we create a directory named ExportTours inside the Queries folder.
After creating the three nested directories, create a C# file named TourItemFileRecord.cs inside the Queries folder:
using Travel.Application.Common.Mappings;
…
namespace Travel.Application.TourLists.Queries.ExportTours
{
public class TourPackageRecord : IMapFrom<TourPackage>
{
public string Name { get; set; }
public string MapLocation { get; set; }
}
}
The CsvFileBuilder file that we will create will need the preceding code to create the type of parameter.
Let's create another C# interface file, ICsvFileBuilder.cs, in the Interfaces folder of the Common directory:
…
namespace Travel.Application.Common.Interfaces
{
public interface ICsvFileBuilder
{
byte[] BuildTourPackagesFile
(IEnumerable<TourPackageRecord> records);
}
}
The preceding code is a contract for CsvFileBuilder, which we are going to create later.
Now let's create two more C# files inside the ExportTours folder. One is the ExportToursVm.cs file, and the other is ExportToursQuery.cs, which we will see in the following section:
// ExportToursVm.cs
namespace Travel.Application.TourLists.Queries.ExportTours
{
public class ExportToursVm
{
public string FileName { get; set; }
public string ContentType { get; set; }
public byte[] Content { get; set; }
}
}
The preceding code is a View Model that we will use for the file builder later.
So now, after writing the ExportToursVm class, we can move on to the next section, which is how to write queries.
Writing queries
We will now create our first query, which is a request for reading data, and a query handler, which will resolve what the query needs. Again, the controller is responsible for sending or dispatching the queries to the relevant handlers.
The following is a block of code for ExportToursQuery and its handler. You will see later how the controller will use ExportToursQuery as an argument in the mediator's Send method:
// ExportToursQuery.cs
using AutoMapper;
using AutoMapper.QueryableExtensions;
using MediatR;
…
namespace Travel.Application.TourLists.Queries.ExportTours
{
public class ExportToursQuery : IRequest<ExportToursVm>
{
public int ListId { get; set; }
}
public class ExportToursQueryHandler :
IRequestHandler<ExportToursQuery, ExportToursVm>
{
…
public async Task<ExportToursVm>
Handle(ExportToursQuery request, CancellationToken
cancellationToken)
{
var vm = new ExportToursVm();
…
vm.ContentType = "text/csv";
vm.FileName = "TourPackages.csv";
return await Task.FromResult(vm);
}
}
}
You create a handler by deriving from IRequestsHandler of the MediatR package. If you notice, we are using DbContext and AutoMapper here to process the request and create the response for the MediatR package.
Next, create a Dtos folder in the root directory of the Travel.Application project. The Dtos folder will have the same level as the Common directory.
After creating the Dtos folder, let's now create two C# files inside it:
// TourListDto.cs
…
namespace Travel.Application.Dtos.Tour
{
public class TourListDto : IMapFrom<TourList>
{
public TourListDto()
{
Items = new List<TourPackageDto>();
}
public IList<TourPackageDto> Items { get; set; }
public int Id { get; set; }
public string City { get; set; }
public string About { get; set; }
}
}
The preceding code is a Data Transfer Object, or DTO, for TourList. The following code is a DTO for TourPackage:
// TourPackageDto.cs
using AutoMapper;
…
namespace Travel.Application.Dtos.Tour
{
public class TourPackageDto : IMapFrom<TourPackage>
{
public int Id { get; set; }
…
public void Mapping(Profile profile)
{
profile.CreateMap<TourPackage, TourPackageDto>()
.ForMember(d =>
d.Currency, opt =>
opt.MapFrom(s =>
(int)s.Currency));
}
}
}
In the same way as the Dtos directory, let's also create another directory inside the Travel.Application project and name it TourLists. Then, create a folder named GetTours inside the TourLists directory.
After creating the GetTours folder, create two C# files inside it:
// ToursVm.cs
using System.Collections.Generic;
using Travel.Application.Dtos.Tour;
namespace Travel.Application.TourLists.Queries.GetTours
{
public class ToursVm
{
public IList<TourListDto> Lists { get; set; }
}
}
The preceding code is a View Model for Tours for GetToursQuery that we are about to create now:
// GetToursQuery.cs
…
namespace Travel.Application.TourLists.Queries.GetTours
{
public class GetToursQuery : IRequest<ToursVm> { }
public class GetToursQueryHandler :
IRequestHandler<GetToursQuery, ToursVm>
{
…
public async Task<ToursVm> Handle(GetToursQuery
request, CancellationToken cancellationToken)
{
return new ToursVm
{
Lists = await _context.TourLists
.ProjectTo<TourListDto>
(_mapper.ConfigurationProvider)
.OrderBy(t => t.City)
.ToListAsync(cancellationToken)
};
}
}
}
The preceding code is a handler for GetToursQuery, which the mediator sends from the controller. We will update TourListsController later to be able to do that.
Now let's move to the next interesting section, Writing commands.
Writing commands
We will now create our first command, which is a request for saving, updating, or deleting data, and a command handler, which will resolve what the command needs. Again, the controller is responsible for sending or dispatching the commands to the relevant handlers.
Now we are in the part where we are going to create commands for TourLists and TourPackages.
Let's create a folder inside the TourLists directory of the Tour.Application project and name it Commands. Then, let's create three folders inside that folder and name them CreateTourList, DeleteTourList, and UpdateTourList.
Now it's time to create some commands and command validators. Create two C# files inside the CreateTourList folder:
// CreateTourListCommand.cs
using MediatR;
…
namespace Travel.Application.TourLists.Commands.CreateTourList
{
public partial class CreateTourListCommand :
IRequest<int>
{
…
}
public class CreateTourListCommandHandler :
IRequestHandler<CreateTourListCommand, int>
{
private readonly IApplicationDbContext _context;
public CreateTourListCommandHandler
(IApplicationDbContext context)
{ _context = context; }
public async Task<int> Handle(CreateTourListCommand
request, CancellationToken cancellationToken)
{
var entity = new TourList { City = request.City };
_context.TourLists.Add(entity);
await _context.SaveChangesAsync(cancellationToken);
return entity.Id;
}
}
}
The preceding code is a command for creating new TourList, and we are using the MediatR package here:
// CreateTourListCommandValidator.cs
using FluentValidation;
…
namespace Travel.Application.TourLists.Commands.CreateTourList
{
public class CreateTourListCommandValidator :
AbstractValidator<CreateTourListCommand>
{
private readonly IApplicationDbContext _context;
public CreateTourListCommandValidator
(IApplicationDbContext context)
{
_context = context;
RuleFor(v => v.City)
…
.NotEmpty().WithMessage("About is required");
}
}
}
The preceding code is a validator of CreateTourListCommand, and we are using RuleFor here from the FluentValidation package.
RuleFor is a builder of validation rules for a particular property. That said, FluentValidation is a validation library that replaces Data Annotations. You should use this instead of Data Annotations because it helps you to write clean and maintainable code.
Now, create a C# file inside the DeleteTourList folder:
// DeleteTourListCommand.cs
using MediatR;
…
namespace Travel.Application.TourLists.Commands.DeleteTourList
{
public class DeleteTourListCommand : IRequest
{
public int Id { get; set; }
}
public class DeleteTourListCommandHandler :
IRequestHandler<DeleteTourListCommand>
{
private readonly IApplicationDbContext _context;
public DeleteTourListCommandHandler
(IApplicationDbContext context)
{
_context = context;
}
public async Task<Unit> Handle(DeleteTourListCommand
request, CancellationToken cancellationToken)
{
var entity = await _context.TourLists
.Where(l => l.Id == request.Id)
.SingleOrDefaultAsync(cancellationToken);
…
_context.TourLists.Remove(entity);
await _context.SaveChangesAsync(cancellationToken);
return Unit.Value;
}
}
}
The preceding code is a command for deleting TourList, and we are using the MediatR package here. The Unit type here is from the MediatR package, which signals a no return value. Since void is not a valid return type, the Unit type represents a void type.
Now, create two C# files inside the UpdateTourList folder:
// UpdateTourListCommand.cs
using MediatR;
…
namespace Travel.Application.TourLists.Commands.UpdateTourList
{
public class UpdateTourListCommand : IRequest
{
…
}
public class UpdateTourListCommandHandler :
IRequestHandler<UpdateTourListCommand>
{
private readonly IApplicationDbContext _context;
public UpdateTourListCommandHandler
(IApplicationDbContext context)
{ _context = context; }
public async Task<Unit> Handle(UpdateTourListCommand
request, CancellationToken cancellationToken)
{
var entity = await
_context.TourLists.FindAsync(request.Id);
…
entity.City = request.City;
await _context.SaveChangesAsync(cancellationToken);
return Unit.Value;
}
}
}
The preceding code is a command for updating existing TourList data in the database. Again, the Unit type is being used here:
// UpdateTourListCommandValidator.cs
using FluentValidation;
…
namespace Travel.Application.TourLists.Commands.UpdateTourList
{
public class UpdateTourListCommandValidator :
AbstractValidator<UpdateTourListCommand>
{
private readonly IApplicationDbContext _context;
public UpdateTourListCommandValidator
(IApplicationDbContext context)
{
_context = context;
RuleFor(v => v.City)
.NotEmpty().WithMessage("City is required.")
…
}
}
}
This preceding code is a validator of UpdateTourListCommand, and we are using the FluentValidation package here.
Now for TourPackage. Let's create a folder in the root folder of the Travel.Application project, just as we did for TourLists, and name it TourPackages.
After creating the TourPackages directory, let's create a folder inside the TourPackages directory and name it Commands. Then, let's create four folders inside that folder and name them CreateTourPackage, DeleteTourPackage, UpdateTourPackage, and UpdateTourPackageDetail.
Now, create two C# files inside the CreateTourPackage folder:
// CreateTourPackageCommand.cs
using MediatR;
…
namespace Travel.Application.TourPackages.Commands.CreateTourPackage
{
public class CreateTourPackageCommand : IRequest<int>
{
…
}
public class CreateTourPackageCommandHandler :
IRequestHandler<CreateTourPackageCommand, int>
{
private readonly IApplicationDbContext _context;
public CreateTourPackageCommandHandler
(IApplicationDbContext context)
{ _context = context;}
public async Task<int> Handle(CreateTourPackageCommand
request, CancellationToken cancellationToken)
{
var entity = new TourPackage { … };
_context.TourPackages.Add(entity);
await _context.SaveChangesAsync(cancellationToken);
return entity.Id;
}
}
}
The preceding code is a command for creating new TourPackage, and we are using the MediatR package here:
// CreateTourPackageCommandValidator.cs
using FluentValidation;
…
namespace Travel.Application.TourPackages.Commands.CreateTourPackage
{
public class CreateTourPackageCommandValidator :
AbstractValidator<CreateTourPackageCommand>
{
private readonly IApplicationDbContext _context;
public CreateTourPackageCommandValidator
(IApplicationDbContext context)
{
_context = context;
RuleFor(v => v.Name)
.NotEmpty().WithMessage("Name is required.")
…
}
public async Task<bool> BeUniqueName(string name,
CancellationToken cancellationToken)
{
return await _context.TourPackages
.AllAsync(l => l.Name != name);
}
}
}
The preceding code is a validator of CreateTourPackageCommand, and we are using the FluentValidation package here.
Now create a C# file inside the DeleteTourList folder:
// DeleteTourPackageCommand.cs
using MediatR;
…
namespace Travel.Application.TourPackages.Commands.DeleteTourPackage
{
public class DeleteTourPackageCommand : IRequest
{
public int Id { get; set; }
}
public class DeleteTourPackageCommandHandler :
IRequestHandler<DeleteTourPackageCommand>
{
private readonly IApplicationDbContext _context;
public DeleteTourPackageCommandHandler
(IApplicationDbContext context)
{
_context = context;
}
public async Task<Unit> Handle(DeleteTourPackageCommand
request, CancellationToken cancellationToken)
{
var entity = await
_context.TourPackages.FindAsync(request.Id);
…
_context.TourPackages.Remove(entity);
await _context.SaveChangesAsync(cancellationToken);
return Unit.Value;
}
}
}
The preceding code is a command for deleting TourPackage, and we are using the MediatR package here.
Now create two C# files inside the UpdateTourPackage folder:
// UpdateTourPackageCommand.cs
using MediatR;
…
namespace Travel.Application.TourPackages.Commands.UpdateTourPackage
{
public partial class UpdateTourPackageCommand : IRequest
{
…
}
public class UpdateTourPackageCommandHandler :
IRequestHandler<UpdateTourPackageCommand>
{
private readonly IApplicationDbContext _context;
public UpdateTourPackageCommandHandler
(IApplicationDbContext context)
{ _context = context; }
public async Task<Unit> Handle(UpdateTourPackageCommand
request, CancellationToken cancellationToken)
{
var entity = await
_context.TourPackages.FindAsync(request.Id);
…
entity.Name = request.Name;
await _context.SaveChangesAsync(cancellationToken);
return Unit.Value;
}
}
}
The preceding code is a command for updating TourPackage, and we are using the MediatR package here.
// UpdateTourPackageCommandValidator.cs
using FluentValidation;
…
namespace Travel.Application.TourPackages.Commands.UpdateTourPackage
{
public class UpdateTourPackageCommandValidator :
AbstractValidator<UpdateTourPackageCommand>
{
private readonly IApplicationDbContext _context;
public UpdateTourPackageCommandValidator
(IApplicationDbContext context)
{
_context = context;
RuleFor(v => v.Name)
…
.MustAsync(BeUniqueName).WithMessage("The specified
name already exists.");
}
public async Task<bool> BeUniqueName(string name,
CancellationToken cancellationToken)
{
return await _context.TourPackages
.AllAsync(l => l.Name != name);
}
}
}
The preceding code is a validator of UpdateTourPackageCommand, and we are using the FluentValidation package here.
Now create two C# files inside the UpdateTourPackageDetail folder:
// UpdateTourPackageDetail.cs
using MediatR;
…
namespace Travel.Application.TourPackages.Commands.UpdateTourPackageDetail
{
public class UpdateTourPackageDetailCommand : IRequest
{
…
}
public class UpdateTourPackageDetailCommandHandler :
IRequestHandler<UpdateTourPackageDetailCommand>
{
private readonly IApplicationDbContext _context;
public UpdateTourPackageDetailCommandHandler
(IApplicationDbContext context)
{
_context = context;
}
public async Task<Unit> Handle
(UpdateTourPackageDetailCommand request,
CancellationToken cancellationToken)
{
var entity = await
_context.TourPackages.FindAsync(request.Id);
…
await _context.SaveChangesAsync(cancellationToken);
return Unit.Value;
}
}
}
The preceding code is another command for updating TourPackage, and we are using the MediatR package here.
// UpdateTourPackageDetailCommandValidator.cs
using FluentValidation;
…
namespace Travel.Application.TourPackages.Commands.UpdateTourPackageDetail
{
public class UpdateTourPackageDetailCommandValidator :
AbstractValidator<UpdateTourPackageDetailCommand>
{
private readonly IApplicationDbContext _context;
public UpdateTourPackageDetailCommandValidator
(IApplicationDbContext context)
{
_context = context;
…
RuleFor(v => v.Currency)
.NotEmpty().WithMessage("Currency is required");
}
public async Task<bool> BeUniqueName(string name,
CancellationToken cancellationToken)
{
return await _context.TourPackages
.AllAsync(l => l.Name != name);
}
}
}
The preceding code is the validator of UpdateTourPackageDetailCommand, and we are using the FluentValidation package here.
Now let's move on to the next section, which is about writing IServiceCollection.
Writing IServiceCollection
IServiceCollection is an interface from the DependencyInjection namespace. We are going to use IServiceCollection for our dependency injection.
And finally, there is a dependency injection for the Travel.Application project. Create a C# file in the root folder of the Travel.Application project:
// DependencyInjection.cs
…
namespace Travel.Application
{
public static class DependencyInjection
{
public static IServiceCollection AddApplication(this
IServiceCollection services)
{
services.AddAutoMapper
(Assembly.GetExecutingAssembly());
services.AddValidatorsFromAssembly
(Assembly.GetExecutingAssembly());
services.AddMediatR(Assembly.GetExecutingAssembly());
services.AddTransient(typeof(IPipelineBehavior<,>),
typeof(PerformanceBehavior<,>));
services.AddTransient(typeof(IPipelineBehavior<,>),
typeof(ValidationBehavior<,>));
services.AddTransient(typeof(IPipelineBehavior<,>),
typeof(UnhandledExceptionBehavior<,>));
return services;
}
}
}
The preceding code is a dependency injection container method. You will see here that IServiceCollection is adding different kinds of services to the collection of the service descriptors.
We will inject the static method, AddApplication, later in the Startup file so that the Web API project, particularly the Startup file, won't need to declare any dependencies on third-party libraries such as AutoMapper because they are already declared in this file.
Now let's go to the Travel.Domain project to add a settings file for the Mail service. Create a folder inside the Travel.Domain project and name it Settings.
After creating the Settings directory, create a C# file inside it:
// MailSettings.cs
namespace Travel.Domain.Settings
{
public class MailSettings
{
public string EmailFrom { get; set; }
…
public string DisplayName { get; set; }
}
}
The preceding code is for the settings of an email service that we are going to create later.
Now let's add one more exception file to the Travel.Application project. Go to the Common directory of the Travel.Application project and create a C# file:
// ApiException.cs
…
namespace Travel.Application.Common.Exceptions
{
public class ApiException : Exception
{
public ApiException() : base() { }
public ApiException(string message) : base(message) { }
public ApiException(string message, params object[]
args)
: base(String.Format(CultureInfo.CurrentCulture,
message, args)) { }
}
}
The preceding code is for an exception that we are going to use in our email service later.
Let's go to the Travel.Shared project to add some NuGet packages to this project:
dotnet add package MailKit
The preceding CLI command installs MailKit, a .NET mail-client library. The following CLI command installs a package that provides an additional configuration in the ASP.NET Core app:
dotnet add package Microsoft.Extensions.Options.ConfigurationExtensions
The following CLI command installs Mimekit, a package for creating and parsing S/MIME, MIME, and PGP messages:
dotnet add package MimeKit
The following CLI command installs CsvHelper, a package for reading and writing CSV files:
dotnet add package CsvHelper
After installing the NuGet packages, let's create two new folders – Files and Services, in the root directory of the Travel.Shared project.
Inside the Files folder, let's create a C# file:
// CsvFileBuilder.cs
using CsvHelper;
using System.IO;
…
namespace Travel.Shared.Files
{
public class CsvFileBuilder : ICsvFileBuilder
{
public byte[] BuildTourPackagesFile
(IEnumerable<TourPackageRecord> records)
{
using var memoryStream = new MemoryStream();
…
return memoryStream.ToArray();
}
}
}
The preceding code is an implementation of CsvFileBuilder.
Now let's create two C# files in the Services folder:
// EmailService.cs
using MimeKit;
using MailKit.Net.Smtp;
…
namespace Travel.Shared.Services
{
public class EmailService : IEmailService
{
…
public async Task SendAsync(EmailDto request)
{
try
{ var email = new MimeMessage { Sender =
MailboxAddress.Parse(request.From ??
MailSettings.EmailFrom) };
email.To.Add(MailboxAddress.Parse(request.To));
…
await smtp.DisconnectAsync(true); }
catch (System.Exception ex)
{ Logger.LogError(ex.Message, ex);
throw new ApiException(ex.Message); }
}
}
}
The preceding code is an implementation of IEmailService.
// DateTimeService.cs
…
namespace Travel.Shared.Services
{
public class DateTimeService : IDateTime
{
public DateTime NowUtc => DateTime.UtcNow;
}
}
The preceding code is an implementation of IDateTime. It only returns DateTime.UtcNow.
And in the case of the dependency injection of the Travel.Shared project, let's create a C# file in the root directory of the Travel.Shared project:
// DependencyInjection.cs
using Microsoft.Extensions.Configuration;
using Microsoft.Extensions.DependencyInjection;
…
namespace Travel.Shared
{
public static class DependencyInjection
{
public static IServiceCollection
AddInfrastructureShared(this IServiceCollection
services, IConfiguration config)
{
services.Configure<MailSettings>
(config.GetSection("MailSettings"));
services.AddTransient<IDateTime, DateTimeService>();
services.AddTransient<IEmailService, EmailService>();
services.AddTransient<ICsvFileBuilder,
CsvFileBuilder>();
return services;
}
}
}
The preceding code is another dependency injection container method that we will add later in the Startup file.
Now it's time for the final step. Go to the Travel.WebApi project and update the appSettings.json file:
// appSettings.json
{
"Logging": {
"LogLevel": {
…
}
},
"MailSettings": {
"EmailFrom": "",
…
"DisplayName": ""
},
"AllowedHosts": "*"
}
This code adds MailSettings in appsettings.json.
Next, we create a C# file inside the Controllers folder of the Travel.WebApi project:
// ApiController.cs
using MediatR;
using Microsoft.AspNetCore.Mvc;
using Microsoft.Extensions.DependencyInjection;
namespace Travel.WebApi.Controllers
{
[ApiController]
[Route("api/[controller]")]
public abstract class ApiController : ControllerBase
{
private IMediator _mediator;
protected IMediator Mediator => _mediator ??=
HttpContext.RequestServices.GetService<IMediator>();
}
}
The preceding code is a property injection to allow ApiContoller to use Mediator. I prefer this approach over the constructor injection because of its simplicity. Property injection frees you up from maintaining all the controllers' parameters and signatures using the constructor injection.
Next, we update the TourPackagesController and TourListController files in the Travel.WebApi project:
// TourPackagesController.cs
…
namespace Travel.WebApi.Controllers
{
[ApiController]
[Route("api/[controller]")]
public class TourPackagesController : ApiController
{
[HttpPost]
public async Task<ActionResult<int>>
Create(CreateTourPackageCommand command)
{ return await Mediator.Send(command); }
[HttpPut("{id}")]
public async Task<ActionResult> Update(int id,
UpdateTourPackageCommand command)
{
…
await Mediator.Send(command);
}
[HttpPut("[action]")]
public async Task<ActionResult> UpdateItemDetails(int
id, UpdateTourPackageDetailCommand command)
{
…
await Mediator.Send(command);
}
[HttpDelete("{id}")]
public async Task<ActionResult> Delete(int id)
{
await Mediator.Send(new DeleteTourPackageCommand { Id
= id });
}
}
}
This updated code of TourPackagesController uses Mediator to send commands and is derived from ApiController.
// TourListsController.cs
…
namespace Travel.WebApi.Controllers
{
[ApiController]
[Route("api/[controller]")]
public class TourListsController : ApiController
{
[HttpGet]
public async Task<ActionResult<ToursVm>> Get()
{
return await Mediator.Send(new GetToursQuery());
}
[HttpGet("{id}")]
public async Task<FileResult> Get(int id)
{
var vm = await Mediator.Send(new ExportToursQuery {
ListId = id });
return File(vm.Content, vm.ContentType, vm.FileName);
}
[HttpPost]
public async Task<ActionResult<int>>
Create(CreateTourListCommand command)
{
return await Mediator.Send(command);
}
[HttpPut("{id}")]
public async Task<ActionResult> Update(int id,
UpdateTourListCommand command)
{
await Mediator.Send(command);
}
[HttpDelete("{id}")]
public async Task<ActionResult> Delete(int id)
{
await Mediator.Send(new DeleteTourListCommand { Id =
id });
}
}
}
This updated code of TourListsController uses Mediator to send commands and is derived from ApiController.
After updating TourListsController, we will add a filter for our API by creating a new folder in the root directory of the Travel.WebApi project and name it Filter. Then, create a C# file, ApiExceptionFilter.cs, inside the newly created folder and add the following code for ApiExceptionFilter:
using System;
…
using Microsoft.AspNetCore.Mvc.Filters;
using Travel.Application.Common.Exceptions;
namespace Travel.WebApi.Filters
{
public class ApiExceptionFilter :
ExceptionFilterAttribute
{
private readonly IDictionary<Type,
Action<ExceptionContext>> _exceptionHandlers;
public ApiExceptionFilter()
{
…
}
public override void OnException(ExceptionContext
context)
{
HandleException(context);
base.OnException(context);
}
private void HandleException(ExceptionContext
context)
{
…
}
private void HandleUnknownException
(ExceptionContext context)
{
…
}
private void HandleValidationException
(ExceptionContext context)
{
…
}
private void HandleNotFoundException
(ExceptionContext context)
{
…
}
}
}
There is nothing special in either method of the preceding class. Please go to the GitHub repository of the preceding code to see the implementations of the methods. The API exception filter that we created will handle any NotFoundException, ValidationException, and UnknownException that our Web API will generate by catching errors and treating them in a consistent manner.
And finally, the last thing to do is to update the Startup.cs file of the Web API project:
// Startup.cs
using Microsoft.Extensions.DependencyInjection;
using Travel.Application;
using Travel.Data;
using Travel.Shared;
using Microsoft.AspNetCore.Mvc;
using Travel.WebApi.Filters;
…
namespace Travel.WebApi
{
public class Startup
{
public Startup(IConfiguration configuration)
{ Configuration = configuration; }
public IConfiguration Configuration { get; }
public void ConfigureServices(IServiceCollection
services)
{
services.AddApplication();
services.AddInfrastructureData();
services.AddInfrastructureShared(Configuration);
services.AddHttpContextAccessor();
services.AddControllersWithViews(options =>
options.Filters.Add(new ApiExceptionFilter()));
services.Configure<ApiBehaviorOptions>(options =>
options.SuppressModelStateInvalidFilter = true
);
…
}
// This method gets called by the runtime. Use this
method to configure the HTTP request pipeline.
public void Configure(IApplicationBuilder app,
IWebHostEnvironment env)
{ … }
}
}
This updated code of the Startup.cs file registers the services of the application, data, and shared projects through dependency injections. The updated code is an elegant way of keeping our container bootstrapping in our startup project without violating the object-oriented design principles.
Now we can check whether our controllers are wired up correctly. Run the application and then go to Swagger UI. Try out the GET request of the TourLists controller:
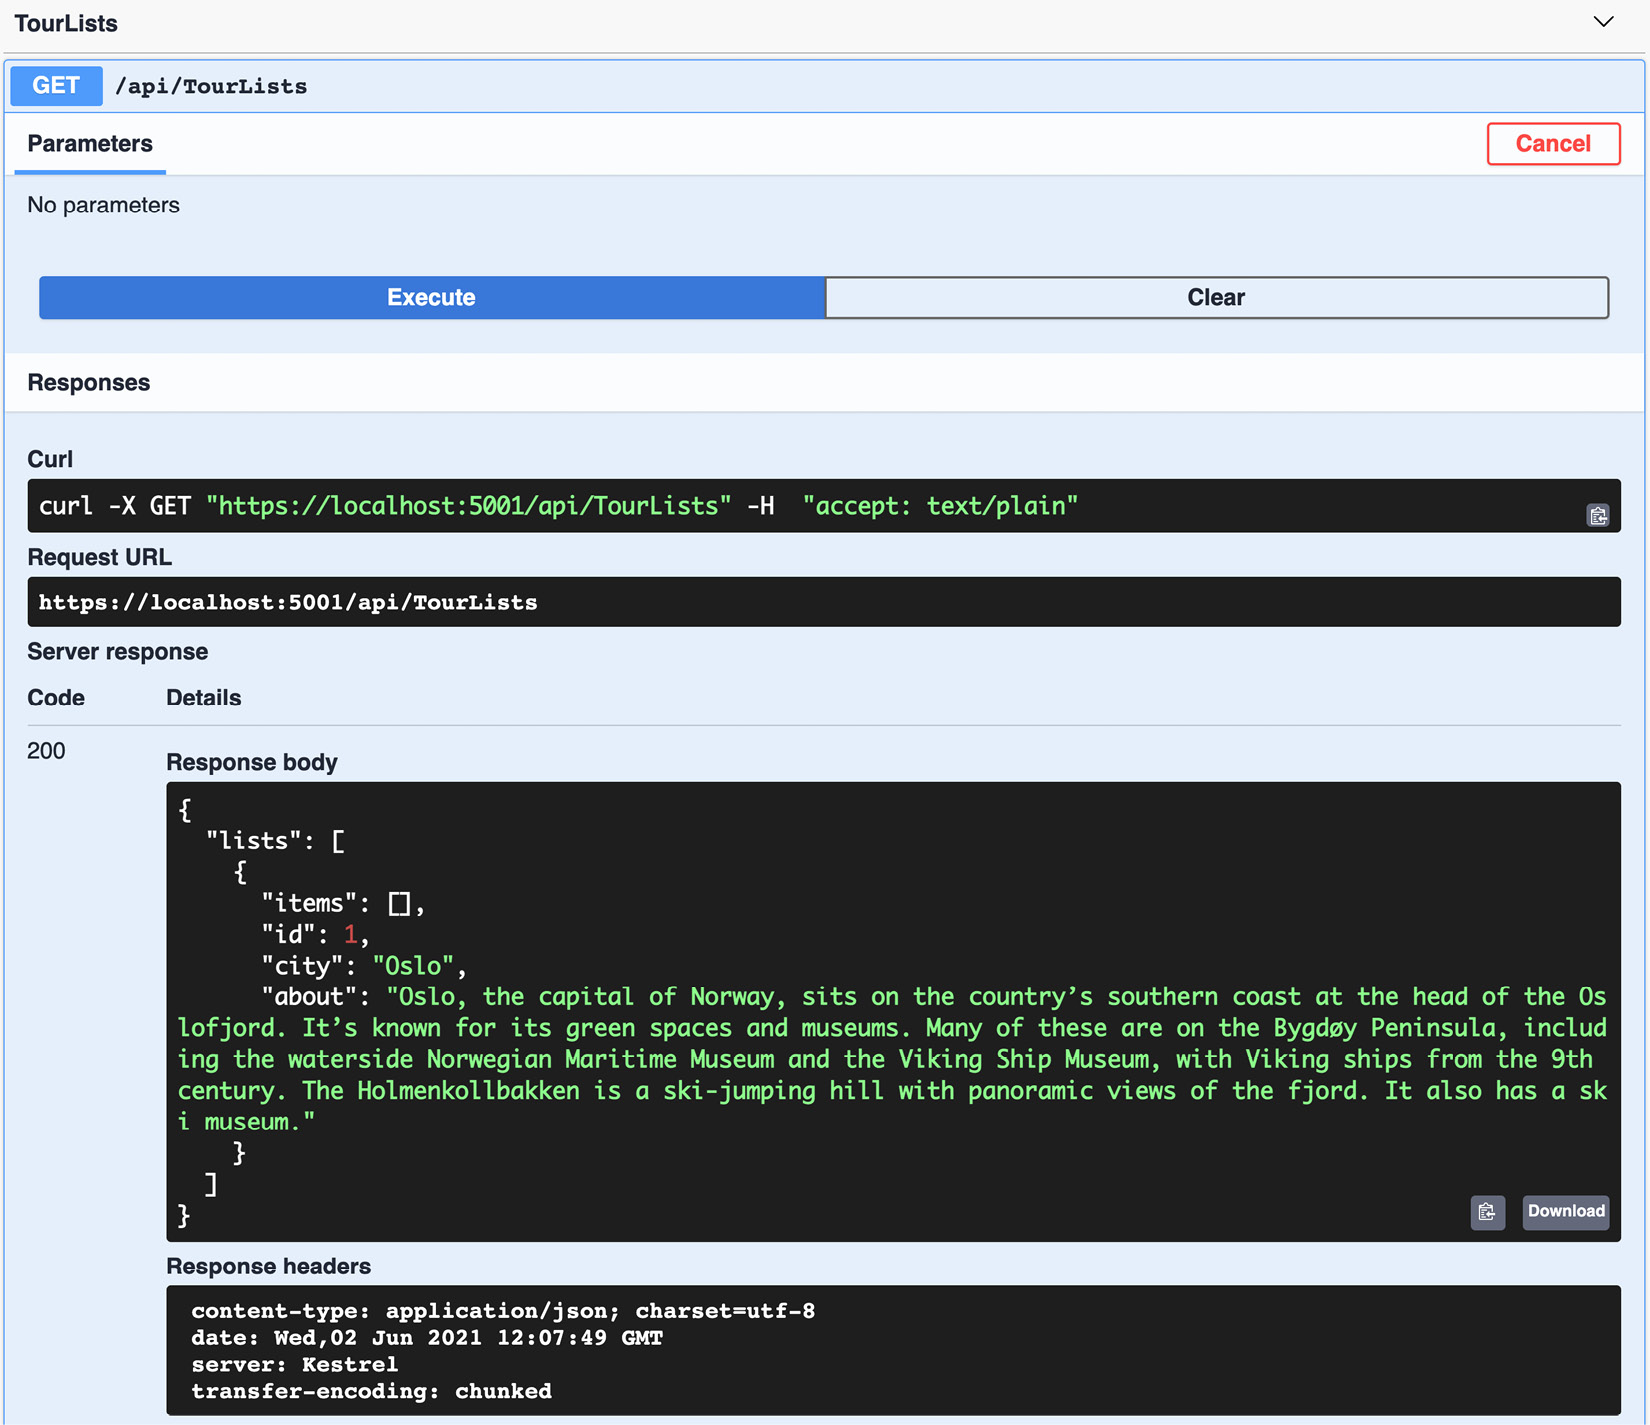
Figure 7.1 – Using Swagger UI to test the TourLists controller
The response from testing the GET request of TourLists here can be seen in Figure 7.1. You can see that the controller responded with 200 with a TourList object.
Now let's wrap this chapter up by summarizing everything that we've learned.
Summary
The entire contents here amounts to quite a chapter. Let's summarize the essential parts.
You have finally seen how to apply CQRS, MediatR, and Pipeline Behavior. The MediatR package makes the CQRS pattern easy to do in ASP.NET Core. The Pipeline Behavior package allows you to run a number of methods, such as validations or loggings, in a command before and after a handler processes it.
You learned how to use the FluentValidation package, a powerful library for validating your models.
You also learned how to use the AutoMapper package, a library that allows you to map an object to another object by writing a few lines of code.
Lastly, you saw how to use IServiceCollection to create a clean dependency injection in the Startup.cs file.
With this, we have made the ASP.NET Core 5 application more testable and scalable. In the next chapter, we will use Serilog for logging in ASP.NET Core 5, and we will also implement API versioning.