Chapter 5
Going Serverless in AWS
This chapter covers the following subjects:
Going Serverless: This chapter begins with an introduction to serverless and cloud-native computing with an overview of the AWS Serverless Application Model (SAM), which allows developers to easily deploy applications in the cloud using a serverless/cloud-native approach. The core of the chapter focuses on serverless processing with the AWS Lambda service. You will learn how to write code for Lambda and invoke functions to perform serverless processing.
Automating Serverless Processing Flows: The second part of this chapter discusses how to automate processing in complicated scenarios with Step Functions and AWS Simple Work Flow.
Messaging and Queueing: The last part of this chapter focuses on queuing with the Simple Queue Service (SQS) and shows how you can use SQS to improve your application. It also covers Simple Notification Service (SNS), which enables you to distribute messages to subscribers and perform advanced message distribution across services.
This chapter covers content important to the following exam domains:
Domain 1: Deployment
1.3 Prepare the application deployment package to be deployed to AWS.
1.4 Deploy serverless applications.
Domain 3: Development with AWS Services
3.1 Write code for serverless applications.
3.2 Translate functional requirements into application design.
3.3 Implement application design into application code.
3.4 Write code that interacts with AWS services by using APIs, SDKs, and AWS CLI.
Domain 4: Refactoring
4.1 Optimize applications to best use AWS services and features.
4.2 Migrate existing application code to run on AWS.
The previous chapters examine the AWS infrastructure—including the compute and the storage services—which essentially gives you a complete set of tools to build your application. You’ve learned some important topics, such as the following:
How to build a virtual private cloud
How to design networks, connection endpoints, site-to-site links, and so on
How to run virtual machines with the EC2 service in a similar manner as would be found in typical enterprise environments
How to make your environment highly available and highly scalable with Auto Scaling, ELB, and Route 53
How to run and orchestrate containerized applications with the ECS, EKS, and Fargate services
How to orchestrate your complete set of infrastructure with CloudFormation
How to easily deploy your application with Elastic Beanstalk
How to select a data store for your static and dynamic content
How to work with the EBS and S3 storage back ends
How to work with the RDS and DynamoDB services
So what is missing? You have the network, you have the compute, and you also have the storage services. That should be all you need. Yes, that is completely true, but the AWS cloud offers you the ability to investigate whether an application is running in an optimal manner And determine whether you can further optimize the deployment.
AWS has provided ever more efficient services that relieve you of the general need to manage and run resources at all times and give you the ability to consume the service per request and only pay for what you are using.
“Do I Know This Already?” Quiz
The “Do I Know This Already?” quiz allows you to assess whether you should read the entire chapter. Table 5-1 lists the major headings in this chapter and the “Do I Know This Already?” quiz questions covering the material in those headings so you can assess your knowledge of these specific areas. The answers to the “Do I Know This Already?” quiz appear in Appendix A, “Answers to the ‘Do I Know This Already?’ Quizzes and Q&A Sections.”
Table 5-1 “Do I Know This Already?” Foundation Topics Section-to-Question Mapping
Foundations Topics Section |
Questions |
Going Serverless |
1, 2, 5, 9, 10 |
Messaging and Queueing |
3, 4, 6, 7, 8 |
1. Which of the following is not a characteristic of a serverless execution environment?
No “idle” cost
Scalable to virtually unlimited capacity
SSH access to execution directory
Ability to process massively parallel tasks
2. Which of these is true about the execution duration of a Lambda function?
The Lambda function execution can run for any amount of time.
The Lambda function execution is limited by the time factor set in the code.
The Lambda function execution is limited to 5 minutes.
The Lambda function execution is limited to 15 minutes.
3. What is the proper procedure for recalling an SNS message?
There is no way to recall a message in SNS.
Instruct SNS to purge the delivery queue.
Instruct SNS to delete the message by using the delivery ID.
While the message is in the sending state, delete it by specifying the receive ID.
4. What are the maximum numbers of subscribers, the types of delivery, and the topics allowed for an AWS account?
12.5 million subscribers per type and up to 8 delivery types per topic and 25,000 topics per account.
12.5 million subscribers per type and 1 delivery type per topic and 100,000 topics per account.
12.5 million subscribers per topic and 100,000 topics per account.
There is no limit to the number of subscribers or delivery types or topics in AWS.
5. In what language(s) can a Lambda function be written?
Any programing language
Java, Go, PowerShell, Node.js, C#, Python, or Ruby
Java, Python, or C#
boto3
6. What is the maximum payload size of an SQS message and the metadata?
200 KB for the message and 64 KB for the metadata
256 KB for the message and the metadata
400 KB for the message and 112 KB for the metadata
400 KB for the message and 112 KB for the index
512 KB for the message and the metadata
7. How can you override the default visibility timeout in SQS for an individual message?
This cannot be done once a queue is active.
Set the queue visibility to the new value while posting the message. Then set the visibility timeout back to the previous value.
Set a custom visibility timeout when posting the message.
Set a custom visibility timeout when receiving the message.
8. When an SNS topic has multiple SQS queues subscribed, what is the layout called?
FIFO (first-in, first-out) sandwich
Fan-out queue
FIFO (first-in, first-out) queue
Fan-out sandwich
9. What are the two types of SQS queues?
Standard queues and fan-out queues
Standard queues and FIFO (first-in, first-out) queues
Standard queues and expedited queues
Standard queues and PIO (prioritized in/out) queues
10. Which of the following can be used to control the permissions for a Lambda function? (Choose all that apply.)
An IAM permission for the user, group, or role to invoke the Lambda service.
An execution role attached to the Lambda function with permissions for the Lambda service to use other AWS resources.
A resource-based permission attached to the Lambda function that defines which AWS accounts and services are allowed to invoke the function.
An access control list (ACL) that defines which AWS accounts and services are allowed to invoke the function.
An execution (ACL) that defines which AWS services Lambda is allowed to use.
Foundation Topics
Going Serverless
The term serverless indicates that there are no servers or other types of instances visible to the consumer. A serverless scenario means less SysOps overhead and much faster deployment. Any serverless service is also designed to be inherently highly available and fault tolerant and will have an SLA that defines uptime and how retries are handled by the service. Serverless services are always waiting for requests to come in, and no idle time is billed to the consumer. For each request, the appropriate resources are provisioned, and the request is processed in the fastest manner possible, within the scope of the definition created by the consumer.
Probably the biggest benefit of serverless solutions is that you only pay for the service when you use it. There are several pay-per-use models in place, depending on the service type:
Request: Pay per each request
Duration: Pay for the exact amount of time of service use
Capacity: A usage time multiplier, where more capacity can equal lower usage times
Volume: Pay per volume of data or traffic ingested or outputted by the service
The jump to cloud-native and serverless might seem daunting at first, but by now, you are actually already familiar with a few serverless components available in AWS, including the following:
Fargate: The Fargate container engine is an example of a serverless processing engine. When using Fargate, you never see any infrastructure components that run your containers (even though the containers are connected to VPC), and you only pay for the time (duration) and size (capacity) of the container when running.
S3: S3 is an example of serverless object storage. You deploy a namespace (bucket), define permissions, and then start uploading/downloading files through a standard HTTP/HTTPS service and pay for the requests and the volume of data stored and downloaded.
DynamoDB on-demand mode: DynamoDB is an example of a serverless database service. You simply deploy a table and start writing/reading items through a standard HTTP/HTTPS service and pay for each read or write request.
The migration to serverless applications is really not a very big step for any application that is planned to be deployed or that is already deployed in a microservices model, since all serverless components comply with modern approaches to designing microservices.
This chapter focuses on serverless AWS services and discusses the Lambda serverless processing environment and the SQS and SNS messaging services. Understanding the serverless approach will help you design and deliver more efficient microservices and cloud-native applications—applications that are written to run in the cloud instead of in an operating system.
The AWS Serverless Application Model
To extend the capability, simplification, and delivery speed of cloud-native applications, AWS has defined the AWS Serverless Application Model (SAM). The SAM is an open-source framework that allows developers to quickly and easily define an application in a standard YAML document. The SAM model uses simple and easy-to-understand shorthand syntax for expressing functions, defining the way APIs are deployed, and attaching databases and other data sources to a SAM-based application.
SAM uses a SAM template that defines the infrastructure components to use and deploys your code into those components. The SAM template essentially becomes a part of your code and enables you to transform your applications to completely cloud-native deployments, with no infrastructure or deployment operations needed to define the environment on which the code will run.
SAM also has its own CLI, which can import the SAM templates and your application code from one place, thus making it easy to develop, test, and deploy your application. SAM templates easily integrate with both third-party and AWS developer tools such as Cloud9, CodeCommit, CodeBuild, CodeDeploy, and CodePipeline to enable a seamless transition for any application running in an on-premises enterprise environment to a cloud-based/cloud-native delivery.
AWS Lambda
The AWS Lambda service is a serverless function processing environment that is inherently highly available and scalable to virtually unlimited capacities. Lambda offers the ability to slice your code into separate functions and deploy and execute each function independently and only when invoked.
Lambda follows, and in some aspect surpasses, the evolution from monolithic applications to microservices by allowing you to start thinking about programming in a pure and simple logical way. Think of the days when you were learning how to code. You might have had to find a spot in Programming 101 at university; or you might have picked up Sams Teach Yourself Python in 24 Hours by Katie Cunningham; or you might fondly remember learning on the job with a mentor.
No matter what kind of application you are planning on building, you start by defining the logical layout of the application. The layout defines how data gets ingested or is input into the application, where the data flows depending on different factors, what action each component in the application performs, and how the data is emitted, stored, or returned to the user after processing. A number of components need to be well defined before a single key is pressed by a developer—from front ends allowing clients to connect, to transport services accepting messages and delivering them to the back end, to back ends interacting with the databases, and performing calculations and transformations.
Writing Code for Lambda
With Lambda, a logical layout is literally all you need. You simply need to make sure each component in the layout maps directly to a function that can independently perform exactly one task. For each component, code is then developed and deployed as a separate Lambda function.
AWS Lambda natively supports running any Java, Go, PowerShell, Node.js, C#, Python, or Ruby code package that can contain all kinds of extensions, prerequisites, and libraries—even custom ones. On top of that, Lambda even supports running custom interpreters within a Lambda execution environment through the use of Layers.
The code is packaged into a standard .ZIP format and added to the Lambda function definition, which in turn stores it on an AWS-managed S3 bucket. You can also provide an S3 key directly to Lambda, or you can author your functions in the browser in the Lambda section of the AWS management console. The Lambda function is configured with a memory capacity. The scaling of capacity goes from 128 MB to 3008 MB, in 64 MB increments.
You can also write the code directly from the Lambda section of the Management Console, which allows you to manage the function in an easy-to-use interface with a simple and efficient editor where you can paste your code. The following example shows how to create a simple Node.js Lambda function that prints out a JSON-formatted response after you input names as key/value pairs.
You start by opening the AWS Management Console and going to the AWS Lambda section and clicking Function and then Create function (see Figure 5-1).

Figure 5-1 The Lambda Section of the AWS Management Console
If you author a function from scratch, you need to give it a name and then click Create function, as shown in Figure 5-2. In this section, you could also configure the permissions, but for this example, the default execution role that only allows access to CloudWatch logs will suffice.
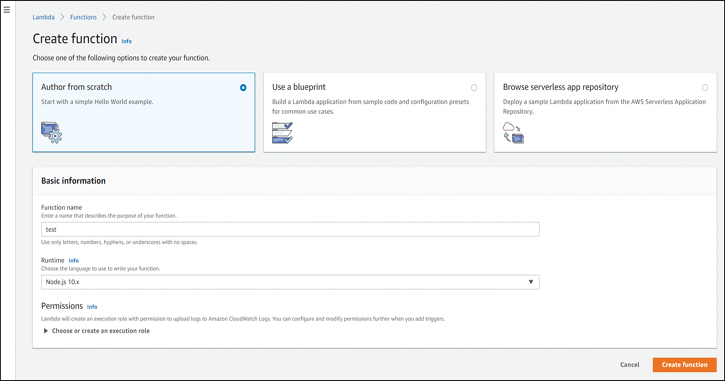
Figure 5-2 Creating a Function in the Lambda Section of the AWS Management Console
Next, you replace the default code with the code shown in Example 5-1. The code defines the variables for the key/value pairs you will be entering in your test procedure and returns them as JSON-formatted values.
Example 5-1 Event Handler for the Lambda Function
exports.handler = async (event) => {
    var myname1 = event.name1;
    var myname2 = event.name2;
    var myname3 = event.name3;
    var item = {};
    item [myname1] = event.name1;
    item [myname2] = event.name2;
    item [myname3] = event.name3;
    const response = {
        body: [ JSON.stringify('Names:'), JSON.stringify(myname1), JSON.stringify(myname2), JSON.
stringify(myname3)],
    };
    return response;
};
When you are done creating the function, your function code should look similar to Figure 5-3. Before you can put it in action, you need to click the Save button at the top right.

Figure 5-3 The Function Code
Next, you need to configure a test event where you will enter your key/value pairs, as demonstrated in Example 5-2. You can use this example to create your test data. Make sure to scroll down and click Save at the bottom of the Configure Test Event dialog box shown in Figure 5-4.
Example 5-2 Test Data for the Lambda Function
 {
  "name1": "jenny",
  "name2": "simon",
  "name3": "lee"
}

Figure 5-4 Configuring a Test Event
Before running the test, you can take a look at the Actions section in the Designer, as shown in Figure 5-5. In the Designer, you can graphically define the layout of the invocation and the services with which you want the Lambda to interact, and the permissions will be configured accordingly. In the Actions drop-down menu, you can choose to publish a new version, create an alias, or delete or export the function.
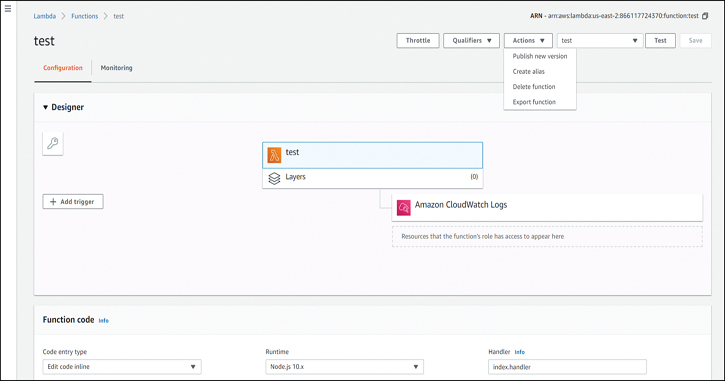
Figure 5-5 Lambda Designer and Actions
Next, you run the test, which invokes the function with your test data. The response should be a JSON-formatted column with the value Names: and then a list of names that you entered in the test data, as shown in Figure 5-6.
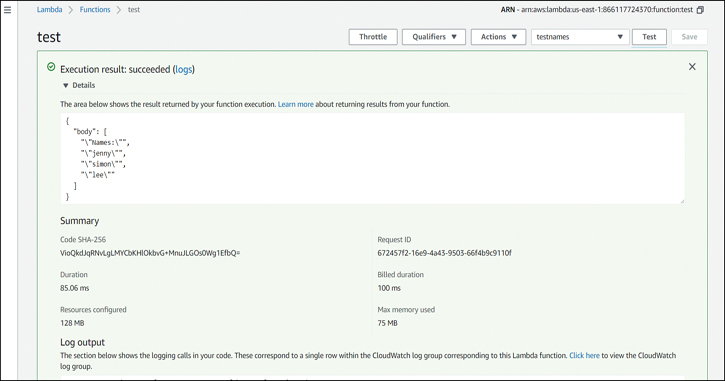
Figure 5-6 Lambda Execution Result
In the execution result, you also have information about how many resources the function consumed, the request ID, and the billed time. At the bottom, you can click the Click here link to go to the logs emitted by Lambda into CloudWatch (see Figure 5-7).
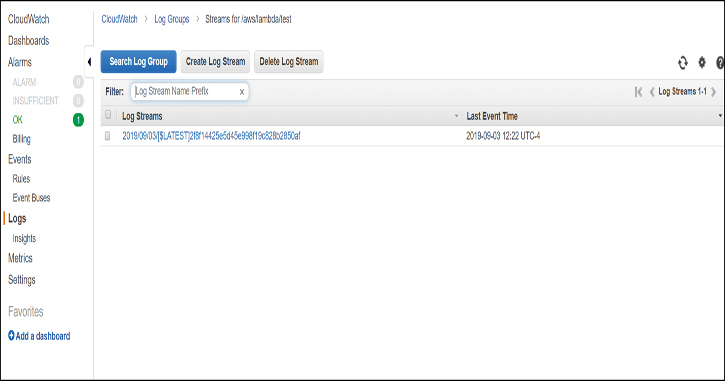
Figure 5-7 Log Stream Created by Lambda
You can click the log stream and see the events. By expanding each event, you get more detail about the request and duration of the execution of the Lambda function, as illustrated in Figure 5-8. Lambda also outputs any logs created by your code into this stream because the execution environment is stateless by default.
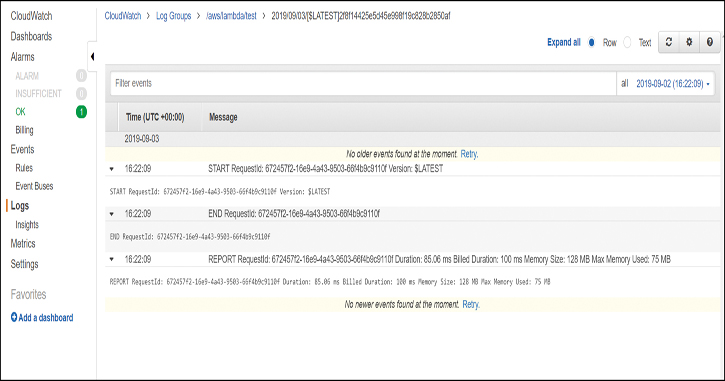
Figure 5-8 Log Events in the Lambda Log Stream
Permissions and Roles for Lambda
For each Lambda function, you need to define what permissions the Lambda function will have for using your AWS services and which identity or service is allowed to invoke the Lambda function. The permissions can be assigned by configuring the following:
An execution role: Allows the code being executed to interact with AWS services. At minimum, a Lambda function requires access to CloudWatch logs to be able to write the log output of the function. Use the execution role instead of hardcoding credentials into the application code.
An IAM policy: Allows users, groups, and roles to configure, manage, and invoke Lambda functions. You need to attach the policy to the IAM principal that you are allowing access to (a user, group, or role).
A resource policy: Allows other accounts and AWS services to invoke the Lambda function. You can attach resource policies to functions, versions, aliases, and layers.
Execution Role
Now consider a case in which a Lambda function interacts with an S3 bucket. For the Lambda function to be able to access the bucket, you need to create a policy and attach it to a Lambda execution role. This role is then specified in the configuration of the Lambda function and allows the code to access the S3 bucket.
In the policy in Example 5-3, you simply allow all actions (s3:*) over the S3 bucket everyonelovesaws and all objects in the bucket denoted as everyonelovesaws/*.
Example 5-3 IAM Policy That Allows Access to S3 and the Logs Required by Lambda
{
   "Version": "2012-10-17",
   "Statement": [
       {
           "Effect": "Allow",
           "Action": "s3:*",
           "Resource": [
               "arn:aws:s3:::everyonelovesaws",
               "arn:aws:s3::: everyonelovesaws/*"
           ]
       },
       {
           "Effect": "Allow",
           "Action": [
               "logs:CreateLogGroup",
               "logs:CreateLogStream",
               "logs:PutLogEvents"
           ],
           "Resource": "arn:aws:logs:*:*:*"
       }
   ]
}
On top of the S3 access, the role also requires additional permissions to grant access to logs:CreateLogGroup, logs:CreateLogStream, and logs:PutLogEvents over arn:aws:logs:*:*:*, which allows the Lambda function to write the log output to CloudWatch logs. Other than the logs part, this is a completely standard IAM policy that you could apply to any user, group, or role, meaning that if you already have a user that has been given a certain level of access to test your code or if you are already using an EC2 instance with a role attached, you can simply copy your existing policy and add the logs section to create a new policy that you can use with the Lambda execution role. AWS also provides quite a number of different managed policies that you can use with your Lambda execution role or base your custom Lambda policy on.
Identity-Based IAM Policy
To grant a user, group, or role the permission to work with a Lambda function, you can simply apply a policy that allows the required level of access. AWS provides three different prebuilt identity-based policies that allow three different levels of access:
AWSLambdaFullAccess: Allows a user, group, or role full control over creation, management, and invocation of Lambda functions.
AWSLambdaReadOnlyAccess: Allows a user, group, or role read-only access to all the existing Lambda functions in the account.
AWSLambdaRole: Allows a user, group, or role the ability to invoke a Lambda function.
Example 5-4 shows the AWSLambdaRole role. You can see that the policy is quite simple, allowing only the action lambda:InvokeFunction on all resources.
Example 5-4 The Lambda Function Invocation Permission IAM Document
{
   "Version": "2012-10-17",
   "Statement": [
       {
           "Effect": "Allow",
           "Action": [
               "lambda:InvokeFunction"
           ],
           "Resource": [
               "*"
           ]
       }
   ]
}
You can use this policy as a template for allowing an invocation of a specific function by replacing the resource section with your function ARN. For example, if you would like to allow access only to a function called test in the Ohio (us-east-2) region in account 111222333444, you can use the following ARN:
"Resource": "arn:aws:lambda:us-east-2:111222333444:function:test"
You can also look up the ARN of a particular function in a particular region by running the following CLI command:
aws lambda get-function --function-name test --region us-east-2
A Resource Policy
To allow an AWS service to invoke your Lambda function, you can either use the Lambda designer in the AWS Management Console or the AWS CLI to assign a permission for a certain AWS service to your Lambda function. Example 5-5 allows the S3 bucket everyonelovesaws from the AWS account number 111222333444 to invoke the test function.
Example 5-5 CLI Script to Add the Lambda Permission to the S3 Bucket
aws lambda add-permission --function-name test
--action lambda:InvokeFunction
--statement-id s3-account
--principal s3.amazonaws.com
--source-arn arn:aws:s3:::everyonelovesaws
--source-account 111222333444
The --source-account option is not required, but it makes good sense to use it because S3 bucket names are global. If you didn’t use the --source-account option and you deleted the everyonelovesaws bucket, another account would be able to create that bucket, and the resource policy would allow the other account’s bucket to invoke your Lambda function. It is thus always recommended to use the --source-account option as it protects your account from undesired actions.
Invoking Lambda
Once the Lambda function is configured and the invocation permissions are defined, the Lambda service allows the function to be invoked. The invocation can come from many different AWS services, such as S3, Kinesis, SNS, SQS, CloudFormation, API Gateway, and CodeCommit; however, you can also invoke the Lambda function by providing test data in the Management Console, at the CLI, and in the SDKs.
You can invoke a function synchronously or asynchronously. With synchronous invocation, the Lambda service opens a session, runs the execution, and returns a response as soon as the code execution is done. The following is an example of synchronous execution of the test Lambda function from the CLI:
aws lambda invoke --function-name test

--payload '{ "name1": "jenny", "name2": "simon", "name3":
"lee"}'

synchronous.json
In this example, the Lambda invocation runs the same test dataset of the three named key/value pairs you used to test the Lambda function but as a payload from the CLI. The response of the Lambda function is recorded in the synchronous.json file that you specified in the last line of the command:
aws lambda invoke --function-name test --invocation-type Event

--payload '{ "name1": "jenny", "name2": "simon", "name3":
"lee"}'

asynchronous.json
With the asynchronous model, Lambda receives your input, adds it to an execution queue, and closes the session with only a successful HTTP 202 response. The Lambda service still creates the asynchronous.json file, but the contents are empty as the session was closed immediately after receiving the invocation request. You can compare the synchronous.json and asynchronous.json files to see the difference.
When working with other AWS services, the Lambda service operates in two different listen modes:
Push: A service triggers the Lambda invocation.
Pull: The Lambda service periodically polls another AWS service for changes.
An example of a push invocation is a file being uploaded to S3. The S3 notification mechanism invokes the Lambda function, and the Lambda function can then pick up the file and process it. This is a very useful design if you are implementing any kind of file-based processing (images, videos, text, JSON content, and so on) and would like to use a serverless architecture for it. For example, you can upload images to S3, and Lambda can extract the image metadata and emit the metadata as key/value pairs into a DynamoDB database.
A pull invocation example would include the AWS Lambda listening to some kind of data stream or message queue. For example, you can subscribe a Lambda function to an SQS message queue. The Lambda service, on the function’s behalf, continuously polls the SQS queue, and when a message is posted, it picks up the message and invokes the function to process the contents. This is very useful when you need to process sensor or log information that is being delivered to an SQS queue. The sensor information can be continuously monitored by Lambda, and an action can be taken if the Lambda service detects an anomaly. To save on polling costs, the Lambda service always uses long polling on the SQS queue, meaning that it polls the queue only every 20 seconds if no messages are present.
Having multiple parallel executions of a Lambda function also means that multiple execution environments are created in parallel for that version of a Lambda function, which in turn creates multiple Lambda log streams. You can even use in-parallel executions to warm up a certain number of Lambda execution environments simply by pushing the same number of parallel invocations. When the task of an execution is complete, the data is either returned to the requester or emitted to any downstream resource, such as a DynamoDB database, an S3 bucket, an SQS queue, or an SNS topic.
Automating Serverless Processing Flows
Now that you have seen how Lambda functions can be really useful for developing event-based applications, I imagine you will start writing all your code in Lambda functions. But that can become complicated. Making sure each Lambda function communicates with the correct next function or component can be complicated, especially across multiple versions of multiple functions. Also, there is the question of maintaining state. To inform all services of each other’s state, you essentially need to continuously exchange messages between all services in a full mesh. Finally, having all the business logic and state handling built into the functions would mean that they would consume additional resources, so this might get very expensive.
Step Functions
Instead of implementing the business logic into the code, you can use AWS Step Functions (see Figure 5-9). AWS Step Functions is a service designed to decouple the business logic from the processing and make your Lambda functions even leaner. The Step Functions service implements a state machine that allows you to both design the logical layout of your application and maintain the execution state of each invocation of your complete application.
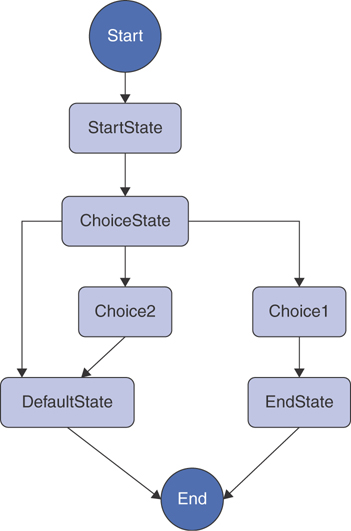
Figure 5-9 A Logical Layout of the Step Functions State Machine
You simply define the state machine with a JSON-formatted document in the AWS State Language. The State Language is similar to the CloudFormation script in that it is easy to read and self-documenting. The Step Functions state machine allows you to define tasks that equate to Lambda functions that are to be executed. After execution of each task, you introduce different operators for each state that help you build the business logic outside your Lambda functions. Step Functions supports the following states:
Task: The input is sent to a Lambda function and represents a unit of work in the state machine.
Pass: The input is simply passed to the output. This can be used to create a virtual placeholder in the logical design where a future task will be implemented.
Choice: The input data is evaluated to decide which task the data will be sent to.
Parallel: The input data is split into parallel branches of execution and sent over to multiple processing tasks.
Wait: The data is held for a certain amount of time before being sent to the next step. This enables you to include sleep-like functionality in Lambda, which would otherwise be very expensive.
Fail: The execution is stopped and marked as failed.
Success: The execution is stopped and marked as completed successfully.
With all these different states, you can build your complete business logic outside the Lambda functions, which can possibly save a tremendous amount of processing time because all the decisions about how to transition the data from one task to another are made by the Step Functions state machine.
Example 5-6 demonstrates a state machine that looks for the value of the name1 key from the test Lambda function you previously created. If it finds the value as jenny, it continues to execute a function called Choice1 and then goes to EndState; on the other hand, if the value does not match jenny (is greater or less than), it continues to the function called Choice2 and then fails with the definition defined in FailState.
Example 5-6 An AWS Step Functions Machine That Checks Whether the First Value of the name1 Key Is jenny
{
  "Comment": "An AWS Step Functions State Machine that checks if the first value of
the name1 key is jenny.",
  "StartAt": "StartState",
  "States": {
    "StartState": {
      "Type": "Task",
      "Resource": "arn:aws:lambda:us-east-2:111222333444:function:test",
      "Next": "ChoiceState"
    },
    "ChoiceState": {
      "Type" : "Choice",
      "Choices": [
        {
          "Variable": "$.myname1",
          "StringEquals": "jenny",
          "Next": "Choice1"
        },
        {
          "Variable": "$.myname1",
          "StringLessThan": "jenny",
          "Next": "Choice2"
        },
                {
          "Variable": "$.myname1",
          "StringGreaterThan": "jenny",
          "Next": "Choice2"
        }
      ],
      "Default": "FailState"
     },
      "Choice1": {
      "Type" : "Task",
      "Resource": "arn:aws:lambda:us-east-2:111222333444:function:choice1",
      "Next": "EndState"
    },
    "Choice2": {
      "Type" : "Task",
      "Resource": "arn:aws:lambda:us-east-2:111222333444:function:choice2",
      "Next": "FailState"
    },
    "FailState": {
      "Type": "Fail",
      "Error": "FailStateError",
      "Cause": "IncorrectUser"
    },
    "EndState": {
      "Type": "Task",
      "Resource": "arn:aws:lambda:us-east-1:123456789012:function:endstate",
      "End": true
    }
  }
}
This example could be used to perform additional actions and ensure that the correct values are inputted into the initial function. The Choice2 state allows for logging or returning additional information to the user before failing the attempt.
Amazon Simple Work Flow
What if you need to coordinate and track the state of an application that consists of multiple types of processing components—Lambdas, EC2 instances, containers—and also includes manual actions to be taken? Step Functions goes a long way toward automating your environment, but to define a complete application with complex and even custom transitions, you can use the AWS Simple Work Flow (SWF) service.
The SWF service provides you with the ability to reliably track the state and coordinate tasks among automated and manual systems and gives you the flexibility to integrate any kind of real-world business process or task on AWS. SWF integrates with most AWS services and is especially useful when using fully managed services because it can automate the provisioning of the service that performs the task automatically when the workflow is executed. Like Step Functions, SWF is designed to decouple the business logic from your application and implement it in a manner that provides a high level of automation and visibility into the state of the execution.
Workflows
An SWF workflow represents your business process. The workflow contains activities and tasks as well as all required orchestration and data transition logic. In the SWF, you can easily define the sequence, circumstances, and actions that your business process has and assign an AWS service to each task.
Each workflow also contains deciders that perform tasks when a certain condition is met and that are able to pass data to the tasks and schedule execution. At the end of the workflow, a final decider is implemented to close the workflow when completed or upon failure.
The workflow also contains the execution history, which enables you to take a look at the existing state and previous states of the workflow execution and determine any anomalies. The execution history is completely authoritative and is generated during the progress of each workflow execution.
Activity and Decider Tasks
A workflow contains the activity task, which defines the actions (activities) that need to be completed, as well as the decision task, which interacts with the decider and informs it of the task completion. To define an activity task, you need to define a list of all the actions (task list), name the activity task, and give it a version. You also need to define the workflow domain it belongs to, an optional schedule to run on, and the timeout for the task. Each activity task is given a unique ID that can help you track the progress of the task in the workflow.
Actors
Actions being performed within a workflow are always executed by actors. An actor or an activity worker needs to be some kind of entity that performs the task, either an AWS service, a software component for data processing, or a person who will execute a manual task.
Domains
Workflow domains are used to logically group workflows that belong to a certain application. An application can have multiple workflows that have the ability to interact and send data and invoke tasks on each other. There is no interaction between workflows allowed across domains.
Messaging and Queueing
While sometimes orchestration of tasks is the only way, other times the only way to efficiently pass data from one service to another is by messaging. Servers (or services) can message each other directly, but that requires that the application understand the state of the infrastructure and services so that it can send the message to the recipient or service it is trying to talk to. This means that the service initiating the message transfer needs to know both the location (DNS, IP, service ID, and so on) and the state of the service (up, busy, down, and so on) to be able to select a recipient that can receive the message. In addition, guaranteed processing and message error handling in case of failure need to be handled within the application.
Instead of directly tying services to each other, you can introduce highly available, fault-tolerant, and scalable messaging services between the servers or services, thus making it possible to decouple the sender from the recipient and also allow multiple senders to address multiple recipients at the same time by specifying the same address of the messaging service.
This part of the chapter looks at Amazon Simple Queue Service (SQS) for message queuing and Amazon Simple Notification Service (SNS) for message distribution.
Amazon SQS
Amazon Simple Queue Service (SQS) is designed to deliver the ability to receive and transmit very high volumes of messages from multiple senders to multiple recipients at the same time. A queue is a message repository that stores messages in a highly available and fault-tolerant manner. The SQS service has the capability to deliver messages with virtually unlimited performance at any scale through a standard HTTP/HTTPS access model. The maximum size of each message sent to the SQS queue, including the message body and any metadata attributes added to the message, is 256 KB.
When a message is received, it is stored on the SQS back end. The service quasi-randomly replicates each message across multiple back-end servers for high availability. Figure 5-10 illustrates how messages are stored in a distributed fashion on the SQS back end.
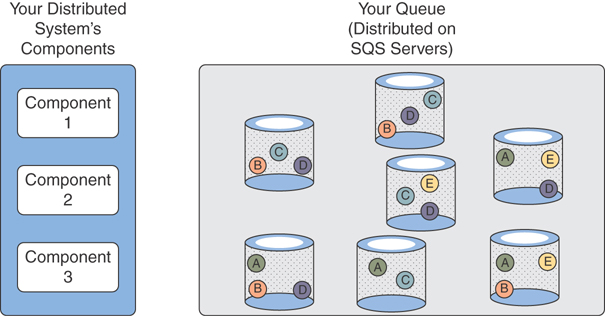
Figure 5-10 The Distribution of Messages Across an SQS Back End
When a recipient polls the message queue, the first back end to respond might have only a subset of messages and may present that subset to the recipient. This is the default operation of the SQS queue, and it allows for maximum performance with virtually unlimited capacity. The drawback of this distribution is that message ordering is not preserved. For example, suppose that messages A, B, C, D, and E shown in Figure 5-10 were posted to the queue in alphabetical order. If the goal is speed, the design indicates that the recipient gets a response from the least loaded back end, and that might be the back end with messages B, C, and D. No message ordering will be preserved by design. This is the way a SQS standard queue operates.
On the other hand, if message ordering is required, you can create an SQS first-in, first-out (FIFO) queue. In a FIFO queue, message ordering is preserved due to an additional index and the sampling of multiple back ends. That also brings into question the performance: The FIFO queues are able to support a maximum of 300 operations per second, which would allow you to transport up to 3000 messages per second in batches of 10 or up to 300 messages per second if your environment posts a single message every time. The FIFO queues also support exactly one delivery, which means that when a message is picked up from the queue, it is deleted by the queue service.
Visibility Timeout
With standard queues, the delivery is guaranteed with an at-least-once delivery approach. When a message is picked up from the queue, the message is retained in the queue but made invisible to other recipients. This enables the message to be processed in a certain amount of time but still be available in case the recipient processing the message suffers a failure. Once the message is processed, the recipient needs to remove the message from the queue, which prevents it from being read again.
This approach helps maintain guaranteed message delivery and processing, but it also means that a message might be delivered and processed multiple times. The structure of the data and the processing logic must be designed so that the message processing output is idempotent, which prevents multiple duplicate results from being created in the processing output.
For example, when processing a message from SQS, try to refrain from adding a processing timestamp to the output data. If you had a timestamp, you could have duplicate entries. Suppose you have a message that has been successfully processed, but it became visible before the recipient deleted it. The message is inadvertently picked up by another recipient and processed, and then the same output with a different processing timestamp is generated and stored on the output data store. These two entries would not have been created as duplicates and would have been idempotent if the processing timestamp were not included in the output data.
The time for which a message becomes invisible is controlled through the visibility timeout. For each standard queue, you define a default visibility timeout. This visibility timeout should be long enough to allow your recipients to process the message but short enough to allow the message to be reread in a timely manner if the processing on the initial reader fails. A reader can also set a custom visibility timeout at the time when it picks up the message or at any other time during which the message is still invisible. This means that you can override the default visibility timeout at any time, even after processing has already started. Figure 5-11 illustrates the process of retrieving a message from the SQS queue.
When a message is read from the SQS queue, you receive a receipt handle, which is the unique identifier that has set in motion the visibility timeout clock and with which you can address the message in the queue and extend the visibility timeout or delete the message when the processing is completed.
The next example shows how to create an SQS queue and post a message with the AWS CLI. You then see how to retrieve the message and delete it from the queue. First, to create a queue.attributes file, you add the following line, which sets the visibility timeout to 60 seconds:
VisibilityTimeout=60
Next, run the following command to create the queue named everyonelovesaws:
aws sqs create-queue --queue-name everyonelovesaws

--attributes file://queue.attributes
Next, you describe the newly created queue to get the queue URL and see if the visibility timeout attribute worked. You run the following command to get the queue URL that you will use in all the following commands:
aws sqs get-queue-url --queue-name everyonelovesaws

Figure 5-11 The Retrieval and Processing of a Message in the Visibility Timeout
The response should look like this:
{

     "QueueUrl": "https://us-east-2.queue.amazonaws.com/
111222333444/everyonelovesaws"
}
To get the visibility timeout, run the following command:
aws sqs get-queue-attributes

--attribute-names VisibilityTimeout --queue-url

https://us-east-2.queue.amazonaws.com/111222333444/everyonelovesaws
This should result in a response similar to the following:
{

     "Attributes": {
         "VisibilityTimeout": "60"
     }
}
To get all the attributes of the queue, you can simply replace --attribute-names VisibilityTimeout with --attribute-names All.
Now send a message to the queue, modifying the message body to your liking:
aws sqs send-message --queue-url

https://s-east-2.queue.amazonaws.com/111222333444/
everyonelovesaws

--message-body "My first message"
You should receive a message ID as the response:
{

     "MD5OfMessageBody": "77a8f18b5388a3865556cc642424151c",

     "MessageId": "d489d625-e649-426f-9e21-dc432a06e778"

}
Now you can use this command to receive a message:
aws sqs receive-message --queue-url

https://s-east-2.queue.amazonaws.com/111222333444/everyonelovesaws
The output of the command should provide the message, its content, and the receipt handle that you can use to manipulate this exact message during its visibility timeout, as demonstrated in Example 5-7.
Example 5-7 Response from the receive-message Command That Shows the Receipt Handle
{
     "Messages": [
         {

             "Body": "My first message",

             "ReceiptHandle": "AQEBa+DIuyBk4RpEBmyOKRmbDHNnRZeOdU8kWf0j4KTYqqr6wWpz9v
tTABppeku8O4TCOX0cKVMSRU7EW6i2tJAJdr8mvV9B7/VPx8cizuR0oa9wAL1jvoObp8bLC9PlQYWc6nDXV
J3orXelekeFbZBtAuK7csOsCLIIDFEQ9U2PHF0kBCc/i/tscrcFY+4U7Swyclg/nkugePklxumlyBj66hE
AxatdqJDXYhcLiAu0PwP5p5vHElRB7hsEr+gG9QGyXgy5fHEOl89xPgP2ki/f7wstQS1dGwDA4ceqy9
qmfFJkq5/6W0AK4/paQQ56SyQ/w+p/fOpND6M6meEloQCNFZCmORenAUcgYhnlaV4bk/emoC9s4vXG/
xIQwEPg5fIkbLeo/OXF71weYWQrIxLW/Q==",

                "MD5OfBody": "77a8f18b5388a3865556cc642424151c",

                "MessageId": "d489d625-e649-426f-9e21-dc432a06e778"
        }

    ]

}
Now that you have received a message, you can run the following command to see if the message became invisible:
aws sqs get-queue-attributes

--attribute-names ApproximateNumberOfMessagesNotVisible
--queue-url  https://us-east-2.queue.amazonaws.com/111222333444/
everyonelovesaws
The output should look like this:
{

     "Attributes": {
         "ApproximateNumberOfMessagesNotVisible": "1"
     }
}
Now you can simulate processing the message and deleting it from the queue. You will need to use the receipt handle from the receive-message command like so:
aws sqs delete-message --queue-url

https://s-east-2.queue.amazonaws.com/111222333444/
everyonelovesaws

--receipt-handle

"AQEBa+DIuyBk4RpEBmyOKRmbDHNnRZeOdU8kWf0j4KTYqqr6wWpz9vtTABppeku8
O4TCOX0cKVMSRU7EW6i2tJAJdr8mvV9B7/VPx8cizuR0oa9wAL1jvoObp8bLC9
PlQYWc6nDXVJ3orXelekeFbZBtAuK7csOsCLIIDFEQ9U2PHF0kBCc/i/tscrcFY+
4U7Swyclg/nkugePklxumlyBj66hEAxatdqJDXYhcLiAu0PwP5p5vHElRB7hsEr+
gG9QGyXgy5fHEOl89xPgP2ki/f7wstQS1dGwDA4ceqy9qmfFJkq5/6W0AK4/
paQQ56SyQ/w+p/fOpND6M6meEloQCNFZCmORenAUcgYhnlaV4bk/emoC9s4vXG/
xIQwEPg5fIkbLeo/OXF71weYWQrIxLW/Q=="
The message with the matching receipt handle is deleted, and you can check the number of messages in the queue by looking at the ApproximateNumberOfMessages attribute:
aws sqs get-queue-attributes

--attribute-names ApproximateNumberOfMessages --queue-url

https://us-east-2.queue.amazonaws.com/111222333444/everyonelovesaws
The output should look like this:
{
     "Attributes": {
         "ApproximateNumberOfMessages": "0"
     }
}
You can see that the SQS service is really simple to use. Experiment a bit with the queue to see what happens when you add many messages and try to read from many systems at once. You can simulate many systems by simply opening several consoles in your Linux environment and run multiple AWS CLI commands in parallel.
Dead Letter Queues
When working with SQS queues, an important concept is the dead letter queue. A dead letter queue is intended for storing any messages that cannot be processed due to the content of the messages and not due to a failure of receivers. For example, say that a recipient receives the message, the message cannot be processed, and if the dead letter queue is not implemented, the message becomes visible again. Another recipient can read the message but cannot process it, and the message becomes visible again. As you can imagine, the queue would quickly fill up to the maximum of approximately 120,000 messages that can exist in a queue at the same time.
To avoid this situation, you need to implement some kind of logic into your processing engine to identify messages that error out due to the content of the message. The processor needs to delete the message from your production queue and post the same message into the dead letter queue. Once a message hits a dead letter queue, you can simply create a CloudWatch alarm for a non-empty queue. The alarm can in turn trigger an SNS notification to an incident response team so that it can take a look at the message and figure out why it was not able to be processed.
Amazon SNS
SNS is a fully managed, highly available message distribution environment that gives you the ability to simplify the way you send messages to subscribers. A number of different subscriber types can help deliver messages to massive numbers of either human or software recipients. The service supports the following subscriber protocols:
HTTP and HTTPS: Sends messages to targets via POST commands and allows for retries
Email: Sends messages to email addresses via SMTP
SMS: Sends messages to mobile phones via SMS texts
Application: Sends JSON-encoded messages to AWS ARN endpoints
SQS: Sends messages to one or more SQS queues
Lambda: Sends JSON-encoded messages to Lambda function ARN endpoints
Topics and Subscriptions
To send messages, you need to create a topic. Each topic has a unique URL created, similarly to the SQS URL used in the previous example of sending and receiving a message with SQS. Subscribers can subscribe themselves, or they can be added by a user or an application (through a role) with the permissions to manage the SNS topic. Once a topic is created and subscribers are subscribed, a publisher, represented by any service or user with permissions to publish to the SNS topic, can create a message.
The maximum size of each message sent to the SNS topic is 256 KB, which includes the message body, any metadata attributes, and the JSON formatting of the message. The message is sent out in a push-based fashion and cannot be recalled once posted due to the distribution mechanisms in place. For example, SMTP and SMS do not have a way to recall a message once it has been delivered to the recipient’s server.
The subscribers have ability to specify a filter messages based on a metadata attribute. When a client subscribes, the filtering allows the client to listen to only messages that it wants to receive. This can be very useful when subscribing different automated systems to an SNS topic so that each part of the system only receives the correct type of notification.
For example a fan-out queue design can be created, where SNS sends a message to multiple SQS queues. You can either deliver all the messages to all the queues or selectively filter the messages according to a certain attribute value. This can be very useful if you want to ensure that one or more queues receive only a certain subnet of messages.
Working with SNS Topics
Let’s look at an example of how to create an SNS topic and subscribe the SQS queue from Chapter 4, “Storing Data in AWS,” to the SNS topic and then publish a message. You can create an email or SMS subscription to your email address or phone number to test different protocols and see the differences in operation.
First, you can create a new SNS topic:
aws sns create-topic --name sqstopic
The output should look like this:
{
     "TopicArn": "arn:aws:sns:us-east-2:111222333444:sqstopic"
}
Record the TopicArn value as you will need it to grant permission in the SQS policy and to address the SNS topic.
Next, you can get the ARN for the SQS queue that you created before:
aws sqs get-queue-attributes --attribute-names QueueArn
--queue-url

https://us-east-2.queue.amazonaws.com/111222333444/everyonelovesaws
The output should look like this:
{
     "Attributes": {
         "QueueArn": "arn:aws:sqs:us-east-2:111222333444:everyonelo
vesaws"
     }
}
Now you can use both ARNs to edit the following policy and replace arn:aws:sqs:us-east-2: 111222333444:everyonelovesaws with your SQS ARN and arn:aws:sns:us-east-2: 111222333444:sqstopic with your SNS ARN:
{ "Policy" : "{"Statement": [{ "Effect": "Allow",
"Principal": {"AWS": "*"},"Action": "SQS:SendMessage
","Resource": "arn:aws:sqs:us-east-2:111222333444:everyone
lovesaws","Condition": {"ArnEquals": {"aws:SourceArn": "
arn:aws:sns:us-east-2:111222333444:sqstopic"}}}]}"}
Save the policy to the sqspolicy.json file. This policy statement, which needs to be formatted exactly, allows the SNS topic to send messages to the SQS queue and will occupy a single line in the sqspolicy.json file.
Next, you apply this policy to the SQS queue:
aws sqs set-queue-attributes --queue-url

https://s-east-2.queue.amazonaws.com/111222333444/
everyonelovesaws

--attributes file://sqspolicy.json
Now you are ready to subscribe the queue to the SNS topic. If you want to subscribe your email instead, you can choose email as the protocol and your email address as the notification endpoint. The same goes for SMS:
aws sns subscribe --topic-arn

arn:aws:sns:us-east-2:111222333444:sqstopic

--protocol sqs --notification-endpoint

arn:aws:sqs:us-east-2:111222333444:everyonelovesaws
The result, which should look like this, indicates that the subscription has been created:
{

     "SubscriptionArn": "arn:aws:sns:us-east-2:111222333444:
sqstopic:49fea96b-87c5-4720-9d71-a8dce33dc08c"
}
An email or SMS subscription needs to be confirmed, but an SQS subscription is created without confirmation.
Now all that you need to do is publish a message:
aws sns publish --topic-arn arn:aws:sns:us-east-2:111222333444:
sqstopic

--message "My first SNS message"
After publishing, you should receive a message ID:
{
     "MessageId": "3c8bf044-c7fa-52c4-8aeb-a5ac0c805ab4"
}
You can now check whether the message has been delivered to the SQS queue by checking the number of messages.
aws sqs get-queue-attributes --attribute-names

ApproximateNumberOfMessages --queue-url

https://us-east-2.queue.amazonaws.com/111222333444/everyonelovesaws
If the number is still 0, try sending another message with the previous command or even sending a few messages. Even if the subscription is confirmed, it might take a minute for everything to go into effect. SNS does not retry the message delivery to SQS; it is essentially “fire and forget.”
The output should now show a message in the queue:
{

     "Attributes": {
          "ApproximateNumberOfMessages": "1"
     }

}
Now you can receive the message from the SQS queue:
aws sqs receive-message --queue-url

https://us-east-2.queue.amazonaws.com/111222333444/everyonelovesaws
The content should look much different than before since the SMS message is JSON formatted and includes an SNS signature and an unsubscribe URL, as demonstrated in Example 5-8. This can be used to cancel your subscription if you subscribed via SMS or email.
Example 5-8 The Response of the sqs receive-message Command Showing the Message Formatted in JSON as Would Be Expected Since It Was Delivered to the Queue Through SNS
{
     "Messages": [
         {
             "Body": "{
 "Type" : "Notification",
 "MessageId" : "86cbb
f6d-7c55-5af1-8350-ea85aee60365",
 "TopicArn" : "arn:aws:sns:us-east-2:
111222333444:sqstopic",
 "Message" : "My first SNS message",

"Timestamp" : "2019-09-03T20:43:31.531Z",
 "SignatureVersion" : "1",

 "Signature" : "q7rKIF8piO+Q8pnl7JKCFZg/0kvjLSHQTK1diLfbxS6eoJyxQtJPMjR8FQ
e9Cx/aJ6GqfPTsevwAwPBMWo8i+rejjKbkXvp8mTotLpa+mzHokzWlq8Npyjyz73vISsY1X8IeTASoeU+
imD6+H6vAgE5xXBNLAl8Bh9Kt3mMzKdC3eceQKWOJNTbf3RSuEIwhnzbbZ9Q2QRCRg/5J7bL6eg1atY0D5/
jxUyIdnpCDxAxHL/9fookjn4bJRSFc/VeGQT3LfjAiSMUrTteSf+O8Dk7M7znKZgs9XOcbcbg1Poa96nY9Zi
PxRvJyDHWNahIE1Mq14A2DQg9lC4UAUrKZPg==",
 "SigningCertURL" : "https://
sns.us-east-2.amazonaws.com/SimpleNotificationService-6aad65c2f9911b05cd53ef
da11f913f9.pem",
 "UnsubscribeURL" : "https://sns.us-east-2.amazonaws.com/
?Action=Unsubscribe&SubscriptionArn=arn:aws:sns:us-east-2:111222333444:sqstopic:
49fea96b-87c5-4720-9d71-a8dce33dc08c"
}",

            "ReceiptHandle": "AQEBrk+x+zvFISEzz4XuidS3F/ZzfglN6QA06Hz5SvUIwAJyQic
J0egnxyLEaQCNWqQHlrgbEi9ai7XOnRS7Dq2BH1ThfxzBCqS1qtI7kjS00Fva4g1flw1OQ3FcyZhuaw2Wu
WkVKrFcFuQjnsj/qaMa8vij3QXL4UjT/45wLiU90VbtoRCNW3iWMhmb9GvgAfhKRoO97z650LeSWgg47EqzJ
VLvndpxg5eNLqR3ckgOKTzEo3hAO6PEtOo7aOcy/Rh+AGK6Qkl37lZGkb/rdSjGIqtKUDd/7nIt
WgxaXIc3+g0LAZLak+5lTgeFcxmyG9rjfPmfjss4mFm7DwGOWzbVYnQcftDsvcdX5i2y/
tRXv7dWrrapS0kdRdKv9emRc1Pm0WFwheXbWYVOTR0gc3IhcA==",

            "MD5OfBody": "e32b6a9e6ee10391388ed97b80cd022c",

            "MessageId": "1f9b9a72-7316-4fef-a38a-970eda015f89"
        }
    ]
}
This example has demonstrated how to use SNS and SQS. By subscribing multiple SQS queues, you would essentially create a fan-out queue.
Exam Preparation Tasks
To prepare for the exam, use this section to review the topics covered and the key aspects that will allow you to gain the knowledge required to pass the exam. To gain the necessary knowledge, complete the exercises, examples, and questions in this section in combination with Chapter 9, “Final Preparation,” and the exam simulation questions in the Pearson Test Prep Software Online.
Review All Key Topics
Review the most important topics in this chapter, noted with the Key Topics icon in the outer margin of the page. Table 5-2 lists these key topics and the page number on which each is found.
Table 5-2 Key Topics for Chapter 5
Key Topic Element |
Description |
Page Number |
Tutorial |
Creating, writing, and testing a Lambda function |
153 |
Node.js Lambda function |
154 |
|
Lambda execution policy |
158 |
|
Lambda IAM policy |
159 |
|
Lambda resource policy |
159 |
|
Step Functions state machine example |
163 |
|
Tutorial |
Using SQS in the CLI |
167 |
Tutorial |
Using SNS in the CLI |
172 |
Define Key Terms
Define the following key terms from this chapter and check your answers in the glossary:
Q&A
The answers to these questions appear in Appendix A. For more practice with exam format questions, use the Pearson Test Prep Software Online.
1. Complete this sentence: To allow a Lambda function to access S3, you need to use a(n) _______.
2. When a Lambda function is invoked twice in a row, how many execution environments are created?
3. When a Lambda function is invoked multiple times in parallel, how many execution environments are created?
4. True or false: You cannot manually invoke a Lambda function.
5. What markup type and language are used in Step Functions?
6. In SWF, who is authorized to run an activity?
7. True or false: SQS is designed to deliver a limited throughput of 10,000 messages per second when using standard queues.
8. True or false: In SQS, you need to know the SQS queue ARN to be able to send a message.
9. When an SNS message is posted to an SQS queue, what formatting is used?
10. Three SQS queues subscribed to an SNS queue are also called a(n) ______.