Chapter 6
AWS Development Tools
This chapter covers the following subjects:
DevOps Basics: This section lays out the basics of DevOps with a focus on CI/CD as the software delivery methodology. This topic is important for proper understanding of the AWS CI/CD tools.
Developing Code in AWS Cloud9: This section provides coverage of Cloud9—a browser-based integrated development environment (IDE).
Storing Code in AWS CodeCommit: This section provides an overview of the CodeCommit repository service in AWS and lays out the basics of creating and using a CodeCommit repository.
Using AWS CodeBuild to Build Artifacts: This section looks at building artifacts with the CodeBuild service.
Using AWS CodeDeploy to Deploy Applications: This section focuses on deploying packages using the CodeBuild service in AWS.
Building a CI/CD Pipeline with AWS CodePipeline: This section of this chapter ties all of the tools together with the CodePipeline service, which provides you with the ability to build a custom CI/CD pipeline and automatically take care of transitioning data from one service to another.
This chapter covers content important to the following exam domain:
Domain 1: Deployment
1.1 Deploy written code in AWS using existing CI/CD pipelines, processes, and patterns.
To ease the development of applications and allow you to fully utilize the potential of the cloud, AWS offers a set of development tools that allow you to efficiently develop, store, build, and deploy code as well as orchestrate the process of transitioning the code to artifacts and the artifacts to deployments. The goal of this chapter is to provide a basic understanding of the DevOps process and an overview of the capabilities offered by the AWS development tools.
“Do I Know This Already?” Quiz
The “Do I Know This Already?” quiz allows you to assess whether you should read the entire chapter. Table 6-1 lists the major headings in this chapter and the “Do I Know This Already?” quiz questions covering the material in those headings so you can assess your knowledge of these specific areas. The answers to the “Do I Know This Already?” quiz appear in Appendix A, “Answers to the ‘Do I Know This Already?’ Quizzes and Q&A Sections.”
Table 6-1 “Do I Know This Already?” Foundation Topics Section-to-Question Mapping
Foundations Topics Section |
Questions |
Developing Code in AWS Cloud9 |
4 |
Storing Code in AWS CodeCommit |
3, 10 |
Using AWS CodeBuild to Build Artifacts |
7, 11 |
Using AWS CodeDeploy to Deploy Applications |
6, 9 |
Building a CI/CD Pipeline with AWS CodePipeline |
1, 2, 5, 8 |
1. Which AWS service allows you to create a fully automated CI/CD toolchain that can be triggered simply with a commit to a repository?
CodeBuild
CodeCommit
CodeDeploy
CodePipeline
2. What factor would make you choose continuous delivery over continuous deployment?
Ownership of production
Speed of delivery
Resource consumption
Size of packages
3. Which command would you use to upload newly committed changes to the CodeCommit repository?
git push
aws codecommit push
aws codecommit upload
git upload
4. Which of the following is a cloud-based IDE and requires the user to run the environment in EC2?
CI/CD
Cloud9
CodeDeploy
CloudCode
5. What are the stages of continuous integration?
Code and test
Plan, code, and build
Plan, code, build, and test
Plan, code, build, test, and deploy to staging
6. What is the name of the specification document used by CodeDeploy?
codedeploy.json
buildspec.yml
appspec.yml
appspec.json
codedeploy.yml
7. What is the name of the specification document used by CodeBuild?
buildspec.json
buildspec.yml
appspec.yml
appspec.json
codebuild.yml
8. Which of the following is not true with pipelines?
Stages can have parallel execution.
Transitions can be encrypted.
Stages can have sequential execution.
Stages cannot include manual steps.
9. What needs to be done on the EC2 side when deploying code to an EC2 instance with CodeDeploy? (Choose two.)
The CodeDeploy agent needs to be installed.
A role with the permissions to access CodeDeploy must be assigned to the EC2 instance.
A role with the permissions to access CodeBuild must be assigned to the EC2 instance.
The incoming port 443 needs to be opened for the agent to communicate with the service.
A role with the permissions to access the package repository must be assigned to the EC2 instance.
10. What is the biggest object size that can be stored to CodeCommit?
10 GB (but as a multipart file)
5 GB
2 GB
Unlimited
11. What kind of action(s) would be suitable for the AfterInstall stage of a CodeBuild process?
Installation of prerequisites
Temporary file cleanup and file permission changes
Starting of the application
Stopping of the application
Foundation Topics
DevOps Basics
When discussing developing, you need to look at the methodologies that exist to develop software in an efficient and effective manner. There are a number of ways to develop software, with different methodologies determining the quality, quantity, and velocity of software delivery that can be achieved. This section focuses on the DevOps approach to delivering software, but before diving in, you need to take a quick look at the history of software development.
Waterfall
Software development essentially started with the Waterfall methodology that was developed in the 1960s to unify the way code was written, tested, and deployed. The Waterfall methodology separates the development process into several stages, with each stage needing to be complete before the next stage starts. The stages are staggered like a terrace waterfall, where each terrace basin fills before starting to allow water to flow to the terrace below it, as illustrated in Figure 6-1.

Figure 6-1 The Waterfall Approach
Although the Waterfall approach is founded on a need for unification of the development process, there are many problems with this methodology. The biggest problem is probably the need for each stage to be fully completed before the next stage is started. In addition, the teams involved are usually completely separated into designers and architects, developers, testers, and sysops. Each team must do a lot of documentation and hand it over to the next team to handle the application. This is time-consuming and diverts resources from the task at hand.
Agile
There have been many attempts as early as the 1970s to improve upon Waterfall with an iterative approach to software development, but major breakthroughs were only starting to be introduced in the 1990s with methodologies such as rapid application development, unified process, dynamic systems development method, and scrum. In 2001 a group of developers sat down to discuss these new approaches and published the Manifesto for Agile Software Development, which includes the most effective ideas implemented in the 1990s and lays out an organizational framework for developing software. In short, the Agile Manifesto outlines the following aspects of software development:
Iterative and evolutionary development: Develop your application in small pieces that can be quickly tested, deployed, and improved, if required. Application components need to be independent so any changes to one component will not affect any other component. This is essentially the basis of microservices-oriented development.
Direct communication: Team members should facilitate direct communication methods, either face-to-face or through chat channels. Communication needs to be frequent, and anyone should be able to address anyone else. A customer representative on the team should act as a direct contact to the end user.
Short feedback cycles: Any software delivered to test, QA, and production should have a fast feedback response cycle to allow for improvements to be built in a rapid manner.
Focus on quality: The software delivery success metrics should be tied to customer satisfaction rather than the number of lines written or the amount of time spent developing.
While Agile practices define processes that allow you to run your software development business in a manner that is conducive to responsive, rapid, and high-quality development of software, Agile sets out guidelines but lacks a more concrete definition of what practices to implement to achieve agility.
DevOps
DevOps aligns almost perfectly with the goals set out by the Agile Manifesto; however, DevOps defines the software development practices you need to use to achieve those goals and focuses on the culture a business needs to adopt to be able to implement these practices. The term DevOps represents the merging of the development and operations roles, requiring teams to be composed with a cross-functional approach. The power of the DevOps team is that it has the ability to take ownership of an application from conception to design; integration, testing, and delivery; monitoring; and, eventually, decommissioning.
DevOps defines a software development life cycle as consisting of several stages, as illustrated in Figure 6-2 and described in the list that follows:
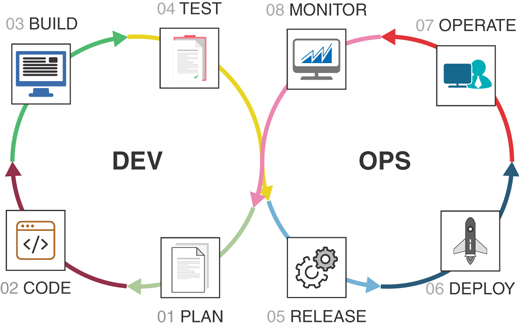
Figure 6-2 The DevOps Approach
Plan: Define the application features and their “stories” that represent the way the application is used. A typical story has the following pattern: As a [role or system], I want to [do something] so that I can [achieve some goal]. The stories are developed in tasks, where a task represents the smallest unit of work required to build a functioning object that will fulfill part or all of the requirements in the story.
Code: The code stage involves writing the code and storing it on a repository.
Build: The build stage takes the code from the repository and builds usable artifacts.
Test: The test stage involves functional and integration testing of the artifacts.
Release: The release stage takes tested and verified artifacts and builds and posts packages on a package repository.
Deploy: The deploy stage involves deploying the packages.
Operate: The operate stage begins with the team ensuring that the application operates in an efficient and performant manner.
Monitor: Once the application is in operation, continuous monitoring and other types of feedback can be looped into the planning stage to develop more features and stories to improve existing components, thus starting the DevOps cycle all over again.
In the DevOps approach, the toolsets used in development are custom built and not all-in-one systems. DevOps refers to toolchains instead of development tools; a toolchain involves a set of tools, each of which is used to do its own job in the most efficient manner, and the work is sent to the next tool at the appropriate time.
CI/CD in the Cloud
One of the software engineering approaches that best fits into the DevOps model is the continuous integration/continuous delivery (or deployment) (CI/CD) approach. CI/CD is a software development and delivery practice that makes the process of writing and delivering software more efficient. CI/CD introduces the practice of using a set of tools that focus on writing, building, and delivering software with increased velocity and efficiency. The most important aspect of CI/CD is that the code is written, tested, and deployed in (very) small increments, in a straightforward and repeatable manner. CI/CD relies heavily on automation and focuses on the use of tools to achieve the goal. Figure 6-3 illustrates the complementary nature of Agile, DevOps, and CI/CD.
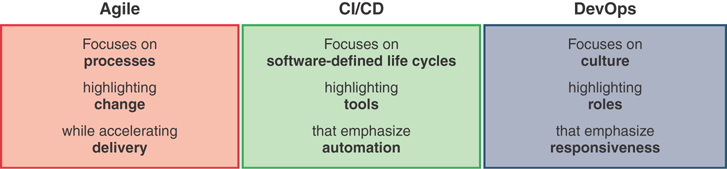
Figure 6-3 Agile Versus CI/CD Versus DevOps
CI/CD can roughly be broken down into two stages:
CI: Continuous integration—the process of continuously writing and improving code
CD: Continuous delivery or continuous deployment—the process of either delivering code to the repository or installing it to production in an automated and repeatable manner
Continuous Integration
Continuous integration is essentially the process of developing code and committing it to the repository. All code in a continuous integration process must be fed into a system that performs functional testing of the code. Feedback from the functional testing is then returned to the developers so that any issues and any improvements evident from the functional testing can be implemented quickly.
CI can be a standalone process and includes the use of the following tools:
Project management: A tool for developing stories and creating tasks
IDE: A tool for developing the code
Repository: A storage environment for the code, preferably a versioning repository that keeps all the versions of the code being committed discoverable
Functional testing: Usually referred to as “the CI server,” a tool that can use the code to perform functional testing and, if required, also build the code and create artifacts
Reporting: A tool that reports the outcome of testing and that can be integrated with the project management tool
Continuous Delivery
Continuous delivery builds on the principles defined in the CI process and allows you to push code or artifacts through integration, load, quality assurance, user acceptance testing, and so on and create packages that allow the application to be deployed. The packages are posted to a package repository and, in some cases, automated notifications can be sent to clients to indicate that a new package is available.
Continuous delivery is useful when developing software that is not maintained in production by the DevOps team. Essentially this is any kind of software that end users can install and manage themselves. In continuous delivery, you would usually find the following tools:
Artifact repository: A storage environment for artifacts that have passed functional testing.
Testing toolchain: A set of tools that can perform integration testing, where the artifacts are deployed and tested in a coordinated manner to simulate not just the functionality of a single artifact but how the artifact interacts with other servers or mocking servers. The tools in the testing toolchain can also perform different types of advanced tests, such as distributed tracing, load testing, and vulnerability checks.
Mocking server: A tool that responds with a typical response for a certain type of input data. When you need to test production-grade features without interacting with the production, the mocking server can simulate a response from production.
Package manager: A tool that creates packages from the artifacts that passed testing.
Package repository: A storage environment that holds deployable packages.
Reporting/notification service: A tool that reports the status of the CD process and notifies the end users of package availability.
Continuous Deployment
Continuous deployment builds on the continuous delivery process and allows the automation of the delivery of packages to the production environment. Essentially, continuous deployment is the same as continuous delivery but adds an automated step after the package has been posted to the repository to install the new version of the package to production. The process also needs to include an automated monitoring process that can determine if the application deployment was successful and can trigger a rollback if required.
Continuous Reaction
It has been proposed that CI/CD is an imperfect system, as far as the DevOps methodology is concerned, and several prominent developers have proposed that the term continuous reaction (CR) be introduced to the CI/CD stack. With CR, the focus is on the state of the application, from deployment to decommissioning, which means you need to implement a monitoring and testing system that can discover any issues on the running application and provide feedback in the CI process. Some say that this is already a part of the continuous delivery process, and if the deliveries are as frequent as multiple times per day, the CR process does not improve upon CI/CD.
However, many applications are deployed and maintained in a deployed state with the same version for much longer—for weeks or even months sometimes—without an upgrade. The CR process would help to close the gap on slow versioning and allow for implementation of security checking as an automated process in production that would feed its findings into the CI/CD process, essentially allowing the CI/CD/CR stack to lift the DevOps practice into what is defined as a DevSecOps practice—involving the development, operations, and the security teams building even more reliable and secure applications.
AWS provides tools that allow you to cover most of the steps of DevOps and CI/CD:
Cloud9: A cloud-based IDE where you can develop code in a collaborative manner
CodeCommit: A highly available Git-compatible code repository with unlimited capacity
CodeBuild: A pay-as-you-go code compilation service
CodeDeploy: An automated tool for deploying code to operating systems
CodePipeline: A CI/CD toolchain orchestration tool
CodeStar: An all-in-one cloud-based tool for building applications in a CI/CD-oriented manner
Developing Code in AWS Cloud9
Developing code sometimes requires you to be able to access a feature-rich set of tools, development kits, libraries, and code execution tools. The usual approach to developing starts with the relatively tedious tasks of installing the integrated development environment (IDE); downloading and installing all the required compliers, libraries, SDKs, and so on; and then testing to determine whether the environment is working as expected.
With AWS Cloud9, you get all the features that allow you to write, run, and debug your code while not being required to install any of the typical prerequisites. Cloud9 is a browser-based IDE with, among others, the following important features:
A clean interface with multiple panels and all the typical features of a modern IDE, including auto-indentation, code hints, autocomplete, and a fully customizable view
Built-in ability to run more than 40 programming languages
Ability to install any programming language interpreters that are not already present
A built-in integrated debugger that allows for setting breakpoints, stepping through code, and inspecting variables for a variety of programming languages
Full integration with the Lambda service and the serverless application model (SAM), with the ability to test run Lambda functions on the local environment
Ability to run the environment in the cloud or on premises
Built-in terminal to execute common commands
Built-in collaboration tools and chat
Creating a Cloud9 Environment
Creating and using a Cloud9 environment is extremely easy. The following steps walk through the process of logging in to the AWS Management Console and navigating to the Cloud9 section:
Step 1.To create an environment, go to the Cloud9 management console and click the Create environment button, as shown in Figure 6-4.

Figure 6-4 AWS Cloud9 Welcome Screen
Step 2.Give the environment a name and a description, as illustrated in Figure 6-5, and then click Next step.

Figure 6-5 Creating a Cloud9 Environment
Step 3.Configure the settings in the screen shown in Figure 6-6. You can either choose to run the environment in the cloud on an EC2 instance of your liking or connect to a server on premises over SSH. The on-premises server needs to have a publicly reachable SSH address that you can log in to. The service will always connect to the on-premises server when a user uses Cloud9 in the browser. For the purposes of this example, leave all the settings at the defaults to create an Amazon Linux t2.micro server in the default VPC.

Figure 6-6 Configuring Settings in a Cloud9 Environment
In the review window shown in Figure 6-7, you can see the overview and some AWS recommended best practices that you should review before clicking Create environment.
Step 4.Once the creation starts, navigate to the EC2 section, and you should see a new instance being created, as shown in Figure 6-8.
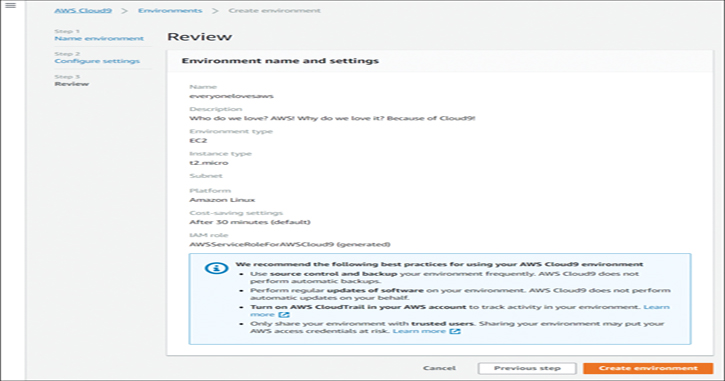
Figure 6-7 Reviewing the Creation of a Cloud9 Environment
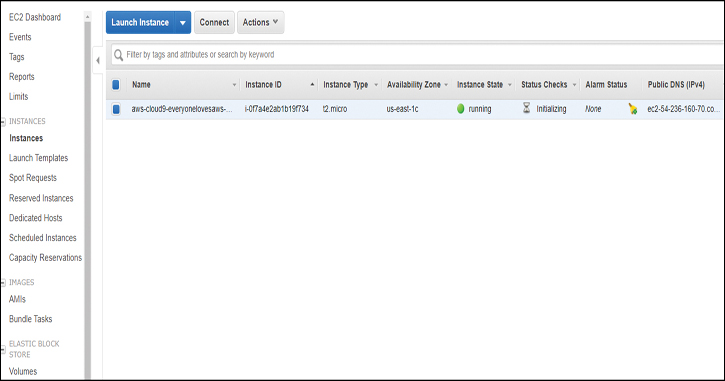
Figure 6-8 EC2 Instance Belonging to the Cloud9 Environment
Creating the environment takes less than a minute, and when it is done, you are presented with the following, as shown in Figure 6-9:
On the left you can see a directory structure of the environment.
The top middle shows a content browser, and the bottom middle shows a command-line interface.
On the right, you can choose between collaboration with chat, the outline, the AWS resources, and the debugger.

Figure 6-9 The Cloud9 Environment IDE Welcome Screen
Step 5.Notice that the command line is a standard Linux command line. In this case, you need to clone a repository to see the operation of the Cloud9 interface, as shown in Figure 6-10. You can use standard Git commands because Git is preinstalled.
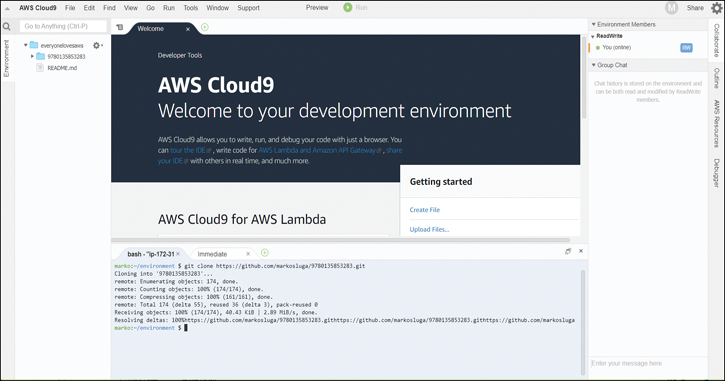
Figure 6-10 Cloning a Repository in the Cloud9 Environment IDE
Step 6.After you pull the code, you can browse through the structure on the left and run any needed tests by clicking Run and selecting a programming language to run in, as shown in Figure 6-11.

Figure 6-11 Testing Code in the Cloud9 Environment IDE
You can also share your environment with other users by selecting Window > Share, as shown in Figure 6-12.
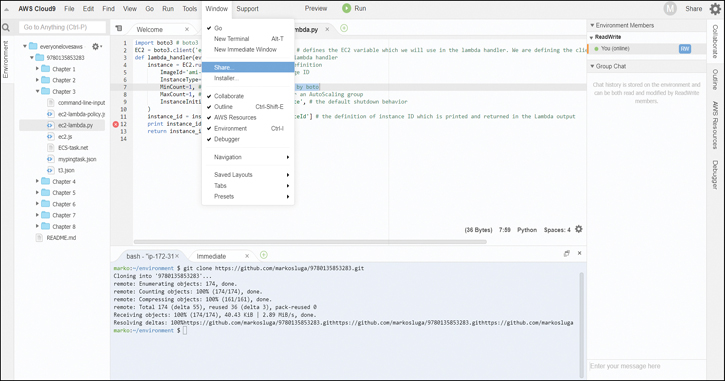
Figure 6-12 Sharing the Cloud9 Environment
This example shows sharing with the dev-demo user. Make sure that the dev-demo user or any other user you share the environment with has at least the privileges specified in the AWSCloud9EnvironmentMember AWS managed IAM policy, as demonstrated in Figure 6-13.
Step 7.Log in with the dev-demo user, and you can see the environment shared with this user (see Figure 6-14).
Step 8.Click Open IDE, and the user dev-demo now has the ability to use the environment independently of any other users. dev-demo has now selected a piece of code, as shown in Figure 6-15.

Figure 6-13 Adding a User to the Cloud9 Environment

Figure 6-14 Browsing to Shared Environments in the Cloud9 IDE

Figure 6-15 Collaborating in the Cloud9 Environment IDE
dev-demo can also collaborate. For example, in Figure 6-15, you can see that dev-demo marked some text, and now the other users can see the text that was marked. This works for any number of users, with each user assigned a color. The users can also collaborate in the chat window on the right, as shown in Figure 6-16.
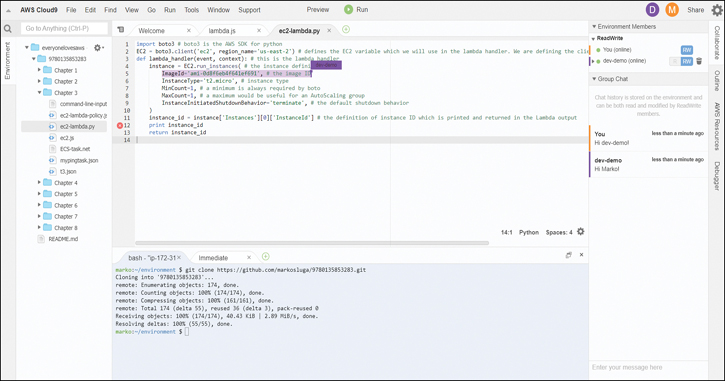
Figure 6-16 Collaborating in the Cloud9 Environment IDE: Marking Text
Step 9.Notice again that the command line is a standard Linux command line, and you can run any Linux command. The example in Figure 6-17 shows the top command being run to see the resource usage of the server.

Figure 6-17 Running Linux Commands in the Cloud9 Environment IDE
Because this is a standard Linux console, you can also use the AWS command line, as demonstrated in Figure 6-18.

Figure 6-18 Using the AWS CLI in the Cloud9 Environment IDE
Step 10. By clicking on AWS Resources on the right, you can create a Lambda function straight out of the Cloud9 interface, as shown in Figure 6-19.

Figure 6-19 Creating a Lambda Function in the Cloud9 Environment IDE
Step 11. Define a runtime and a size for the Lambda function, and the interface creates everything needed to develop it. You also have an option to choose from many prebuilt Lambda functions for use in your application, as shown in Figure 6-20.
When the sample application is created, you see a directory structure environment created for the Lambda function, as shown in Figure 6-21.
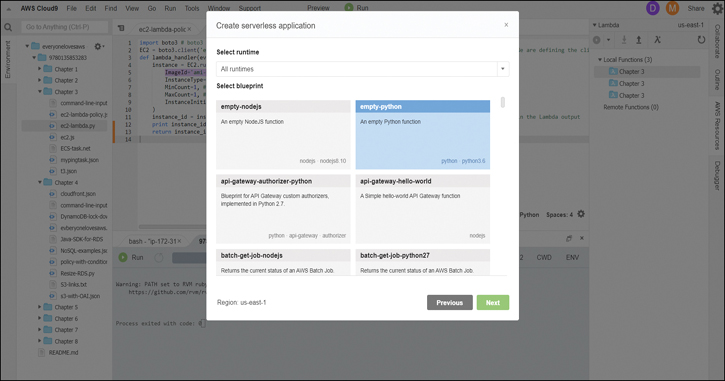
Figure 6-20 Configuring the Lambda Function in the Cloud9 Environment IDE

Figure 6-21 Writing Code for a Lambda Function in the Cloud9 Environment IDE
Step 12. To verify that the Lambda function was also created, you can go to the Management Console and navigate to the Lambda section, as shown in Figure 6-22.
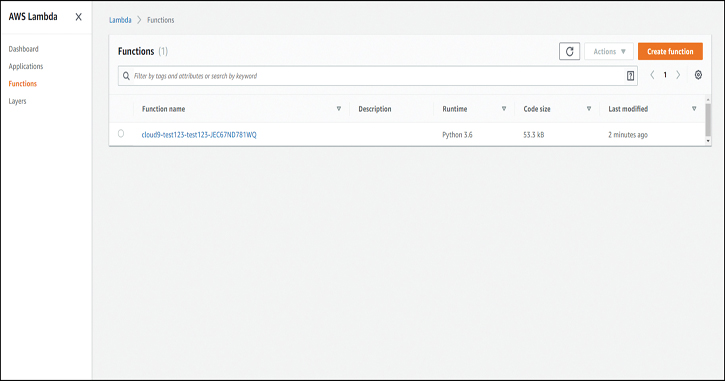
Figure 6-22 The Lambda Function Created by Cloud9
Step 13. When you are done, you can simply delete the Cloud9 environment; however, the Lambda function created in this example persists. If you want to clean up, you need to delete the Lambda function separately from the Cloud9 environment.
Storing Code in AWS CodeCommit
After you have developed code, you need to store it somewhere. AWS CodeCommit is a Git-compatible versioning code repository that is provided as a managed service. This means that the repository has unlimited storage and is always highly available. The storage back end of CodeCommit sits on S3 and is thus backed by the same durability as S3. At the time of writing, the service also has a free tier for up to 5 users, 50 GB of storage, and 10,000 Git requests per month. Beyond the free tier, the current cost is $1 per user per month, which includes an additional 10 GB of storage and 2000 Git requests for that user. CodeCommit does have some limitations; for example, the maximum file size in CodeCommit is limited to 2 GB, and the maximum commit object, tag, or tree is limited to 6 MB, but these limitations are negligible. All these specifications and limitations are subject to change over time as AWS improves and extends the functionality of the service.
Using CodeCommit with Git
To start working with CodeCommit, you first need to create a group that contains your users and has permissions to push code to the repository. You can use the built-in policy AWSCodeCommitPowerUser, which lets a user both read and commit to the repository but does not allow deletion. For this purpose, create a group called CodeCommitPowerUsers:
aws iam create-group --group-name CodeCommitPowerUsers
Next, you attach the policy to the group. You can find the policy ARN in the Management Console or by inspecting the policy details by name. For simplicity, include the ARN in the command:
aws iam attach-group-policy --policy-arn arn:aws:iam::aws:policy/
AWSCodeCommitPowerUser --group-name CodeCommitPowerUsers
Next, add your user to the group:
aws iam add-user-to-group --user-name marko --group-name
CodeCommitPowerUsers
Now it is time to create the repository. Use the AWS CodeCommit create-repository command and specify a repository name and description:
aws codecommit create-repository --repository-name everyonelovesaws
--repository-description "We Love AWS"
You should now see output like that shown in Example 6-1. Jot down the cloneUrlHttp value because you will use it later in this example.
Example 6-1 Output of the create-repository Command
{
    "repositoryMetadata": {
        "repositoryName": "everyonelovesaws",
        "cloneUrlSsh": "ssh://git-codecommit.us-east-2.amazonaws.com/v1/repos/
everyonelovesaws",
        "lastModifiedDate": 1568408112.681,
        "repositoryDescription": "We Love AWS",
        "cloneUrlHttp": "https://git-codecommit.us-east-2.amazonaws.com/v1/repos/
everyonelovesaws",
        "creationDate": 1568408112.681,
        "repositoryId": "279a0e48-fe9e-41f3-99ee-2ec09647c518",
        "Arn": "arn:aws:codecommit:us-east-2:111222333444:everyonelovesaws",
        "accountId": "111222333444"
    }
}
CodeCommit repositories are private by default, and either each user needs to have Git credentials generated or you can use the CodeCommit credential helper to pass through the credentials from the same credentials file the AWS CLI uses. To set up the credential helper that will automate this process, you need to run the following two commands:
git config --global credential.helper '!aws codecommit
credential-helper $@'

git config --global credential.UseHttpPath true
Next, you will use Git to clone the repository. When not using the credential helper, you are prompted for credentials; otherwise, the command succeeds and clones the repository:
git clone https://git-codecommit.us-east-2.amazonaws.com/v1/repos/
everyonelovesaws
Next, you enter the repository and create an empty file named text.txt:
cd everyonelovesaws

touch test.txt
Now add the newly created file(s), commit it, and push the commit:
git add .

git commit -m "Add test file"
You should now see the following output:
1 file changed, 1 insertion(+)

 create mode 100644 test.txt
Finally, push the content to the repository:
git push
After pushing the file, you should see the output shown in Example 6-2.
Example 6-2 Output of the git push Command
Counting objects: 3, done.
Writing objects: 100% (3/3), 245 bytes | 245.00 KiB/s, done.
Total 3 (delta 0), reused 0 (delta 0)
To https://git-codecommit.us-east-2.amazonaws.com/v1/repos/everyonelovesaws
 * [new branch]      master -> master
This shows that the repository is created and that the file has been pushed to the repository. In the same way, you can also migrate your existing repository from any other source to CodeCommit: Simply clone the repository to your computer, copy or move the files from your repository directory to the directory created by CodeCommit, and then add, commit, and push the newly created files and directories to the CodeCommit repository.
Using AWS CodeBuild to Build Artifacts
Now that you have stored your code to a repository, you can continue the CI/CD process by automating the way code is transformed into artifacts so testing can begin. The AWS CodeBuild service allows you to create builds on the fly. With CodeBuild, you pay only for the resources consumed by the build process and never pay for any idling resources. This can be a great benefit to teams that develop on a 9-to-5 basis as they can save a lot of resources during off-hours.
The CodeBuild service uses a very simple approach to defining the builds. Basically, you need to provide a buildspec.yml file in your code repository to specify which commands and actions need to be initiated during the build process. You can install your build tool, clone repositories, initiate builds with different tools, and, of course, emit the artifacts to any repository you like.
The flexibility provided with CodeBuild means that you can quickly and easily migrate any of your current build servers that run 24/7 into a service platform that can perform as many builds in parallel as required; you consume resources only when a build is initiated. The CodeBuild service can also be automatically triggered from the CodeCommit or other repositories whenever a push delivers new code to a repository.
Automating the Build Process with CodeBuild
In this section, you will create a CodeBuild project and source the code from the CodeCommit repository you created earlier. You will output the build artifacts into an S3 bucket. Start by creating an output S3 bucket in the AWS CLI:
aws s3api create-bucket

--bucket everyonelovesaws-artifacts

--region us-east-2

--create-bucket-configuration LocationConstraint=us-east-2
Next, you need to create a service role in IAM. For this purpose, you can use the IAM policy in Example 6-3 to provide the correct level of access to the CodeBuild service.
Example 6-3 CodeBuild IAM Role Policy
{
  "Version": "2012-10-17",
  "Statement": [
    {
      "Sid": "CloudWatchLogsPolicy",
      "Effect": "Allow",
      "Action": [
        "logs:CreateLogGroup",
        "logs:CreateLogStream",
        "logs:PutLogEvents"
      ],
      "Resource": [
        "*"
      ]
    },
    {
      "Sid": "CodeCommitPolicy",
      "Effect": "Allow",
      "Action": [
        "codecommit:GitPull"
      ],
      "Resource": [
        "*"
      ]
    },
    {
      "Sid": "S3GetObjectPolicy",
      "Effect": "Allow",
      "Action": [
        "s3:GetObject",
        "s3:GetObjectVersion"
      ],
      "Resource": [
        "*"
      ]
    },
    {
      "Sid": "S3PutObjectPolicy",
      "Effect": "Allow",
      "Action": [
        "s3:PutObject"
      ],
      "Resource": [
         "*"
       ]
    },
    {
      "Sid": "ECRPullPolicy",
      "Effect": "Allow",
      "Action": [
        "ecr:BatchCheckLayerAvailability",
        "ecr:GetDownloadUrlForLayer",
        "ecr:BatchGetImage"
      ],
      "Resource": [
        "*"
      ]
    },
    {
      "Sid": "ECRAuthPolicy",
      "Effect": "Allow",
      "Action": [
        "ecr:GetAuthorizationToken"
      ],
      "Resource": [
        "*"
      ]
    },
    {
      "Sid": "S3BucketIdentity",
      "Effect": "Allow",
      "Action": [
        "s3:GetBucketAcl",
        "s3:GetBucketLocation"
      ],
      "Resource":
        "*"
    }
  ]
}
Save the policy as codebuild-policy.json and run the following command to create a role:
aws iam create-role --role-name CodeBuildRole --assume-role-
policy-document file://codebuild-policy.json
Now you are ready to create a new CodeBuild project. Use the file in Example 6-4, which defines the source as the everyonelovesaws CodeCommit repository, and set the target as the everyonelovesaws-artifacts bucket created earlier. The configuration also specifies the CodeBuildRole role to use with this project.
Example 6-4 CodeBuild Specification for the Project
{
    "name": "eveeryonelovesaws-codebuild",
    "source": {
        "type": "CODECOMMIT",
        "location": "everyonelovesaws"
    },
    "artifacts": {
        "type": "S3",
        "location": "everyonelovesaws-artifacts"
    },
    "environment": {
        "type": "LINUX_CONTAINER",
        "image": "aws/codebuild/standard:1.0",
        "computeType": "BUILD_GENERAL1_SMALL"
    },
    "serviceRole": "CodeBuildRole"
}
Save this document as project.json and run the following command:
aws codebuild create-project --cli-input-json file://project.json
The output of the command should look like the output shown in Example 6-5.
Example 6-5 Output of the CodeBuild project Command
{
    "project": {
    "timeoutInMinutes": 60,
    "name": "eveeryonelovesaws-codebuild",
    "serviceRole": "arn:aws:iam::111222333444:role/CodeBuildRole",
    "created": 1568411589.662,
    "artifacts": {
        "packaging": "NONE",
        "name": "eveeryonelovesaws-codebuild",
        "namespaceType": "NONE",
        "encryptionDisabled": false,
        "location": "everyonelovesaws-artifacts",
        "type": "S3"
    },
    "lastModified": 1568411589.662,
    "cache": {
        "type": "NO_CACHE"
    },
    "environment": {
        "computeType": "BUILD_GENERAL1_SMALL",
        "imagePullCredentialsType": "CODEBUILD",
        "privilegedMode": false,
        "image": "aws/codebuild/standard:1.0",
        "environmentVariables": [],
        "type": "LINUX_CONTAINER"
    },
    "source": {
        "insecureSsl": false,
        "type": "CODECOMMIT",
        "location": "everyonelovesaws"
    },
    "queuedTimeoutInMinutes": 480,
    "badge": {
        "badgeEnabled": false
    },
    "encryptionKey": "arn:aws:kms:us-east-2:111222333444:alias/aws/s3",
    "arn": "arn:aws:codebuild:us-east-2:111222333444:project/eveeryonelovesa
ws-codebuild"
    }
}
Next, you need to create a buildspec.yml file in the everyonelovesaws repository to specify the actions that the CodeBuild service needs to perform. First, clone the repository (or, if you still have a clone, skip this step) and then enter the repository directory:
git clone https://git-codecommit.us-east-2.amazonaws.com/v1/repos/
everyonelovesaws

cd everyonelovesaws
Next, you need to create a buildspec.yml file from the sample in Example 6-6. This buildspec specifies that zip needs to be installed, a directory and file are created, and the directory is zipped into a file called artifact.zip, which CodeBuild then outputs to the repository. This is a very simple example that only demonstrates the operation of the buildspec file. You would, of course, add commands relevant to your build here. As you can see, there are several phases listed in this file:
install: Installs any application required to run the build (in this example, zip).
pre_build: Runs commands required before the build; in this example, it creates a directory and file and traverses directories as you would in the command line.
build: Runs the build; in this example, it simply zips the build directory.
post_build: Runs after the build is completed; in this example, it outputs the zip file to the S3 repository, but you could include other features, such as trying to execute and test the artifacts.
Example 6-6 The buildspec.yml File Written in YAML
version: 0.2

phases:
  install:
    commands:
      - echo Preparing prerequisites
      - apt-get install zip
  pre_build:
    commands:
      - echo Preparing directory
      - chmod +x scripts/*
  build:
    commands:
      - echo Build started on `date`
      - zip artifact.zip appspec.yml -r scripts
  post_build:
    commands:
      - echo Uploading files to s3
      - aws s3 cp artifact.zip s3://everyonelovesaws-artifacts/
      - echo Build completed on `date`
After you have saved the snippet from Example 6-6 in the buildspec.yml file, you build an appspec.yml file and a couple of scripts in the scripts directory. You will use these with the CodeDeploy service. For the appspec.yml file, use the snippet in Example 6-7.
Example 6-7 The buildspec.yml File Written in YAML
version: 0.0
os: linux
files:
  - source: /
    destination: /home/ec2-user/codedeploy
hooks:
  BeforeInstall:
    - location: scripts/dependencies.sh
      timeout: 300
      runas: root
  AfterInstall:
    - location: scripts/unzip.sh
      timeout: 300
      runas: root
Save the file next to the buildspec.yml file and then create a new directory called scripts:
mkdir scripts
Next, create two files in the scripts directory (the dependencies.sh file) to install the prerequisites in the environment where you will be deploying the application with CodeDeploy, with the following contents:
#!/bin/bash
yum update
yum -y install zip
The script named unzip.sh can also be used with CodeDeploy. In this case, it downloads a file with the following contents and unzips it:
#!/bin/bash

mkdir unzip

cd unzip

aws s3 cp s3://1234-everyonelovesaws-artifacts/artifact.zip
artifact.zip

unzip -o artifact.zip
If your bucket has a different name, replace everyonelovesaws-artifacts with your bucket name.
Finally, you need to commit the changes and push the newly created files to the repository:
git add .

git commit -m "Added buildspec file"

git push
Now all there is to do is to run a build of the project to test the functionality of the buildspec file because the build process automatically picks up the build file and runs the commands within:
aws codebuild start-build --project-name "everyonelovesaws-codebuild"
The output of the command shows the status of the build at the time it was initiated, as Example 6-8 shows.
Example 6-8 Output of the start-build Command
{
    "build": {
        "buildComplete": false,
        "phases": [
            {
                "phaseStatus": "SUCCEEDED",
                "endTime": 1568415672.669,
                "phaseType": "SUBMITTED",
               "durationInSeconds": 0,
                "startTime": 1568415672.528
            },
            {
                "phaseType": "QUEUED",
                "startTime": 1568415672.669
            }
        ],
        "timeoutInMinutes": 60,
        "logs": {
            "deepLink": "https://console.aws.amazon.com/cloudwatch/
home?region=us-east-2#logEvent:group=null;stream=null"
        },
        "serviceRole": "arn:aws:iam::111222333444:role/CodeBuildRole",
        "artifacts": {
            "encryptionDisabled": false,
            "location": "arn:aws:s3:::everyonelovesaws-artifacts/
eveeryonelovesaws-codebuild"
        },
        "projectName": "eveeryonelovesaws-codebuild",
        "cache": {
            "type": "NO_CACHE"
        },
        "initiator": "marko",
        "buildStatus": "IN_PROGRESS",
        "environment": {
            "computeType": "BUILD_GENERAL1_SMALL",
            "imagePullCredentialsType": "CODEBUILD",
            "privilegedMode": false,
            "image": "aws/codebuild/standard:1.0",
            "environmentVariables": [],
            "type": "LINUX_CONTAINER"
        },
        "source": {
            "insecureSsl": false,
            "type": "CODECOMMIT",
            "location": "https://git-codecommit.us-east-2.amazonaws.com/v1/repos/
everyonelovesaws"
        },
        "currentPhase": "QUEUED",
        "queuedTimeoutInMinutes": 480,
        "startTime": 1568415672.528,
        "id": "eveeryonelovesaws-codebuild:63ba82d1-58df-4021-9a28-d6a800b0ba69",
        "arn": "arn:aws:codebuild:us-east-2:111222333444:build/eveeryonelovesaws-code
build:63ba82d1-58df-4021-9a28-d6a800b0ba69",
        "encryptionKey": "arn:aws:kms:us-east-2:111222333444:alias/aws/s3"
    }
}
The build should not take more than 30 seconds to run, but to see the status of the build later on, you can either use the ID provided in the output in Example 6-8 or search for the ID with the following command:
aws codebuild list-builds-for-project --project-name "eveeryo-
nelovesaws-codebuild"
The output of the command shows the build ID of the build initiated before:
{
    "ids": [
        "eveeryonelovesaws-codebuild:63ba82d1-58df-4021-9a28-d6a800b0ba69"
    ]
}
You can then use the following command to get an update on the status of the build:
aws codebuild batch-get-builds --ids eveeryonelovesaws-
codebuild:63ba82d1-58df-4021-9a28-d6a800b0ba69
This section demonstrates how you can automate your build process with the CodeBuild service. As you can see, the simple structure of the buildspec.yml file helps to easily migrate any kind of existing build project to a CodeBuild environment.
Using AWS CodeDeploy to Deploy Applications
Now you are ready for the next stage. The CodeBuild process created the artifacts, and now it is time for the installation. With CodeDeploy, you can set up an automated process to deploy code to your EC2 instances, ECS containers, on-premises servers, and Lambda functions. The service is fully managed and relies on the appspec.yml file, which has a script similar to the buildspec.yml file used with CodeDeploy.
The idea behind CodeDeploy is that automation makes the deployments repeatable so you can use the same approach to deploy to test, staging, and production, which can simplify the way you deliver software to the environment.
When deploying a new version of the application with CodeDeploy, you need to, of course, think about the availability of the application. The service is designed to work with live applications and deploy the application with minimal disruption through the utilization of two options: in-place upgrades and blue-green deployment.
With in-place upgrades, existing instances are upgraded and verified in a rolling fashion, one by one. If instances are in an AutoScaling group behind a load balancer, each instance will be deregistered from the load balancer during the upgrade and only reregistered when CodeDeploy verifies the installation.
With blue-green deployments, you simply replace the existing deployment (blue) with a new deployment (green) and then redirect the traffic to the newly created deployment after the application installation has been verified by CodeDeploy. With EC2 instances, a new AutoScaling group is deployed, and the application is installed. Once the installation is verified, the new group is registered with the load balancer, and the old group is deregistered and terminated. With Lambda functions and ECS, the default operation is blue-green, and replacement functions and replacement task sets are spun up and verified before the traffic is switched over.
When used with EC2 or on-premises servers, CodeDeploy requires an agent to communicate with the CodeDeploy service and install applications defined in the appspec.yml file (created in Chapter 5, “Going Serverless in AWS”). In the example that follows, you will analyze the structure of the appspec.yml file, which has several sections:
version: Defines the appspec version (which, at the time of writing, is 0.0)
os: Defines the operating system to deploy on as either Linux or Windows
files: Defines the root of the installation package to work from and the target directory to install to
BeforeInstall: Specifies the scripts to run before the installation
AfterInstall: Specifies the scripts to run after the installation
ApplicationStart: Specifies the scripts to run to start the application
ApplicationStop: Specifies the scripts to run to stop the application
Example 6-9 shows the full structure of the appspec.yml file.
Example 6-9 CodeDeploy appsec.yml File
version: 0.0
os: [linux|windows]
files:
  - source: /directory/root/to/install/from
    destination: /directory/to/install/to
hooks:
  BeforeInstall:
    - location: scripts/before-intall.sh
      timeout: 300
      runas: root
  AfterInstall:
    - location: scripts/after-install.sh
      timeout: 60
      runas: root
  ApplicationStart:
    - location: scripts/start-service.sh
      timeout: 60
      runas: root
  ApplicationStop:
    - location: scripts/stop-service.sh
      timeout: 60
      runas: root
Deploying Code to EC2 Instances with CodeDeploy
You can start the CodeDeploy configuration by creating the required IAM roles that will be used by the CodeDeploy service and the EC2 instances so that they can connect to S3 and retrieve the configuration and the package that you will install on the EC2 instance. The first IAM role to create is CodeDeployServiceRole for the CodeDeploy service.
To create the role, you first need to create a codedeploy-policy.json file from the snippet in Example 6-10.
Example 6-10 IAM Policy Used in the Example to Allow CodeDeploy to Assume a Role
{
    "Version": "2012-10-17",
    "Statement": [
        {
            "Effect": "Allow",
                         "Principal": {
                "Service": [
                    "codedeploy.amazonaws.com"
                ]
                         },
            "Action": [
                "sts:AssumeRole"
            ]
        }
    ]
}
This policy document simply allows the CodeDeploy service (codedeploy.amazonaws.com) to assume the role ("sts:AssumeRole") that you will be creating. After you have saved the file, you run the aws iam create-role command:
aws iam create-role --role-name CodeDeployServiceRole

--assume-role-policy-document file://codedeploy-policy.json
You then attach the AWSCodeDeployRole AWS managed policy with the ARN arn:aws:iam::aws:policy/service-role/AWSCodeDeployRole to the to the newly created role:
aws iam attach-role-policy

--policy-arn arn:aws:iam::aws:policy/service-role/AWSCodeDeployRole

--role-name CodeDeployServiceRole
Next, you need to create an IAM role for the EC2 instances. Attach two policies to the role. First you can use the policy that allows the EC2 instance to assume the role, as demonstrated in Example 6-11.
Example 6-11 IAM Policy Used in the EC2 Instance Role
{
    "Version": "2012-10-17",
    "Statement": [
        {
            "Sid": "",
            "Effect": "Allow",
            "Principal": {
                "Service": "ec2.amazonaws.com"
            },
            "Action": "sts:AssumeRole"
        }
    ]
}
Save this policy as a file called codedeploy-EC2-trust.json and run the following command to create the role named CodeDeployEC2Role:
aws iam create-role --role-name CodeDeployEC2Role

--assume-role-policy-document file://codedeploy-EC2-trust.json
Next, use a permissions policy that allows read access to S3 so that the EC2 instance can pick up the file from the S3 bucket, as demonstrated in Example 6-12. This policy allows access to all S3 buckets, and you need to modify it to allow access to only the buckets that are relevant to the job.
Example 6-12 IAM Policy Allowing Read Access to S3
{
    "Version": "2012-10-17",
    "Statement": [
        {
            "Action": [
                "s3:Get*",
                "s3:List*"
            ],
            "Effect": "Allow",
            "Resource": "*"
        }
    ]}
Save this file as codedeploy-EC2-permissions.json and run the following command to attach the permissions to the CodeDeployEC2Role role:
aws iam put-role-policy

--role-name CodeDeployEC2Role

--policy-name CodeDeploy-EC2-permissions

--policy-document file://codedeploy-EC2-permissions.json
Now create an instance profile to use with the EC2 AutoScaling group that simply references the role so that it can be automatically attached to the EC2 instance:
aws iam create-instance-profile

--instance-profile-name CodeDeploy-EC2-Profile
Next, specify the CodeDeployEC2Role role name to be attached to the CodeDeploy-EC2-Profile profile:
aws iam add-role-to-instance-profile

--instance-profile-name CodeDeploy-EC2-Profile

--role-name CodeDeployEC2Role
Now, create and launch an AutoScaling group that spins up an Amazon Linux instance in the us-east-2 (Ohio) region. If you have chosen another region, you need to change the image-id to the corresponding AMI. Then you add the user data to install the CodeDeploy agent in this instance, as demonstrated in Example 6-13.
Example 6-13 User Data bash Script That Deploys the CodeDeploy Agent
#!/bin/bash
yum update
yum -y install ruby
yum -y install wget
cd /home/ec2-user
wget https://aws-codedeploy-us-east-2.s3.us-east-2.amazonaws.com/latest/install
chmod +x ./install
./install auto
service codedeploy-agent start
Save this file as userdata.sh and run the command shown in Example 6-14 to create the AutoScaling group configuration. Notice that the launch configuration also references the CodeDeployDemo-EC2-Profile instance profile, which was created to attach the role to the EC2 instances. To allow access to SSH to the instance, create a new security group with port 22 allowed so that you can log in to the instance and check its contents. Be sure to change the key name and the security group ID to the appropriate ones for your account.
Example 6-14 CLI Input to Create an AutoScaling Launch Configuration
aws autoscaling create-launch-configuration
--launch-configuration-name code-deploy-launch-configuration
--image-id ami-00c03f7f7f2ec15c3
--instance-type t2.micro
--iam-instance-profile CodeDeployDemo-EC2-Profile
--user-data file://userdata.sh
--key-name marko
--security-groups sg-07a3fb6342dec0bf8
Now that you have a launch configuration, you need to create an AutoScaling group from it. Simply define an AutoScaling group of a minimum size of 1 and maximum size of 1 to maintain the instance number at 1. Also, don’t forget to change the subnet ID to the correct ID of your subnet:
aws autoscaling create-auto-scaling-group

--auto-scaling-group-name codedeploy-asg

--launch-configuration-name code-deploy-launch-configuration

--min-size 1 --max-size 1

--vpc-zone-identifier "subnet-16841a6c"
After an instance is launched, you can look up the IP or DNS information in the Management Console or by using the AWS CLI. When you have the connection address, you can SSH to the instance to verify that the agent is running. Once you are logged in to the instance, simply run the following command:
sudo service codedeploy-agent status
The output of the command should look something like this:
The AWS CodeDeploy agent is running as PID 3502
Now that you have the prerequisites met, you can create a CodeDeploy application, a deployment group, and a deployment. An application can have multiple deployment groups, and a deployment group can have multiple deployments. Each deployment typically represents a version of the application component that you are deploying. This structure enables you to maintain fine-grained control over the way you deploy applications to your clusters. To create an application, run the following command:
aws deploy create-application --application-name deploy-
everyonelovesaws
When an application is created, you can create a deployment group as demonstrated in Example 6-15. Make sure to change the ARN of the service role to the ARN of the CodeDeploy service role you created earlier.
Example 6-15 CLI Input to Create a CodeDeploy Deployment Group
aws deploy create-deployment-group
--deployment-group-name eveeryonelovesaws-group
--application-name deploy-everyonelovesaws
--auto-scaling-groups codedeploy-asg
--deployment-config-name CodeDeployDefault.OneAtATime
--service-role-arn arn:aws:iam::111222333444:role/CodeDeployServiceRole
Once a deployment group is created, simply create a deployment to deploy the file created in the build process earlier in this chapter. Be sure to change bucket=everyonelovesaws-artifacts shown in Example 6-16 to the correct name of your bucket, such as bucket=1234-random-bucket.
Example 6-16 CLI Input to Create a CodeDeploy Deployment
aws deploy create-deployment
--application-name deploy-everyonelovesaws
--deployment-config-name CodeDeployDefault.OneAtATime
--deployment-group-name eveeryonelovesaws-group
--description "Deploy the application on to EC2"
--s3-location
bucket=everyonelovesaws-artifacts,bundleType=zip,key=artifact.zip
To check on the status of the deployment, run the following command:
aws deploy get-deployment --deployment-id d-SBG2T1VGN
Look for the DepylomentOverview section to see if your deployment succeeded or failed in the output. The output of the command should look something like the output shown in Example 6-17.
Example 6-17 Output of the get-deployment CLI Command
{
    "deploymentInfo": {
        "applicationName": "deploy-everyonelovesaws",
        "status": "Succeeded",
        "deploymentOverview": {
            "Skipped": 0,
            "Succeeded": 1,
            "Failed": 0,
            "Ready": 0,
            "InProgress": 0,
            "Pending": 0
        },
        "description": "Deploy the application on to EC2",
        "deploymentConfigName": "CodeDeployDefault.OneAtATime",
        "creator": "user",
       "fileExistsBehavior": "DISALLOW",
        "deploymentId": "d-SBG2T1VGN",
        "deploymentStatusMessages": [],
        "ignoreApplicationStopFailures": false,
        "autoRollbackConfiguration": {
            "enabled": false
        },
        "deploymentStyle": {
            "deploymentType": "IN_PLACE",
            "deploymentOption": "WITHOUT_TRAFFIC_CONTROL"
        },
        "updateOutdatedInstancesOnly": false,
        "instanceTerminationWaitTimeStarted": false,
        "computePlatform": "Server",
        "deploymentGroupName": "eveeryonelovesaws-group",
        "createTime": 1568472443.732,
        "completeTime": 1568472455.717,
        "revision": {
            "revisionType": "S3",
            "s3Location": {
                "bundleType": "zip",
                "bucket": "1234-everyonelovesaws-artifacts",
                "key": "artifact.zip"
            }
        }
    }
}
Now log in to the instance in the AutoScaling group and verify that the appspec.yml and the script directory with the files have been created in the /home/ec2-user/codedeploy directory.
Next, you can clean up the AutoScaling group instances to save resources and prepare for CodeDeploy by setting the minimum and maximum to 0:
aws autoscaling update-auto-scaling-group

--auto-scaling-group-name codedeploy-asg

--min-size 0 --max-size 0
Why did the appspec.yml and the scripts get copied to the /home/ec2-user/codedeploy directory? As you defined in the appspec.yml file, the working directory is /home/ec2-user/codedeploy, and you installed zip and then copied the artifact.zip file from S3 and unzipped it. The example does this only because you did not create an artifact that contained an actual installation to be performed. In a real-world scenario, you would install your application files to create a meaningful installation, but in this case the files created in the CodeBuild process are used to demonstrate the capabilities of the CodeDeploy service.
Building a CI/CD Pipeline with AWS CodePipeline
You have now seen all the components of a typical CI/CD toolchain being used to write, commit, build, and deploy the code. As you saw, that process involves many manual steps, but as mentioned earlier in this chapter, you need to use as much automation as possible to be compliant with Agile, DevOps, and CI/CD.
CodePipeline is a service that can orchestrate the way your code transitions from the commit to the build and to the deploy process. The CodePipeline service provides the ability to trigger a transition of the code from one stage to another in an automated manner and provides you with the ability to deploy a fully automated CI/CD chain within AWS.
You can use the AWS Code* services, or you can use other tools that allow you to store, build, and deploy code to your environments because the CodePipeline service has the ability to interact with multiple types of repositories (such as Git and Bitbucket), different CI servers (such as Jenkins), and a variety of deployment and configuration management tools (such as Chef and Puppet). When working with external systems or fetching data from another AWS account, CodePipeline can perform artifact encryption during stage transitions so that your environment is always secure. CodePipeline also supports integration with Lambda functions and the CloudFormation service, which gives you the ability to perform infrastructure configuration and intelligent actions on a certain CodePipeline trigger.
When you create a pipeline, you need to define stages that can execute one or more sequential actions, split out the actions to be performed in parallel, and allow for manual processes such as approvals or reviews to be integrated into a stage. The act of data passing between stages is called a transition, and for each transition, you can define whether to use encryption.
To create a pipeline, you can define a JSON pipeline definition to be used with the AWS CLI, or you can create the pipeline through CloudFormation by defining it in the CloudFormation template. You can also easily create a pipeline from the AWS Management Console.
Automating the CI/CD Process
To completely automate the CI/CD process, you first need to create a service role and give it the permissions required to access all the environments. The example that follows simply uses the AWS managed “full access” roles for each service. (This is for demonstration purposes only, and I urge you to lock down the policies in a production environment.) First, you create a new service role called CodePipelineServiceRole with the trust from the codepipeline-trust.json file with the contents provided in Example 6-18.
Example 6-18 IAM Policy That Allows CodePipeline to Assume a Role
{
  "Version": "2012-10-17",
  "Statement": [
    {
      "Effect": "Allow",
      "Principal": {
       "Service": "codepipeline.amazonaws.com"
      },
      "Action": "sts:AssumeRole"
    }
  ]
}
Save this file as codepipeline-trust.json so you can use it in the next CLI command:
aws iam create-role --role-name CodePipelineServiceRole

--assume-role-policy-document file://codepipeline-trust.json
Now you need to attach the access policies to this role to allow CodePipeline to access CodeCommit, CodeBuild, CodeDeploy, and S3, as demonstrated in Example 6-19.
Example 6-19 Five AWS CLI Inputs Required to Attach the Policies to the CodePipeline Role
aws iam attach-role-policy
--policy-arn arn:aws:iam::aws:policy/AWSCodePipelineFullAccess
--role-name CodePipelineServiceRole

aws iam attach-role-policy
--policy-arn arn:aws:iam::aws:policy/AWSCodeCommitFullAccess
--role-name CodePipelineServiceRole

aws iam attach-role-policy
--policy-arn arn:aws:iam::aws:policy/AWSCodeDeployFullAccess
--role-name CodePipelineServiceRole

aws iam attach-role-policy
--policy-arn arn:aws:iam::aws:policy/AWSCodeBuildAdminAccess
--role-name CodePipelineServiceRole

aws iam attach-role-policy
--policy-arn arn:aws:iam::aws:policy/AmazonS3FullAccess
--role-name CodePipelineServiceRole
Before creating the pipeline, you need to start an instance in the AutoScaling group:
aws autoscaling update-auto-scaling-group

--auto-scaling-group-name codedeploy-asg

--min-size 1 --max-size 1
Next, you need to wait up to a minute for the instance to become active and then deploy the CloudFormation template to build the pipeline. The template that you will be using is written in YAML and represents an automated way to perform the same task of building the pipeline. Example 6-20 demonstrates the complete process.
Example 6-20 A CloudFormation Template That Delivers the Complete Pipeline Deployment
AWSTemplateFormatVersion: "2010-09-09"

Description: "Builds a CodePipeline from the everyonelovesaws CodeCommit repository,
the eveeryonelovesaws-codebuild build stage and deploy-everyonelovesaws deploy stage
and automatically runs upon creation. Please remember to replace the account ID,
region and your commit, build and deploy project names."

Resources:
    codepipeline4c5e802:
        Type: "AWS::CodePipeline::Pipeline"
        Properties:
            ArtifactStore:
                Location: "codepipeline-us-east-2-131893590922"
                Type: "S3"
            RoleArn: "arn:aws:iam::866117724370:role/CodePipelineServiceRole"
            Name: "everyonelovesaws-pipeline"
            Stages:
              -
                Name: "Source"
                Actions:
                  -
                    Name: "Source"
                    ActionTypeId:
                        Category: "Source"
                        Owner: "AWS"
                        Provider: "CodeCommit"
                        Version: "1"
                    Configuration:
                        RepositoryName: "everyonelovesaws"
                        BranchName: "master"
                        PollForSourceChanges: "false"
                    Region: "us-east-2"
                    OutputArtifacts:
                      -
                        Name: "SourceArtifact"
              -
                Name: "Build"
                Actions:
                  -
                    Name: "Build"
                    ActionTypeId:
                       Category: "Build"
                        Owner: "AWS"
                        Provider: "CodeBuild"
                        Version: "1"
                    Configuration:
                        ProjectName: "eveeryonelovesaws-codebuild"
                    Region: "us-east-2"
                    InputArtifacts:
                      -
                        Name: "SourceArtifact"
                    OutputArtifacts:
                      -
                        Name: "BuildArtifact"
              -
                Name: "Deploy"
                Actions:
                  -
                    Name: "Deploy"
                    ActionTypeId:
                        Category: "Deploy"
                        Owner: "AWS"
                        Provider: "CodeDeploy"
                        Version: "1"
                    Configuration:
                        ApplicationName: "deploy-everyonelovesaws"
                        DeploymentGroupName: "eveeryonelovesaws-group"
                    Region: "us-east-2"
                    InputArtifacts:
                      -
                        Name: "BuildArtifact"
Before deploying the CloudFormation template, check that your AutoScaling instance is up and running and verify that the CodeDeploy agent is up, if required. When you are sure the process should work, deploy the CloudFormation stack. The stack picks up the latest version of the application, sends it through the build process, and deploys it on the EC2 instance in the AutoScaling group. To deploy the template, run the following:
aws cloudformation deploy --template-file cloudformation-codepipe-
line.yml --stack-name codepipeline
When the template finishes running, you can list the pipelines with the following command:
aws codepipeline list-pipelines
Next, inspect the status of the newly created pipeline with the following command:
aws codepipeline get-pipeline-state --name everyonelovesaws-
pipeline
You should see output similar to that shown in Example 6-21. Look for "status": "Succeeded" or "status": "Failed" to determine whether the pipeline ran successfully.
Example 6-21 Output of the get-pipeline Command
{
    "updated": 1568484301.522,
    "created": 1568484301.522,
    "pipelineVersion": 1,
    "pipelineName": "everyonelovesaws-pipeline",
    "stageStates": [
        {
            "actionStates": [
                {
                    "actionName": "Source",
                    "revisionUrl": "https://us-east-2.console.aws.amazon.com/
codecommit/home#/repository/everyonelovesaws/commit/
e14dae18359fdeff7197ddb4f32a5fc41e76ffb2",

                    "entityUrl": "https://us-east-2.console.aws.amazon.com/
codecommit/home#/repository/everyonelovesaws/browse/master/--/",
                    "latestExecution": {
                        "status": "Succeeded",
                        "lastStatusChange": 1568484305.429,
                        "externalExecutionId":
"e14dae18359fdeff7197ddb4f32a5fc41e76ffb2",
                        "summary": "Version 5
"
                    },
                    "currentRevision": {
                        "revisionId": "e14dae18359fdeff7197ddb4f32a5fc41e76ffb2"
                    }
                }
            ],
            "inboundTransitionState": {
                "enabled": true
            },
            "latestExecution": {
                "pipelineExecutionId": "21b6843c-c036-452d-8932-e69cfc6606e9",
                "status": "Succeeded"
            },
            "stageName": "Source"
        },
        {
           "actionStates": [
                {
                    "actionName": "Build",
                    "entityUrl": "https://us-east-2.console.aws.amazon.com/codebuild/
home?#/projects/eveeryonelovesaws-codebuild/view",
                    "latestExecution": {
                        "status": "Succeeded",
                        "lastStatusChange": 1568484337.564,
                        "externalExecutionUrl": "https://
us-east-2.console.aws.amazon.com/codebuild/home?#/builds/
eveeryonelovesaws-codebuild:fcf48854-3e85-475c-9bc8-4ace242974bf/view/new",
                        "externalExecutionId":
"eveeryonelovesaws-codebuild:fcf48854-3e85-475c-9bc8-4ace242974bf"
                    }
                }
            ],
            "inboundTransitionState": {
                "enabled": true
            },
            "latestExecution": {
                "pipelineExecutionId": "21b6843c-c036-452d-8932-e69cfc6606e9",
                "status": "Succeeded"
            },
            "stageName": "Build"
        },
        {
            "actionStates": [
                {
                    "actionName": "Deploy",
                    "entityUrl": "https://us-east-2.console.aws.amazon.com/
codedeploy/home?#/applications/deploy-everyonelovesaws",
                    "latestExecution": {
                        "status": "Succeeded",
                        "lastStatusChange": 1568484370.043,
                        "externalExecutionUrl": "https://us-east-2.console.aws.ama-
zon.com/codedeploy/home?#/deployments/d-KSCQGEZGN",
                        "externalExecutionId": "d-KSCQGEZGN",
                        "summary": "Deployment Succeeded"
                    }
                }
            ],
            "inboundTransitionState": {
                "enabled": true
            },
            "latestExecution": {
                "pipelineExecutionId": "21b6843c-c036-452d-8932-e69cfc6606e9",
                "status": "Succeeded"
            },
            "stageName": "Deploy"
        }
    ]
}
Now you can create a new file in the everyonelovesaws repository to see how the push will trigger the code pipeline. Make sure you are in the local repository directory and then create a new file:
touch new.file

git add .

git commit -m "New version to test CodePipeline"
To watch this happen, I recommend opening the AWS Management Console and navigating to the CodePipeline section, as shown in Figure 6-23, and in parallel running the git push command on your Linux machine.
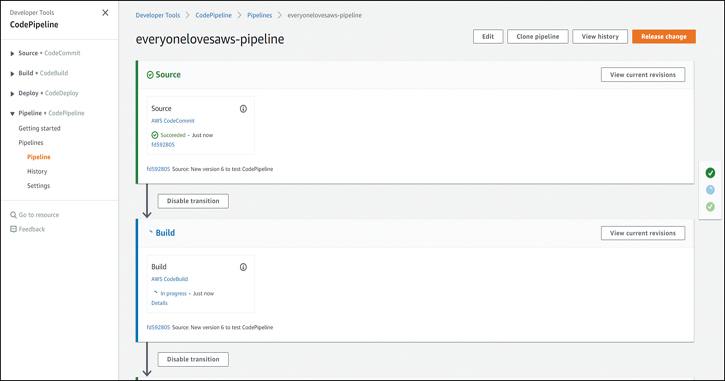
Figure 6-23 The Status in the Console Showing That the CodePipeline Has Been Triggered
Integrating the CI/CD Pipeline into Your Code
If you prefer to integrate the creation of the pipeline into your code, you can use the Python example script in Example 6-22, which works with the AWS boto3 SDK, and you can build the pipeline straight out of your code. Make sure to replace the account ID 111222333444 and any other identifying components, such as names of build processes, with your IDs.
Example 6-22 A Python Example Script That Builds the Complete Pipeline Through the AWS boto3 SDK
import boto3

codepipeline_client = boto3.client('codepipeline', region_name='us-east-2')
response = codepipeline_client.list_pipelines()
s3_client = boto3.client('s3', region_name='us-east-2')
response = s3_client.list_buckets()
iam_client = boto3.client('iam', region_name='us-east-1')
response = iam_client.list_policies()
response = codepipeline_client.list_pipelines()
response = codepipeline_client.list_pipelines()
response = s3_client.list_buckets()
codecommit_client = boto3.client('codecommit', region_name='us-east-2')
response = codecommit_client.list_repositories()
response = codecommit_client.list_repositories()
response = codecommit_client.list_repositories()
codebuild_client = boto3.client('codebuild', region_name='us-east-2')
response = codebuild_client.list_projects()
codedeploy_client = boto3.client('codedeploy', region_name='us-east-2')
response = codedeploy_client.list_deployment_groups(
    applicationName='deploy-everyonelovesaws'
)
response = codedeploy_client.batch_get_deployment_groups(
    applicationName='deploy-everyonelovesaws',
    deploymentGroupNames=[
        'eveeryonelovesaws-group'
    ]
)
events_client = boto3.client('events', region_name='us-east-2')
response = events_client.put_rule(
    Description='Amazon CloudWatch Events rule to automatically start your pipeline
when a change occurs in the AWS CodeCommit source repository and branch. Deleting
this may prevent changes from being detected in that pipeline. Read more: http://
docs.aws.amazon.com/codepipeline/latest/userguide/pipelines-about-starting.html',

    EventPattern='{"source":["aws.codecommit"],"detail-type":["CodeCommit Repository
State Change"],"resources":["arn:aws:codecommit:us-east-2:111222333444:everyoneloves
aws"],"detail":{"event":["referenceCreated","referenceUpdated"],"referenceType":["br
anch"],"referenceName":["master"]}}',
   Name='codepipeline-everyo-master-756715-rule',
    State='ENABLED'
)

response = events_client.put_targets(
    Rule='codepipeline-everyo-master-756715-rule',
    Targets=[
        {
            'Arn': 'arn:aws:codepipeline:us-east-2:111222333444:everyonelovesaws-
pipeline',
            'Id': 'codepipeline-everyonelovesaws-pipeline',
            'RoleArn': 'arn:aws:iam::111222333444:role/service-role/
cwe-role-us-east-2-everyonelovesaws-pipeline'
        }
    ]
)
response = codepipeline_client.create_pipeline(
    pipeline={
        'stages': [
            {
                'name': 'Source',
                'actions': [
                    {
                        'region': 'us-east-2',
                        'name': 'Source',
                        'configuration': {
                            'RepositoryName': 'everyonelovesaws',
                            'BranchName': 'master',
                            'PollForSourceChanges': 'false'
                        },
                        'actionTypeId': {
                            'category': 'Source',
                            'owner': 'AWS',
                            'provider': 'CodeCommit',
                            'version': '1'
                        },
                        'outputArtifacts': [
                            {
                                'name': 'SourceArtifact'
                            }
                        ],
                        'inputArtifacts': []
                    }
                ]
            },
            {
                'name': 'Build',
                'actions': [
                    {
                        'region': 'us-east-2',
                        'name': 'Build',
                        'configuration': {
                            'ProjectName': 'eveeryonelovesaws-codebuild'
                        },
                        'actionTypeId': {
                            'category': 'Build',
                            'owner': 'AWS',
                            'provider': 'CodeBuild',
                            'version': '1'
                        },
                        'inputArtifacts': [
                            {
                                'name': 'SourceArtifact'
                            }
                        ],
                        'outputArtifacts': [
                            {
                                'name': 'BuildArtifact'
                            }
                        ]
                    }
                ]
            },
            {
                'name': 'Deploy',
                'actions': [
                    {
                        'region': 'us-east-2',
                        'name': 'Deploy',
                        'configuration': {
                            'ApplicationName': 'deploy-everyonelovesaws',
                            'DeploymentGroupName': 'eveeryonelovesaws-group'
                        },
                        'actionTypeId': {
                            'category': 'Deploy',
                            'owner': 'AWS',
                            'provider': 'CodeDeploy',
                            'version': '1'
                        },
                        'inputArtifacts': [
                            {
                                'name': 'BuildArtifact'
                            }
                        ],
                        'outputArtifacts': []
                    }
                ]
            }
        ],
        'version': 1,
        'artifactStore': {
            'location': 'codepipeline-us-east-2-131893590922',
            'type': 'S3'
        },
        'name': 'everyonelovesaws-pipeline',
        'roleArn': 'arn:aws:iam::111222333444:role/CodePipelineServiceRole'
    }
)
response = codepipeline_client.get_pipeline(
    name='everyonelovesaws-pipeline'
)
response = codepipeline_client.get_pipeline_state(
    Name='everyonelovesaws-pipeline'
)
response = codepipeline_client.get_pipeline_execution(
    pipelineExecutionId='c127ccb2-e6ef-4908-954c-84193d90adc5',
    pipelineName='everyonelovesaws-pipeline'
)
Exam Preparation Tasks
To prepare for the exam, use this section to review the topics covered and the key aspects that will allow you to gain the knowledge required to pass the exam. To gain the necessary knowledge, complete the exercises, examples, and questions in this section in combination with Chapter 9, “Final Preparation,” and the exam simulation questions in the Pearson Test Prep Software Online.
Review All Key Topics
Review the most important topics in this chapter, noted with the Key Topics icon in the outer margin of the page. Table 6-2 lists these key topics and the page number on which each is found.
Table 6-2 Key Topics for Chapter 6
Key Topic Element |
Description |
Page Number |
Section |
Creating and using a Cloud9 environment |
187 |
Section |
Using CodeCommit with Git |
196 |
Section |
Automating the build process with CodeBuild |
198 |
CodeBuild IAM Role Policy |
199 |
|
CodeBuild Specification for the Project |
201 |
|
The buildspec.yml File Written in YAML |
203 |
|
CodeDeploy appsec.yml File |
207 |
|
Section |
Deploying Code to EC2 Instances with CodeDeploy |
208 |
User Data bash Script That Deploys the CodeDeploy Agent |
210 |
|
Section |
Automating the CI/CD Process |
214 |
CloudFormation template for CodePipeline in YAML |
216 |
|
Python script that deploys the CodePipeline |
221 |
Define Key Terms
Define the following key terms from this chapter and check your answers in the glossary:
Q&A
The answers to these questions appear in Appendix A. For more practice with exam format questions, use the Pearson Test Prep Software Online.
1. How does an appspec.yml file specify the application installation procedure?
2. True or false: A CodeCommit repository has a limited capacity that is tied to the number of users.
3. What kind of credentials are required to use CodeCommit?
4. Which command is used to initiate CodeBuild for a certain project name in the CLI?
5. Complete this sentence: An AWS Cloud9 ______ can be shared with other IAM users.
6. To install Cloud9, what must be installed on a developer's computer?
7. Complete this sentence: CodeDeploy can deploy applications to _________.
8. True or false: CodePipeline is designed to work only with the CodeCommit, CodeBuild, and CodeDeploy tools.
9. You have deployed a code pipeline. What action needs to be taken to trigger it?
10. What is the differentiating factor between DevOps and Agile?