CHAPTER 4
Introduction to Amazon Elastic Compute Cloud
In this chapter, you will
• Learn the benefits of Amazon EC2
• Go through the Amazon EC2 instance types and features
• Walk through the steps for using Amazon EC2
• See the pricing for Amazon EC2
• Understand what shared tenancy, dedicated hosts, and dedicated instances are
• Explore instances and Amazon machine images (AMIs)
• Learn about virtualization in an AMI
• Go through the instance life cycle
• Learn how to connect to an instance
• Learn about security groups
Amazon Elastic Compute Cloud (EC2) provides almost infinite compute capability in the cloud, and it is not only reliable but secure. You can run any kind of workload in the Amazon cloud and don’t have to invest a lot of capital expenditures to get computing resources. The model for cloud computing is pay as you go, which means you pay just for the resources that you are going use on an hourly basis or per second basis depending on instance type. Therefore, to procure new servers, you don’t really have to wait months to get a budget approved. As a result, you can deploy your applications faster as well as innovate quickly. Amazon’s EC2 ecosystem is designed to scale; as a result, whenever there is a spike in the traffic of your workload, you can quickly spin off additional servers almost instantly, and when the traffic reduces, you can get rid of those servers. For example, say for your normal business during weekdays you need a server with 16 CPUs, but on the weekend you are expecting twice that traffic. You can provision an extra 16 CPUs only for the weekend, and when Monday comes, you can get rid of that server. You have to pay for the additional server only for the hours on Saturday and Sunday.
Benefits of Amazon EC2
When you deploy a new application or a new workload on your data center (in other words, on-premise), it takes a few months just to provision the hardware, whereas if you decide to host your workload on Amazon EC2, it is almost instant. Similarly, you get several benefits when you choose to host your application or workload on Amazon EC2.
The following are the benefits of EC2:
• Time to market The biggest advantage of running an EC2 server is the time to market. You can deploy any server almost instantly, and as a result you don’t have to wait for weeks or months to get a new server. This also facilitates innovation because you can quickly get the resources for your new project. If the project ends, you can simply get rid of the servers and start a new project with new resources.
• Scalability Another benefit of running EC2 is scalability; you can scale up and scale down at any point of time depending on your workload. In the past, you always had to over-provision the resources just to make sure that you would be able to support the peak demand. But with EC2 servers you don’t have to over-provision the resources; you just provision the resources that are needed for your business, and whenever there is additional growth or a spike, you can quickly deploy additional servers that can take care of the additional demand. EC2 Auto Scaling technologies allow you to automatically scale up or scale down applications depending on the needs. In this way, you get the best of both worlds. You not only maximize the performance but also minimize the cost.
• Control You have complete control over the servers just like you have control over the servers in your data center. You can start and stop the service at any point of time, and you have the root access to the servers. You can interact with the servers just like you interact with any other machine. You can control or reboot the servers remotely using web service APIs, and you can also access them using the Amazon console.
• Reliable EC2 offers a reliable environment where replacement instances can be rapidly and predictably commissioned. EC2’s service level agreement is 99.95 percent availability for each region.
• Secure The entire infrastructure of Amazon is secure; in fact, security is a highest-priority job for Amazon. Everything that operates under the EC2 cloud is secure. You can create an EC2 resource in conjunction with Amazon VPC to provide security and networking functionality for your compute resources.
• Multiple instance type Amazon EC2 allows you to select from a variety of instances. You can choose the instance on the basis of operating system, software package, CPU storage size or memory, and so on. You can also choose an instance from the Amazon Marketplace where various third-party vendors offer their prepackaged servers.
• Integration Amazon EC2 is integrated with most of the AWS services such as S3, VPC, Lambda Redshift, RDS, EMR, and so on. Using EC2 and the other services of AWS, you can get a complete solution for all of your IT needs.
• Cost-effective Since you pay only for the usage of the server on an hourly basis or per second depending on which instance you run, you don’t really have to pay a huge capital expense when you provision servers on EC2.
When you spin off servers in Amazon EC2, you have complete control over the type of storage you use, the network configurations, the security configuration, and so on. The EC2 web interface allows you to configure a server in a minimal amount of time. Imagine a traditional deployment model where you have to provision a server. The operating system installation takes a couple of hours, not including the time it takes to configure the storage and network. If you add all this time together, it would be a couple of days of effort. With Amazon EC2, the time required to obtain and boot the new server is a matter of minutes. Since now it takes only a few minutes to deploy a server, you can actually deploy hundreds or thousands of servers almost instantly, and since this model is very scalable, you can quickly scale up or scale down, depending on your workload or traffic volume.
You have the choice of multiple instance types, operating systems, and software packages. Amazon EC2 allows you to select a configuration of memory, CPU, instance storage, and boot partition size that is optimal for your choice of operating system and application. For example, your choice of operating systems includes numerous Linux distributions and Microsoft Windows Server.
The following are the operating systems supported by EC2:
• Windows
• Amazon Linux
• Debian
• SUSE
• CentOS
• Red Hat Enterprise Linux
• Ubuntu
Amazon EC2 Instance Types and Features
Amazon EC2 offers a variety of instance types to choose from, which can fit any type of workload depending on the use case. You can choose from various combinations of CPU, memory, networking, and storage to deploy your server. When you create a new instance, the instance type that you specify determines the hardware of the host computer used for your instance. There are various instance types offered by Amazon, and each instance type offers different types of compute, memory, and storage capabilities grouped into an instance family. You can choose an instance depending on your workload. For example, if your workload is compute intense, you can choose a compute-optimized EC2 instance, and if your workload is memory intense, you can choose a memory-optimized instance.
You will notice that there are two types of instances that are available within the EC2 ecosystem: current-generation instances and previous-generation instances. Current-generation instances contain the latest of everything (for example, the latest version of chipsets, memory, processor, and so on), whereas the previous generation consists of the machines that are one or two generations older than the current one. Amazon still supports them because of backward compatibility, and there are many users who have optimized their applications around the previous-generation machines. The current-generation instance will always have a higher number than a previous-generation instance.
Let’s examine the various types of instances offered by Amazon EC2. The instance types are broadly divided into the following categories:
• General purpose
• Compute optimized
• Memory optimized
• Storage optimized
• Advanced computing
General Purpose (T3, T3a, T2, M6g, M5, M5a, M5n, M4, and A1)
The general-purpose instances provide a balance of computer memory and network resources and are a pretty good choice for many applications. Some of the general-purpose instances, such as T3 and T2, provide burstable performance, which means these instances provide a baseline level of CPU performance with the ability to burst above the baseline. The way it works is that T3 and T2 instances accrue CPU credits when they are idle and use the CPU credits when they are active. The instance provides burstable performance depending on how many CPU credits it has accrued over a period of time. Let’s look at how the burstable performance works. The standard EC2 instance type provides fixed CPU utilization, which means you will not get any credit for not utilizing the unused CPU. For example, if you are running an EC2 instance with one core and in a minute your CPU utilization is 40 percent, you won’t get any credit for the un-utilized 60 percent of the CPU. On the other hand, the burstable instances provide the ability to burst CPU utilization above baseline level. The CPU credits are measured in units of 100 percent utilization of a full CPU core for one minute. A burstable performance instance provides the ability to burst the CPU utilization for the unused portion. In the previous example, in a burstable performance instance the 60 percent of the unused CPU credits are accrued in the CPU credit balance, which can be used when more CPU utilization is needed. T3 and T2 are suitable for workloads that do not employ full CPU utilization. Some use cases might be for web servers and development environments. Other general-purpose instances are M5, M5n, and M4, which can be used for a lot of things, such as building web sites, development environments, build servers, code repositories, microservices, test and staging environments, and so on. M5, M5n, and M4 do not provide burstable performance like T3 and T2. In addition to this, the general-purpose servers, including the ARM- and gravitational-based processors A1 and M6g, belong to this category. The general purpose of the servers also includes the AMD-based processor T3a, and M5a is an example of it.
Compute Optimized (C6g, C5, C5a, C5n, and C4)
If you have an application or workload that is heavy on compute, a compute-optimized instance is ideal for that. A compute-optimized instance has high-performance processors, and as a result any application that needs a lot of processing power benefits from these instances. Some good use cases for the compute-optimized workload are media transcoding, applications supporting a large number of concurrent users, long-running batch jobs, high-performance computing, gaming servers, and so on.
Memory Optimized (R6g, R5, R5a, R5n, R4, X1e, X1, High Memory, and Z1d)
The memory-optimized instances are ideal if the workload you are planning to run has a lot of memory requirements. Any application that processes large data sets in memory will benefit by using the memory-optimized instance. Some good use cases for memory-optimized instances are running in memory databases such as a SAP HANA or Oracle database in-memory, NoSQL databases like MongoDB and Cassandra, big data processing engines like Presto or Apache Spark, high-performance computing (HPC) and Electronic Design Automation (EDA) applications, genome assembly and analysis, and so on.
Storage Optimized (I3, I3en, D2, and H1)
Storage-optimized instances can be used for the workloads that require high-sequential read and write access to very large data sets on local storage. Since they are optimized at storage, they deliver many thousands of low-latency, random I/O operations per second (IOPS). Some use cases for the storage-optimized instance could be running a relational database that is I/O bound, running an I/O-bound application, NoSQL databases, data warehouse applications, MapReduce and Hadoop distributed caches for in-memory databases like Redis, and so on. You can also select a high I/O instance and dense storage instances depending on workload.
Accelerated Computing (P3, P2, Inf1, G4, G3, and F1)
If you have high-processing computing requirements, for example, you want to run machine learning algorithms, molecular modeling, genomics, computation of fluid dynamics, autonomous vehicle, drug discovery, seismic analysis, computational finance, and so on, then an advanced computing instance is going to give you the most bang for the buck. These advanced computing instances provide access to hardware-based accelerators such as graphic processing units (GPUs) or field programmable gate arrays (FPGAs), which enable parallelism and give high throughput. The advanced computing also includes GPU compute instances and GPU graphics instances.
Let’s discuss some of the key features of the Amazon EC2 instance.
Processor Features
The EC2 instances use an Intel processor, so they in turn use all the processor features that Intel provides. Some of the processor features that are often seen in the EC2 instances are as follows:
• Intel AES New Instructions (AES-NI) This encryption instruction applies the Advanced Encryption Standard (AES) algorithm better compared to the original one and provides faster data protection and greater security. All the current-generation EC2 instances have this feature.
• Intel Advanced Vector Extensions Intel AVX instructions improve performance for applications such as image and audio/video processing. They are available on instances launched with HVM AMIs.
• Intel Turbo Boost Technology Intel Turbo Boost Technology provides more performance when needed.
• Intel Deep Learning Boost These processors are designed to boost the AI deep learning use cases.
Network Features
Whenever you launch an EC2 instance, you need to do so inside a VPC. Amazon VPC allows customers with great control of the IP address space the ability to segment with subnets, the ability to provide network-level security, and so on.
You can also launch an instance in a placement group to maximize the bandwidth and get better network performance. A placement group is a logical grouping of instances within a single AZ. If you have an application or workload that needs low-latency or high-network throughput, the placement group is going to provide you with that benefit. This is also known as cluster networking. R5, R4, X1, M5, M4, C5, C4, C3, I3, I2, P3, P2, G3, D2, and H1 instances (and more) support cluster networking. In addition to these are a few other instances that support placement groups. Since AWS keeps on adding instance types, you should check the AWS web site to find the latest on types supported. When launched in a placement group, EC2 instances can utilize up to 10Gbps for single-flow traffic in each direction. To use a placement group, first you need to create a placement group and then start launching multiple instances in your placement group. There is no charge for creating a placement group; only when you start an instance in a placement group are you billed for the usage of the instance. It is recommended that you use the same type of instance in a placement group, although it is possible to use multiple instance types in the same placement group. A placement group cannot span multiple AZs, and also the name of a placement group must be unique within your AWS account. You cannot move an existing or running instance in a placement group. To get the maximum benefit for your placement group, you should choose an instance type that supports “enhanced networking.” Enhancement networking provides higher bandwidth, higher packet per second (PPS) performance, and lower inter-instance latencies. It uses single root I/O virtualization (SR-IOV), which is a method of device virtualization that provides higher I/O performance and lower CPU utilization and thus provides high-performance networking capabilities. Since there is no additional cost for using enhanced networking, you should look for an instance that supports enhanced networking and put it in a placement group.
Storage Features
Amazon provides a variety of storage that you can use along with the EC2 instance depending on your workload requirement. The block storage that you attach along with the EC2 instance is known as Elastic Block Storage (EBS). When you attach an EBS volume, it becomes the primary storage, and you can use it like any other physical hard drive. The EBS volume persists independently for the life span of the Amazon EC2 instance. Amazon provides three types of volumes. You can choose any one of them depending on your workload and computation requirements. This has already been discussed in detail in Chapter 2.
• General purpose (GP2) This is the general-purpose EBS volume backed up by solid-state drives (SSDs) and can be used for any purpose. This is often used as the default volume for all the EC2 instances. It is also commonly called GP2 and is more cost-effective than PIOPs, which are discussed in the next section. You can combine multiple GP2 volumes to get better performance at lower cost.
• Provisioned IOPS (PIOPS) If you have a computing need for a lot of I/O, for example, running a database workload, then you can use a provisioned IOPS-based EBS volume to maximize the I/O throughput and get the IOPS that your application or database may need. PIOPS costs a little bit more than the general-purpose EBS volumes since you get more IOPS compared to a general-purpose EBS volume.
• Magnetic Magnetic hard drives provide the lowest cost per gigabyte for all the volume time. They are ideal for running a development workload or a non-mission-critical workload where very high performance is not required.
Some of the EC2 instances also include a local disk in the physical hardware, which is also known as an instance store. The instance store is ephemeral storage and persists only until the end of the EC2 instance’s life. If you shut down or stop the machine, the instance store is gone; therefore, you should not keep any important data in an instance store. If the instance is rebooted, either intentionally or accidentally, the data in the instance store persists. You should keep all your data in Elastic Block Store.
You will notice that some instances are EBS optimized. EBS-optimized instances enable EC2 instances to fully use the IOPS provisioned on an EBS volume. EBS-optimized instances deliver dedicated throughput between Amazon EC2 and Amazon EBS, with options between 500Mbps and 14,000Mbps depending on the instance type used. The dedicated throughput minimizes contention between Amazon EBS I/O and other traffic from your EC2 instance, providing the best performance for your EBS volumes.
Some instances support a cluster networking feature. If you launch instances that support cluster networking in a common cluster placement group, they are placed into a logical cluster that provides high-bandwidth, low-latency networking between all instances in the cluster.
Steps for Using Amazon EC2
It is pretty easy to spin off an EC2 instance. Using the following steps, you should be able to launch an EC2 instance quickly:
1. Select a preconfigured Amazon Machine Image. You can also create your custom AMI and later use that to launch an instance.
2. Configure the networking and security (virtual private cloud, public subnet, private subnet, and so on).
3. Choose the instance type.
4. Choose the AZ, attach EBS, and optionally choose static EIP.
5. Start the instance and you are all set.
Pricing for Amazon EC2
Amazon provides multiple pricing options, depending on the duration of the instance and your payment flexibility. The instances are divided into three categories from a pricing perspective:
• On-demand instance
• Reserved instance
• Spot instance
On-Demand Instance
This is the most popular pricing model of an EC2 instance. In this model, you pay just for the usage on a flat hourly rate or per-second billing. There are no up-front costs or hidden costs or anything else. Say if you create an instance and use it for ten hours and later discard the instance, you need to pay only for ten hours. There is no commitment or minimum term involved; as a result, you can scale up or down at any point in time. If you are developing a new application and don’t know how many resources it is going to take, an on-demand instance is a great way to start.

NOTE Effective October 2, 2017, usage of Linux instances that are launched in the on-demand, reserved, and spot forms will be billed in 1-second increments with a minimum of 60 seconds. Similarly, provisioned storage for EBS volumes will be billed in 1-second increments with a minimum of 60 seconds. This means if you use an EC2 instance for five minutes, you will be charged only for five minutes. Before this change, the EC2 instance was charged on an hourly basis.
Reserved Instance
A reserved instance provides up to a 75 percent discount compared to an on-demand instance. If you already know how many resources your workload is going to take and for how long, a reserved instance is going to provide the maximum cost benefit. One of the best use cases of instances is running the production workload. Say you know that your production server is going to take 16 CPUs and you need this production server configuration for at least a year. You can reserve the capacity for a year and get the discount compared to an on-demand instance. A reserved instance is ideal when you know your application has a pretty steady state or is predictable in terms of performance. Since reserves require either a one-year or three-year commitment, it is important to know the nature of the workload before committing to a reserved instance. You can reserve the instance for either a region or a specific AZ. When you reserve the instance for a region, it is called a regional reserved instance, and when you reserve the instance for a particular AZ, it is referred to as a zonal reserved instance. Multiple payment options are available when you reserve an instance. You can either pay for it in full, which is called up-front reserved, or make a partial payment up-front, which is called partial up-front reserved. Or you can pay nothing in advance, and everything gets billed into a monthly billing cycle that is called no up-front reserved. Thus, you can have the following pricing model for a reserved instance:
1 year, no up-front costs, reserved
1 year, partial up-front costs, reserved
1 year, all up-front costs, reserved
3 years, no up-front costs, reserved
3 years, partial up-front costs, reserved
3 years, all up-front costs, reserved
The reserved instance is divided into two subcategories: standard reserved instance and convertible reserved instance. The standard reserved instance is the regular one you have just studied. The convertible reserved instance provides better flexibility if your compute requirement changes over the given period of time. A convertible reserved instance provides you with the ability and flexibility to exchange the instance from one class of family to another class if your computing need changes. You can purchase the reserved instance for only three years. Please note that standard and convertible reserved instances can be purchased to apply to instances in a specific availability zone or to instances in a region.
For convertible reserved instances, the following are the payment options:
3 years, no up-front costs, convertible
3 years, partial up-front costs, convertible
3 years, all up-front costs, convertible
Spot Instance
As you are probably aware, AWS has the largest compute capabilities among all the different cloud providers, and often some of the excess compute capacity is unused. AWS gives you the ability to bid for the unused capacity, and you can get up to a 90 percent discount compared to on-demand pricing. This pricing model is called spot pricing, and the instance created using the spot pricing model is called a spot instance. The spot instance runs on the bidding model, and you can bid for the spot pricing. The spot price fluctuates based on supply and demand, and if someone overbids you, you then lose the instance, on very short notice. Spot instances offer the same features you’re used to with EC2, but for a fraction of the cost. Spot instances help you unlock the full value of EC2; however, you must be careful when choosing the type of workload you are going to run in the spot instance. Spot instances are great for workloads that can restart from where they failed; in other words, they’re great for running non-mission-critical projects. Often, customers will add a few spot instances along with on-demand instances to provide additional horsepower. Here are some of the use cases where spot instance can be leveraged:
• Anything containerized
• Big data frameworks like Apache Spark and Hadoop
• Batch processing
• Stateless web services
• Machine learning (PyTorch, Tensorflow, or jobs that require heavy training)
• Continuous Integration and Continuous Deployment (CI/CD) with Jenkins
• High-performance computing (HPC), such as for genomics sequencing
• Anything fault-tolerant or stateless that can be instance flexible
The most common use case where spot implementations are successful is building a fault-tolerant workload because EC2 can reclaim the spot instance with a two-minute notification. You should architect your workloads in such a way that they can gracefully handle interruptions. One of the common successful spot implementation patterns is using a spot fleet, which is a collection, or fleet, of spot instances and, optionally, on-demand instances. You can mix and match different types of instances in a spot fleet and, thus, if there is an interruption in a particular type of instance, other types of instances continue to run that support your workload. When you request spot instances, one of the best practices is to use the default maximum price (the on-demand price). Setting the spot price to the maximum price doesn’t mean that you will be charged the maximum price; you will be charged only the price of the spot instance, which is current at that particular point in time. However, setting the spot price to maximum will make sure no one overbids you. If you don’t want to set the spot price to the maximum value, you can also look at spot price history to get an idea about the fluctuations in the spot price.
Shared Tenancy, Dedicated Hosts, and Dedicated Instances
EC2 runs on a virtualized environment; therefore, it is possible that on the same physical machine another customer might be running a different EC2 instance. AWS never over-provisions the resources, which means if you create a server with 16 CPUs, for sure you are going to get 16 CPUs; however, sometimes because of some compliance requirement, you may have to segregate your instances even at the physical level. Dedicated hosts and dedicated instances solve this problem.
Shared Tenancy
This is the default behavior when you launch an instance in EC2. In this case, you run the EC2 instances on multitenant hardware. Dedicated instances are the most popular in Amazon’s EC2 ecosystem.
Dedicated Host
A dedicated host means it is a physical server exclusively assigned to you. Dedicated hosts can help you reduce costs by allowing you to use your existing server-bound software licenses, including Windows Server, SQL Server, and SUSE Linux Enterprise Server. If you want, you can also carve as many virtual machines (VMs) as you want depending on the capacity of the physical server. It can be purchased on-demand or on a reservation basis.
Dedicated Instance
In this case, you run the EC2 instances on single-tenant hardware. Dedicated instances are Amazon EC2 instances that run in a virtual private cloud on hardware that’s dedicated to a single customer. Your dedicated instances are physically isolated at the host hardware level from instances that belong to other AWS accounts.
Using a bare-metal instance is another way of getting a dedicated instance. As the name suggests, in a bare-metal instance, there is no hypervisor, which means bare-metal instances provide your applications with direct access to the processor and memory resources of the underlying server. This instance type is a perfect fit for applications that need to run in nonvirtualized environments for licensing or support requirements.
Instances and AMIs
An Amazon Machine Image is a blueprint that has all the details of the software configuration of the server that you are going to launch in the Amazon cloud (Figure 4-1). For example, an AMI may have details of the operating system, the application server, the applications running in it, and so on. When you launch an instance or server using an AMI, it inherits all the qualities of the AMI. You can launch as many instances as you want from an AMI.

Figure 4-1 Launching one or many instances from AMI
The AMI contains a blueprint about the root volume for the instance, and the root volume contains information about the operating system and various other software running on top of the operating system, such as application servers or the Linux, Apache, MySQL, and PHP (LAMP) stack or any other custom application.
It also has the launch permission information that controls what AWS accounts can use the AMI to launch the instance. Launch permissions fall into the following categories:
• Public The owner grants launch permissions to all AWS accounts.
• Explicit The owner grants launch permissions to specific AWS accounts.
• Implicit The owner has implicit launch permissions for an AMI.
It has block device mapping information that specifies which volume needs to be attached or will be attached when the instance is launched.
As discussed previously, various types of instances are available from Amazon Web Services. You can choose from a compute-intensive instance or an all-memory intensive instance and so on. Using a single AMI, you can launch different types of instances. You can choose an instance type depending on the workload you are going to run. Once you launch the instance, you will get an EC2 server according to the specifications you specify during the launch, and you can log into the system exactly the way you log in to a system on your premise. You can run all the commands that you normally run on a system that run on-premise or at your data center. For example, if you launch a Linux server, you can connect to it by PuTTY, and you can run all the standard Linux commands that you normally run on a Linux server. Similarly, if you launch a Windows server, you can connect to it using RDP, and you can run all the Windows commands that you would on a Windows server in your data center.
Please note there is a limit on the number of instances you can start in a particular region. The limit depends on the instance type. But again, this limit is a soft limit, and with a support ticket you should be able to increase the limit at any time.
Instance Root Volume
An instance root device contains the image that is used to boot the instance. When EC2 was launched initially, all the root devices used to get launched from S3 since the instance root used to be backed up at S3. If the instance root device is backed up by S3, it is called an instance store–backed AMI. After the introduction of Amazon EBS, the images are backed up by an EBS volume because whenever an instance is launched, the root device for the instance is launched from the EBS volume, which is created from an EBS snapshot. It is also known as an Amazon EBS–backed AMI.
Now you can launch an instance either from an instance store–backed AMI or from an Amazon EBS–backed AMI. If you launch an instance that is backed up by an instance store, then when the instance is launched, the image that is used to boot the instance is copied to the root volume. As long as the instance is running, all the data in the instance store volume persists. But whenever the instance is terminated, all the data is gone. Please note instance store–backed instances do not support the stop action; therefore, you can’t stop that instance. If an instance store–backed instance fails or terminates, the data residing on the instance store cannot be restored. Therefore, it is important if you are using an instance store, you should back up your data to a persistent storage regularly and/or on your instance stores across multiple availability zones. The only exception is when the instance is rebooted, data in the instance store persists. Figure 4-2 shows instance creation backed up by an instance store.
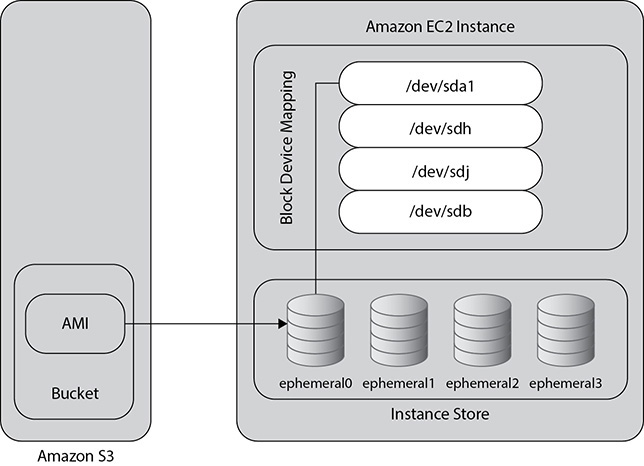
Figure 4-2 Instance creation backed by an instance store
On the other hand, if you launch an instance that is backed up any Amazon EBS–backed instance, the data always persists. These instances support the stop action, and the instance can be stopped and restarted without losing any data. Even if the instance terminates or fails, you don’t lose the data. Since the instance root volume runs out of an EBS volume, you can even attach the root volume of your instance to a different running instance for debugging or any other purpose, such as changing the size of the instance or modifying the properties of the instance.
When you use an instance with an instance store, you can’t detach an instance store volume from one instance and re-attach it to a different instance.
It is recommended that you use an instance that is backed up by EBS, but in case you need to use an AMI that is backed up by an instance store, please don’t store any data in the instance store. Rather, attach an EBS volume to it and store all your data in the EBS volume. By doing this, even if you lose the instance, the EBS volume is going to retain all the data, which you can again mount to any other instance and get the data. Figure 4-3 shows instance creation backed up by an EBS volume.

Figure 4-3 Instance creation backed up EBS volume
Obtaining an AMI
There are many ways you can obtain an AMI for your use. AWS publishes many AMIs with many common software configurations that are available for public use. There are a lot of AMIs that are available via the community. A lot of developers also create their own AMI and make it available for public use; you can even use them. You can also create your own AMI and publish it to the developer community. In the community images, you will see a wide variety of different AMIs available. You can choose any one of them depending on your usage. For example, if you need to pre-install Linux, Apache, MySQL, and PHP, you can quickly search AMIs with the LAMP stack and use that to create your EC2 instance. As soon as the instance is created, the LAMP stack is already deployed for you. You just need to start the web server, and then you are all set.
As discussed previously, irrespective of how you choose your AMI, either it will be backed up by Amazon EBS or it will be backed up by the instance store.

TIP You can convert an instance store–backed Linux AMI that you own to an Amazon EBS–backed Linux AMI; you can’t do that with Windows-based AMIs.
You can also create your AMI and save it as a template to launch further instances. You can also distribute your AMIs with the developer community. You can take a public AMI, make customizations on top of it, and then save it as a custom AMI for your own use or distribute it to a different team in your organization or to an external community. If you want to keep the AMI for your own use, make sure you keep it private so that only you can use it. When you create an AMI, you have the choice to back it up either via EBS volume or by instance store.
The image created by the developer community is called a shared AMI. When you share an AMI with the developer community, that will also be called a shared AMI. Since anyone can create the AMI and share it with the developer community, as a result Amazon does not vouch for those AMIs. If you want to use a shared AMI, you should be careful because you don’t know who has created the AMI and whether it has any bugs. You can also leverage AWS forums to ask any questions about a shared AMI.
Please note an AMI is a regional resource. If you want to share an AMI to a different region, you need to copy the AMI to a different region and then share it. You can also share an AMI with specific accounts without making it public (when you make an AMI public, everyone has access to it). For example, if you want to share it to multiple friends or multiple clients, sharing with AWS IDs is the way to go.
The AWS Marketplace is an online store where you can buy software that runs on AWS. You can also purchase an AMI from the AWS Marketplace. When you purchase an AMI from the AWS Marketplace, you launch it in the same way as you would for any other AMI. The marketplace is integrated with EC2; therefore, it is easy and simple to launch an AMI from the marketplace. The instance is charged according to the rates set by the owner of the AMI, as well as the standard usage fees for the software running on top of it, if any. You can also create your own AMI and sell it to the AWS Marketplace.
Once you’re done with the AMI, you can deregister it. Once you deregister it, you won’t have access to it, and you will not be able to create any instances from it.
Virtualization in AMI
Linux Amazon machine images use one of two types of virtualization:
• Hardware Virtual Machine (HVM)
• Paravirtual (PV)
The main difference between them is how they boot and how they take advantage of the hardware extensions in the context of CPU, memory, and storage to provide better performance.
HVM AMI
HVM AMI executes the master boot records of the root block device and then presents a fully virtualized set of hardware to the operating system. As a result, the operating system runs directly on top of the VM as it is without any modification similar to the way it runs on a bare-metal hardware.
HVM AMIs are presented with a fully virtualized set of hardware and boot by executing the master boot record of the root block device of your image. This virtualization type provides the ability to run an operating system directly on top of a virtual machine without any modification, as if it were run on the bare-metal hardware. The Amazon EC2 host system emulates some or all of the underlying hardware that is presented to the guest. The EC2 server emulates some or all of the underlying hardware that is presented to the guest. As a result of this, the performance becomes really fast since HVM guests can take full advantage of all the hardware extensions that provide fast access to the underlying hardware on the host system.
All current-generation instance types support HVM AMIs.
PV AMI
PV AMIs boot with a boot loaded called PV-GRUB. It starts the boot cycle and loads the kernel specified in the menu.lst file on your image. Paravirtual guests can run on host hardware that does not have explicit support for virtualization. But unfortunately, they can’t really take advantage of special hardware extensions that HVM can take such as enhanced networking or GPU processing and so on.
The following generation instance types support PV AMIs: C1, C3, HS1, M1, M3, M2, and T1. Current-generation instance types do not support PV AMIs.
Amazon recommends you use an HMV image to get the maximum performance when you launch your instance. Also, you should always use a current-generation instance over a previous-generation instance to get the latest and greatest hardware (CPU, memory, and so on) features.
Instance Life Cycle
Since you are going to work with the instance on a day-to-day basis, it is important for you to understand the overall life cycle for an instance. Let’s understand all the phases of an EC2 instance.
Launch
When you launch an instance, immediately it enters into the “pending” state. The AMI you specify at the launch is used to boot the instance. The hardware on which it gets booted up depends on the type of hardware that you select for the instance type. Before starting the instance, a few health checks are performed to make sure that there are no issues with the hardware and the instance can come online without any issues. Once the instance is up and running and is ready for you, it enters into the “running” state. As soon as it is in the running state, the instance is ready for all practical purposes, and you can connect to it and start using it. At this moment, the billing starts, and you are billed for each hour of usage. When the instance reaches the running state, you are still liable to pay the bill, even if you don’t connect and use it.
Start and Stop
If the health check fails, the instance does not get started. At that time, you can either start a new instance or try to fix the issue. If there are no issues with the health check, the instance starts normally, and you can start using it thereafter.
You can stop an instance only if it is backed up by an EBS-backup instance. You can’t stop an instance backed by an instance store. When you stop your instance, it enters the stopping state and then the stopped state. Amazon doesn’t charge you once the instance is in a stopped state or if you stop it. Since the data resides in the EBS volumes, you are charged for the EBS volumes. You can also modify an instance type by upgrading it to new or bigger hardware by stopping it and then starting it on a new instance.
Reboot
You can reboot an instance that is either backed up by instance store or backed up by EBS. A reboot is similar to rebooting an operating system. All the data is saved after the reboot; even the data in the instance store is saved, and nothing is lost. The IP address, machine type, and DNS name all remain the same after the reboot. You can reboot the instance either via the Amazon console or via CLI and API calls.
Termination
If you do not need the instance anymore, you can terminate it. As soon as you terminate the instance, you will see that the status changes to “shutting down” or “terminated.” The moment the instance is shut down, the billing stops, and you don’t have to pay anything after that. If the instance has termination protection enabled, you may have to perform an additional step, or you may have to disable termination protection to terminate the environment. Termination protection is a helpful feature that can protect an instance against accidental termination. If you enable the termination protection, then before terminating, the system will prompt you with “Do really want to terminate the instance?”
You will notice that even after the termination of the instance, it remains visible in the console for a little while. This is normal behavior, and after a while the entry is automatically deleted.
You can either delete the EBS volume associated with the instance or preserve the EBS volume associated with the instance. The Amazon EBS volume supports the DeleteOnTermination attribute. This attribute controls whether the volume is deleted or preserved when you terminate the instance. The default behavior is to delete the root device volume and preserve any other EBS volumes.
Retirement
When AWS determines there is an irreparable hardware failure that is hosting the instance, then the instance is either retired or scheduled to be retired. As soon as the instance reaches its retirement date, it is stopped or terminated by AWS. If the instance is a backed EBS volume, you have all the data stored in the EBS volume, and therefore you can start the instance any time by choosing a different hardware. If the instance’s root volume is backed up by the instance store, you must take the backup of all the files stored in the instance store before it gets terminated or you will lose all the data.
Connecting to an Instance
Once you launch an instance successfully, the next step is to connect to it. To connect to it, you need the connection details of the instance. The same can be obtained by logging into the console and going to the EC2 home page. Select the instance and then click Actions | Connect. A connection pop-up will open with all the connection details, as shown in Figure 4-4.

Figure 4-4 Connection details for an EC2 instance
If you launch the instance in the public subnet, it will be assigned a public IP address and public DNS name via which you can reach the instance from the Internet. Besides the public IP address, it will also be an allocated private IP address and private DNS. If you choose the IPv6 IP address, then it will be allocated a public IPv6 IP address as well.
Here is how all IPs look:
• Public DNS (IPv4) ec2-54-241-169-35.us-west-1.compute.amazonaws.com
• IPv4 public IP 54.241.169.35
• Private DNS ip-172-31-10-142.us-west-1.compute.internal
• Private IPs 172.31.10.142
The public DNS name is automatically created by AWS during the instance creation and stays with the instance for its tenure. You won’t be able to change the public DNS associated with an instance. You can find the public DNS from the EC2 console main page and then select the instance for which you are querying the details, as shown in Figure 4-5.
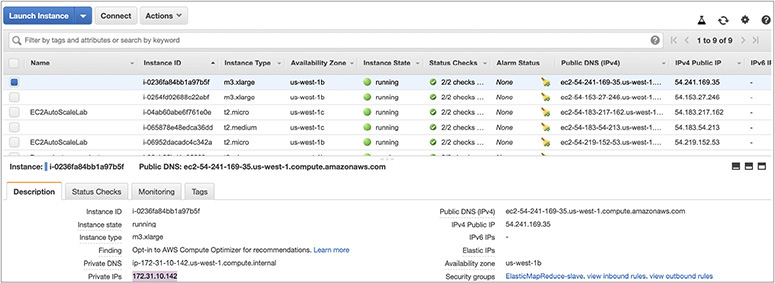
Figure 4-5 Public DNS of an EC2 instance
The public IP address will also be assigned if you create the instance in the public subnet. The public IP address is also unique, and you won’t be able to modify this. The public IP address will persist for the life span of the instance. If you terminate the instance, the public IP address will automatically be disassociated, and you can’t associate the same public IP address in any other server even if you terminate an instance. If you want to associate an IP address from one server with another server, then you can do it via an elastic IP address.
Optionally you can also assign an EIP address to an EC2 instance. I already discussed EIP in the previous chapter, so I am not going to discuss this again. EIP addresses can be moved from one instance to other.
If you create the instance in a private subnet, then it will be allocated a private IP address and a private DNS.
If you look at Figure 4-4, you will notice that to connect to an instance, the console prompts you to download a private key in your local machine and then change the permission in it. Amazon EC2 uses the public-private key concept used in cryptography to encrypt and decrypt the login information. In cryptography a public key is used to encrypt the data, and the private key associated with it is used to decrypt the data. You need the private key to connect to an EC2 instance. There are multiple ways of creating the key pair (a combination of public and private keys is called a key pair). You can create it via the AWS console or via the AWS command-line interface or by API. AWS customers can also bring their own keys and upload them in the system. The keys that Amazon EC2 uses are 2,048-bit SSH-2 RSA keys. You can have up to 5,000 key pairs per region.
Once you download the private key, you can connect to the EC2 instance using the instructions shown in Figure 4-4. You must be wondering where the public key is kept. The public key is stored inside the EC2 instance in the ~/.ssh/authorized_keys directory.

The connect details screen will also tell which user to use to log in to the instance. By default the user will be ec2-user for Amazon Linux, and it will be a different user for a different Linux distribution. After the initial login using the keys, you can configure SSO and log in via LDAP.
In the case of a Windows-based EC2 instance, the server generates a random password for the administrator account and encrypts the password using the public key. The first time a user logs in, the password is decrypted using the private key, and immediately after that, the user is prompted to change their password.
Security Group
A security group acts as a virtual firewall that controls the traffic for one or more instances. When you launch an instance, you associate one or more security groups with the instance. You add rules to each security group that allow traffic to or from its associated instances. You can modify the rules for a security group at any time; the new rules are automatically applied to all instances that are associated with the security group. When you decide whether to allow traffic to reach an instance, you evaluate all the rules from all the security groups that are associated with the instance.
The rules of a security group control the inbound traffic that’s allowed to reach the instances that are associated with the security group and the outbound traffic that’s allowed to leave them.
The following are the characteristics of security group rules:
• By default, security groups allow all outbound traffic.
• You can’t change the outbound rules for an EC2-Classic security group.
• Security group rules are always permissive; you can’t create rules that deny access.
• Security groups are stateful—if you send a request from your instance, the response traffic for that request is allowed to flow in regardless of the inbound security group rules. For VPC security groups, this also means that responses to allowed inbound traffic are allowed to flow out, regardless of outbound rules.
• You can add and remove rules at any time. Your changes are automatically applied to the instances associated with the security group after a short period.
• When you associate multiple security groups with an instance, the rules from each security group are effectively aggregated to create one set of rules. You use this set of rules to determine whether to allow access.
For each rule, you specify the following:
• Protocol This is the protocol to allow. The most common protocols are 6 (TCP), 17 (UDP), and 1 (ICMP).
• Port range For TCP, UDP, or a custom protocol, this is the range of ports to allow. You can specify a single port number (for example, 22) or a range of port numbers (for example, 7000 to 8000).
• ICMP type and code For ICMP, this is the ICMP type and code.
• Source or destination This is the source (inbound rules) or destination (outbound rules) for the traffic. Specify one of these options:
• An individual IPv4 address. You must use the /32 prefix after the IPv4 address, for example, 203.0.113.1/32.
• (VPC only) An individual IPv6 address. You must use the /128 prefix length, for example, 2001:db8:1234:1a00::123/128.
• A range of IPv4 addresses, in CIDR block notation, for example, 203.0.113.0/24.
• (VPC only) A range of IPv6 addresses, in CIDR block notation, for example, 2001:db8:1234:1a00::/64.
• Another security group. This allows instances associated with the specified security group to access instances associated with this security group. This does not add rules from the source security group to this security group. You can specify one of the following security groups:
• The current security group.
• EC2-Classic A different security group for EC2-Classic in the same region.
• EC2-Classic A security group for another AWS account in the same region (add the AWS account ID as a prefix, for example, 111122223333/sg-edcd9784).
• EC2-VPC A different security group for the same VPC or a peer VPC in a VPC peering connection.
When you specify a security group as the source or destination for a rule, the rule affects all instances associated with the security group. Incoming traffic is allowed based on the private IP addresses of the instances that are associated with the source security group (and not the public IP or elastic IP addresses). If your security group rule references a security group in a peer VPC and the referenced security group or VPC peering connection is deleted, the rule is marked as stale.
If there is more than one rule for a specific port, you apply the most permissive rule. For example, if you have a rule that allows access to TCP port 22 (SSH) from IP address 203.0.113.1 and another rule that allows access to TCP port 22 from everyone, everyone has access to TCP port 22.
Amazon Elastic Container Service
Amazon Elastic Container Service (ECS) is a container management service that allows you to manage Docker containers on a cluster of Amazon EC2. Amazon ECS is highly scalable; it is fast; and it allows you to start, stop, manage, and run the containers easily and seamlessly. Using Amazon ECS, you can easily launch any container-based application with simple API calls.
Containers are similar to hardware virtualization (like EC2), but instead of partitioning a machine, containers isolate the processes running on a single operating system. This is a useful concept that lets you use the OS kernel to create multiple isolated user space processes that can have constraints on them like CPU and memory. These isolated user space processes are called containers. Using containers you can build your own application, share the image with others, deploy the image quickly, and do lots of other things quickly. Containers are portable, which makes the development life cycle simpler. The same image can run on the developer’s desktop as well as in the production server. The image is consistent and immutable; therefore, no matter where it runs or whenever you start it, it’s always the same. The entire application is self-contained, and the image is the version that makes deployments and scaling easier because the image includes the dependencies. Containers are very efficient. You can allocate exactly the amount of resources (CPU, memory) you want, and at any point in time you can increase or decrease these resources depending on your need.
Containers enable the concept of microservices. Microservices encourage the decomposition of an app into smaller chunks, reducing complexity and letting teams move faster while still running the processes on the same host. If you are planning to run a microservice architecture, a container should be your first choice.
Often it is seen that once developers start deploying their applications on containers, the tasks of managing and scaling the containers become challenging. For example, if there are 200 developers and everyone is trying to deploy the part of their code using containers, managing these 200 containers becomes really challenging. A couple of the problems often faced are: What happens when a container dies? How do you know whether the host where you are putting the containers has enough resources? Managing the state of the cluster, hosting the containers is critical for the successful deployment of the containers and applications running inside it. Flexible scheduling is another challenge that is often faced. Amazon ECS solves all these problems.
Amazon ECS handles the complexity of cluster and container management so you don’t have to install and operate your own cluster management infrastructure. Amazon has built several core distributed systems primitives to support its needs. Amazon ECS is built on top of one of these primitives. Amazon exposes this state management behind a simple set of APIs that give the details about all the instances in your cluster and all the containers running on those instances. Amazon ECS APIs respond quickly whether you have a cluster with one instance and a few containers or a dynamic cluster with hundreds of instances and thousands of containers. These are some of the benefits of running containers on Amazon ECS:
• Eliminates cluster management software. There is no need to install any cluster management software.
• You can easily manage clusters for any scale.
• Using ECS you can design fault-tolerant cluster architecture.
• You can manage cluster state using Amazon ECS.
• You can easily control and monitor the containers seamlessly.
• You can scale from one to tens of thousands of containers almost instantly.
• ECS gives you the ability to make good placement decisions about where to place your containers.
• ECS gives you the intel about the availability of resources (CPU, memory).
• At any time you can add new resources to the cluster with EC2 Auto Scaling.
• It is integrated with other services such as Amazon Elastic Container Registry, Elastic Load Balancing, Elastic Block Store, Elastic Network Interfaces, Virtual Private Cloud, IAM, and CloudTrail.
Lab 4-1: Using EC2
This lab will walk you through launching, configuring, and customizing an EC2 virtual machine to run a web server. You will successfully provision and start an EC2 instance using the AWS Management Console.
Creating a New Key Pair
In this lab, you will need to create an EC2 instance using an SSH key pair. The following steps outline how to create a unique SSH key pair for you to use in this lab:
1. Sign into the AWS Management Console and open the Amazon EC2 console at https://console.aws.amazon.com/ec2.
2. In the upper-right corner of the AWS Management Console, confirm you are in the desired AWS region (e.g., Oregon).
3. Click Key Pairs in the Network & Security section near the bottom of the leftmost menu. This will display a page to manage your SSH key pairs.

4. To create a new SSH key pair, click the Create Key Pair button at the top of the browser window.
5. In the resulting pop-up window, type [First Name]-[Last Name]-awslab in the Key Pair Name text box and click Create.

6. The page will download the file joyjeet-banerjee-awslab.pem to the local drive. Follow the browser instructions to save the file to the default download location.
Remember the full path to the file.pem file you just downloaded. You will use the key pair you just created to manage your EC2 instances for the rest of the lab.
Launching a Web Server Instance
In this example, you will launch a default Amazon Linux instance with an Apache/PHP web server installed on initialization.
1. Click EC2 Dashboard toward the top of the left menu.
2. Click Launch Instance.
3. In the Quick Start section, select the first Amazon Linux AMI and click Select.
4. Select the general-purpose t2.micro instance type and click Next: Configure Instance Details.

5. On the Configure Instance Details page, expand the Advanced Details section at the bottom of the page, and type the following initialization script information into the User Data field. (You can use SHIFT-ENTER to create the necessary line break, or alternatively you could type this into Notepad and copy and paste the results.) Then click Next: Add Storage. This will automatically install and start the Apache web server on launch.
#include https://s3.amazonaws.com/jbawsbook/bootstrap.sh
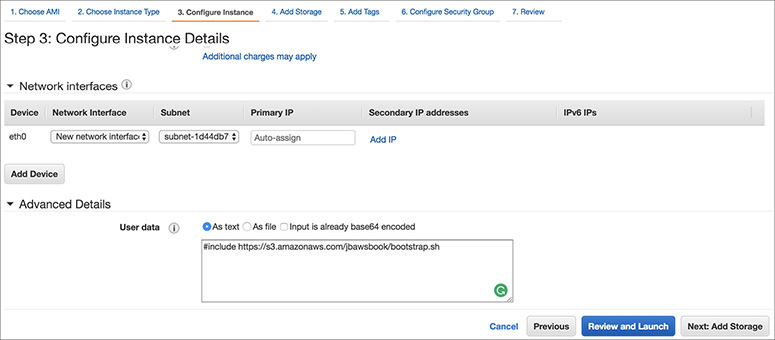
Click Next: Add Storage to accept the default storage device configuration.
6. Next, on the Add Tags page choose a “friendly name” for your instance. This name, more correctly known as a tag, will appear in the console once the instance launches. This makes it easy to keep track of running machines in a complex environment. Name yours according to this format: [Name] Web Server.

7. Then click Next: Configure Security Group.
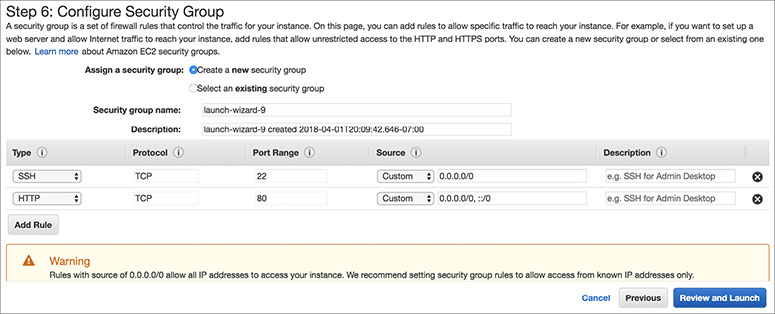
8. You will be prompted to create a new security group, which will be your firewall rules. On the assumption you are building out a web server, name your new security group [Your Name] Web Tier, and confirm an existing SSH rule exists that allows TCP port 22 from anywhere. Click Add Rule.
9. Select HTTP from the Type drop-down menu, and confirm TCP port 80 is allowed from anywhere. Click Add Rule.
10. Click the Review And Launch button after configuring the security group.
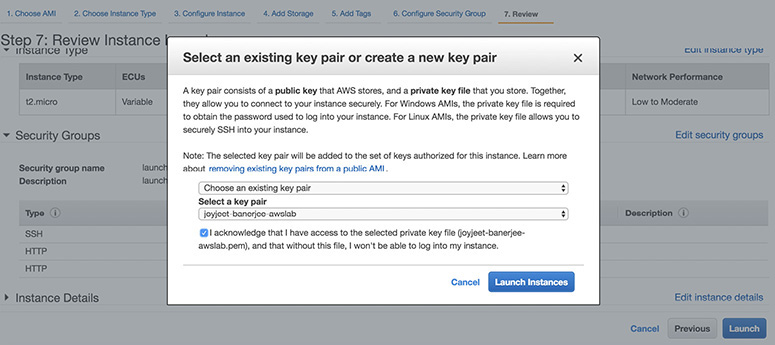
11. Review your choices and then click Launch.
12. Select the [YourName]-awslab key pair that you created at the beginning of this lab from the drop-down and select the “I acknowledge” check box. Then click the Launch Instances button.
13. Click the View Instances button in the lower-right portion of the screen to view the list of EC2 instances. Once your instance has launched, you will see your web server as well as the availability zone the instance is in and the publicly routable DNS name.
14. Select the check box next to your web server name to view details about this EC2 instance.
Browsing the Web Server
To browse the web server, follow these steps:
1. Wait for the instance to pass the status checks to finish loading.
2. Open a new browser tab and browse the web server by entering the EC2 instance’s public DNS name into the browser. The EC2 instance’s public DNS name can be found in the console by reviewing the Public DNS name line.

3. You should see a web site with the details of the EC2 instance, the instance ID, and the availability zone.
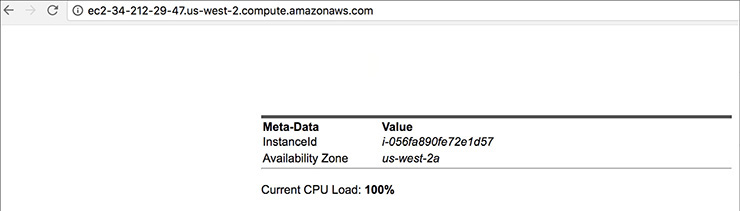
Great job! You have deployed a server and launched a web site in a matter of minutes.
Lab 4-2: Creating an EBS Instance and Attaching It to an EC2 Instance
1. In this lab, you will create a new provisioned IOPS-based EBS volume and then attach it to an existing EC2 instance. Go to the AWS console and select EC2.
2. Make sure you are in the correct region.
3. In the left menu, select Volumes under Elastic Block Store.
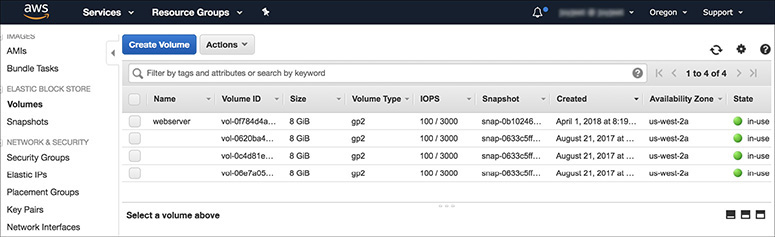
4. Click Create Volume at the top.
5. For Volume Type, select Provisioned IOPS.
6. For Size, select 10.
7. For IOPS, select 100.
8. For Availability Zone, choose the AZ where your EC2 instance is running. In this example, we have chosen us-east-1b.
9. Leave the defaults for the rest of the settings except Tags. Select the Add Tags To Your Volume box.
10. Add a tag to uniquely identify this volume. In this example, we have added Name for Key and EBSforBook for Value.
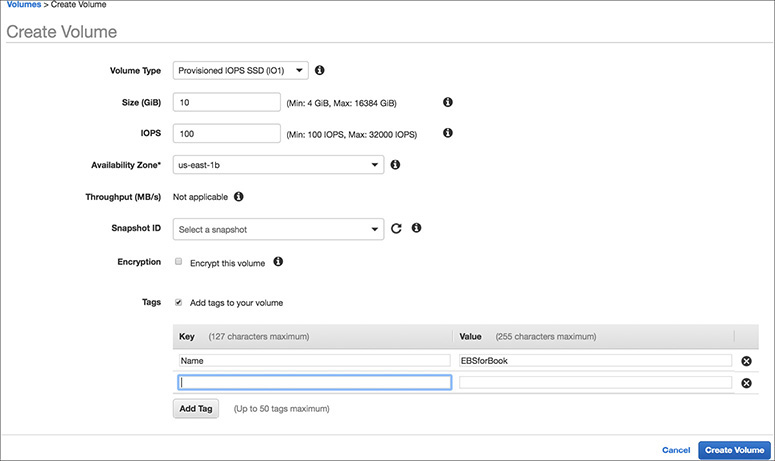
11. Click Create Volume. You will see an alert about a volume being created successfully and with the volume ID.

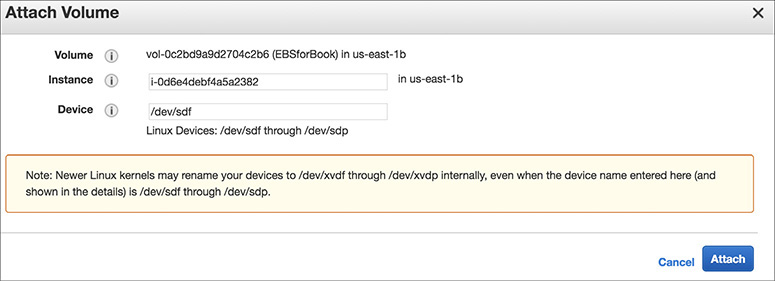
12. You have successfully created the volume. Now mount it to a running EC2 instance by clicking the EBS volume.
13. Select the new volume you have created and click Actions | Attach Volume.

14. To attach the volume, you need the instance ID and device name. You can obtain the instance ID from the instance detail page of the EC2 instance. The instance detail page will also show you the existing devices that are in use. Choose a device name that is not in use. The system will prompt you for a device name. You can use that as well.
15. The volume is already added in the EC2 instance, so go to the details page from the EC2 instance to see the new volume.
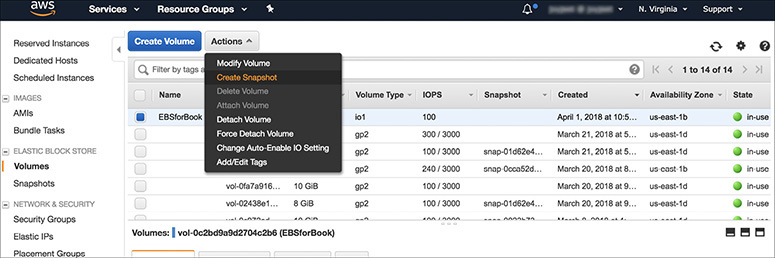
16. Go to the EBS volume page to see the details for this volume. Look at State; it should say that it’s in use. Now look at the attachment information; you will see where it is attached.
17. Select this volume and take a snapshot. Click Volume | Actions | Create Snapshot.
18. The Create Snapshot window will open; provide the description for the snapshot. You will notice that Encrypted will show as Not Encrypted since the EBS volume is not encrypted. Add a tag and create the snapshot.

19. The snapshot will be created, and you will get the ID of the snapshot.

20. Now use this snapshot to create another EBS volume and then attach it to a new EC2 instance. Try it yourself. By doing this, you should be able to create a clone of any EBS volume and should be able to mount it to any other EC2 instance.
Lab 4-3: Creating an Elastic File System (EFS) and Mounting Across Two EC2 Instances in Different AZs
1. In this lab, you will create an EFS and mount it across two EC2 instances in different AZs. Go to the AWS console and select EFS.
2. Choose the region of your choice from the top-right corner and click Create File System.
3. Select the VPC where you want to create the EFS. You can create the EFS across the VPC’s AZ. In this case, you will use the VPC that has only two AZs. Therefore, you should be able to create the mount target only in those two AZs. If you choose the default AZ in the Virginia region, you should be able to create six mount targets since there are six availability zones in Virginia.

4. Add tags to the file system so that you can uniquely identify it. In this case, we have added Name for Key and EFSbook for Value.
5. Under Choose Performance Mode, select General Purpose since you are going to attach this EFS to only two EC2 instances. When you have many servers and you need faster input/output, choose Max I/O.
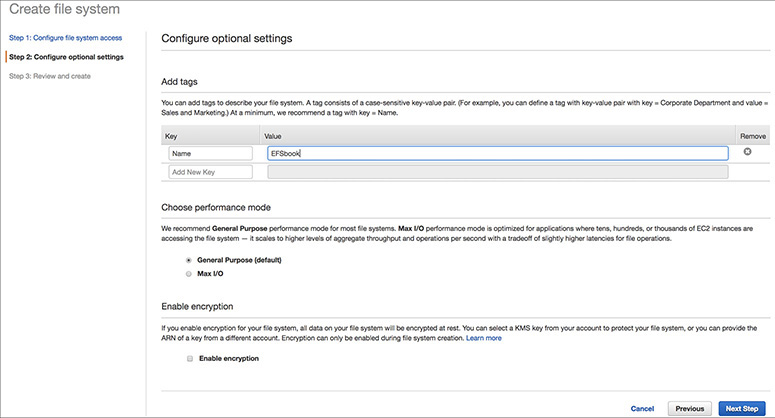
6. Deselect Enable Encryption since you are not going to encrypt the EFS.
7. Review the details and click Create File System.

8. It will take a few minutes to create the file system. Once the file system has been created, you will see the details on the confirmation screen.

9. Now that the EFS has been created, the next step is to mount it across EC2 instances. If you look at the previous illustration carefully, you will notice it has an instructions link for mounting an Amazon EC2 instance. Click the link, and you will see the detailed instructions.
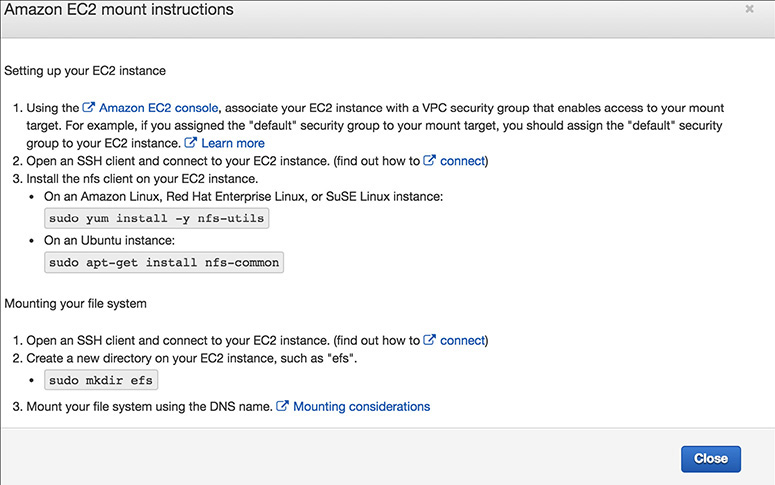
10. Log in to the EC2 instance from a terminal.
11. Install the NFS client on the EC2 instance. You can do this by running the following command on an Amazon Linux, Red Hat Enterprise Linux, or SUSE Linux instance:
![]()
Or you can run the following command on an Ubuntu instance:
![]()
12. Make a directory where you will mount the EFS (say efs) by running this command:
![]()
13. Mount the EFS by running the following command:
![]()
14. Once the file system is mounted, create a file and save it.
15. Now mount the EFS from a second EC2 instance in a different AZ. You should be able to access the file that you have created and saved in the EFS from the first EC2 instance.
Chapter Review
In this chapter, you learned that there are five types of EC2 instances available: general purpose, compute optimized, memory optimized, storage optimized, and advanced computing. You learned how you can use a placement group to reduce the latency across instances. A placement group is a logical grouping of instances within a single AZ. You also learned that three types of EBS volumes can be attached to the EC2 instance: a general-purpose EBS volume backed up by solid-state drives, a provisioned IOPS-based EBS volume to maximize the I/O throughput, and a magnetic hard drive that provides the lowest cost per gigabyte. You learned about EBS-optimized instances that deliver dedicated throughput between Amazon EC2 and Amazon EBS volumes. You learned about the pricing model of EC2, which can be either on-demand (on an hourly or a per-second basis depending on the instance type) or a reserved instance (where you can reserve the instance in advance) and spot instances (where you bid for the unused compute). The default behavior of EC2 is shared tenancy, where you run EC2 instances on multitenant hardware. You can also host the EC2 instance on a dedicated host as well as on a dedicated instance. A dedicated host is a physical server exclusively assigned to you, and a dedicated instance is where you run the EC2 instances on single-tenant hardware. An Amazon machine image is a blueprint that has all the details of the software configuration of the server that you are going to launch in the Amazon cloud. An instance root device contains the image that is used to boot the instance. Linux AMIs use one of two types of virtualization: paravirtual and hardware virtual machine. Amazon Elastic Container Service is a container management service that allows you to manage Docker containers on a cluster of Amazon EC2 instances.
Questions
1. You know that you need 24 CPUs for your production server. You also know that your compute capacity is going to remain fixed until next year, so you need to keep the production server up and running during that time. What pricing option would you go with?
A. Choose the spot instance
B. Choose the on-demand instance
C. Choose the three-year reserved instance
D. Choose the one-year reserved instance
2. You are planning to run a database on an EC2 instance. You know that the database is pretty heavy on I/O. The DBA told you that you would need a minimum of 8,000 IOPS. What is the storage option you should choose?
A. EBS volume with magnetic hard drive
B. Store all the data files in the ephemeral storage of the server
C. EBS volume with provisioned IOPS
D. EBS volume with general-purpose SSD
3. You are running your application on a bunch of on-demand servers. On weekends you have to kick off a large batch job, and you are planning to add capacity. The batch job you are going to run over the weekend can be restarted if it fails. What is the best way to secure additional compute resources?
A. Use the spot instance to add compute for the weekend
B. Use the on-demand instance to add compute for the weekend
C. Use the on-demand instance plus PIOPS storage for the weekend resource
D. Use the on-demand instance plus a general-purpose EBS volume for the weekend resource
4. You have a compliance requirement that you should own the entire physical hardware and no other customer should run any other instance on the physical hardware. What option should you choose?
A. Put the hardware inside the VPC so that no other customer can use it
B. Use a dedicated instance
C. Reserve the EC2 for one year
D. Reserve the EC2 for three years
5. You have created an instance in EC2, and you want to connect to it. What should you do to log in to the system for the first time?
A. Use the username/password combination to log in to the server
B. Use the key pair combination (private and public keys)
C. Use your cell phone to get a text message for secure login
D. Log in via the root user
6. What are the characteristics of AMI that are backed up by the instance store? (Choose two.)
A. The data persists even after the instance reboot.
B. The data is lost when the instance is shut down.
C. The data persists when the instance is shut down.
D. The data persists when the instance is terminated.
7. How can you make a cluster of an EC2 instance?
A. By creating all the instances within a VPC
B. By creating all the instances in a public subnet
C. By creating all the instances in a private subnet
D. By creating a placement group
8. You need to take a snapshot of the EBS volume. How long will the EBS remain unavailable?
A. The volume will be available immediately.
B. EBS magnetic drive will take more time than SSD volumes.
C. It depends on the size of the EBS volume.
D. It depends on the actual data stored in the EBS volume.
9. What are the different ways of making an EC2 server available to the public?
A. Create it inside a public subnet
B. Create it inside a private subnet and assign a NAT device
C. Attach an IPv6 IP address
D. Allocate that with a load balancer and expose the load balancer to the public
10. The application workload changes constantly, and to meet that, you keep on changing the hardware type for the application server. Because of this, you constantly need to update the web server with the new IP address. How can you fix this problem?
A. Add a load balancer
B. Add an IPv6 IP address
C. Add an EIP to it
D. Use a reserved EC2 instance
Answers
1. D. You won’t choose a spot instance because the spot instance can be taken away at any time by giving notice. On-demand won’t give you the best pricing since you know you will be running the server all the time for the next year. Since you know the computation requirement is only for one year, you should not go with a three-year reserved instance. Rather, you should go for a one-year reserved instance to get the maximum benefit.
2. C. The magnetic hard drive won’t give you the IOPS number you are looking for. You should not put the data files in the ephemeral drives because as soon as the server goes down, you will lose all the data. For a database, data is the most critical component, and you can’t afford to lose that. The provisioned IOPS will give you the desired IOPS that your database needs. You can also run the database with general-purpose SSD, but there is no guarantee that you will always get the 8,000 IOPS number that you are looking for. Only PIOPS will provide you with that capacity.
3. A. Since you know the workload can be restarted from where it fails, the spot instance is going to provide you with the additional compute and pricing benefit as well. You can go with on-demand as well; the only thing is you have to pay a little bit more for on-demand than for the spot instance. You can choose a PIOPS or GP2 with the on-demand instance. If you choose PIOPS, you have to pay much more compared to all the other options.
4. B. You can create the instance inside a VPC, but that does not mean other customers can’t create any other instance in the physical hardware. Creating a dedicated instance is going to provide exactly what you are looking for. Reserving the EC2 instance for the instance for one or three years won’t help unless you reserve it as a dedicated instance.
5. B. The first time you log in to an EC2 instance, you need the combination of the private and public keys. You won’t be able to log in using a username and password or as a root user unless you have used the keys. You won’t be able to use multifactor authentication until you configure it.
6. A, B. If an AMI is backed up by an instance store, you lose all the data if the instance is shut down or terminated. However, the data persists if the instance is rebooted.
7. D. You can create the placement group within the VPC or within the private or public subnet.
8. A. The volumes are available irrespective of the time it takes to take the snapshot.
9. A. If you create an EC2 instance in the public subnet, it is available from the Internet. Creating an instance inside a private subnet and attaching a NAT instance won’t give access from the Internet. Attaching an IPv6 address can provide Internet accessibility provided it is a public IPv6 and not private. Giving load balance access to the public won’t give the EC2 access to the public.
10. C. Even if you reserve the instance, you still need to remap the IP address. Even with IPv6 you need to remap the IP addresses. The load balancer won’t help because the load balancer also needs to be remapped with the new IP addresses.