
CHAPTER 7
Storage and Archiving in the AWS Cloud
In this chapter, you will
• Learn how Amazon Elastic Block Storage (EBS) provides block-level storage volumes for use with your EC2 instances
• See how Amazon Simple Storage Service (S3) provides object storage in the AWS cloud
• Understand Amazon S3 Glacier, a storage service optimized for infrequently accessed data that’s ideal for data archiving and backup storage
• Learn how Amazon Elastic File System (EFS) provides scalable file storage for your EC2 instances
• Learn about Amazon Snowball, a service that helps you transport large quantities of data to and from AWS with the help of an AWS-provided storage appliance
• Learn about the Amazon Storage Gateway, a service that connects your on-premise software appliances with AWS S3 storage
This chapter discusses the various storage options offered by AWS. These storage options are wide ranging—from object storage in the cloud, to an elastic file system that lets you access an AWS-based file system as a local file system.
Overview of AWS Storage Options
AWS offers a broad range of storage options that offer plenty of flexibility. You can move between various storage tiers and storage types at any time. Your goal is to choose the AWS storage option that suits your organization’s needs, including cost, availability, durability, and performance considerations. Before you consider the various storage alternatives offered by AWS, you must identify your storage requirements.
Identifying Your Storage Requirements
There’s no one AWS storage type that suits all workloads. Different storage types are geared toward different purposes, such as durability, speed of access, cost efficiency, and security. You must therefore understand the performance profiles of your workloads and choose a specific storage type that matches each type of workload that you manage.
Following are the key factors that determine the type of storage required for a workload:
• Performance You can measure performance in terms of throughput, or IOPS (I/O per second). Throughput (measured in megabytes per second) is the amount of data transferred in a set time period; IOPS relates to the latency or speed of data access. Some workloads require a high throughput, while others require a high IOPS. AWS offers storage types that are optimized for either, so you can pick the right storage for your needs.
• Availability This criterion measures the ability of the storage volumes to return data when it’s requested.
• Frequency of data access AWS offers storage types designed for frequent, less frequent, or infrequent access to data.
• Data durability If your data is critical and must be stored indefinitely, you must choose the storage type that meets these requirements. Transient data such as clickstream and Twitter data, for example, doesn’t require high durability, because it’s not critical data.
• Data sensitivity Some types of data are critical from a business point of view, and others are critical from a security or regulatory point of view.
• Cost of storage Probably one of the most important criteria in choosing the storage type is the cost of storing data. Your storage budget, the importance of the data that you store, and the speed with which you must retrieve the data are pertinent factors in evaluating the storage cost factor.
Choosing the right AWS storage service means that you evaluate these key storage-related factors, keeping in mind your budget, compliance and regulatory requirements, and your application requirements for availability, durability, and performance of the data storage.
AWS Storage Categories
AWS offers three basic storage service categories: object, block, and file. Each of these storage services satisfies a different set of storage requirements, thus providing you a way to choose the storage service, or services, that work best for you.
Object Storage
Amazon S3 is an all-purpose object storage option that offers the highest level of data durability and availability in the AWS cloud. Object storage means that the files that you store in this type of storage are saved as single objects, and not as data blocks. If you store a file sized 40MB, it’s saved as a single, 40MB-sized object in S3.
As you’ll learn in the next section, block storage is provided as mountable storage volumes that you can format and use. Object storage is completely different from block storage in this regard: With block storage, you don’t have direct access to the object storage volumes in S3; instead, you use APIs to make calls to the S3 service to read, write, update, or delete data that you store in S3 buckets. (I describe buckets and the objects that you store in them in the sections “Buckets” and “Objects,” later in the chapter.)
As with most AWS object storage types, S3 is a regional service. The data that you store in S3 is automatically replicated across several data centers in different availability zones (AZs). This is a true advantage of S3 storage, because if you had to provide the same level of data durability on your own, you’d need to store your data in multiple data centers.
A key difference in the way you work with S3 and EBS (block storage) is that with S3, there’s no need for you to provision the storage. Use whatever storage you need, and AWS bills you for that storage volume. This is much simpler than provisioning several EBS volumes ahead of time and having to pay for all those volumes, regardless of your usage of those volumes.
S3 comes in three storage tiers for hot, warm, and cold data. To optimize your storage costs, you can move data between the three storage tiers based on how your data changes over time. Hot data is data that your applications and services request quite frequently. Cold data is data that you access infrequently or rarely (such as archived data and backup data). Warm data falls in between the hot and cold data types, in terms of cost and the speed of access. The hotter data costs the most to store but is much faster to access. The reverse is true of the coldest data—it’s the cheapest to store but slowest in access time.
S3 is ideal for storing unstructured data such as media content. Here’s how the three S3 storage tiers differ:
• Amazon S3 Standard Delivers low latency and high throughput and is ideal for storing frequently accessed data, such as cloud applications, gaming, dynamic web sites, and data analytics.
• Amazon S3 Standard – Infrequent Access (Amazon S3 Standard – IA) Ideal for less frequently accessed data, such as backup data. It’s cheaper than S3 Standard, but it also costs more to retrieve or transfer data.
• Amazon Glacier Ideal for storing data long-term—for example, storing data for meeting compliance and regulatory requirements. There are various methods to retrieve data from Glacier that differ in their speed and cost of access. You can’t retrieve data that you store on Glacier immediately; retrieval can take a few minutes to several hours. So use Glacier when you don’t need to retrieve the data often and you can afford to wait a long time to view it. In addition, content can’t be searched or served directly from Glacier storage, unlike other S3 storage types.
Here’s the pricing structure for S3 storage as of February 2019, based on the US East (N. Virginia) prices (costs may vary across AWS regions):

As you can tell, there’s an inverse relationship between the speed of access and its cost. AWS charges you only for usage of S3 storage, so it doesn’t bill you on the basis of your provisioned S3 storage. Take advantage of this by using S3 wherever possible.
Block Storage
Amazon EBS is block-level storage that you can use with EC2 instances. Files are stored in block storage volumes (similar to hard drives), and data is divided into chunks, or blocks, of a certain size, such as 512-byte blocks. A file of 20KB in size could be chunked into 40 blocks, for example. The OS tracks each of the data blocks independently of the other blocks.
The block storage that your provision with EBS is in the form of disk drives that are mountable to EC2 instances. The drives come unformatted, and you can format them and specify their block sizes. Although the Amazon Machine Image (AMI) you may use determines things such as the block size, you can make changes to a drive by specifying attributes such as the format and the file size of the disk drives.
An EBS volume can be a boot volume or a data volume. You can make the same EBS volume serve as both a boot and a data volume, but this means that you’ll need to shut down the instance when resizing the volume. Many EC2 servers are stateless, so there’s no need to maintain separate boot and data volumes for those instances.
Although a boot volume (root device volume) is automatically destroyed when you terminate an instance, additional EBS volumes that you’ve attached to an instance (data volumes) are independent of the instance lifecycle, and thus stay intact after instance termination if the Delete on Termination option is not selected. Once you attach the block storage to an instance, you can copy, share, resize, restore, and detach the drives as you’d do with any other disk drive.

NOTE AWS is aware of an EBS volume’s properties such as encryption, IOPS, and size, but it can’t see what’s on the blocks of the block storage volumes.
EBS storage is meant for storing data that requires both long-term persistence and quick access. There are two types of block stage: solid-state drive (SSD) and hard disk drive (HDD). Here are the differences between the two EBS block storage types:
• SSD storage is best for transactional workloads, where you need high performance with a high IOPS. You can choose from the following SSD types:
• SSD Provisioned IOPS SSD (io1) If your workloads are latency sensitive and require a minimum guaranteed IOPS, the io1 SSD volumes are right for you. These storage volumes require you to pay separately for the Provisioned IOPS you ask for.
• EBS General Purpose SSD (gp2) The gp2 SSD volumes offer a cost and performance balance and are meant for general use where you don’t need high levels of Provisioned IOPS. The gp2 volumes cost less than the io1 volumes.
• HDD storage disks are designed for throughput-heavy workloads such as data warehouses. As with Provisioned IOPS SDD, you have two choices:
• Throughput Optimized HDD (st1) The st1 volumes are optimized for frequently accessed workloads.
• Cold HDD (sc1) The sc1 volumes are designed for infrequently accessed workloads.

TIP AWS charges for all the EBS volumes that you provision, regardless of your usage of those volumes. For S3 and EFS, however, AWS charges you only for what you use, and not for what you provision.
Here’s the pricing structure for EBS storage as of February 2019, based on the US East (N. Virginia) prices:

Not only is EBS Provisioned IOPS storage more expensive, but you pay for the EBS volumes that you provision, regardless of the extent of your usage. Therefore, you must consider using these volumes only if your applications strongly demand the Provisioned IOPS.
File Storage
Amazon EFS provides scalable file storage for your EC2 instances without your having to provision storage. Big data, content management, and web serving applications can benefit from EFS file storage. Its fast file synchronization capability enables you to synchronize your on-premise files to EFS at speeds that are up to five times faster than normal Linux copy mechanisms.
In the same N. Virginia region as in the previous two cases (S3 and EBS), EFS storage costs you $0.30 per GB-month. EFS is, therefore, generally more expensive than EBS and S3, but you don’t need to provision storage; instead, you can simply use EFS for scalable file storage.
In Chapter 3, I discussed the instance store as a storage option. The instance store is also a block storage type but is often referred to as ephemeral storage because it’s best for temporary work, not for persistent storage such as EBS. Instance storage, unlike EBS storage volumes, isn’t separate from the instance. It’s located on the same hardware as an instance and its cost is included in that of the instance per hour. This means that when you stop the instance, the instance volume isn’t available and all data on it is lost. You can run a root volume on the instance store instead of an EBS volume, but if you do, you can’t really stop the instance, as a stop terminates the instance.
Unlike EBS volumes, which you can attach to all EC2 instance types, some instance types don’t support instance stores; they support only EBS volumes. Also, unlike EBS volumes, you can choose an instance store–based storage volume only when creating an instance, but not later. Finally, any encryption that you want to perform for the data on instance store volumes is at the OS level, and you’re fully responsible for it.
Now that you have a basic idea of the various AWS storage options, it’s time to dive into the details of each of the key storage choices.
TIP As a best practice, tag all your EC2 resources such as EBS volumes. Tagging helps you easily keep track of your resource inventory.
Amazon Elastic Block Storage
Amazon Elastic Block Storage (EBS) provides block storage volumes that you can attach to your EC2 instances. You can use the volumes like any other physical hard drives. The EC2 instance can format the EBS volume with a file system such as ext3 or ext4 and use the volume as it would any local physical drive. Once you attach the EBS volumes to an EC2 instance, they persist independently from the instance, meaning that they’ll remain intact after you terminate the instance, unlike instance store volumes, which are ephemeral.
AWS recommends that you use EBS volumes when you require quick access and want to store data for long periods. Thus, EBS volumes work well for storing file systems and databases, and they are the best choice when you need raw, unformatted block-level storage. EBS volumes are appropriate for applications that perform random reads and writes and for throughput-heavy applications that perform massive continuous reads or writes.
An EBS volume and the EC2 instance to which you attach the volume must belong to the same AZ. You can attach multiple EBS volumes of varying sizes to an EC2 instance, but you can attach an EBS volume only to one EC2 instance at any time.
Benefits of Amazon EBS Storage
EBS storage volumes offer several benefits:
• Persistent storage EBS volumes live independently of the EC2 instance to which you attach the volumes. However, you continue to pay for the volumes even if you terminate the instance. Data on an EBS volume stays intact through instance starts and terminations. The data remains persistently on the volumes until you delete the data. When you delete an EBS volume, AWS will zero-out (wipe out all data from the disk) the volume before assigning it to other AWS accounts. By default, the volumes are detached from an instance upon instance termination, and you can reattach them to another EC2 instance, if you want.
• Dynamic changes If you use a current generation EBS volume by attaching it to a current generation EC2 instance type, you can increase the instance size, the Provisioned IOPS capacity, and the instance type while the volume continues to be attached to the EC2 instance.
• Snapshots for backups You can create backups of EBS volumes in the form of snapshots and store the snapshots in Amazon S3 in multiple AZs. You pay for the S3 storage charges based on the EBS volume size. EBS backups are incremental backups, which means that for newer snapshots, you pay only for the data that’s beyond the volume’s original size.
• Replication AWS automatically replicates an EBS volume in the AZ in which you create the volume.
• Encryption You can encrypt your EBS volumes to satisfy various data-at-rest encryption requirements or regulations. The snapshots that you make of an encrypted EBS volume are automatically encrypted. To protect your sensitive data, it’s a best practice to encrypt data or use EBS-encrypted volumes.
Enhancing EBS Performance and Best Practices
For best performance, AWS recommends that you use an EBS-optimized instance. EBS optimization offers the best performance for EBS volumes by minimizing the network contention between EBS I/O and the other traffic flowing to and from an EC2 instance. Depending on the EC2 instance type, an EBS-optimized instance provides a dedicated bandwidth that’s between 425 Mbps and 14,000 Mbps.
You can choose from various EBS volume types, each of which offers a performance delivery that’s guaranteed to be very near to its baseline and burst (when workload is heavy) performance if you attach it to an EBS-optimized instance. For instance, General Purpose (gp2) EBS volumes will deliver performance that’s within 10 percent of their baseline and burst performance, 99 percent of the time, throughout a year. So if you want guaranteed disk performance to meet the needs of your critical applications, use EBS-optimized EC2 instances.
In addition to configuring EBS-optimized instances, you may want to consider following these best practices for getting the most of your EBS storage volumes:
• Instead of attaching just a single EBS volume to an instance, consider stringing together multiple EBS volumes in a RAID 0 configuration to take advantage of the maximum bandwidth for the instance.
• For the st1 and sc1 EBS volume types (described in the following section), consider increasing the read-ahead setting to 1MB to achieve the maximum throughput for your read-heavy workloads. This setting is ideal for workloads with large sequential I/Os (but detrimental to workloads that consist of many small, or random, I/Os).
• If you create an EBS snapshot from an EBS backup, it pays to initialize the volume ahead of time by accessing all the blocks in the volume before making the volume accessible to users and applications. This strategy avoids a significant latency hit when an application first accesses a data block on the restored EBS volume.
EBS Volume Types
Amazon EBS offers the following EBS volume types:
• General Purpose SSD (gp2)
• Provisioned IOPS SSD (io1)
• Throughput Optimized HDD (st1)
• Cold HDD (sc1)
• Magnetic (standard, a previous-generation type)
I discuss the first four volume types in this chapter. These four EBS volume types differ in performance and price, and you should choose the volume that best fits your performance and cost requirements. The main difference among the instance types is their price/performance ratio.
Throughput and I/O per second (IOPS) are the key performance attributes of a disk. Throughput is the rate at which data is processed. For the two HDD volume types, which are throughput oriented, the dominant performance attribute is mebibyte per second (MiBps). IOPS are a unit of measure (the operations are measured in kibibytes, or KiB) representing input/output operations per second. For the two SSD volume types, the dominant performance attribute is IOPS.
The four volume types fall under two broad categories:
• SSD-backed volumes For workloads that involve heavy read/write operations of small I/O size and whose primary performance attribute is IOPS. They can offer a maximum of 64,000 IOPS, whereas the HDD storage type can offer 500 IOPS at best.
• HDD-backed volumes For large workloads where high throughput (MiBps) is more important than IOPS.
Before we delve into the performance details of the four types of EBS volumes, you need to understand two key concepts that play a role here: the bucket and credit model, which involves burst performance, and throughput and I/O credits.
Bucket and Credit Model: I/O and Throughput Credits and Burst Performance
When evaluating the four volume types, you should consider two important interrelated concepts: burst performance and I/O and throughput credits, which together are referred to as the bucket and credit model. Of the four volume types, three instance types—gp2 (General Purpose SSD), st1 (Throughput Optimized HDD), and sc1 (Cold HDD)—use the bucket and credit model for performance.
The performance of a volume depends directly on the size of the volume. The larger the volume, the higher the baseline performance level in terms of IOPS or throughput, depending on the type of disk. Often, a disk volume is expected to support a sustained increase in IOPS or throughput required by the workload. For example, a database may require a high throughput when you’re performing a scheduled backup. You obviously don’t want to pay the cost of a more powerful volume type just because your workload may spike at times. Ideally, your volumes should be able to support the higher throughput or IOPS for short periods of time by being able to burst through their provisioned performance levels when the workload demands it.
AWS provides I/O and throughput credits to enable a volume to burst occasionally through its baseline performance. I/O and throughput credits represent the ability of a volume to acquire additional capability to burst beyond its baseline performance to reach the higher performance level that you require for a short period. There is a maximum on the number of IOPS or throughput for the burst performance. Each volume receives an initial I/O credit balance and the volumes add to their I/O at a certain rate per second, based on the volume size.
NOTE The baseline IOPS or throughput performance level is the rate at which a volume earns I/O or throughput credits.
For a volume type with IOPS as the dominant performance attribute (such as gp2), burst performance provides the ability to go above their minimum IOPS for an extended period. Once the volume uses up its credit balance, the maximum IOPS performance stays at the baseline IOPS performance level. At this point, the volume starts acquiring (earning) I/O credits. The IOPS performance of the volume can again exceed the baseline performance if its I/O demands fall below the baseline level, and as a result, more credits are added to its I/O credit balance. Larger drives accumulate I/O credits faster since their baseline performance is higher.
For a volume type with throughput (MiBps) as its dominant performance attribute (such as st1), burst performance means the volume can support higher throughput than the baseline throughput of the volume. Once a volume uses up all its I/O or throughput credit balance (the maximum IOPS or throughput), the volume reverts to its base IOPS or throughput performance.
Now that you’ve learned the key concepts of throughput credits and burst performance, you’re ready to learn the details of the four types of EBS storage volumes. It’s easy to analyze the performance characteristics of the various volume types by focusing on the SSD and HDD drives separately. As I go through the various volume types, I describe the bucket and credit model in greater detail where it’s relevant.
Hard Disk Drives
HDD-backed volumes are throughput optimized and are ideal for large workloads where you are focusing on throughput rather than IOPS. There are two types of HDD: Throughput Optimized HDD (st1) and Cold HDD (sc1).
Throughput Optimized HDD (st1) Throughput Optimized HDD storage provides low-cost HDD volumes (magnetic storage) designed for frequently accessed, throughput-heavy sequential workloads such as those you encounter when working with data warehouses or big data environments such as a Hadoop cluster. You measure performance for a st1 volume in terms of throughput, and not IOPS. Throughput Optimized HDD volume sizes range from 500GiB to 16TiB.
As with the gp2 volume type (discussed in the following sections), st1 volumes rely on the burst bucket performance model, with the volume size determining both the baseline throughput, the rate at which throughput credits accrue, and the burst throughput of the volume. Remember that an HDD volume (such as st1) bases its bursting on throughput (measured in MiBps), and not on IOPS, as an SSD volume (such as gp2), which uses IOPS as the criterion for bursting.
You can calculate the available throughput of an st1 volume with the following formula:
Throughput = (size of the volume) × (credit accrual rate per TiB)
Let’s take, for example, a small st1 volume, sized 1TiB. Its base throughput is 40 MiBps, meaning that it can fill its credit bucket with I/O credits at the rate of 40 MiBps. The maximum size of its credit bucket is 1TiB worth of credits. You can calculate the baseline throughput of a 5TB-sized volume thus:
Throughput = 5 × 40 MiBps / 1TiB = 200 MiBps
The baseline, or base throughput, ranges from 20 MiBps to 500 MiBps for volumes ranging from 0.5 to 16TiB. The maximum of 500 MiBps is reached by a volume sized 12.5TiB:
12.5TiB × 40 MiBps / 1TiB = 500 MiBps
Burst throughput starts at 250 MiBps per tebibyte (TiB) and is capped at 500 MiBps. You will hit the cap at a volume size of 2TiB:
TiB × 250 MiBps / 1TiB = 500 MiBps
Figure 7-1 shows the relationship between st1 volume size and throughput. You can see that both burst throughput and base throughput max out at 500 MiBps.

Figure 7-1 Relationship between an st1 volume’s size and its throughput
Cold HDD (sc1) Cold HDD (sc1) offers the lowest-cost HDD volumes; it’s designed for workloads that you access infrequently. These volumes are ideal where cost, rather than the access speed, is your main objective.
The sc1 type volume ranges in size from 0.5TiB to 16TiB. The sc1 volume type uses a burst-bucket performance model and works like the st1 model discussed earlier. For a small 1TiB sc1 volume, the credit bucket fills at the rate of 12 MiBps, with a maximum of 1TiB of credits. Its burst throughput is capped at 80 MiBps.
You use the same formula as for the st1 volume type to calculate the baseline throughput for sc1. To figure out the baseline throughput for the largest-sized sc1 type volume:
16 TiB × 12 MiBps / 1TiB = 192 MiBps
The maximum burst throughput is capped at 250 MiBps, and you reach this level with a 3.125TiB volume as shown here:
TiB × 80 MiBps / 1TiB = 250 MiBps
NOTE The four EBS volume types I discussed here all fall under the Current Generation volume type. To cut your storage costs, you can also use a magnetic or standard volume for storing data that you rarely access. The magnetic volumes range in size from 1GiB (gibibyte) to 1TiB and support roughly 1000 IOPS.
Choosing Between the st1 and sc1 HDD Volume Types The scan time for reading data is a critical performance indicator for both HDD types (st1 and sc1). Scan time is the time it takes to complete a full volume scan and is a function of the volume size and throughput of the volume:
scan time = volume size / throughput
Regardless of the volume size, the scan times for the sc1 HDD type are much longer (almost twice as long) than the scan times for the st1 HDD type. If you often need to support workloads that involve many full volume scans, it’s a good idea to go for st1. The sc1 volume type is suitable for workloads that you access infrequently, and where scan performance isn’t important.
Finally, for both HDD types st1 and sc1, the throughput is the smaller of the volume throughput and the instance throughput.
TIP High performance storage requires sufficient network bandwidth. If you’re planning on using a Provisioned IOPS SSD (io1) volume type, or either of the HDD volume types (st1 and sc1), it’s a good idea to attach the EBS volume either to an EBS-optimized instance or to an EC2 instance with 10Gb network connectivity.
Solid-State Drives
Solid-state drives (SSDs) are designed for high performance. There are two types of SSD-backed volumes: General Purpose SSD (gp2) and Provisioned IOPS SSD (io1).
General Purpose SSD (gp2) General Purpose SSD (gp2) volumes offer a balance between price and performance and are suitable for many workloads, such as interactive applications that require low latency, as well as large development and test databases.
The gp2 volumes offer very fast performance, with single-digit millisecond latencies. A gp2 volume can range in size from 1GiB to 16TiB. The volumes have a baseline performance that scales linearly at 3 IOPS/GiB and can burst to a maximum of 3000 IOPS for extended period of time. A 100GiB gp2 volume, then, has a baseline of 300 IOPS (3×100), and a 1TiB volume has a 3000 IOPS baseline performance. The minimum performance is 100 IOPS (at 33.33GiB and smaller sized volumes) and the maximum IOPS is 16,000, offered by large gp2 volumes sized at 5334GiB and higher, up to a maximum size of 16TiB. A gp2 volume delivers 90 percent of its provisioned performance 99 percent of the time.
A key point that you must understand here is that when you attach multiple EBS volumes to an EC2 instance, the maximum amount of performance for that instance is calculated as the combined performance of all the EBS volumes that you’ve attached to the instance. As Table 7-1 shows, the maximum IOPS for gp2 volumes is 16,000 IOPS. You can attain this performance with a single, large gp2 volume sized 16GiB (the maximum size for a gp2 volume), or you can cobble together a set of four 4TiB-sized gp2 volumes and stripe them as a single RAID 0 device, giving you a logical gp2 volume sized 16TiB, with a combined performance of 64,000 IOPS.
Each gp2 volume comes with an initial I/O credit balance of 5.4 million I/O credits. For smaller (under 1TiB) gp2 volumes, these I/O credits can sustain a maximum burst performance of 3000 IOPS for 30 minutes. The volumes earn I/O credits at the baseline performance rate of 3 IOPS per GiB of volume size. A 500GiB-sized volume will thus have a baseline performance of 1500 IOPS.
When a gp2 volume requires more IOPS than its baseline performance level, it draws down the I/O credits it has accumulated in its credit balance. A volume can use its I/O credits to burst to a maximum of 3000 IOPS. For example, a volume sized 500GiB has a baseline performance of 1500 IOPS and offers a maximum burst duration of 1 hour at 3000 IOPS.
Figure 7-2 shows how both baseline performance and burst IOPS are based on the size of a gp2 volume.

Figure 7-2 Volume size and maximum IOPS for a gp2 EBS volume
NOTE For a gp2 volume type, EBS will deliver the performance you provision 99 percent of the time.
A volume’s ability to burst beyond its baseline performance is based on the I/O credits that the volume accumulates at a rate of 3 credits per GiB of provisioned storage per second. Once the burst performance window opens, the volume consumes the credits at the rate of 3 credits per IOPS. A volume can accumulate a maximum of 54 million credits, which means that it can burst for a maximum of 3000 IOPS for 30 minutes. After the volume exhausts all its credits, its performance falls back to its baseline performance.
Burst performance and I/O credits are applicable only to volumes under 1000GiB. For these volumes, burst performance is allowed to exceed their baseline performance. A 16TiB-sized volume (the largest-sized volume in the gp2 volume type) has a baseline performance of 16,000 IOPS, which is greater than the maximum burst performance, and, therefore, it always has a positive I/O credit balance. This maximum 16,000 IOPS baseline performance is for volumes sized 5334GiB and higher. For all volumes sized 5334GiB to 16,384MiB (the 16TiB maximum volume size for a gp2 volume), the baseline performance remains at the maximum level of 16,000 IOPS.
NOTE A gp2 volume larger than 1000GiB has a baseline performance that’s equal to or greater than the maximum burst performance, which is 3000 IOPS. Their I/O credit balance never depletes as well.
You can use the following formula to calculate the burst duration of a volume, which is directly related to volume size:
burst duration = credit balance / burst IOPS – 3 (volume size)
Provisioned IOPS SSD (io1) Provisioned IOPS SSD (io1) volumes are the most expensive as well as the highest-performance storage volumes and are ideal for missional-critical business applications such as online transaction processing databases that rely on low latency operations, as well as high throughput–demanding large NoSQL databases such as Cassandra and MongoDB.
TIP Because of Provisioned IOPS storage’s much higher cost, you shouldn’t choose it when a cheaper gp2 volume can provide the same baseline IOPS.
Minimum and Maximum IOPS It’s a good idea to mention the minimum and maximum IOPS you can specify for a Provisioned IOPS volume. AWS recommends that you specify a minimum of 2 IOPS for each GiB of a Provisioned IOPS volume. This is to ensure adequate performance and minimize latency. So, if you’re provisioning a gp2 volume sized 6000GiB, you assure that the volume has a performance of at least 12,000 IOPS.
There’s also a maximum amount of IOPS that you can provision for a Provisioned IOPS volume. You can specify a maximum of 50 IOPS per GiB unto a maximum of 20,000 IOPS per volume. So, you can provision a 200GiB-sized gp2 volume for 10,000 IOPS. You can provision a gpc2 volume sized 400GiB or higher for the maximum amount of IOPS.
EC2 Instance Maximum IOPS and Throughput There’s a practical limit to the number of IOPS and throughput that you can provision for a single EC2 instance. The maximum IOPS a single EC2 instance can handle is set at 65,000 IOPS. If you need more IOPS than this for your applications, you must provision multiple instances.
As with IOPS, there’s also a practical limit on the throughput a single EC2 instance can handle. If you turn on EBS optimization for a volume, the instance can achieve a 12 GiBps maximum throughput.
You can specify from 100 to 64,000 IOPS per a single Provisioned IOPS SSD volume. The maximum ratio of Provisioned IOPS to volume size is 50. This means that a 200GiB io1 volume can be provisioned with a maximum of 10,000 IOPS. As mentioned earlier, the maximum IOPS you can provision is 64,000 IOPS per volume, Thus, for a volume that’s 1280GiB or larger, you can provision up to the 64,000 IOPS maximum, since 1280GiB × 50 IOPS = 64,000 IOPS.
NOTE EBS delivers the IOPS performance that’s within 10 percent of the rate you specify, 99.99 percent of the time during a year.
Provisioned IOPS SSD volumes range in size from 4GiB to 16TiB, with the 16TiB-sized volume offering a maximum of 32,000 IOPS. This volume type doesn’t use the bucket and credit performance model like the gp2 volumes. Instead, it lets you specify the IOPS you require, and EBS will deliver that performance. If you’re using a gp2 volume and find that your workloads require IOPS of greater than 16,000 IOPS (maximum offered by a gp2 volume type) for long periods, you may consider the Provisioned IOPS volume type.
Comparing the EBS Volume Types
Table 7-1 shows the performance storage characteristics of each of the four EBS volume types.
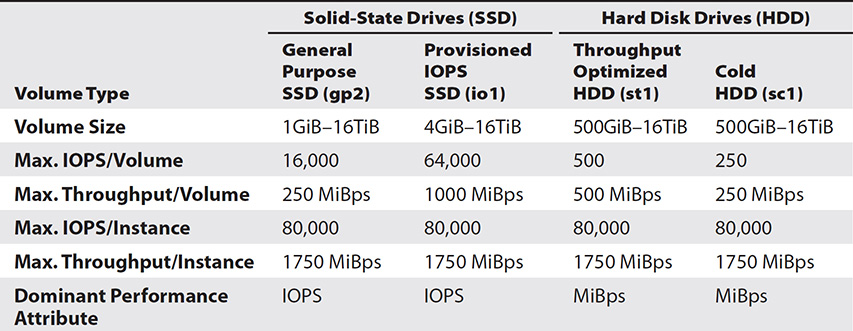
Table 7-1 EBS Volume Types and Their Performance and Storage Characteristics
NOTE Although Table 7-1 indicates that the maximum throughput per instance (for all volumes types) is 1750 MiBps, not all instance types support this high a throughput. You must launch an r4.8xlarge or an x1.32xlarge to get this throughput.
Now that you know a bit about IOPS and throughput performance, and IOPS and throughput–related bursting behaviors of the various EBS volume types, let’s compare several aspects of the EBS volume types. We’ll look at cost, maximum throughput, and maximum IOPS.
Pricing and Cost A Provisioned IOPS volume is the most expensive storage volume type, since it not only costs more per GB-month of storage, but you also must pay an additional $0.05 per Provisioned IOPS per month (at current prices). So if you use a 10,000 IOPS volume, it’s going to cost you $650 a month on top of the storage cost per month.
If you focus just on the cost per GB-month, the Cold HDD (sc1) volume type may look like the best choice. However, there’s a minimum size of 500GiB for a sc1 volume. If you’re storing only 20GiB of data, then you’ll be paying for a lot more storage than you need.
Maximum Throughput You can compute throughput as a product of the IOPS offered by a volume type and the packet size. Both Throughput Optimized HDD (st1) and Cold HDD (sc1) have very small maximum IOPS (500 for st1 and 250 for sc1), and thus have a small maximum throughput, especially for small random writes. A General Purpose SSD (gp2) volume, on the other hand, offers the highest throughput for such small random writes, at 16,000 IOPS. With a maximum IOPS of 64,000 a Provisioned IOPS SSD volume (io1) offers four times more maximum throughput that a gp2 volume (1000MiB versus 250MiB).
Maximum IOPS Table 7-1 showed the maximum IOPS for all the volume types. EBS specifies the IOPS ratings based on 16KB-sized packets for the SSD volumes and 1MB packets for the HDD volumes. You can go to a maximum packet size of 256KB for SSD volumes and 1MB for HDD volumes.
The difference in the sizing of the packets for the SSD and HDD volumes helps SSD volumes efficiently process a large number of small packets, while HDD handles fewer large packets more efficiently.
Packet size has a huge bearing on the IOPS for a volume and could lead to a lower IOPS than the rated IOPS for the volume. For example, a 100GiB-sized gp2 volume is rated at 300 IOPS if the packet size is 16KB. The 300 random read/write operations are sustained only if the packet size remains at or under 16KB. Should the packet size increase, say to an average of 64KB, the 100GiB volume can support read/write operations at the rate of only 75 IOPS.
Managing Amazon EBS
To use an EBS volume to store your data persistently, you must create the volume and attach it to an EC2 instance. In this section, I’ll show you how to perform common EBS-related administrative tasks such as the following:
• Create an EBS volume
• Attach an EBS volume to an EC2 instance
• Make an EBS volume available for use
• Detach an EBS volume
• Delete an EBS volume
Creating an EBS Volume
You can create and attach an EBS volume when launching an EC2 instance or create the volume and attach it to an existing instance. To keep latency low, however, EBS doesn’t permit attaching volumes to an instance across AZs. This means that both the instance and the volume that you’d like to attach to it must be located in the same AZ. Here are the key things to know regarding the creation of EBS volumes:
• You can create encrypted EBS volumes as long as the EC2 instance type supports Amazon EBS encryption.
• You can create and attach an EBS volume at instance creation time through the specification of block device mapping.
• You can restore an EBS volume from snapshots (see note).
• You can tag the volumes when creating them to support inventory tracking.
NOTE When you restore an EBS volume from snapshots, the storage blocks of the restored volume must be initialized (with the dd command on a Linux system) before they are accessed. This results in a delay when access is made for the first time to a storage block, but after the first access, performance is normal. To avoid the significant increase in latency in this situation, access each block in the restored volume before making it accessible to users and applications. This process was previously known as pre-warming and is now called initialization of the volume.
Exercise 7-1 walks you through the steps for creating an EBS volume from the console. You can also create an EBS volume from the command line with the create-volume command. Following is an example that shows how to create a 500GiB General Purpose (SSD) EBS volume:
$ aws ec2 create-volume –size 500 –region us-east-1 –availability-zone us-east-1a –volume-type gp2
You must specify the volume size, volume type, region, and the AZ when creating an EBS volume. You can specify several optional parameters, such as encryption, which will encrypt the EBS volume. If provisioning an io1 volume type, you should specify the IOPS.
TIP EBS volumes that you create from an encrypted snapshot are automatically encrypted.
The previous example showed how to create a brand-new volume from scratch, but you can also create an EBS volume from a snapshot that you’ve stored in S3. You must specify the snapshot ID if you want to restore your EBS volume from the snapshot. The following example shows how to create an EBS volume (Provisioned IOPS) from a snapshot:
$ aws ec2 create-volume –size 500 –region us-east-1 –availability-zone us-east-1a –snapshot-id snap-084028835991ca12d –volume-type io1 –iops 1000
The volume type is io1 (Provisioned IOPS SSD), and the iops attribute specifies that you want this volume to support 1000 IOPS.
When you create an EBS volume from an EBS snapshot, the volume loads lazily, meaning that the EC2 instance can start accessing the volume and all its data before all the data is transferred from S3 (snapshot) to the new EBS volume.
NOTE You can view all EBS volumes in your account by opening the EBS console and then selecting Volumes in the navigation pane.
Attaching an EBS Volume to an EC2 Instance
As long as an EC2 instance is in the same AZ as an EBS volume, you can attach the volume to an instance. You can attach multiple EBS volumes to a single EC2 instance. If the volume is encrypted, the instance must support EBS encryption. Exercise 7-2 shows how to attach an EBS volume to an EC2 instance using the console. You can also attach the volume from the command line, with the attach-volume command:
$ aws ec2 attach-volume –volume-id vol-1234567890abcdef0 --instance-id 01283ef334d86420 --device /dev/sdf
In this command, you specify the volume-id attribute to represent the volume you want to attach, and the instance-id attribute to specify the EC2 instance to which you want to attach the volume. You attach the volume to the instance as the device, /dev/sdf.
NOTE In most cases, you can attach a volume to a running or stopped EC2 instance.
You can view the EBS volumes attached to an EC2 instance by opening the EC2 console and selecting Instances in the navigation pane. To do so from the command line, run this command:
$ aws ec2 describe-volumes –region us-west-2
After creating an EBS volume and attaching it to an EC2 instance, you can modify the volume by increasing the volume type, increasing the volume size, or changing the volume’s IOPS settings. You can make these changes to a volume that’s attached to an instance as well as a detached EBS volume. AWS starts charging you at the new volume’s rate once you start the change in a volume’s settings.
Once you attach an EBS volume to an EC2 instance, it isn’t ready for use. You must first format and mount the drive, as I explain in the next section.
Making an EBS Volume Available for Use
Before an EC2 instance can start using the EBS volume you’ve attached to it, you must format the volume with a file system and mount the volume. This is so because initially the instance sees only a block volume with no file system on it. Once you format and mount the volume, the instance can use it the same way it does a regular hard disk drive.
Follow these steps to format and mount an EBS volume to make it available for use on a Linux system:
1. Connect to the EC2 instance to which you’ve attached the new EBS volume through SSH.
2. Although you name the EBS volume something like /dev/sdf, it could be attached with a different name such as /dev/xvdh or /dev/hdf, depending on the OS of the EC2 instance. Run the lsblk command to view the available disk devices and their mount points; you can figure out the correct device name to specify later on:
$ lsblk
3. If this is a volume you’ve restored from an EBS snapshot, you may not want to create a file system for the device because it already has one (unless you want to overwrite the existing file system). If this is a new volume, which is a raw block device, you must create a file system on the device. Run the mkfs command to create the file system on the device. Here’s the general format of the mkfs command to create an ext4 file system:
$ sudo mkfs -t ext4 device_name
In our case, the command is as follows:
$ sudo mkfs -t ext4 /dev/xvdf
4. Create a mount point directory for the volume with the mkdir command:
$ sudo mkdir /dev/xvdf /mydata
This command creates the directory /mydata, where you can write and read files after you mount the volume.
5. Add an entry for the new device to the /etc/fstab file, so the EBS volume is mounted automatically after a system reboot. Just add the following line at the end of the /etc/fstab file:
/dev/xvdf /data ext4 defaults 1 2
6. To make sure that your entry to the /etc/fstab file is correct, unmount the new device and mount all file systems listed in the /etc/fstab file (with the mount -a command):
$ sudo umount /mydata
$ sudo mount -a
7. Assign proper file permissions for the new volume mount to ensure that your applications and users can write to and read from the new EBS volume you’ve made available for use.
8. To find out how much disk space is available on this EBS volume, run the following Linux command:
$ df -hT /dev/xvda1
If you modify an EBS volume by increasing its size, you must extend the volume’s file system so it can use the increased storage capacity.
Attaching an EBS Volume to an Instance
In the previous section, I showed how to take a raw EBS volume, format it, and mount it to an EC2 instance. If you already have an EBS volume available to you, you can simply attach it to an instance, as long as both the volume and the instance are in the same AZ.
You can attach an EBS volume from the EC2 console or from the command line with the attach-volume command, as shown here (you must obtain the volume ID and the instance ID first):
$ aws ec2 attach-volume –volume-id vol-1234567890abcdef0 --instancce-id i-01474ef662b89480 –device /dev/sdf
This command attaches an EBS volume to a running or stopped instance and makes the volume available to the instance with the device name that you specify (/dev/sdf in this example).
Detaching and Deleting an EBS Volume
You can disassociate an EBS volume from an EC2 instance by detaching the volume from the instance. You can also delete an EBS volume from your account.
There are two ways to detach an EBS volume for an EC2 instance:
• Terminate the instance The EBS volume is automatically detached from the instance when you terminate an instance.
• Unmount the volume If the EC2 instance is running, you must unmount the volume on the instance.
From the command line, run the detach-volume command to detach a volume from an instance. As you can see in the following example, to detach a volume, you need to specify the volume-id attribute, and there’s no need to specify the instance name:
$ aws ec2 detach-volume –volume-id vol-1234567890abcdef0
NOTE You can’t detach an EBS volume that’s serving as the root device for an instance without first stopping the instance. You may remount the same volume to the same instance, but it may get a different mount point.
Encrypting EBS Volumes
EBS offers encryption for most EC2 instance types. Creating an encrypted EBS volume and attaching it to an EC2 instance not only protects the data that you store on the EBS volume but offers several other encryption-related benefits.
Encrypting an EBS volume will encrypt the following:
• Data you store on the volume
• Data that flows between that volume and the EC2 instance to which you’ve attached it
• Snapshots that you create from that volume
• EBS volumes that you create from the snapshots that you make of that volume
EBS encryption uses AWS Key Management Service (KMS) customer master keys (CMKs) to encrypt volumes and snapshots. Unless you specify a custom CMK, AWS creates and manages a unique CMK for you in each AWS region where you own AWS resources. AWS uses the industry-standard AWS-256 encryption algorithm when it encrypts your EBS volumes with a data key. It stores the data key with the encrypted data on the volume, after first encrypting the key with your CMK. All snapshots and EBS volumes that you create from those snapshots share the same data key.
You can transfer data normally between encrypted and unencrypted EBS volumes (volume-level encryption). The snapshot of an unencrypted volume is by definition unencrypted. However, you can encrypt a volume’s data by applying encryption to a copy of a snapshot that you’ve made of an unencrypted EBS volume.
You can also encrypt data at the client level by incorporating encryption at the OS level of the EC2 instance. When you do this, you fully manage the encryption, including the storage and availability of the encryption keys. AWS doesn’t manage encryption keys for you in this case, as it does in the case of volume-level encryption.
EBS Monitoring and EBS CloudWatch Events
EBS sends notifications based on CloudWatch Events. These events can be volume events such as creating a volume, deleting a volume, and attaching a volume. Other EBS-related events include EBS snapshot events, such as creating a snapshot and copying a snapshot.
You learned about Amazon Lambda in Chapter 4. You can employ Amazon Lambda functions to handle CloudWatch Events and to help automate the workflow of a data backup. A CloudWatch Events rule that matches a new event can route the event to a Lambda function that you create that handles that event. Suppose, for example, that you’ve created a Lambda function that copies an EBS snapshot to a different region. You make this Lambda function available in the CloudWatch console. When EBS emits a createSnapshot event, CloudWatch invokes the Lambda function, which automatically copies the snapshot created in, say, the us-east-1 region to the us-east-2 region.
NOTE Remember that once you create an EBS volume, it continues to count toward the storage limit for your account, even if you’ve detached that volume from the instance or have even terminated the instance to which you had attached that volume.
For all volumes except Provisioned IOPS volumes, CloudWatch provides metrics such as the number of bytes read/written, the read and write I/O per second, idle time, queue length, and other metrics, every five minutes. For Provisioned IOPS volumes, the metrics also include the throughput percentage, which shows the percentage of throughput a volume is using, compared to the throughput that you’ve provisioned. If the throughput percentage is low on a regular basis, it’s an indication that you’ve overprovisioned the IOPS for the volume, so you’re paying more than you need to for that volume. For volumes such as gp2, sc1, and st1, you also get burst balance metrics, which show the burst bucket credits still available to the volume.
Backing Up EBS Volumes with Snapshots
A point-in-time EBS snapshot helps you back up data you store on the volume. A snapshot makes a copy of an EBS volume. When you create a snapshot of an EBS volume, the snapshot is automatically stored for you in Amazon S3. EBS stores the snapshots at the regional level in multiple AZs in Amazon S3. Since a snapshot is linked to the region where you create it, you must start the snapshot process in the region where you need to store copies of your data. You can use EBS snapshots for backing up data or to save data before you terminate an instance. The maximum number of EBS snapshots you can take in your AWS account is 10,000, by default.
Although EBS volumes can survive a loss of a disk, because they’re redundant arrays, the volumes are located in only one AZ. If the AZ in which a volume lives becomes unavailable, your applications won’t be able to access the data stored in the volume. Maintaining EBS snapshots enables you to survive an AZ failure.
NOTE Taking a snapshot is free, but storing it isn’t. AWS charges you for storing the snapshots in EBS.
How EBS Snapshots Work
To minimize the time to create a snapshot every time you back up the same volume, and to save on storage costs (by avoiding data duplication), EBS snapshots are incremental in nature. Incremental snapshots capture only the changes in a volume over time. The first snapshot you take of an EBS volume is a full snapshot that captures all the data on the volume. The second snapshot captures only the changed data blocks of the volume since the full backup of the volume. Subsequent snapshots copy and store only the amount of data that has changed since the previous incremental backup.
NOTE If a large amount of data, such as more than 10GB, has changed since the previous snapshot, EBS will create a full snapshot that has all the EBS volume’s data, rather than storing the large amount of changed data.
You can use an EBS snapshot to create a new EBS volume that will be a replica of the backed-up EBS volume. A point-in-time snapshot means that with this snapshot, you can restore the data up to this moment to a new EBS volume.
When you start creating a new EBS volume from a snapshot, you don’t need to wait for all the data to load from the snapshot. Instead, you can start using the new volume immediately. Any data that you access that isn’t already on the new volume is immediately downloaded from Amazon S3, while the download continues uninterrupted in the background. You can take a new snapshot of a volume even if a previous snapshot of the volume is in the pending state. However, the volume may take a performance hit until the snapshots complete.
EBS automatically encrypts the snapshots of an encrypted volume. Any volumes that you create from an encrypted snapshot are also automatically encrypted. You can make copies of snapshots and share them across AWS accounts. You can choose to encrypt a snapshot that’s unencrypted during a copy of the unencrypted snapshot.
Creating EBS Snapshots
Unlike instance store storage, data on EBS persists, and most of the time, the data is critical. A snapshot helps you take a point-in-time backup of an EBS volume; it’s a backup of an EBS volume that AWS stores in S3. You can create a new EBS volume using data stored in a snapshot by specifying the snapshot’s ID.
AWS stores all snapshots in Amazon S3 at the regional level, across multiple AZs. Although the snapshots are stored in S3, they’re not like other S3 objects because they contain only the data that has changed since the previous snapshot was created. You can’t access your snapshots from the S3 console or APIs; instead, you must access them through the EC2 console and APIs.
TIP You can modify the permissions on EBS snapshots to share the snapshots privately with specific accounts or publicly with the greater AWS community.
Creating a snapshot could take some time and depends on the size of the source EBS volume. You can create up to five snapshots concurrently. Exercise 7-3 shows how to create an EBS snapshot from the console. You can create a snapshot from the command line by executing the create-snapshot command:
$ aws ec2 create-snapshot –volume-id vol-1234567890abcdef0 –description "Test snapshot of an EBS volume"
You can view snapshot information by going to the Amazon EC2 console and selecting Snapshots in the navigation pane. Or, from the command line, run the describe-snapshots command to view your snapshots:
$ aws ec2 describe-snapshots –owner-ids 01234567890
This command shows all the snapshots that are available to you, including the private snapshots that you own, private snapshots owned by other AWS accounts to which you have create volume permissions, and public snapshots that are available for all AWS accounts.
NOTE As mentioned, snapshots are incremental in nature, meaning that only the first snapshot is a full backup of the EBS volume. Other snapshots you create following this contain only those blocks on the EBS volume that have changed since the time you created the first backup. This incremental backup strategy means only the first snapshot’s storage will be the same as the EBS volume it’s backing up. The latter snapshots would be much smaller and are based on the amount of data that changes in between snapshots.
EBS snapshots use a lazy loading strategy that lets you use the snapshot immediately after you create it, even before S3 has loaded all the data in the snapshot. If your applications try to access data that hasn’t been loaded on the snapshot yet, the volume downloads the required chunk of data from Amazon.
TIP Tag the EBS snapshots you take to make it easier for you to manage the snapshots. Tags, for example, make it easier to find the name of the original volume used to make the snapshot.
Sharing EBS Snapshots and Making a Snapshot Public
You can share your EBS snapshots with other AWS accounts to enable other users to create EBS volumes with those snapshots. Although you can’t make an encrypted snapshot publicly available, you can publicly share your unencrypted snapshots. If you share an encrypted snapshot, remember that you must also share the custom CMK that you’ve used to encrypt the snapshot.
You must modify a snapshot’s permissions to enable sharing. The following example shows how to execute a modify-snapshot-attribute command to modify a snapshot attribute to grant the CreateVolumePermission for a specific AWS user:
$ aws ec2 modify-snapshot-attribute –snapshot-id snap-1234567890abcdef0 –attribute CreateVolumePermission –operation-type add –user-ids 123456789023
The modify-snapshot-attribute command also enables you to make a snapshot public. Just replace the -user-ids attribute with –group-name all.
NOTE A snapshot can be used to create an EBS volume in the same region where you created the snapshot. However, you can ship snapshots across regions to migrate data centers or perform disaster recovery.
Deleting a Snapshot
Deleting an EBS volume doesn’t delete its snapshots. You must explicitly delete any snapshots you don’t need. You can delete an EBS volume if you decide that you no longer need the volume. You can do so from the EC2 console or by running the delete-volume command:
$ aws ec2 delete-volume –volume-id vol-1234567890abcdef0
If you think you may need to use this volume later, you can create a snapshot of the EBS volume before deleting it.
NOTE Deleting a volume doesn’t affect the snapshots you’ve made of the volume. Similarly, removing the snapshots doesn’t affect the source volume because they are independent of each other.
Earlier, I explained that snapshots are incremental in nature, with each subsequent snapshot after the first snapshot storing only the data that has changed since the previous snapshot. When you use incremental backups for a database such as Oracle, you must retain all the incremental backups to restore the database. EBS snapshots work differently, in that you need to retain only the latest snapshot to restore the EBS volume. Snapshots contain only the changed data and reference the data from earlier snapshots.
Let’s look at a simple example to explain the unique nature of an EBS snapshot and what happens when you delete and restore a snapshot. This sequence of events shows how you can restore an EBS volume from a later snapshot, even after removing one or more earlier snapshots. In this example, I create two snapshots: Snapshot A and Snapshot B. The EBS volume for which I am creating a snapshot has 10GiB of data.
1. I create the first snapshot, Snapshot A, which is a full copy of the 10GiB EBS volume.
2. By the time I take the next snapshot (an incremental snapshot), 2GiB of data has changed. Therefore, the snapshot I create now, Snapshot B, copies and stores only the 2GiB of changed data. Snapshot B also references the other 8GiB of data that was copied and stored in Snapshot A in step 1.
3. I delete Snapshot A. EBS moves the 8GiB of data stored in Snapshot A to Snapshot B after the deletion of Snapshot A. As a result, Snapshot B now has all 10GiB of data (its own 2GiB, plus the 8GiB data moved from the deleted Snapshot A).
4. I restore the EBS volume for which I took the snapshots. I can restore all 10GiB stored in Snapshot B.
TIP You need to retain only the latest snapshot of an EBS volume to be able to restore the volume.
From the storage cost point of view, you still pay for storing all 10GiB of data, since the 8GiB of data from the deleted snapshot (Snapshot A) continues to be stored in Snapshot B.
Creating an AMI from a Snapshot
You can create an AMI from the snapshot of the root volume by adding metadata and registering the snapshot as an AMI. For a Linux AMI, you can do this by running the register-image command from the AWS CLI. Or, you can do the same thing from the EC2 console by selecting Elastic Block Store | Snapshots | Actions | Create Image | Create Image From EBS Snapshot.
TIP As you know, EBS is block storage that you provision in terms of specific-sized volumes. AWS charges you on the basis of the size of the EBS volumes that you provision, and not on the basis of your usage of those volumes. Thus, to save costs, it’s quite important that you don’t overprovision EBS storage. You should provision only what you currently need for your applications, since you can easily grow the storage later.
Amazon S3: Object Storage in the Cloud
Amazon Simple Storage Service lives up to its name. It is an easy-to-use web service interface that you use to store and retrieve data from anywhere on the Web. S3 is primarily designed for handling read workloads, and you can use it to store data such as video clips and data for big data workflows. It is a scalable, fast, inexpensive, and reliable data storage infrastructure and offers 99.999999999 percent durability and 99.99 percent availability of objects over a year. It also automatically detects and repairs any lost data, through built-in redundancy.
Here are some key facts to remember about S3:
• You store S3 objects (data and metadata) in logical containers called buckets and manage permissions on the resources through access control and authentication policies.
• You can upload and download data using standards-based REST- and SOAP-based interfaces (APIs).
• You can store an infinite amount of data in S3 buckets.
• S3 is a regional service that offers you a high parallel throughput and stores your data within a region for compliance requirements.
• AWS automatically replicates the data that you store in S3 to at least three different data centers.
• You can configure access policies to limit who is authorized to view the data that you store in S3.
• Your S3 storage costs include the cost of the storage for the data you keep in S3, plus charges for the API calls you make to move data into and out of S3.
You can use S3 APIs to perform operations such as the following:
• Create a bucket
• Read from and write to an object
• Delete an object
• List the keys contained in a bucket

EXAM TIP The exam is likely to test your knowledge of size limits. An S3 object can have a maximum size of 5TB. The largest object that you can upload in a single PUT request is 5GB. AWS recommends that you consider using S3’s Multipart Upload capability for objects larger than 100MB for speedy transmission of the data and the ability to recover from data transmission failures.
S3 Basic Entities and Key Concepts
The key entities in S3 are buckets and objects. To store data such as photos, videos, or documents in S3, your first step is to create a bucket (in any AWS region); then you can upload your objects (files that contain text, photos, and so on) to that bucket. The following sections describe buckets, objects, and other S3 concepts.
Buckets
A bucket in which you store objects is a globally unique (across all AWS accounts) entity. Although you access individual buckets and the content that you store in those buckets from the Web with an URL, your data isn’t exposed to the general public because of the security features built into S3 that require the right permissions to access the objects.
Bucket Naming Rules Bucket names must comply with DNS naming conventions. Here are the key naming rules to which you must adhere:
• A bucket name must consist of only lowercase characters, numbers, periods, and dashes. Each of a bucket’s labels must start with a lowercase character or number.
• The bucket names cannot use underscores, end with a dash, have two or more consecutive periods, or have a dash next to a period.
• A bucket name cannot be formatted as an IP address.
Addressing the Objects in a Bucket Let’s look at an example. Suppose I create a bucket named samalapati1 and store an object named photos/kitten.jpg in it. I can address this object with the following unique URL:
http://samalapati1.s3.amazonaws.com/photos/kitten.jpg
S3 offers two differently styled URLs to access buckets: a virtual-hosted-style URL and a path-style URL. When you use a virtual-hosted-style URL, you specify the bucket name as part of the domain name, as in this example:
http://samalapati1.s3.amazonaws.com
When you use a path-style URL, there’s no need to specify the bucket name as part of the domain:
http://s3.amazonaws.com/samalapati1
Buckets and Hierarchies A bucket is a flat container for objects. Buckets may look like directories, but they don’t have a hierarchical file organization. You can, however, create a logical file system hierarchy by using key names to stand for folders. For example, here’s a bucket with four objects, each with its own key name:
sample1.jpg
photos/2019/Jan/sample2.jpg
photos/2019/Feb/sample3.jpg
photos/2019/Mar/sample4.jpg
Based on the key names, this implies the following logical folder structure:
• sample1.jpg: this is the root of this bucket.
• sample2.jpg object: this is located in the photos/2019/Jan subfolder.
• sample3.jpg object: this is located in the photos/2019/Feb subfolder.
• sample4.jpb object: this is located in the photos/2019/Mar subfolder.
Buckets are useful for organizing the S3 namespace. They also identify the account to be charged for the storage and data transfer to S3. You can control access to S3 data at the bucket level and aggregate S3 usage at the bucket level.
NOTE You can specify a region for your buckets to provide lower latency or to meet regulatory requirements.
The Delimiter and Prefix Parameters An S3 bucket doesn’t work like a Linux directory, with files stored inside a directory. Objects within a bucket are laid out flatly and alphabetically. Unlike Linux, where a directory is a file, in S3, everything is an object, and you identify each object by its key.
You can use the delimiter and prefix parameters to make S3 buckets work like a directory. The two parameters limit the results returned by a list operation. The prefix parameter limits the response to the keys that begin with the prefix you specify. The delimiter parameter helps the list command roll up all the keys with a common prefix into a single summary list result.
You can also use slash (/) as a delimiter. Here’s an example that shows how the delimiter and prefix parameters help. This example stores data for different cities:
North America/Canada/Quebec/Montreal
North America/USA/Texas/Austin
Instead of trying to manage a flat key namespace such as this, you can use the delimiter and prefix parameters in a list operation. So to list all the states in the United States, you can set the delimiter='/' and the prefix='North America/USA/'. A list operation with a delimiter enables you to browse the data hierarchy at just one level by summarizing the keys nested at the lower levels. If, for example, an S3 object myobject has the prefix myprefix, the S3 key would be myprefix/myobject.
Objects
Objects are the data that you store in S3; objects consist of data and metadata. Two items help you uniquely identify an object: a key (the object’s name) and a version ID. Metadata, which is a set of key-value pairs, is helpful in describing the data, with entities such as the Content-Type and the date in which the object was last modified. You can use the standard metadata as well as configure custom metadata for a bucket.
You place objects in S3 and access those objects using standard HTTP REST verbs (also called methods) such as GET, POST, PUT, PATCH, and DELETE. These five verbs correspond to the create, read, update, and delete operations, respectively. You use these verbs with their corresponding actions in S3.
Keys
A key uniquely identifies an object within a bucket. A bucket, key, and version ID uniquely identify an object in the entire Amazon S3 storage. You can uniquely identify every object in Amazon S3 with the following four entities:
• Web service endpoint
• Bucket name
• Key
• Version (optional)
Consider the URL http://mydocs.s3.amazonaws.com/2018-12-28/AmazonS3.wsdl. In this URL,
• S3.amazonaws.com is the web service endpoint.
• mydocs is the bucket name.
• 2018-12-28/AmazonS3.wsdl is the key.
Note that there’s no version entity (which is optional) in this URL.
High Availability and Durability of Data
S3 provides high availability for the data you store in it, which means that the data is almost always available to you when you need it. In addition, S3 ensures data durability, which means that the data is resilient to any storage or other types of failures. S3 offers high availability by replicating your data on multiple servers. S3 Standard storage delivers a guaranteed availability of 99.99 percent. AWS guarantees this through an SLA that penalizes AWS if the availability of your data goes below 99.99 percent in any month (roughly equal to a downtime of 44 minutes). S3 offers a data durability of 99.999999999 for your data, making it very unlikely that you’ll ever lose data. This is why AWS recommends that you store your EBS snapshots in S3.
The S3 Data Consistency Model
S3 offers eventual consistency. A consistent read offers reads that aren’t stale, but with a potentially higher read latency and lower throughput. Eventually consistent reads offer a lower read latency and higher read throughput, but at the cost of making stale reads possible.
When you make a PUT request and it’s successful, your data is safe in S3. However, S3 takes time to replicate data to all the servers that have a copy of this data, so you may see a situation where the following is true:
• Following a PUT operation, an immediate read operation of the object may return the older data, and a listing of the objects may not show the new object.
• After a DELETE operation, an immediate listing of the keys might still list the deleted object, and an immediate attempt to read the data might return data that you’ve deleted.
When you PUT a new object in an S3 bucket, the S3 service provides read-after-write consistency for the PUT. S3 offers eventual consistency for overwrite PUTs and DELETEs. An update to a single key is atomic; a read following a PUT to an existing key (update) won’t return corrupt or partial data.
S3 Storage Classes
Each object in S3 is associated with one of six storage classes: STANDARD, REDUCED_REDUNDANCY, INTELLIGENT_TIERING, STANDARD_IA, ONEZONE_IA, and Glacier. Your choice of the storage class depends on your use cases. Some types of storage are ideal for storing data that you frequently access, and others are best for less frequently used data. Objects that you store in the STANDARD, RRS, STANDARD_IA, and ONEZONE_IA storage classes are available for real-time access. Glacier objects aren’t accessible in real-time; you must first restore the objects before accessing them. Not all storage classes offer the same levels of durability.
Storage Classes for Frequently Accessed Objects
S3 offers two storage classes for frequently accessed objects stored in S3.
STANDARD Storage Class This default storage class offers millisecond access to your data. AWS stores STANDARD S3 data durably by replicating it across a minimum of three geographically separated data centers to ensure a guaranteed SLA of eleven 9’s (99.999999999 percent) durability. There’s is no minimum storage duration for the S3 objects that you store in the STANDARD storage class.
REDUCED_REDUNDANCY (RRS) Storage Class This storage class is designed for storing non-critical data (such as thumbnails and other processed data that you can easily reproduce). This class stores data at a lower level of redundancy than S3 STANDARD storage, with “only” four 9’s (99.99 percent) durability for RRS data, and it stores the data in only two data centers. RRS costs less than STANDARD S3 storage because of the lower durability of its data. If you’re storing mission-critical data, RRS isn’t a good choice, but if you can easily reproduce the data should you lose it, it is an appropriate choice because of its cost effectiveness—and the considerably high availability (about 400 times more durability than a typical disk drive) that it offers.

CAUTION RRS storage has an annual expected loss of 0.01 percent of the objects you store in S3. AWS recommends that you not use this storage class.
Storage Classes for Frequently and Infrequently Accessed Objects
The INTELLIGENT_TIERING storage class is designed for storing long-lived data with changing or unknown access patterns. It stores objects in two access tiers: one optimized for frequent access and a lower-cost tier for data that you infrequently access. This storage class automatically moves data to the most cost-effective storage class based on the data access patterns.
S3 monitors the access pattern of objects that you store in this storage class and moves any object that hasn’t been accessed in 30 days to the (cheaper) infrequent access tier. The INTELLIGENT_TIERING autotiering of data ensures that the most cost-effective storage access tier is used, even if you can’t predict your future access patterns.
This storage class is suitable for objects that are larger than 128KB that you intend to retain for longer than 30 days. Smaller objects are charged at the frequent access tier rates. If you delete objects before 30 days, you are still charged for 30 days.
Storage Classes for Infrequently Used Data
You can choose from three different storage classes for data that you access infrequently. Here are the key differences among the STANDARD_IA, ONEZONE_IA, and Glacier storage classes:
STANDARD_IA Storage Class Just like the STANDARD storage class, STANDARD_IA stores data in multiple AZs. This makes STANDARD_IA resilient because it can withstand the loss of an AZ. If your data cannot be easily (or never) re-created, use STANDARD_IA storage class. It is designed for long-lived, infrequently accessed, noncritical data, such as database backup archives. Suppose, for example, that you run a web site that stores historical photos, with most images being requested only a couple of times a year. STANDARD_IA storage would be a cost-effective and highly available choice for storing this type of data. You can serve the images directly from STANDARD_IA by hosting your web site in S3. There’s is no minimum storage duration for the S3 objects that you store in the STANDARD_IA storage class.
ONEZONE_IA Storage Class ONEZONE_IA stores objects in a single AZ, so it is cheaper to store data in this class than in STANDARD_IA. However, the data isn’t resilient, and you can lose data when the only AZ is lost for any reason. Use this storage class for data that can be easily re-created. ONEZONE_IA requires a minimum storage duration of 30 days.
Glacier Storage Class Designed for archiving data, Glacier offers the same resiliency as the STANDARD storage class. You cannot, however, access the objects that you store in real-time. The Glacier storage class requires a minimum duration of 90 days.
Storage Class Cost and Durability
Here are some guidelines regarding cost and durability for the various storage classes.
RRS is cheaper than STANDARD S3 storage but is significantly less durable. It’s the only storage class that offers less than 99.999999999 percent durability. If, however, you know you’re going to retrieve the data frequently (a few times a month or more), it’s cheaper to stay with STANDARD S3 storage because it costs more to retrieve data from the storage classes designed for infrequent access. If you infrequently access data, choose a storage class other than RRS, such as STANDARD_IA, ONEZONE_IA, or Glacier.
Another cost consideration is the length of time for which you store the data. Infrequently accessed data storage classes such as STANDARD_IA have a minimum storage requirement of 30 days, meaning that AWS bills you for 30 days, even if you store the data for only a day or two. Although STANDARD_IA may be cheaper than STANDARD S3, this minimum billing structure makes it more expensive than storing short-term data in STANDARD S3 storage.
Glacier is the cheapest of all the storage classes, but it’s best only if you almost never retrieve the data that you store. Unlike all the other storage classes, with Glacier, you must wait three to five hours to retrieve data; other storage classes enable you to retrieve your data in milliseconds. The minimum storage duration for Glacier is 90 days.
S3 and Object Lifecycle Management
Lifecycle policy rules apply actions to a group of objects. Using lifecycle management policies for S3 objects is a best practice that reduces your S3 storage costs and optimizes performance by removing unnecessary objects from your S3 buckets. There is no additional cost for setting up lifecycle policies.
You can configure two types of lifecycle policies:
• Transition actions These actions define when an object is moved to a different storage class. You can configure a lifecycle transition policy to automatically migrate objects stored in one S3 storage class to another (lower cost) storage class, based on the age of the data. You may, for example, specify that a set of S3 objects be moved to the STANDARD_IA storage class 30 days after their creation. You may also specify that a set of objects be moved to long-term Glacier storage class a year after their creation date.
• Expiration actions You can specify when an object can expire. A lifecycle expiration policy automatically removes objects from your account based on their age. For example, you can configure a policy that specifies that incomplete multipart uploads be deleted based on the age of the upload.
EXAM TIP If you see a question asking about how to set up a storage policy for backups and such, know that it’s asking about the S3 lifecycle management policies. For example, if you need to set a tiered storage for database backups that must be stored durably, and after two weeks, archived to a lower-priced storage tier, you can configure a lifecycle management policy that automatically transitions files older than two weeks to AWS Glacier.
You can use the Amazon S3 Analytics feature to help you determine how you should transition your S3 data to the right storage class. S3 Analytics performs a storage class analysis of your storage access patterns. This helps you determine when you can transition data stored in less frequently accessed but more expensive STANDARD S3 storage to cheaper STANDARD_IA storage, which is designed for storing infrequently accessed data. The best way to benefit from storage class analysis is by filtering the storage analysis results by object groups, rather than by a single object.
S3 Multipart Uploads
When creating a new, large S3 object or copying a large object, you can use the Multipart Upload API to upload the object in parts, in any order you choose. To improve throughput, you can upload several parts in parallel. Once you upload all the parts of an object, S3 puts together all the parts to create the object. You can retransmit a part if the transmission of that part fails.
TIP The smaller part sizes in a Multipart Upload minimize the delays when you have to restart uploads due to a network error. You can easily resume the upload on failure.
Amazon S3 recommends that you consider using a Multipart Upload when an object’s size reaches 100MB instead of attempting to upload the object in a single operation. The maximum object size for a Multipart Upload is 5TB, and the maximum number of parts per upload is 10,000.
Making Requests for S3 Data
Amazon S3 is a REST service, and, therefore, you send requests to the service via the REST API or—to make your life easy—via the AWS SDK wrapper libraries that wrap the S3 REST API. Your request can be anonymous or authenticated. An authenticated request must include a signature value that AWS partly generates from your AWS access keys (access key ID and secret access key).
You send an S3 request to an S3 service endpoint, a URL that acts as an entry point to a web service. Most AWS services offer a regional endpoint. When you create a new Amazon Virtual Private Cloud (VPC) endpoint for S3, you associate a subnet with the endpoint. When you do this, it adds a route to the endpoint in the subnet’s route table.
Here’s an example entry point for the DynamoDB service:
https://dynamodb.us-west-2.amazonaws.com
Using Amazon Athena to Query S3 Data
Amazon Athena is an interactive query service that enables you to query data in S3 via standard SQL statements. For example, if your developers want to query data from a set of CSV files that you’ve stored in S3, they can use Athena instead of going to the trouble of developing a program for querying the data. Athena is a serverless offering, meaning that there’s no infrastructure or anything else for you to maintain; you pay just for the queries that you execute against your S3 data.
Hosting a Static Web Site on Amazon S3
You can host static web sites in S3 that can contain client-side, but not server-side, scripting. To host a static web site, you must first configure an S3 bucket for web site hosting, and then upload your web content to that bucket. You must enable the bucket with public read access, so everyone in the world can read objects in that bucket.
EXAM TIP If you’re asked how you can quickly make your web site highly scalable, a good answer is to choose S3 static web site hosting, because it enables you to scale up virtually infinitely, using S3 to serve a large traffic volume. A DB server that supports your web site can’t easily handle the strain of a huge increase in your web traffic.
There are three steps in setting up a static web site in S3 from the S3 bucket properties settings:
1. Enable static web site hosting in the S3 bucket properties.
2. Select the Make Public option for permissions on the bucket’s objects.
3. Upload an index document to the S3 bucket.
Your static web site is available to your users at AWS region–specific endpoints of the bucket you’ve designated for web site hosting. Once you create a bucket and configure it as a web site, URLs such as the following examples provide users access to your web site content.
In this case, the bucket is called examplebucket and it’s being created in the us-west-2 region. This URL returns the default index document that you configure for your web site:
http://examplebucket.s3-website-us-west-2.amazonaws.com/
This URL returns the photo1.jpg object that you stored at the root level of the bucket:
http://examplebucket.s3-website-us-west-2.amazonaws.com/photo123.jpg
The two examples use an S3 web site endpoint, but you can use your own custom domain when configuring a bucket for web site hosting, by adding your web site configuration to the bucket. For example, you can use a custom domain such as example.com to serve content from your web site. S3, along with Route 53, supports hosting of websites at the root domain, so your users can access your site by going to either http://www.example.com or http://example.com.
EXAM TIP Know how domain names and bucket names work in S3 static web site hosting. Although you can name your bucket anything when using an S3 web site endpoint, when you use a custom domain such as example.com, your bucket names must match the names of the web site. So if you want to host a web site named example.com on S3, you must create a bucket named example.com. If you want the web site to handle requests for both example.com and www.example.com, you must create two buckets: example.com and www.example.com. Subdomains must have their own S3 buckets that are named the same as the subdomain.
Managing Access to Your S3 Resources
Only the resource owner (an AWS account) has permissions to access buckets, objects, and related subresources such as lifecycle and web site configuration. By default, all S3 resources are private, and only the object owner has permissions to access them. However, the owner can choose to share objects with others by creating a pre-signed URL using the owner’s security credentials. Pre-signed URLs are valid for a specific duration and enable the owner to grant time-bound permissions to a user to view, modify, delete, upload, or download objects from and to the owner’s bucket. For example, the AWS account owner can create an access policy to grant an IAM user in the AWS account PUT Object permissions to enable that user to upload objects to the owner’s S3 bucket.
You can grant permissions to individual users and accounts, to everyone (called anonymous access), or to all users who authenticate successfully with AWS credentials. When would you grant anonymous access to an S3 bucket? A good use case is when you configure the S3 bucket as a static web site. In this case, you grant the GET Object permission to everyone to make the bucket’s objects public.
You manage S3 access by configuring access policies. These policies enable you to grant permissions and specify who gets the permissions, the resources for which they get the permissions, and the actions you want to allow on the resources. There are two basic types of access policy options: resource-based policies and user policies. A resource-based policy is attached to an S3 bucket such as a bucket or object. Bucket policies and access control lists (ACLs) are resource-based policies. User policies are IAM access policies that you attach to users in your AWS account. You can choose a resource-based policy, a user policy, or a combination of both to grant permissions to your S3 resources.
TIP For mobile apps that access your AWS resources stored in S3, AWS strongly recommends that you not embed or distribute AWS credentials with the app, even in an encrypted format. You should instead have the app request temporary AWS security credentials using web identify federation. Your users can use an external identify provider (idP), such as Facebook, and receive an authorization token, and then exchange the token for temporary AWS credentials that map to a restricted IAM role with just the permissions to use the resources to perform the tasks required by the mobile app. This is a flexible method that also rotates the credentials.
It’s important that you clearly understand S3 resources before you learn how to grant permissions to those resources. First, let’s go over how S3 assigns ownership to resources such as buckets and objects. Here are the key things to remember regarding ownership of S3 resources:
• An S3 resource owner is the AWS account that creates the resource.
• Your AWS account is the parent owner for the IAM users that you create in your AWS account.
• When an IAM user puts an object in a bucket, the parent account is the owner of the object.
• Always use the administrative user (IAM user) accounts, and not the root AWS user account, to create buckets and grant permissions on them.
When the owner of a bucket grants permissions to users in a different AWS account to upload objects, the other AWS account becomes the owner of the object, and the bucket owner does not have permissions on the object. However, the bucket owner can deny access to the objects, archive the objects, or delete the objects, regardless of who owns them. In addition, the bucket owner pays for storing the objects, not the user who uploads the objects to the bucket.
Buckets and objects are the fundamental S3 resources, but each of these has several subresources. Bucket resources include the following subresources:
• Lifecycle These resources store the bucket lifecycle configuration.
• Website This subresource stores the web site configuration when you configure an S3 bucket for web site hosting.
• Versioning These subresources store the versioning configuration.
• CORS (Cross-Origin Resource Sharing) These help you configure buckets to allow cross-origin requests.
• Policy and ACL These store the bucket’s access permissions.
• Logging These subresources help you request S3 to save bucket access logs.
Object subresources include the following:
• ACL These resources store an object’s access permissions.
• Restore These resources help restore archived objects such as the objects you store in the Glacier storage class.
Resource Operations
You can manage S3 buckets and objects with the help of a set of operations that S3 provides for both buckets and objects.
Operations on Buckets S3 bucket operations include the following:
• DELETE Bucket Deletes the bucket; you must delete all the objects in a bucket before you can delete the bucket
• GET Bucket (List Objects) Returns some or all the objects in a bucket up to a maximum of 1000 objects
• GET Service Returns a list of your S3 buckets
• GET Bucket acl Returns the ACL of a bucket
• PUT Bucket Creates a bucket
• PUT Bucket policy Returns the policy of the specified bucket
EXAM TIP If a question asks about the meaning of an error code, such as “403 Forbidden,” know that one of the reasons for this error is the denial of access to a bucket. You’d need to check the bucket’s access policy to ensure that the user can access this bucket. The “403 Bad Request” error is due to some type of invalid request. A reason for the “404 Not Found” error is that the specified bucket doesn’t exist.
Operations on Objects Object operations include the following:
• GET Object Returns the current version of the object by default. To use GET Object, a user must have READ access on the object.
• DELETE Object Removes the null version of an object if one exists and inserts a delete marker, which becomes the current version. Otherwise, S3 doesn’t remove the object. You can remove a specific version of an object, if you own the object, by specifying the versionId subresource in your request. This request will permanently delete the object version that you specify.
• READ Object Retrieves the object, provided you have read access to the object.
• PUT Object Adds an object to a bucket, provided you have write permission on the bucket to add objects to the bucket.
• UPLOAD Part Uploads a part in a Multipart Upload of an object; you must initiate a Multipart Upload before uploading a part of it.
As you’ll learn shortly, you specify permissions in an access policy. You do this not by directly specifying an operation such as DELETE bucket or PUT Object, but by using keywords that map to specific S3 operations. Table 7-2 shows some common permission keywords and how they map to the S3 operations on buckets and objects.

Table 7-2 Permission Keywords and How They Map to S3 Operations
Access Policy Language
In the following sections, I explain both types of resource-based policies—bucket policies and ACLs—as well as user-based policies. Both bucket policies and user policies employ a JSON-based access policy language.
Before I jump into the discussion of the various types of policies, it helps to understand the basics of the key access policy language elements. You use the following basic elements in a bucket or user access policy:
• Resource The resource element specifies the resources for which you allow or deny permissions. Buckets and objects are the two S3 resources that you’ll specify in your access policies.
• Action This element enables you to specify the permission (using permission keywords) on a resource. For each S3 resource, such as a bucket or an object, S3 supports specific operations that you can perform on them. So, for example, the s3:ListBucket action grants a user permission to perform the S3 GET Bucket (List Objects) operation.
• Effect The effect element shows how S3 should respond to a user request to perform a specific action and can take two values: allow or deny. If you don’t specify the value allow, by default, access is denied. However, you can explicitly specify deny as a value for the effect element to ensure that a user can’t access the resource, regardless of being granted access through another access policy.
• Principal This element specifies the user or the AWS account that gets the access permission for the resources and actions that you’ve specified in the access policy statement. For a bucket policy, the principal can be a user, account, service, or another entity.
• Condition Though the first four elements here are mandatory, condition is an optional policy element that enables you to specify the condition(s) under which a policy will be in effect. I show examples that illustrate how to specify the condition element later in this chapter in the section “Granting Permissions to Multiple Accounts with Conditions.”
EXAM TIP Understand that an explicit deny will keep a user from accessing a resource, even though you may have granted the user access through another access policy. You may see a situation in which there are two statements in an access policy, with the first statement specifying an allow for a specific user. However, if the second statement has a deny for all users, the deny overrides the allow in the first statement, and thus the user won’t have access to that bucket.
Resource-Based Policies
In a resource-based access policy, you attach the policy directly to the S3 resource you want to manage, such as an S3 bucket or object. There are two types of resource-based access policies: bucket policies and access control lists (ACLs). Remember that both buckets and objects have associated ACLs.
Bucket Policies You can associate a bucket policy with your S3 bucket to grant IAM users and other AWS accounts permissions on the bucket and the objects inside the bucket.
NOTE Remember that any object permissions that you grant for the objects in a bucket apply only to those objects that you, as the bucket owner, create in that bucket.
A bucket policy supplements, and often replaces, ACL-based access policies. You use a JSON file to create a bucket policy. Here’s an example:

This bucket policy grants the following permissions on a bucket named mybucket. The Principal, Action, Effect, and Resource elements of the policy specify the user(s), permissions, whether you allow or deny the access request, and the bucket, respectively:
• Principal The permissions are granted to two AWS accounts.
• Action Specifies two permissions: s3:PutObject and s3:PutObjectAcl
• Effect The value is allow, which allows the action that you’ve specified on the resource you name in this policy.
• Resource Specifies the bucket name (mybucket) to which you are granting the permissions.
By specifying s3:PutObject as the value for the Action element, you’re permitting two users to upload objects to this bucket. However, they can’t read other objects in this bucket. You must specify the action s3:GetObject to grant a user read permission on objects in a bucket.
You can create a policy that grants anonymous access by specifying the principal element with a wild card (*), as shown here:
"Principal": "*"
Bucket policies offer you a way to grant access to a bucket to other accounts without having to create a role for those accounts in your root account. You can use bucket policies for a variety of use cases. I show typical use cases in this section by describing the specific elements that are most helpful to understand.
Granting Permissions to Multiple Accounts with Conditions The following example shows how to grant the s3:PutObject and s3:PutObjectAcl permissions to multiple accounts on an S3 bucket named examplebucket:

The condition element requires the requests to include the public-read canned ACL.
Restricting Access to Specific IP Addresses The following example shows the Statement portion of an access policy that allows any user ("Principal": "*") to perform any action ("Action": "s3:*") on objects in the S3 bucket examplebucket:

The example also illustrates how to specify multiple conditions in a statement. The condition block in the statement restricts the access to requests originating from a specific range of IP addresses (54.240.143.0/24) that you specified under the IpAddress condition. The NotIpAddress condition specifies that the IP address 54.240.143.188.32 is not permitted to originate the request.
The IpAddress and NotIpAddress conditions are given a key-value pair to evaluate. Both key-value pairs use the aws:SourceIP AWS-wide key. AWS-wide keys, which have a prefix of aws:, are a set of common keys that all AWS services that support access policies will honor. Another example of an AWS-wide key is aws:sourceVpc.
In addition to AWS-wide keys, you can also specify condition keys, called Amazon S3-specific keys, that apply only in a limited context, to grant S3 permissions. Amazon S3-specific keys use the prefix s3: instead of aws:. For example, the following chunk of an access policy shows how to specify a condition that restricts a user to listing only those object keys with the finance prefix ("s3:prefix": "finance"):
Making a Bucket Policy Require MFA You can make a bucket policy enforce MFA by specifying the aws:MuliFactorAuthAge key in a bucket policy, as shown in this example:

This access policy denies any operation on the /hrdocuments folder in the examplebucket bucket unless the request is MFA authenticated.
ACL Policies Like bucket policies, S3 ACL policies are resource-based policies that enable you to control bucket and object access. ACLs are much more limited than access policies and are designed mainly for granting simple read and write permissions (similar to Linux file permissions) to other AWS accounts.
An ACL uses an Amazon S3-specific XML schema, a set of permission grants that identify the grantee and the permissions they’re granted. An ACL that you attach to a bucket or object specifies two things:
• The AWS accounts (or groups) that can access the resource
• The type of access
NOTE Bucket policies supplement, and often replace, ACL-based access policies.
Each S3 bucket and object has an associated ACL. S3 creates a default ACL for all the buckets and objects, granting the owner of the bucket or object full control over the resource.
Here’s an example of an ACL policy that contains a grant that shows the bucket owner as having full control permission (FULL_CONTROL) over the bucket:


NOTE You can’t grant the FULL_CONTROL permission in an ACL when you create the ACL through the console.
Types of Grantees in an ACL You can specify two types of grantees in an ACL: an AWS account or a predefined S3 group. You can’t grant access to a single user in an ACL.
You grant permission to an AWS account by specifying either the canonical user ID or the e-mail address. Regardless, the ACL will always contain the canonical user ID for the account and not its e-mail address, as S3 replaces the e-mail address that you specify with the canonical user ID for that account. The canonical user ID associated with an AWS account is a long string that you can get from the ACL of a bucket or object to which an account has access permissions.
AWS provides the following predefined groups to help you. You specify an AWS URI instead of a canonical user ID when granting access to one of these groups. Here are the AWS predefined groups:
• Authenticated Users group Represents all AWS accounts, meaning that when you grant permissions to this group, all authenticated AWS accounts—any AWS authenticated user in the world—can access the resource.
• All Users group When you grant access permission to this group, anyone in the world can access the resource via either a signed (authenticated) or an unsigned (anonymous) request. Obviously, you must be careful when specifying this group!
• Log Delivery group You can grant this group the write permissions on a bucket to enable the group to write S3 server access logs to the bucket.
NOTE AWS highly recommends that you not grant the All Users group the WRITE, WRITE_ACP, or FULL_CONTROL permissions.
Permissions You Can Grant in an ACL Unlike the large number of permissions that you can grant through an access policy, an ACL enables you to grant only a small set of permissions on buckets and objects. Here are the permissions that you can grant via an ACL:
• READ For a bucket, it enables grantees to list the bucket’s objects. For an object, it permits grantees to read the object data and metadata.
• WRITE Grantees can create (PUT operation), overwrite, and delete a bucket’s objects. Write permission isn’t applicable to objects.
• READ_ACP and WRITE_ACP Grantees can read from and write to the bucket or object ACLs.
• FULL_CONTROL The grantee has the READ, WRITE, READ_ACP, and WRITE_ACP permissions on the bucket. When you grant this permission on an object, the grantee gets the READ, READ_ACP, and WRITE_ACP permissions on the object.
S3 provides a set of predefined grants, called canned ACLs, each with a predefined set of grantees and permissions. For example, the canned ACL named public-read grants the owner FULL_CONTROL and READ access to the All Users group.
Here are the corresponding access policy permissions for the five types of ACL permissions that you can grant on a bucket or object:
• READ corresponds to the s3.ListBucket and s3:GetObject access policy permissions.
• WRITE corresponds to the s3:PutObject and s3:DeleteObject permissions.
• READ_ACP corresponds to the s3:GetBucketAcl and s3:GetObjectAcl permissions.
• WRITE_ACP corresponds to the s3:PutBucketAcl and s3:PutObjectAcl permissions.
• FULL CONTROL corresponds to a combination of access policy permissions.
User Policies
You can also attach IAM policies to IAM users, groups, and roles in your AWS account to grant them access to S3 resources. Let’s take a case where you want an EC2 instance to have permissions to access objects in an S3 bucket. The most secure way to do this would be to create an IAM role and grant it the necessary permissions to access the S3 bucket. You then assign that role to the EC2 instance.
NOTE You can grant anonymous permission in an IAM bucket policy, but not in an IAM user policy, because the user policy is associated with a specific user. Thus, there’s no principal element in an IAM user policy.
The following is an example user policy:

An access policy can have multiple sets of permissions under its Statement clause. This policy has two distinct sets of permissions:
• The first (TestStatement1) grants the user permissions to read, upload, and delete objects, among other permissions.
• The second set of permissions (TestStatement2) grants the same user permission to list all the user’s buckets.
An advantage to creating a group-based policy is that you don’t have to name the individual buckets. When a new bucket is created in your account, anyone to whom you granted wildcarded S3 permissions will be able to access the new bucket, without you having to modify the policies.
How Amazon S3 Authorizes Requests
S3 evaluates all the access policies related to a request, including resource-based (bucket policies plus ACLs) and user policies, to determine whether to allow or deny the request. When Amazon S3 receives a request to perform an action on an S3 resource, it processes the request in the following manner by evaluating the set of relevant access policies (user, bucket, and ACL) based on the specific context:
• User context In the user context, if the request is from an IAM user, S3 evaluates the subset of access policies owned by the parent account, including any user policies associated by the parent with this user. If the parent happens to be the owner of the S3 resource (bucket or object), S3 also evaluates the relevant resource policies (bucket policies, bucket ACLs, and object ACLs). In this case, S3 doesn’t evaluate the bucket context, since it evaluates the bucket policy and the bucket ACL as part of the user context. When the parent AWS account owns a bucket or object, a user or a resource policy can grant permission to the IAM user.
• Bucket context In the bucket context, S3 evaluates the access policies set up by the AWS account that owns the bucket. If the parent AWS account of the IAM user making the request isn’t the bucket owner, the IAM user needs permissions from both the parent AWS account and the bucket owner. For bucket operations, the bucket owner must have granted permissions to the requester through a bucket policy or a bucket ACL. For object operations, S3 ensures that there isn’t an explicitly set deny policy by the bucket owner on access to this bucket’s objects.
• Object context For requests seeking to perform operations on objects, S3 checks the object owner’s access policies.
NOTE The user context isn’t evaluated for requests that you make using the root credentials of your AWS account.
Let’s walk through a simple object operation request by an IAM user to learn how S3 steps through the user, bucket, and object contexts to determine whether it should grant the user’s request. Let’s say for an object operation, the user’s parent AWS account is 1111-1111-1111. The user requests a read (GET) operation on an object owned by a different AWS account, 2222-2222-222. The bucket in which this object lives is owned by yet another AWS account, 3333-3333-3333.
Because there are different AWS entities, and the parent AWS account doesn’t own the bucket in question, S3 requires the user to have permission from all three accounts—the parent AWS account, the bucket owner, and the object owner. Here’s how S3 checks all the relevant access policies, one by one:
• S3 first evaluates the user context to ensure that the parent AWS account has an access policy that grants the user permission to perform the read operation. If the user doesn’t have the permission, S3 denies the request. If the user does have the permission, S3 next evaluates the bucket context, since the parent is not the owner of the object.
• In the bucket context, S3 checks the bucket policies in the bucket owner’s account to ensure there is no explicit deny policy for this user to access the object.
• Finally, in the object context, S3 checks the object ACL to verify that the user has permission to read the object. If so, it authorizes the user’s read request.
Protecting Your Amazon S3 Objects
You protect your S3 data with three main strategies: encryption, versioning and MFA delete, and object locking. In addition, you may also need to durably store your S3 data across multiple regions with S3 cross-region replication.
Encrypting S3 Data
You can use both server-side and client-side encryption to protect your S3 data.
Server-side encryption protects data at rest in the AWS data centers. With server-side encryption, you request S3 to encrypt your objects before storing the objects on disk. S3 decrypts the data when you download the encrypted objects. You can use either AWS KMS-managed keys (SSE_KMS), Amazon S3-managed keys (SSE_S3), or your own keys (SSE-C) for encrypting the data. When you use your own encryption keys, you must provide the keys and the encryption algorithm as part of your request in each API call that you or your application makes to S3. You manage your own keys (be sure to rotate the keys regularly for additional security), but S3 handles the encryption and decryption of your data.
In client-side encryption, you, not Amazon, perform the encryption, and you are also in charge of the encryption keys. You encrypt the data before you send it to S3. You can use an AWS KMS-managed customer master key or your own client-side master key.
Let’s say, for example, that you have some unencrypted objects in an S3 bucket. You can encrypt the objects from the Amazon S3 console. To ensure that all new objects that users place in that bucket are also encrypted, you must set a bucket policy that requires encryption when users upload the objects.
Versioning and MFA Delete
Amazon S3 offers strategies to protect data from accidental deletes and overwrites through versioning and MFA Delete.
Versioning S3 Objects While encryption protects your data from hacking and other security vulnerabilities, there are other ways you can lose your S3 data. For example, you can accidentally delete or overwrite objects. Or an application failure may wipe out the data. Version-enabling your S3 buckets lets you access earlier versions of the objects when you accidentally delete or overwrite the objects.
Versioning maintains multiple versions of an object in a bucket. It keeps a copy of each update you make to an object. Once you enable versioning, when you delete an object, S3 inserts a delete marker, which becomes the current version of the object. S3 doesn’t remove the object, so you can easily recover the deleted older version any time. If you accidentally or otherwise overwrite an object, S3 stores the action as a new object version, again helping you restore the older version.
You can configure versioning from the Amazon S3 console or programmatically using the AWS SDKs. In addition to the root account that created the bucket and owns it, an authorized user can also configure versioning for a bucket.
A bucket for which you enable versioning stores multiple object versions. One of these object versions is current, and the others are noncurrent object versions (if you have multiple versions). Exercise 7-9 shows how to enable versioning for an S3 bucket.
A bucket can be in one of three states:
• Unversioned (the default state)
• Versioning-enabled
• Versioning-suspended
You may choose to turn off versioning on a bucket. However, the bucket won’t return to an unversioned state.
After you enable versioning for an object, any updates or deletes of the object introduces a new version of the object into the bucket and marks it as the current version of the object. If you just “delete” an object, it adds the new version to the bucket, but it’s only a marker (a 0-byte file) that indicates that the object doesn’t exist any longer. If you then try to access the object, you’ll get an HTTP 404 error (no file found). By deleting the 0-byte version, you can restore the previous version of the object, thus providing a way to retrieve an object that you deleted by mistake. To remove a version without producing the marker file for the object, you must purge the object by executing a delete version task. You can mark any of an object’s versions as the current version (also called restoring) or delete or expire any versions if you don’t need them any longer.
At this point, you may wonder, if a bucket has multiple versions of an object, which versions will S3 return when you make a request to read an object (GET request)? If you make a simple GET request, you always get back the current version of the object that you had requested. You can retrieve a prior version of the object by specifying the object’s version ID. Figure 7-3 shows how, by specifying a versionId property, a GET request obtains a specific version of an object and not the current version.

Figure 7-3 A GET request for a specific version of a versioned object
Here’s what you need to know from Figure 7-3:
• The GET request seeks to retrieve the object with the key photo.gif.
• The original object in a bucket before you turn on versioning has a version ID of null. If there are no other versions, this is the version that S3 returns.
• In this example, there are three versions of the object, with the IDs null, 111111, and 121212, with the object with version ID 121212 being the current (latest) version of the object. A GET request that doesn’t specify an object ID retrieves the current version of the object.
• The GET request in Figure 7-3 specifies the version ID 111111, thus retrieving this version and not the original or the current version of the object.
Although versioning of S3 objects offers several benefits, a cost is attached. AWS bills you for storing each of an object’s versions, which means that your S3 storage costs are going to be higher if you have many objects with multiple versions. If it’s critical for you to keep older versions in place, versioning is the way to go, but if cost is a concern, stay away from S3 versioning.
MFA Delete For stronger protection of your S3 data, you can optionally enable Multi-Factor Authentication Delete (MFA Delete) for a bucket. MFA Delete works together with bucket versioning. Once you configure MFA Delete, S3 requires further authentication whenever you want to delete an object version permanently or change a bucket’s versioning state.
An MFA device forces the requestor to enter an additional means of authentication in the form of an authentication code that the MFA device generates. You can use either a hardware or a virtual MFA device.
MFA Delete works together with object versioning. You can use the two together if, for example, you must retain all copies of an S3 object to satisfy a compliance requirement.
Locking Objects
Often, regulatory requirements demand that you keep critical data for a specific length of time. Amazon S3 Object Lock helps you with this by enabling you to explicitly specify an S3 object’s retention period. When you specify a retention period, the object is locked by S3 and no one can delete or overwrite it.
In addition to a retention period, you can configure a legal hold to safeguard S3 objects. A legal hold isn’t based on a time period; it prevents an object from being deleted until you remove the hold. You can use either a retention period or a legal hold, or both together, to protect objects.
To use S3 Object Lock to protect an object, you must first version-enable the S3 bucket where the object lives. Both retention period and legal hold apply to a specific object version—you specify the retention period or a legal hold, or both together, for a specific object version. The restrictions that you place apply only to this object version and new versions can still be created for that object.
How Retention Period and Legal Hold Work Together A retention period that you specify for an object version keeps that version from being deleted for that period. S3 stores a timestamp of the object version in its metadata to indicate its retention period. When the retention period expires, you can delete or overwrite the object version, unless you’ve placed an additional legal hold on the object version.
Here’s what you need to remember about retention periods for an object version:
• Because you specify retention periods for a specific object version, different versions of the same object can have different retention periods.
• You can explicitly set the retention period by specifying a Retain Until Date attribute for an object version.
• You can also specify the retention period for all objects in a bucket with a bucket default setting.
• An explicit retention setting for an object version overrides the bucket default settings for that object version.
• After you apply a certain retention setting of an object, you may extend it by submitting a new lock request for the object version.
• You can configure a default retention period for objects placed in an S3 bucket.
A legal hold is independent of a retention period. You can place a legal hold on an object version to keep it from being deleted or overwritten. Unlike a retention period, however, a legal hold isn’t for any specific time period; it remains in effect until you explicitly remove it. You can also place a legal hold on an object version for which you’ve already specified a retention period. When the retention period expires, the legal hold continues to stay in effect, protecting the object from being deleted or overwritten.
Configuring Object Lock for an Object Follow these steps to configure Object Lock for objects in S3:
1. Create a bucket with S3 Object Lock enabled.
2. Optionally, configure a retention period for the objects in the bucket.
3. Place the objects you want to lock in the new bucket.
4. Apply a retention period, a legal hold, or both to the objects.
Securing S3 Data with Cross-Region Replication
Although strategies such as versioning and MFA Delete offer protection against accidental deletions of data and such, you may also need to durably store your S3 data across multiple regions for various reasons. You can do this with S3 cross-region replication (CRR), which automatically and asynchronously copies your S3 data across buckets located in different AWS regions. Although it doesn’t cost you anything to set up CRR, you are billed for transferring data across regions and for storing multiple copies of the data in those regions.
Use Cases for CRR You can use CRR to satisfy regulatory and compliance requirements that require you to store data in multiple geographically distant AZs. By maintaining copies in various locations, you can also minimize latency in accessing key objects by maintaining copies of an object closer to your user groups.
By default, CRR replicates the replicated object’s ACL along with the data. If you don’t happen to own the destination bucket, you can configure CRR to change replica ownership over to the AWS accounts that own the destination buckets (this is called the owner override option) to maintain an object copy under a different ownership. Changing the ownership of the replicas can also safeguard key data by saving the same data under different buckets that are owned by different entities. By replicating data to a different region, you can be assured that your critical S3 data has multiple copies spread across multiple regions.
Setting Up CRR You enable CRR at the bucket level by adding the replication configuration to your source bucket. CRR has some requirements:
• Both the source and the destination buckets must be located in different AWS regions.
• You must enable versioning for both the source and destination S3 buckets.
• If the source and destination buckets are owned by different AWS accounts (cross-account scenario), the owner of the destination bucket must grant the owner of the source bucket permissions to replicate objects through a bucket policy.
Once you meet all the requirements, you can enable CRR of data from the source bucket to the destination bucket in the other region by adding the replication configuration to the source bucket. You can replicate all or some of the objects in the source bucket to the destination bucket. For example, you can specify that S3 replicate only objects with the key name prefix Finance/. S3 then replicates objects such as Finance/doc1 but not objects with the key HR/doc1. Although, by default, the destination object replicas use the same S3 storage class as the source objects, you can specify a different storage class for them when configuring CRR.
Optimizing Amazon S3 Storage
Amazon S3 offers best practices for optimizing S3 performance. You can optimize performance in several areas.
You can scale read performance by creating several prefixes in a bucket to enhance performance. An application can achieve a minimum of 3500 PUT/POST/DELETE operations and 5500 GET requests per second per prefix in a bucket. You can have an unlimited number of prefixes in a bucket. A higher number of prefixes helps you increase read/write performance by parallelizing the reads and writes. So by creating 10 prefixes in an S3 bucket, you can achieve a read performance of 55,000 requests per second.
If your applications receive mostly GET requests, you can use Amazon CloudFront for enhancing performance. CloudFront reduces the number of direct requests to S3, reducing your costs for retrieving data from S3, in addition to reducing application latency. CloudFront retrieves the popular objects from S3 and caches them. It then serves requests for these objects from its cache, which reduces the number of GET requests it sends to S3.
You can improve network throughput between your OS/application layer and Amazon S3 by TCP window scaling, adjusting the TCP window sizes and setting them larger than 64KB at both the application and the kernel levels.
Finally, enabling TCP selective acknowledgment helps to improve recovery time after losing a large number of TCP packets.
Setting Up Event Notifications for an S3 Bucket
You can configure notifications to various destinations following certain S3 bucket events. When you configure the notifications, you need to specify the type of event and the destination to which the notification must be sent.
S3 can notify destinations when the following types of events occur:
• Object creation events This notification is sent whenever an object is created in the bucket, with actions such as Put, Post Copy, and CompleteMultiPartUpload.
• Object delete events You can configure the deletion of a versioned or unversioned object to trigger an event notification.
• Restore object events These events send notifications when an object stored in the Glacier storage class is restored.
• RRS object lost events These events send notifications when S3 finds that an object of the RRS storage class is lost. (Remember that RRS offers lower redundancy than Standard S3 storage.)
Event notifications can be sent to destinations such as an SNS topic, an SQS queue, or a Lambda function.
Archival Storage with Amazon S3 Glacier
Amazon S3 Glacier, a REST-based web service, is a storage service that’s ideal for storing rarely used data, often called cold data. Glacier is low-cost storage for data archiving and for storing backups for long periods of time, even as long as several years. Glacier is ideal for storing data that you access rarely to infrequently. Glacier is optimized for long-term archival storage and isn’t suited for data that is erased within 90 days.
Unlike the other Amazon S3 storage classes, which are all designed to provide immediate access to your data, Glacier is meant purely as storage that is not for immediate retrieval. Typically, it takes three to five hours to retrieve data from Glacier. However, by paying a much higher price for the data retrieval, you do have the option of immediately retrieving data from Glacier.
Key Glacier Concepts and Components
Vaults and archives are the key Glacier resources. A vault is a container for storing archives. An archive is the basic storage unit and can include data such as documents, photos, and videos that you want to store in Glacier.
NOTE Vaults are key entities in Glacier. You can manage vaults from the Glacier console, but for uploading data, you must use the AWS CLI or write code via the REST API (Glacier web service API) or through AWS SDKs that wrap the Glacier REST API calls, to make it easy for you to develop applications that use Glacier by taking care of tasks such as authentication and request signing.
In addition to vaults and archives, which make up the data entities of Glacier, two other concepts are important to know: jobs and notifications. Jobs perform queries on archives and retrieve the archives, among other things. The notification mechanism notifies you when jobs complete.
Vaults
Vaults are the logical containers in which you store the data you want to archive. There’s no limit on the number of archives you can store within a vault.
Vault operations are region-specific. You create a vault in a specific region and request a vault list from a specific region as well. You can create up to 1000 vaults in an AWS region. You create vaults from the S3 console by following the steps in Exercise 7-10.
Glacier inventories each of your vaults every 24 hours. The inventory contains information about the archives, such as their sizes, IDs, and their creation times. Glacier also ensures that an empty vault is truly so, by checking whether any writes have occurred since it took the last inventory. You can delete a vault if there were no archives in it when Glacier computed its most recent inventory or if there were no writes since that inventory.
You refer to your vaults through unique addresses of the form:
https://<region-specific-endpoint>/<account-id>/vaults/<vaultname>
For example, the vault that you may create in Exercise 7-10 in the us-west-2 (Oregon) region has the following URI:
https://glacier-us-west-2.amazonaws.com/111122223333/vaults//myvault
In this URI,
• 111122223333 is your AWS account ID.
• vaults is the collection of vaults owned by your account.
• myvault is your vault’s name.
Archives
An archive is data that you store in a vault. Although you can upload single files as archives, it’s economical to bundle multiple files together in the form of a TAR or ZIP file before uploading it to Glacier. Once you upload an archive to Glacier, you can only delete it—you can’t overwrite or edit it.
As is the case with a vault, an archive has a unique address with the following general form:
https://<region-specific-endpoint>/<account-id>/vaults/<vaultname>/archives/<archive-id>
The following is the URI for an archive that you store in the vault named myvault:
You can perform three types of archive operations in Glacier: upload archives, download archives, and delete archives. You can upload archives via the AWS CLI or write code (REST APIs, or AWS SDKs) to do so. You can upload archives ranging from 1 byte to 64GB in size, which is a single operation. However, AWS recommends that you use a multipart upload for archives larger than 100MB. A multipart upload enables you to upload archives that are as large as 40,000GB (40TB).
You must use the AWS CLI or write code to perform any archive operation, such as uploading, downloading, or deleting archives. You can’t perform archive operations from a console. The code you write may directly invoke Glacier REST APIs or the AWS SDKs, which provide a wrapper for those APIs.
Once you upload an archive, you can’t update its contents (or its description). To update the archive content or its description, you must delete the archive and upload a different archive.
Jobs
You run Glacier jobs to perform queries on your archives, retrieve the archives, or retrieve a vault’s contents (inventory). You use SQL queries, which Glacier Select executes, writing the query’s output to Amazon S3. For example, a select job performs a select query on an archive, an archive-retrieval job retrieves an archive, and an inventory-retrieval job inventories a vault.
Both the retrieval of the list of archives (inventory) and the retrieval of an archive itself are actions that require you to wait. You start a job and wait to download the output once Glacier completes the job execution.
Once again, you use a unique URL of the following form to track the jobs that you initiate with Glacier:
https://<region-specific-endpoint>/<account-id>/vaults/<vaultname>/jobs/<job-id>
Notifications
Because Glacier jobs may run for a long time, it provides notifications to let you know that your job has completed. You can configure Glacier to send the notifications to an Amazon Simple Notification Service (SNS) topic. Glacier reports the job completion in the form of a JSON document.
You can configure one notification per vault, each identified by a unique URL of the following form:
https://<region-specific-endpoint>/<account-id>/vaults/<vaultname>/notification-configuraton
Because Glacier updates its inventory every 24 hours, you may not see your new archive right after you upload it to your vault.
Glacier Archive Retrieval and Data Retrieval Policies
You can specify one of three archive retrieval options when starting a job to retrieve an archive. The options differ in their access time/cost ratio:
• Standard Standard retrievals typically complete within a few hours—say, three to five hours. This is the default retrieval option if you don’t specify one.
• Expedited An expedited retrieval makes all but very large archives (sized 250MB or larger) available within one to five minutes. You can purchase provisioned capacity to ensure that your retrieval capacity is available to you when you need it. A unit of capacity provides up to 150 MBps of throughput and ensures that at least three expedited retrievals can be made every five minutes.
• Bulk A bulk retrieval is the cheapest Glacier option and helps you retrieve very large amounts of data inexpensively if time isn’t a big concern. Bulk retrievals complete within five to twelve hours.
You can select from the following three Glacier data retrieval policies to set limits on data retrieval and manage the data retrieval activities in your AWS account across an AWS region:
• Free Tier Only Your retrievals stay within your daily free tier allowance and AWS won’t bill you for data retrieval. Any data revival requests that exceed the retrieval limit won’t be accepted.
• Max Retrieval Rate You can set a data retrieval limit with a bytes-per-hour maximum. A new retrieval request that causes the peak retrieval rate of in-progress jobs to exceed the bytes-per-hour limit that you specify is rejected by Glacier. The free tier policy rate is 14MB per hour. If you set the Max retrieval rate to just 2MB per hour, you’ll be wasting a lot of your daily free tier allowance. A good strategy would be to set your policy first to the Free Tier Only policy and switch it to the Max Retrieval Rate policy later, once you’re more familiar with the archival retrievals.
• No Retrieval Limit Glacier accepts all data retrieval requests and your retrieval cost is proportional to your usage.
Data retrieval policies apply only to standard data retrievals. Your data retrieval policy settings don’t have a bearing on the standard retrieval time, which is three to five hours.
S3 Glacier Vault Lock
Often, you’re bound by various regulatory and compliance requirements to store key data in a way that it can’t be tampered with. Glacier’s Vault Lock feature helps you enforce compliance policies for a Glacier vault. For example, you can set up a Vault Lock policy that specifies a control such as “write once read many” (WORM). You lock up this policy in the vault, which prevents any changes to it after that.
You can use both the Vault Lock and vault access policies together. You can use the Vault Lock policy to deploy regulatory and compliance controls, which require tighter controls on data access. You can use the vault access policies for controlling noncompliance-related access.
The Lock Process
Locking a vault involves initiating the lock and then completing the lock process. You initiate the lock by attaching a vault lock policy to the vault. You do this by calling Initiate Vault Lock (POST lock-policy) with a Vault Lock policy that includes the control you want to set up. This call attaches the policy to the vault and returns a unique lock ID.
Once you create a Vault Lock policy, you have 24 hours to review and evaluate the policy with the help of the lock ID that expires after that time. After this point, you can’t change the policy any longer. You call the Complete Vault Lock (POST lockId) procedure with the lock ID that was returned by the call to Initiate Vault Lock (POST lock-policy).
If a company must retain compliance data for multiple years in a form that prevents any changes in the data (immutable data), activating Vault Lock is a cost-effective and easy way to do this. No user, including the AWS root account, can change the data.
Amazon Elastic File System
Amazon Elastic File System (EFS) offers file storage for your EC2 instances in the Amazon cloud. It’s a managed file storage service, which means that instead of running your own Network File System (NFS), you let Amazon handle the file storage infrastructure for you.
Although you create the file system in a specific AZ, EC2 instances running in other AZs can access the file system, thus giving you a data source that supports a large number of users.
Using Amazon EFS, you create and mount files systems on an EC2 instance and read from and write data to it as you do with any other file system. You can mount the file systems in your Amazon VPC, through the NFS versions 4.0 and 4.1 (NFSv4) protocol.
There are a few key differences between Amazon EBS and Amazon EFS. Unlike EBS volumes, in EFS, there are no unformatted blocks for you to format and use. EBS is much more flexible than EBS storage, helping you easily grow your shared storage to multiple petabytes in a single logical volume. The biggest difference between EBS and EFS is that you use EBS volumes for a single EC2 instance, whereas EFS is designed as a multiuser system, enabling multiple EC2 instances to access the same file system.
EBS is much cheaper than provisioning an EFS file system on a per-GB cost of storage basis, so if you require storage for a single EC2 system, there’s no need for you to use EFS. EFS, however, is cheaper if you have a large number of users that need to access the same file system. On top of the cost savings, you won’t have the overhead of setting up your own multiuser file system that’s also highly available.
Setting Up an EFS-Based File System
To start using EFS files systems, you need to do the following, in order:
1. Create mount targets. Mount targets are endpoints in your Amazon VPC where you mount the EFS file systems on an EC2 instance running in your VPC.
2. Create your EFS file systems. The file systems will appear as any other file systems that an EC2 instance uses. AWS recommends that you tag the file systems with the Name tag (you can also add other tags as well) to make it easy for you to identify the file systems in the console.
3. Mount the EFS file system. You must mount the new EFS file system on an EC2 instance so you can access the file system.
4. Create the necessary security groups. You must associate both the EC2 instance and the mount targets with security groups. The security groups act as virtual firewalls to control the traffic flowing between the instance and the mount targets. The security group that you associate with a mount group controls the inbound traffic to the mount target through inbound rules that allow traffic from a specific EC2 instance.
Creating Mount Targets
Before you create an EFS file system, you must create the mount targets where you’ll be mounting the file systems on EC2 instances in your VPC. The mount target security group controls the traffic accessing the file systems by serving as a security group. You can create the mount targets from the console, but you can also do it via the command line by executing the create-mount-target command:

Replace the values of the parameters in italics with appropriate values for your VPC.
You can create one mount target in each AZ. If your VPC has multiple subnets in an AZ, you can create a mount target in only one of those subnets. You can create a new security group for the mount target prior to running this command if you don’t want to use your default security group.
Creating an EFS File System
You can create the EFS file system from the console or the command line. Exercise 7-4 shows how to do it from the EFS Management Console.
Mounting the EFS File System
After creating an EFS file system, you must connect to an EC2 instance and mount the file system using the mount targets that you created for this file system. Exercise 7-5 shows how to do this.
AWS recommends that you use the amazon-efs-utils package that it freely makes available to help you mount the EFS file systems. This package contains the mount helper, a program that you can use when mounting a specific type of file system. The mount helper creates a file system type called efs that’s compatible with the Linux mount command. It also supports mounting the EFS file system at boot time through entries you make in the /etc/fstab file. Exercise 7-5 uses the amazon-efs-utils package and shows you how to mount an EFS file system.
Creating Security Groups
When you configure EFS file systems, both the EC2 instance on which you mount the file system and the mount targets have security groups associated with them to control traffic. You can choose to create a special security group for the mount target or let EFS associate your VPC’s default security group with the mount target.
You must configure the following rules for the two security groups:
• The mount target’s security group must allow inbound access (on the NFS port) from all EC2 instances on which you mount the EFS file system.
• Each of the instances where you mounted the EFS file system must allow outbound access to the mount target (on the NFS port).
Using an EFS File System
Once you mount an EFS file system, there’s nothing new. You work with the file system as if it were a regular local file system. By default, only the root user has rwx permissions on the root directory, but you can grant other users permissions to modify the file system.
To delete an EFS file system, you must first unmount the file system. To do this, open the Amazon EFS Management Console, select the file system you want to delete, and then, select Action | Delete File System. The command will first delete all the mount targets and then the EFS file system.
Amazon Snowball
Amazon Snowball service offers a way to bypass the Internet and directly move large chunks of data into and out of AWS. A Snowball device enables you to access AWS cloud storage (Amazon S3) locally in your own data center when connecting to the Internet to move data might not be a viable option. Snowball enables you to transport data at faster than Internet speeds, at a lower cost to boot.
A Snowball device, which is a rugged, secure (it encrypts all your data automatically) shipping container, helps you ship data through a regional carrier. Figure 7-4 shows an Amazon Snowball appliance. The device helps you transport hundreds of terabytes or petabytes of data between your data center and Amazon S3. The Snowball appliance has interfaces that you use to create data loading jobs, transfer the data to and from S3, and trace the status of your jobs until they complete.
Figure 7-4 An Amazon Snowball appliance
NOTE Use an alternative strategy to transfer data smaller than 10 TB. Snowball is designed for transferring very large sets of data.
Sending data via Snowball is ridiculously simple:
1. You create a job in the AWS Management Console to get a Snowball device to be shipped to you.
2. After delivery, power on the Snowball device, attach it to your network, and establish a connection with a Snowball client that you download from AWS.
3. Select the data files you want Snowball to transfer, and Snowball encrypts (encryption is mandatory) the files and transfers them to the device.
4. Once the data transfer is complete, use the provided shipping label and ship the device back to the specified AWS facility.
5. AWS imports your data into Amazon S3.
That’s it. No code and no commands to run.
Snowball devices are enclosed in tamper-resistant containers, employ 256-bit encryption, and use the Trusted Platform Module (TPM) to transfer data securely. The encryption keys are safely stored in the AWS Key Management Service (KMS), and not on the device.
NOTE When downloading data from your on-premise location to S3 storage, you can choose the S3 Glacier storage type to archive the data at a low cost.
You can use storage protocols such as HDFS, S3 API, and the S3 CLI to move data into and out of a Snowball device. You can manage your Snowball data transfer jobs through the AWS Snowball Management Console or with the job management API if you want to do it programmatically.
The Snowball Edge device is like Amazon Snowball, with on-board storage and computing power. It can perform some local processing on top of transferring data between your data center and AWS.
AWS Storage Gateway
AWS Storage Gateway offers a way to connect a software or hardware appliance with S3, thus helping you integrate your on-premise environment with the AWS cloud storage infrastructure. You can run the gateway with an on-premise virtual machine (VM) appliance, use the AWS Storage Gateway hardware appliance, or set it up in AWS as an EC2 instance.
Gateway Types
AWS Storage Gateway offers three types of storage solutions: file-based, volume-based, and tape-based.
To set up AWS Storage Gateway, you must make the following choices:
• Storage solution: Choose a file, volume, or tape gateway.
• Hosting option: You can deploy the Storage Gateway on-premises as a VM appliance, or in AWS as an EC2 instance.
File Gateway
A file gateway is like a file system mount on Amazon S3. The file gateway provides a file interface to S3 by enabling you to access S3 objects as files or file share mount points and works with a virtual software appliance. The software appliance acts as the gateway and you deploy it in your data center as a VM.
Using the file gateway, you can store and retrieve objects in S3 using standard file protocols such as Network File System (NFS) and Server Message Block (SMB). You can access the S3 data from any AWS application or service.
The file gateway offers a cost-effective alternative to maintaining storage on your own premises. It integrates to your applications through standard file system protocols and provides low-latency access to the data by locally caching data. The file gateway manages all data transfers from your data center to AWS and optimizes data transfers by parallel data streaming, saving your applications from network congestion.
Volume Gateway
A volume gateway uses AWS cloud storage–backed storage volumes you mount as Internet Small Computer System Interface (ISCSI) from an application server in your data center. There are two types of volumes: cached volumes and stored volumes.
A cached volume lets you store your data in S3 and keep a copy of the frequently accessed portions of that data locally. This offers the twin benefits of providing your applications fast access to frequently accessed data, while reducing your local storage expenditures. This type of volume helps you grow your storage in AWS.
A stored volume provides fast access to all your data by letting you configure the gateway to store all your data locally in your data center. Since you won’t be storing any of this data on S3, you can make snapshots of this data to S3 for disaster recovery of either your local databases or data for Amazon EC2 instances. Unlike a cached volume, which helps you grow your storage in AWS, a stored volume offers storage that has a 1:1 relationship with the volume size.
Tape Gateway
The tape gateway enables you to archive backup data to Amazon Glacier, eliminating the need for you to provision and maintain a physical tape infrastructure.
Setting Up and Activating the AWS Storage Gateway
To use the Storage Gateway, you must first create the gateway and activate it. Following this, you create file shares and start using them. You can create the gateway on-premises or in an EC2 instance. If you chose to create the gateway on-premises, you can download and deploy the gateway VM and activate the gateway. You can create the gateway on an EC2 instance using an AMI with the gateway VM image and then activate the gateway.
Creating a File Share
You can create file shares that can be accessed by NFS or SMB. You can have both NFS- and SMB-based file shares on the same file gateway. If you’re using the NFS protocol, by default, everyone who can access the NFS server can also access the file share. You limit client access by IP addresses. For an SMB-based file share, authentication can be through specifying limited access to some domain users and groups, by provisioning guest access, or by using Microsoft Active Directory (AD) access.
You can encrypt the objects that a file gateway stores in S3 by using the AWS Key Management Service (KMS).
Using the File Share
To use the file share you’ve created, you must mount the file share on a storage drive on your client and map it to an S3 bucket. You can then test the file gateway by copying files to your mapped drive. If everything goes right, you should be able to see the files that you’ve uploaded in your S3 bucket after that.
Chapter Review
This is a huge chapter in many ways! AWS offers several types of storage, each designed for a set of use cases. Each of these storage types offers a different combination of cost, availability, and performance. Therefore, one of your key functions as an AWS SysOps Administrator is to match your specific use cases to the various storage types.
You use Amazon EBS volumes for persistent storage with your EC2 instances. AWS recommends that you use EBS-optimized volumes for best performance. Amazon S3 is a way to store objects in the AWS cloud. You can access these objects directly via unique URLs for each object.
Amazon S3 Glacier is meant for storing backups and other data that you must store for compliance and regulatory purposes. Unless you pay additional charges, the data you store in Glacier isn’t available immediately, as is the case with EBS and S3 storage.
If you want multiple users and multiple EC2 instances to access a file system, Amazon EFS is the way to go, rather than setting up such a file system by yourself.
Amazon Snowball is quite different from all the other AWS storage services in that it enables you to transport large data sets quickly and economically to and from AWS, with the help of a storage appliance.
Finally, the Amazon Storage Gateway helps you connect your on-premise software appliance with AWS S3.
Exercises
These exercises are designed to teach you how to perform important AWS administrative tasks through the console. If you make a mistake, retrace your steps and ensure that you’ve correctly performed the steps. You’ll know that you’ve correctly completed the exercise if you achieve the goal set for you in each exercise.
Exercise 7-1: Create an EBS volume from the console.
1. Open the EC2 console: https://console.aws.amazon.com/ec2/.
2. In the navigation bar, select the region where you want to create the volume.
3. In the navigation pane, select ELASTIC BLOCK STORE | Volumes.
4. Select Create Volume.
5. For Volume Type, select a volume type.
6. For Size (GiB), specify the volume size.
7. If you chose a Provisioned IOPS SSD volume, for IOPS, specify the maximum IOPS you want the volume to support.
8. For AZ, select the AZ in which you want to create the volume.
9. Select Create Volume.
Exercise 7-2: Attach an EBS volume to an EC2 instance from the console.
1. Open the EC2 console: https://console.aws.amazon.com/ec2/.
2. In the navigation pane, select ELASTIC BLOCK STORE | Volumes.
3. Select an EBS volume and then select Actions | Attach Volume.
4. For Instance, enter the name of the EC2 instance.
5. For Device, use the device name suggested by AWS or enter a different device name.
6. Select Attach.
7. Connect to the EC2 instance and mount the volume.
Exercise 7-3: Create an EBS snapshot from the EC2 console.
1. Open the EC2 console: http://console.aws.amazon.com/ec2/.
2. In the navigation pane, select Snapshots.
3. Select Create Snapshot.
4. In the Create Snapshot page, select the EBS volume that you want to back up.
5. Select Add Tags To Your Snapshot to make it easy for you to manage this snapshot.
6. Select Create Snapshot.
Exercise 7-4: Create an Amazon EFS file system.
1. Open the Amazon EFS Management Console: https://console.aws.amazon.com/efs/.
2. Select Create File System.
3. Select your default VPC from the VPC list.
4. Select all the AZs, and leave the default subnets, security groups, and automatic IP addresses alone (these are your mount targets). Click Next Step.
5. Enter a name for the file system (keep General Purpose and Bursting as the default performance and throughput modes). Click Next Step.
6. Select Create File System.
7. Make sure to note down the File System ID value, which you’ll be using to mount this EFS file system
Exercise 7-5: Mount an EFS file system.
You must complete Exercise 7-4 before starting this exercise.
1. Using SSH, connect to the EC2 instance where you want to mount the EFS file system.
2. Install the amazon-efs-utils package to help mount the files:
$ sudo yum install -y amazon-efs-utils
3. Make a directory to serve as the mount point for the EFS file system:
$ sudo mkdir myefs
4. Mount the EFS file system you created in Exercise 7-4 to the mount point myefs. The value of the file-system-id you must specify in this command is the File System ID that you saved in step 7 of Exercise 7-4.
5. Move to the new directory you created in step 3:
$ cd myefs
6. Make a subdirectory under the myefs directory and change ownership to your EC2 instance user (ec2-user):.
$ sudo mkdir test
$ sudo chown ec2-user test
7. Move to the subdirectory test under the myefs directory and create a test file for testing purposes:
$ cd test
$ touch test.txt
8. Run the ls -al command to ensure that you can see the test.txt file, with the proper permissions (ec2-user:ec2-user).
Exercise 7-6: Create an Amazon S3 bucket.
1. Sign in to the AWS Management Console and open the Amazon S3 console: https://console.awsamazon.com/s3.
2. Select Create Bucket.
3. Enter a bucket name that complies with the DNS naming conventions.
4. Select US West (Oregon) as the Region where the bucket will be stored.
5. Select Create.
Exercise 7-7: Upload an object to an Amazon S3 bucket.
1. Log into the Amazon S3 console as in Exercise 7-6.
2. In the Bucket Name list, select the name of the bucket where you want to upload the object.
3. Select Upload.
4. In the Upload dialog box, select Add Files.
5. Select a file to upload, and then select Open.
6. Select Upload.
Exercise 7-8: Delete an Amazon S3 object and bucket.
1. Log into the Amazon S3 console as in Exercise 7-6.
2. In the Bucket Name list, select the name of the bucket where you want to upload the object.
3. In the Bucket Name list, check the box for the object you want to delete, and then select More | Delete.
4. In the Delete Objects dialog box, select the name of the object, and then click Delete.
5. This sequence of steps is for deleting the bucket. In the bucket name list, select the bucket name, and then select Delete Bucket.
6. In the Delete Bucket dialog box, enter the name of the bucket that you want to delete, and then click Confirm.
Exercise 7-9: Enable versioning for an Amazon S3 bucket.
1. Log into the Amazon S3 console as in Exercise 7-1.
2. From the Bucket Name list, select the name of the bucket you want to enable versioning for.
3. Select Properties.
4. Select Versioning.
5. Select Enable Versioning, and then click Save.
Exercise 7-10: Create an Amazon S3 Glacier vault.
1. Log into the AWS management Console and open the Glacier console: https://console.aws.amazon.com/glacier/.
2. From the Region Selector, select a region where you want to create the vault.
3. Click Create Vault.
4. In the Vault Name field, enter a name for your new vault (myvault). Click Next Step.
5. Since this is only an exercise, select Do Not Enable Notifications.
6. Click Submit.
7. Verify that the new vault, myvault, is listed on the Glacier Vaults page.
Exercise 7-11: Create a lifecycle policy for an Amazon S3 bucket from the S3 console.
1. Open the Amazon S3 console: https://console.aws.amazon.com/s3/.
2. From the Bucket Name list, select the name of the bucket for which you want to create a lifecycle policy.
3. Select the Management tab, and then select Add Lifecycle Rule.
4. In the Lifecycle Rule dialog box, enter a name for your lifecycle rule. To apply this lifecycle rule to all objects in this bucket, click Next.
5. Select Current Version so that transitions are applied to the current version of the objects.
6. Select Add Transitions and specify Transition To Standard-IA After. Enter the value 30 days as the number of days after object creation that the transition must be applied to move the object.
7. Click Next.
8. To set up the Expiration policies, select Current Version.
9. Select Expire Current Version Of Object and then enter 365 days as the number of days after object creation that the object should be deleted.
10. Click Next.
11. For Review, verify the rule settings and click Save. You’ll see your new rule in the Lifecycle page.
Questions
The following questions will help you measure your understanding of the material presented in this chapter. Read all the choices carefully because there may be more than one correct answer. Choose all the correct answers for each question.
1. When you terminate an EC2 instance that’s backed by an S3-based AMI, what happens to the data on the root volume?
A. The data is automatically saved as a copy of the EBS volume.
B. The data is automatically saved as an EBS snapshot.
C. The data is automatically deleted.
D. The data is unavailable until the instance is restarted.
2. Given the following IAM policy:
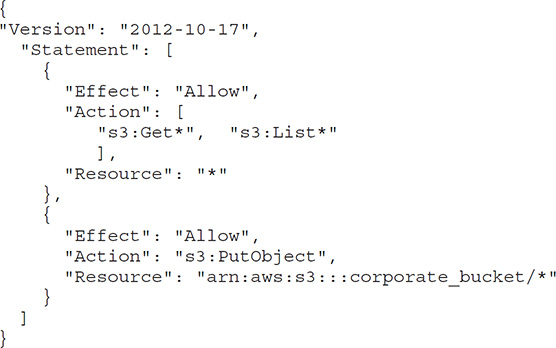
What does the IAM policy allow? (Choose three)
A. The user is allowed to read objects from all S3 buckets owned by the account.
B. The user is allowed to write objects into the bucket named corporate_bucket.
C. The user is allowed to change access rights for the bucket named corporate_bucket.
D. The user is allowed to read objects from the bucket named corporate_bucket.
3. When you’re restoring an Amazon EBS volume from a snapshot, how long must you wait before the data is available to you?
A. The data is available immediately.
B. The length of the wait depends on the size of the EBS volume.
C. The length of the wait depends on how much data you’ve stored on the volume.
D. The length of the wait is based on the amount of storage you want to retrieve from the restored volume.
4. When you restore an EBS volume from an EBS snapshot, what happens when an application accesses data on the restored EBS volume as well as further access attempts made to the same storage blocks on the volume? (Choose two)
A. When an access is made for the first time to a storage block, there’s a delay.
B. After the first access, performance is normal.
C. The data is returned immediately when the data is accessed for the first time.
D. The data is returned immediately for the first and any subsequent access attempts.
5. What’s the best type of storage volume to attach to your EC2 instances, which an application running on those instances needs to edit common files in a single shared volume?
A. A single EBS gp2 volume
B. An Amazon Elastic File System (EFS) volume
C. A large EBS volume
D. An Amazon Elastic Block Store (EBS) volume with high IOPS
6. Which of the following statements are true of Amazon EBS? (Choose two)
A. EBS automatically creates snapshots for the volumes when data changes.
B. When you stop an instance, any EBS attached volumes are lost.
C. Data in an EBS volume is automatically replicated within an AZ.
D. You can encrypt all the application data that you store on an EBS volume by encrypting the volume when you create it.
7. You use S3 to store critical data for your company. Several users within your group currently have full permissions to your S3 buckets. You need to come up with a solution that doesn’t adversely impact your users, but that also protects against the accidental deletion of objects. Which two options will address this issue? (Choose two)
A. Enable versioning on your S3 buckets.
B. Configure your S3 buckets with MFA Delete.
C. Create a bucket policy and allow only read only permissions to all users at the bucket level.
D. Enable object lifecycle policies and configure data older than one month to be archived in Glacier.
8. An organization’s security policy requires that multiple copies of all critical data be replicated across at least a primary and a backup data center. The organization has decided to store some critical data on Amazon S3. Which option should you implement to ensure this requirement is met?
A. Use the S3 copy API to replicate data between two S3 buckets in different regions.
B. You don’t need to implement anything since S3 data is automatically replicated between regions.
C. Use the S3 copy API to replicate data between two S3 buckets in different facilities within an AWS region.
D. You don’t need to implement anything since S3 data is automatically replicated between multiple facilities within an AWS region.
9. Your organization must ensure that it records all the data that you upload to the Amazon S3 buckets as well as all the read activity of the S3 data by the public. How do you achieve these two goals?
A. Turn on AWS CloudTrail logging.
B. Turn on Amazon CloudWatch logging.
C. Turn on server logging.
D. Turn on Amazon Inspector.
10. How long will an Amazon EBS volume be unavailable when you take a snapshot of the volume?
A. The length of time the EBS volume is unavailable depends on the EBS volume’s size.
B. The length of time depends on the amount of data that you’ve stored on the EBS volume.
C. The length of time depends on whether you’re using an Amazon EBS-optimized instance.
D. The volume is available immediately.
11. Which of the following statements are true regarding the S3 storage classes that you can choose from? (Choose two)
A. STANDARD_IA is the default storage class.
B. STANDARD and STANDARD_IA are designed for long-lived and infrequently accessed data.
C. STANDARD_IA and ONEZONE_IA are for storing infrequently accessed data that requires millisecond access.
D. STANDARD_IA storage class is good when you have only a single copy of data that can’t be re-created.
12. Who is the owner of an Amazon S3 object when the owner of an S3 bucket grants permissions to users in another AWS account to upload objects to the bucket?
A. The other AWS account that uploaded the objects is the owner of the objects.
B. The owner of the S3 bucket is the owner of the objects.
C. Both the other AWS account that uploads the objects and the owner of the bucket own the objects.
D. The root IAM account user is always the sole owner of all S3 objects.
13. You’ve version enabled an S3 bucket, and currently, there are three versions of an object in this bucket, with the IDs null, 1111-1111-1111, and 2222-2222-2222. When a simple GET request asks for an S3 object without specifying an object version ID, which of the three object versions does Amazon S3 return?
A. The object version with the object ID null
B. The original version of the object
C. The object version with the object ID 1111-1111-1111
D. The object version with the object ID 2222-2222-2222
14. Which of the following upload mechanisms does AWS recommend that you use when you’re uploading an archive that’s 1000GB in size to Amazon S3 storage?
A. Perform the upload as a single operation.
B. Perform a multipart upload of the archive.
C. Use AWS Direct Connect to upload the archive.
D. Use Amazon Snowball to move the archive to S3.
15. You’ve set a retention period of 30 days for a specific S3 object version. The bucket default retention period setting is 30 days. You submit a new lock request for the object version with a Retain Until Date of 120 days. When will the retention period for this object version expire?
A. In 30 days
B. In 60 days
C. Immediately—because of the conflicting retention periods, the object version can’t be retained for any time period
D. 120 days
16. Which of the following EBS storage types is the best choice if your applications need a high throughput without any bottlenecks?
A. gp2
B. sc1
C. io1
D. st1
17. You’re running an EC2 instance in the us-east-1a AZ. You’d like to attach an EBS volume to this instance, and you have two unattached volumes—one located in the us-east-1a AZ and the other in the us-east-1b AZ. Which of these two EBS volumes can you successfully attach to this EC2 instance?
A. The EBS volume in us-east-1a only
B. The EBS volume in us-east-ib only
C. Both the EBS volumes
D. You can’t attach either of the two volumes to the instance.
18. Which of the following storage options is best suited for a scenario in which multiple EC2 instances need to attach to the storage?
A. Amazon S3
B. Amazon EBS
C. Amazon EFS
D. Amazon Glacier
19. When you encrypt an EBS volume, which of the following types of data are encrypted? (Choose all correct answers)
A. Data-at-rest stored on the EBS volume
B. Data that moves between EBS volume and the EC2 instance to which the volume is attached
C. The snapshots that you create from this EBS volume
D. The EBS volumes that you create from snapshots that you create from this volume
20. How do you update the contents of a Glacier archive?
A. You run the upload operation to upload an archive’s contents.
B. You delete the archive and upload another archive.
C. You keep the archive and upload another archive with different content but the same archive ID.
D. You can’t delete an archive.
21. Which of the following is the default Glacier archival retrieval option?
A. Bulk
B. Expedited
C. Standard
D. Multi-part upload
22. Which of the following AWS services provide out-of-the-box user-configurable automatic backup-as-a-service and backup rotation options? (Choose two)
A. Amazon S3
B. Amazon RDS
C. Amazon EBS
D. Amazon Redshift
23. Which of the following statements about the following S3 bucket policy is/are true?
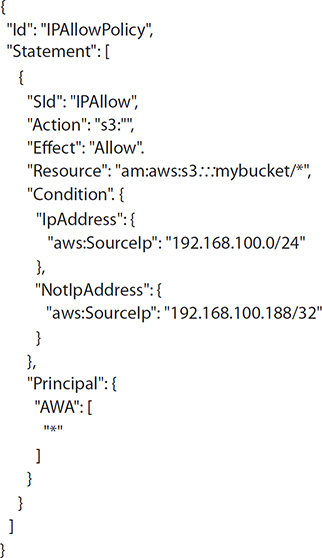
A. It denies the server with the IP address 192.168.100.0 full access to the mybucket bucket.
B. It denies the server with the IP address 192.168.100.188 full access to the mybucket bucket.
C. It grants all the servers within the 192.168.100.0/24 subnet full access to the mybucket bucket.
D. It grants all the servers within the 192.168.100.188/32 subnet full access to the mybucket bucket.
24. When an EBS snapshot is initiated but the snapshot is still in progress, which of the following is true?
A. You can’t use the EBS volume.
B. You can use the EBS volume in the read-only mode.
C. You can use the EBS volume while the snapshot is in progress.
D. You can’t initiate a snapshot on an EBS volume that’s in use by an instance.
25. You’re running a database on an EC2 instance, with the data stored on Elastic Block Store (EBS). You are seeing occasional fluctuations in the response times of the database queries and notice that there are high wait times on the disk volume. What are the ways in which you can improve the performance of the database’s storage while continuing to store data persistently? (Choose two)
A. Move to an SSD-backed instance.
B. Move the database to an EBS-optimized instance.
C. Use Provisioned IOPs EBS.
D. Use the ephemeral storage on an m2 4xiarge instance.
26. Which of the following are true of Amazon S3? (Choose two)
A. Objects are directly accessible via a URL.
B. S3 enables you to store objects of virtually unlimited size.
C. S3 enables you to store virtually unlimited amounts of data that you can use to support a database.
D. S3 offers Provisioned IOPS.
27. What is the best way to resize an instance store–backed volume?
A. You can’t resize an instance store–backed volume.
B. Copy the data on the volume to a larger or smaller volume.
C. Use a snapshot of the instance volume to restore data to a larger or smaller instance store–backed volume.
D. Stop the EC2 instance first and start the resizing operation from the EC2 console.
28. You have been tasked with identifying an appropriate storage solution for a NoSQL database that requires random I/O reads of greater than 100,000 4KB IOPS. Which EC2 option will meet this requirement?
A. EBS Provisioned IOPS
B. SSD instance store
C. EBS optimized instances
D. High Storage instance configured in RAID 10
29. You need to store data long term for historical purposes. Your analysts occasionally search this data, maybe two or three times a year. Which of the following storage options is the most cost effective, as well as highly available, option?
A. Store the data on Glacier and serve your users directly from there.
B. Store the data in S3 and serve your users directly from there.
C. Store the data on S3 by choosing Infrequent Access (Amazon S3-IA) and serve your users directly from S3.
D. Store the data on EFS and run a web server on an EC2 instance to serve the data to the users.
30. You’re evaluating the storage options for running a database that will have approximately 4000 transactions per second. The data stored on the database is roughly 1.6TB and will grow gradually over time. Which of the following EBS volumes would get you the optimal cost and performance ratio?
A. One gp2 volume sized 2TB
B. One SSD volume sized 2TB with provisioned UOPS of 4000
C. One magnetic volume sized 2TB with a Provisioned IOPS of 4000
D. One st1 volume sized 2TB with Provisioned IOPS of 4000
31. You want to trace all writes made to an Amazon S3 bucket as well as all the public reads of the content stored in the bucket. Which of the following steps will achieve your goals? (Choose two)
A. Turn on CloudTrail logging.
B. Turn on CloudWatch logging.
C. Turn on Server Access logging.
D. Turn on IAM logging.
32. Which of the following storage choices will ensure that key compliance can’t be removed for five years, without any possibility of an erroneous or intentional access to the data?
A. S3 with cross-region replication (CRR)
B. S3 with Bucket Lock
C. S3 with Versioning and Bucket Lock
D. Glacier Vault Lock
33. Which of the following are true about Amazon EBS storage? (Choose two)
A. When you stop an instance, all data on the EBS volume is lost.
B. EBS automatically replicates data within an AZ.
C. You can encrypt EBS volumes without affecting the workloads on the instance to which the volume is attached.
D. You must always attach at least one instance store volume to an EC2 instance, in addition to the EBS volumes.
Answers
1. C. You cannot restart a terminated EC2 instance and the data will be deleted automatically.
2. A, B, D. A is correct because the first Action block in the permissions policy grants read permission (S3:Get) on all objects owned by this account in all S3 buckets. B is correct because the second Action block grants the user permission to write objects (S3:PutObject) to all S3 buckets (Resource": "*"). D is correct because the user is granted permission to read objects from the bucket corporate_bucket, not directly, but through the Resource": "*" specification, which grants the S3:Get (read permission) on all objects in all buckets in this account.
3. A. The data on the restored volume is immediately available. EBS uses a lazy loading algorithm. It creates the volume immediately and makes it accessible to you but loads it in a lazy fashion. When you request data that hasn’t yet been restored to the volume, that data chunk is immediately restored when you first request it.
4. A, B. Because there’s a (sometimes significant) delay when you make a request for a data chunk for the very first time, AWS recommends that you read all of the data first (this process is called initializing) to avoid the delays. Subsequent requests for the same data get immediate responses.
5. B. A single EFS file system is what you need here. Multiple EC2 instances and many users can access and share a single EFS file system, unlike an EBS volume, which you can mount only to a single EC2 instance.
6. C, D. EBS automatically replicates the EBS volume to multiple locations within an AZ, thus ensuring AZ level redundancy for your data. You can encrypt all data that you store on a volume by choosing the encryption option when creating the volume.
7. A, B. Object versioning is designed to protect data against unintentional or erroneous deletion of data by storing multiple versions of an object. MFA Delete offers strong protection against unintentional or unauthorized data deletion by requesting a one-time code from an MFA device before allowing you to delete an object.
8. D. You don’t need to implement anything since S3 data is automatically replicated between multiple facilities within an AWS region.
9. A, B. CloudTrail and CloudWatch logging will show all upload as well as read activity in Amazon S3 buckets.
10. D. There’s no delay in accessing an EBS volume after starting a snapshot on the volume. The data continues to be available immediately, as usual.
11. C, D. Both STANDARD_IA and ONEZONE_IA storage classes are designed for storing long-lived, infrequently accessed data that requires millisecond access. STANDARD_IA storage stores data redundantly across multiple AZs, similar to the STANDARD storage class. STANDARD_IA objects can withstand the loss of an AZ, so this storage class is a safe choice when you have only a single copy of data that you can’t re-create in the case of a data loss or data unavailability.
12. A. The user from the other AWS account that uploaded the objects is the owner of those objects, regardless of who owns the bucket. The bucket owner doesn’t have permissions on the object but can deny access to the objects, archive the objects, or delete the objects, regardless of who owns them.
13. D. The object version with the object ID 2222-2222-2222 is the version you’ll retrieve when you don’t specify an object version with your GET request. A GET request without any object version retrieves the latest version of the object.
14. B. AWS recommends that you perform a multipart upload for archives larger than 100MB. (You can upload archives ranging from 1 byte to 64GB in size in a single operation, however.)
15. D. The object version will be retained for 120 days since you can extend a retention period after you’ve applied a retention setting to an object version. An explicit retention period that you set overrides any bucket default settings for that object.
16. A. The EBS gp2 volume comes with 3000 IOPS as a baseline and offers the highest throughput of all the volume types listed here.
17. A. To ensure the lowest possible latency, EBS doesn’t allow you to mount EBS volumes to an EC2 instance across AZs.
18. C. Amazon EFS is designed for multiple users (instances) that need to access the same file system. EFS offers an easy way to set up a file system for multiple users without your having to rig up a file system yourself that’s highly available and redundant like EFS.
19. A, B, C, D. EBS encryption offers a comprehensive way to safeguard the data that you store on an EBS volume. When you encrypt an EBS volume, all the data that’s at rest and that moves between the volume and the instance, as well as all snapshots and the EBS volumes that you create from those snapshots, are encrypted.
20. B. After you upload an archive, you can’t update its contents or description. The only way to update an archive is to delete the archive and upload another archive.
21. C. Standard is the default option if a retrieval request doesn’t specify a retrieval option.
22. C, D. Both Amazon EBS and Amazon Redshift provide out-of-the-box automatic backup and backup rotation options.
23. C. The S3 bucket policy grants all servers with an IP address that falls within the subnet 192.168.100.0/24 ("Condition {"IpAddress {"aws:SourceIp" "192.168.100.0/24") full access to the mybucket S3 bucket ("Resource":."arn.aws.s3::mybucket/"").
24. C. You can use the snapshot for both reads and writes while the snapshot is in progress.
25. A, B. An SSD-backed instance offers persistent storage that’s very fast. AWS recommends that you use an EBS-optimized instance for best performance. EBS optimization offers the best performance for EBS volumes by minimizing the network contention between EBS I/O and other traffic flowing to and from an EC2 instance.
26. A, B. You can (and must) access objects via a unique URL for each object that you store in S3. In addition, S3 enables you to store objects of virtually unlimited size.
27. A. You can’t resize an instance store–backed volume.
28. A. EBS Provisioned IOPS is your choice when you want to assure yourself of a high number of IOPS, such as a large number of random reads or writes.
29. C. Storing the data on S3 enables users to directly access it via a URL, which isn’t possible with any other storage solution. The S3 Infrequent Access storage tier is also low cost, compared to S3 STANDARD. The data access is slow, but it doesn’t matter since your analysts request the data only a few times a year.
30. A. The 2TB gp2 volume offers the storage that the database needs and comes with a base IOPS of 6000 (3000 IOPS per TB), which more than takes care of the required IOPS of 4000, without paying a much higher cost for a provisioned SSD volume.
31. A, C. CloudTrail logs all API calls made to AWS, and since S3 access is through API calls, the writes and reads are logged. Activating Server Access logging helps track outside access to your AWS resources.
32. D. Glacier Vault offers the most robust protection for data. Until the storage period expires, no one, including the root account user, can tamper with the data once you activate Glacier Vault Lock.
33. B, C. EBS automatically replicates data in multiple data centers within an AZ. You can transparently encrypt EBS volumes while they’re being used by applications.