Chapter 10
The Right Tools
Developers are today both blessed and cursed by an unprecedented number and variety of software development tools. If you need a text editor, dozens of superb editors are available that you can download for free. If you need to convert UNIX line-endings to Windows, you can choose from several hundred utilities (assuming you haven't written your own). Most programmers have a favorite utility for constructing and testing regular expressions, and every Windows programmer should be aware of the Sysinternals utilities. While you enjoy the convenience and power of modern integrated development environments such as Visual Studio and Eclipse, you should remain mindful of what sed, awk, and grep can do for you. If you aren't aware of utilities like these then you are missing a trick. Visual Studio is an extremely capable development tool, but beware that you aren't suffering from the law of the instrument.
I call it the law of the instrument, and it may be formulated as follows: Give a small boy a hammer, and he will find that everything he encounters needs pounding.
—Abraham Kaplan
Exploring Visual Studio
If you write code using the Microsoft stack of technologies then Visual Studio needs no introduction. Many programmers have a love/hate relationship with Visual Studio, loving it for its power and convenience, hating it for its quirks and idiosyncrasies. To be perfectly fair, recent Visual Studio releases have seen the balance shifting away from quirks toward more power and convenience. If the new default color scheme and the ALL CAPS menu doesn't put you off then you will probably love the latest version. Test your knowledge of the Visual Studio IDE with the following questions.
QUESTIONS
1. Visual Studio Build and Rebuild
In Visual Studio, what is the difference between the Build Solution and Rebuild Solution options (see
Figure 10.1)? Why would you choose one over the other?
2. Finding hidden exceptions
Consider a scenario in which you suspect that a poorly coded
try/catch block is hiding an important exception, something like the following code:
 try {
     RiskyOperation();
 }
 catch (Exception ex) {
     // TO DO - Ask Mark what to do here
 }
The catch block will catch every kind of exception and silently swallow all of them. The program will continue as if the exception hadn't occurred. If this kind of poorly constructed (or incomplete) exception handling is rife throughout the application then setting a breakpoint inside each of the catch blocks in order to confirm the source of a problem will be impractical.
What else can you do with Visual Studio that might help you prove (or disprove) your theory about a hidden or “swallowed” exception?
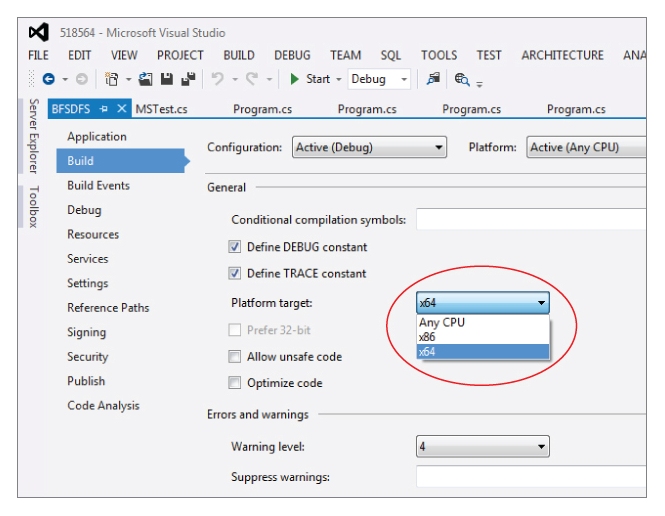
3. Targeting any CPU
Figure 10.2 shows (circled) that you can instruct Visual Studio to build a project to target a 32-bit platform (x86), a 64-bit platform (x64), or Any CPU.
With regard to these options:
- What does the Any CPU option actually mean with regard to the executable file that is produced?
- If you build an executable on a 32-bit machine with the Any CPU option, can you then copy the executable to a 64-bit machine and expect it to work without modification? What about vice versa?
- Suppose a vendor gives you a non-managed 64-bit DLL. What kind of problem might you encounter by using this DLL on a 32-bit machine when your executable is built for Any CPU?
- How can you tell what platform a .NET executable targets (that is, 32, 64, any) when all you have is the executable itself (that is, when you don't have the project settings file)?
4. Understanding Visual Studio project configuration
Consider a scenario in which you are working on a new product feature. You write and test your code using the default Debug configuration, but when your code is incorporated into the main team build—which uses the project's Release configuration—your code doesn't appear to work correctly. You are unable to reproduce the problem in Debug mode.
What should you look for in your code that might explain the different behavior when the application is built in Release configuration?
Exploiting Command-Line Tools
It doesn't matter which operating system or which programming languages you favor, if you don't have at least a working knowledge of the following command-line tools then you are missing out on a lot of fun and productivity. Many of these tools were developed originally for the UNIX operating system but today they are available for nearly every operating system, including all versions of Windows.
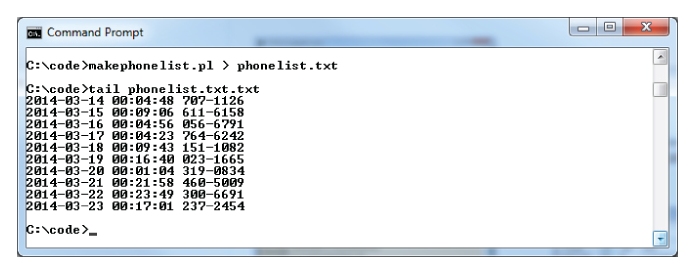
It should go without saying, but all the phone numbers used in this chapter are fictitious so please don't try calling them. If you want to generate a list of random phone numbers for yourself, here is the Perl script I used.
use strict; use warnings;

use Date::Calc qw( Add_Delta_DHMS );

my @start = (1980,1,1,0,0,0);

for ( my $i = 0; $i < 12500; $i++ )
{

    my $h = int( rand( 24 ) );
    my $m =  int( rand( 60 ) );

    my $p1 = int( rand( 1000 ) );
    my $p2 = int( rand( 10000 ) );

    my @date = Add_Delta_DHMS(@start,$i,0,$h,$m);

    printf(”%4d-%02d-%02d %02d:%02d:%02d %03d-%04d
”, @date, $p1, $p2);
}
This script outputs 12,500 fake log entries, each with a random phone number. To create a file from it, you can redirect the output from this script as shown in Figure 10.3. If you need to install Perl on a Windows PC then you can obtain it from http://www.activestate.com/activeperl/downloads.
QUESTIONS
5. Finding a needle in a haystack with grep
Given a text file containing a list of several million phone numbers, use grep to determine whether the specific number 555-1234 exists in this file.
An excerpt from this file is shown in
Figure 10.3. (Note: the
tail utility is used to show the last part of this file, it is not necessary to use
tail in your answer.)
6. Finding more than one needle with grep
Given a text file containing a list of several million phone numbers (an excerpt from this file is shown in
Figure 10.3), use
grep to obtain a list of telephone numbers beginning with
555.
For example, your grep command should find 555-1234, 555-0000, and so on, but it should not find 999-1234 or 000-0000.
7. Sorting output with sort
In addition to reading from and writing to files, most tools work perfectly well with the standard streams: stdin (input), stdout (output), and stderr (errors). Write a command line that takes advantage of streaming to send output from grep to sort. Your commands should use grep to find phone numbers beginning with 555- and then use sort to sort this list into alphabetical order.
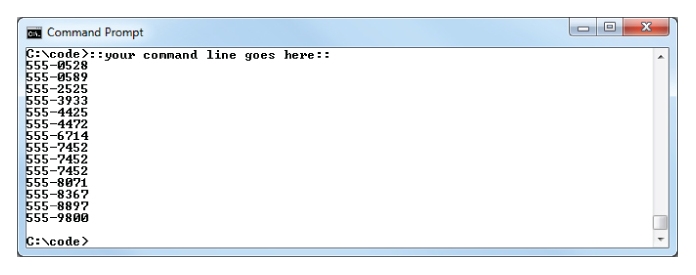
8. Finding unique values with uniq and sort
The list of phone numbers shown in
Figure 10.4 contains several duplicates. Modify or append to the command line used to produce this list so that it only shows one line per unique telephone number.
9. Ignoring errors by redirecting stderr
Suppose you have a utility that, in the normal course of operation, generates so many error messages that it makes it difficult to see the messages that are not errors.
Assuming that this utility sends its error messages to stderr, write a command line that uses redirection to filter out these error messages, leaving the command window (or the terminal window) free of errors.
For the purpose of constructing a command line you can assume the utility is named chatterbox.
10. Slicing text files with awk
Using the same file shown in
Figure 10.3, write an
awk command line that extracts a list of phone numbers from this file. Pipe this output to
sort and then
uniq to obtain a unique list of phone numbers.
You can assume that the list shown in
Figure 10.3 is representative of the entire file. That is, the format for every line of the file is strictly the same as shown in the sample.
11. Anonymizing data with sed
Suppose that you have found some duplicate phone numbers in the file phonelist.txt and now you need to write a report to your boss about these numbers. You know that the report might be forwarded to others so, conscious of data protection, you want to somehow redact part of the number before including it in your report.
For example, instead of 555-7452 you want to include xxx-7452.
Write a command line using sed that will replace all area codes (that is, all three-digit numbers) with xxx. Make sure to avoid replacing numbers that are not area codes. In other words, ensure that your command does not result in xxx-xxx2.
Understanding PowerShell
PowerShell is primarily a tool for the administration of Windows systems via a command shell but its tight integration with the .NET framework and the ability to create scripts with its built-in scripting language make it a valuable tool for programmers as well as administrators. If you've never tried PowerShell (many programmers haven't) then take a look at what you're missing out on by reviewing the following questions.
QUESTIONS
12. Experimenting with String.Formats in Powershell
Write a PowerShell command that will allow you to conveniently experiment with different date formats for use in a call to the .NET String.Format method.
Here is an example of this kind of formatting in C#:
String.Format(”{0:d/M/yyyy HH:mm:ss}”, date);
13. Working with objects in PowerShell
Use PowerShell to update the platform element in the following XML from LIVE to TEST. Assume the XML file is named release.xml.
Here is the original XML:
 <release>
   <platform>LIVE</platform>
 </release>
Here is the XML your command should produce:
 <release>
   <platform>TEST</platform>
 </release>
Troubleshooting with Utilities from Sysinternals
Few things are more irritating to a Windows user than trying to perform some operation—perhaps compiling a solution in Visual Studio—and to be hit with a “file in use” error that won't go away. You might close all of your Explorer windows, restart Visual Studio, spin three times on your office chair, and still get the message. If this has happened to you then you are probably aware of how Process Explorer from Sysinternals can help. If you aren't aware then you should immediately download these utilities (http://technet.microsoft.com/en-US/sysinternals) and review the following questions.
QUESTIONS
14. Find open file handles with Process Explorer
Describe how you can use Process Explorer to determine which processes have a file open (which is preventing you from deleting or renaming that file).
15. Finding which processes update a registry key
Suppose that you have installed Visual Studio 2012 and you don't like the new uppercase menus. You search the Web and find a registry hack that restores the familiar Visual Studio lowercase menus. All is well until the following day when you see that menus have reverted to uppercase. You suspect that something on your machine is resetting the registry key but you have no idea what it might be.
The registry value that determines the case of Visual Studio menus is stored at HKEY_CURRENT_USERSoftwareMicrosoftVisualStudio11.0GeneralSuppressUppercaseConversion.
Describe how you might use Process Monitor to identify processes that update this registry value.
Managing Source Code
If you work with other programmers in a team then it's a reasonably safe bet that your team uses source control. If your team doesn't use source control then it's a reasonably safe bet that your team wishes it did use source control (and that the team finds it difficult or awkward to synchronize code changes between team members). Source control is a vital tool in any professional programming environment, arguably ranking just below an IDE (or a compiler plus a text editor) in importance and usefulness.
Review the questions in this section to test your knowledge of various source- control systems. All version control systems share common goals but each has its own unique approach to satisfying those goals.
Source control with Team Foundation Server
If you develop software for the Microsoft stack then sooner or later you will encounter Team Foundation Server (TFS). This tool offers much more than just source control. It also offers project tracking, automatic data collection and reporting, and support for automated builds via Team Build. It is sometimes said of TFS that if a team were using it purely for source control then the team would be better off using some other tool and avoiding all of the administrative overhead that comes with TFS. It pays to know some of the more advanced features of TFS so you can get more out of it than just revision control.
QUESTIONS
16. Shelving changes in TFS
Describe shelving in TFS and how it can be useful to a programmer working in a team.
17. Safeguarding the build with gated check-ins
Describe some of the key benefits of the TFS gated check-in feature and contrast gated check-in with continuous integration.
Source control with Subversion
Subversion was designed as a replacement for CVS (Concurrent Versioning System, a much older source control system that began its life as a collection of shell scripts). Subversion improves on CVS in a number of ways including:
- Atomic commits
- More efficient branching
- Tree-based commits (not just file-based)
QUESTIONS
18. Understanding Subversion basics
Describe the basic Subversion commands required to perform the following actions:
- Create a new, local repository
- Import a folder into a new project in the newly created repository
- Check out a project from a repository
- Add a file to the project
- Commit working copy changes to a repository
19. Branching and tagging with Subversion
Describe the difference between a branch and a tag in Subversion.
20. Reverting committed changes from Subversion
Assume that you have the following commit history in a Subversion branch:
 123 (250 new files, 137 changed files, 14 deleted files)
 122 (150 changed files)
 121 (renamed folder)
 120 (90 changed files)
 119 (115 changed files, 14 deleted files, 12 added files)
 118 (113 changed files)
 117 (10 changed files)
Commit number 123 represents the latest version of this branch, and your working copy of this branch is up to date.
What Subversion commands could you issue that would undo the changes made in commits 118 and 120 while retaining all the other changes?
Source control with git
A distinguishing feature of git is that it is a distributed version control system (DVCS). No central git server acts as the master repository, which is different from other source control systems such as Subversion and TFS where a central server is an integral part of the system.
With git, instead of code changes being committed to a master repository and from there synchronized with each developer's working copy, git repositories are synchronized by exchanging sets of changes (patches) in a peer-to-peer arrangement. This has a number of significant benefits, including:
- Users can continue to commit changes even when disconnected from the network.
- Many git operations are faster because they don't involve a remote server.
- The impact of a corrupted or destroyed repository is minimal because every other developer in the team has a copy of the same repository.
One relatively minor but potentially confusing aspect of git for newcomers is how it uses SHA1 hashes instead of revision numbers to uniquely identify each commit. Figure 10.26 (shown later in the “Answers” section for this chapter) shows the log for a working copy; notice that (for example) the initial commit is identified as:
commit 0e1771a65e03e25de2be10706f5655bf798d62b8
This isn't as awkward as it might seem. Most git commands accept the first few characters of the hash so you don't need to type (or copy/paste) more characters than necessary to unambiguously identify the revision. For instance, the following git commands have the same effect:
git checkout 0e1771a65e03e25de2be10706f5655bf798d62b8

git checkout 0e17  # same as above provided no other revisions
                   # have the same first 4 characters ‘0e17'
This reliance on SHA1 hashes is a logical consequence of the distributed nature of git. It doesn't have a central server, which makes tracking and issuing sequential revision numbers impractical.
QUESTIONS
21. Understanding git basics
Describe the basic
git commands required to perform the following actions:
- Create a new, local repository
- Add files to the newly created repository
- Commit working copy changes to a repository
22. Finding a bad commit with git bisect
Explain how the git bisect command can help you track down the commit in which a bug was introduced.
ANSWERS
1. Visual Studio Build and Rebuild
In Visual Studio,
what is the difference between the Build Solution and Rebuild Solution options (
see Figure 10.1)? Why would you choose one over the other?
When you use the Build Solution option, Visual Studio builds only what it thinks necessary to bring the solution output up to date. If it thinks everything is up to date then Visual Studio essentially does nothing. This approach to building a solution or a project is called an incremental build and it is the default build behavior.
When you press F5 to start debugging a project, Visual Studio saves all the source files that have been updated and then performs a build, just as if you had saved the files yourself and then requested to Build Solution.
The Clean Solution option (shown but not circled in
Figure 10.1) removes solution output files (not necessarily all of them) leaving the solution in a so-called clean state. This can be useful if, for instance, you want to copy the solution folder without copying all the large binary (for example, executable) files. It also means that the next build will need to recompile all the necessary source files in order to reconstruct these solution output files.
The Rebuild Solution option essentially performs a “clean” and then a “build,” combining these two actions into one. This is useful when you suspect Visual Studio's tracking of changed files might be incorrect or out of sync.
2. Finding hidden exceptions
Consider a scenario in which you suspect that a poorly coded try/catch block is hiding an important exception,
something like the following code:
 try {
     RiskyOperation();
 }
 catch (Exception ex) {
     // TO DO - Ask Mark what to do here
 }
The catch block will catch every kind of exception and silently swallow all of them. The program will continue as if the exception hadn't occurred. If this kind of poorly constructed (or incomplete) exception handling is rife throughout the application then setting a breakpoint inside each of the catch blocks in order to confirm the source of a problem will be impractical.
What else can you do with Visual Studio that might help you prove (or disprove) your theory about a hidden or “swallowed” exception?
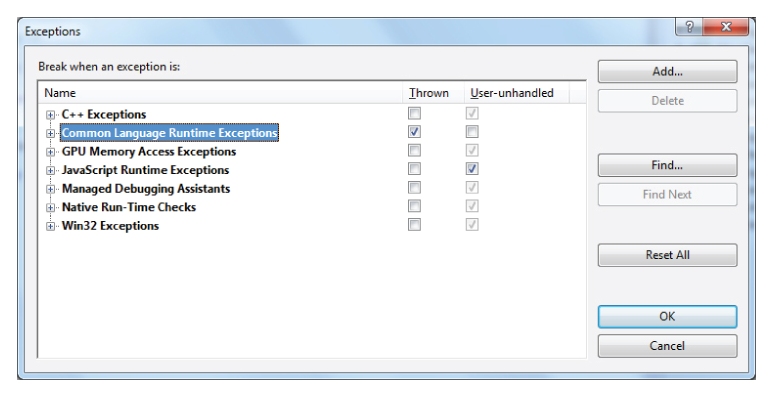
When running an application Visual Studio will by default break into debug mode when it encounters an unhandled CLR exception. The problem with the code in this question is that it technically handles the exception, even though it does nothing useful with it.
You can ask Visual Studio to break into debug mode when an exception is thrown, regardless of whether it is caught or not. This can be used to test the theory that an exception is being hidden (that is, caught and not rethrown or otherwise handled in a useful way).
You can find the option for this behavior under DEBUG ⇒ Exceptions as shown in
Figures 10.5 and
10.6.
3. Targeting any CPU
Figure 10.4 shows (circled)
that you can instruct Visual Studio to build a project to target a 32-
bit platform (
x86),
a 64-
bit platform (
x64),
or Any CPU.
With regard to these options;
- What does the Any CPU option actually mean with regard to the executable file that is produced?
- If you build an executable on a 32-bit machine with Any CPU, can you then copy the executable to a 64-bit machine and expect it to work without modification? What about vice versa?
- Suppose a vendor gives you a non-managed 64-bit DLL. What kind of problem might you encounter when using this DLL on a 32-bit machine when your executable is built for Any CPU?
- How can you tell what platform a .NET executable targets (that is, 32, 64, Any) when all you have is the executable itself (that is, when you don't have the project settings file)?
If you target Any CPU then the application will be built to run on both 32- and 64-bit platforms. This means that if the application starts on a 32-bit machine it will run as a 32-bit process, and if it starts on a 64-bit machine it will run as a 64 bit process. Prior to .NET 4.5 this was the end of the story, but Visual Studio 2012 and .NET 4.5 added the option to target “Any CPU, Prefer 32-bit.” You can see this option in
Figure 10.11 (shown later in this section). This option means that the executable will run on a 64-bit machine as a 32-bit process, even when it could in theory run as a 64-bit process.
Building a .NET executable on a 32-bit (or 64-bit) machine does not determine on which platforms the executable can then be run. It's all about the project settings (or the command-line options if you build with MSBuild). You can build a 64-bit executable on a 32-bit machine, and even though this executable won't run on that 32-bit machine it can be copied to 64-bit machines and it will run just fine. Building a 32-bit executable on a 64-bit machine in order to run it on a 32-bit machine works equally well.
Prior to .NET 4.5 the Any CPU option was sometimes problematic. Unlike .NET assemblies, the target platforms for non-managed DLLs are determined when they are compiled, so a non-managed DLL compiled to run as 64-bit will only ever run on a 64-bit platform. If you try to use this DLL from a 32-bit .NET executable you get a run-time exception in the form of a BadImageFormatException. The same exception occurs if you try to load a 32-bit unmanaged DLL from a 64-bit .NET process. The same problem can occur with managed assemblies if they are set to target 32-bit only or 64-bit only. Note that the executable file determines whether an application is loaded and run as a 32-bit or 64-bit process, not the supporting assemblies and DLLs.
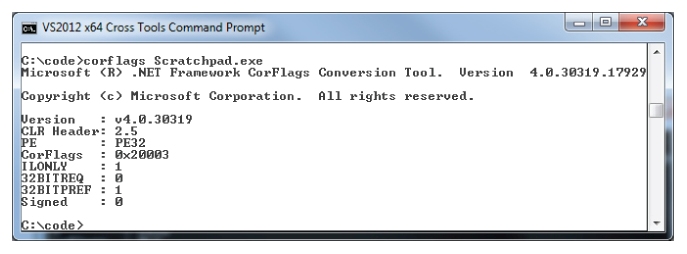
If you are given a .NET executable and you need to determine which platforms it will run on, you can use the .NET Framework tool,
corflags.exe, as illustrated in
Figures 10.7,
10.8,
10.9, and
10.10.
You can also use the CorFlags utility to change the target platform of a .NET executable.
4. Understanding Visual Studio project configuration
Consider a scenario in which you are working on a new product feature. You write and test your code using the default Debug configuration, but when your code is incorporated into the main team build—which uses the project's Release configuration—your code doesn't appear to work correctly. You are unable to reproduce the problem in Debug mode.
What should you look for in your code that might explain the different behavior when the application is built in Release configuration?
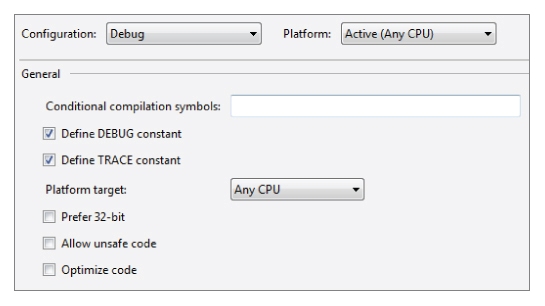
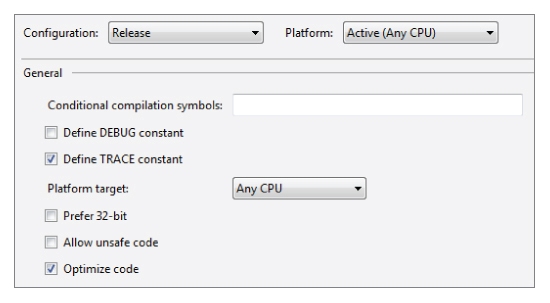
When considering the difference between Debug and Release builds, most programmers think of the debugging information that is stored in PDB files. This is an important difference (it enables interactive debugging) but it does not explain how code can behave differently when built using a Release configuration.
If you look at the property page of a Visual Studio project and switch between Debug and Release configurations (see
Figures 10.11 and
10.12) you will notice that (by default) Release mode turns off the “Define DEBUG constant” option.
When checked, this option is equivalent to writing:
#define DEBUG
When unchecked, this option is equivalent to writing:
#undef DEBUG
If you write code that is surrounded by an
#if DEBUG directive then this code will be excluded when
DEBUG is not defined.
 static void Main(string[] args)
 {
     Init();

     DoWork();

 #if DEBUG
     CheckDatabase();  // Won't be included unless DEBUG is defined
 #endif

     Finish();
 }
Most programmers would not surround an important function like CheckDatabase with #if/#endif because it is obviously incorrect—the method should be called regardless of the DEBUG symbol.
More realistically, what can happen, particularly when the programmer is conscientiously writing defensive code, is that the programmer surrounds the call to
CheckDatabase with an assertion like this:
 static void Main(string[] args)
 {
     Init();

     DoWork();

     Debug.Assert(CheckDatabase()); // Note: MUST return true!

     Finish();
 }
The programmer who wrote this code presumably wanted an alert if CheckDatabase ever returned false, but failed to appreciate that the entire line would be ignored when the DEBUG symbol is not defined, which is exactly the case when compiling in Release mode.
This is the most likely cause of the problem in the example scenario, and an easy mistake to make.
5. Finding a needle in a haystack with grep
Given a text file containing a list of several million phone numbers, use grep to determine whether the specific number 555-1234 exists in this file.
An excerpt from this file is shown in Figure 10.13 (
shown earlier in this chapter).
This straightforward problem is easily solved with grep. Your interviewer might not mention grep explicitly, but when given this kind of problem (“find all of X in a large file”) you should always consider using grep before you start writing your own utility from scratch.
To confirm that the number
555-1234 exists in the file you can use
grep as follows:
grep 555-1234 phonelist.txt
If the number 555-1234 exists in the file then the matching line will be shown. If not, nothing will be shown.
6. Finding more than one needle with grep
Given a text file containing a list of several million phone numbers, use grep to obtain a list of telephone numbers beginning with 555.
For example, your grep command should find 555-1234, 555-0000, and so on, but it should not find 999-1234 or 000-0000.
To answer this question you need to use
grep with a regular expression. Your regular expression should look similar to this:
555-[0-9][0-9][0-9][0-9]
You could use a simpler pattern such as
555-, but it is usually a good idea to be more specific and avoid potential false matches. Now you can use this regular expression in the
grep command as shown in
Figure 10.13.
Note that if this question had asked for just the numbers (rather than the entire line) you could have used the
-o option to output just the matching text. You could also make the regular expression a little more compact by using the
-E option to take advantage of
grep's support for the extended regular-expression syntax. Both of these options are shown in
Figure 10.13.
7. Sorting output with sort
In addition to reading from and writing to files, most tools work perfectly well with the standard streams: stdin (input), stdout (output), and stderr (errors). Write a command line that accepts input from stdin, uses grep to find phone numbers beginning with 555-, and sorts the output from grep into alphabetical order with the sort utility.
If you've ever piped output from one utility to another then you can easily answer this question.
Using the
grep command from the previous question you can combine it with
sort to produce the required output as shown in
Figure 10.14.
8. Finding unique values with uniq and sort
The list of phone numbers shown in Figure 10.14 contains several duplicates. Modify or append to the command line used to produce this list so that it only shows one line per unique telephone number.
This is another easy question provided you are familiar with piping output and the
sort utility.
Figure 10.15 shows one way of obtaining a sorted list of unique values.
Many versions of
sort have a built-in ability to return a unique list of values in addition to sorting so you could alternatively use a command line like this:
grep -oE “555-[0-9]{4}” phonelist.txt | sort -u
9. Ignoring errors by redirecting stderr
Suppose you have a utility that, in the normal course of operation, generates so many error messages that it makes it difficult to see the messages that are not errors.
Assuming that this utility sends its error messages to stderr, write a command line that uses redirection to filter out these error messages, leaving the command window (or the terminal window) free of errors.
For the purpose of constructing a command line you can assume the utility is named chatterbox.
The key to this question is to know that on both Windows and UNIX you can reference the three standard streams using their file descriptors. These are always 0 (stdin), 1 (stdout), and 2 (stderr). When combined with the redirect operator (the greater-than symbol: >), you can send error messages to a file or to a place where they will never been seen again (the null device).
In UNIX-based operating systems you can send the
stderr stream to
/dev/null as follows:
chatterbox 2> /dev/null
In Windows you can send it to the
NUL device with:
chatterbox 2> NUL
Of course, if you don't want to ignore the errors and you also don't want them to pollute the console/terminal window, you could send the errors to a file:
chatterbox 2> errors
You could also send
stdout and
stderr to two different files:
chatterbox 1> output 2> errors
Conversely you can redirect
stderr to
stdout:
chatterbox 2>&1
10. Slicing text files with awk
Using the same file as shown in Figure 10.3, write an awk command line that extracts a list of phone numbers from this file. Pipe this output to sort and then uniq to obtain a unique list of phone numbers.
You can assume that the list shown in Figure 10.3 is representative of the entire file. That is,
the format for every line of the file is strictly the same as shown in the sample.
The awk utility makes extracting columns from text files a trivial task. By default, it splits a line of text into parts using whitespace as a delimiter and assigns each part to the built-in awk variables, $1, $2, $3, and so on ($0 contains the entire line).
The command line to obtain a unique, sorted list of phone numbers from the file
phonelist.txt is as follows:
awk ‘{print $3}’ phonelist.txt | sort | uniq
This
awk command prints the 3rd “column” in the file
phonelist.txt. If you want to try this out for yourself, note two things:
- The GNU equivalent of awk is gawk, and gawk is commonly used as a drop-in replacement for awk. In other words, if you don't have awk on your machine, try gawk.
- If you run this command on Windows you might need to use double quotes (”) instead of single quotes (') as shown earlier.
- If you do a lot of text-processing then studying a few more sophisticated examples of awk in action will pay off; in particular, look at how awk handles associative arrays. For instance, here is an example that obtains a list of duplicated numbers in the file phonelist.txt.
awk ‘{ if(a[$3]) {print $3 } a[$3]=$3 }’ phonelist.txt
- This example works by building up an associative array for all phone numbers in the file. If the number has been previously seen by awk as it iterates through the file then it will print the number. It will not print numbers that occur exactly once because the expression if(a[$3]) will never evaluate to true for those phone numbers.
11. Anonymizing data with sed
Suppose that you have found some duplicate phone numbers in the file phonelist.txt and now you need to write a report to your boss about these numbers. You know that the report might be forwarded to others so, conscious of data protection, you want to somehow redact part of the number before including it in your report.
For example, instead of 555-7452 you want to include xxx-7452.
Write a command line using sed that replaces all area codes (that is, all three-digit numbers) with xxx. Make sure to avoid replacing numbers that are not area codes. In other words, ensure that your command does not result in xxx-xxx2.
The
sed utility (the name “sed” is short for “stream editor”) is perfect for quick substitutions like the one required by this question. The only special knowledge you need is regular expressions; the rest is simple. Here is the
sed command to make phone numbers anonymous:
sed ‘s/[0-9][0-9][0-9]-/xxx-/'
You can combine this with
awk to obtain a list of duplicated numbers and then make them anonymous for publication:
 awk ‘{ if(a[$3]) {print $3 } a[$3]=$3 }’ phonelist.txt
     | sed ‘s/[0-9][0-9][0-9]-/xxx-/'
You can see the results of this command line in
Figure 10.16. Note that this examples shows
gawk and
sed in a Windows command window, thus requiring the use of double quotes rather than single quotes.
12. Experimenting with String.Formats in PowerShell
Write a PowerShell command that allows you to conveniently experiment with different date formats for use in a call to the .NET String.Format method.
Here is an example of this kind of formatting in C#:
String.Format(”{0:d/M/yyyy HH:mm:ss}”, date);
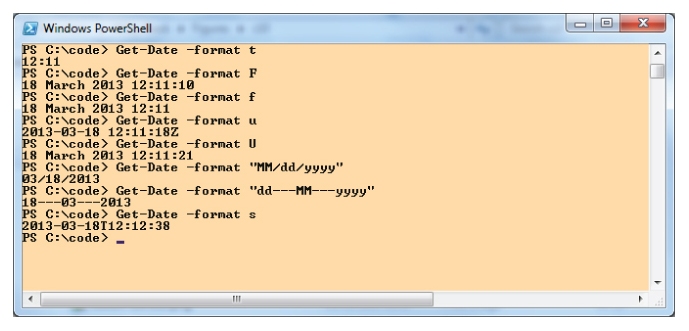
Because PowerShell is tightly integrated with .NET, you are able to use .NET Framework classes directly at the command line. This can be a convenient way to try out a .NET feature without the overhead of writing and compiling an application to test with.
You can use the static method
String.Format directly:
[string]::Format(”{0:f}”, (Get-Date) )
Note that this example uses the PowerShell
cmdlet Get-Date to retrieve the current date and time to use as an argument in
String .Format. You could also use the built-in format operator
-f without directly invoking
String.Format as follows:
”{0:f}” -f (Get-Date)
You could also use the
-format option of the
Get-Date cmdlet as follows:
Get-Date -format “f”
With any of these approaches you can now experiment with date formats without the overhead of writing and compiling a full .NET application.
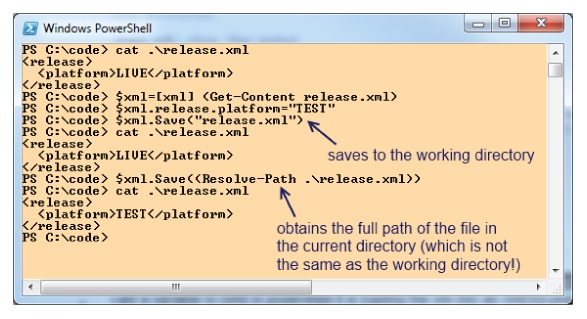
13. Working with objects in PowerShell
Use PowerShell to update the platform element in the following XML from LIVE to TEST. Assume the XML file is named release.xml.
Here is the original XML:
 <release>
   <platform>LIVE</platform>
 </release>
Here is the XML your command should produce:
 <release>
   <platform>TEST</platform>
 </release>
PowerShell differs from traditional command shells in one significant way: It allows you to create and interact with .NET objects as actual objects and not just textual representations of objects. PowerShell documentation refers to this as the object pipeline. You have seen (in a previous section of this chapter) the power of combining command-line utilities by piping text; PowerShell takes this to another level by allowing you to pipe objects and object properties between commands. This means that if you load an XML document into a PowerShell variable you can manipulate the elements of that document directly; you don't need to hack away with awk or grep.
Figure 10.18 shows how to do this with just a few PowerShell commands.
Note that
Figure 10.18 also illustrates one of PowerShell's quirks. When you start a PowerShell command window and “change directory” with the
cd command to a folder, you are not actually changing the
working directory of that window. Applications that you start and .NET objects that you instantiate have a working directory that is different from the current
location shown in the PowerShell prompt. PowerShell uses the more general word “location” (rather than “directory”) because you can set the location to a place that is not part of the file system. For instance, you can navigate to a location in the Windows registry:
Set-Location HKCU:SoftwareMicrosoftWindows
In
Figure 10.18 you can see that I saved a file as
.
elease.xml. This file was actually saved in my working directory rather than the current location
C:code. It is for this reason that I then used the cmdlet
Resolve-Path, which returns the full path of the specified file, enabling me to save my updated XML in the right place.
You can use the static method
Environment.CurrentDirectory to see your current working directory, as illustrated in
Figure 10.19.
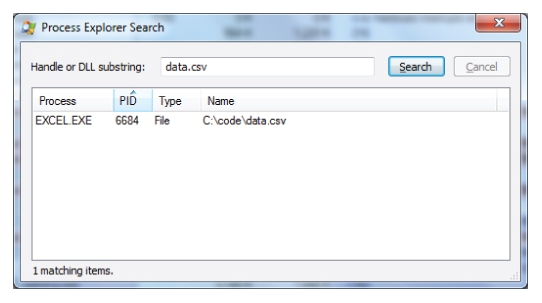
14. Find open file handles with Process Explorer
Describe how you can use Process Explorer to determine which processes have a file open (which is preventing you from deleting or renaming that file).
Process Explorer is probably the most well-known of the utilities from Sysinternals. This utility lives up to its name and shows you a great deal of information about running processes, including open file handles. You can search for a file handle (or DLL) from the Find menu or by pressing Ctrl+F and typing in the name of the file in question. See
Figure 10.20 for an example.
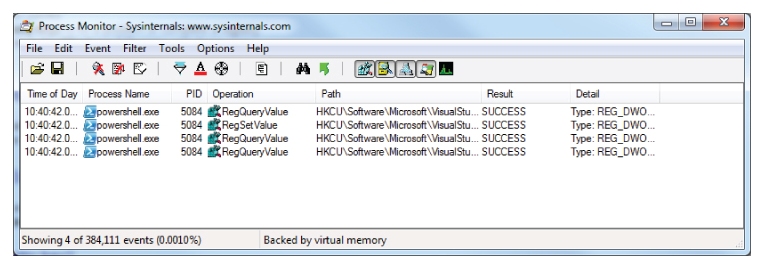
15. Finding which Processes Update a registry key
Suppose that you have installed Visual Studio 2012 and you don't like the new all-uppercase menus. You search the Web and find a registry hack that restores the familiar Visual Studio lowercase menus. All is well until the following day when you see that menus have reverted to uppercase. You suspect that something on your machine is resetting the registry key but you have no idea what it might be.
The registry value that determines the case of Visual Studio menus is stored at HKEY_CURRENT_USERSoftwareMicrosoftVisualStudio11.0GeneralSuppressUppercaseConversion.
Describe how you might use Process Monitor to identify processes that update this registry value.
Process Monitor lets you view Windows system activity in real time. It also lets you filter these activities in a number of ways, including filtering by path. This is one way that you might track down which processes are changing a given registry value.
Figure 10.21 shows how you can set a filter in Process Monitor and
Figure 10.22 shows the resulting list of processes that have updated the
SuppressUppercaseConversion registry key.
Note that the same approach could be used to identify processes that update files in a folder.
If you want to try this out for yourself (or if you are just curious about how to toggle menu case in Visual Studio 2012), here is a PowerShell command line that updates the relevant registry key. Set this value to 1 to disable the uppercase menus, or set it to 0 to enable them.
 Set-ItemProperty -Path
 HKCU:SoftwareMicrosoftVisualStudio11.0General
 -Name SuppressUppercaseConversion -Type DWord -Value 1
16. Shelving changes in TFS
Describe shelving in TFS and how it can be useful to a programmer working in a team.
Microsoft TFS was the first source-control system to use the term shelving. It refers to how a programmer can save her source code changes in TFS without performing a check-in. These saved changes (called a shelveset) are then available for reference by anyone in the team. The programmer who creates a shelveset may safely undo or overwrite changes in her local working copy without any risk of losing them. Shelvesets are not versioned; in other words, you cannot update a shelveset and retain previous versions of that shelveset.
Microsoft's documentation lists six primary reasons for creating a shelveset:
- Interruption: You have pending changes that are not ready for check in, but you need to work on a different task.
- Collaboration: You have pending changes that are not ready for check in but you need to share them with another team member.
- Code Review: You want another team member to perform a code review of your pending changes.
- Private Build: Before you check in your changes, you can use your automated build system to build and test your code.
- Backup: You have work in progress that you cannot finish now so you want a backup copy that is stored on your server and available to other team members who might need to access it.
- Handoff: You have work in progress that you want to hand off to another team member.
- Source: http://msdn.microsoft.com/en-us/library/ms181403(v=vs.110).aspx
- My experience of using TFS in a large team has been that the top two items in this list (interruption and collaboration) are the most common reasons for creating a shelveset, but your experience might be different.
17. Safeguarding the build with gated check-ins
Describe some of the key benefits of the TFS gated check-in feature and contrast gated check-in with continuous integration.
Continuous integration (CI) is popular with development teams. The basic idea is that each time a developer performs a check-in (or on a schedule) a build system gets those changes and attempts to perform a build. If the build fails then this failure is flagged to other team members who then know that the latest version of the source code has a problem (and often who caused the problem).
One of the drawbacks of CI is that by the time the team becomes aware of a problem in the build the faulty source code changes are already committed to the source repository. If a developer isn't aware of the failed build or gets the latest source code without waiting for a CI build to complete then she might suffer problems that could have been avoided.
Gated check-in is a way of mitigating this risk. When gated check-in is set up for a TFS installation each check-in is tested by TFS to ensure that it builds prior to being accepted. TFS creates a shelveset for these changes and if the build fails then the shelveset is not checked-in. This provides much of the benefit of continuous integration but without the risk of “breaking the build.”
18. Understanding Subversion basics
Describe the basic Subversion commands required to perform the following actions:
- Create a new, local repository
- Import a folder into a new project in the newly created repository
- Check out a project from a repository
- Add a file to the project
- Commit working copy changes to a repository
- Create a new, local repository:
svnadmin create svnrepo
- Import a folder into the new repository:
 svn import xmlfiles file:///c:/code/svnrepo/xmlfiles -m
     “Initial import”
- Check out a project from a repository:
svn checkout file:///c:/code/svnrepo/xmlfiles xmlwork
- Add a file to the project:
 svn add xmlwork
ewfile.xml
- Commit working copy changes to a repository:
svn commit -m “Added newfile.xml, updated release.xml” xmlwork
- Figure 10.23 shows these commands in action along with the Subversion responses to each command.
19. Branching and tagging with Subversion
Describe the difference between a branch and a tag in subversion.
This is almost a trick question because Subversion handles branches and tags in exactly the same way. Both are created by issuing a svn copy command.
While Subversion does not make any technical distinction between a branch and a tag, there is an important logical distinction, one that is common to most source control systems, including Subversion.
To illustrate the logical difference between a branch and a tag in Subversion, consider the following typical scenario.
A development team is working on a (fictitious) product called Mega and come to a point where they decide it is ready for its first release. They package up the Mega 1.0 application and install it on a server for use by MegaCorp customers.
MegaCorp's customers love the Mega product, but after a week or so they have reported a few significant bugs. Meanwhile the team has continued work on the next release of Mega (Mega 1.1) and has made many significant changes to the source code.
Alongside the ongoing development work on Mega 1.1 another team has been formed to rewrite Mega as a jQuery plugin.
Mega now has three active and concurrent streams of work:
- Mega 1.0 bug fixes
- Mega 1.1 ongoing development
- Mega jQuery rewrite “jMega”
- Obviously MegaCorp does not want to release all of this work (some of it unfinished) to the live server at the same time as it releases bug fixes. MegaCorp needs a strategy for managing the concurrent streams of work while allowing all of them to proceed unconstrained by the ongoing work of other teams. One possible strategy that relies on branches, tags, and the concept of a trunk is as follows.
- The trunk is where Mega 1.0 was first produced and where the next version of Mega will come from. This is where developers working on Mega 1.1 will commit their source code changes.
- At the point when Mega 1.0 was released, a tag was created from the trunk. This is where the team will make urgent bug fixes; that is, fixes that can't wait until Mega 1.1 is released. All the bug fixes that go into this tag will also go into the trunk so that they are included in the next release of Mega.
- When the jMega team starts work it will take a branch of the Mega source code. This branch is where it will commit its source code changes. The jMega team might decide to adopt changes from the trunk (for example, bug fixes and new features) although because jMega is a complete rewrite, some of these will lose relevance.
- To summarize, a branch and a tag in Subversion are technically the exact same thing; however, a branch and tag might be treated differently by the programmers who create and use them. No fixed rules exist about how to manage branches and tags, but branches are often used for long-running or divergent items of work whereas tags are often used as a snapshot of a branch at a certain point of time.
20. Reverting committed changes from Subversion
Assume that you have the following commit history in a Subversion branch:
 123 (250 new files, 137 changed files, 14 deleted files)
 122 (150 changed files)
 121 (renamed folder)
 120 (90 changed files)
 119 (115 changed files, 14 deleted files, 12 added files)
 118 (113 changed files)
 117 (10 changed files)
Commit number 123 represents the latest version of this branch, and your working copy of this branch is up to date.
What Subversion commands could you issue that would undo the changes made in commits 118 and 120 while retaining all the other changes?
Subversion excels in situations like this. Because every change to a trunk (or branch or tag) is recorded against the tree of files (rather than against each individual file) then undoing changes, even when they include file deletions, additions, and file renaming, is not difficult.
Assuming that you have an up-to-date working copy of this branch then the commands that will undo commits 118 and 120 are as follows:
 svn merge -c -120 .
 svn merge -c -118 .
Notice that the revision numbers that are to be undone are specified with a leading minus; that is,
-120 rather than
120. This undoes these revisions in your working copy. After you are satisfied with the state of your working copy then you can commit it to the branch.
svn commit
21. Understanding git basics
Describe the basic git commands required to perform the following actions:
- Create a new, local repository
- Add files to the newly created repository
- Commit working copy changes to a repository
- A git repository is a collection of files inside a .git folder that is created when you run the command git init, as shown in Figure 10.24.
- Importing (“adding”) files and folders to this new git repository is equally simple. Here is the command to add everything in the current folder into the repository that was set up inside this folder (in Figure 10.24):
git add .
- After you have edited a file and added a file you can commit these changes to the repository with the following commands:
 git add .   # Adds the new files to staging

 git commit -a -m “Edited release.xml, added newfile.xml”
- The -a option tells git commit to automatically stage files that have been modified and deleted. The -m option lets you specify a commit message. Prior to this commit you also needed to add new files with git add.
- Figure 10.25 shows these commands in action.
22. Finding a bad commit with git bisect
Explain how the git bisect command can help you track down the commit in which a bug was introduced.
Quite often a bug is introduced to a body of source code without anyone noticing. A bug might go undetected for months or longer, and when finally it is detected tracing its origin can be very difficult.
The git bisect command essentially performs an interactive binary search through the history of a repository to quickly home in on a bad commit. It works by starting with a known “bad” point (that is, a commit in which the bug is present) and a known “good” point (that is, a prior commit in which the bug is not present) and bisecting these two points until the origin of the bug is found. At each step it is up to you to tell git whether the commit is good or bad.
To illustrate
git bisect in practice, consider the short history of a working copy folder as shown in
Figure 10.26. Somewhere in this history there is a bad commit.
The following transcript shows the series of commands that leads to the identification of the bad commit. First, notice that the
HEAD revision of
index.html contains a mismatched closing
</div> tag:
 C:codegit>cat index.html

 <!DOCTYPE html>
 <html>
     <body>
         <span style=”font-size:x-large;”>Hello</div>, World!
     </body>
 </html>
You want to find the revision that introduced these mismatched tags. You begin by telling git that you are on the hunt:
C:codegit>git bisect start
Next, you tell
git to note a known “good” version (this commit ID is from the log shown in
Figure 10.24):
C:codegit>git bisect good 0e177
You also tell git that the latest version is bad:
 C:codegit>git bisect bad HEAD

 Bisecting: 3 revisions left to test after this (roughly 2 steps)
 [df69f5501df314238203dd270d20c26ba8084174] Emphasis added
Git responds by choosing a commit halfway between the two points and checking this version out (so that the working copy contains this version):
 C:codegit>cat index.html

 <!DOCTYPE html>
 <html>
    <body>
        <span style=”font-size:x-large;”>Goodbye</div>, cruel world!
    </body>
 </html>
You can see that this version contains the tag mismatch, so now you tell git that it is a “bad” commit.
 C:codegit>git bisect bad
 Bisecting: 0 revisions left to test after this (roughly 1 step)
 [310bc973fbd542648e87bef80d2e8ff10f396e51] The world can be cruel

 C:codegit>
 C:codegit>cat index.html

 <!DOCTYPE html>
 <html>
     <body>
         Goodbye, cruel world!
     </body>
 </html>
You can see that this version doesn't have these mismatched tags and so you deem it “good” and tell git:
 C:codegit>git bisect good

 df69f5501df314238203dd270d20c26ba8084174 is the first bad commit
 commit df69f5501df314238203dd270d20c26ba8084174
 Author: kiwicoder <[email protected]>
 Date:  Tue Mar 19 23:12:40 2013 +0000

     Emphasis added

 :100644 100644 ea10847270df53ca03d62123b5c6347920aec354
 d17d29200de22f27d3228950
 9e1eeff3cee35a9d M      index.html
Git now responds by telling you the commit in which these mismatched tags were added (revision df69f5…) and now its work is done! You can go have a word with the author of this commit and make an appropriate note in the bug tracker.
To tell git that you are finished bisecting you issue a
git bisect reset command. git will restore the working copy back to the state it was in before you started bisecting.
 C:codegit>git bisect reset

 Previous HEAD position was 310bc97... The world can be a cruel place
 Switched to branch ‘master'