
Chapter 7. Command Pattern
To command is to serve, nothing more and nothing less.
When you do the common things in life in an uncommon way, you will command the attention of the world.
Create like a god, command like a king, work like a slave.
What is the Command Pattern?
The command pattern allows a client to issue requests to an object without making
any assumptions about the request, or the receiving object. Think of the request as
a command sent to an object to engage in a known behavior. The straightforward way
to do this would be to create an instance of the object, and call the method that
implements the required command (or behavior). For example, let’s assume that we’re
building a house that allows computer control of many of its components such as
lights, doors, heating, etc. Let’s look at the code that would turn on a light bulb.
The Light class implements a method called
on() that turns on a light. A client would
execute the following code to turn the light on.
var light = new Light();
light.on();
Let’s look at another command to open a door. In this case, the
receiver of the command is an instance of the Door class, which implements a method called open() that opens the front door.
var frontdoor = new Door();
frontdoor.open();
Notice the tight coupling between the client and the receivers. By coupling, we
mean the degree to which one section of code relies on another section. The client
is tightly bound not only to the receiver classes (Light and Door), but to particular
methods (on() and open()) in those classes as well. This is not a good situation if we
want to have a flexible system that allows future expansion.
What would happen if we replace our ordinary front door with a new sliding door?
What if the new class that controls the door is called SlidingDoor, and the method in the class that opens the door is
called slideOpen()? We have to modify the code in
the client to refer to the new receiver class. Avoid getting into situations that
require modifying existing code. In addition, this new situation can require
modifications in multiple places. For example, if the front door was controlled from
two locations, a wall mounted control panel with buttons assigned to each controlled
device and a handheld remote control (like a TV remote), changing the receiver class
for the front door would require code changes in both control devices. Also, you
couldn’t reassign the buttons on the control to a different layout, as the control
code is hardcoded to each button.
To have a flexible and extensible system, commands need to be assigned to buttons on the controls without explicitly specifying the receiver or the specific method in the receiver. This would decouple the client from the receiver, but how can we do this? It seems counterintuitive at first, but we need to encapsulate both the receiver and the receiving method in a command object. By encapsulation, we mean hiding the receiver and its method from where they’re called. Let’s look at a non-technical example to figure out what a command object looks like.
Mom Needs to Issue Some Commands
Parents assign household chores for children to keep them occupied in their younger years. Getting children to do their fair share of household work is a good thing anyway. Asking the children to do something is easy to do – just ask them. However, whether they do the assigned task is a different matter altogether. In our example, we’re dealing with a model bunch of kids who are really conscientious and do their assigned tasks without raising a fuss. Let’s assume that mom assigns the tasks for each person in the household. However, mom has to leave for a day on a business trip, and won’t be around to assign tasks verbally. Mom needs to formalize a procedure to assign daily tasks for this and future instances when she will be away. This is a good opportunity to implement a command pattern structure.
Mom has several household chores in mind. She decides to write short notes for
each task and assign them to a child. Dad will be the person who looks at each
note and conveys what needs to be done to each child. Because Dad is notorious
for losing reminders and notes, Mom makes the task notes more official and
portable by putting each note into an envelope. This is analogous to a
command interface, which is simply an interface that
declares a method (generally called execute)
that does some task. Figure 7-1 shows the
household equivalent of a command interface. Mom’s command interface is a note
with the operative word “do,” which will eventually describe what chore needs to
be done, and who will do it.

Mom creates several concrete commands that conform to the command interface for the household tasks that need to be done while she is away. She puts notes, assigning each task to a different person, inside four envelopes. When the envelopes are sealed, it’s not possible to tell which kid’s responsibility it is to do the tasks, or even what tasks are enclosed in the envelopes. All we know is that the envelope contains a task. Therefore, the receiver and the task are hidden or encapsulated within the envelope.
Figure 7-2 shows Mom’s concrete commands that implement her command interface declared in Figure 7-1. The four concrete commands: John will load the dishwasher, Jane will walk the dog, Jack will do the laundry, and Dad will clean the garage (Dad won’t know what hit him). Mom has assigned each task to the person most appropriate to carry it out. She knows that Jane is the best person to walk the dog, as Brutus is on his best behavior when Jane is around. Dad is the best person to clean the garage, as it is his mess in the first place, and so on and so forth.
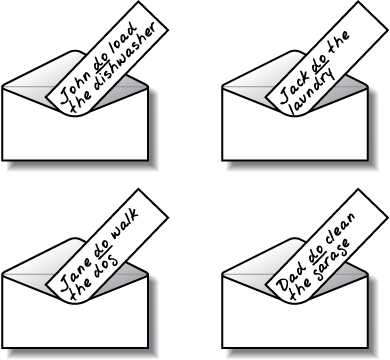
Each envelope encapsulates a particular behavior that’s assigned to a particular receiver. The envelopes, being very portable objects, can be simply given to someone (Dad) who will ask the assigned person to execute the indicated task. Mom hands the sealed envelopes to Dad, who will perform the task of invoker. He will hang on to each envelope until it’s time to execute the tasks. Dad doesn’t know what tasks the envelopes contain or who will execute the tasks or how they will do it. All he knows to do is open the sealed envelop and read the do instructions -"John do load the dishwasher” and “Jack do the laundry,” etc. We have now decoupled the receiver and the methods that execute the task in the receiver by encapsulating both within a command object that is a sealed envelope. The command object is the envelope that hides both the receiver and the task.
It’s time to do the assigned tasks when Dad brings the kids home from school. He opens each envelope, calls out the assigned tasks to each child, and then goes on to do his assigned task (mumbling to himself). Dad has no idea how the kids are doing their assigned tasks. Jane rides her bike while walking the dog. John asks his friend Mike to help him load the dishwasher. How each receiver executes its job is not the concern of the invoker.
Key Features of the Command Pattern
The primary usefulness of the command pattern is the flexibility and extensibility it affords when defining behavior in applications.
The command pattern encapsulates behavior in a portable command object.
The command pattern decouples the classes and which methods in those classes execute required behavior from the location where the behavior is called.
The command pattern allows a client to dynamically create new behavior by creating new command objects and assigning them to invokers at runtime.
The command pattern allows for straightforward implementation of command chaining, undo, redo and logging features into an application.
Class Diagram of the Command Pattern
The Command class (Example 7-3) is an interface that declares, at a minimum, a
single method called execute(). The ConcreteCommand classes implement the Command interface. There can be multiple concrete
commands. Concrete commands usually have parameterized
constructors that take an instance of a receiver class to
implement the required behavior. The client instantiates a Receiver object and passes it to the ConcreteCommand constructor when creating a new
concrete command.

The ConcreteCommand references the receiver
and delegates to it when implementing the execute() method.
The client assigns each ConcreteCommand
instance to specific triggers in invokers. Invokers are
where the commands are called from. They hold on to the ConcreteCommand objects and call their execute() methods when it’s time to execute the command. You’ll
clearly see how this is implemented in ActionScript 3 in the minimalist
application.
Minimalist Example of a Command Pattern
This example implements the command pattern class diagram in Figure 7-3. The command pattern consists of the
command interface, concrete commands
that implement the command interface, invokers that call the
execute() method in concrete commands,
receivers that implement the behavior required of commands,
and clients that create concrete commands and pass them on to
invokers.
Code examples Example 7-1 through Example 2-7 show the minimalist implementation of the command pattern.
The Command Interface
Example 7-1 shows the ICommand class that defines the interface for commands. It
defines a single method called execute().
The Concrete Command
Example 7-2 shows the ConcreteCommand class that implements the ICommand interface. The parameterized constructor
takes a Receiver class instance and assigns
it to the receiver property. The execute() command is implemented by delegating to
the receiver instance by calling its action() method. Note that, because the receiver
instance is passed to the constructor, the ConcreteCommand class and Receiver class are loosely coupled, allowing a subclass of
Receiver to be passed if needed.
The Receiver
Example 7-3 shows the Receiver class. It implements a method called action(). Receiver classes implement required
command behavior in the command pattern. The only elements that know about the
receivers in the command pattern are the concrete commands and the client.
Receivers are hidden from invokers.
The Invoker
Example 7-4 shows the Invoker class. It has a method called setCommand() that takes a concrete command instance, which is
saved in the currentCommand property. The
executeCommand() method calls the
execute() method in the concrete command
instance. Note that the invoker does not refer to the receiver, and has no idea
about its type.
The Client
Example 2-7 shows the Main
class (also the document class for the Flash document) that
represents the client. The client does several tasks. It
first creates an instance of the receiver (line 9) and
passes it as a parameter when creating a ConcreteCommand instance (line 10). The instance of ConcreteCommand is called a command
object. The client then creates an instance of the Invoker class (line 12) and passes the command
object to it (line 13). Finally, the client executes the command by calling the
execute() method on the command
object.
1           package
2           {
3               import flash.display.MovieClip;
4
5               public class Main extends MovieClip
6               {
7                   public function Main()
8                   {
9                       var rec:Receiver = new Receiver();
10                   var concCommand:ICommand = new ConcreteCommand(rec);
11
12                   var invoker:Invoker = new Invoker();
13                   invoker.setCommand(concCommand);
14                   concCommand.execute(); // execute command
15               }
16           }
17       }
The output from the minimalist application will be the following trace from
the receiver object indicating that its action() method has been called.
Receiver: doing action
Setting a Trigger to Invoke the Command
In most situations, the client does not call the execute() method in the command object. You wouldn’t need to have
an invoker if this were the case. Invokers hang on to command objects until it’s
time to execute them. There can be many triggers such as user events, and timers
that would do this.
To make our minimalist example reflect the true nature of the invoker, we can
implement a timer event that invokes the command. Example 7-6 shows the TimedInvoker class that extends
the Invoker class (see Example 7-4). It implements the setTimer() method, which creates a timer that dispatches a timer
event every second (1000 ticks equal 1 second) 5 times (line 10). It then
registers the onTimerEvent() listener method
to intercept timer events (line 11) and starts the timer. The onTimerEvent() method calls the executeCommand() method in the superclass.
1           package {
2
3               import flash.events.Event;
4               import flash.events.TimerEvent;
5               import flash.utils.Timer;
6
7               class TimedInvoker extends Invoker {
8
9                   public function setTimer() {
10                   var timer:Timer = new Timer(1000, 5);
11                   timer.addEventListener(TimerEvent.TIMER,
                         this.onTimerEvent);
12                   timer.start();
13               }
14
15               public function onTimerEvent(evt:TimerEvent):void {
16                   this.executeCommand();
17               }
18           }
19       }
Replace lines 12 through 14 in the Main
class (see Example 2-7) with the following statements to use the
new timed invoker.
var invoker:TimedInvoker = new TimedInvoker();
invoker.setCommand(concCommand);
invoker.setTimer();
This will cause the command to be executed every second for 5 seconds based on timer events. This is a more accurate representation of the command pattern where the invoker executes commands based on different triggers, independent of the client.
Key OOP Concepts in the Command Pattern
The key concept in the command pattern is encapsulation. Encapsulation is basically information hiding. You want to hide implementation details of parts of a program that are most likely to change from other parts.
Command objects, which are instances of concrete commands, embed behavior. However, which classes execute that behavior and which methods in those classes implement that behavior are hidden from where the behavior is called. This information is encapsulated within the command object.
We saw in the minimalist example that nowhere in the invoker (Example 7-4) is the type of the receiver mentioned. The invoker only
knows what’s implemented in the command interface (Example 7-1). It
only knows that the command object has a method called execute(). All the invoker knows is to call that method in the
command object when it’s time to do it.
This decouples the invoker from the receiver. If it becomes necessary to use a
different receiver to implement a required behavior, we can modify the concrete
command to delegate to a different receiver. The invoker won’t know that anything
has changed; it’ll keep calling the execute()
command in the same command object, oblivious to the fact that its behavior is now
implemented using a different receiver.
Minimalist Example: Macro Commands
Macro commands are useful extensions of concrete commands. They allow the creation of composite commands that run several sub-commands in sequence. Consider what happens when you quit or exit an application. If there are open unsaved documents the application will ask if you want to save changes. The quit command is then a macro command that does several housekeeping tasks before quitting. These tasks are themselves commands, but are referred to as subcommands when invoked by a macro command.
Macro commands need to implement more functionality than a simple command does because they need to define interfaces to add and remove subcommands. We will extend the original command interface to fit the new requirements.
The Macro Command Interface
Example 7-7 shows the IMacroCommand interface. It extends the ICommand interface (Example 7-1) and declares
the add() and remove() methods.
Two Concrete Subcommands
To demonstrate a macro command, we will implement two concrete command classes
(ConcreteCommand1 and ConcreteCommand2) that use two receiver classes
(Receiver1 and Receiver2). These are shown in Example 7-8 through Example 7-11.
package {
    class ConcreteCommand1 implements ICommand
    {
        var receiver:Receiver1;

        public function ConcreteCommand1(rec:Receiver1):void
        {
            this.receiver = rec;
        }

        public function execute():void
        {
            receiver.action1();
        }
    }
}package {
class ConcreteCommand2 implements ICommand
{
var receiver:Receiver2;
public function ConcreteCommand2(rec:Receiver2):void
{
this.receiver = rec;
}
public function execute():void
{
receiver.action2();
}
}
}The Concrete Macro Command
We will now develop a macro command that implements the IMacroCommand interface. The implementation is
straightforward as Example 7-12 shows; it pushes
commands into the commandObjectList array in
the add() method, and executes them in
sequence in the execute() method.
package
{
    class ConcreteMacroCommand implements IMacroCommand
    {
        var commandObjectList:Array;

        public function ConcreteMacroCommand()
        {
            this.commandObjectList = new Array();
        }

        public function add(c:ICommand):void
        {
            commandObjectList.push(c);
        }

        public function remove(c:ICommand):void
        {
            for (var i:int = 0; i < commandObjectList.length; i++)
            {
                if (commandObjectList[i] === c)
                {
                    commandObjectList.splice(i, 1);
                    break;
                }
            }
        }

        public function execute():void
        {
            for (var i:int = 0; i < commandObjectList.length; i++)
            {
                commandObjectList[i].execute();
            }
        }
    }
}
A Macro Command Object Created from the Client
The client first creates the two subcommands. It then creates a new macro command and adds the two subcommands to it. Finally, it creates an invoker and sets it to execute the macro command. Example 7-13 shows how to create the macro command.
var command1:ICommand = new ConcreteCommand1(new Receiver1());
var command2:ICommand = new ConcreteCommand2(new Receiver2());

// create a macro command and add commands
var macroCommand:IMacroCommand = new ConcreteMacroCommand();
macroCommand.add(command1);
macroCommand.add(command2);

var invoker:TimedInvoker = new TimedInvoker();
// assign macro command to the invoker
invoker.setCommand(macroCommand);
// invoke commands on timer events
invoker.setTimer();
Note that macro commands do not delegate to receivers to implement required
behavior. The primary purpose is to execute sub-commands. Since they implement
the ICommand interface, invokers are
indistinguishable from other command objects.
Example: Number Manipulator
The invoker in the previous examples can hold only one command object. However, in
real applications, invokers need to hold multiple commands. For example, take the
File menu of any application. It is a good example of an invoker. The File menu has
Open, Save and Save As menu items. Each of these menu items can be a command
container that calls the execute() method of the
embedded command object when triggered by the user. Toolbars in applications are
also invokers. They generally consist of button icons that execute particular
commands to manipulate elements in an application or document.
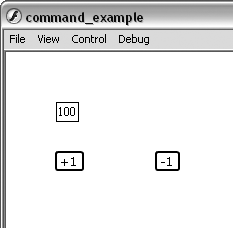
In the Number Manipulator application (Figure 7-4), we will create an invoker that contains buttons onto which command objects can be attached. When the button’s clicked, the attached command will be executed. The example application will consist of two buttons and a text field. The two buttons will have embedded command objects that will increment and decrement the numerical value in the text field.
Note
We could have used the built-in Button
component in Flash CS3 for the buttons in our application. However, we will
implement our own button class to illustrate how easily you can create custom
buttons with ActionScript 3.0. Use of components is demonstrated in Chapter 12, where we build an
application that has several user interface elements to illustrate the
Model-View-Controller pattern.
A Utility Button Class
First we need to create a button class that can be reused in subsequent
examples. Example 7-14 shows the TextButton class that subclasses the built-in SimpleButton class in ActionScript 3.0. The
TextButton constructor takes one
parameter that defines the text on the button. The TextButton.as file contains an embedded class called TextButtonState that subclasses Sprite to draw required button states. The
TextButtonState constructor takes two
parameters: button state color, and button text. It creates a new text field
with the passed text and draws a filled rounded rectangle around it, using the
passed color. A new sprite is created and assigned to the up, down, and over
states of TextButton.
package
{
    import flash.display.*;
    import flash.events.*;

    public class TextButton extends SimpleButton
    {
        public var selected:Boolean = false;

        public function TextButton(txt:String)
        {
            upState = new TextButtonState(0xFFFFFF, txt);
            downState = new TextButtonState(0x999999, txt);
            overState = new TextButtonState(0xCCCCCC, txt);
            hitTestState = upState;
        }
    }
}

import flash.display.*;
import flash.text.TextFormat;
import flash.text.TextField;
import flash.text.TextFieldAutoSize;

class TextButtonState extends Sprite
{
    public function TextButtonState(color:uint, labelText:String)
    {
        var label = new TextField();
        label.autoSize = TextFieldAutoSize.LEFT;
        label.text = labelText;
        label.x = 2;
        var format:TextFormat = new TextFormat("Verdana");
        label.setTextFormat(format);
        var buttonWidth:Number = label.textWidth + 10;
        var background:Shape = new Shape();
        background.graphics.beginFill(color);
        background.graphics.lineStyle(2, 0x000000);
        background.graphics.drawRoundRect(0, 0, buttonWidth, 18, 4);
        addChild(background);
        addChild(label);
    }
}
Triggering an Invoker by Button Clicks
Now that we have a button, let’s use it to create a multibutton invoker. Example 7-15 shows the InvokerPanel class that contains buttons with commands assigned
to them. Two arrays, commandList and buttonList, are declared to hold the button
instances and corresponding command objects. The public setCommand() method takes two parameters, a slot position and
command object (line 17), and assigns the command to the requested slot position
in the commandList array. The setButton() method takes two parameters, a slot
position as before, and button text (line 22). The setButton() method creates a new TextButton instance, and assigns it to the requested location on
the buttonList array. It then draws the
button, assigns an event handler to intercept mouse clicks, and adds it to the
display list. The mouse click is the trigger for the button and its assigned
command object. When there’s a click on the button, the event is intercepted by
the buttonClicked() method, which traverses
the buttonList array to find the button
clicked. And when the originating button is found, it executes the corresponding
command object from the commandList
array.
1           package
2           {
3               import flash.display.*;
4               import flash.events.*;
5
6               class InvokerPanel extends Sprite
7               {
8                   var commandList:Array;
9                   var buttonList:Array;
10
11               public function InvokerPanel()
12               {
13                   this.commandList = new Array(5);
14                   this.buttonList = new Array(5);
15               }
16
17               public function setCommand(nSlot:int, c:ICommand):void
18               {
19                   this.commandList[nSlot] = c;
20               }
21
22               public function setButton(nSlot:int, sName:String):void
23               {
24                   var btn:TextButton = new TextButton(sName);
25                   this.buttonList[nSlot] = btn;
26                   btn.x = nSlot * 100;
27                   btn.addEventListener(MouseEvent.CLICK, this.buttonClicked);
28                   this.addChild(btn);
29               }
30
31               private function buttonClicked(e:Event)
32               {
33                  for (var i:int = 0; i < buttonList.length; i++)
34                   {
35                       if (buttonList[i] === e.target)
36                       {
37                           this.commandList[i].execute();
38                           break;
39                       }
40                   }
41               }
42           }
43       }
The Increment and Decrement Commands
Now that our InvokerPanel is complete, we
can develop the command classes to increment and decrement a value in a text
field. Example 7-16 and Example 7-17 show the IncrementCommand and DecrementCommand classes, both of which implement the ICommand interface (Example 7-1).
Note that the receiver is the built-in TextField class and the text in the field is assigned using its
text property. The execute() method gets the text value from the
receiver, casts it to a Number, and assigns the manipulated value back to the
receiver.
package {

    import flash.text.TextField;

    class IncrementCommand implements ICommand {

        var receiver:TextField;

        public function IncrementCommand(rec:TextField):void {
            this.receiver = rec;
        }

        public function execute():void {
            receiver.text = String(Number(receiver.text) + 1);
        }
    }
}package {
import flash.text.TextField;
class DecrementCommand implements ICommand {
var receiver:TextField;
public function DecrementCommand(rec:TextField):void {
this.receiver = rec;
}
public function execute():void {
receiver.text = String(Number(receiver.text) – 1);
}
}
}The Client
The only remaining task is to develop the client code to create the command objects and assign them to the buttons on the invoker. Example 7-18 shows how the client first creates the receiver, which is a built-in text field (line 2), and assigns the number 100 to it. The receiver is then positioned and added to the display list (line 8). The client then creates two concrete commands to increment and decrement the receiver (lines 11-12). Next, the client creates the invoker button panel, and two buttons. Finally, the command objects are assigned to the proper button slots (lines 23-24). Note that the button slots are numbered from 0 through 4.
1        // create new receiver
2        var numDisplayField:TextField = new TextField();
3        numDisplayField.autoSize = TextFieldAutoSize.LEFT;
4        numDisplayField.text = '100'; // default value
5        numDisplayField.border = true;
6        numDisplayField.x = 50;
7        numDisplayField.y = 50;
8        this.addChild(numDisplayField);
9
10       // concrete command objects
11       var incCommand:ICommand = new IncrementCommand(numDisplayField);
12       var decCommand:ICommand = new DecrementCommand(numDisplayField);
13
14       // create invoker button panel
15       var panel:InvokerPanel = new InvokerPanel();
16       panel.setButton(0,"+1");
17       panel.setButton(1,"-1");
18       panel.x = 50;
19       panel.y = 100;
20       this.addChild(panel);
21
22       // add commands to invoker buttons
23       panel.setCommand(0, incCommand);
24       panel.setCommand(1, decCommand);
Running the number manipulator example will produce a text field with the number 100 and two buttons labeled “+1” and “-1” (see Figure 7-4).
Extended Example: Sharing Command Objects
Portability is a significant advantage of command objects. They’re portable
because they encapsulate everything that’s needed to execute a particular command.
They’re not tightly coupled to either the receiver or the invoker, and conform to a
stable interface. Any code segment can execute a command by just calling the
execute() method on a command object. Why is
portability such a good thing?
Let’s go back to our File menu example. We know that a File menu can be an invoker where the menu items are attached to command objects that can be executed. How about keyboard shortcuts for the File menu? The keyboard shortcut Ctrl-O on the PC and Command-O on a Mac will perform the same behavior as selecting the Open menu item. Ctrl-S on the PC and Command-S on a Mac will save a file exactly the same way as choosing the Save menu item. So, the keyboard shortcuts are invokers too, but do we need to create a whole new set of command objects for it? Not at all, we can create a single command object and share it with multiple invokers.
Triggering an Invoker by Key Presses
Let’s extend our number manipulator example and add keyboard shortcuts to
increment and decrement the number in the text field. The first step is to
develop a new invoker to handle keyboard input. Example 7-19 shows the InvokerKeyboard class. Structurally, it’s similar to previous
multibutton invokers. However, unlike the InvokerPanel class, InvokerKeyboard does not have to subclass Sprite because it’s not going to be added to the
display list. The Stage instance is passed to
InvokerKeyboard as the onKeyPress listener has to be registered with the
stage. This is essential to intercept all key down events.
Two arrays, keyList and commandList, hold the shortcut key code and
corresponding command objects. The public setCommand() method takes two parameters, a key code value and
command object, and pushes them in tandem to the keyList and commandList
arrays. If there is a key press and the keyList array contains the keycode for the key pressed, the
corresponding command from the commandList
array will be executed.
package
{
    import flash.events.*;
    import flash.display.Stage;

    class InvokerKeyboard
    {
        var commandList:Array;
        var keyList:Array;

        public function InvokerKeyboard(stageTarget:Stage)
        {
            this.commandList = new Array();
            this.keyList = new Array();
            stageTarget.addEventListener(KeyboardEvent.KEY_DOWN,
                                     this.onKeyPress);
        }

        public function setCommand(keycode:int, c:ICommand):void
        {
            this.keyList.push(keycode);
            this.commandList.push(c);
        }

        private function onKeyPress(event:KeyboardEvent)
        {
            for (var i:int = 0; i < keyList.length; i++)
            {
                if (keyList[i] === event.keyCode)
                {
                    this.commandList[i].execute();
                    break;
                }
            }
        }
    }
}
Sharing Command Objects from the Client
Now that the keyboard invoker has been implemented, we can add the following
at the end of the client code shown in Example 7-18. This creates a new InvokerKeyboard instance, and assigns the same
command objects to it that were used for the InvokerPanel.
var kb:InvokerKeyboard = new InvokerKeyboard(this.stage);
// add commands to keyboard shortcut invoker
kb.setCommand(Keyboard.RIGHT, incCommand);
kb.setCommand(Keyboard.LEFT, decCommand);
kb.setCommand(Keyboard.NUMPAD_ADD, incCommand);
kb.setCommand(Keyboard.NUMPAD_SUBTRACT, decCommand);
The keyboard right arrow key and the plus key on the numeric keypad should perform the increment command. Conversely, the left arrow key and negative key on the numeric keypad should perform the decrement command.
Command sharing is a powerful feature of the command pattern and makes extending applications much easier to manage. For example, if we decide to use a different receiver, we just need to pass an instance of the new receiver when creating the command object. Because the same command object is used in multiple invokers, the changes are seamlessly spread through the application. If command objects were not used and receivers were called directly from multiple invokers, code changes in multiple locations would be necessary.
Extended Example: Implementing Undo
Another powerful feature of the command pattern is the clear-cut means it provides
for implementing undo, redo, queuing, and logging features. We all know how valuable
the undo feature is in any productivity application, including games. Because the
command object encapsulates execution of commands, it can just as easily encapsulate
an undo() command to reverse itself and go back
to its previous state.
We need to expand the command interface to declare an undo() command. However, before we proceed, let’s stop and think
about how to implement this feature. To implement undo, we need to keep track of
executed commands using a command stack. A stack is a data structure that’s based on
the last-in-first-out (LIFO) principle. Stacks implement push() and pop() operations that
store and retrieve items from it. The pop operation always retrieves the last item
pushed. This is exactly what we need to implement undo, as it simply reverses the
last command. Whenever a command is executed, its command object should be pushed
into a stack. Ideally there should be only one command stack per application. When
the user wants to undo the last command, the stack should be popped, and the
undo() command of the popped command object
should be executed.
An Abstract Interface for Commands
Instead of declaring a pure interface, we will declare an abstract interface
for commands that support undo. We’ll do this to implement the command stack
feature within the command class. Example 7-20 shows the
abstract interface for the CommandWithUndo
class that implements this. Arrays in ActionScript support the push and pop
operations. The command stack is a static array called aCommandHistory that’ll hold the command objects that have
already been executed. The default implementation for the execute() method is to push the current command
object into the command stack. The undo()
method has been declared as an abstract method requiring implementation by
subclasses.
Note that ActionScript 3.0 language does not support abstract classes. It is up to the programmer to make sure that classes that need to behave as abstract are subclassed, and abstract methods implemented.
package
{
    // ABSTRACT Class (should be subclassed and not instantiated)
    public class CommandWithUndo implements ICommand
    {
        internal static var aCommandHistory:Array = new Array();

        public function execute():void
        {
            aCommandHistory.push(this);
        }

        // ABSTRACT Method (must be overridden in a subclass)
        public function undo():void {}
    }
}
Concrete Commands that Implement Undo
Now we will re-implement the increment and decrement concrete commands to the
abstract interface declared by CommandWithUndo. The two new concrete command classes are
IncrementCommandWithUndo (Example 7-21) and DecrementCommandWithUndo (Example 7-22). To implement the undo feature, we
primarily need to push all executed command objects into the command stack. The
execute() method does this by calling the
execute() method in the superclass in the
last statement (line 17), and implementing the undo() method. The undo()
method simply reverses the effects of the execute() method (line 22).
1           package
2           {
3               import flash.text.TextField;
4
5               class IncrementCommandWithUndo extends CommandWithUndo
6               {
7                   var receiver:TextField;
8
9                   public function IncrementCommandWithUndo(rec:TextField):void
10               {
11                   this.receiver = rec;
12               }
13
14               override public function execute():void
15               {
16                   receiver.text = String(Number(receiver.text) + 1);
17                   super.execute();
18               }
19
20               override public function undo():void
21               {
22                   receiver.text = String(Number(receiver.text) – 1);
23               }
24           }
25       }
The DecrementCommandWithUndo class is
similar, and shown in Example 7-22.
package
{
    import flash.text.TextField;

    class DecrementCommandWithUndo extends CommandWithUndo
    {

        var receiver:TextField;

        public function DecrementCommandWithUndo(rec:TextField):void
        {
            this.receiver = rec;
        }

        override public function execute():void
        {
            receiver.text = String(Number(receiver.text) – 1);
            super.execute();
        }

        override public function undo():void
        {
            receiver.text = String(Number(receiver.text) + 1);
        }
    }
}
We also need a new command object that’ll be attached to an undo button on the
invoker. Example 7-23 shows the UndoLastCommand class that will undo the last operation. The
execute() method first checks if the
aCommandHistory array contains any
command objects, and pops the array to get the most recently executed command.
It then proceeds to call the undo() method on
the popped command object. Note that the undo command does not push itself into
the command stack. It also throws an IllegalOperationError exception if its undo() method is called.
package
{
    import flash.errors.IllegalOperationError;

    class UndoLastCommand extends CommandWithUndo
    {
        override public function execute():void
        {
            if (aCommandHistory.length)
            {
                var lastCommand:CommandWithUndo = aCommandHistory.pop();
                lastCommand.undo();
            }
        }

        override public function undo():void
        {
            throw new IllegalOperationError("undo operation not supported
                on this command");
        }
    }
}
Undoable Commands Assigned from the Client
In Example 7-24, the client can be modified to create command objects using the concrete commands that support undo (lines 11–13). A new “Undo” button is added (line 19), and the corresponding command object is attached to it (line 27).
1        // create new receiver
2        var numDisplayField:TextField = new TextField();
3        numDisplayField.autoSize = TextFieldAutoSize.LEFT;
4        numDisplayField.text = '100'; // default value
5        numDisplayField.border = true;
6        numDisplayField.x = 50;
7        numDisplayField.y = 50;
8        this.addChild(numDisplayField);
9
10       // create concrete commands
11       var incCommand:CommandWithUndo = new IncrementCommandWithUndo(
             numDisplayField);
12       var decCommand:CommandWithUndo = new DecrementCommandWithUndo(
             numDisplayField);
13       var undo:CommandWithUndo = new UndoLastCommand();
14
15       // create invoker button panel
16       var panel:InvokerPanel = new InvokerPanel();
17       panel.setButton(0,"+1");
18       panel.setButton(1,"-1");
19       panel.setButton(2,"Undo");
20       panel.x = 50;
21       panel.y = 100;
22       this.addChild(panel);
23
24       // add commands to invoker
25       panel.setCommand(0, incCommand);
26       panel.setCommand(1, decCommand);
27       panel.setCommand(2, undo);
The example application will look like Figure 7-4 with an additional “Undo” button. Command “redo” functionality including logging features can be implemented in similar ways. Logging features are useful when the commands executed need to be saved on disk. For example, saving the installation command objects on disk when a new application is installed will facilitate an uninstall by loading the logged commands and undoing them in reverse order.
Example: Podcast Radio
This example implements a classic car radio with a twist. Instead of programming the push buttons to tune to a radio station, they will be attached to command objects that will download and play the latest episode from a podcast. Think of this as a futuristic car radio when long-range Wi-Fi becomes a reality. You can listen to the NPR hourly news summary on demand without waiting for the top of the hour. Figure 7-5 shows the screen layout of the application. It consists of labeled buttons that indicate the genre of the podcast assigned to each button, and a text field that displays the title of the podcast item that is currently playing.

What is a Podcast?
A podcast is a media file that is distributed over the Internet. Podcasts are distributed using a syndication feed, which is a standard way of distributing content that is regularly updated. The feed is an XML file just like a syndicated news feed that lists news stories with the most recent one first. The difference between news feeds and podcasts is that in podcasts, the story is not text but a URL to a media file. In an audio podcast, the linked media file is usually in MP3 format. Example 7-25 shows a fictitious podcast XML feed in RSS syndication format (with many elements deleted for clarity).
<?xml version="1.0" encoding="utf-8"?>
<rss version="2.0">
 <channel>
  <title>10AM ET News Summary</title>
  <item>
   <title>News Summary for Saturday, Nov 18 2006 at 10:00 AM EST</title>
   <pubDate>Sat, 18 Nov 2006 10:16:06 EST</pubDate>
   <enclosure url="http://news.podcasts.org/6507084.mp3">
  </item>
 </channel>
</rss>
To play an audio podcast, the podcast XML file has to be loaded and parsed to
access the url attribute of the
enclosure element that holds the URL to the audio file.
Thereafter, the audio file has to be loaded from the Web and played.
Creating a Package with Utility Classes
First, we need to create two utility classes to create the button and text
fields on the stage. The first is the same TextButton class shown in Example 7-14 that
creates buttons on the stage. We also develop a class called TextDisplayField that subclasses TextField to format and display the title of the
currently playing podcast item. We will add both classes into a package called
utils.
The TextDisplayField class is shown in
Example 7-26. The class is straightforward, and its
main purpose is to set the initial text in the field, set the font size, and
show the text field border.
package utils {

    import flash.text.TextFormat;
    import flash.text.TextField;
    import flash.text.TextFieldAutoSize;

    public class TextDisplayField extends TextField {

        public function TextDisplayField(labelText:String = "",
                                    fontSize:int = 14,
                                    showborder:Boolean = true) {
            autoSize = TextFieldAutoSize.LEFT;
            text = labelText;
            border = showborder;
            var format:TextFormat = new TextFormat("Verdana");
            format.size = fontSize;
            setTextFormat(format);
        }
    }
}
Now that the utility classes have been created, we can develop the command pattern elements for the application.
Creating a Command to Play a Podcast
The command interface will be the same ICommand class defined in Example 7-1. The
concrete command will be the PlayPodcastCommand class shown in Example 7-27. The constructor takes two parameters, the
receiver of type Radio, and the URL of the
podcast as type String.
package
{
    class PlayPodcastCommand implements ICommand
    {
        var receiver:Radio;
        var podCastURL:String;

        public function PlayPodcastCommand(rec:Radio, url:String):void
        {
            this.receiver = rec;
            this.podCastURL = url;
        }

        public function execute():void
        {
            this.receiver.playPodcast(this.podCastURL);
        }
    }
}
Developing the Radio Receiver
The receiver class shown in Example 7-28 is
called Radio and subclasses Sprite. It uses the TextDisplayField class (see Example 7-26)
from the previously developed utils package
to display a text field to show the currently playing podcast item (lines
20-21). The audioDisplay property references
the text field. In addition, it declares a static property called audioChannel of type SoundChannel (line 15). The reason the sound channel is declared
as static is to make sure that only one podcast plays at a
given moment, even if there are multiple instances of the Radio class in the application. The playPodcast() method loads the XML file for the
podcast and registers the xmlLoaded listener
method (line 28) to intercept the Event.COMPLETE event. After the XML file is loaded, it is parsed
using the new E4X features in ActionScript 3.0 (ECMAScript for XML) to get the
title element (line 42) and the enclosure attribute (line 44) of the first item
element. The audio file is then loaded and played through the audioChannel sound channel (lines 46-51).
1           package
2           {
3
4               import flash.display.*;
5               import flash.events.*;
6               import flash.media.Sound;
7               import flash.media.SoundChannel;
8               import flash.net.*;
9               import utils.*;
10
11           class Radio extends Sprite
12           {
13
14               private var audioDisplay:TextDisplayField;
15               private static var audioChannel:SoundChannel =
                     new SoundChannel();
16               var xmlLoader:URLLoader;
17
18               public function Radio()
19               {
20                   audioDisplay = new TextDisplayField(
                         "click button to play", 14);
21                   this.addChild(audioDisplay);
22               }
23
24               public function playPodcast(url:String)
25               {
26                   var xmlURL:URLRequest = new URLRequest(url);
27                   this.xmlLoader = new URLLoader(xmlURL);
28                   xmlLoader.addEventListener(Event.COMPLETE,
                         xmlLoaded);
29                   xmlLoader.addEventListener(IOErrorEvent.IO_ERROR,
                         loadError);
30               }
31
32               private function xmlLoaded(evtObj:Event)
33               {
34                   var xml:XML = new XML();
35                   xml = XML(xmlLoader.data);
36                   // set the default XML namespace to the source
37                   if (xml.namespace("") != undefined)
38                   {
39                       default xml namespace = xml.namespace("");
40                   }
41                   // set the display field to audio stream name
42                   this.audioDisplay.text = xml..item[0].title;
43                   // get audio url
44                   var url = xml..item[0].enclosure.attribute("url");
45                   // load audio and play
46                   var request:URLRequest = new URLRequest(url);
47                   var audio:Sound = new Sound();
48                   audio.addEventListener(IOErrorEvent.IO_ERROR,
                         loadError);
49                   audio.load(request);
50                   audioChannel.stop(); // stop previous audio
51                   audioChannel = audio.play();
52               }
53
54               private function loadError(event:Event):void
55               {
56                   trace("Load error " + event);
57               }
58           }
59       }
Push Button Invokers for the Radio
The ControlButtons class shown in Example 7-29 is identical to the InvokerPanel class (Example 7-15) discussed
previously. The only difference is that now the TextButton class has to be imported from the
utils package. Its main function is to hold push button
instances and command objects associated with them, and execute the
corresponding command when a button’s clicked.
package
{
    import flash.display.*;
    import flash.events.*;
    import utils.*;

    class ControlButtons extends Sprite
    {
        var commandList:Array;
        var buttonList:Array;

        public function ControlButtons()
        {
            this.commandList = new Array(5);
            this.buttonList = new Array(5);
        }

        public function setCommand(nSlot:int, c:ICommand):void
        {
            this.commandList[nSlot] = c;
        }

        public function setButton(nSlot:int, sName:String):void
        {
            var btn:TextButton = new TextButton(sName);
            this.buttonList[nSlot] = btn;
            btn.x = nSlot * 100;
            btn.addEventListener(MouseEvent.CLICK,
                this.buttonClicked);
            this.addChild(btn);
        }

        private function buttonClicked(e:Event)
        {
            for (var i:int = 0; i < buttonList.length; i++)
            {
                if (buttonList[i] === e.target)
                {
                    this.commandList[i].execute();
                    break;
                }
            }
        }
    }
}
The Client Assigns Podcasts to Push Buttons
In Example 7-30, the client first
creates the receiver and adds it to the display list (lines 1-5). It then
creates the push buttons that represent the invoker. The buttons’ labels
correspond to the podcast’s genre. Finally, the concrete command objects are
created, and assigned to the corresponding buttons in the invoker (lines 25-29).
The PlayPodcastCommand class constructor
takes the podcast URL as a parameter in addition to the receiver instance. The
client code can be run from the document class of the Flash
document.
1        // create radio (receiver)
2        var radio:Radio = new Radio();
3        radio.x = 50;
4        radio.y = 50;
5        this.addChild(radio);
6
7        // create control buttons (invoker)
8        var controls:ControlButtons = new ControlButtons();
9        controls.setButton(0,"News");
10       controls.setButton(1,"Music");
11       controls.setButton(2,"Technology");
12       controls.setButton(3,"Business");
13       controls.setButton(4,"Sports");
14       controls.x = 50;
15       controls.y = this.stage.stageHeight - 50;
16       this.addChild(controls);
17
18       // attach podcast station commands to invoker buttons
19       var podcastURL_1:String =
             "http://www.npr.org/rss/podcast.php?id=500005";
20       var podcastURL_2:String =
             "http://www.npr.org/rss/podcast.php?id=1039";
21       var podcastURL_3:String =
             "http://www.npr.org/rss/podcast.php?id=1019";
22       var podcastURL_4:String =
             "http://www.npr.org/rss/podcast.php?id=1095";
23       var podcastURL_5:String =
             "http://www.npr.org/rss/podcast.php?id=4499275";
24
25       controls.setCommand(0, new PlayPodcastCommand(radio,
             podcastURL_1));
26       controls.setCommand(1, new PlayPodcastCommand(radio,
             podcastURL_2));
27       controls.setCommand(2, new PlayPodcastCommand(radio,
             podcastURL_3));
28       controls.setCommand(3, new PlayPodcastCommand(radio,
             podcastURL_4));
29       controls.setCommand(4, new PlayPodcastCommand(radio,
             podcastURL_5));
Extended Example: Dynamic Command Object Assignment
Remember the classic car radio with the AM and FM stations? Each push button can be programmed with an AM and FM station. What’s active depends on the receiver mode. If you choose AM mode (by pressing the AM button), then the push buttons will tune the programmed AM stations. Conversely, they will tune to their FM stations if in FM mode. The buttons are context sensitive. The Properties panel in the Flash application is a good example of this context sensitive nature of available commands. The available commands on the Properties panel change based on the type of object selected on the stage. Only the commands that are relevant to the selected object are active.
Due to the portability of command objects, we can dynamically assign and replace them at runtime. All the examples we have looked at so far assign commands to invokers at compile time from the client. When we assigned a command to a button, it stayed there for the duration and didn’t change. We will extend the podcast radio example application to dynamically assign command objects to the push buttons. Figure 7-6 shows the extended application with two podcast genres: Music and News. It will work very much like the AM and FM mode example described previously. Command objects will be assigned dynamically to buttons 1 through 3. When the Music genre button is pressed, station buttons 1 through 3 will play music podcasts. Similarly, if the News button is pressed, the station buttons will play news podcasts.

A Context Sensitive Invoker
To assign commands dynamically in our extended example, the invoker needs to be mindful of the state of the application. It needs to assign different sets of command objects to the podcast radio station buttons based on the state of the application, or, in this case, the selected podcast genre.
The DynamicControlButtons class, shown in
Example 7-31, extends the ControlButtons class from Example 7-29. It keeps track of the selected genre in the
property currentGenre (line 7). The two
podcast genres are defined by the static constants NEWS and MUSIC (lines 5-6). It
also declares and initializes two arrays (lines 9-10) to hold the command
objects assigned to the news and music genres for the three station
buttons.
The setGenre() method sets the genre by
setting the currentGenre property (lines
18-27). The setGenreCommand() method (lines
29-38) assigns the passed commands to the two arrays that hold the news and
music command objects. After any changes to the state of the application, the
updateCommandButtons() method is called
to dynamically assign the command objects for the chosen genre to the station
buttons (positions 1-3 on the commandList
array).
1           package
2           {
3               class DynamicControlButtons extends ControlButtons
4               {
5                   public static const NEWS:uint = 0;
6                   public static const MUSIC:uint = 1;
7                   var currentGenre:uint = NEWS;
8
9                   var newsPodcastCommands:Array;
10               var musicPodcastCommands:Array;
11
12               public function DynamicControlButtons()
13               {
14                   this.newsPodcastCommands = new Array(3);
15                   this.musicPodcastCommands = new Array(3);
16               }
17
18               public function setGenre(genre:uint)
19               {
20                   if (genre == NEWS)
21                   {
22                       this.currentGenre = NEWS;
23                   } else if (genre == MUSIC) {
24                       this.currentGenre = MUSIC;
25                   }
26                   this.updateCommandButtons();
27               }
28
29               public function setGenreCommand(nSlot:int, c:ICommand,
                     genre:uint):void
30               {
31                   if (genre == NEWS)
32                   {
33                       this.newsPodcastCommands[nSlot] = c;
34                   } else if (genre == MUSIC) {
35                       this.musicPodcastCommands[nSlot] = c;
36                   }
37                   this.updateCommandButtons();
38               }
39
40               private function updateCommandButtons()
41               {
42                   for (var i:int = 0; i < 3; i++)
43                   {
44                       if (currentGenre == NEWS)
45                       {
46                           this.commandList[i] =
                                this.newsPodcastCommands[i];
47                       } else if (currentGenre == MUSIC) {
48                           this.commandList[i] =
                                 this.musicPodcastCommands[i];
49                       }
50                   }
51               }
52           }
53       }
Commands to Dynamically Assign Command Objects
To dynamically assign command objects, we need to create two new concrete
commands to set the podcast genre to either music or news. This is accomplished
by the SetToMusicGenreCommand (Example 7-32) and SetToNewsGenreCommand (Example 7-33)
classes.
package
{
    class SetToMusicGenreCommand implements ICommand
    {
        var receiver:DynamicControlButtons;

        public function SetToMusicGenreCommand(
            rec:ControlButtons):void
        {
            this.receiver = rec;
        }

        public function execute():void
        {
            this.receiver.setGenre(
                DynamicControlButtons.MUSIC);
        }
    }
}package
{
class SetToNewsGenreCommand implements ICommand
{
var receiver:DynamicControlButtons;
public function SetToNewsGenreCommand(
rec:ControlButtons):void
{
this.receiver = rec;
}
public function execute():void
{
this.receiver.setGenre(DynamicControlButtons.NEWS);
}
}
}Note that the receiver for both these commands is of type DynamicControlButtons, which is the invoker. Here
the invoker is also the receiver for the commands that set the podcast
genre.
Dynamic Command Assignment Setup from the Client
The client has to specify command objects for both the music and news genres to the station buttons (the first three buttons), and the commands to change the genre (to the last two buttons). The dynamic assignment of command objects to the station buttons takes place in the invoker. The client essentially programs the buttons on the radio, very much like someone programming actual push buttons on a car radio to specific stations.
The client first creates the receiver and adds it to the
display list. It then creates the invoker, assigns labels
to each of the five buttons, and adds it to the display list. Podcast URLs are
then assigned to variables (three URLs for each genre). Next, the client does
the important job of creating PlayPodcastCommand command objects and assigning them to them to
the station buttons for each genre. Finally, the client creates and assigns the
genre selection command objects to the corresponding buttons on the invoker.
Example 7-34 shows the
setup.
// create radio (receiver)
var radio:Radio = new Radio();
radio.x = 50;
radio.y = 50;
this.addChild(radio);

// create control buttons (invoker)
var controls:DynamicControlButtons = new DynamicControlButtons();
controls.setButton(0,"1");
controls.setButton(1,"2");
controls.setButton(2,"3");
controls.setButton(3,"News");
controls.setButton(4,"Music");
controls.x = 50;
controls.y = this.stage.stageHeight - 50;
this.addChild(controls);

// podcast URLs
var podcastNewsURL_1:String =
    "http://www.npr.org/rss/podcast.php?id=500005";
var podcastNewsURL_2:String =
    "http://rss.cnn.com/services/podcasting/newscast/rss.xml";
var podcastNewsURL_3:String =
    "http://www.npr.org/rss/podcast.php?id=510053";
var podcastMusicURL_1:String =
    "http://www.npr.org/rss/podcast.php?id=510019";
var podcastMusicURL_2:String =
    "http://www.npr.org/rss/podcast.php?id=510026";
var podcastMusicURL_3:String =
    "http://minnesota.publicradio.org/tools/podcasts/
    new_classical_tracks.xml";

// add station commands to invoker buttons
controls.setGenreCommand(0, new PlayPodcastCommand(radio,
    podcastNewsURL_1), DynamicControlButtons.NEWS);
controls.setGenreCommand(1, new PlayPodcastCommand(radio,
    podcastNewsURL_2), DynamicControlButtons.NEWS);
controls.setGenreCommand(2, new PlayPodcastCommand(radio,
    podcastNewsURL_3), DynamicControlButtons.NEWS);
controls.setGenreCommand(0, new PlayPodcastCommand(radio,
    podcastMusicURL_1), DynamicControlButtons.MUSIC);
controls.setGenreCommand(1, new PlayPodcastCommand(radio,
    podcastMusicURL_2), DynamicControlButtons.MUSIC);
controls.setGenreCommand(2, new PlayPodcastCommand(radio,
    podcastMusicURL_3), DynamicControlButtons.MUSIC);

// add genre selection commands to invoker buttons
controls.setCommand(3, new SetToNewsGenreCommand(controls));
controls.setCommand(4, new SetToMusicGenreCommand(controls));
Summary
The command pattern is a very powerful example of encapsulation or information hiding, and shows its utility in many situations common to software design.
In essence, the command pattern embeds behavior in command objects. Commands are
executed by calling the execute() method in the
command object. What classes are delegated to when executing that behavior, and
which methods in those classes implement that behavior, are hidden from where the
behavior is called. This essentially decouples the code that invokes the behavior
from the code that implements the behavior.
This decoupling makes command objects extremely portable, and it is this portability that supports its wide applicability in many situations. A single command object can be shared between several invokers. For example, a single instance of a command object can be used by different code sections in an application. This makes it easy to extend or change application behavior.
One of the most useful characteristics of command objects is that they can be assigned to invokers at runtime. This enables behavior to be changed based on state, a very useful feature in making applications context sensitive.
In addition, the command pattern allows applications to implement some common features required in many applications, such as: command chaining (macro commands), undo, redo, and logging.