
Chapter 5. Adapter Pattern
Adapt or perish, now as ever, is nature’s inexorable imperative.
The presentations and conceptions of the average man of the world are formed and dominated, not by the full and pure desire for knowledge as an end in itself, but by the struggle to adapt himself favorably to the conditions of life.
What is the Adapter Pattern?
The basic motivation for the adapter pattern is to enable wider use of existing classes. For example, let’s assume that there’s a class that does a particular job, and does it well. We want to use this class in an application, but it just doesn’t fit all the current requirements. We may want to expand its features, or combine it with some other classes to provide additional functionality. The bottom line is that we must adapt this existing class to fit new requirements. This is what the adapter pattern does; it allows a client to use an existing class by converting its interface into one that fits a new context. The key point to remember is that the existing class isn’t modified, but an adapter class that has the right interface uses it or extends it to provide the necessary functionality.
A Design Pattern for Potty Training
A good example of an adapter is the toilet seat adapter used by toddlers that fits on top of a traditional toilet seat. Let’s take a look at the context. We have a legacy object that is the toilet seat, whose basic design hasn’t changed in years. It functions well for its original adult users (probably why the design hasn’t changed). Let’s look at the new context in Figure 5-1. We now need to adapt it for use by a toddler. The problem is obvious - incompatible interfaces! The legacy toilet seat was designed to fit an adult’s bottom, and we now need to convert that interface to fit a toddler’s smaller bottom. We need an adapter that presents the correct interface to fit the current context. The toilet seat adapter was built to do precisely that. We get to use an existing object whose interface has been converted to one that the client expects.

How is this analogous to an adapter pattern? We have an existing object (toilet seat); a new interface it needs to conform to (a toddler’s bottom); an adapter that converts the interface (toilet seat adapter); and a new client (toddler).
Let’s extend this analogy to computer code. The existing object would be analogous to an existing class that creates objects. The new interface would represent new requirements for this class. The adapter would be another class that implements the new interface by using the existing class.
What would be the alternative to using an adapter in this case? We could rewrite or modify the code in the existing class to fit the new interface. This is analogous to buying one of those small potties built for toddlers (with no plumbing). I think most people would rather not have to deal with the additional cost and the disposal issue. This can be as painful as changing existing code that already works, introducing bugs, and breaking dependencies. An adapter would be a better option in both cases.
Key Features of the Adapter Pattern
Before considering an adapter pattern for a project, a couple conditions should exist:
An existing class that meets some of the implementation requirements, but whose interface is incompatible in the new context of use
A target interface for the new context
If these conditions exist, then we can develop an adapter class that uses the existing class to implement the target interface. The new context should be thoroughly analyzed, and the new requirements defined, before thinking about implementation. In other words, we should know the desired interface before we look at existing classes and their functionality to figure out if they’ll fit the bill. We can then develop an adapter class that implements the target interface. There’s no point to adapting an existing class if it doesn’t provide some benefit, such as savings in development time compared to developing a whole new class.
Object and Class Adapters
An adapter can exploit an existing class to implement functionality in two ways. The adapter can use either composition or inheritance to access an existing class. If the adapter subclasses the existing class, it will inherit the methods and properties. If the adapter uses composition to access the existing class, the adapter class will hold a reference to an instance of the existing class, and use its methods and properties for implementation. In OOP, composition is generally preferred over inheritance. However, as we will see in subsequent examples, there are good arguments for both approaches depending on the context. Either way, the idea is to use the properties and methods of the existing class to provide most or some of the functionality required.
Object Adapters
When the adapter uses composition to access the existing class, it’s known as an object adapter. Object adapters store a reference to an instance of the existing class. Therefore, an object adapter uses an existing class.
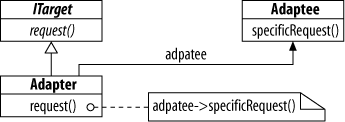
All adapter classes implement an interface. In the class
diagram shown in Figure 5-2, the
interface called ITarget declares a single
method called request(). The class diagram
shows that a reference to an instance of the Adaptee class is stored in the variable adaptee. When implementing the request() method, the adapter references this instance.
Minimalist example of an object adapter
Example 5-1 through Example 2-7 show the implementation of an object adapter in ActionScript 3.0. The different files are called: Adaptee.as (existing class), ITarget.as (required interface), Adapter.as (adapter), and Main.as (client; also the document class for the Flash document).
package
{
    public class Adaptee
    {
        public function specificRequest():void
        {
            trace("Called Adaptee:specificRequest()");
        }
    }
}Package
{
public class Adapter implements ITarget
{
private var adaptee:Adaptee;
public function Adapter()
{
this.adaptee = new Adaptee();
}
public function request():void
{
adaptee.specificRequest();
}
}
}package
{
import flash.display.MovieClip;
/**
* Main Class
* @ purpose: Document class for movie
*/
public class Main extends MovieClip
{
public function Main()
{
var target:ITarget = new Adapter();
target.request();
}
}
}The client class Main creates an
instance of the adapter class and calls the method request() defined in the ITarget interface. The client sees only the interface that’s
implemented by the adapter. Object adapters are like traffic cops, as they
intercept method calls and decide what to do with them. Some of the method
calls are directed to the appropriate methods in the Adaptee class. The Adaptor class keeps tight control of access to the existing
class by implementing only the ITarget
interface. The client doesn’t even know that the adapter’s using an existing
class. The Adaptee class could have many
public methods and properties that aren’t accessible through the
adapter.
Because the Adaptor class creates an
instance of the Adaptee class, there’s
tight coupling between them. This doesn’t allow the
adapter to use a subclass of Adaptee or
use a totally different existing class without modifying existing Adapter code.
Using a parameterized adapter class
A variation on the previous example of the adapter is to require the
client to pass an instance of the existing class when creating an adapter.
You can do this by using a parameterized constructor in the adapter class.
The following changes are needed in the Adapter class constructor.
public function Adapter(a:Adaptee)
{
    this.adaptee = a;
}
This is desirable in many cases, as it reduces the coupling between the
Adapter and Adaptee classes, providing more flexibility. However, this
puts the burden on the client to create an instance of Adaptee class and pass it to the
adapter.
var adaptee:Adaptee = new Adaptee();
var target:ITarget = new Adapter(adaptee);
The disadvantage of doing it this way is that the existing class is no
longer hidden from the client. The client creates the instance of Adaptee that is passed to the Adaptor. This could potentially cause
disruption if the client inadvertently manipulates the Adaptee instance.
Class Adapters
When the adapter uses inheritance to access an existing class, it’s known as a class adapter. The adapter class extends the existing class and has an is-a relationship with it. Extending the existing class allows the adapter to inherit its properties and methods.
As is evident from the class diagram, implementing a class adapter requires
multiple inheritance. Multiple inheritance is an OOP
feature that enables a class to inherit from more than one superclass. In Figure 5-3, the Adapter class inherits from both the Target and the Adaptee
classes.

According to the classic treatise on design patterns written by the group
affectionately known as the Gang of Four (GoF), one inheritance branch of a
class adapter is used to inherit the interface, and the
other to inherit implementation. They also point out that
in most cases, the class adapter inherits the interface
publicly while the implementation branch is inherited
privately. This hides the implementation branch of the
inheritance from public view, resulting in the desirable situation where only
the public interface is left visible to clients. In Figure 5-3, the Adapter class would inherit publicly from the Target class and privately from the Adaptee class. This implies that the Adapter would be a subclass of Target, and it would make use of Adaptee methods and properties to implement
required operations.
Implementing multiple inheritance in a programming
language is not an easy task, and ActionScript 3.0 doesn’t support it.
Therefore, implementing a classic class adapter is not possible using
ActionScript 3.0. However, an ActionScript 3.0 class can subclass and implement
an interface at the same time. If the required interface is defined at ITarget, then the class declaration will be:
public class Adapter extends Adaptee implements ITarget
The Adapter class will implement the
ITarget interface and inherit from the
Adaptee class at the same time. The big
difference is that inheritance of Adaptee
will be public, exposing its functionality. Although not a pure class adapter,
this implementation does have its uses and can be desirable in certain
contexts.
Minimalist example of a class adapter
Example 5-5 through Example 5-8 show the implementation of a class adapter in ActionScript 3.0. The different files are called: Adaptee.as (existing class), ITarget.as (required interface), Adapter.as (adapter), and Main.as (client).
package
{
    public class Adaptee
    {
        public function requestA():void
        {
            trace("Called Adaptee:requestA()");
        }

        public function requestB():void
        {
            trace("Called Adaptee:requestB()");
        }

        public function requestC():void
        {
            trace("Called Adaptee:requestC()");
        }
    }
}package
{
public interface ITarget
{
function renamedRequestA():void
function requestB():void
function requestC():void
function requestD():void
}
}package
{
public class Adapter extends Adaptee implements ITarget
{
public function renamedRequestA():void
{
this.requestA();
}
override public function requestB():void
{
trace("Called Adapter:requestB()");
}
public function requestD():void
{
trace("Called Adapter:requestD()");
}
}
}package
{
import flash.display.MovieClip;
/**
* Main Class
* @ purpose: Document class for movie
*/
public class Main extends MovieClip
{
public function Main()
{
var target:ITarget = new Adapter();
target.renamedRequestA();
target.requestB();
target.requestC();
target.requestD();
}
}
}The client would generate the following output. These are trace statements that indicate which class and method produced the output.
Called Adaptee:requestA()
Called Adapter:requestB()
Called Adaptee:requestC()
Called Adapter:requestD()
The method declaration renamedRequestA() is simply a name change to a method whose
implementation is already available in the Adaptee. This conversion is implemented by directing the
request to requestA() in the Adaptee.
Method requestB() is available in
Adaptee, but the Adapter has overridden and re-implemented it
because the existing functionality wasn’t what was needed.
Method requestC() is available in
Adaptee and the method call passes
directly to it. This is the primary advantage of using inheritance: you
don’t have to implement a method if you need the functionality and
method signature implemented in the Adaptee.
Method requestD() is implemented in the
Adapter. The Adaptor class isn’t required to use the Adaptee class to implement everything. The
adapter can have custom methods and properties to accomplish what it needs
to do. The ITarget interface could
declare methods that are needed in the new context, but have no relation to
the existing class.
Key OOP Concepts in the Adapter Pattern
Comparing the advantages and disadvantages of object and class adapters enables us to clearly understand the merits of composition versus inheritance in OO (object-oriented) design.
Object and Class Adapters Compared
Choosing between object and class adapters depends on the context in which
they are used. Object adapters that use parameterized constructors are flexible
because the Adaptee object is passed to them.
This decouples the Adaptor and Adaptee classes, allowing instances of subclasses
of Adaptee class to be passed to the
adapter.
For their part, class adapters generally have less code, resulting in quicker
implementation. Because they subclass the Adaptee, they have an is-a relationship with
the Adaptee class. The Adapter class is therefore the same
Type as the Adaptee,
and easier to deal with from a client standpoint. Clients need to create only
one instance of the Adapter class (as opposed
to both an Adaptee and Adapter instance, in the case of parameterized
object adapters). Class adapters can also be less time-consuming to implement if
the target interface is large, because most methods will be inherited.
The decision to choose either an object or adapter class to implement an
adapter depends on many factors: flexibility required, the size of the
interface, ease of implementation, and match between the required interface and
the Adaptee.
As a general rule, composition is better than inheritance because of its flexibility and loose coupling. However, the adapter pattern shows that there can be instances where you can save time and gain coding efficiency by using inheritance.
Example: Car Steering Adapter
Adapter patterns are commonly used when there is an existing legacy class that
provides the functionality you require, but whose interface doesn’t conform to what
you need. Let’s assume that we have a legacy class called LegacyCar, which is a car sprite from an old game. The LegacyCar class was initially developed for use with a
steering wheel input device to provide an authentic driving experience. We will
change the interface to the LegacyCar class so
that we can steer the car using different input devices such as a keyboard and
mouse.
The Existing Class
The LegacyCar class shown in Example 5-9 is a subclass of the Sprite class, and is saved as LegacyCar.as.
1 package {
2
3     import flash.display.*;
4     import flash.events.*;
5     import flash.geom.*;
6
7     public class LegacyCar extends Sprite
8     {
9
10         internal var nSpeed:Number; // holds speed of car in pixels/frame
11         internal var nSteeringWheelAngle:Number; // steering rotation in Degrees
12
13         public function LegacyCar(xLoc:int, yLoc:int)
14         {
15             nSpeed = 5;
16             nSteeringWheelAngle = 0;
17             this.drawCar();
18             this.setLoc(xLoc, yLoc);
19         }
20
21         private function drawCar():void
22         {
23             // draw car body
24             graphics.beginFill(0x00FF00); // green color
25             graphics.drawRect(-20, -10, 40, 20);
26             graphics.endFill();
27             // draw tires
28             drawTire(-12, -15);
29             drawTire(12, -15);
30             drawTire(-12, 15);
31             drawTire(12, 15);
32         }
33
34         private function drawTire(xLoc:int, yLoc:int)
35         {
36             graphics.beginFill(0x000000); // black color
37             graphics.drawRect(xLoc - 4, yLoc - 2, 8, 4);
38             graphics.endFill();
39         }
40
41
42         // method to set the x and y location of the sprite
43         private function setLoc(xLoc:int, yLoc:int):void
44         {
45             this.x = xLoc;
46             this.y = yLoc;
47         }
48
49         // method to attach event handlers and get the car moving
50         public function start():void
51         {
52             if (this.stage)
53             {
54                 // attach EnterFrame event handler doMoveCar()
55                 this.addEventListener(Event.ENTER_FRAME, this.doMoveCar);
56             } else {
57                 throw new Error("Add car to display list first")
58             }
59         }
60
61         // method to set the steering wheel angle (in Degrees)
62         public function setSteeringWheelAngle(nAngle:int):void
63         {
64             nSteeringWheelAngle = nAngle;
65         }
66
67         // move the car
68         private function doMoveCar(event:Event):void
69         {
70             this.rotation += nSteeringWheelAngle * 0.01; // rotate sprite
71             trace(nSteeringWheelAngle);
72             var newLocOffset:Point = Point.polar(nSpeed,
73                                     this.rotation * Math.PI / 180);
74             this.x += newLocOffset.x; // move by the x offset
75             this.y += newLocOffset.y; // move by the y offset
76             // place Sprite in center of stage if it goes off screen
77             if ((this.y < 0) || (this.y > this.stage.stageHeight) ||
78                 ((this.x < 0)) || (this.x > this.stage.stageWidth))
79             {
80                 this.setLoc(this.stage.stageWidth * 0.5,
81                                     this.stage.stageHeight * 0.5);
82             }
83         }
84     }
85 }
The parameterized constructor (lines 13–19) gets the
initial location of the car through xLoc and
yLoc parameters. The constructor sets the
property nSpeed to its default value of 5,
and sets nSteeringWheelAngle to zero
indicating that the steering wheel is held straight. It then calls the drawCar() method to draw the car, and the setLoc() method with the passed x and y
coordinates to place the Sprite.
The drawCar() method (lines 21–32) uses the
graphics property of the Sprite class to draw the car from the perspective
of looking down on it from above (map view). The car is a green rectangle with
four black wheels (also rectangles) drawn using the drawTire() method (lines 34–39). The car is drawn so that its
registration point is in the center of the
sprite.
The LegacyCar class has two public methods.
The start() method (lines 50–59) checks
whether the sprite has been added to the display list by
checking the existence of the stage object (a
sprite can be added to the display list using the addChild() method). If the stage object exists, it registers the doMoveCar() listener method to respond to enter
frame events (line 55). The doMoveCar() method essentially gets the car moving forward by
nSpeed pixels per frame. The LegacyCar class was not designed to control the
speed of the car or stop it from moving.
The other public method (lines 62–65) is setSteeringWheelAngle(), which takes the angle of the steering
wheel in degrees as a parameter, and sets the nSteeringWheelAngle property to it. The nSteeringWheelAngle property represents the rotation angle of the
steering wheel in degrees.
The doMoveCar() method (lines 68–83) is the
enter frame event handler (it was registered as the
enter fame handler in line 55). An enter fame event is generated each time the
playhead in Flash enters a new frame. The frame rate can be set within the Flash
document. The doMoveCar() method is executed
on each enter frame event. It rotates the car sprite by 1 percent of the
rotation angle of the steering wheel (stored in nSteeringWheelAngle). For example, if the rotation angle of the
steering wheel is negative 200 degrees, the car sprite will rotate 2 degrees
anticlockwise each time an enter frame event is received.
It then uses the polar() method in the
Point class to figure out the next
location of the car sprite, based on its speed (nSpeed) and current direction (rotation property of the Sprite class). It then moves the sprite to its new location. The
final task of the doMoveCar() function is to
check whether the car sprite has moved offscreen. If so, it simply moves it back
to the center of the stage.
The LegacyCar class is not the most
functional car we’ve come across, but it provides a solid implementation for
steering a car using a steering wheel input device. We hope to make use of this
in our new context that requires us to steer the car using different input
devices.
Interface Conversion
The primary function of an adapter pattern is to convert the interface of an existing class to fit into a new context. First, we need to figure out the original interface, and then determine the requirements of the new context. After this, we can determine if converting the interface of the existing class using an adapter is a viable option.
The original interface
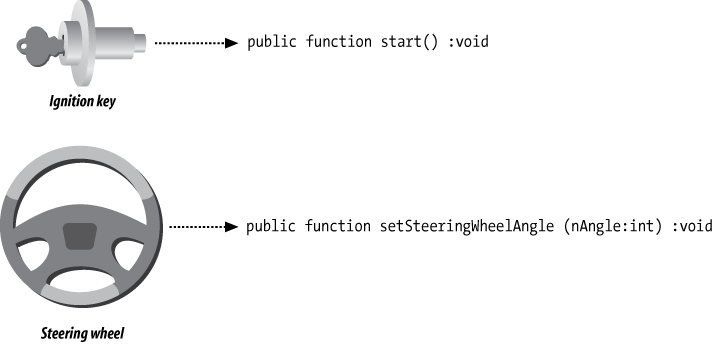
The LegacyCar class has two public
methods that represent its interface. Public methods are the primary way by
which a client can access and manipulate an object. The public start() method simply gets the car moving.
Therefore, it functions like the ignition key of the car (assume that the
car’s in gear all the time). The setSteeringWheelAngle() public method takes in the angle of
the steering wheel and rotates the car accordingly. The interface is
illustrated in Figure 5-4.
The new context
Let’s assume that the new context requires the car to be driven, not only
by a steering wheel, but by alternative input devices as well. For example,
we need to drive the car using the keyboard or the mouse. Think of the new
context as an effort to modify the car to be driven by someone disabled who
can’t use a steering wheel. The original interface allowed the car to be
steered with very fine-grained movements using the setSteeringWheelAngle() method. You could make the steering
wheel turn half a degree or 900 degrees (2.5 complete rotations of the
steering wheel). However, generating such a wide range of values is not
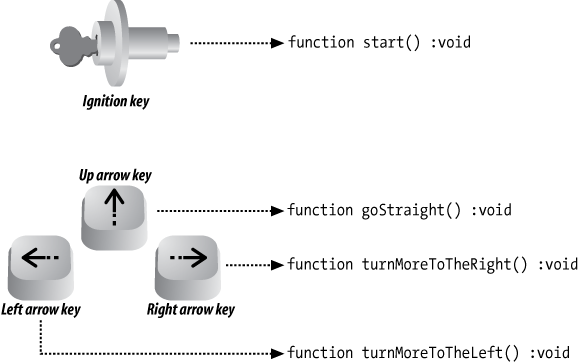
possible with key presses. A key press essentially has two values, key down
and key up. It is evident that we’ll have to turn the steering wheel in
discrete steps. For example, we can assume that every press of the left
arrow key represents turning the steering wheel by 50 degrees
counterclockwise. The right arrow key will, in turn, represent turning the
steering wheel in the clockwise direction. It will also be helpful to have a
way to get the steering wheel back to its original position. The up arrow
key can be used to set the steering wheel angle to zero. We need to convert
the interface to fit this new context.
The new interface
Based on the previous analysis, the new interface needs several methods to
meet the requirements of the new context. The ICar target interface, shown in Example 5-10 and
depicted in Figure 5-5, is
designed for the new context.
The Adapter Class
We now have a target interface. The next step is to figure out if an object or
class adapter is the most suitable option. Because the existing class is small
with only two public methods, we won’t get any benefits from using a class
adapter. If there were methods in the existing class that could be directly used
by the client in the new context, a class adapter would make sense. Therefore,
the CarAdapter shown in Example 5-11 will be implemented as an object adapter.
package
{
    public class CarAdapter implements ICar
    {

        private var legacyCar:LegacyCar;
        private var nSteeringAngle:Number;

        public function CarAdapter(car:LegacyCar)
        {
            this.legacyCar = car;
            this.nSteeringAngle = 0;
            this.goStraight();
        }

        public function start():void
        {
            legacyCar.start();
        }

        public function turnMoreToTheLeft():void
        {
            legacyCar.setSteeringWheelAngle(nSteeringAngle -= 50);
        }

        public function turnMoreToTheRight():void
        {
            legacyCar.setSteeringWheelAngle(nSteeringAngle += 50);
        }

        public function goStraight():void
        {
            legacyCar.setSteeringWheelAngle(nSteeringAngle = 0);
        }

    }
}
The CarAdapter class implements the
ICar interface and has a parameterized
constructor that receives a LegacyCar
instance. It contains four public methods as specified in the interface. All
four methods use one of the public methods in the LegacyCar class for implementation. The steering angle is set in
discrete steps of 50 degrees, as discussed previously. Note the nSteeringAngle property that keeps track of the
current steering angle of the car. Adapter classes can have their own properties
and methods to support implementation.
The Client
All that’s left to accomplish is to develop a client to test the adapter. The
client (Main.as shown in Example 5-12) creates a new
instance of LegacyCar and passes two
parameters to the constructor that places it on the center of the stage. Next,
it creates an instance of CarAdapter and
passes the previously created LegacyCar
instance to it. The client also has to receive input from the keyboard to steer
the car. To do this, the client attaches the onKeyPress() listener function to respond to key
down events. This listener function calls appropriate methods on
the adapter class based on keyboard input. The onKeyPress() listener function responds to the left, right and up
arrow key down events, and calls turnMoreToTheLeft(), turnMoreToTheRight(), and goStraight() methods implemented in the adapter.
package
{
    import flash.display.MovieClip;
    import flash.text.*;
    import flash.events.*;
    import flash.ui.*;

    public class Main extends MovieClip
    {
        private var carAdapter:ICar; // declare adapter

        public function Main()
        {
            // Create a legacy car instance
            var legacyCar:LegacyCar =
                new LegacyCar(this.stage.stageWidth * 0.5,
                                  this.stage.stageHeight * 0.75);
            addChild(legacyCar); // add legacy car to stage display list

            // Wrap legacy car with the CarAdapter
            this.carAdapter = new CarAdapter(legacyCar);

            // attach KEY_DOWN event listener onKeyPress() to the stage
            this.stage.addEventListener(KeyboardEvent.KEY_DOWN,
                 this.onKeyPress);

            carAdapter.start();
        }

        private function onKeyPress(event:KeyboardEvent):void
        {
            switch (event.keyCode)
            {
                case Keyboard.LEFT :
                    this.carAdapter.turnMoreToTheLeft();
                    break;
                case Keyboard.RIGHT :
                    this.carAdapter.turnMoreToTheRight();
                    break;
                case Keyboard.UP :
                    this.carAdapter.goStraight();
                    break;
            }
        }
    }
}
Note that the new interface turns the car in discrete steps (50 degrees on each key press). Therefore, to make a hard turn right, the right arrow key should be pressed and held down (to generate multiple key down events). A quick press and release of the appropriate keys results in small turns.
Extended Example: Steering the Car Using a Mouse
If the target interface is designed with flexibility and future use in mind, the
adapter can be used in multiple contexts. Because steering is accomplished in
discrete steps using the turnMoreToTheLeft(),
turnMoreToTheRight(), and goStraight() methods implemented in the adapter, it
can be used with different input devices such as a joystick or mouse. Let’s look at
how a client can use mouse input to steer the car. For example, we can use a mouse
click to straighten the steering and make the car go straight. How can a left and
right turn be accomplished using the mouse? One way is by keeping track of the
horizontal movement of the mouse as shown in Figure 5-6. If the mouse moves to the left,
we can call turnMoreToTheLeft(). If the mouse
moves to the right, we can call turnMoreToTheRight().

The basic client is similar to the Main class
(Example 5-12) that used keyboard input to steer the
car. The following changes need to be made to the Main class in order to steer the car using the mouse. We need to add
a new property to keep track of the previous horizontal location of the mouse on the
stage, to figure out if the mouse moved to the left or right. The initial horizontal
location will be zero.
private var oldMouseStageX:Number = 0;
An additional change is to attach different listener functions that respond to
mouse events rather than keyboard events. Instead of attaching a listener function
to intercept key down events, we need to attach listeners to
intercept mouse down and mouse move
events. Note that the listeners should be attached to the stage rather than the
LegacyCar object. This enables the listener
functions to receive mouse clicks over the broad area of the stage, as opposed to
directly over the car object.
this.stage.addEventListener(MouseEvent.MOUSE_MOVE, this.doMouseMove);
this.stage.addEventListener(MouseEvent.MOUSE_DOWN, this.doMouseDown);
All that’s required now is to implement the listener functions that call the
appropriate methods in the adapter. The doMouseDown() function listens to mouse down
events and calls the goStraight() method in the
adapter.
private function doMouseDown(event:MouseEvent):void
{
    this.carAdapter.goStraight();
}
The doMouseMove() function listens to
mouse move events. It checks whether the mouse has moved to
the left or right from its last position. The last mouse position is saved in the
oldMouseStageX property. Based on whether the
mouse moved to the left or right, the adapter methods turnMoreToTheLeft() and turnMoreToTheRight() are called.
private function doMouseMove(event:MouseEvent):void
{
    // change in horizontal mouse position
    var xDiff = event.stageX - this.oldMouseStageX;
    if (xDiff > 0) {
        this.carAdapter.turnMoreToTheRight();
    } else {
        this.carAdapter.turnMoreToTheLeft();
    }
    event.updateAfterEvent(); // process this event first
    this.oldMouseStageX = event.stageX // save old mouse x position
}
As is evident from this example, that well-thought-out design of adapters can be used in multiple contexts.
Example: List Display Adapter
Adapter patterns also come in handy to create reusable
classes that use existing classes to implement some of the required
functionality. For example, think about when you would want to display a list of
values on the Stage. There may be many instances when you want
to do this: lists of names, lists of high scores in a game, lists of products in a
shopping cart, etc. In Flash you can use a TextField to display a list, putting each item on a separate line.
However, this requires that the display text be preformatted with a carriage return
character ('
', ASCII 13) separating each list
item before sending it out to the TextField
object for display. The following code snippet will display a list using a TextField object.
var listField = new TextField();
listField.x = 20;
listField.y = 20;

var sList:String = "Bread";
sList += "
" + "Butter";
sList += "
" + "Cheese";

listField.text = sList;

addChild(listField);
This works, but what if you want to delete an item from the list? You essentially have to recreate the list again. Thinking more about this, it becomes apparent that holding the list items in an array and splitting the array to create a string separated by return characters would be a better option. This would require more code, and our little code block ceases to become a “snippet” and screams out for a generic solution.
Wouldn’t it be nice to have a reusable ListDisplayField where you can add one list item at a time? It would
function very much like a TextField with built-in
list item functionality. This is a good context in which to develop an adapter
because we’ll be using an existing class and converting its interface to fit a new
context.
The Existing Class
The TextField class is used for text
display and input in ActionScript 3.0. We will use it as the existing class. It
has a detailed interface with many properties and methods that allow low-level
manipulation of rendered text. The ActionScript 3.0 documentation (accessible
online) describes this class at length.
Interface Conversion
We need to convert the TextField class
interface to enable adding and deleting list items as required in the new
context. The deleteItemAt(n:uint) method
defines a return type signifying the success or failure of the operation. The
interface also defines a method to clear the field. The IListDisplay interface in Example 5-13
defines the new target interface.
The Adapter Class
Before we implement the IListDisplay
interface, a decision regarding which type of adapter, class or object, needs to
be made. The existing interface of the TextField class is quite extensive and contains several methods
that would be directly useful in the new context. For example, the TextField interface defines many properties such
as backgroundColor and border that enable formatting the text field
display object. In addition, it also defines methods such as setTextFormat() that allows formatting the text in
the field using a TextFormat object. If the
ListDisplayField adapter is implemented
as a class adapter, we can benefit from less code and implementation efficiency.
However, if we implement ListDisplayField as
a class adapter in ActionScript 3.0 using inheritance, all the public methods
and properties in TextField will be exposed.
We will need to carefully override some of the methods and properties in the
TextField class that allow direct
manipulation of text in the field. The adapter implementation is shown in Example 5-14.
1 package
2 {
3     import flash.text.*;
4
5     // Adapter
6     public class ListDisplayField extends TextField
          implements IListDisplay
7     {
8
9         private var aList:Array;
10
11         public function ListDisplayField()
12         {
13             super(); // Call the TextField constructor
14             this.clear();
15         }
16
17         public function addItem(s:String):void
18         {
19             this.aList.push(s);
20             this.update();
21         }
22
23         public function deleteItemAt(i:uint):Boolean
24         {
25             if ((i > 0) && (i <= aList.length)) {
26                 aList.splice(i-1, 1);
27                 this.update();
28                 return true;
29             } else {
30                 return false;
31             }
32         }
33
34         public function clear():void
35         {
36             aList = [];
37             this.update();
38         }
39
40         internal function update()
41         {
42             var listText:String = "";
43             // split the array to create a string separated by returns
44             for (var i:Number = 0; i < aList.length; i++) {
45                 listText += aList[i] + "
";
46             }
47             super.text = listText;
48         }
49
50         override public function set text(s:String):void
51         {
52             throw new Error("Cannot directly set text property -
                   use addItem() method");
53         }
54
55         override public function set htmlText(s:String):void
56         {
57             throw new Error("Cannot directly set htmlText property");
58         }
59
60         override public function appendText(s:String):void
61         {
62             throw new Error("Cannot append text - use addItem() method");
63         }
64
65         override public function replaceSelectedText(s:String):void
66         {
67             throw new Error("Cannot replace selected text");
68         }
69
70         override public function replaceText(beginIndex:int, endIndex:int,
               newText:String):void
71         {
72             throw new Error("Cannot replace text");
73         }
74     }
75 }
The ListDisplayField adapter extends the
TextField class, and implements the
IListDisplay interface. The constructor
calls the super() method to invoke the
constructor in the superclass TextField (line
13). The implementation is straightforward in that the list of items to display
is stored in an array called aList that is a
property of the class. The addItem(s:String)
method appends the passed string value to the end of the aList array. The deleteItemAt(i:uint) method deletes the item at the requested
location in aList (list index starts at 1).
This method checks to see if the delete location is within array bounds, and
returns a Boolean value accordingly. Note the use of the qualifier super to set the text in the update() method (line 47). This allows the method
to access the superclass property, listText,
directly. This is necessary as the setter method for the text property is
overridden (lines 50–53). In fact, several public methods in the TextField class that allow direct setting of field
contents are overridden to prevent clients from breaking IListDisplay functionality. The overridden methods
are: setter methods to the text and htmlText properties including appendText(), replaceSelectedText(), and replaceText().
The Client
Clients would use the ListDisplayField
adapter class just as they would a TextField
class. This is the big advantage to implementing class adapters in ActionScript
3.0, as the public methods and properties of the existing class behave as
expected (unless overridden). The following client, Main.as shown in Example 5-15,
uses a TextFormat object to set the font and
font size of the display object. In addition, the border property of the text field is set to show the field
boundary.
package
{
    import flash.display.MovieClip;
    import flash.text.*;

    public class Main extends MovieClip
    {
        public function Main()
        {
            // create ListDisplayField
            var shoppingListField:ListDisplayField = new ListDisplayField();

            // develop field formatting
            var format:TextFormat = new TextFormat();
            format.size = 18;
            format.font = "Arial";

            // set field location and format
            shoppingListField.x = 20;
            shoppingListField.y = 20;
            shoppingListField.border = true;
            shoppingListField.defaultTextFormat = format;

            // create list
            shoppingListField.addItem("Bread");
            shoppingListField.addItem("Butter");
            shoppingListField.addItem("Broccoli");
            shoppingListField.addItem("Cheese");
            // changed mind about Broccoli
            shoppingListField.deleteItemAt(3);

            addChild(shoppingListField);
        }
    }
}
This client code will display a text field located at point (20,20) on the stage, showing Bread, Butter, and Cheese in three separate lines in Arial font size 18. Displaying lists and deleting list items by location is now especially easy for clients. There is no need to keep items in a list or traverse this list to delete items. All this is implemented by the adapter and encapsulated. Note that additional methods to manipulate the list can be easily added to the adapter class. For example, a method to delete items by content rather than location, or a method to replace or insert a list item can be implemented by extending the adapter. We have therefore created a generic class that is reusable in multiple contexts by converting the interface of an existing class.
Extended Example: Displaying the O’Reilly New Books List
To further illustrate the utility of the ListDisplayField adapter, we’ll use it to display the list of new
books published by O’Reilly Media, Inc. Because this list changes often, it makes
sense to access the list dynamically using network methods, and display the book
titles using the ListDisplayField adapter.
The new books list is published from the O’Reilly web site as a web feed. A web feed is a data format used to publish content that changes frequently. The content publisher syndicates a web feed, allowing users to subscribe to it.
The O’Reilly new books web feed, shown in Example 5-16, is published using the Atom Syndication Format, commonly known as Atom. Another common web feed format is RSS (the RSS 2.0 acronym stands for Really Simple Syndication). Syndication formats are specified using XML (Extensible Markup Language), which is a way to create special-purpose markup languages to describe data.
<?xml version='1.0' encoding='utf-8'?>
<feed xmlns='http://www.w3.org/2005/Atom'
xmlns:itunes='http://www.itunes.com/dtds/podcast-1.0.dtd'
xml:lang='en-US'>
<title>O'Reilly Media, Inc. New Books</title>
<link rel="alternate" type="text/html" href=http://www.oreilly.com/
hreflang="en" title="O'Reilly Media, Inc. New Books" />
<rights>Copyright O'Reilly Media, Inc.</rights>
<updated>2006-09-28T22:45:16-08:00</updated>
<link rel="self" type="application/atom+xml" href=
"http://www.oreillynet.com/pub/feed/29"/>
<entry>
<title>Designing and Building Enterprise DMZs</title>
<id>http://www.oreilly.com/catalog/1597491004</id>
<link rel='alternate' href='http://www.oreilly.com/
catalog/1597491004'/>
<summary type='html'>
<i>Building DMZs for Enterprise Networks</i> covers a
sorely needed area in critical business infrastructure:
the Demilitarized Zone. DMZs play a crucial role in any
network consisting of a Hosted Internet Web Server, internal
servers which need to be segregated, External to Internal DNS
Server, and an E-mail SMTP Relay Agent. This book covers what
an administrator needs to plan out and integrate a DMZ into a
network for small, medium, and Enterprise networks.
</summary>
<author><name>Hal Flynn</name></author>
<updated>2006-09-28T22:45:16-08:00</updated>
</entry>
<entry>
<title>Windows PowerShell Quick Reference</title>
<id>http://www.oreilly.com/catalog/windowspowershell</id>
<link rel='alternate' href='http://www.oreilly.com/catalog/
windowspowershell'/>
<summary type='html'>
For years, support for scripting and command-line administration
on the Windows platform has paled in comparison to the
support offered by the Unix platform. Unix administrators
enjoyed the immense power and productivity of their command
shells, while Windows administrators watched in envy.
Windows PowerShell, Microsoft's next-generation command shell
and scripting language, changes this landscape completely.
This Short Cut contains the essential reference material to
help you get your work done-including the scripting language
syntax, a regular-expression reference, useful .NET classes,
and much more.
</summary>
<author><name>Lee Holmes</name></author>
<updated>2006-09-27T22:46:17-08:00</updated>
</entry>
</feed>We will subscribe to the web feed, extract the book titles using ECMAScript for
XML (E4X), and display them using the ListDisplayField adapter. ActionScript 3.0 fully supports E4X, making
it possible to access and manipulate XML documents in a form that mimics XML syntax.
Example 5-17 shows the implementation.
1 package
2 {
3     import flash.display.MovieClip;
4     import flash.text.*;
5     import flash.events.*;
6     import flash.net.*;
7
8      /**
9      *    Main Class
10     *    @ purpose:        Document class for movie
11     */
12     public class Main extends MovieClip
13     {
14         var xml:XML;
15         var xmlLoader:URLLoader;
16         var newBookListField:ListDisplayField;
17
18         public function Main()
19         {
20             // create ListDisplayField (Adapter)
21             newBookListField = new ListDisplayField();
22
23             // develop field formatting
24             var format:TextFormat = new TextFormat();
25             format.size = 14;
26             format.font = "Arial";
27
28             // set field location and format
29             newBookListField.x = 20;
30             newBookListField.y = 20;
31             newBookListField.width = 500;
32             newBookListField.height = 300;
33             newBookListField.border = true;
34             newBookListField.defaultTextFormat = format;
35
36             // create list from O'Reilly New Books Feed (Atom)
37             var newBooksURL = "http://www.oreillynet.com/pub/feed/29";
38             xml = new XML();
39             var xmlURL:URLRequest = new URLRequest(newBooksURL);
40             xmlLoader = new URLLoader(xmlURL);
41             xmlLoader.addEventListener(Event.COMPLETE, xmlLoaded);
42
43             addChild(newBookListField); // add field to display list
44         }
45
46         function xmlLoaded(evtObj:Event)
47         {
48             xml = XML(xmlLoader.data);
49             // set the default XML namespace
50             if (xml.namespace("") != undefined)
51             {
52                 default xml namespace = xml.namespace("");
53             }
54             // populate the ListDisplayField with new book titles
55             for each (var bookTitle:XML in xml..entry.title)
56             {
57                 newBookListField.addItem(bookTitle.toString());
58             }
59         }
60     }
61 }
The feed URL (http://www.oreillynet.com/pub/feed/29) is specified
in line 37. The URLLoader() method (line 40)
loads this document over the Internet, and calls the xmlLoaded() function when loading is complete. The xmlLoaded() method is registered as a listener
function (line 41) because loading data is an asynchronous operation requiring
notification when the process is completed. It is important that the default
namespace be set if a namespace is specified in the XML document (lines 50–53). This
enables E4X to do proper validation while parsing the XML document. The for each statement accesses each book title (lines
55–58) and adds it to the ListDisplayField
adapter. Figure 5-7 shows
the output from the example.

Summary
The adapter pattern allows existing classes to be used in situations that didn’t exist or weren’t anticipated when they were developed. For example, an application can have a lot of legacy code, code that is no longer supported or maintained, but needs to be used for various reasons. Adaptor classes use or extend existing code to fit new requirements. The main focus of the adapter pattern is to convert the interface of the existing class to one that fits a new context.
Adapter patterns are very close in intent and in function to several other patterns such as the façade, decorator (see Chapter 4), and bridge. The primary distinctions are that the adapter requires a target interface to which the adapter provides the implementation, there has to be an existing class that the adapter uses or extends to provide the implementation, and there is no requirement to simplify the interface.
There are two types of adapters, and choosing between object and class adapters highlights the advantages and disadvantages of composition versus inheritance in implementation. They also illustrate the importance of interfaces, and how they allow the designer to encapsulate implementation details.