
Making a local site
Dreamweaver Technique: Setting Up Your Site
Generating and saving pages
Previewing your Web site
Publishing online
Web sites — especially those integrating Web applications — are far more than collections of HTML documents. Every image — from the smallest navigational button to the largest background image — is a separate file that must be uploaded with your HTML page. Moreover, if you use any additional elements, such as an included script, background sound, digital video, or Java applet, these files must be transferred as well. To preview the Web site locally and view it properly on the Internet, you have to organize your material in a specific manner.
In Dreamweaver, the process of creating a site can also involve developing Web applications in a particular server model. Dreamweaver is unique in its capability to author sites for a variety of server models. Although it is possible to mix pages developed for different server models, it's not really practical. Dreamweaver enables you to select one server model for each site.
Dreamweaver gives Web developers who work with existing sites a direct connection to the server. Working in this mode enables you to make quick corrections to a page and transfer files, but many of Dreamweaver's special features require that you establish a local site.
As I describe in this chapter, each time you begin developing a new site, you define several initial parameters, including the chosen server model (provided, of course, you are creating a dynamically driven site, such as a Web application). These steps lay the groundwork for Dreamweaver to properly link your local development site with a remote online site, as well as to link properly to your data sources (again, for dynamically driven sites). This chapter begins with a brief description of approaches to online design, aimed primarily at those who are just starting to create Web sites. The remainder of the chapter is devoted to the mechanics of setting up your site and basic file manipulation. You also learn how to connect directly to servers, without establishing a local site.
Ready to jump in and start building sites with Dreamweaver? It's really easy to define a simple site and start designing. Here's how:
Choose Site

When the Site Setup dialog box opens, enter a name for your site in the Site Name field.
Click the folder icon next to the Local Site Folder field.
In the Choose Root Folder dialog box, navigate to the folder you want to contain your site and click Select (Choose).
When you return to the Site Setup dialog, click Save.
That's it! Of course, there's a lot more you can do pertaining to sites in Dreamweaver, all of which is covered in the rest of this chapter.
Planning in Web design, just as in any other design process, is essential. Not only does careful planning cut your development time considerably, but it makes it far easier to achieve a uniform look and feel for your Web site — making it friendlier and easier to use. This section briefly covers some of the basics of Web site design: what to focus on, what options to consider, and what pitfalls to avoid. If you are an established Web site developer who has covered this ground before, feel free to skip this section.
Even before you choose the overarching structure for your site (as discussed in the following sections), you need to address the all-important issues of message, audience, and budget.
If I had to pick one overriding concern for Web site design, it would be to answer the following question: What are you trying to say? The clearer you are about your message, the more focused your Web site will be. To this end, I find it useful to try to state the purpose of the Web site in one sentence. "Creating the coolest Web site on the planet" doesn't count. Although it could be regarded as a goal, it's too open-ended to be useful. Here are some examples of clearly stated Web site concepts:
To provide the best small-business resource center focused on Adobe software
To chronicle the world's first voyage around the world by hot air balloon
To advertise music lessons offered by a collective of keyboard teachers in New York City
Right behind a site's concept in terms of importance — some would say neck-and-neck with it — is the site's audience. Who are you trying to reach? Quite often, a site's style is heavily influenced by a clear vision of the site's intended audience. Take, for example, a small site I developed for my wife's Feldenkrais practice, www.eastvillagefeldenkrais.com. This site is pitched to the intended audience of folks seeking movement ease in the East Village of New York City. Hence, the site is a bit snazzy but focuses on being informative and locally oriented.
In contrast, a site that is devoted to mass-market e-commerce must work with a very different group in mind: shoppers. Everyone at one time or another falls into this category, so I am really talking about a state of mind, rather than a profession. Many shopping sites use a very straightforward page design that is easily maneuverable, comforting in its repetition — where visitors can quickly find what they are looking for and, with as few impediments as possible, buy it.
Unfortunately, Web sites aren't created in a vacuum. Virtually all development work happens under real-world constraints of some kind. A professional Web designer is accustomed to working within a budget. In fact, the term budget can apply to several concepts.
First, you have a monetary budget — how much is the client willing to spend? This translates into a combination of development time (for designers and programmers), materials (custom graphics, stock photos, and the like), and ongoing maintenance. You can build a large site with many pages that pulls dynamically from an internal database and requires very little hands-on upkeep. Alternatively, you can construct a small, graphics-intensive site that must be updated by hand weekly. It's entirely possible that both sites end up costing the same.
Second, budget also applies to the amount of time you can afford to spend on any given project. The professional Web designer is quick to realize that time is an essential commodity. The resources needed when undertaking a showcase for yourself when you have no deadline are very different from those needed when you sign a contract on June 30 for a job that must be ready to launch on July 4.
The third real-world budgetary item to consider is bandwidth. The Web, with faster Internet connections and an improved infrastructure, is slowly shedding its image as the World Wide Wait. However, many users are still stuck with slow modems, which means that Webmasters must keep a steady eye on a page's weight — how long it takes to download under the most typical modem rates. Of course, you can always decide to include that animated video masterpiece that takes 8 minutes to download on a cable modem — you just can't expect everyone to wait to see it.
In conclusion, when you are trying to define your Web page, filter it through these three ideas: message, audience, and the various faces of the budget. The time spent visualizing your Web pages in these terms is time decidedly well spent.
Many, if not most, Web applications require more than one Web page. One variation on a search engine, for example, might use the following:
An entry page containing the form elements (text field, list boxes, and so on) that make up the search criteria.
A results page that displays the list of items matching the search criteria; each of the items typically provides a link to a detail page and more information.
A detail page (or pages) that provides more information — this page is linked from the results page.
An error page, if the initial search criteria do not have any matches.
The experienced Web developer maps out the structure for all the anticipated Web applications in the site before beginning the building process. In addition to providing a truer picture of the work involved, mapping the required pages highlights potentially redundant pages — for example, the same error page may be used throughout the site — and pinpoints areas that would benefit from dynamic data application. The Web application map can also serve as a workflow schematic that shows which pages are static HTML and could be built by an HTML designer with little or no coding experience (typically, the entry and error pages) and which pages are dynamic Web pages that require data-aware designers.
Now that you've decided on a design and mapped your site, you're ready to set it up in Dreamweaver. When you define a site, you are telling Dreamweaver where to store your Web pages locally, where to transfer them to remotely, as well as the style of code in which to write them. Defining a site is an essential first step.
The Site Setup dialog box offers a multi-tiered approach that allows you to define just what you need and nothing more. You can create a local site in just two steps and quickly get started designing pages with nothing more. Or, if you already know the login and other details for your Web host, you can define a remote server as well. In addition, there are numerous details, such as version control, that can be specified if necessary.
The Site Setup dialog box comprises three main categories — Site, Servers, and Version Control — and a fourth category, Advanced Settings, with a variety of site-level properties. You can set up a basic local site by accessing just the Site category.
Note
The sub-categories in the Site Setup dialog box Advanced Settings category (Local info, Cloaking, Design Notes, File View Columns, Contribute, Templates, and Spry) are especially helpful for working in a team environment. You can find more information on these features later in this chapter and on team Web site building in Chapter 31.
The three main steps for fully defining a site in Dreamweaver are:
Locate the folder to be used for the local development site.
Enter the remote site information.
If you are creating a Web application, specify the testing server model to be used for the site.
While these steps can be taken one stage at a time, the first step of defining a local folder must be taken first and is essential in Dreamweaver.
After your site is on your Web server and fully operational, it consists of many files — plain HTML, style sheets, JavaScript, graphics, and other media files — that make up the individual Web pages. All these associated files are kept on the remote server in one folder, with, likely, one or more subfolders. This main folder is called the remote site folder. In order for Dreamweaver to properly display your linked pages and embedded images — just as they are displayed online — the program maintains a mirror of your remote site on your local development system. This primary mirror folder on your system is known as the local site folder.
You must establish the local site folder at the beginning of a project. This ensures that Dreamweaver duplicates the complete structure of the Web development site when it comes time to publish your pages to the Web. One of Dreamweaver's key site-management features enables you to select just the HTML pages for publication; Dreamweaver then automatically transfers all the associated files, creating any needed folders in the process. The mirror images of your local and remote site folders are critical to Dreamweaver's capability to expedite your workload in this way.
Tip
If you do decide to transfer an existing Web site to a new Dreamweaver local site folder, run Dreamweaver's Link Checker after you've consolidated all your files. Choose Site
To set up a local site folder in Dreamweaver, follow these steps:
Choose Site
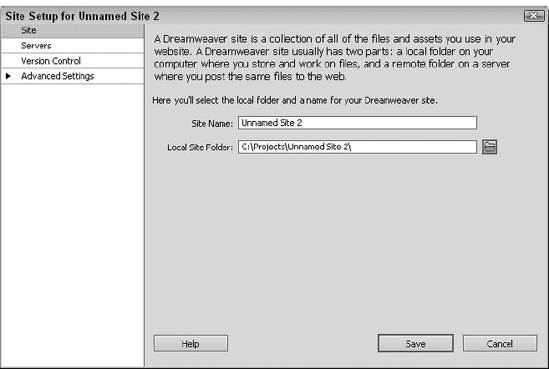
The Site Setup dialog box opens, as shown in Figure 4-1.
From the Site category, enter a name for your site in the Site Name text field. This is the name that appears in the Sites drop-down list and the Edit Sites dialog box.
Specify the folder to serve as the local site folder by either typing the pathname directly into the Local Site Folder field or clicking the folder icon to open the Choose Root Folder dialog box. Click New Folder if needed. When you've made your choice there, click the Select (Choose) button.
Note
The Choose Root Folder dialogs look somewhat different on the PC than on the Mac, but you can make sure you're designating the folder you want with a single technique. On both operating systems, the current folder is listed at the top of the dialog box. Verify that the desired folder is displayed before you click Select on the PC and Choose on the Mac.
Click Save.
Your new site appears in the Files panel, as shown in Figure 4-2, with any files in the folder, collapsed under the site name. Any defined site can be accessed by selecting it from the list at the top of the Files panel.
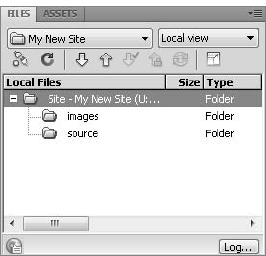
Figure 4-2. Previously created folders — as well as files, if any — in the chosen local site folder appear in the Files panel after the site is set up.
While the details entered in the Site category are all you need to get started creating a local site with Dreamweaver, there are a few more settings you can specify to make working with a local site easier and customized to your liking. These settings are contained under Advanced Settings in the Local Info subcategory. You can easily modify these properties after you've created your site.
Choose Site
When the Manage Sites dialog box appears, make sure the site you want to modify is chosen in the list and click Edit.
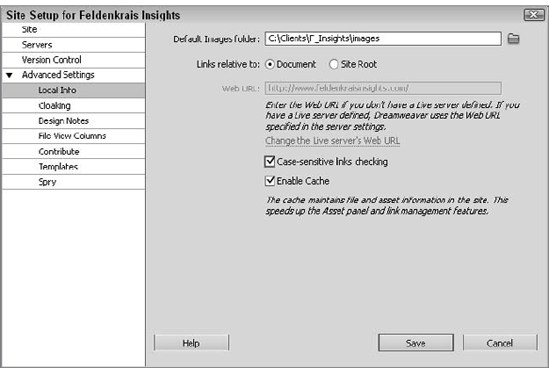
When the Site Setup dialog box appears, expand the Advanced Settings category and choose Local Info (see Figure 4-3).
If your site is to have a dedicated images folder, specify it in the Default Images Folder text box. Note that your Default Images Folder can have subfolders.
Any images that you select from outside your local site folder will need to be copied to the site root. If you have a Default Images Folder established, Dreamweaver will automatically copy those files there, saving you the step of selecting it each time.
Choose which type of links you'd prefer to use by default: Document or Site Root. If you're unsure, leave the standard option, Document.
Enter the full URL for your site in the Web URL text field. This field is unavailable if a remote server has already been defined.
When checking links for your Web site, Dreamweaver uses the Web URL to determine whether absolute links, such as
www.idest.com/dreamweaver/index.htm, reference external files or files on your site.If you'd like to make sure that your links match files names, including their case, choose the Case-Sensitive Links Checking option. This option is most helpful when your site is hosted on a Unix server that relies on case-sensitive filenames.
For fastest performance, select the Enable Cache option. Having a site cache enables Dreamweaver to store information that makes certain key site tasks, such as link updates, run faster.
Setting Up Your Site
In this Technique, you set up a site that is used throughout this book in the other Dreamweaver Techniques. The process is simple, but essential.
If you haven't already downloaded the Dreamweaver Technique Simulation files from the book's Web site to your system, visit
www.wiley.com/go/dreamweaverCS5bibleand download the.zipfile now. Uncompress the.zipfile and copy/move the resulting folder named Techniques to wherever you store, or plan to store, sites you create on your computer.Choose Site
In the Site tab of the Site Setup dialog box, enter Techniques in the Site Name field.
Select the folder icon next to the Local Site Folder field.
In the Choose Local Root Folder dialog box, locate and select the Techniques folder; click Select (Choose) when you're done.
Click OK to create the site. This doesn't modify anything in the Techniques folder; it simply sets Dreamweaver up so that it knows where the referenced files are located.
In Dreamweaver Techniques found in subsequent chapters, you'll be directed to open files in the Techniques site just established.
To share your site with others — whether globally through the World Wide Web or more specifically via an intranet or other network — you can define one or more servers. A remote server is connected to the Internet and publicly accessible; files are typically transferred to a remote server via FTP (File Transfer Protocol). A testing server is intended to be used for development and testing and most often is accessed through a closed network.
Note
Dreamweaver allows you to define as many servers as you need, whether remote or testing and then access them whenever you'd like. In the simplest scenario, a designer would establish a remote server with the information provided from the Web host. For sites that require server-side coding, such as PHP or ColdFusion, many Dreamweaver developers create a testing server on their development system, as well as a remote server. Team-developed sites might add another testing server to which designers post their pages for additional testing. At the appropriate time, the network administrator exports the files from the testing server to the remote server; alternatively, if you have sufficient access, you can handle the transfer yourself. For any server — testing or remote — a remote site folder is created on the server that acts as a mirror to the local site folder.
You'll need various bits of information to establish a server, particularly if you post your material to a remote site via FTP. In addition to the FTP host's name — used by Dreamweaver to find the server on the Internet — you also need, at a minimum, the username and password to log on to the server. The host's technical support staff can provide you with this and any other necessary information.
To set up a connection to a remote server, follow these steps:
Choose Window
In the Manage Sites dialog box, select the site you want to add a remote server to and click Edit.
Tip
To open your site definition directly, double-click the site name in the Files panel.
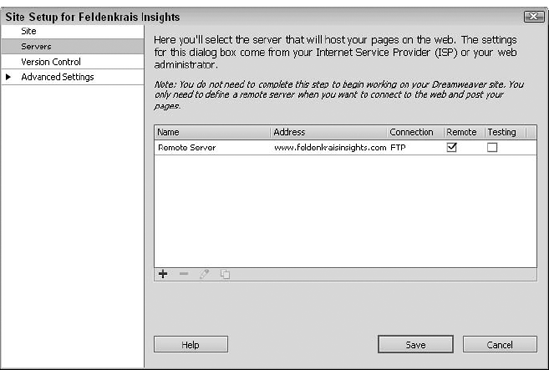
In the Site Setup dialog box, choose Servers.
The Servers category screen displays all the servers currently defined and allows you to add new ones, as well as edit existing definitions, or remove any you no longer need (see Figure 4-4).
Click Add New Server, the plus sign.
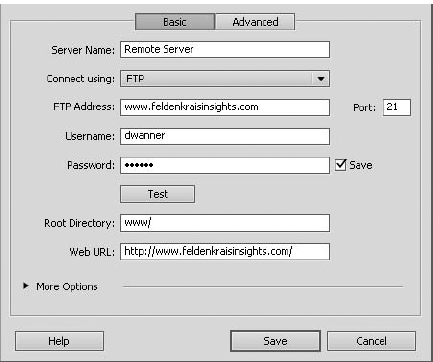
In the Basic tab, enter how you want to identify your remote server in the Server Name field.
From the Connect Using list, choose the access description that applies to your site; FTP is shown in Figure 4-5:
FTP: Select this option if you connect to your Web server via File Transfer Protocol (FTP).
SFTP: Choose this option to connect using Secure File Transfer Protocol (SFTP).
Local/Network: Select this option if you are running a local Web server and want to store your remote site on your local drive, or if your Web server is mounted as a network drive.
WebDAV: Choose this option to store your files remotely in a Web-based Distributed Authoring and Versioning (WebDAV) system.
RDS: Choose this option if you are working with a ColdFusion site that has Remote Development Services (RDS) enabled.
If you selected FTP for access, complete the following options:
FTP Address: Enter the host name of the FTP connection for your Web server, which is usually in the form
ftp.sitename.com. Do not include the full URL, such asftp://ftp.sitename.com.Port: The default FTP port number is
21; change this value if necessary.Username: Enter the login name you have been assigned for access to the Web server.
Password: Enter the password necessary for you to gain access to the Web server. Note that many servers are case-sensitive when it comes to usernames and passwords.
Save: Dreamweaver automatically selects this option after you enter a password. Deselect it only if you and others access the server from the current system.
Test: After you've specified all your FTP parameters, you can click the Test button to verify that Dreamweaver can connect successfully to your Web server.
Root Directory: Enter the directory in which publicly accessible documents are stored on the server. Typical host directory names are
www/,public/,docs/, andpublic_html/. Your remote site folder is a subfolder of the host directory. If you are unsure of the exact name of the host directory, check with your Web server administrator. Often, the FTP host connects to the correct directory automatically, and you can leave this field blank.Web URL: Enter the Web address for your site.
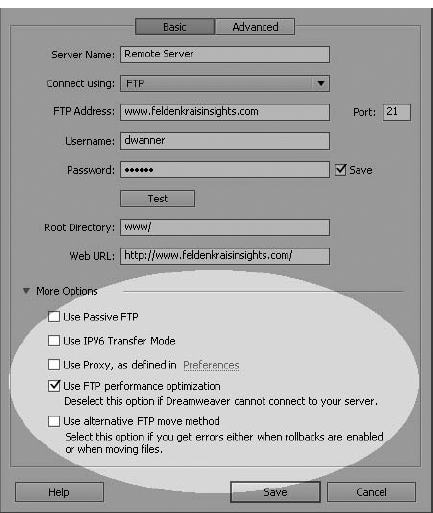
If the connection test is unsuccessful, expand the More Options link and choose from the following options shown in Figure 4-6:
Use Passive FTP: Passive FTP establishes the FTP connection through the local software, rather than the server. Certain firewall configurations use passive FTP; check with your network administrator to see if you need it.
Use IPv6 Transfer Mode: IPv6 (Internet Protocol version 6) is the most recent networking communication standard enjoying widespread adoption. Select this option if you need to connect to an IPv6-enabled FTP server.
Use Proxy: This option is automatically selected if you've set the Preferences with the correct firewall host/port information (to access this information, click the Preferences button).
Use FTP performance optimization: On by default, disable this option if the test is unsuccessful and try again.
Use alternative FTP move method: Select this option only if errors occur when transferring files or using Contribute rollbacks. The alternative method is an older, slower one and should be avoided if possible.
If you're working with a team or are interested in other remote server options, click the Advanced tab to access the following choices:
Maintain synchronization information: With this option selected (as it is by default), Dreamweaver automatically stores details for files in both the local and remote sites to determine which is the most recent.
Automatically upload files to server on Save: Choose this option to store files locally and remotely simultaneously. Under most circumstances, I do not recommend that this option be selected because the risk for uploading unfinished work is too great.
Enable File check out: c designers or contributors on a site. If this option is enabled, three additional choices are activated:
Check out files when opening: When selected, Dreamweaver will automatically check out any files when they are opened; if not selected, Dreamweaver asks if you'd like to check out the file or just make it viewable.
Check-out Name: Enter the name you want to appear in the Files panel for checked-out files.
Email Address: Enter the e-mail address to associate with a checked-out file.
When you're done, click Save.
On the Servers category screen, the new server is listed; make sure the Remote checkbox is selected and click Save once again.
As with other elements of the Site Setup dialog, the Servers category is multi-layered with numerous options available if needed. In most situations, the best strategy is to start with the default options and modify only if necessary.
The steps for setting up a testing server are quite similar to those for defining a remote server. In fact, if you put files on your testing server by using FTP, it can be exactly the same except you select the Testing checkbox instead of the Remote checkbox in the Servers category. However, many Dreamweaver users create their testing server on a local or networked system, which can speed up the development and testing process.
To define a local testing server, follow these steps:
Choose Window
In the Manage Sites dialog box, select the site you want to add a remote server to and click Edit.
In the Site Setup dialog box, choose Servers.
Click Add New Server, the plus sign.
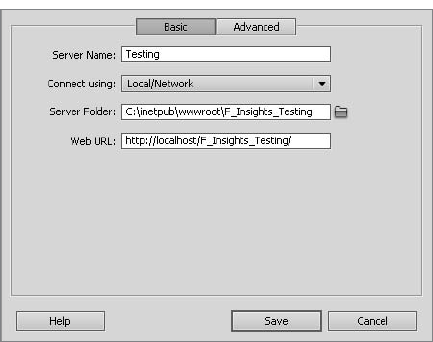
In the Basic tab, enter the name you want to identify your testing server in the Server Name field.
From the Connect Using list choose Local/Network (see Figure 4-7).
Click the Remote Folder icon to choose a local or networked folder for the remote testing site.
Tip
Web servers running on both primary operating systems automatically recognize folders in specific locations as sites, easily located in a browser with an
http://localhost/address. If you're on a PC, choose a subfolder within the c:inetpubwww folder; on the Mac, select a subfolder in the Sites folder located within your [username] folder.In the Web URL field, enter the Web address for your site, if available.
If you're working with a server model such as PHP or ColdFusion, click the Advanced tab and make your choice from the Server Model list.
Available server models in the list are: ASP JavaScript, ASP VBScript, ASP.NET C#, ASP.NET VB, ColdFusion, JSP, PHP MySQL, or None. Dreamweaver creates code for ASP VBScript, ColdFusion and PHP.
Click Save to return to the Server category.
If necessary, choose the Testing checkbox.
Click Save.
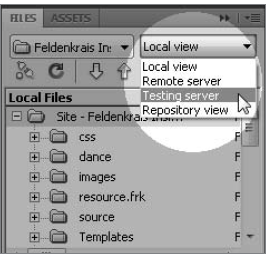
After you've defined your servers, you can access them directly by choosing the one you want from the list on the top right of the Files panel, as shown in Figure 4-8.
Dreamweaver supports site cloaking, which enables you to exclude (cloak) specified site folders from operations such as Put, Get, Check In/Out, Synchronize, and so on. (For a full list of cloaked operations, see the following paragraphs.) The site cloaking feature can save you a significant amount of upload/maintenance time. Suppose that you're working on a site that contains several dozen large MP3 files, all stored in a folder named mp3s. You can cloak the mp3s folder, so that when you put (upload) your site files at the end of the day, you don't end up re-putting all those MP3 files, which most likely haven't changed, anyway.
Note
A site's folder-cloaking settings are sticky; after you've specified them, Dreamweaver remembers them whenever you work on the site.
Cloaking excludes cloaked folders from the following operations:
Put, Get
Check In, Check Out
Reports
Select Newer Local, Select Newer Remote
Sitewide commands, such as Check Links Sitewide and Find And Replace Entire Site
Synchronize
Asset panel contents
Template and library updating
Cloaking and uncloaking site folders is a breeze. Follow these steps:
In the Files panel, select the desired site from the drop-down list box. Note that this site must have cloaking enabled in the Site Setup dialog box, which is the default site setting. If, however, you need to enable cloaking for a site, choose Site
Select the folder(s) you want to cloak or uncloak.
From the Options menu of the Files panel, choose Site
To uncloak all site folders (and files), choose Site

You can change any of the information associated with your local site folders by choosing Site
After your participation in a project has ended, you can remove the site from your list. In the Edit Sites dialog box, choose the site you want to remove, and click the Remove button. Note that this action removes the site only from Dreamweaver's internal site list; it does not actually delete any files or folders from your hard drive.
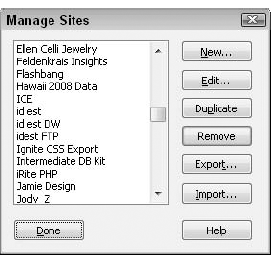
Figure 4-10. Create new sites, edit existing ones, or remove unwanted ones with the Manage Sites dialog box.
Tip
Before you remove a site, make sure you export the site settings by choosing Export from the Manage Sites dialog box (Site
With the local site folder established, Dreamweaver can properly manage links regardless of whether the document relative or site folder relative format is used.
Note
You can find a discussion of document-relative and site folder–relative addressing in Chapter 9.
You've considered message, audience, and budget issues. You've chosen a design. You've set up your site and its address. All the preliminary planning is completed, and now you're ready to really rev up Dreamweaver and begin creating pages. This section covers the basic mechanics of opening and saving Web pages during development.
Building Placeholder Pages
One technique you might find helpful — and especially so with the use of document-relative addressing in Dreamweaver Web projects — is what I call placeholder pages. These placeholder pages provide an effortless way to include links as you create Web pages.
Suppose, for example, you've just finished laying out most of the text and graphics for your home page and you want to put in some navigation buttons. You drop in your button images and align them just so. All that's missing are the links. If you're using document-relative addressing, the best way to assign a link is to click the Browse For File button in the Property inspector and select your file. But what do you do if you haven't created any other pages yet and there aren't any files to select? That's when you can put placeholder pages to work.
After you've designed the basics of your site and created your local site folder, as described previously in this chapter, start with a blank Dreamweaver page. Type a single identifying word on the page and save it in the local site folder. Repeat this step for all the Web pages in your plan. When it comes time to make your links, all you have to do is point and click to the appropriate placeholder page. This arrangement also gives you an immediate framework for link testing. When it comes time to work on the next page, just open up the correct placeholder page and start to work.
Another style of working involves using the Files panel as your base of operations, rather than the Document window. It's very easy in Dreamweaver to choose File
Start Dreamweaver as you would any other program. Double-click the Dreamweaver program icon, or single-click if you are using Internet Explorer's Desktop Integration feature in Windows or if you have Dreamweaver's icon in your Dock on OS X. After the splash screen, Dreamweaver opens with the Welcome screen, which lists 10 of your previously opened documents and also offers a full range of new document types. Choose HTML from the Welcome screen to create a new blank page. This page is created from the Default.html file found in Dreamweaver's Configuration/DocumentTypes/NewDocuments folder. Of course, you may want to replace the original Default.html file with one of your own — perhaps with your copyright information. All your blank pages are then created from the template that you've designed.
Tip
If you do decide to create your own Default template, it's probably a good idea to rename the Dreamweaver Default template — as Original-Default.html or something similar — prior to creating your new, personalized Default template.
To open an existing file that belongs to a site you've defined in Dreamweaver, select the site in the Files panel and double-click the file icon. Recently opened files, regardless of their origin, are available through the Welcome screen or from the File
To open an existing file that does not belong to a site defined in Dreamweaver — or that was created in a different program — choose File
Tip
You can enable/disable Dreamweaver from automatically repairing HTML syntax errors in your files when it opens them. Choose Edit
To add an entry, place your cursor at the end of the line above where you want your new file format to be placed, and press Enter (Return). Type in your file extension(s) in capital letters followed by a colon and then the text description. Save the Extensions.txt file and restart Dreamweaver to see your modifications.
You can work on as many Dreamweaver files as your system memory can sustain. When you choose File
Tip
If you are using the Windows version of Dreamweaver and are working with maximized documents, you can easily switch among open files by clicking their respective tabs at the top of the Document window or by using the Windows menu.
Each time you open a new file, Dreamweaver temporarily names the file Untitled-n, where n is the next number in the sequence. This naming convention prevents you from accidentally overwriting a new file opened in the same session.
Note
Using the New Document dialog box to create new documents of all types (HTML, JavaScript, ASP, ColdFusion, and so on) is discussed in detail later in this chapter in the section "Creating New Documents."
Saving your work is very important in any computer-related task, and Dreamweaver is no exception. To initially save the current file, choose File
By default, all HTML files are saved with an .htm filename extension. Different file formats are saved with different extensions; XML documents, for example, are stored with an .xml extension. To save your file with another extension, such as .shtml or .xhtml, change the Save As Type option to the specific file type and then enter your full filename with the extension.
Warning
Although it may seem kind of backward in this age of long filenames, it's still a good idea to choose all-lowercase names for your files without spaces or punctuation other than an underscore or hyphen. Not all servers read the filename correctly, and you can encounter problems linking your pages.
When you're done working on a file, you can close it by choosing File
Note
You can easily tell whether a file has been altered since the last save by looking at the title bar. Dreamweaver places an asterisk after the filename in the title bar for modified files. Dreamweaver is even smart enough to properly remove the asterisk should you reverse your changes with the Undo command or the History panel. On OS X you also see that the Close widget, in the top left corner of the Document window appears filled in when the file is unsaved.
When you're finished working for the day — or, more often, the late, late night — you can close Dreamweaver by choosing File
Tip
Have to stop work in the middle of a session and want to get back to work ASAP? Leave one or more documents open when you close Dreamweaver and they'll reappear when the program next launches. To enable this feature, choose the Reopen On Startup option from the General category of Preferences.
Dreamweaver provides three methods for creating new documents:
Select your preferred document type from the Create New column of the Dreamweaver Welcome screen.
You can use the New Document dialog box to create a new document of a type that you select from a comprehensive list, including HTML, XSLT, ActionScript, CSS, JavaScript, ASP VBScript, ColdFusion, and PHP. If you work with multiple document types, this is the way to go.
You can create a new document of a default type that you've specified in the Preferences dialog box. If you work mostly with one document type — HTML, ColdFusion, or ASP, for example — this method can prove very convenient.
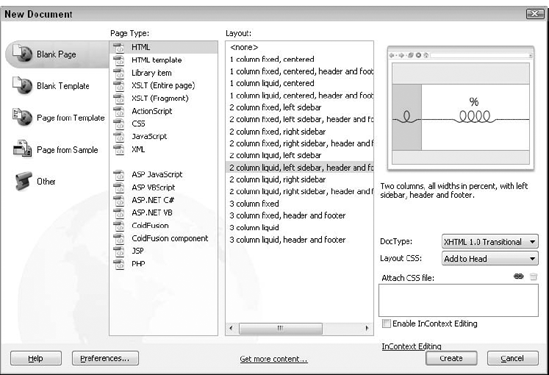
Dreamweaver offers a wide range of starting points through the New Document dialog box: you can start off with anything from a completely blank page to the basic HTML code to a fully CSS compliant, 3-column elastic design with header and footer.
All of the layouts listed in the New Document dialog box when the Blank Page
To create a new document using the New Document dialog box, follow these steps:
Choose File
In the New Document dialog, select the category of new document that you want to create: Blank Page, Blank Template, Page From Template, Page From Sample, or Other.
The adjoining columns and page preview change according to the New Document category selected. The following steps assume that the Blank Page category has been selected.
In the Page Type list, select the specific type of document you want to create: HTML, HTML Template, Library Item, and so on. The page types are grouped into static page types, which do not require an additional application server, and dynamic page types, which do.
From the Layout column, choose the basic page design. Select <none> for a blank HTML page. Select any layout to view the illustrated preview and read a brief description of the design. Two key terms are used to identify layout characteristics:
Fixed: Notes a column or other page component where the width is defined in pixels. A fixed width layout does not expand or contract.
Liquid: Indicates a column or other page component where the width is defined as a percentage, so the column or page component expands or contracts depending on the width of your browser window, as shown in Figure 4-12.
If desired, select a different option from the Document Type (DTD) list. Note that this setting does not stick; you'll need to reset it each time or select a new DTD option in the New Document category of Preferences.
If you're working with a CSS-based layout, choose where you would like to store the pre-designed CSS layout rules from the Layout CSS list. Choose Add To Head if you'd like to embed the rules in the newly created document, Create A New File to put them in a new external CSS document, or Link To Existing File to append the rules to an existing CSS document.
If you'd like to link or import one or more existing CSS external style sheets, click the Attach Style Sheet icon in the Attach CSS File section. You can attach as many external CSS style sheets as you'd like. If you'd like to delete one from the list, select it and click Remove (the trashcan icon).
Click Create to create a new, blank document of the selected category/type.
If you want to create a new document based on a custom template, use the Page From Template — rather than the Blank Page — category. For more information on creating and using templates, see Chapter 28.
Note
To learn more about the CSS layouts available from the New Document dialog box, see Chapter 6.
If you often create one type of document — HTML or ColdFusion files, for example — you can take advantage of Dreamweaver's default document feature to save yourself some document creation time and trouble. By using the techniques described in this section, you can open a new document of your default type (HTML, ColdFusion, and so on) with one quick keyboard shortcut — in other words, without having to work your way through the New Document dialog box.
To create a new default document, follow these steps:
Choose Edit
Note the Show New Document Dialog On Ctrl+N (Command+N) option. Clear this box if you want Ctrl+N (Command+N) to create a new default document without showing the New Document dialog box; check it if you want Ctrl+N (Command+N) to show the New Document dialog box.
Tip
If you are a Windows user, no matter what Show New Document Dialog On Ctrl+N setting you choose, Ctrl+Shift+N always creates a new default document without showing the New Document dialog box.
If desired, select a different option from the Document Type (DTD) list. When you're finished, click OK to close the Preferences dialog box.
After you perform the preceding step, you're done. To create a new default document, simply press Ctrl+Shift+N (Windows only). If you turned off the Show New Document Dialog On Ctrl+N option, you can also press Ctrl+N (Command+N).
Note
If, when defining your site, you specified a server model to be used, the new default document is the file type that corresponds to that server model — despite the Preferences dialog box setting you have chosen.
When using Dreamweaver or any other Web authoring tool, it's important to frequently check your progress in one or more browsers. Dreamweaver's Document window offers a near-browser view of your Web page, but because of the variations among the different browsers, it's imperative that you preview your page early and often. Dreamweaver offers you easy access to a maximum of 20 browsers — and they're just a function key away.
You add a browser to your preview list by choosing File
Choose File
To add a browser (up to 20), click the Add (+) button and fill out the following fields in the Add Browser dialog box (see Figure 4-13):
Name: When you choose the browser application, Dreamweaver automatically provides a name for the browser. You can accept this name, or change it by typing a new name in the Name field.
Application: Type in the path to the browser program or click the Browse button to locate the browser executable (
.exe) file.Primary Browser/Secondary Browser: If you want, select one of these checkboxes to designate the current browser as such.
After you add a browser to your list, you can easily edit or delete it. Reopen the Preview In Browser Preferences category and highlight the browser you want to modify or delete.
To alter your selection, click the Edit button. To delete your selection, click the Remove (−) button.
After you finish your modifications, click OK to close the dialog box.
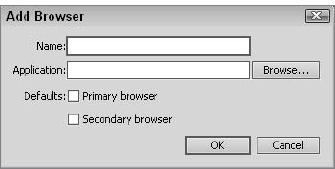
Figure 4-13. It's best to leave the Name field blank until you choose the browser executable in the Application field; Dreamweaver automatically fills in the name and removes any previously entered value.
After you add one or more browsers to your list, you can preview the current page in these browsers. Choose File
In order to view any changes you've made to your Web page under construction, you must select the Preview In Browser menu option again (or press one of the function keys for primary/secondary browser previewing, described in the following paragraph). Clicking the Refresh/Reload button in your browser does not load in any modifications. The temporary preview files are deleted when you quit Dreamweaver.
Tip
Dreamweaver saves preview files with a filename like the following: TMP5c34jymi4q.asp; a unique name is generated with each preview to ensure that the browser does not load the page from the cache. If Dreamweaver unexpectedly quits, these TMP files are not deleted. Feel free to delete any such TMP files you find in your site; or use them as backups to restore unsaved work should a crash occur.
You can also use keyboard shortcuts to preview two different browsers by pressing a function key. Press F12 (Option+F12) to preview the current Dreamweaver page in your primary browser, and Ctrl+F12 (Command+F12) to preview the same page in your secondary browser. These are the primary and secondary browser settings you establish in the Preview In Browser Preferences panel, explained in Chapter 3.
You can easily reassign your primary and secondary browsers. Go to the Preview In Browser Preferences category, select the desired browser, and select the appropriate checkbox to designate the browser as primary or secondary. In the list of browsers, you see the indicator of F12 (Option+F12) or Ctrl+F12 (Command+F12) appear next to the browser's name.
In addition to checking your Web page output on a variety of browsers on your system, it's also a good idea to preview the page on other platforms. If you're designing on a Macintosh, try to view your pages on a Windows system, and vice versa. Watch out for some not-so-subtle differences between the two environments in terms of color rendering (colors in Macs tend to be brighter than in PCs) and screen resolution. If you don't have easy access to another operating system and a wide range of browsers, Adobe BrowserLab can come to your rescue.
Note
BrowserLab is an online rendering service capable of displaying your Web pages in a variety of browser versions and operating systems. A page can be viewed in a single browser/OS configuration, such as Firefox 3.5 – Windows XP; two configurations side-by-side; or two configurations over-laid one another, with variable transparency. BrowserLab makes it possible to quickly preview your pages on the most commonly used browsers and OS combinations.
It's important to understand that BrowserLab displays an image of your Web page, not the page itself. Although you can scroll the window to see the entire page, no interactivity — such as links, hover states or JavaScript effects — are possible. However, you can trigger any JavaScript in Dreamweaver's Live View, freeze JavaScript by pressing F6, and then preview the result in BrowserLab.
Note
As with other Adobe services, you'll need an Adobe account to use BrowserLab. Adobe accounts are free and easy to get: just visit any page on the Adobe Web site, including www.adobe.com, and click the Your Account link in the top navigation. When the login page appears, click the Create an Adobe Account link and fill out the simple form and your account is immediately available.
To preview a Dreamweaver page in BrowserLab, follow these steps:
Choose File
When the Adobe BrowserLab panel appears, as shown in Figure 4-14, choose Local from the list if you want to render the currently displayed page or Server if you want to render the version of the current page that resides on the active server.
Click Preview.
Adobe BrowserLab will open in your primary browser. Before you can proceed, you'll need to log in.
If you are not currently logged into Adobe, enter your e-mail and password.

Once logged in, the selected page will render in BrowserLab with the default browser and operating system configuration. Viewing a single page on BrowserLab is known as 1-up View. You can change views by selecting from the list in the upper-left corner of the BrowserLab window. Available options are:
1-up View: Displays a single browser/OS configuration.
2-up View: Displays two browser/OS configurations side-by-side (see Figure 4-15).
Onion skin View: Shows two browser/OS configurations, one on top of another with a variable transparency so you can compare pages on the pixel level. A slider at the top of the page controls the transparency of the two rendered pages.
Show/Hide Rulers: Displays rulers for any rendered pages.
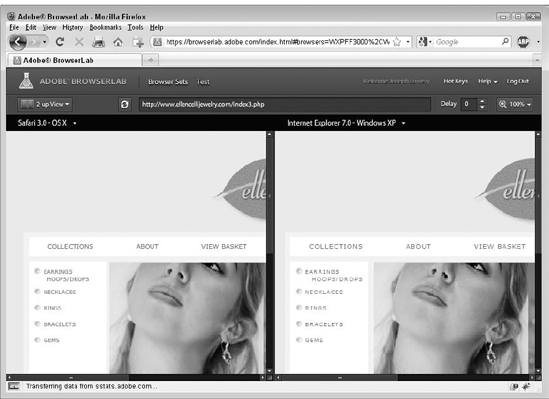
Figure 4-15. Easily compare the same page on two different browser/OS configurations with 2-up View.
BrowserLab allows you to customize the browser/OS configurations you'd like to incorporate in your testing. Click Browser Sets and choose the combinations you want to use from the Available Browsers list: your chosen browsers will appear in the column on the right. You can reorder the browsers by simply clicking and dragging them. Any number of custom browser sets can be created in this manner.
Note
Adobe BrowserLab is a commercial service. As of this writing, the details on how much BrowserLab will cost, if anything, have not been announced.
The final phase of setting up your Dreamweaver site is publishing your pages to the Web. When you begin, this publishing process is up to you. Some Web designers wait until everything is absolutely perfect on the local development site and then upload everything at once. Others like to establish an early connection to the remote site and extend the transfer of files over a longer period of time.
I fall into the latter camp. When I start transferring files at the beginning of the process, I find that I catch my mistakes earlier and avoid having to make massive changes to the site after everything is up. For example, in developing one large site, I started out using mixed-case filenames, as in ELFhome.html. After publishing some early drafts of a few Web pages, however, I discovered that the host had switched servers; on the new server, filenames had to be entirely lowercase. Had I waited until the last moment to upload everything, I would have been faced with an unexpected and laborious search-and-replace job.
After you've established your local site folder — and you've included your remote site's FTP information in the setup — the actual publishing of your files to the Web is a very straightforward process.
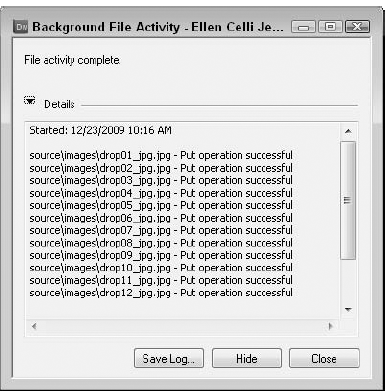
Putting and getting files to and from your server, while easy, can be incredibly time-consuming. Dreamweaver frees its users from the drudgery of waiting for files to transfer through its background FTP feature. Uploading and retrieving files is a separate computer process in Dreamweaver, distinct from working in Design and Code view. When you initiate a publishing event, the Background File Activity dialog box with a small progress bar appears, as seen in Figure 4-16. You can dismiss the dialog by clicking Hide; when hidden, file activity can be seen in the bottom of the Files panel. An ongoing log is shown when you click Details, and can be saved when the transfers have been completed by clicking Save Log.
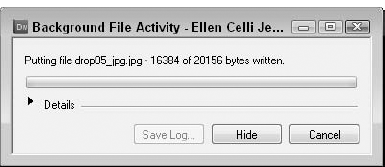
Figure 4-16. Dreamweaver transfers files through a background FTP process so you can continue working while files are being published.
To transfer your local Web pages to an online site, follow these steps:
Choose Window
In the Files panel, click the Connect button. (You may need to connect to the Internet first.) Dreamweaver displays a message box showing the progress of the connection.
If you didn't enter a password in the Remote Info category when you defined the site, or if you entered a password but didn't opt to save it, Dreamweaver asks you to type in your password. When the connection is complete, the directory listing of the remote site appears in the Files panel.
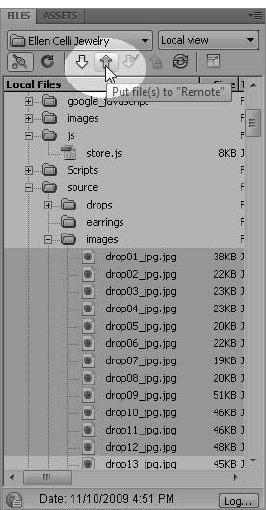
Click the Expand/Collapse button to expand the Files panel into its two-pane view: Remote pane on the left, Local pane on the right. In the Local pane (green icons), select the folder(s) and file(s) you want to upload — or, to upload the entire site, select the site folder (at the top of the list) — and then click the Put File(s) button, as shown in Figure 4-17.
If Dreamweaver asks if you would like to move the dependent files as well, click Yes to transfer all embedded graphics and other objects, or No if you'd prefer to move these yourself. You can also select the Don't Ask Me Again checkbox to make transfers of dependent files automatic in the future.
The Background File Transfer dialog box appears. Click Hide to hide the dialog box and continue working in Dreamweaver; click Details to see the files being transferred. If hidden, you can restore the Background File Transfer dialog box by clicking the globe icon at the bottom of the Files panel.
After each file has successfully transferred, Dreamweaver places a checkmark next to its icon — provided that File Check In/Out is enabled in the site's Remote Info category.
When you finish transferring your files, click the Disconnect button.
If you'd like to store the log file, display the Background File Transfer dialog box (if necessary) and click Save Log.
Note
Dreamweaver provides an FTP Log panel that displays all your FTP file transfer activity (Puts, Gets, and so on). This panel is particularly useful for troubleshooting FTP transfer errors. For more information, see the next section, "Using the FTP Log panel."
Remember that the only files you have to highlight for transfer to the remote site are the HTML files. As noted previously, Dreamweaver automatically transfers any dependent files (if you allow it), which means that you'll never forget to move a GIF again. (Nor will you ever move an unnecessary file, such as an earlier version of an image, by mistake.) Moreover, Dreamweaver automatically creates any subfolders necessary to maintain the site's integrity. Combine these two features to save substantial time and worry.
Warning
Be aware that Dreamweaver does not always know to include files that are used within scripts; you might need to upload these files manually.
Now you have made your site a reality, from the planning stages to the local site folder and onto the Web. Congratulations — all that's left is to fill those pages with insightful content, amazing graphics, and wondrous code.
Like all data transfers on the Internet, FTP file transfers sometimes go awry: Servers are busy or down, file/directory permissions are improperly set, passwords are misspelled, and so on. If you run into an FTP transfer problem with your Dreamweaver Put File(s) or Get File(s) command, you can use the FTP Log panel to find out exactly what went wrong.
The FTP Log panel displays all your FTP file-transfer activity. To display the FTP Log panel, first choose Windows
FTP logs may seem complex and indecipherable, but the information they contain is invaluable for troubleshooting FTP errors. Figure 4-18, for example, displays the FTP log that results from Putting (uploading) a file to a remote server.
In this chapter, you learned some options for planning your Web site and what you need to do in Dreamweaver to initialize the site. As you plan your site and set up your servers, keep these points in mind:
Put as much time into planning your site as possible. The more clearly conceived the site, the cleaner the execution.
Set up your local site folder in Dreamweaver right away. The local site folder is essential for Dreamweaver to properly publish your files to the remote site later.
Establish as many servers as your development process requires, whether to connect to your remote server on the Web or a local or networked testing server.
If you are creating a Web application, choose one server model per site and set it when you define your site. This step is needed so that Dreamweaver knows the type of server code to write.
Get started quickly with any of the 16 CSS-based layouts, available through the New Document dialog box.
Preview early, often, and with various browsers. Dreamweaver gives you quick function-key access to a primary (F12/Option+F12) and secondary (Ctrl+F12/Command+F12) browser. Check your pages frequently in these browsers, and then spend some time checking your pages against other available browsers and browser versions.
Dreamweaver also gives you the option to check your page with browsers and operating systems not available on your local system through Adobe BrowserLab. You can compare your page designs in up to two browser configurations side-by-side or even overlaid on top of one another.
Establish an early connection to the Web and use it frequently. You can begin publishing your local site through Dreamweaver's Site window almost immediately.
In the next chapter, you learn how to use Dreamweaver to begin coding your Web pages.