
Keeping current with Check In/Check Out
Storing information with Design Notes
Assembling interactive reports
Integrating with Contribute
Using Visual SourceSafe with Dreamweaver
Accessing a WebDAV server
Source control with Subversion
Major Web sites that are designed, developed, and maintained by one person are increasingly rare. After a site has reached a certain complexity and size, it's far more timely and cost-effective to divide responsibility for different areas among different people. For all its positive aspects, team development has an equal number of shortcomings — as anyone who has had his or her work overwritten by another developer working on the same page will attest.
Dreamweaver includes a number of features that make it easy for teams to work together. In addition to the existing Check In/Check Out facility, version control and collaborative authoring have been enabled in Dreamweaver through the connectivity to the WebDAV (Web Distributed Authoring and Versioning) standard. Of special note is Dreamweaver's robust support for Subversion, the open source version control system.
Another member of the Adobe software family, Contribute, is tightly integrated with Dreamweaver. Contribute-enabled sites can be administered directly from within Dreamweaver with full access to the latest version of Contribute administrative controls.
In addition to providing links to industry-standard protocols used in team development, Dreamweaver also includes a more accessible Design Notes feature. When custom file columns (which rely on Design Notes to store their information) are set up, a project's status is just a glance away. For more detailed feedback, Dreamweaver's Reports command provides an interactive method for uncovering problems and offers a direct link to fixing them. As with many Dreamweaver features, the Reports mechanism is extensible, which means JavaScript-savvy developers can create their own custom reports to further assist their team. This chapter examines the various Dreamweaver tools — both old and new — for developing Web sites with a team.
Site development can be subdivided in as many different ways as there are site development teams. In one group, all the graphics may be handled by one person or department, whereas layout is handled by another, and JavaScript coding by yet another. Or, one team may be given total responsibility over one section of a Web site — the products section, for example — whereas another team handles the services division. No matter how the responsibilities are shared, the danger of overlap always exists. Two or more team members might unknowingly work on the same page, graphic, or other Web element — and one person's work might replace the other's when the work is transferred to the remote site. Suddenly, the oh-so-efficient division of labor becomes a logistical nightmare.
Dreamweaver's core protection for team Web site development is its Check In/Check Out system. When properly established and adhered to, the Check In/Check Out system stops files from being overwritten improperly. It also lets everyone on the team know who is working on what file, and it provides a direct method of contacting team members, right from within Dreamweaver.
As with any team effort, to get the most out of the Check In/Check Out system everybody must follow the rules:
Rule Number 1: All team members must have Check In/Check Out set up for their Dreamweaver-defined sites.
Rule Number 2: All team members must have Design Notes enabled in their Site Setup (in order to share Design Notes information).
And, arguably the most important rule:
Rule Number 3: All team members must use Dreamweaver to transfer files to and from the remote server.
If the Check In/Check Out system fails and a file is accidentally overwritten, it is invariably because Rule Number 3 was broken: Someone uploaded or downloaded a file to or from the Web server using a tool other than Dreamweaver.
Before I discuss the Check In/Check Out setup procedure, examine how the process actually works with two fictional team members, Eric and Bella:
Eric gets an e-mail with a note to update the content on the About Our Company page with news of a merger that has just occurred.
Bella receives a similar note — except Bella is the graphic artist and needs to change the logo to reflect the new organization.
Eric connects to the remote site, selects the
about.htmfile, and clicks the Check Out button on Dreamweaver's Files panel toolbar. If Eric had clicked Get instead of Check Out, he would have received a read-only file on his system.Dreamweaver asks Eric if he would like to include dependent files in the transfer. Because he doesn't know that Bella needs to work on the site also, he clicks OK. The file on the remote system is downloaded to Eric's machine and a small green checkmark appears next to the name of each file transferred in both the Remote Site and Local Files views, as shown in Figure 31-1.
Bella connects to the remote site in Dreamweaver and sees a red check next to the file she needs to work on,
about.htm. Next to the file is the name of the person who currently has the file, Eric, as well as his e-mail address.Bella selects the link to Eric's e-mail address and drops him a note asking him to let her know when he's done.
Eric finishes adding the content to the page and clicks the Check In button to transfer the files back to the remote server. The checkmarks are removed from both the Remote and Local views and the local version of
about.htmis marked as read-only by Dreamweaver, indicated with a closed padlock symbol. This feature prevents Eric from working on the file without first checking it out.Bella receives Eric's "I'm done!" e-mail and retrieves the file by clicking the Check Out button in the Files panel toolbar. Now, on Bella's machine, the transferred files have a green checkmark and her name, whereas on Eric's screen, the checkmarks are displayed in red.
After she's finished working on the graphics side of the page, ensuring that Eric's new content wraps properly around her new logo, Bella selects the HTML file and then clicks Check In. By opting to transfer the dependent files as well, all her new graphics are properly transferred. Again, the checkmarks are removed, and the local files are set to read-only.
The work is completed without anyone stepping on anyone else's toes — or files.

Warning
Dreamweaver places a small text file with a .lck (lock) extension on both the server and local site for each checked-out document. The .lck file stores the Check Out name of the person transferring the files and, if available, his or her e-mail address. These files must not be deleted from the server because their existence signals to Dreamweaver that a file has been checked out. After the file is checked back in, the .lck file is deleted from the server.
Dreamweaver's Check In/Check Out system is activated through the Site Setup dialog box. The Check In/Check Out settings must be input individually for each site; no global option exists for all sites. Although it's generally best to set it up when the site is initially defined, you can enable Check In/Check Out at any time.
To establish the Check In/Check Out feature, follow these steps:
Choose Site

From the Manage Sites dialog box, select the desired site in the list and choose Edit or click the New button to define a new site.
Select the Remote Info category in the Site Setup dialog box.
From the Access list, choose either FTP or Local/Network.
Choose the Enable File Check In And Check Out option.
If you want to automatically check out a file when opening it from the Files panel, select the Check Out Files When Opening option.
When you select the Check Out Files When Opening option, you can double-click a file in the Files panel or select it and then choose File
Enter the name you displayed under the Checked Out By column in the Check Out Name field. It's a good idea to use a name that not only identifies you but also the system on which you're working. Thus, jlowery-laptop or jlowery-iMac is a better choice than just jlowery.
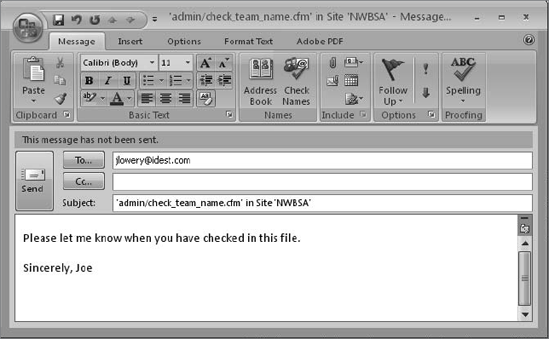
To enable team members to send you a message from within Dreamweaver, enter your full e-mail address in the E-mail Address field.
Entering an e-mail address converts the Checked Out By name to an active link. If you select the link, you prompt the default e-mail program to display a new message form. (The To field contains the supplied e-mail address, and the Subject field contains the site name and filename, as shown in Figure 31-2.)
Make sure that any other information necessary for establishing an FTP or network connection is entered.
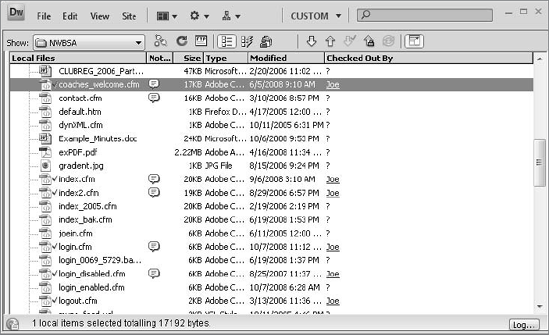
By default, Dreamweaver hides the Checked Out By column for performance reasons. If you want to display the link to the person who has checked out the file in the Files panel, switch to the File View Column category, select the Checked Out By entry, and select the Show option.
Click OK to close the Site Setup dialog box.
From the Manage Sites dialog box, click Done.
Note
The preceding procedure works for both FTP and network-connected remote sites. If you are working within a WebDAV environment, see the "Communicating with WebDAV" section later in this chapter that discusses enabling Check In and Check Out protocols for that environment.
After the Check In/Check Out feature is enabled, additional buttons and commands become available. The Files panel toolbar shows both a Check Out File(s) button and a Check In button, as shown in Figure 31-3, and the Site
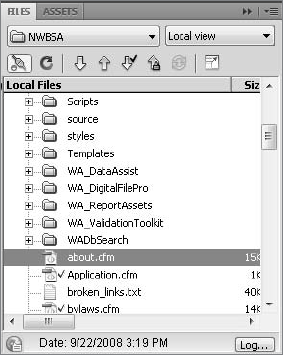
Figure 31-3. The Check In and Check Out buttons do not appear unless Enable Check In/Check Out has been selected in the Site Setup dialog box.
To check out a file or series of files from the Files panel, follow these steps:
Choose Window
If necessary, select the desired site — where Check In/Check Out has been enabled — from the Site drop-down list.
Click the Connect button in the Files panel toolbar. If you've chosen Local/Network as your remote access method, you're connected automatically.
Choose the HTML or other Web documents you want to check out from the Files panel (it doesn't matter whether you're using Local view or Remote view). It's not necessary to select the dependent files; Dreamweaver transfers those for you automatically.
Click Check Out File(s) in the Files panel toolbar or select Site
If the Prompt On Get/Check Out option is selected in Preferences, Dreamweaver asks if you'd like to transfer the dependent files. Click Yes to do so or No to transfer only the selected files. When Dreamweaver has completed the transfer, green checkmarks appear next to each primary file (HTML, ASP, ColdFusion, and so on) in both the Remote Site and Local Files views; dependent files are made read-only locally, designated by a padlock symbol.
I recommend checking out all the files that you need in a work session right at the start. Although you can check out an open document — by choosing Site
Tip
To edit a graphic or other dependent file that has been locked as part of the checkout process, you can unlock the file from the Files panel. Right-click (Control+click) the file in the Files panel and, from the context menu, choose Turn Off Read Only. (The Turn Off Read Only option is called Unlock on the Mac.) One related tip: To quickly select the file for an image, choose the image in the Assets panel; and from the context menu, choose Locate In Site.
After you've completed your work on a particular file, you're ready to check it back in. To check in the current file, follow these steps:
Choose Site
If you haven't saved your file, but you've enabled the Save Files Before Putting option from the Site category in Preferences, your file is automatically saved; otherwise, Dreamweaver asks if you want to store the file before transferring it.
If Prompt On Put/Check In is enabled, Dreamweaver asks if you want to transfer the dependent files as well. If any changes have been made to the dependent files, click Yes.
After the files are transferred, Dreamweaver removes the checkmarks from the files and makes the local files read-only.
Note
Ever start working on a file only to realize you're working on the wrong one? If you make this or any other mistake that makes you wish you could go back to the original version when working with a checked-out file, don't worry. Even if you've saved your changes locally, you can choose Site
When several people are working on a site, they can't just rely on the Web pages to speak for themselves. In any team collaboration, a great deal of organizational information needs to be communicated behind the scenes: who's working on what areas, the status of any given file, when the project is due, what modifications are needed, and so on. Dreamweaver includes a feature called Design Notes that is designed to facilitate team communication in a very flexible manner.
Dreamweaver Design Notes are small files that, in a sense, attach themselves to the Web pages or objects they concern. A Design Note can be attached to any HTML page, graphic, or media file inserted into a page. Design Notes follow their corresponding file whenever that file is moved or renamed using the Dreamweaver Files panel; moreover, a Design Note is deleted if the file to which it is related is deleted. Design Notes have the same base name as the file to which they are attached — including that file's extension — but are designated with an .mno extension. For example, the Design Note for the file index.htm would be called index.htm.mno; Design Notes are stored in the _notes subfolder, which is not displayed in the Dreamweaver Files panel.
Design Notes can be entered and viewed through the Design Notes dialog box, shown in Figure 31-4. This dialog box may optionally be set to appear when a file is opened, thus passing instructions from one team member to another automatically. In addition to the Design Notes dialog box, you can configure File view columns to display Design Note information right in the Files panel; the File view columns feature is covered in the section "Browsing File View Columns" later in this chapter.

Figure 31-4. You can configure a Design Note to pop up whenever a file is opened to alert a fellow team member of work to be done.
Design Notes are enabled by default, but they can be turned off on a site-by-site basis. To disable Design Notes, follow these steps:
Choose Site
In the Manage Sites dialog box, select the site you want to alter and choose Edit.
In the Site Setup dialog box, expand Advanced Settings and then select the Design Notes category (see Figure 31-5).
Deselect the Maintain Design Notes option to completely stop Dreamweaver from creating Design Notes. Dreamweaver alerts you to the consequences of disabling Design Notes. Click OK to continue.
If you want to work with Design Notes locally, but don't want to automatically transfer them to the remote site, leave Maintain Design Notes checked, and uncheck Upload Design Notes For Sharing.
To remove Design Notes that no longer have an associated file — which can happen if a file is deleted or renamed by a program other than Dreamweaver — click the Clean Up button. Dreamweaver gives you an opportunity to confirm the delete operation.
Click Save to close the Site Setup dialog box, and then click Done to close the Manage Sites dialog box.
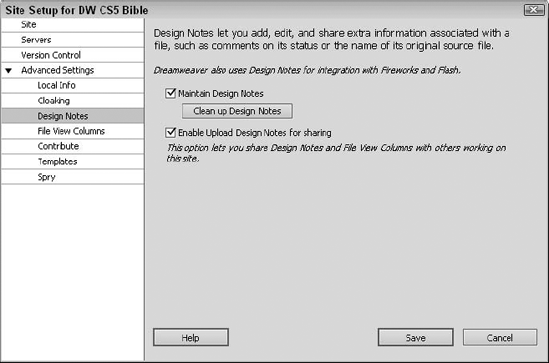
Figure 31-5. Design Notes play an important role in cross-product integration when working with Photoshop, Fireworks, Flash, and Contribute.
Design Notes serve two different purposes. From a team perspective, they're invaluable for tracking a project's progress and passing information among team members. However, Design Notes are also used by Dreamweaver and other Adobe products, including Fireworks, to pass data between programs and program commands. For example, Fireworks uses Design Notes to store the location of a Fireworks source file that is displayed in the Image Property inspector when you select the exported graphic in Dreamweaver.
Keep in mind the dual nature of Design Notes. I strongly recommend — whether you work with a large team or you're a team of one — that you keep Design Notes enabled and fully functioning.
What is the one thing a Web site project manager always wants to know? The status of every page under development: what's still in the planning stages, what has been drafted, what has made it to beta, and what's ready to go live? The manager who has an awareness of each page's status can prioritize appropriately and add additional resources to the development of a page if necessary. Individual team members who are working on a page should also know how far along that page is.
Design Notes put the Status category front and center for all files. It's the one standard field that is always available, and it offers eight different values and one custom value. Entries may be date-stamped in the Notes area to show a history of revisions, as shown in Figure 31-6. Optionally, you can elect to display the Design Note the next time the file is opened by anyone.

To enter the status of a file, follow these steps:
Choose File
On the Basic Info tab of the Design Notes dialog box, choose one of the following standard options from the Status drop-down list: draft, revision1, revision2, revision3, alpha, beta, final, or needs attention.
To add the current date (mm/dd/yyyy, such as 03/07/10) to the Notes field, click the Calendar icon.
Enter any desired text into the Notes field. The same Notes text is displayed regardless of which Status option you choose.
If you'd like the Design Notes dialog box with the current information to appear the next time the page is loaded, select the Show When File Is Opened option. The Show When File Is Opened option is available only for Design Notes attached to pages, not for Design Notes attached to page elements such as images.
Click OK when you're finished.
Aside from monitoring the status of a project, you can use a Design Note to describe any single item. The All Info tab of the Design Notes dialog box enables you to enter any number of name/value pairs, which can be viewed in the Design Note itself or — more effectively — in the File view columns. This mechanism might be used to indicate which graphic artist in your department has primary responsibility for the page, or how many billable hours the page has accrued. You can also use the All Info tab to set a custom value for the Status list on the Basic Info tab.
To enter a new name/value pair, follow these steps:
Choose File
Select the All Info tab. If a Status and/or Notes entry has been made on the Basic Info tab, you'll see these values listed in the Info area.
Click the Add (+) button to enter a new name/value pair.
In the Name field, enter the term you want to use.
In the Value field, enter the information you want associated with the current term.
To edit an entry, select it from the list in the Info area and alter either the Name or Value field.
To delete an entry, select it and click the Remove (–) button.
Click OK when you're finished.
As noted earlier, you can create a custom Status list option in the All Info tab. To do so, just enter status in the Name field of a new name/value pair and enter the desired listing in the Value field. If you switch to the Basic Info tab, you find your new status entry listed as the last item. You can add only one custom status entry; if you add another, it replaces the previous one.
Although Design Notes can hold a lot of information about a Web page or element, the details are kept out of sight. With an eye toward heightening the visibility of Design Notes data — thus making them more useful — the Dreamweaver engineers have tied the columns of the Files panel's File view directly to Design Notes. In the previous section, you saw how the Notes column indicated that a Design Note existed for a particular file; now you learn how to create custom File view columns to display any value stored in a Design Note.
With custom columns in the File view, a quick glance at the Files panel can reveal which files are completed, which are in revision, and which need attention. Moreover, custom columns can be sorted, just as regular columns. You can, for instance, easily group together all the files with the same due date, or those coded by the same programmer. File view columns — even the built-in ones such as Type and Modified — can be realigned, re-ordered, or hidden. Only the Local Files column cannot be altered or moved. With this level of customization possible, virtually the entire File view can be reshaped, like the one in Figure 31-8.
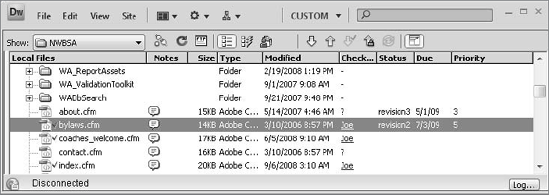
Figure 31-8. File view columns can be substantially reorganized to reflect the concerns of your team on a project-by-project basis.
The six standard columns — Local Files (which shows the filename), Notes, Size, Type, Modified, and Checked Out By — can be supplemented by any number of custom columns. Modification of the column setup is handled in the File View Columns category of the Site Setup dialog box. File views are managed on a per-site basis; when defining the File views, you can determine if the views are to be seen by anyone accessing the development site. Likewise, any custom column can optionally be shared among team members.
To create a custom File view, follow these steps:
Open the File View Columns category with one of these methods:
Select Manage Sites and open the Site Setup for the desired site. Then select the File View Column option from the category list.
Choose View
If you'd like team members to see the custom columns you're developing, select Enable Column Sharing. You also need to choose the Share With All Users Of This Site option for each custom column you want to share.
To add a custom column, click the Add (+) button. A new entry at the end of the list is created.
Enter a unique name for the column in the Column Name field. If you enter an existing name, Dreamweaver warns you and requests a new name before proceeding.
Pick a Design Note field to link to the new column from the Associate With Design Note list. You can choose one of the suggested Design Note fields (assigned, due, priority, or status) or you can enter your own. Design Note fields can be uppercase, lowercase, or mixed-case; multiple words are also allowed.
Select an Alignment option from the list: Left, Center, or Right. Columns that hold numeric or date values should be aligned to the right.
Make sure the Show option is selected.
To share this column with fellow team members, choose the Share With All Users Of This Site option. Selecting this option causes Dreamweaver to create a file called
dwSiteColumnsAll.xmlwithin the _notes folder on the remote site. When another member of your team connects to the site, Dreamweaver reads this file and incorporates it into that person's Site Setup. This enables any other user to see the same column set up on his or her system.Use the up and down arrows to reposition the column.
To add additional columns, repeat Steps 3 through 9.
Click OK when you're finished.
How might a team benefit from custom File view columns? Some of the possibilities for custom columns include the following:
Project Manager
Lead Designer
Lead Programmer
Template Used
Date Created
Date Due
Percentage Complete
Client Contact
Warning
File view columns are sorted alphabetically even if the values are numeric. For example, if you have three files with the numeric values 100%, 50%, and 10%, an ascending sort displays 10%, 100%, 50%. As a workaround, use decimal values (.10, .50, and 1.00) to represent percentages, and the files will be sorted correctly. If your columns require date values, use leading zeros in dates, such as 01/03, to ensure that the columns are properly sorted.
Although having the Design Notes information visible in File view columns is extremely helpful for maintaining an overview of a Web site, Dreamweaver takes the feature a step further. After a custom file column is established, you can handle additions and modifications to the Design Note from the Files panel. Click in the custom column of the file; the existing information, if any, is highlighted and can be altered. If there is no data in the column, the column becomes editable.
Note
Although the Design Note is actually a separate file, you cannot change File view columns for a locked file. One solution is to temporarily turn off the read-only feature and then add the File view info and relock the file if necessary.
To turn off the read-only feature, right-click (Control+click) the file in the Files panel and, from the context menu, choose Turn Off Read Only. (The Turn Off Read Only option is called Unlock on the Mac.)
Although custom File view columns can present a tremendous degree of detail, the data is only viewable from the Files panel. Often, managers and team members need to extract certain bits of information about a site in order to know where they stand and fix problems in an organized, timely fashion. Some Webmasters use third-party utilities to comb their sites and generate lists of errors, which can then be assigned for resolution. These utilities can also be used to establish workflow patterns as they gather information, such as which pages are currently incomplete, or who is currently working on what site elements.
Dreamweaver reports give the Webmaster and team members a new tool for efficiently building Web sites. The information from a Dreamweaver report can be instantly used — double-clicking any report detail opens the referenced file — or stored as an XML file for later output. Dreamweaver includes seven standard reports that may be generated individually or combined into one. As with many Dreamweaver features, the Reports command is extensible, enabling users to build custom reports.
How do Dreamweaver reports work? The user must first choose from a variety of scopes: the current document, selected files in the site, all the files in a particular folder, or the entire site. After the scope has been selected, the report elements — what the report actually covers — are selected. The report is then run, and Dreamweaver outputs the results into a floating panel, as shown in Figure 31-9. Each entry in the Results panel is capable of opening the listed file; in the case of reports querying the underlying HTML, the entries lead directly to the referenced code.
Generated reports can also be saved for later use. The reports are saved in an XML file format that can be imported into a Web page, database, or spreadsheet program. Although this information can be extracted by hand, the structured format of the XML file makes it a perfect candidate for an automated process handled by an extension or other utility.
Two different types of Dreamweaver reports are available: those concerned with the code in the pages themselves and those accessing workflow details (see Figure 31-10).
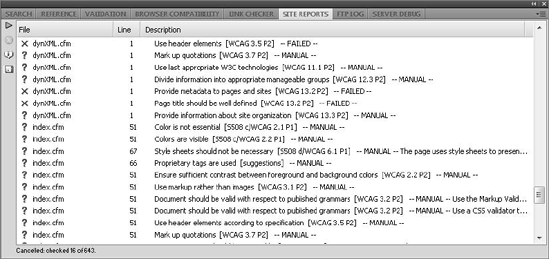
Figure 31-9. Dreamweaver reports return interactive results — just double-click any listed entry to open the related file.

To access a Dreamweaver report, follow these steps:
Choose Site
Select which reports you'd like to include from either the Workflow or HTML Reports categories.
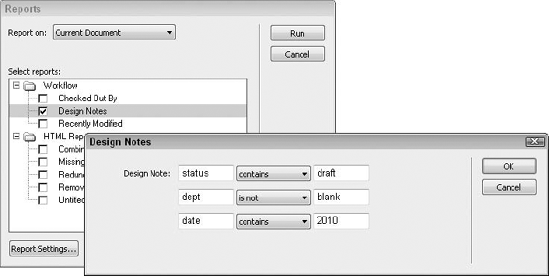
If you choose an option from the Workflow category, the Report Settings button activates. Click it to define the report search for Workflow reports like Design Notes, as shown in Figure 31-11.
Dreamweaver remembers the Report On setting each time you run this command. The Report Settings options are covered in detail later, in the section "Using Workflow reports."
Click the Run button. The Site Reports panel appears if it isn't already active. As the report is processed, results are listed in the upper window.
From the Site Reports panel, you can click the Stop icon to halt the report.
To open any referenced file, double-click the entry or right-click (Control+click) the entry and select Open File from the context menu.
To store the report as an XML file, select Save Report and enter a file and path in the Save File dialog box.
Entries in the Site Reports panel are initially sorted by filename in an ascending order; however, selecting any column heading (File, Line, or Description) re-sorts the list accordingly. If many result listings are returned, the Site Reports panel can be resized to display more of them.
Dreamweaver includes six options under the HTML Reports category:
Combinable Nested Font Tags: Looks for code in which the font tag has been applied to the same text at different times, as shown in the following example:
<font color="#000000"><font size=+1>Monday, December 15th @7pm
 </font></font>
Missing Alt Text: Searches for
<img>tags in which the alt attribute is empty or missing entirely. To comply with accessibility guidelines established by the W3C, all images should have alt attributes that describe the graphic.Redundant Nested Tags: Identifies tags nested within themselves, as shown in the following example:
<b><b>On Sale!</b></b>
Removable Empty Tags: Finds non-empty tags (that is, tags with both an opening and closing element) with no content, as in this code:
<div align="center"> </div>
Untitled Documents: Looks for pages that have no title or use the default Untitled Document text.
You can run any or all the HTML reports at once — just select the desired report(s) from the Reports dialog box. The Site Reports panel lists the name of the file, the line number where the search condition was found, and an error message for each entry. Selecting a file displays the error message with additional detail, if available, in the Detailed Description area. Select Open File from the context menu or double-click an entry to load the file if it's available. If the file is currently locked, Dreamweaver asks if you'd like to view the read-only file or unlock it. All HTML report files are displayed in the split-screen Code and Design view.
Workflow reports, unlike HTML reports, don't examine the code of Web pages. They look at the metadata — the information about the information — of a site. Three standard reports are available under the Workflow heading:
Checked Out By: Displays any file checked out by a particular person as designated in the Report Settings dialog box. If nothing is entered in the Report Settings dialog box, a list of all files in the selected scope that have been checked out by anyone is returned.
Note
To run this report, you must be able to connect to your remote site.
Recently Modified: Returns a list of pages modified in a user-definable period along with their modification date; you can, optionally, search for pages modified by a specific user, if the site is being administered by Contribute.
In addition to the Results panel listing, this report also automatically opens a print-ready version in your primary browser with links to each page listed. The pages can either be viewed locally — best for static pages — or through the testing server, which is necessary for dynamic pages.
Design Notes: Examines the designated files according to search criteria set up in the Report Settings dialog box, as shown in Figure 31-12. Searches can be conducted on a maximum of three criteria. If no criterion is entered, a list of all files with Design Notes in the selected scope is returned.

Figure 31-12. Get a complete printable report on files changed in a given time frame by running the Recently Modified report.
The Report Settings dialog box for the Design Notes reports is relatively flexible because it enables and-type searches. To use the Design Notes Report Settings dialog box, follow these steps:
In the Reports dialog box, select the Design Notes option under the Workflow category. The Report Settings button is made available.
Click Report Settings. The Report Settings dialog box opens; the previous Design Notes Settings are restored.
In the Report Settings dialog box, enter the name of the Design Notes field in the first column. The name of the Design Notes field is case-sensitive, so entering Status in the Report Settings dialog box will not match status in the Design Note.
Choose a criteria type from the middle column drop-down list. The options are as follows: contains, does not contain, is, is not, and matches regex.
In the third column, enter the value of the Design Notes field being sought. As with the Design Notes field, the value search is case-sensitive.
To add a second or third condition to the query, repeat Steps 3 through 5 in the second and third line of the Report Settings dialog box. Additional conditionals are applied in an and-type search. For example, a setting where the first line reads:
status is revision3
and the second line reads:
done is 1.00
returns all Design Notes for which both conditions are true. Currently, there is no way to perform an or-type search.
Click OK when you're finished.
Click Run to execute the search.
Of all the criteria options — is, is not, contains, and so on — available in the Report Settings dialog box for Design Notes, the most powerful is matches regex. Regular Expressions are pattern-matching mechanisms and, as such, are extremely flexible. The syntax, however, is unique and requires a bit of use before it becomes second nature. Here are some examples you might find useful:
Regular Expression | Matches |
|---|---|
| Any text |
| An empty string |
| Any single number |
| Any digit from 0 to 5 |
| Either the word "graphics" or the word "code" |
One of a Web designer's greatest challenges is the ongoing maintenance of a site. In many situations, Web sites thrive on current information and, without continual updates, lose their effectiveness. Site maintenance is a prickly thorn bush for all involved: Web developers find it time-consuming and a distraction from their primary business, design. Web site owners want editorial control and immediate access — without the technical administrative headaches.
Adobe Contribute was introduced to solve the thorny problem of Web site upkeep. Contribute makes it easy for non-technical users to modify and add content to their Web sites; if your users are familiar with a word processor and a browser, they'll be able to master Contribute with little effort. After a content contributor has an established connection to a site — a process Contribute greatly simplifies — all he does is browse to a page, make his edits, and publish it back to the Web. The Contribute interface, shown in Figure 31-13, is designed with the non-technical user in mind.
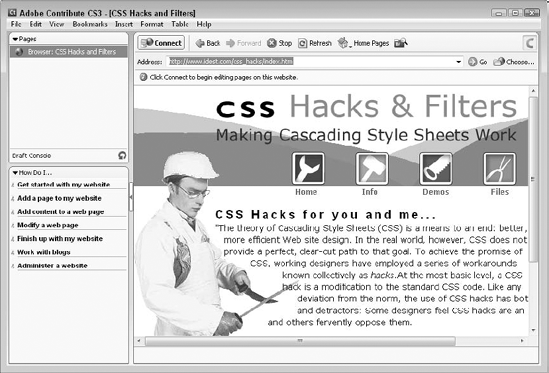
Figure 31-13. Contribute packs a lot of power in a simplified interface, allowing the non–technically savvy to modify Web pages with ease.
If you're a designer working with content contributors using Contribute, you can easily set up your site to be compatible. Contribute compatibility relies on key team-oriented features discussed elsewhere in this chapter: Check In/Check Out and Design Notes.
The key to Contribute is controlled access. Although the program makes it easy for anyone to modify pages on the Web, it also restricts what changes can be made. Some of the restrictions are inherent in the type of pages that make up the site — Dreamweaver templates, for example, are ideally suited for allowing only designated sections of a document to be edited. However, many basic limitations, such as which pages can be edited, are established by the Contribute administrator. Although Contribute sites can be administered from within Contribute itself, its tight integration with Dreamweaver provides another path: The same administrative options are available within Dreamweaver.
Note
To administer Contribute from within Dreamweaver, Contribute 2.0 or better must be installed on the same machine as Dreamweaver; greater functionality comes from working with Contribute 3.1 or higher.
Like other sitewide settings, Contribute compatibility is managed through the Site Setup dialog box. As noted earlier, Contribute utilizes several optional Dreamweaver features — Design Notes and Check In/Check Out — controlled through the same interface. For your convenience, if you opt to establish Contribute administration, Dreamweaver enables all the necessary options with one click, if you have not previously done so.
Note
To make Contribute compatibility available, the site must be configured with the proper form of remote access, such as FTP or SFTP. Neither WebDAV nor SourceSafe is compatible with Contribute. RDS-based sites require custom settings for Contribute compatibility.
To set up Contribute compatibility for your current site, follow these steps:
Choose Site
With the current site selected in the Manage Sites dialog, click Edit. The Site Setup dialog appears.
From the Advanced view of the Site Setup dialog, select the Contribute category.
Select the Enable Contribute Compatibility option.
If you have not previously enabled Design Notes (for both local and remote use) and Check In/Check Out, Dreamweaver displays a dialog informing you of their necessity and offers to automatically enable these settings; click OK to continue.
If Check In/Check Out was not previously set up, the Contribute Site Settings dialog box is displayed. Enter a checkout name and e-mail address in the appropriate fields, and click OK. Dreamweaver displays the Site Root URL for the current site, as shown in Figure 31-14, gathered from the information entered in the Remote Site category.
To verify the Site Root URL, click Test.
Click OK when you're finished to close the Site Setup dialog box.
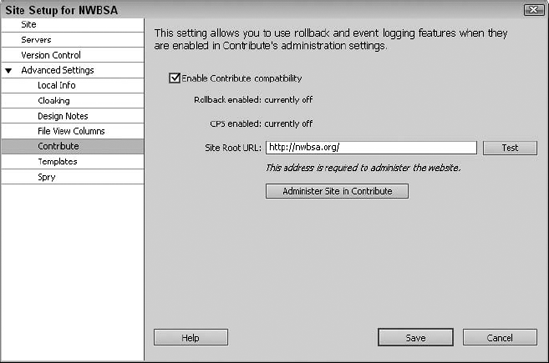
The Contribute category in Preferences updates to reflect the newly set-up Contribute administration. In addition to the URL to the site, you'll also see indicators concerning the status of rollback (the ability to reinstate previous versions) and CPS (Contribute Publishing Services).
Each Contribute site has a single administrator. The administrator is responsible for controlling overall access to the site as well as establishing editing parameters. Among other options, the administrator can allow pages edited by Contribute users to be rolled back to previous versions. When you enable Contribute compatibility, you're establishing yourself as the site administrator.
Note
Before you can set up yourself as an administrator, Contribute compatibility must be enabled as described in the previous section, and you must have a network connection.
To begin modifying Contribute settings, click Administer Site In Contribute in the Contribute category of the Site Setup dialog box. The primary administrative interface, shown in Figure 31-15, opens after a connection is established.
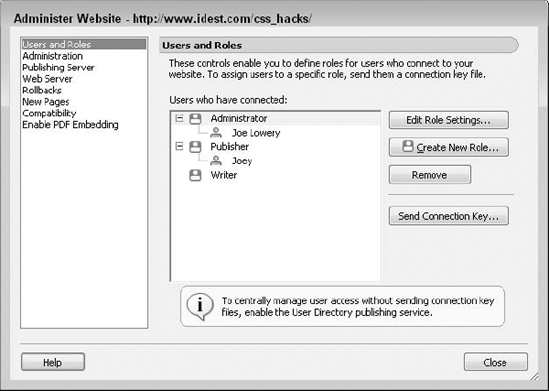
Figure 31-15. The Administer Website dialog available through Dreamweaver is the same as the one found in Contribute.
To modify the settings that control administration, follow these steps:
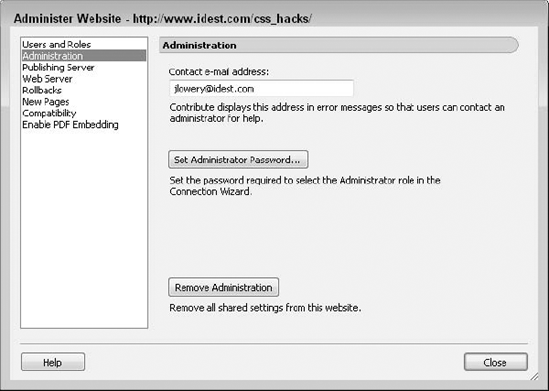
From the Administer Website dialog box, select Administration. The Administration dialog box is displayed, as shown in Figure 31-16.
To change the administrator's e-mail address, enter a valid e-mail address in the Contact E-mail Address field.
Tip
For administrative duties, it's a good idea to use a special e-mail address that is different from your checkout address, such as [email protected]. Use your e-mail client to sort the incoming administrative queries into a special folder.
To alter the current administrator password, click Set Administrator Password and enter the old password and new password where indicated in the Set Administrator Password dialog box; click OK to return to the Sitewide Settings dialog box.
To stop administering the Contribute site, click Remove Administration and click Yes when asked to confirm your choice.
After you've chosen all the necessary sitewide options, click OK to close the Sitewide Settings dialog box and return to the Administer Website dialog.
The proper use of roles is a key aspect of administering a Contribute site. A Contribute role is a collection of users with common tasks and restrictions; for example, those in the public relations department responsible for posting press releases — and nothing else — to the Web might be in one role, whereas the members of the human resources department might be in another. Each role can have a specific area of the Web site in which it can edit pages; furthermore, different options for editing and creating, such as working with specific templates, may be available for each role. All these options, as well as the basic creation and removal of roles are handled by the Contribute administrator from the Edit Role Settings section of the Administer Website dialog box.
Two roles are created by default when Contribute administration is declared: administrator and users. The primary difference between these two roles, initially, is that administrators can delete the files they are able to edit whereas users cannot. However, these preliminary settings are only starting points and can easily be altered by the administrator.
Basic role management — creating, removing, duplicating, and editing — is handled directly in the Edit Role Settings section of the Administer Website dialog box, as shown previously in Figure 31-15. The following list explains how to do these tasks:
To define a role, click Create New Role; when the New Role dialog opens, select the role you want to copy and enter a name in the provided field.
To remove an existing role, select the role to be deleted and click Remove. You'll be asked to confirm the removal.
To modify the settings of any role, select the role from the list and click Edit Role Settings. Another dialog box with several categories, discussed in the following section, is displayed.
If your Contribute site does not have CPS enabled, you can assign users to specific roles by creating a Connection Key; CPS-enabled sites manage users independently. Both approaches are described later in this chapter.
Any changes made concerning role management are written to the server after the Administer Website dialog is dismissed by clicking OK.
As administrator, you have extensive control over what each defined role can do in Contribute. If you want, you can define members of particular roles to modify the text only in specific areas of existing pages. You may grant other roles a broader responsibility to create new pages based on specific templates, and you can give them full rein on those pages. All the settings are applied by selecting the role and clicking Edit Role Settings in the Administer Website dialog box.
Eight categories are available when setting role options:
General: Sets the role description and home page.
Folder/File Access: Determines which folders (and all the files and what they contain) are available for editing. It also determines if the role may delete files.
Editing: Governs user actions on non-template pages and various editing options including paragraph spacing and accessibility options.
Styles and Fonts: Controls whether users are allowed to apply HTML or CSS styles or both.
New Pages: Sets the type of new pages, if any, that the user can create.
File Placement: Determines where dependent files are stored on the site.
Shared Assets: Defines images, Flash movies, or Dreamweaver Library items to be available by all users within a particular role.
New Images: Limits the size of the uploadable images.
Contribute stores these settings on the site's remote server in a hidden folder called _mm.
The opening category of the Edit Role Settings dialog box offers three basic options: the capability to publish files, the Role Description, and the Role Home Page. Users are either able to publish their Contribute-modified page directly to the site or not; if the Allow Users To Publish Files option is disabled, the user must submit the page for review to another user, typically one in a managerial capacity. The reviewer has the option of sending it back to the user with comments, publishing it, or submitting it to another user for review.
Users see the Role Description when they initially connect. In general, it is used to explain who fits in the role and what restrictions are applied; this information is entered directly into the Role Description field, as shown in Figure 31-17.
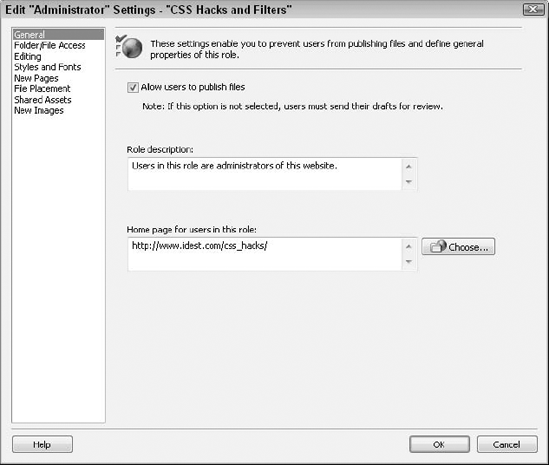
Figure 31-17. For most roles, the right to publish files directly — set in the General category of the Edit Role Settings dialog — is a key defining element.
The third option, Home Page For Users In This Role, sets the starting point for the current role. Enter the absolute URL for the desired folder in the field or click Choose to locate the folder in the site.
Tip
It's a good idea to be as specific as possible when setting the home page for a given role because it makes it easier for members of the role to navigate more quickly to their pages. Note, however, that without setting further restrictions in the Folder/File Access category, the users can still edit pages on other parts of the site.
The Folder/File Access category (see Figure 31-18) is used to limit the current role's editing to the files in specific folders as well as their options for deleting files. Initially, users are allowed to modify files in any folder within the site. Whenever possible, it's advisable to limit roles to folders specific to their needs; this reduces user error and keeps users targeted to their tasks.
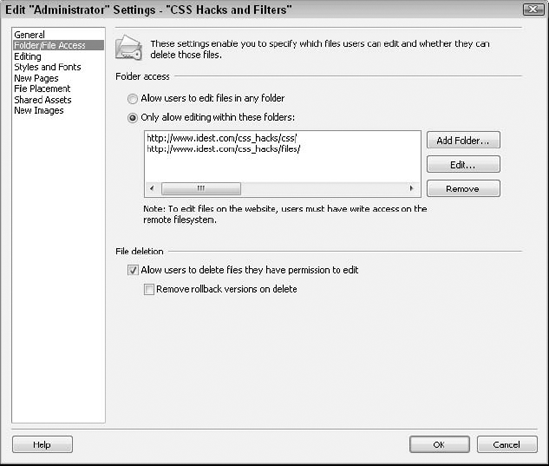
To specify one or more folders for a role, follow these steps:
After a folder has been added, you can modify your choice by selecting the folder and clicking Edit to select a different folder or Remove to keep the files in the folder from being edited.
Users may also be given the power to delete the files they can edit. In the File Deletion area of the Folder/File Access category, choose the Allow Users To Delete Files They Have Permission To Edit option. After this option is enabled, you may also decide to allow such a deletion to remove the files stored as rollback versions.
The Editing category of the Edit Role Settings dialog governs much of the hands-on experience of the Contribute user. Here, the administrator sets the overall access granted for modifying pages as well as for enabling special options that make the process more familiar to non-technical users. The three main areas in this category are General Editing Restrictions, Paragraph Spacing, and Other Editing Options, as shown in Figure 31-19.
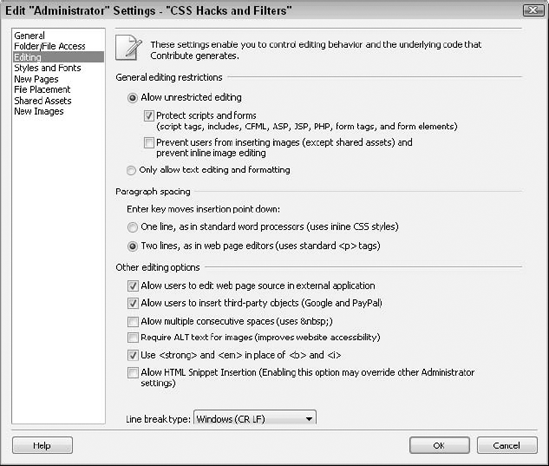
Figure 31-19. Enhance the Contribute experience by enabling Word-like options from the Editing category.
The General Editing Restrictions area of the Editing category applies to pages not constructed from Dreamweaver templates. Here, two key options exist: you can either allow unrestricted modifications to the pages or limit the user to just editing and formatting text. If you choose the Allow Unrestricted Editing option — which also allows users to add images and Flash movies among other elements — it is highly recommended that the Protect Scripts And Forms option remain enabled. If this option is deselected, server-side code as well as forms can be deleted or changed. User-supplied images, as well as image editing, can also be put off-limits.
The two paragraph spacing options control what happens when a Contribute user presses the Enter (Return) key. If you choose the One Line option, a single line separates headings and paragraphs, like this:
BigCo, Inc. Wins Major Award
BigCo, Inc. is proud to announce the receipt of the prestigious Giant Company award. The Giant Company award is presented semi-annually to companies that have obtained a particular size without collapsing under their own weight.
The single-line format probably feels more familiar to Contribute users who come from a word-processing background; to create more space between paragraphs, users just press Enter (Return) again. However, to accomplish this look, inline CSS styles are used, resulting in code that can be harder to maintain.
Selecting the Two Lines option results in content looking like this:
BigCo, Inc. Wins Major Award
BigCo, Inc. is proud to announce the receipt of the prestigious Giant Company award. The Giant Company award is presented semi-annually to companies that have obtained a particular size without collapsing under their own weight.
Code entered when the Two Lines option is selected uses standard heading and paragraph tags. Which option you choose depends on the design constraints of your site and the sophistication of its users.
Seven miscellaneous options are found under the Other Editing Options areas:
Allow Users To Edit Web Page Source In External Application: If enabled, this option allows users to open the current Contribute page in Dreamweaver or another editor. Although this is an extremely beneficial option for administrators, it is equally dangerous for most other roles; administrators should enable this setting with extreme caution.
Allow Users To Insert Third-Party Objects: Contribute includes a number of special functions that insert a Google search form and a PayPal button; when checked, this option allows users to add the code.
Allow Multiple Consecutive Spaces: Typically, browsers ignore more than one space in a row; select this option to allow users to add non-breaking spaces (
) by pressing the spacebar.Require ALT Text For Images: When this option is checked, users must add alternative text for every inserted image. Moreover, Contribute warns users that when Flash content is added, users with disabilities may not be able to access it.
Use
<strong>And<em>In Place Of<b>And<i>: This option ensures that<strong>and<em>tags are used instead of the deprecated<b>and<i>tags when users elect to bold or italicize their text. Almost all browsers render the text as expected with the<strong>and<em>tags.Allow HTML Snippet Insertion: If checked, an Insert
Line Break Type: Choose an option from this list to set the characters used to end lines in the Contribute code. The choices — Windows (CR LF), Macintosh (CR), and Unix (LF) — refer to the Web site host machine and not the Contribute users system.
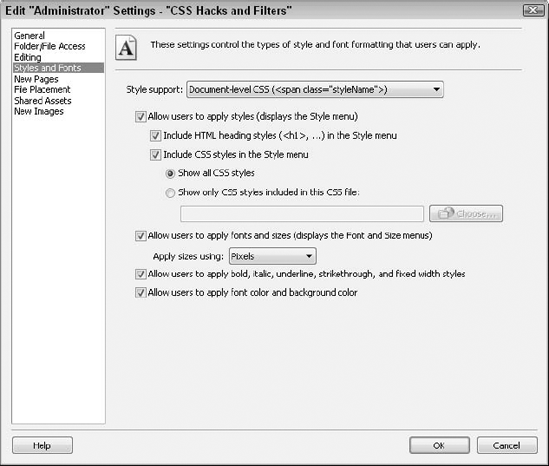
Much of the specific look of a page — and the underlying code that generates that look — is controlled by the Styles and Fonts category of the Edit Role Settings dialog (see Figure 31-20). Overall, the administrator can allow or disallow the application of new styles and/or new fonts and text sizes to text. If these options are disabled, the user can only work with styles in existing paragraphs. If the options are enabled, the administrator has the further choice of preferring CSS over HTML.
Keep the Allow Users To Apply Styles option enabled if you want Contribute to display the Style drop-down list when editing pages; if this option is disabled, new paragraphs inherit the style of the previous paragraph. Choose the Include HTML Heading Styles In The Style Menu to display Heading 1 through Heading 6 and Paragraph styles in the drop-down list. If the Include CSS Styles In The Style Menu option is checked, Contribute automatically lists all the available styles. Which styles are available is determined by two further options: Show All CSS Styles and Show Only Styles Included In This CSS File. If the latter option is selected, the administrator should select a relevant CSS file that includes CSS classes to be made available to the Contribute user.
Tip
You don't have to actually use a fully defined CSS file to filter your CSS classes for Contribute users; all you need is the class selector names and opening and closing curly braces, like this: .firstparagraph, .memberContent, .copyrightInfo, .legalNotice {}.
If your pages do not use CSS — or you want to offer your users more control over their pages — enable the Allow Users To Apply Fonts And Sizes option; when this option is disabled, neither the Font nor Size drop-down lists are shown in Contribute. If you've allowed the option, choose between using HTML Tags or Inline CSS Styles by selecting the appropriate radio button. When you select Inline CSS Styles, an additional option is enabled that determines how sizes are set: by points, pixels, or ems. Administrators can also restrict the use of applied styles such as bold, italic, underline, strikethrough, and fixed-width styles and/or font and background color.
Although many Contribute users begin by modifying the content on existing pages, some, if not all, eventually create new pages within the site. The New Pages category of the Permissions Role dialog box, shown in Figure 31-21, offers a full range of options for this important task. As administrator, you can limit users to creating new files based on specific Dreamweaver templates or enable them to start from scratch; alternatively, you can completely disable the option and restrict their access to existing pages.
This category has five primary options, which can be enabled or disabled in any combination:
Create A Blank Page: Allows users to start with a totally empty page, just as in Dreamweaver.
Note
Contribute doesn't have all the editing power that Dreamweaver includes, and allowing users to start with a blank page causes more problems than it solves. I generally recommend that this option not be checked.
Use Built-In Starter Pages: Contribute includes a nice range of simple style pages, including calendars and photo-album layouts; selecting this option allows users to create pages based on the sample layouts.
Create A New Page By Copying Any Page On The Website: Many users adhere to the adage that imitation is the sincerest form of flattery — and it's also an easy way to create a new page. Select this option when you want to make it possible for users to base their pages on any existing page found on the site.
Create A New Page By Copying A Page From This List: This option is a refinement of the previous one. Rather than allowing users to use a copy of any page from the site as a starting point, if you enable this option you specify which pages may be copied. After the option is enabled, the Add and Remove buttons become active, so you can choose files to copy and remove those choices later.
Use Dreamweaver Templates: Dreamweaver templates are ideal for working with Contribute because they maintain the overall look and feel of a page while focusing contributors on working within editable areas. If you enable this option, you can choose between allowing members of a given role to copy any template or just specific ones in the site. Templates can be hidden from a role and later revealed or vice versa.
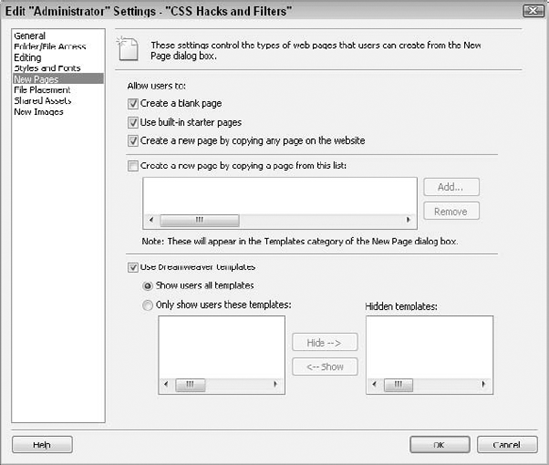
Figure 31-21. How — and if — Contribute users can create new pages for the site is set in the New Pages category.
Initially, I find it helpful to limit the options for creating new pages, such as copying specific standard pages, working with certain templates, or both. Keep in mind that, if necessary, role options can be altered at any time.
The File Placement category allows the administrator to specify where dependent files, added by Contribute users, are stored in the site. This category is tremendously useful for organizing file clutter by standardized rules. Initially, three document types are predefined, as shown in Figure 31-22; the administrator can modify these settings and declare any others necessary.
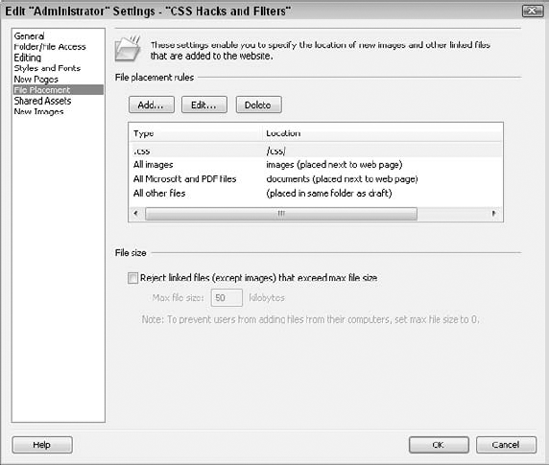
Figure 31-22. Organize your Contribute-dependent files automatically by defining rules in the File Placement category.
Dependent files, such as images, Word files, PDFs, and CSS external files, can be placed in three locations, chosen by clicking Edit:
Same Folder As Draft: Places files in the same folder as the current page.
Folder Next To Each Draft: Stores files in a subfolder within the same folder as the current page. Administrators define the name of the subfolder and it will be created automatically on first use.
Specific Folder On Your Website: Puts files of a given type in a single specified folder; administrators can browse for the file to identify its path. If this option is selected, an option to write site-root relative links is provided.
Although it takes a degree of upfront planning, it is highly recommended that you attempt to set rules for all the various types of dependent files on your site as early as possible. Although rules such as this take effect immediately when defined, they're not retrospective and you could save yourself a great deal of cleanup with thoughtful application of the File Placement category.
One of the challenges of managing a Contribute-powered site is maintaining design control. At a certain level, if you give users the opportunity to insert any type of image or Flash movie, they will respond with often undesirable choices. The Shared Assets feature of Contribute makes it possible to specify images, Flash movies, or Library items (see Figure 31-23).

Figure 31-23. Help shape your user's choices by declaring images, Flash movies, and Library items as Shared Assets.
The ability to include Library items is particularly powerful. This option makes it possible to define blocks of content that can be quickly and easily integrated into a Web page. Not only can one or more paragraphs of text be defined but also fully designed tables, mixtures of graphics and text, or any other page elements. You can integrate Dreamweaver behaviors in your Library items, and Contribute will automatically include the necessary JavaScript code when the shared Library item is inserted into the page.
With the ease of digital photography, inserting images on the Web becomes a double-edged sword. On one hand, it's now incredibly easy to add graphics to a page — however, unless optimized for the Web, digital images can slow page loading to a crawl. In the New Images category of the Edit Role Settings dialog (see Figure 31-24), the dimensions of images — and even the JPEG quality — are restricted. You can even reject images over a certain file size.
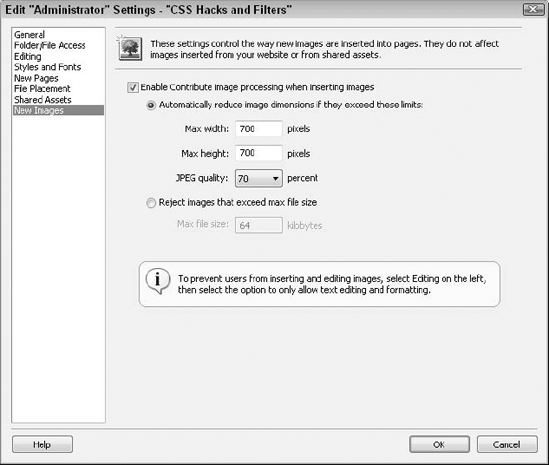
Figure 31-24. Before you grant your Contribute users the capability to upload images of any size, think about the impact such a decision has on page-load size.
The default is to allow users to alter images using Contribute's image-editing tools (crop, rescale, flip, and lighten/darken) and to restrict those images to a particular set of dimensions. Administrators can optionally choose to set an upper limit on file size.
Tip
Although no hard and fast rules exist about what limit, if any, to set, use your own guidelines as a starting point. If you typically design sites where images are 50KB or smaller, you might consider entering 50 into the kilobyte field. However, if you keep in mind that Contribute users are probably not as adept as designers at optimizing images, you might want to relax this restriction a bit and set a value between 60 and 80KB.
For a site of any size, managing the Contribute users can be as challenging as establishing the roles. Contribute gives you two paths to follow for user management: Connection Keys or CPS. Connection Keys are ideal for Contribute sites with a limited number of users, whereas the user management options provided by CPS are suitable for medium to large organizations.
One of the most successful innovations introduced with Contribute is the concept of the Connection Key. A Connection Key is an encrypted file that contains all the information users need to publish to a given Web site — including complex and potentially dangerous info such as FTP addresses and passwords — geared to a specific role. Because the file is encrypted, it can be safely transmitted or posted in a network location. All the user does upon receipt is to open the file and supply the administrator-chosen password, and Contribute does the rest. You can even send the Connection Key right from Dreamweaver via e-mail.
To create a Connection Key, follow these steps:
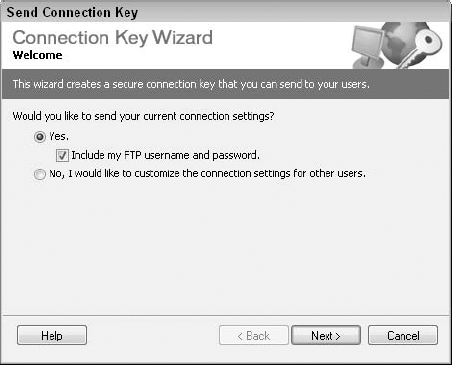
From the Administer Website dialog box, choose Send Connection Key. The first screen of the Connection Key Wizard appears, as shown in Figure 31-25.
Choose whether you want the user to receive the current connection settings or a customized set:
If you want to send your connection settings, select Yes; if the remote site is connected through FTP, select the Include My FTP Username And Password option unless the user has his own FTP username and password.
To specify a different connection, choose No.
When you're finished, click Next.
If you opted to set up custom settings, the next screen of the Connection Key Wizard enables you to choose the type of connection (FTP, Secure FTP, or Local/Network) and to provide the relevant information (such as FTP server name and login). Click Next when you're finished.
From the Role Information screen of the Connection Key Wizard, select the role the Connection Key is intended for. All the currently established roles are listed. Click Next when you're ready.
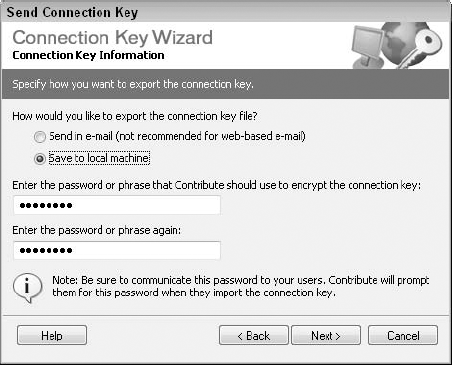
On the Connection Key Information screen (see Figure 31-26), first decide what you want to do with the Connection Key when it is created: send by e-mail or store on the local machine.
Tip
Even though the Connection Key is encrypted, many organizations are not comfortable with sending sensitive information over the Web. As an alternative, consider storing the Connection Key in a password-protected area of the network and send the user the details for retrieving the file.
Enter the password needed to unlock the Connection Key in both fields of the current screen. The password can be either a single combination of words and letters or a phrase. Whichever you use, you must communicate this to the user in some way. When you've entered the password or phrase twice, click Next.
After verifying your choices on the Summary screen of the Connection Key Wizard, click Done. To change any settings, click Back.
If you've elected to send the Connection Key through e-mail, an e-mail message opens with the Connection Key attached, and a preliminary subject and message are supplied. Supply the e-mail address, customize the message as you see fit, and send.
To apply the Connection Key, your users need only have Contribute installed on their systems and online access to their sites. When they open the Connection Key file, Contribute launches, if necessary, and displays the dialogs to get them started.
Much of the power of the Contribute Publishing Services application comes from its capability to manage users centrally. Rather than working with a disparate set of Connection Keys, user access and role assignment are handled through a single interface. Users can be entered singly or automatically through CPS's integration with existing user directory services such as Lightweight Directory Access Protocol (LDAP) or Microsoft's Active Directory. Once a user is available to the system, he or she can be assigned to any defined role and reassigned or removed as needed.
To add a new user using CPS's manual entry option, follow these steps:
Open the CPS Administrator in your browser by visiting
https://servername:8900/contribute/admin/server.cfmwhere servername is the network name of your server.Enter your password in the provided field and click Log In.
From the main Contribute Publishing Services screen, choose User Directory.
Make sure that the Directory Type list is set to File-based.
Click Add to view the Add User dialog box, as shown in Figure 31-27.
Enter the user's name, e-mail address, username, and password in the provided fields and click OK when you're done.
All entries are listed in the User area and can easily be edited or removed. The next time you open the Administer Site dialog box of the CPS-enabled site, you'll see the users available for assignment.

If you've enabled Contribute compatibility in Dreamweaver and the administrator has enabled rollbacks, you can revert to a previous version of a modified page. This feature can be a life-saver, especially when you're dealing with less accomplished Contribute users who may just be finding their way. The rollback feature even enables you to see a preview of the page to make sure that you're bringing back the correct version.
Warning
Whether rollbacks are allowed — and how many previous versions to make available — is a significant decision. Enabling this option means that all users can store previous versions of all their edited pages and that all users can roll back any page they can access, whether they or someone else made the edits. You also must make sure that adequate server space is available to store the number of files maintained by the rollback option.
Before you can roll back a page in Dreamweaver, however, the capability to do so must be enabled through Contribute administration, as described in the following steps:
From the Contribute category in the Site Setup dialog, select Administer Site.
Dreamweaver indicates that rollbacks are not enabled.
Enter the administrator's password in the provided dialog box.
When the Administer Website dialog box appears, select the Rollbacks category.
Click the checkbox so that the Enable Rollbacks option is selected.
Specify the number of versions to be kept by entering a number in the pop-up list; by default, Contribute maintains the previous three versions of every page in a folder on the server called _baks — you can opt to store up to 99 versions.
Click Close to verify the changes to the Administer Website dialog.
Dreamweaver now shows that rollbacks are enabled.
Click OK to dismiss the Site Setup dialog.
To roll back a page in Dreamweaver, follow these steps:
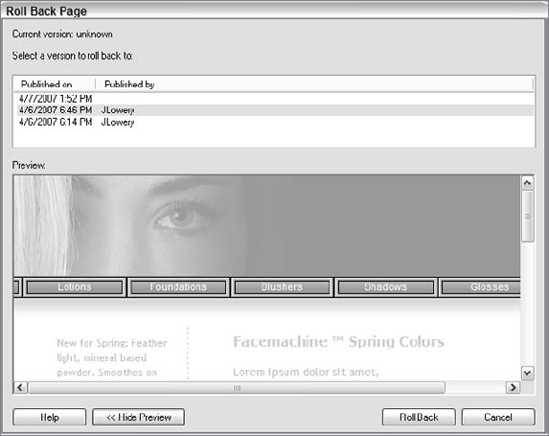
In the Files panel, right-click (Control+click) the page you want to revert and choose Roll Back Page from the contextual menu. The Roll Back Page dialog is displayed, listing each of the previous versions and when they were published and by whom.
To view a page version, select it from the list and choose Show Preview. The Roll Back Page dialog box expands to display a preview, as shown in Figure 31-28. While the preview is open, you can choose another version from the list to view.
When you've found the version you want to use, click Roll Back. Dreamweaver switches the current version of the page with the selected version on the server, and the Roll Back Page dialog closes.
What happens to the page replaced during a rollback operation? It also becomes a rollback version and, if necessary, can be brought back through the same process.
Web Distributed Authoring and Versioning (WebDAV) is an Internet protocol that enables Web developers to collaborate over the Web itself. WebDAV enables developers to log in over the Web to work on a common set of files. Normally, the HTTP protocol, the basis for most Internet communication, permits files only to be read. With the WebDAV set of extensions installed, you can also write files to the server. More importantly, you can lock files to prevent multiple, simultaneous edits; in other words, files may be checked out for modification and checked in when the update is complete.
Dreamweaver supports the WebDAV protocol, enabling developers and designers around the world to work together on a single site. The WebDAV setup is, like VSS, handled through the Remote Info category of the Site Setup dialog box. After it is established, the Dreamweaver/WebDAV connection is transparent, and the Check In/Check Out features work as they do on a standard FTP or network connection.
Dreamweaver's implementation of WebDAV connectivity is geared toward Microsoft IIS and Apache servers. Both have been fully tested and are supported. WebDAV implementations on other servers may interact erratically, or not at all, with Dreamweaver. For more in-depth information on WebDAV, including a list of publicly available servers, visit www.webdav.org.
To establish a WebDAV connection, follow these steps:
Choose Site
From the Manage Sites dialog box, choose the site to be connected to the WebDAV server from the list and click Edit.
Select the Remote Info category.
From the Access drop-down list, choose WebDAV.
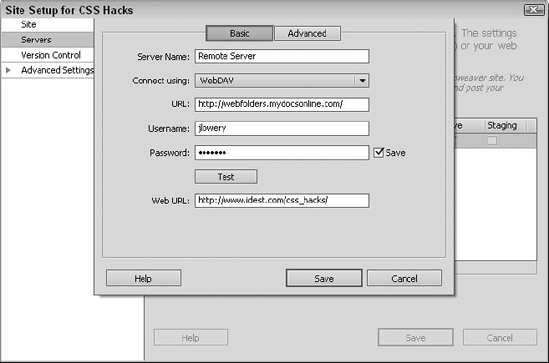
All the connection information is entered through the displayed settings, shown in Figure 31-29.
Enter the absolute URL to the WebDAV server in the URL field.
Enter your WebDAV login name in the Login field.
Enter your WebDAV password in the Password field.
Enter your Check out name and then put your e-mail address in the Email address field. The username and e-mail address are displayed for checked-out files.
To circumvent automatic logon to the WebDAV database when connecting in Dreamweaver — and cause Dreamweaver to prompt you for a password every time — deselect the Save option.
If you want to automatically check out a file when opening it from the Files panel, select the Check Out Files When Opening option. When this option is enabled, double-clicking a file in the Local Files view (or selecting it and then choosing File
Click OK to close the Site Setup dialog box.
Click Done to close the Manage Sites dialog box.
To use the WebDAV server, click the Connect button on the Files panel toolbar or choose Site
Subversion, often abbreviated SVN, is an extremely popular open source version-control system. The goal of Subversion is to allow multiple developers to work on the same site or source code. Subversion is available on Mac and Linux platforms, as well as being freely available. Moreover, Subversion allows multiple developers access, automatically merging changes to different parts of the page and notifies users if a conflict arises. These differences have led to widespread adoption, especially among Web developer teams in larger organizations. In recognition of this workflow, Subversion is robustly supported in Dreamweaver.
Developers whose companies relied on Subversion for their version control used to have to perform a kind of Texas two-step for common operations. Getting and putting files from the central Subversion source, called a repository, was usually handled by another client program like TurtleSVN, which moved the files in and out of a Dreamweaver local site root. From there, developers would make any necessary code changes, save their files, and then return to the third-party client to put — or commit — their modified documents. Dreamweaver now makes it possible to connect directly to the Subversion repository, check out and commit files, and even receive notification of file conflicts.
Dreamweaver has seamlessly integrated its support for Subversion. Common file operations take place through the Files panel where a file's status is clearly represented. Less frequently used commands are available through right-click context menus. And, as you discover in the next section, setup is right where you'd expect it to be: in the Site Setup dialog box.
In order for you to work with a Subversion repository, you need to establish a connection to it. Similar to a remote site, a Subversion repository requires you to log in to a specific server address with a recognized username and password. The declaration of all these details and any other necessary ones is handled through the Version Control category of the Site Setup dialog box.
Note
Although you can download and install the Subversion server software on your local development system, a great number of ISPs make it available at little or no cost. For this book, I've been using myVersionControl (www.myversioncontrol.com), which offers free access for up to 4MB of storage. Additional storage is offered for a small monthly fee. Account setup is very straightforward and, best of all, integrates with Dreamweaver without a hitch.
To establish a connection to a Subversion repository, follow these steps:
Choose Site
When the Manage Sites dialog box is displayed, choose the site you want to work with and Edit.
If you're creating a new site, choose New
In the Site Setup dialog box, switch to the Version Control category.
From the Access list, choose Subversion.
Choose the protocol from the Protocol list (see Figure 31-30).
Many ISPs use HTTPS for their Subversion protocol; if you are connecting to a networked server, check with your network administrator for the proper details.
Enter the address to the Subversion server in the Server Address field, without the protocol: for example,
idest.myversioncontrol.cominstead ofhttps://idest.myversioncontrol.com.Enter the path to your repository in the Repository Path field.
Generally, the repository path is at least two levels deep, as in
/subversion/cs5. Be sure to include a leading forward slash and omit the trailing one.If your Subversion server is on a different port than usual, enter the port number in the adjacent field.
Enter your username in the Username field and password in the Password field.
When you're done, click Test. If the connection is successful, Dreamweaver presents an alert to inform you that both server and project are accessible, as shown in Figure 31-31.
Click Save to close the Site Setup dialog and Done to close the Manage Sites dialog.

Now that your connection is made, you can begin working with files in the repository.

Communication is the key to any team effort and, in Subversion, the repository is communication central. Checking files in and out of the repository should become second nature for any developer working on a Subversion project — it is how the overall project stays current. Dreamweaver keeps the process straightforward and all the operations easily accessible. Not only does Dreamweaver give you a live view of the repository, but you can also tell local file status — whether a file has been retrieved from the repository and remains unchanged or has been modified and is now ready for check in. Should you encounter a problem and need to revert to a previous version, you can easily do so. Moreover, if you are extensively overhauling a page and require exclusive ownership, locking — and unlocking — a file is just a click away.
Just as you can view your files on a remote site root in the Files panel or both local and remote files side-by-side in the extended Files panel, you can see files in your Subversion repository. Moreover, because a connection has been established, special Subversion commands are available in both the local and repository views.
To view your repository in the standard Files panel, choose Repository View from the View list at the top of the panel (see Figure 31-32). Right-click (Control+click) to reveal the Subversion shortcut menu.
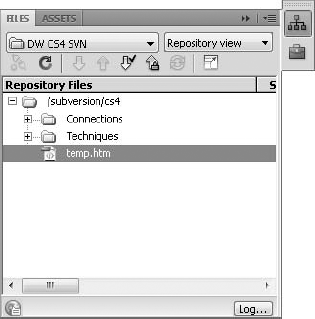
Figure 31-32. Switch to the Repository view of the Files panel to see files already committed to the project.
To see both local and repository files, click Expand on the Files panel. When the expanded Site panel appears, if you haven't previously chosen Repository View, click Repository Files to connect to your Subversion server and project (see Figure 31-33).
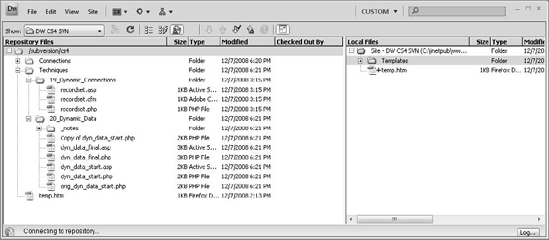
Figure 31-33. Quickly check the status of files in both the Repository and Local Files views through the extended Files panel.
Note
Unlike with remote folders and testing servers, you can't drag and drop between the Local Files pane and the Repository Files pane in the extended Files panel. All transfers from one system to the other must be made through the context menus or the icons at the top of the Files panel.
Assuming some work has already started on your Subversion project, the first thing you'll want to do is get all the current files. In Subversion, transferring folders and files from the repository to your local system is referred to as mounting folders.
Warning
If you're moving files from the Subversion repository to your local site for the first time, it is fine to use the Mount Folders command. However, if you already have files with the same name in your local site, Dreamweaver will not transfer any files. To update files already available locally, choose Subversion
To move work from the Subversion repository to your local site, follow these steps:
From the Files panel, click Extend.
In the extended Files panel, choose Repository Files.
When the repository files are displayed, right-click (Control+click) on any file or folder you want to copy to your local site and choose Mount Folders (see Figure 31-34).

Figure 31-34. The Mount Folders command is a great way to get your initial files from the Subversion repository.
The Background File Activity panel displays the progress and closes automatically when done. If you are copying a great many files, click Hide and continue working in Dreamweaver.
Dreamweaver indicates a file's status in three ways:
Files that are retrieved from the repository and not yet modified have no identifying icons in the Files panel.
Files that are found in the local site, but not in the repository, are noted with a plus sign.
Files that have been modified locally, but not yet checked in to the repository, are indicated with a checkmark.
To make sure you've got the most current status of a file or folder, select it in the Files panel and choose Version Control
The process of posting a modified document to the Subversion repository is called committing a file. When a file is committed, the Subversion server compares it to the existing version in the repository and merges them. In Dreamweaver, you commit a file by checking it in.
To commit a file, follow these steps:
From the Files panel, select one or more locally modified files.
You can easily identify any file that has been changed since it was retrieved from the repository by the green checkmark next to its name (see Figure 31-35).
Click Check In.
You can also choose Check In from the context menu or from the File Management menu button in the Document toolbar.
When the CheckIn dialog box (see Figure 31-36) appears, select any file you want to transfer and, if desired, enter a comment in the Commit Message field.
If a file you're not ready to commit appears in the list, select it and click Ignore.
When you're ready, click Commit.
Dreamweaver displays the Background File Activity dialog as the files are being transferred.
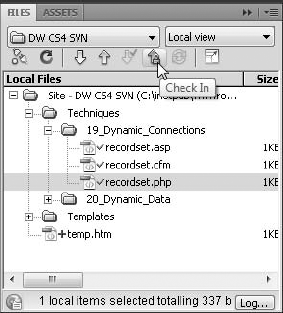
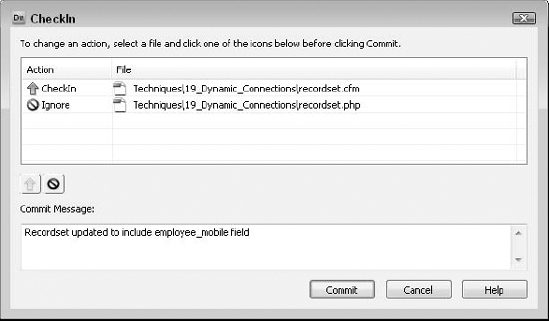
It's important to keep in mind that until you commit a file, your work has not been integrated into the project.
So far you've seen how to post your work to the Subversion project, but how do you integrate another developer's work with your local files? The Get Local Version command does exactly that. When you choose Get Local Version, the selected file does not replace your current version, but rather merges with it. Any code in the repository version that is not in your local file — which does not conflict with any changes you have made — is written into your local file.
To get the latest version of a file or files, follow these steps:
From the Files panel, select one or more files you wish to update.
Right-click (Control+click) and choose Version Control
The Background File Activity dialog displays the progress of the transfer and closes when the operation is complete.
You'll notice that if the file you got the latest version of has been modified locally, the green checkmark remains after the operation. This is because the files have been merged to include your local changes, but the updated file has not yet been committed to the repository.
Because of the tight connection between local files and those in the repository, any change to the file itself — whether moving it from one folder to another, copying it, or removing it entirely — has to be handled with Subversion commands. Dreamweaver gives you direct access to SVN Move, SVN Copy, SVN Delete, and SVN Revert commands.
Note
Whenever you perform one of the key file management operations in the local site, Dreamweaver marks the associated files to be updated in the repository when the files are committed. These changes are tracked with the history feature of Subversion so that they can be rolled back if necessary. You'll notice temporary indicators in the Files panel for the affected documents; once the file has been committed, the indicators are removed.
For example, let's say you move one folder from one place to another by dragging it in the Files panel. After Dreamweaver has completed the operation, you'll still see the file in its original location, but it will have a red bar, the delete icon, associated with it. Similarly, the copied file will have an Add With History icon — a plus sign with two small green triangles in one corner. Both of these icons can be seen in Figure 31-37. When you check in these files (or their encompassing folders), the CheckIn dialog box appears to make sure you want to commit these changes to the repository.
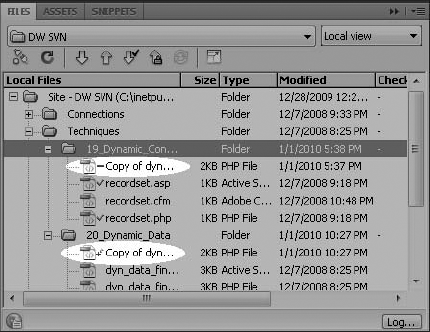
Figure 31-37. A moved file is marked with a delete icon in the old folder and added to the history icon in the new one.
When you delete a file in a Subversion-enabled site, Dreamweaver gives you the option to either remove the file from the repository as well, or just delete the file locally (see Figure 31-38). As the Delete Subversions Assets dialog box notes, if you decide to remove the file locally only, you can bring the repository and local site into sync by choosing Version Control
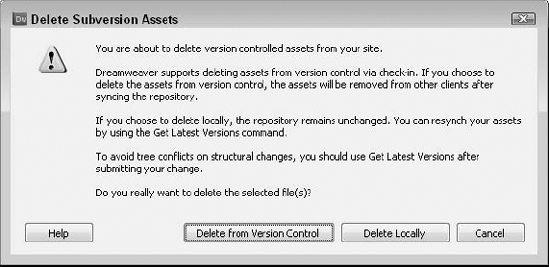
Figure 31-38. It's typically best to keep the sites in sync by deleting a file from version control, but you can delete locally if necessary.
If you make changes to the site and realize it's a mistake before you check the files in, you can go back to a previous version with the Revert command. Let's say, for example, you inadvertently deleted the wrong file and now the file is displayed with a delete icon in the Files panel. Simply right-click (Control+click) on the file and choose Version Control
Although Subversion does a remarkable job of merging changed files from multiple sources, a developer occasionally may need to work more exclusively on a file. Unlike Visual Source Safe or Dreamweaver's own Check In/Check Out system, you cannot completely prevent another developer from working on the same file. You can, however, lock the file, which stops anyone else from committing changes to a file. Once the file is unlocked, others can commit their files as usual.
To lock a file, follow these steps:
From the Files panel, select one or more files you wish to lock.
Right-click (Control+click) and choose Version Control
The Background File Activity dialog displays the progress of the operation.
Dreamweaver displays a padlock icon next to the locked file on both the local and repository views.
To unlock a file, choose Version Control
One of the primary purposes of Subversion is to keep track of all the changes made to a file and, if necessary, to allow for an older version to become the current one. Dreamweaver not only fulfills these functions with its Subversion implementation, but also allows you to compare two versions of the same file or compare the current version to your local copy. To take advantage of the comparison features, you must install a third-party tool that compares files and inform Dreamweaver of its location through the File Compare category of Preferences.
Note
To learn more about file comparison utilities and how to integrate them with Dreamweaver, see Chapter 4.
To work with different versions of a file, follow these steps:
From the Files panel, select a file to inspect.
Right-click (Control+click) and choose Version Control
When the Revision History dialog box appears (see Figure 31-39), choose the desired operation:
To compare a version to the current local copy, select the version and click Compare To Local.
To compare two different versions, select them both and click Compare.
To display a selected version, click View.
To make a prior version the current one, select it and click Promote To Current.

Figure 31-39. Compare any version to your local version or promote it to the current version through the Revision History dialog.
The current version of a file is listed in the Revision History with inward pointing angle brackets around the version number, like this: >10<.
Although Subversion smoothly blends files from disparate sources for the most part, conflicts inevitably occur. In Subversion, one type of conflict is a direct difference between a line of code in a page checked in to the repository and the same line of code in a file that is being committed. Another type of conflict, known as a tree conflict, involves file management, such as renaming, moving, or deleting a file.
If Subversion detects either type of conflict, the file cannot be committed and the developer is informed of the conflict. It is up to the developer who is committing the file to make acceptable changes. Naturally, communication with the other developers is vital to making sure that the proper updates are made.
Once a conflict has been identified, the best course is the following:
Get the latest version of the file from the Subversion repository.
Make any necessary changes in the code.
Save your file.
In the Files panel, right-click (Control+click) on the files and choose Version Control
Check in your file.
The expression "many hands make light work" certainly applies to Web site production and maintenance — but without some type of authoring management, the many hands may soon create a disaster. Dreamweaver offers both built-in and industry-standard authoring management solutions to aid in the development of Web sites. In addition to the precautions against overwriting files, Dreamweaver includes several other key features to help with team communication and to keep those many hands working together. For your team to get the most out of Dreamweaver, keep the following points in mind:
For Dreamweaver's standard Check In/Check Out feature to be effective, everybody on the team must have the system engaged and in use for all file transfers.
Metadata — information about information — about a project can be tied to any Web page or Web object through Dreamweaver's Design Notes feature. Again, to get the most out of this feature, it is essential that all team members use Dreamweaver's Files panel to manage their files.
Dreamweaver includes interactive report capabilities that enable team members to quickly check the status of various HTML and workflow conditions, which can, if necessary, enable them to open a file directly for repair.
Dreamweaver can tie into existing development projects through the WebDAV standard support.
Subversion version-control support is built into Dreamweaver. When connection to a Subversion server is established, users can get files from the Subversion repository, make changes, and commit the files directly from within Dreamweaver.
In the next chapter, you learn about working with XML in Dreamweaver.