
13. Printing and Exporting
Lesson Overview
In this lesson, you’ll learn how to do the following:
• Check a document for potential printing issues.
• Confirm that an InDesign file and all of its elements are ready for printing.
• Assemble all necessary files for printing or delivery to a service provider or printer.
• Generate an Adobe PDF file for proofing.
• Preview a document onscreen before printing.
• Select appropriate print settings for fonts and graphics.
• Print a proof of a document.
• Create a print preset to automate the printing process.
• Manage the colors in a document.
This lesson will take approximately 45 minutes.
Download the project files for this lesson from the Lesson & Update Files tab on your Account page at www.peachpit.com and store them on your computer in a convenient location, as described in the Getting Started section of this book.
Your Accounts page is also where you’ll find any updates to the chapters or to the lesson files. Look on the Lesson & Update Files tab to access the most current content.

Adobe InDesign CC provides advanced printing and print preparation controls to manage your print settings, regardless of your output device. You can easily output your work to a laser or inkjet printer, high-resolution film, or a computer-to-plate imaging device.
Getting started
In this lesson, you’ll work on a magazine cover that contains a full-color image and also uses a spot color. The document will be printed on a color inkjet or laser printer for proofing and also on a high-resolution imaging device, such as a computer-to-plate or film imagesetter. Prior to printing, the document will be exported to a PDF file that can be used in a review process.
1. To ensure that the preference and default settings of your Adobe InDesign program match those used in this lesson, move the InDesign Defaults file to a different folder following the procedure in “Saving and restoring the InDesign Defaults file” on page 3.
![]() Note
Note
If you have not already downloaded the project files for this lesson to your computer from your Account page, make sure to do so now. See “Getting Started” at the beginning of the book.
2. Start Adobe InDesign. To ensure that the panels and menu commands match those used in this lesson, choose Window > Workspace > [Advanced], and then choose Window > Workspace > Reset Advanced.
3. Choose File > Open and open the 13_Start.indd file in the Lesson13 folder, located inside the Lessons folder within the InDesignCIB folder on your hard drive.
![]() Tip
Tip
A preference option in InDesign lets you control whether an alert is displayed when you open a document with missing or modified links. To disable the alert, deselect the Check Links Before Opening Document option in the File Handling section of the Preferences dialog box.
4. An alert message informs you that the document contains missing and modified links. Click Don’t Update Links. You will correct these problems later in this lesson.
When you print an InDesign document or generate a PDF file for printing, InDesign must access the original artwork that was placed in the layout. If imported artwork has been moved, graphic filenames have changed, or the location of the original graphic files is no longer available, InDesign alerts you that the original artwork cannot be located or has been modified. This alert appears when a document is opened, printed, exported, or checked for printing using the Preflight panel. InDesign shows the status of all files necessary for printing in the Links panel.
5. Choose File > Save As, rename the file 13_Cover.indd, and save it in the Lesson13 folder.

Preflighting files
InDesign provides integrated controls for performing a quality check on a document prior to printing or handing off a document to a print service provider. Preflight is the standard industry term for this process. In “Preflighting as you work,” in Lesson 2, you learned how you can take advantage of the live preflight capabilities in InDesign and specify a preflight profile in the early stages of creating a document. This lets you monitor a document as you create it to prevent potential printing problems from occurring.
You can use the Preflight panel to confirm that all graphics and fonts used in the file are available for printing and that there are no instances of overset text. Here, you’ll use the Preflight panel to identify a pair of missing graphics in the sample layout.
![]() Tip
Tip
You can also access the Preflight panel by double clicking “3 errors” at the bottom of the document panel, or by selecting it from the pop-up menu.
1. Choose Window > Output > Preflight.
2. In the Preflight panel, make sure that On is selected and confirm that [Basic] (Working) is selected in the Profile menu. Notice that one error is listed (Links). The 3 in parentheses indicates that there are three link-related errors.
Notice that no text errors appear in the Error section, which confirms that the document has no missing fonts and no overset text.
3. Click the triangle to the left of Links, then click the triangle to the left of Missing Link to display the names of the two missing graphic files. Double-click the Title_Old.ai link name; this centers the graphic in the document window and selects the graphics frame.
4. At the bottom of the Preflight panel, click the triangle to the left of Info to display information about the missing file.
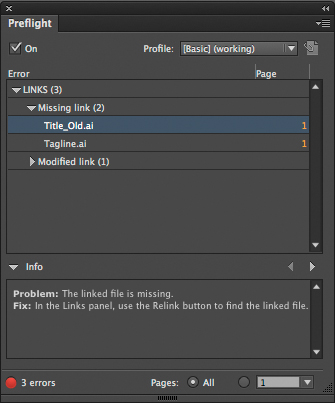
In this case, the problem is a missing graphic file, and the fix is to use the Links panel to find the linked file. Now you’ll replace this outdated version of the magazine’s title with a revised version that includes a color change.
5. If the Links panel isn’t open, click the Links panel icon or choose Window > Links to open it. Make sure that the Title_Old.ai file is selected in the Links panel, and then choose Relink from the panel menu. Browse to the Links folder inside the Lesson13 folder. Double-click the Title_New.ai file. The new file is now linked, replacing the original file.
Notice that after you relink the Title_New.ai graphic, the new magazine title is a different color and is displayed at low resolution, the default setting for imported Adobe Illustrator files.
6. To display the title at high resolution, select the graphics frame with the Selection tool (![]() ), and then choose Object > Display Performance > High Quality Display.
), and then choose Object > Display Performance > High Quality Display.
7. Repeat steps 5 and 6 to relink the cover photograph named PhotoOld.tif with a brighter version of the graphic named PhotoNew.tif.
8. In the Preflight panel, click the triangle to the left of Modified Link. The graphic named “Tagline.ai” has been modified. To update the link to this graphic (“home accessories”), select it in the Links panel and then choose Update Link from the panel menu. Choose Object > Display Performance > High Quality Display.
9. Choose File > Save to save the changes you’ve made to the document.
Packaging files
You can use the Package command to assemble a copy of your InDesign document and all linked items, including graphics, into a single, convenient folder. InDesign also copies the fonts needed for printing. Now you’ll package the files for the magazine cover in preparation for sending them to your print provider. This ensures that all project components required for output are provided.
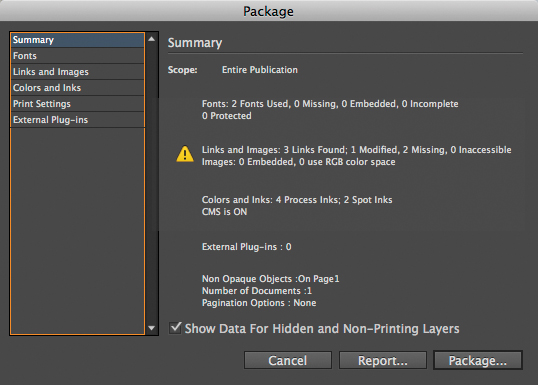
1. Choose File > Package. The Summary section of the Package dialog box notifies you of two more printing-related issues:
• Because the document contains an RGB graphic, InDesign alerts you to its presence. You’ll convert this image to CMYK when you print the cover later in this lesson.
• The document also contains duplicate spot colors. These duplicates are for instructional purposes only and will not cause printing errors. You’ll use the Ink Manager feature later in the lesson to manage this situation.
3. In the Printing Instructions dialog box, type a filename for the file that accompanies the InDesign document (for example, “Info for Printer”), and also include your contact information. Click Continue.
InDesign uses this information to create an instructions text file that will accompany the InDesign file, links, and fonts in the package folder. The recipient of the package can use the instructions file to better understand what you want done and how to contact you if there are questions.
![]() Tip
Tip
You can also edit the Instructions text file from the Create Package Folder dialog box by clicking the Instructions button.
4. In the Create Package Folder dialog box, browse to locate the Lesson13 folder. Notice that the folder that will be created for the package is named 13_Cover Folder. InDesign automatically names the folder based on the document name, which you assigned at the beginning of this lesson.
![]() Tip
Tip
When Copy Fonts (Except CJK) is selected in the Create Package Folder dialog box, InDesign generates a folder called “Document fonts” in the package folder. If you open an InDesign file located in the same folder with the Document fonts folder, InDesign will automatically install these fonts for you, and they will be available for that document only. When you close the document, the fonts are uninstalled.
5. Confirm that the following options are selected:
• Copy Fonts (Except CJK)
• Copy Linked Graphics
• Update Graphic Links In Package
6. Click Package.

7. Read the warning message that informs you about the licensing restrictions that may affect your ability to copy fonts, and then click OK.
Creating a preflight profile
When the live preflight feature is enabled (that is, when On is selected in the Preflight panel), the default working profile, called [Basic], is used to preflight your InDesign documents. This profile checks for basic output conditions, such as missing or modified graphic files, overset text, and missing fonts.
You can also create your own custom preflight profiles or load profiles from your print service provider or other source. When you create a custom preflight profile, you specify the conditions you want to detect. Here’s how to create a profile that alerts you when non-CMYK colors are used in a layout:
1. If the Preflight panel is not open, choose Window > Output > Preflight, and then choose Define Profiles from the Preflight panel menu.
2. Click the New Preflight Profile button (![]() ) on the lower-left side of the Preflight Profiles dialog box to create a new preflight profile. In the Profile Name box, enter CMYK Colors Only.
) on the lower-left side of the Preflight Profiles dialog box to create a new preflight profile. In the Profile Name box, enter CMYK Colors Only.
3. Click the triangle to the left of Color to display color-related options, and select Color Spaces And Modes Not Allowed.
4. Click the triangle to the left of Color Spaces And Modes Not Allowed, and select all of the available options except CMYK (RGB, Gray, Lab, and Spot Color).
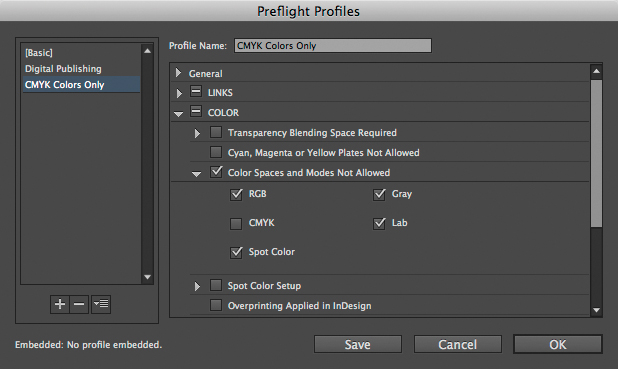
5. Leave existing preflight criteria for Links, Images And Objects, Text, and Document as is. Click Save, and then click OK.
6. Choose CMYK Colors Only from the Profile menu in the Preflight panel. Notice the additional errors that are listed in the Error section of the panel.
7. Click the triangle next to Color to expand the display, and then click the triangle next to Color Space Not Allowed to see a list of objects that do not use the CMYK color model. Click various objects to view information about the problem and how to fix it. (Make sure the Info section of the Preflight panel is visible. If not, click the triangle to the left of Info to display it.)
8. Choose [Basic] (Working) from the Profile menu in the Preflight panel to return to the default profile used for this lesson.
8. Switch to Explorer (Windows) or Finder (Mac OS), and then navigate to the 13_Cover Folder in the Lesson13 folder (located inside the Lessons folder within the InDesignCIB folder on your hard drive). Open the folder.
Notice that InDesign created a duplicate version of your document and also copied all fonts, graphics, and other linked files necessary for high-resolution printing. Because you selected Update Graphic Links In Package, the duplicate InDesign file now links to the copied graphic files located in the package folder instead of to the original linked files. This makes the document easier for a printer or service provider to manage and also makes the package file ideal for archiving.
9. When you have finished viewing its contents, close 13_Cover Folder and return to InDesign.
Creating an Adobe PDF proof
If your documents need to be reviewed by others, you can easily create Adobe PDF (Portable Document Format) files to transfer and share. There are several benefits to this convenient format: Files are compressed to a smaller size, all fonts and graphic links are self-contained in a single composite file, and files are displayed onscreen and print the same whether opened on a PC or a Mac. InDesign exports directly to Adobe PDF.
Saving a composite of your publication as an Adobe PDF document also has many advantages for printing. You can create a compact, reliable file that you or your service provider can view, edit, organize, and proof. Then later, your service provider can either output the Adobe PDF file directly or process it using tools from various sources for such post-processing tasks as preflight checks, trapping, imposition, and color separation.
You will now create an Adobe PDF file that is suitable for review and proofing purposes.
1. Choose File > Export.
2. Choose Adobe PDF (Print) from the Save As Type (Windows) or Format (Mac OS) menu, and for the filename, type 13_Cover_Proof.pdf. If necessary, navigate to the Lesson13 folder, and then click Save. The Export Adobe PDF dialog box opens.
![]() Note
Note
The presets available in the Adobe PDF Preset menu are used for creating a range of Adobe PDF files, from small files suitable for onscreen viewing to press-ready files that are suitable for high-resolution output.
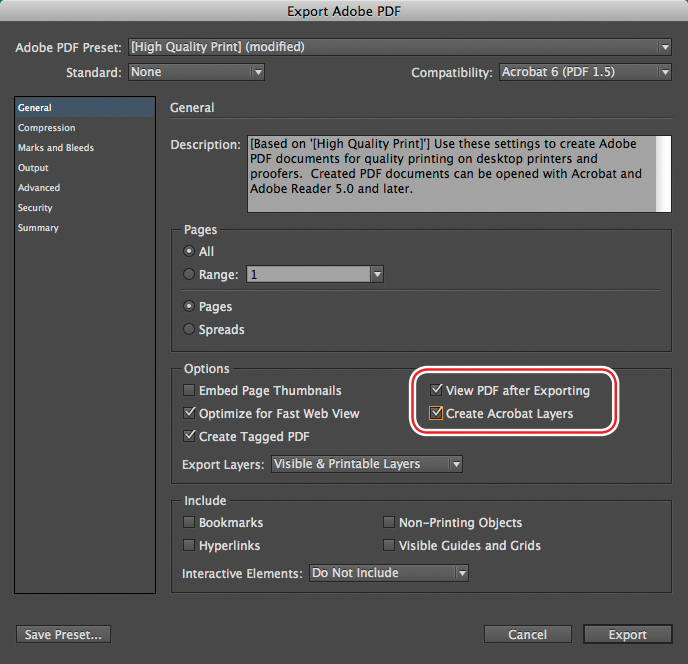
3. In the Adobe PDF Preset menu, choose [High Quality Print]. This setting creates PDF files that are suitable for output on desktop printers and proofers and onscreen proofing.
4. In the Compatibility menu, choose Acrobat 6 (PDF 1.5). This is the earliest version that supports more advanced features in the PDF file, including layers.
5. In the Options section of the dialog box, select
• View PDF After Exporting
• Create Acrobat Layers
Automatically viewing the PDF file after exporting is an efficient way of checking the results of the file export process. The Create Acrobat Layers option converts the layers in the InDesign layout into layers that can be viewed (or hidden) in the resulting PDF file.
![]() Note
Note
Adobe PDF export in InDesign is performed in the background, which enables you to continue working while an Adobe PDF is being created. If you try to close your document before the background process is completed, InDesign will display a warning message.
The Export Layers menu lets you choose the layers to be exported when creating the PDF. For this exercise, use the default option: Visible & Printable Layers.
6. Click Export. An Adobe PDF file is generated and displays on your monitor in Adobe Acrobat or Adobe Reader.
![]() Tip
Tip
You can view the progress from the Window > Utilities > Background Tasks panel.
7. Review the Adobe PDF, and then return to Adobe InDesign.
Viewing a layered Adobe PDF file using Adobe Acrobat and Adobe Reader
Using layers in an InDesign document (Window > Layers) can help you organize the text and graphic elements in a publication. For example, you can place all text elements on one layer and all graphic elements on another. The ability to show/hide and lock/unlock layers gives you further control over the design elements. In addition to showing and hiding layers in InDesign, you can show and hide layers in InDesign documents that have been exported as Adobe PDFs by opening the documents with Adobe Acrobat. Use the following steps to view the layers in the Adobe PDF file you just exported (13_Cover_Proof.pdf).
1. Click the Layers icon along the left side of the document window, or choose View > Show/Hide > Navigation Panes > Layers, to display the Layers panel.
2. Choose View > Zoom > Fit Height to display the entire page.
3. Click the plus sign (Windows) or the triangle (Mac OS) to the left of the document name in the Layers panel.
The layers in the document are displayed.
4. Click the eye icon (![]() ) to the left of the Text layer. When the icon is hidden, so are all objects on this layer.
) to the left of the Text layer. When the icon is hidden, so are all objects on this layer.
5. Click the empty box to the left of the Text layer to turn the visibility back on for the text.
6. Choose File > Close to close the document. Return to InDesign.
Previewing separations
If your documents need to be color-separated for commercial printing, you can use the Separations Preview panel to gain a better understanding of how each portion of the document will print. You’ll try out this feature now.
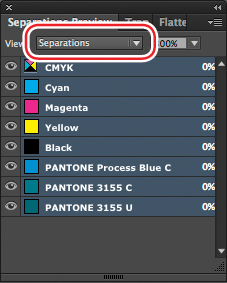
1. Choose Window > Output > Separations Preview.
2. Select Separations from the View menu in the Separations Preview panel. Move the panel so that you can see the page, and adjust the panel’s height so that all of the listed colors are visible. If it’s not already selected, choose View > Fit Page In Window.
![]() Note
Note
Pantone LLC is a company that uses the Pantone Matching System (PMS) to specify its inks. The number indicates the color hue, while the letter indicates the type of stock the ink is best suited for. The same Pantone number with different letters means the inks are a similar color but intended to print on different paper stocks. U is for uncoated papers and C is for coated glossy papers.
3. Click the eye icon (![]() ) next to CMYK to hide all page elements that use CMYK colors, and show only elements to which spot (Pantone) colors are applied.
) next to CMYK to hide all page elements that use CMYK colors, and show only elements to which spot (Pantone) colors are applied.
4. Click the eye icon next to Pantone 3155 C. No elements are displayed on the page, indicating that this color is applied to all of the remaining elements.
You may have noticed that two of the Pantone colors share the same number. While these are similar colors, they represent two kinds of ink, intended for different print uses. This may cause confusion at output, or incur the expense of unwanted printing plates. You will correct this later using the Ink Manager.
5. Choose Off from the View menu in the Separations Preview panel to enable viewing of all colors.
Previewing how transparency effects will be flattened
Documents that contain objects to which transparency effects, such as opacity and blending modes, have been applied usually need to undergo a process called flattening when they are printed or exported. Flattening divides transparent artwork into vector-based areas and rasterized areas.
Some of the objects in this magazine cover have been adjusted using transparency effects. Next, you’ll use the Flattener Preview panel to determine the objects to which transparency effects have been applied and the areas on the page that are affected by transparency.
1. Choose Window > Output > Flattener Preview.
2. If the entire page is not visible in the document window, double-click the Hand tool (![]() ) to fit the document to the current window size, and position the Flattener Preview panel so that you can see the entire page.
) to fit the document to the current window size, and position the Flattener Preview panel so that you can see the entire page.
3. In the Flattener Preview panel, choose Transparent Objects from the Highlight menu.
4. If it’s not already selected, choose [High Resolution] from the Preset menu. You’ll use this setting again later in this lesson when printing this file.
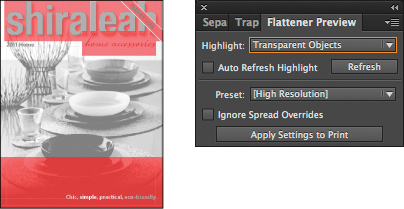
Notice how some of the objects on the page are displayed with a red highlight. These are objects to which transparency effects, such as a blending mode, opacity, or any of nine additional special effects, are applied. You can use this highlight to help identify areas of your layout that may be unintentionally affected by transparency, so that you can either adjust your layout or transparency settings accordingly.
![]() Tip
Tip
To prevent an object, such as a text frame, from being affected by transparency, you can arranging it so it is above the transparent object in the stacking order. Either move it forward or to the front (Object > Arrange) or place it on higher layer.
Transparency can be applied in Photoshop, Illustrator, or directly in the InDesign layout. The Flattener Preview panel identifies transparent objects, regardless of whether the transparency was created using InDesign or imported from another application.
5. Choose None from the Highlight menu to disable the flattener preview.
Previewing the page
Now that you’ve previewed the color separations and areas of transparency in the layout, you’ll preview the page to get an idea of how the final cover will look when printed.
1. If you need to change the display magnification to fit the page to the document window, double-click the Hand tool (![]() ).
).
![]() Tip
Tip
You can also toggle between the different screen modes by choosing a mode from the Screen Mode widget in the Application bar.
2. At the bottom of the Tools panel, click and hold down the Screen Mode button (![]() ), and then choose Preview (
), and then choose Preview (![]() ) from the menu. All guides, frame edges, and other nonprinting items are hidden.
) from the menu. All guides, frame edges, and other nonprinting items are hidden.
3. Click and hold down the Mode button, and then choose Bleed (![]() ). Additional space outside the perimeter of the final document size is displayed. This confirms that the color background extends beyond the edge of the document, ensuring complete coverage in the printed piece. After the job is printed, this excess area is trimmed to the final printed size.
). Additional space outside the perimeter of the final document size is displayed. This confirms that the color background extends beyond the edge of the document, ensuring complete coverage in the printed piece. After the job is printed, this excess area is trimmed to the final printed size.
![]() Tip
Tip
It is common to set up bleed and slug areas when you create a new InDesign document. After you choose File > New > Document, click More Options in the New Document dialog box to display bleed and slug controls.
4. Click and hold down the Mode button, and then choose Slug (![]() ). The page now displays additional space below the bottom of the page. This additional area is often used to provide production information about the job. Use the scroll bar on the right side of the document window to see this area. If you want to set up the bleed or slug areas in an existing file, choose File > Document Setup and click Bleed And Slug to reveal the bleed and slug setup options.
). The page now displays additional space below the bottom of the page. This additional area is often used to provide production information about the job. Use the scroll bar on the right side of the document window to see this area. If you want to set up the bleed or slug areas in an existing file, choose File > Document Setup and click Bleed And Slug to reveal the bleed and slug setup options.
5. Double-click the Hand tool (![]() ) to fit the entire page to the document window.
) to fit the entire page to the document window.
After confirming that the file looks acceptable, you are ready to print it.
Printing a laser or inkjet proof
InDesign makes it easy to print documents to a variety of output devices. In this part of the lesson, you’ll create a print preset to save settings—and save time in the future—without having to individually set each option for the same device.
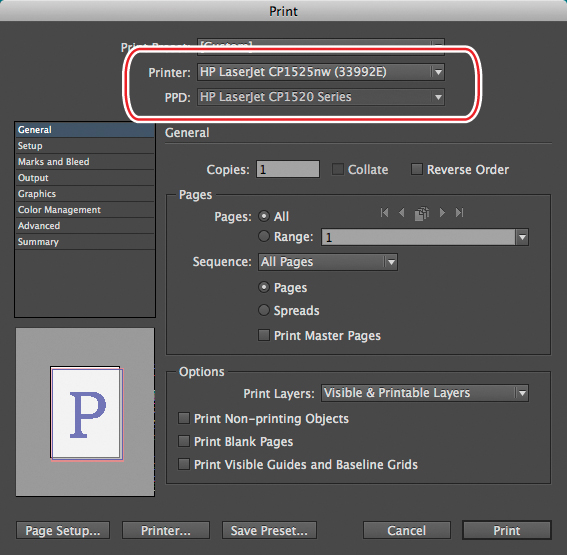
1. Choose File > Print.
2. From the Printer menu in the Print dialog box, choose your inkjet or laser printer.
Notice how InDesign automatically selects the PPD (printer description) software that was associated with this device at the time you installed the equipment.
![]() Note
Note
If you do not have access to a printer, you can choose PostScript File® from the Printer menu. If you do, you can choose an Adobe PDF PPD (if available) and complete all of the steps in the remainder of the lesson. If no other PPDs are available, you can choose the Device Independent PPD; however, some of the controls covered in the remainder of the lesson are not available if you choose Device Independent.
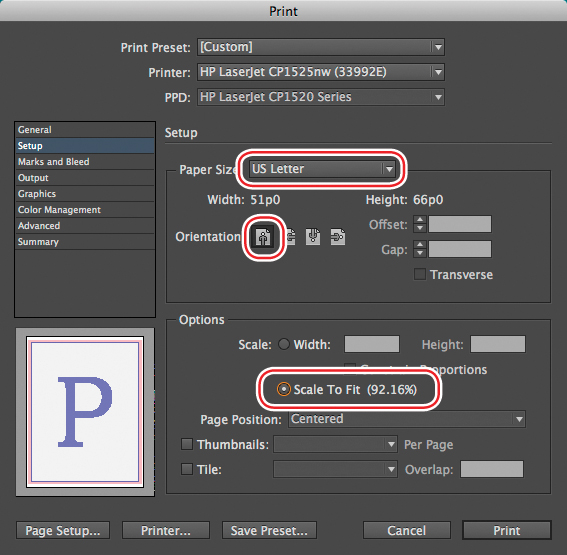
3. On the left side of the Print dialog box, click the Setup category, and then choose the following options:
• Paper Size: US Letter
• Orientation: Portrait (![]() )
)
• Scale To Fit
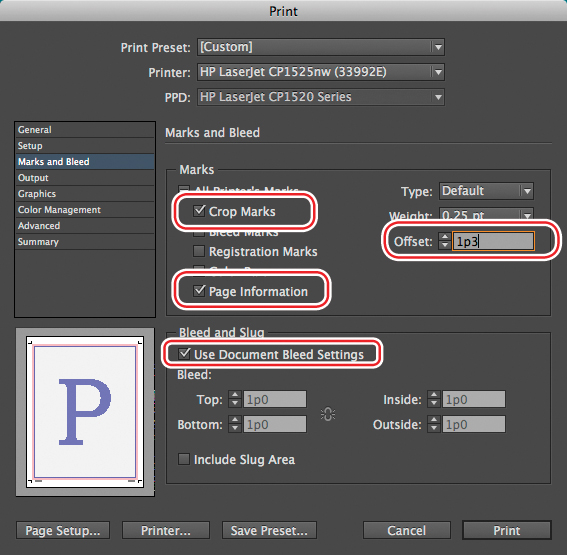
4. On the left side of the Print dialog box, click the Marks And Bleed category, and then choose these options:
• Crop Marks
• Page Information
• Use Document Bleed Settings
5. In the Offset box, enter a value of 1p3. This value determines the distance beyond the page edges where the specified marks and page information appear.
The crop marks print outside of the page area and provide guides showing where the final document is trimmed after printing. The page information automatically adds the document name, along with the date and time it was printed, to the bottom of the printout. Because the crop marks and page information are printed outside the page edges, it’s necessary to choose Scale To Fit to fit everything onto an 8.5″ × 11″ piece of paper.
Selecting User Document Bleed Settings causes InDesign to print objects that extend outside the edge of the page area. This option eliminates the need for entering the amount of extra area that should be imaged.
![]() Tip
Tip
The preview pane in the lower-left corner of the Print dialog box shows how the page area, marks, and bleed area will print.
6. On the left side of the Print dialog box, click the Output category. Choose Composite CMYK from the Color menu. (If you are printing to a black-and-white printer, choose Composite Gray.)
Choosing Composite CMYK causes any RGB colors, including those in RGB graphics, to be converted to CMYK at the time of printing. This setting changes neither the original, placed graphics nor any colors applied to objects.
![]() Note
Note
You can have InDesign maintain the existing colors used in a job by choosing Composite Leave Unchanged from the Color menu. Additionally, if you are a printer or service provider and need to print color separations from InDesign, choose Separations or In-RIP Separations based upon the workflow that you use. Also, certain printers, such as an RGB proofer, may not let you choose Composite CMYK.
7. On the left side of the Print dialog box, click the Graphics category. Choose Optimized Subsampling from the Send Data menu.
When Optimized Subsampling is selected, InDesign sends only the image data necessary for the printer selected in the Print dialog box. This can speed up the time it takes to send the file to print. To have the complete high-resolution graphic information sent to the printer, which may take longer to image, select All from the Send Data menu.
8. Optionally, choose Subset from the Fonts Download menu. This causes only the fonts and characters that are actually used in the document to be sent to the output device and can reduce the time it takes to print single-page documents and short documents without much text.
9. On the left side of the Print dialog box, click the Advanced category and set the transparency flattener preset to Medium Resolution from the Preset menu.
The flattener preset determines the print quality of placed artwork or images that include transparency. It also affects the print quality of objects using transparency features and effects applied to them within InDesign, including objects with drop shadows or feathering. You can choose the appropriate transparency flattener preset for your output needs. (The three default transparency flattener presets are explained in detail in a sidebar within the section called “Previewing how transparency effects will be flattened,” earlier in this lesson.)
![]() Tip
Tip
If your document contains transparency that is flattened during the printing process, select Simulate Overprint in the Output section of the Print dialog box when printing, for the best print result.
10. Click Save Preset at the bottom of the Print dialog box, name the preset Proof, and click OK.
Creating a print preset saves Print dialog box settings so you do not need to individually set every option each time you print to the same device. You can create multiple presets to meet various quality needs of individual printers you may use. When you want to use these settings in the future, you can choose them from the Print Preset menu at the top of the Print dialog box.
![]() Tip
Tip
To quickly print using a preset, choose File > Print Preset and select the device preset. Holding down the Shift key while doing this will print without prompting you with the Print dialog box.

11. Click Print. If you are creating a PostScript file, click Save, browse to the Lesson13 folder, and save the file as 13_End.indd.ps. The PostScript file could be provided to your service provider or commercial printer, or converted to an Adobe PDF file using Adobe Acrobat Distiller.
![]() Note
Note
The Optimized Subsampling option cannot be selected if you are using the Device Independent PPD, because this generic driver can’t determine what information a specific printer chosen later may need.
Using the Ink Manager
The Ink Manager provides control over inks at output time. Changes you make using the Ink Manager affect the output, not how the colors are defined in the document.
The Ink Manager options are especially useful for print service providers when printing color separations for multicolor publications. For example, if a publication that will be printed with CMYK process inks uses a spot color, the Ink Manager provides the option to change the spot color to the equivalent CMYK process color. If a document contains two similar spot colors when only one is required, or if the same spot color has two different names, the Ink Manager lets you map the variations to a single spot color.
Next, you’ll learn how to use the Ink Manager to convert a spot color to a CMYK color, and you’ll create an ink alias so that the desired number of separations are created when the document is output as color separations.
1. Click the Swatches panel icon or choose Window > Color > Swatches to open the Swatches panel, and then choose Ink Manager from the Swatches panel menu.
![]() Note
Note
You can also open the Ink Manager by choosing Ink Manager from the Separations Preview panel menu.
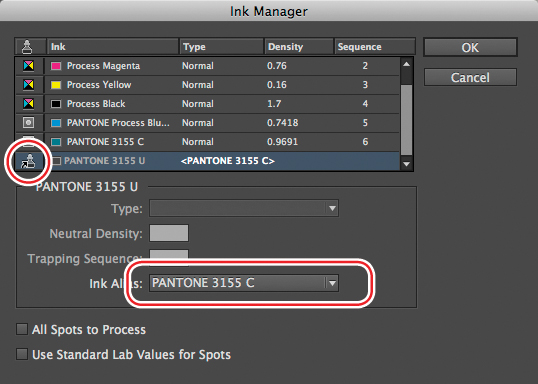
2. In the Ink Manager dialog box, click the spot icon (![]() ) to the left of the Pantone 3155 C color swatch. It changes to a CMYK icon (
) to the left of the Pantone 3155 C color swatch. It changes to a CMYK icon (![]() ). The color will now print as a combination of CMYK colors instead of printing on its own, separate color plate.
). The color will now print as a combination of CMYK colors instead of printing on its own, separate color plate.
This is a good solution to limit the printing to 4-color process without having to change this spot color in the source files of the imported graphics. The All Spots To Process option at the bottom of the dialog box lets you convert all spot colors to process.
3. Click the CMYK icon (![]() ) that now appears to the left of the Pantone 3155 C color swatch to convert it back to a spot color.
) that now appears to the left of the Pantone 3155 C color swatch to convert it back to a spot color.
4. Click the Pantone 3155 U color swatch, and then choose Pantone 3155 C from the Ink Alias menu. Now any page elements to either of the two versions of Pantone 3155 are applied will print on the same separation. (The sample document uses only Pantone 3155 C.) You don’t need to do anything to Pantone Process Blue C. After you relinked the two missing graphics earlier in this lesson, the document no longer contains any elements to which Pantone Process Blue C is applied.
5. Click OK to close the Ink Manager dialog box.
6. Choose File > Save to save your work, and then close the file.
Congratulations! You’ve completed this lesson.
Exploring on your own
1. Create new print presets by choosing File > Print Presets > Define. Define presets to use for oversized formats or for printing to various color or black-and-white output devices you may use.
2. Open the 13_Cover.indd file and explore how each color separation can be enabled or disabled using the Separations Preview panel. Choose Ink Limit from the View menu in the same panel. See how the total ink settings used in creating CMYK colors affect how various images print.
3. With the 13_Cover.indd file active, choose File > Print. Click the Output category on the left side of the Print dialog box, and examine the different options for printing color documents.
4. Choose Ink Manager from the Swatches panel menu and experiment with adding ink aliases for spot colors and converting spot colors to process.
Review questions
1. What problems does InDesign look for when using the [Basic] (Working) profile in the Preflight panel?
2. What elements does InDesign gather when it packages a file?
3. If you want to print the highest-quality version of a scanned image on a lower-resolution laser printer or proofer, what option can you select?
4. What functions do the Ink Manager provide?
Review answers
1. You can confirm that all items necessary for high-resolution printing are available by choosing Window > Output > Preflight. By default, the Preflight panel confirms that all fonts used in the document or inside placed graphics are available. InDesign also looks for linked graphic files and linked text files to confirm that they have not been modified since they were initially imported and also warns you of missing graphic files and overset text frames.
2. InDesign gathers a copy of the InDesign document along with copies of all the fonts and graphics used in the original document. The original files remain untouched.
3. By default, InDesign sends only the image data necessary to an output device. If you want to send the entire set of image data, even if it may take longer to print, in the Print dialog box in the Graphics area, you can choose All from the Send Data menu.
4. The Ink Manager provides control over inks at output time, including the ability to convert spot colors to process colors and to map individual ink colors to different colors.