
16. Working with Long Documents
Lesson Overview
In this lesson, you’ll learn how to do the following:
• Combine multiple InDesign documents into a book file.
• Control page numbering across documents in a book.
• Create text variables for running headers or footers.
• Add footnotes.
• Create cross-references.
• Specify a source document for defining a book’s styles.
• Create a table of contents for a book.
• Generate a formatted index.
This lesson will take about 45 minutes to complete.
Download the project files for this lesson from the Lesson & Update Files tab on your Account page at www.peachpit.com and store them on your computer in a convenient location, as described in the “Getting Started” section of this book.
Your Accounts page is also where you’ll find any updates to the chapters or to the lesson files. Look on the Lesson & Update Files tab to access the most current content.
Longer publications, such as books and magazines, generally consist of one document per chapter or article. InDesign’s book features allow you to combine the documents so you can track page numbers across chapters; create tables of contents, indexes, cross-references, and footnotes; globally update styles; and output the book as one file.
Getting started
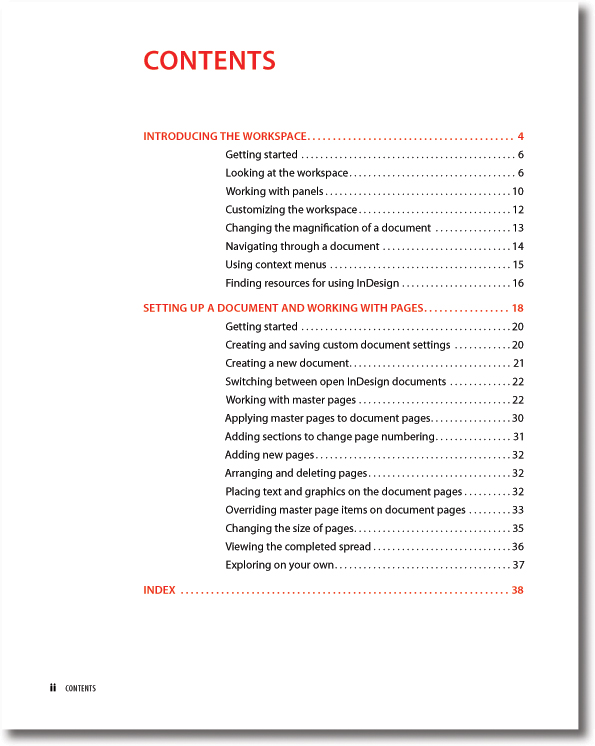
In this lesson, you’ll combine several documents into an InDesign book file. A book file allows you to perform many functions across all the documents—such as creating a table of contents or updating styles—while retaining the ability to open and edit each document individually. The four sample documents you’ll work with consist of the table of contents, first chapter, second chapter, and index from a book in progress. The skills you learn in this lesson apply to long single documents, such as reports, and to multi-document projects, such as books.
1. To ensure that the preference and default settings of your Adobe InDesign program match those used in this lesson, move the InDesign Defaults file to a different folder following the procedure in “Saving and restoring the InDesign Defaults file” on page 3.
![]() Note
Note
If you have not already downloaded the project files for this lesson to your computer from your Account page, make sure to do so now. See “Getting Started” at the beginning of the book.
2. Start Adobe InDesign. To ensure that the panels and menu commands match those used in this lesson, choose Window > Workspace > [Book], and then choose Window > Workspace > Reset Book.
Starting a book
In InDesign, a book is a special type of file that displays as a panel, much like a library. The Book panel displays the documents you add to the book and provides quick access to most book-related functions. In this section, you will create a book file, add documents (chapters), and specify the page numbering for the chapters.
Creating a book file
Before starting a book, it’s a good idea to collect all the InDesign documents for the book into a single folder for the project. This folder is also a good place to store all the fonts, graphic files, libraries, preflight profiles, color profiles, and other files required for completing the publication.
In this exercise, the InDesign documents are already stored in the lesson folder. You will create a new book file and store it in the lesson folder.
![]() Tip
Tip
You open and close book files the same way you open and close libraries. Use File > Open to open the book, and click the panel’s close button to close a book.
1. Choose File > New > Book.
2. In the New Book dialog box, type CIB.indb in the Save As box. Click Save to store the file in the Lesson16 folder.
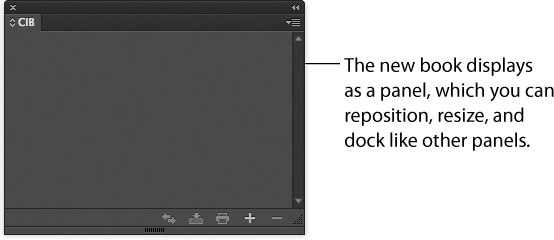
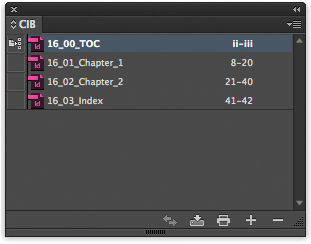
3. A new Book panel named CIB appears. If necessary, choose the book name from the bottom of the Window menu to bring it to the front.
Adding documents to a book file
The Book panel displays a link to each document in the book—it does not literally contain the documents. You can add documents one at a time (as they become available) or all at once. If you start with a few documents and add more documents later, you can change the order of the documents and update the page numbering, styles, table of contents, and more as necessary. The ability to add and reorganize chapters makes the book feature ideal for compiling documents from multiple users into a single publication. In this exercise, you will add all four documents to the book.
![]() Tip
Tip
You can also click the Add Documents button, at the bottom of the Book panel, to add documents to a book.
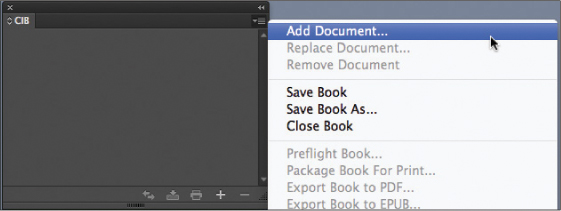
1. Choose Add Document from the Book panel menu (![]() ).
).
2. In the Add Documents dialog box, select all four InDesign files in the Lesson16 folder. You can select a range of continuous files by Shift-clicking the first file and the last file.
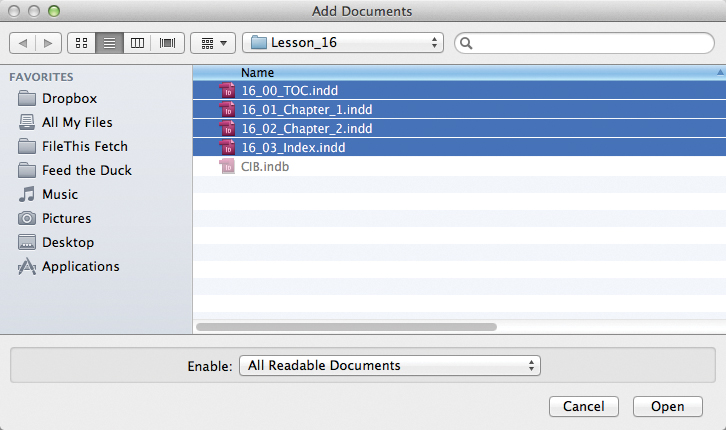
3. Click Open to add the documents to the book. If the Save As dialog box displays for each document, click Save.
4. If necessary, drag the chapters up and down in the book so they are in the order shown: 16_00_TOC, 16_01_Chapter_1, 16_02_Chapter_2, 16_03_Index.
![]() Tip
Tip
When you add multiple documents to a book, the chapters are listed in alphabetical order. You can drag documents up and down in the panel to reorder them. For organizational purposes, most publishers name document files in order, starting with 00 for front matter, 01 for the first chapter, 02 for the second chapter, and so on.
5. Choose Save Book from the Book panel menu (![]() ).
).
Specifying page numbering across the book
A challenging aspect of working with multi-document publications is tracking page numbers as chapters get longer, shorter, and rearranged. InDesign’s book feature can automate this for you, numbering pages in a book from start to finish across multiple documents. You can override the page numbering as necessary by changing the numbering options for a document or creating a new section within a document.
In this part of the lesson, you will specify page-numbering options to ensure continuous, up-to-date page numbers as chapters are added or rearranged.
1. Notice the page numbering shown next to each chapter in the Book panel.
2. Choose Book Page Numbering Options from the Book panel menu (![]() ).
).
3. In the Book Page Numbering Options dialog box, select Continue On Next Even Page in the Page Order section.
4. Select Insert Blank Page to ensure that each chapter ends on a right-facing page. If a chapter ends on a left-facing page, a blank page is automatically added.
5. If necessary, select Automatically Update Page & Section Numbers to keep page numbers updated across the book.
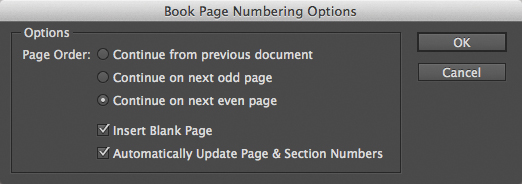
6. Click OK. Notice how each document in the Book panel now starts with an even page number.
![]() Tip
Tip
You can also save the book by clicking Save Book at the bottom of the Book panel menu.
7. Choose Save Book from the Book panel menu (![]() ).
).
Customizing page numbering
At this point, the table of contents already uses Roman numerals for its two-page spread: pages ii and iii. Chapter 1 has a section start that begins on page 8 and uses Arabic numerals. From there, the book uses continuous page numbering. In this exercise, you will adjust Chapter 1’s section start to begin on page 4.
1. In the Book panel, click to select the book’s second document: 16_01_Chapter_1.
![]() Note
Note
When you select Document Numbering Options from the Book panel menu, the selected document opens automatically. You can also open documents by double-clicking them in the Book panel.
2. Choose Document Numbering Options from the Book panel menu (![]() ).
).
3. In the Document Numbering Options dialog box, select Automatic Page Numbering.
4. Make sure that Arabic numerals (1, 2, 3, 4) are selected in the Style menu.

5. Click OK. Choose File > Save and close the document.
![]() Tip
Tip
As you add, edit, and rearrange chapters, you can also force page numbering to update by choosing one of the Update Numbering commands from the Book panel menu.
6. Review the book page numbering now. The first document, containing the table of contents, is still numbered ii–iii, with the remaining documents starting on page 4 and continuing to the end. Try dragging 16_02_Chapter_2 up above 16_02_Chapter_1 to see how the page numbering changes when you rearrange documents in a book file.
7. When you have finished, put the chapters back in the correct order.
Creating a running footer
A running header or footer is text that repeats on chapter pages—such as the chapter number (in the header) and the chapter title (in the footer). InDesign can automatically fill in the text for a running footer according to a chapter’s title, for example. To do this, you define a text variable for the running footer text. In this case, the variable is populated with the chapter title text (the source text). You then insert the text variable on the master page in the footer (or wherever you want it to appear in the document).
![]() Tip
Tip
Running headers and footers are just one use for text variables. You might use a text variable to insert and update the date in a document, for example.
The advantage to using a text variable rather than simply typing the chapter title on the master page is that if the chapter title changes (or you’re starting a new chapter from a template), the footer is automatically updated. Because you can place the text variables wherever you want, the steps for creating running headers and running footers are the same.
In this part of the lesson, you will create a text variable for the chapter title in Chapter 2, place it on the master page, and see how it updates on all the pages of the chapter.
Defining a text variable
First, you’ll create a text variable for the chapter title.
1. In the Book panel, double-click the document titled 16_02_Chapter_2. If necessary, double-click the page 18 icon in the Pages panel to center it in the document window.
2. Choose Type > Paragraph Styles to open the Paragraph Styles panel.
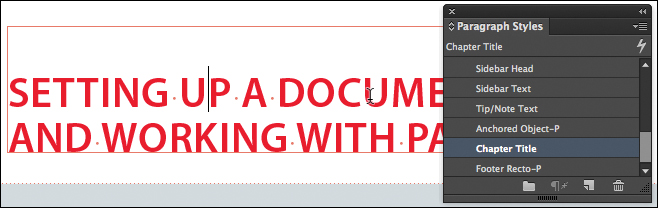
3. Using the Type tool (![]() ), click in the chapter title “Setting Up a Document and Working with Pages” to see the paragraph style applied to it: Chapter Title.
), click in the chapter title “Setting Up a Document and Working with Pages” to see the paragraph style applied to it: Chapter Title.
You will use this information to create the text variable, which will specify that whatever text is using the Chapter Title paragraph style will be placed in the footer.
4. Choose Type > Text Variables > Define.
![]() Tip
Tip
The use of text variables and the ability to generate an automatic table of contents rely on conscientious use of paragraph styles. The reason is these features extract the text you specify—text that is formatted with specific paragraph styles.
5. In the Text Variables dialog box, click New.

6. Type Chapter Title for Footer in the Name box.
Now you will specify that you want text formatted with a specific paragraph style to be used for a running header (or in this case, a running footer).
![]() Note
Note
You noted the paragraph style applied to the chapter title in step 3.
7. Choose Running Header (Paragraph Style) from the Type menu. The Style menu lists all the paragraph styles in the document.
You will choose the paragraph style that is applied to the chapter title.
8. Choose Chapter Title from the Style menu.
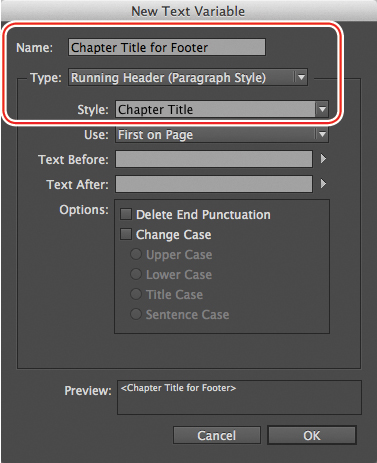
9. Leave all the other settings at the defaults, and click OK. The new text variable appears in the list of variables.
10. Click Done to close the Text Variables dialog box.
11. Choose File > Save.
Inserting a text variable
Now that you’ve created the text variable, you can insert it on the master page (or anywhere in the document).
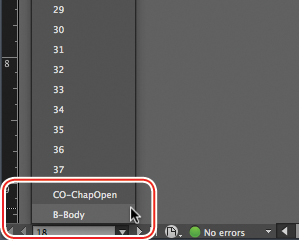
1. Click the page number menu in the lower-left corner of the document window. Scroll down to the master pages, and choose B-Body.
2. Zoom in on the lower-left corner of the left-facing master page.
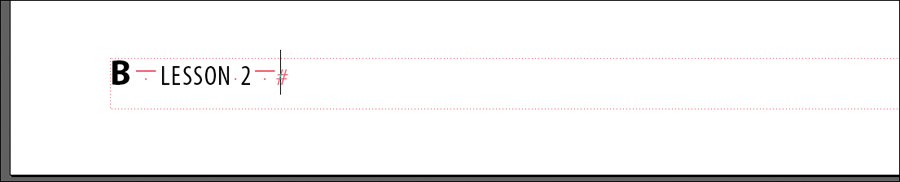
3. Using the Type tool (![]() ), click to place the text insertion point after the em space character (
), click to place the text insertion point after the em space character (![]() ). This is where you will place the variable.
). This is where you will place the variable.
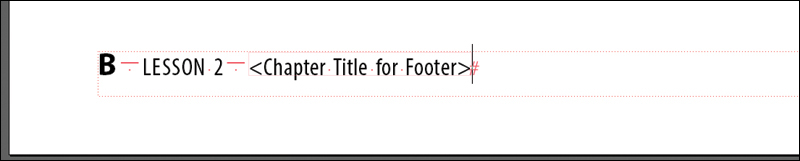
4. Choose Type > Text Variables > Insert Variable > Chapter Title For Footer.
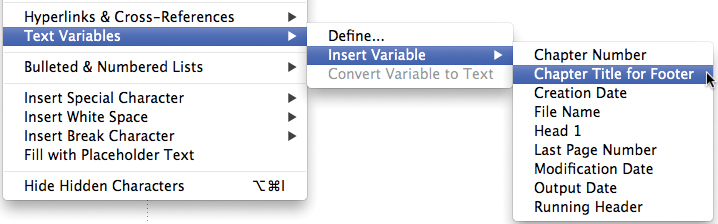
A placeholder for the text variable displays in brackets <>.
![]() Tip
Tip
Changing the source text—in this case, the first instance of text formatted with the Chapter Title paragraph style—automatically changes the running footer on every page.
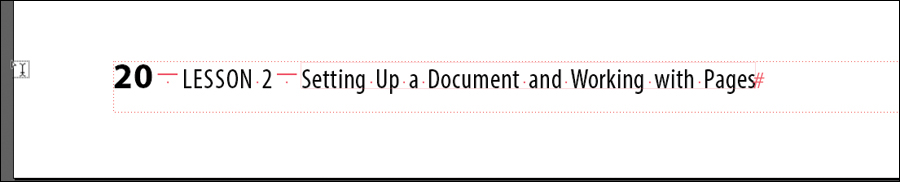
5. From the page number menu in the lower-left corner of the document window, choose 20.
On page 20, notice that the chapter title is now placed in the running footer.
![]() Note
Note
A text variable behaves as a single character when it is populated with the source text. This means that even if the source text is long, it will remain on a single line, possibly truncated.
6. Choose View > Fit Spread In Window, and scroll through the pages to see that the running footer is updated everywhere.
7. Choose File > Save. Leave the chapter open for another lesson.
Each chapter in the book can use the same text variable but have a different running footer according to its chapter title.
Adding a footnote
With InDesign, you can create footnotes or import them from text imported as a Microsoft Word document or as a Rich Text Format (RTF) file. With imported text, InDesign automatically creates and places the footnotes, which you can then fine-tune in the Document Footnote Options dialog box.
In this exercise, you will add a footnote and customize its formatting.
1. In the Book panel, double-click the document titled 16_01_Chapter_1.
2. Choose page 9 from the page menu in the lower-left corner of the document window.
3. Zoom as necessary to see the main body paragraph under the subhead “Reviewing the document window.”
4. Using the Type tool (![]() ), select the second-to-last sentence in the paragraph, starting with “Bleeds are used.”
), select the second-to-last sentence in the paragraph, starting with “Bleeds are used.”
5. Choose Edit > Cut. This text will be used in a footnote rather than in the body of the text.
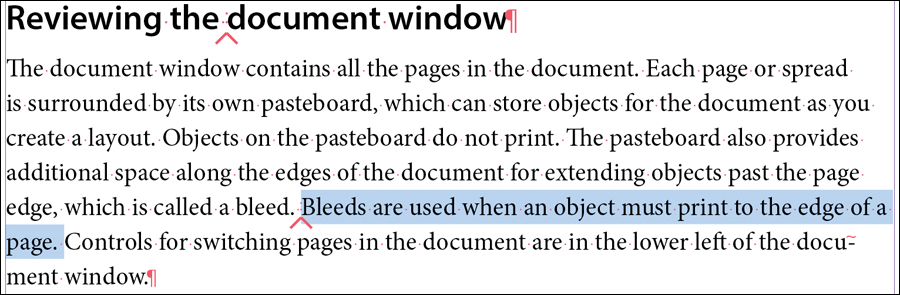
6. Position the text insertion point just after “bleed.”
![]() Note
Note
You cannot insert footnotes in table text or in other footnotes.
7. Choose Type > Insert Footnote.
A footnote reference number appears in the text. In addition, a footnote text frame and placeholder appear at the bottom of the page, along with the blinking text insertion point to the right of the footnote number.
8. Choose Edit > Paste.

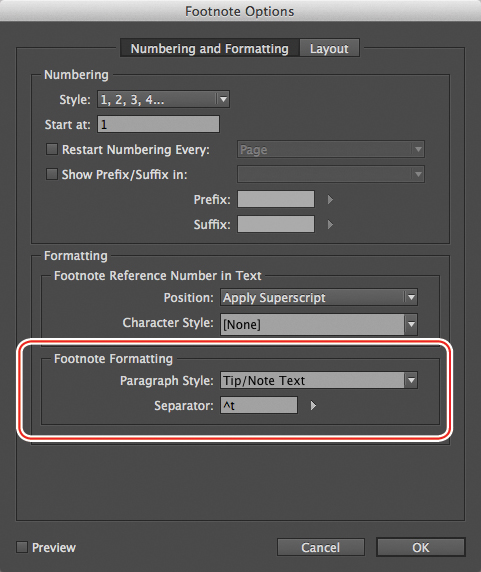
9. With the text insertion point still in the footnote, choose Type > Document Footnote Options.
Notice all the options for customizing the footnote numbering and formatting. Here you can control the numbering style and appearance of the footnote reference numbers and footnote text throughout a document.
10. In the Footnote Options dialog box, under Footnote Formatting, choose Tip/Note Text from the Paragraph Style menu. Click Preview to see the change to the footnote text formatting.
11. Click the Layout tab to view all the options for customizing the placement and formatting of footnotes throughout a document. Leave all settings at the defaults.
12. Click OK to format the footnote.

13. Choose File > Save. Leave the chapter open for the next part of the lesson.
Adding a cross-reference
Cross-references, common in technical books, point you to another section of a book for more information. Keeping cross-references up to date as chapters in a book are edited and revised can be difficult and time-consuming. InDesign lets you insert automatic cross-references that update across the documents in a book file. You can control the text used in the cross-references, as well as their appearance.
In this exercise, you will add a cross-reference that refers the reader to another section in the same chapter of the book.
1. With 16_01_Chapter_1 open, choose page 13 from the page menu in the lower-left corner of the document window.
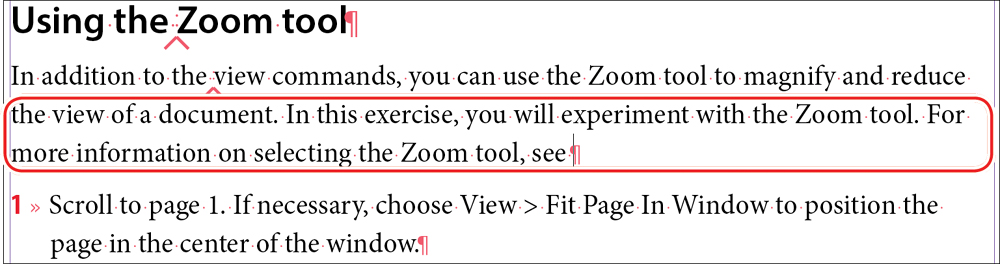
2. Zoom as necessary to see the paragraph under the subhead “Using the Zoom tool.”
3. Using the Type tool (![]() ), click at the end of the paragraph and type For more information on selecting the Zoom tool, see. Leave a space after the word “see.”
), click at the end of the paragraph and type For more information on selecting the Zoom tool, see. Leave a space after the word “see.”
Note that the carets in the text are index markers.
4. Choose Type > Hyperlinks & Cross-References > Insert Cross-Reference.
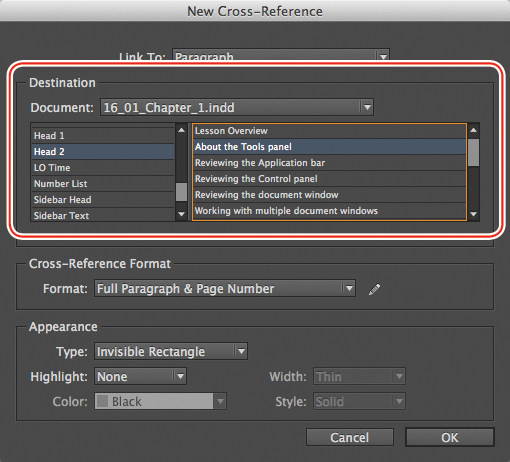
5. In the New Cross-Reference dialog box, leave the Link To setting as Paragraph.
![]() Tip
Tip
You can create cross-references within any document or book chapter. In addition, you can create cross-references to other chapters in the same book.
You will link the cross-reference to text in this chapter that is formatted with a specific paragraph style.
6. In the scroll list at left, select Head 2 to specify the paragraph style of the referenced text.
The cross-reference you’re creating is to a section name that is formatted with the Head 2 style. All the text formatted with Head 2 appears in the scroll list at right. In this case, you know the text you are cross-referencing is under the subhead “About the Tools panel.” When creating cross-references, you may need to look at the referenced text first to determine how it is formatted.
7. In the scroll list at right, select About The Tools Panel.
8. Confirm that Full Paragraph & Page Number is selected from the Format menu under Cross-Reference Format.
9. Click OK to create the cross-reference and close the dialog box.
![]() Tip
Tip
To update cross-references across documents in a book, select Update All Cross-References from the Book panel menu.
10. Type a period (.) after “page 7” in the newly inserted cross-reference text.

11. Choose File > Save. Leave the chapter open for the next exercise.
Synchronizing a book
To maintain consistency across the documents in a book file, InDesign allows you to specify a source chapter for specifications, such as paragraph styles, color swatches, object styles, text variables, and master pages. You can then synchronize selected chapters with the source chapter.
Synchronizing documents compares all the styles in a book document to the source document. The process adds any missing styles and updates any variations from the source chapter, but it does not change any additional styles not included in the source document.
In this exercise, you will change the color used in a heading paragraph style, and then synchronize the book so that the color is used consistently.
1. With 16_01_Chapter_1 still open, choose View > Fit Page In Window. It does not matter which page is displayed.
2. Choose Type > Paragraph Styles to open the Paragraph Styles panel. Click the pasteboard to make sure nothing is selected.
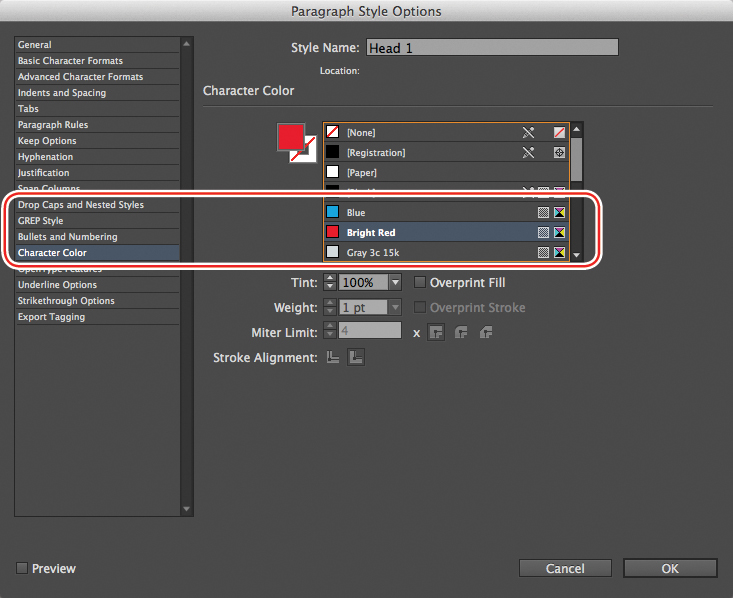
3. Double-click Head 1 to edit the style. From the categories on the left side of the Paragraph Style Options dialog box, select Character Color.
4. To the right, under Character Color, click the Bright Red swatch.
![]() Note
Note
When you make the change to the Head 1 style, you will notice that the subheads change color as well. That’s because in the template for this book, Head 2 and Head 3 are based on Head 1, so they adopt any changes made to the common formatting in Head 1.
5. Click OK to update the paragraph style.
6. Choose File > Save to save the change with the document.
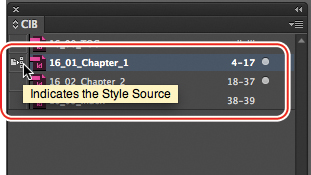
You now need to specify that the current chapter, Getting Started, is the source document in the book.
7. In the Book panel, to the left of the 16_01_Chapter_1 chapter name, click in the blank box.
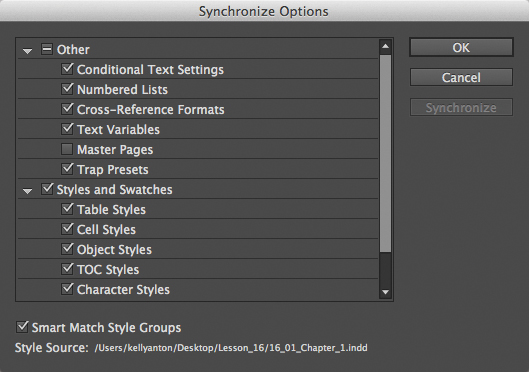
8. Choose Synchronize Options from the Book panel menu (![]() ). Review the options available in the Synchronize Options dialog box; then click Cancel. You do not need to change any options.
). Review the options available in the Synchronize Options dialog box; then click Cancel. You do not need to change any options.
![]() Tip
Tip
InDesign allows you to synchronize master pages in a book. For example, if you add a block of color to a master page used for chapter openers, you can synchronize master pages to have the change affect all the chapters.
Now you will select the chapters you want to synchronize—in this case, the two main chapters, not the table of contents or index chapters.
9. Shift-click to select 16_01_Chapter_1 and 16_02_Chapter_2.
10. Choose Synchronize Selected Documents from the Book panel menu.
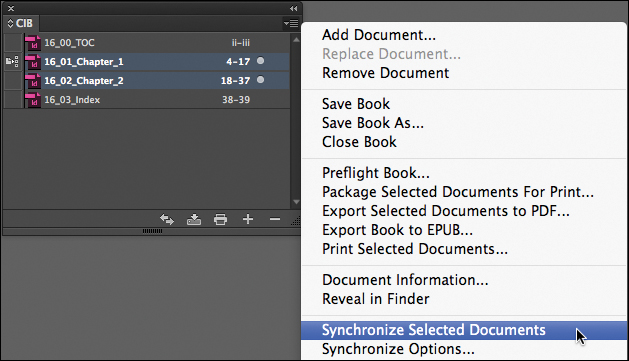
11. An alert indicates the process is complete. Click OK.
12. Choose Save Book from the Book panel menu.
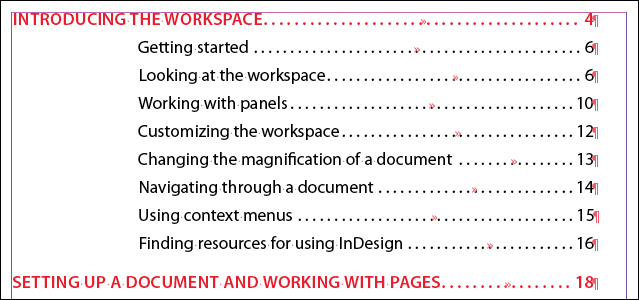
13. In the document window, click the tab for 16_02_Chapter_2. Notice that the heads and subheads have changed from black to red as well.
Generating a table of contents
With InDesign, you can generate a fully formatted table of contents with accurate page numbers for a single document or all the documents in a book file. The table of contents consists of text that you can place anywhere—at the beginning of a document or in its own document within a book file. The feature works by copying text formatted with specific paragraph styles, compiling the text in order, and then reformatting the text with new paragraph styles. The veracity of the table of contents, therefore, depends on correctly applied paragraph styles.
In this exercise, you will generate a table of contents for the book.
Preparing to generate the table of contents
To generate a table of contents, you need to know what paragraph styles are applied to the text that will go in the table of contents. In this case, you will create a two-level table of contents consisting of the chapter names and first-level heads. Now you will open a chapter to study its paragraph styles.
![]() Tip
Tip
Although the feature is called Table of Contents, you can use it to create any type of list based on text that is formatted with specific paragraph styles. The list does not need to contain page numbers and can be alphabetical. If you were working on a cookbook, for example, you could use the Table of Contents feature to compile an alphabetical list of the recipe names in the book.
1. In the document window, click the tab for 16_01_Chapter_1.
2. Choose Type > Paragraph Styles to open the Paragraph Styles panel.
3. On page 4 of Chapter 1, click in the chapter title. In the Paragraph Styles panel, notice that the Chapter Title paragraph style is applied.
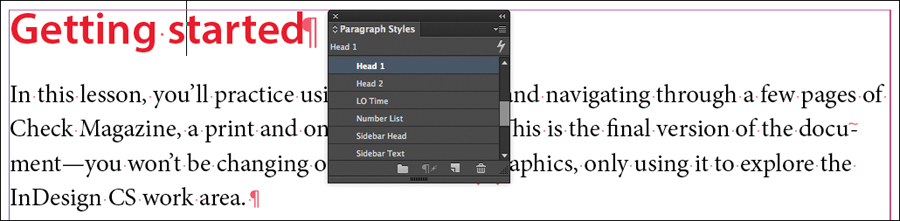
4. On page 6 of the chapter, click in the “Getting started” section name. In the Paragraph Styles panel, notice that the Head 1 paragraph style is applied.
5. Close and save 16_01_Chapter_1 and 16_02_Chapter_2.
6. In the Book panel, double-click 16_00_TOC to open it.
You are going to generate your own table of contents in the next two exercises.
Setting up the table of contents
Now that you are familiar with all the paragraph styles that will be used to generate the table of contents, you will “map” them in the Table Of Contents dialog box. In this exercise, you will specify what paragraph styles to include and how to format the final table of contents.
1. Choose Layout > Table Of Contents.
2. In the Table Of Contents dialog box, make sure the Title box is empty. In this template, the master page supplies the table of contents title.
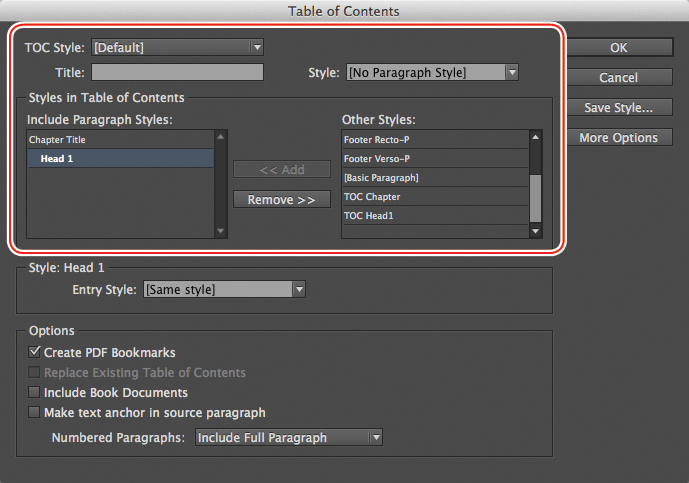
3. Under Styles In Table Of Contents, scroll through the Other Styles list box at right to locate Chapter Title. Select it and click Add.
4. Repeat step 3 to locate and select Head 1. Click Add. Leave the Table Of Contents dialog box open.
![]() Tip
Tip
Paragraph styles for formatting tables of contents and lists often make sophisticated use of nested styles and tab leaders to achieve a complex look automatically. For example, tables of contents often start with a bold chapter number followed by a chapter name, a custom tab leader, and bold page numbers.
Now that you have specified what text needs to go in the table of contents—text formatted with Chapter Title followed by Head 1—you will specify how it should look in the table of contents. The paragraph styles for formatting the table of contents are included in this template. If you did not create those styles in advance, you can select New Paragraph Style from the Entry Style menu.
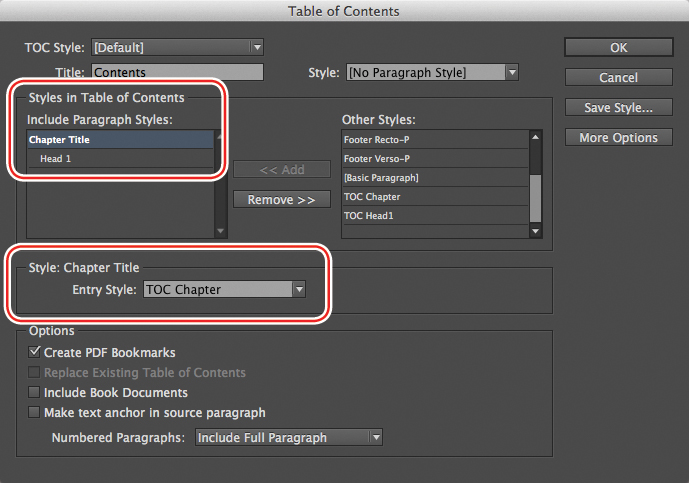
5. On the left side of the Table Of Contents dialog box in the Include Paragraph Styles list box, select Chapter Title.
![]() Tip
Tip
In the Table Of Contents dialog box, click More Options to see controls for suppressing page numbers, alphabetizing the list, and applying more sophisticated formatting. If you have more than one list in a document—for example, a table of contents and a figures list—you can click Save Style to save the settings for each type.
6. Under Style: Chapter Title below, choose TOC Chapter from the Entry Style menu.
7. In the Include Paragraph Styles list box, select Head 1. Under Style: Head 1, select TOC Head1 from the Entry Style menu.
![]() Tip
Tip
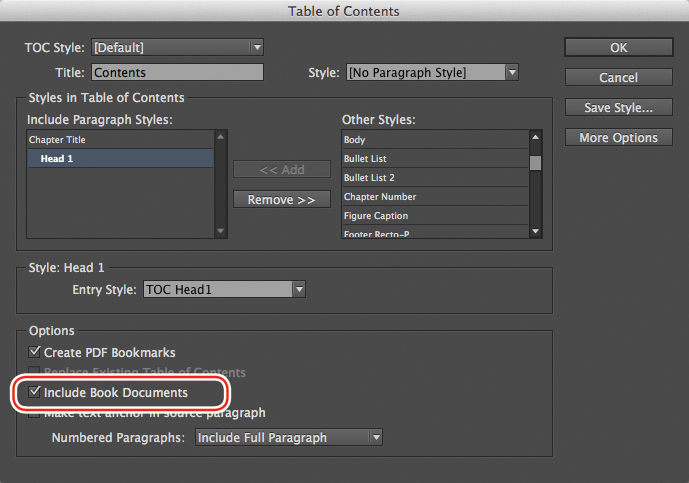
If you export a document or book as a PDF, select Create PDF Bookmarks in the Table Of Contents dialog box to automatically create Bookmarks in the PDF.
8. Select Include Book Documents to generate a table of contents for all the chapters in the book file.
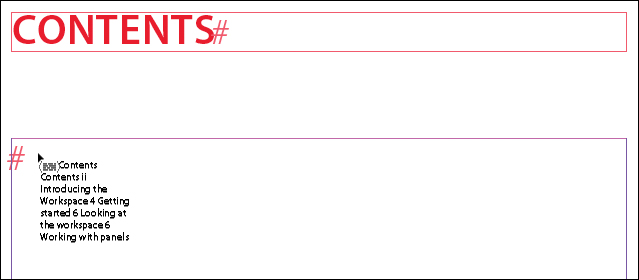
9. Click OK. (An alert may display asking if you want to include items in overset text; click Yes.) The pointer is now loaded with the table of contents text.
Flowing the table of contents
You flow the table of contents text the same way you flow other imported text. You can either click in an existing text frame or drag to create a new text frame.
1. Click in the text frame below the word “Contents.” The table of contents flows into the text frame.
2. Choose File > Save, and close the document.
![]() Tip
Tip
As chapters are added to the book, edited, and reflowed, you can update the table of contents by choosing Layout > Update Table Of Contents. Note that if the table of contents adds pages to the beginning of the document, you may need to update the table of contents to account for any page number changes.
3. From the Book panel menu (![]() ), choose Save Book. This saves all changes made to the book file.
), choose Save Book. This saves all changes made to the book file.
Indexing a book
To create an index in InDesign, you apply nonprinting tags to text. The tags indicate the index topic—the text that shows up in the index. The tags also indicate the reference—the range of pages or cross-reference that shows up in the index. You can create up to a four-level index with cross-references for an individual document or for a book file. When you generate the index, InDesign applies paragraph and character styles and inserts punctuation. While indexing is an editorial skill that requires special training, designers can create simple indexes and generate an index from tagged text.
Viewing index tags
In this exercise, you will view existing index tags to get familiar with them.
![]() Tip
Tip
To add a new index entry, select the text to be inserted into the index with the Type tool, then choose New Page Reference from the Index panel menu.
1. In the Book panel, double-click 16_01_Chapter_1 to open the chapter. Zoom in on the first paragraph of page 7.
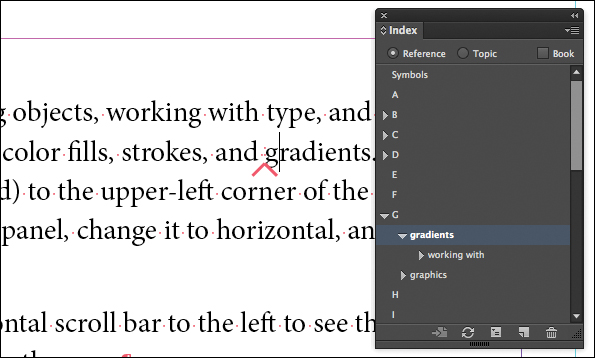
2. Choose Window > Type & Tables > Index to open the Index panel.
3. Note the index markers (![]() ) in the text, and the topics listed in the Index panel. Click the arrows in the Index panel to see the topics.
) in the text, and the topics listed in the Index panel. Click the arrows in the Index panel to see the topics.
4. Close 16_01_Chapter_1.
Generating an index
As you do with a table of contents, when you generate an index you need to specify paragraph styles. You can also fine-tune the index with character styles and custom punctuation. InDesign provides default styles for the index, which you can customize after generating the index, or you can use styles set up for a book’s template.
In this exercise, you will generate the formatted index using existing styles.
![]() Tip
Tip
InDesign lets you import a list of index topics from another InDesign document. You can also create a list of topics independent of index references. Once you have the list of topics, you can start adding references.
1. In the Book panel, double-click 16_03_Index to open the index chapter.
2. In the Index panel, click Book in the upper-right corner to display the index for all the chapters in the book.
3. In the Index panel, choose Generate Index from the panel menu (![]() ).
).
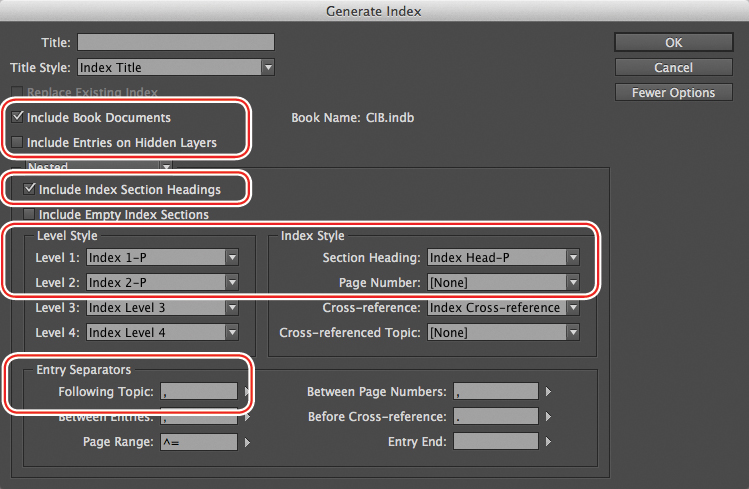
4. In the Generate Index dialog box, delete the highlighted word “Index” in the Title box. The title is already placed on the page in a different text frame.
5. Click More Options to see all the index controls.
6. At the top of the dialog box, select Include Book Documents to compile the index from all the chapters.
7. Select Include Index Section Headings to add letter headings, such as A, B, C. Be sure that Include Empty Index Sections is not selected.
8. On the right side of the dialog box under Index Style, choose Index Head-P from the Section Heading menu. This specifies the formatting of the letter headings.
9. Under Level Style, choose Index 1-P for Level 1 and Index 2-P for Level 2 to specify the paragraph styles applied to the various levels of entries in the index.
10. At the bottom of the dialog box under Entry Separators, type a comma and a space in the Following Topic box. This specifies the punctuation inserted after an index topic and the first reference.
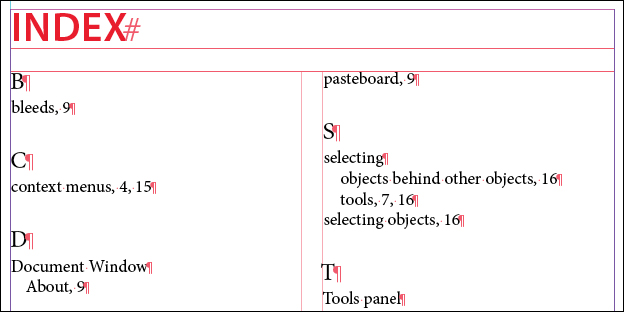
11. Click OK. Now you’ll flow the index into the text frame.
12. Click the loaded pointer in the main text frame to flow the index.
![]() Tip
Tip
If you manually touch up the index, for example by inserting manual column or page breaks, those changes will be reflected even if you update the index.
13. Choose File > Save, and close the document.
This introduction to long documents showed the potential of various features. For example, when documents are combined into a book file, you can print the entire book at once or output it all as a PDF. Keep in mind that the ability to automatically create a table of contents, index, footnote, and cross-reference are useful for longer individual documents as well as multi-document publications.
Congratulations. You have completed the lesson.
Exploring on your own
To experiment more with long-document features, try the following:
• Add and delete pages from one of the documents in a book file to see how the page numbers in the Book panel automatically update.
• Change an object on a master page in the source document. Then choose Synchronize Options from the Book panel menu (![]() ) and select Master Pages in the Synchronize Options dialog box. Synchronize the book to see how all pages based on that master page update.
) and select Master Pages in the Synchronize Options dialog box. Synchronize the book to see how all pages based on that master page update.
• Add a new footnote and experiment with the layout and formatting controls.
• Create different cross-references in the book to reference a chapter name or section name rather than a page number.
• Add more index topics and references at various levels.
Review questions
1. What are the advantages of using the book feature?
2. Describe the process and results of moving a chapter file in a book.
3. Why go to the trouble of creating an automatic table of contents or index?
4. How do you create running headers and footers?
Review answers
1. The book feature allows you to combine multiple documents into a single publication with the appropriate page numbering and a complete table of contents and index. You can also output multiple files in one step.
2. To move a file in a book, select it in the Book panel and drag it up or down. The book repaginates as necessary.
3. The automatic table of contents and index features require some thought and setup, but they are automatically formatted, accurate, and easy to update.
4. Use the Running Header text variable on a master page to create a running header or footer. The text on each document page updates according to the text variable’s definition.