
8. Finishing, Rendering, and Outputting
Lesson overview
• Perform color-correcting tasks in Adobe Premiere Pro
• Apply color grading presets in Adobe SpeedGrade
• Export a sequence as a movie file in Adobe Premiere Pro
• Apply encoding presets in Adobe Media Encoder
• Render a composition from Adobe After Effects
• Perform batch rendering tasks in Adobe Media Encoder

Export settings in Adobe Media Encoder.
Preserving your final audio edit in Adobe Premiere Pro
If you are continuing from the previous lesson, feel free to continue with the Adobe Premiere Pro project you already have open. If you are starting at this lesson, navigate to the Lesson 08 folder on your hard drive and open the Adobe Premiere Pro project Lesson_08 Start.prproj. Save your Adobe Premiere Pro project file in the Lesson 08 folder as Afrolicious Promo.prproj.
Because you are continuing with a previous version of this edit, you’ll first save a new version of your sequence. This allows you to go back to the previous version if need be and is a recommended best practice in the video editing workflow.
1. In the Project panel, twirl open the Sequences bin.
2. Click on the Afrolicious Promo Final Audio Mix sequence to select it. Choose Edit > Copy to copy it to your clipboard. Then choose Edit > Paste.
This will make a duplicate of this sequence outside of the Sequences folder.
3. To modify the name of the sequence, click on the name of the sequence to select it.
4. Change the name of the sequence to Afrolicious Promo Final Color Correction, press Return (Enter), and drag it into the Sequences folder.

5. Double-click the Afrolicious Promo Final Color Correction sequence to load it in your Timeline.
Note that the sequence appears in a new tabbed Timeline panel in front of your original sequence.

Having multiple Timeline panels open simultaneously can be useful in certain situations, but it can also be confusing. For the time being, you’ll close the first Timeline to eliminate the possibility of accidentally modifying the wrong sequence.
6. In the Timeline panel, click the Afrolicious Promo Final Audio Mix tab to select it.
7. Press Command+W (Ctrl+W) to close this sequence.
The new sequence is now the only one visible in the Timeline, which will ensure that you are working on the most recent iteration.
8. Press Command+S (Ctrl+S) to save your Adobe Premiere Pro project.
The basics of color correction
Before rendering and outputting a final movie, it is standard procedure to spend some time adjusting the color in your video. You should do this to ensure that all video clips in a given sequence are consistent in terms of hue, saturation, and brightness.
Color correction is also a very important step in meeting broadcast standards. Color correction may involve a variety of processes. The most common is white balancing. White balancing is the process of adjusting the hue of a video so that any object in a shot that appears white in reality also appears white in the video. This is often necessary if lighting exposure was miscalculated during production. Many color-correcting tools include white balancing controls as well as saturation and contrast controls.
Similar tools for color correction may be used in the process of color grading to achieve stylistic adjustments to hue, saturation, and brightness.
Color grading entails selectively adjusting the color of a video using masks and color-correcting tools to enhance the colors that were captured in-camera. This is done to draw attention to specific subjects in frame and further evoke the desired emotional tone of a story.
For example, color grading can be used to colorize a sequence to make it appear as though it was shot on old film stock or to make a scene that was shot during the day appear to take place during twilight. Color grading can be a simple process driven by presets, or it can be a complex set of operations that is artistic and highly technical.

Using color-correction techniques in Adobe Premiere Pro
Adobe Premiere Pro comes equipped with a variety of color-correction tools and effects that will serve the needs of most projects.
In this exercise, you’ll learn the basics of using the YC Waveform monitor in Adobe Premiere Pro CS6 as well as how to perform simple color correcting with the Three-Way Color Corrector effect.
Before you start color-correcting the clips in Adobe Premiere Pro, it is recommended that you change your workspace so the related panels are showing in your Adobe Premiere Pro interface.
Setting up for color correction
Adobe Premiere Pro, along with the other applications in Adobe CS6 Production Premium, comes with preset workspaces so that you can quickly change your user interface without having to open all of the relevant panels manually. By enabling a workspace, the relevant panels are placed for you automatically.
There are workspaces in Adobe Premiere Pro for various tasks, including one for color correction.
1. Change your Adobe Premiere Pro workspace by choosing Window > Workspace > Color Correction.
You want your user interface to correspond to the instructions in this lesson, so you’ll reset your Color Correction workspace to its default setting in case the workspace had been modified on your system.
2. Reset this workspace by choosing Window > Workspace > Reset Current Workspace, and then click Yes.
3. At the bottom right of the interface, you should see a Reference panel. You want to bring up the YC Waveform monitor in this panel. Click the wrench icon at the top right of the Reference panel and choose YC Waveform from the menu.

Using the YC Waveform
The YC Waveform displays a graph showing the signal intensity in the video clip. The horizontal axis of the graph corresponds to the video image (from left to right), and the vertical axis is the signal intensity in units called IRE (named for the Institute of Radio Engineers).
The YC Waveform displays luminance information as a green waveform. Bright objects produce a waveform pattern (bright green areas) near the top of the graph; darker objects produce a waveform toward the bottom. Generally, luminance and chroma values should be about the same and distributed evenly across the 7.5 to 100 IRE range.
The YC Waveform also displays chrominance information as a blue waveform. The chrominance information is overlaid on the luminance waveform.
When you scrub through your Timeline, you should see that the luminance of all of the shots fall within this broadcast-safe range. In projects that use raw media with extended dynamic range, the footage may not be broadcast safe and the editor would need to spend considerable time color correcting it. However, in this lesson you’ll be using the YC Waveform monitor to make sure that any color corrections that you apply to the clips do not cause the luminance of these clips to fall outside the broadcast-safe range.
Using the Three-Way Color Corrector
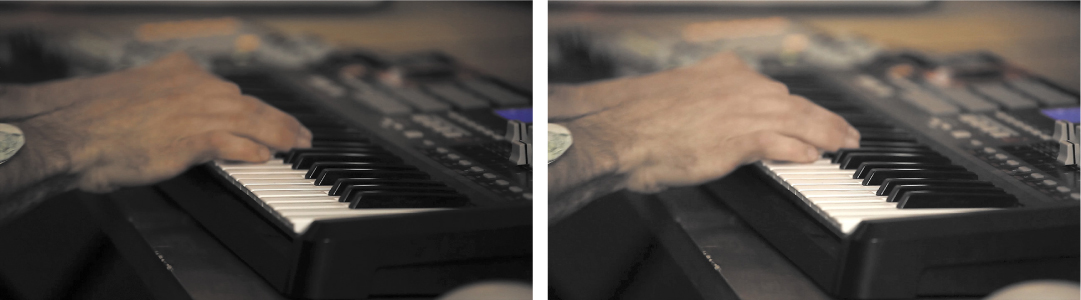
Next, you’ll do some white balancing to the video clips of the inside of Joey’s recording studio because these shots appear a bit too warm—that is, the hue of the colors in the shot is a bit too orange/yellow—and could use a bit of overall brightening. Select the second of these shots, Studio_04.mp4. The clip shows Joey’s hands on a synthesizer keyboard.
Press the equal (=) key to zoom in on your Timeline. Press the minus (–) key to zoom out of your Timeline. Press the backslash () key to show your entire sequence in your Timeline.
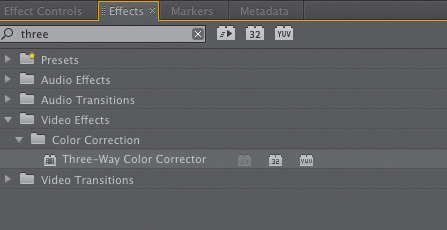
1. Press Shift+7 to access the Effects panel. In the Effects panel search field, type three to find the effect called Three-Way Color Corrector. Double-click on the effect to apply it to the selected clip in your Timeline.
2. Press Shift+5 to access the Effect Controls panel and look at the controls for the Three-Way Color Corrector.

3. Adjust your CTI to Studio_04.mp4. This clip just needs a bit of brightening. In the Three-Way Color Corrector effect controls, you’ll see a slider for Input Levels, which has a black slider handle on the left, a white slider handle on the right, and a gray slider handle in the middle. Adjust the white slider to the right, keeping an eye on the Program Monitor to see the changes. You should notice that the clip now appears brighter overall. While making the adjustments, also look at the YC Waveform monitor to make sure that the luminance peak doesn’t go higher than 100 IRE.
When color correcting, it’s also important to maintain consistency and continuity in your edit. If you’re color correcting a clip that shows the same location or intended lighting conditions as other clips in your edit, make sure that the color correcting you do doesn’t make the shots look different in terms of brightness, contrast, and color hue.
4. Adjust your current time indicator (CTI) to show the previous shot, Studio_03.mp4. Is there color consistency between these two shots? Adjust the input sliders on the Three-Way Color Corrector effect on Studio_04.mp4 until the lighting of the shots match.
5. When you’re done, scrub the CTI in your Timeline ahead to clip Studio_06.mp4, and select the clip. Notice how this shot is a bit warmer in hue than the previous studio shots. You can use the Three-Way Color Corrector effect again but this time to apply white balancing.
6. Press Shift+7 to access the Effects panel. Your previous search results should still be visible. If not, type three in the Effects panel search field to find the Three-Way Color Corrector effect. Double-click on the effect to apply it to the selected clip in your Timeline.
7. Press Shift+5 to access the Effect Controls panel. Notice the three color wheels in the Three-Way Color Corrector: one for Shadows, one for Midtones, and one for Highlights. Each has its own eyedropper color sampler. You can achieve white balance in a clip with this effect by using the Highlights eyedropper to sample an area in frame that is pure white or close to pure white. White balancing can be enhanced by using the Shadows eyedropper to sample an area in frame that is pure black or close to pure black.
8. Use the Highlights eyedropper to sample an area in Studio_06.mp4 that is close to pure white, such as a white area on the computer monitor. Use the Shadows eyedropper to sample an area in frame that is close to pure black, such as the black outer frame of the computer monitor or the black speaker hanging on the wall in the background of the shot. Use the Midtones eyedropper to sample an area in frame that is of medium luminance, such as the singer’s beige shirt. Adjust the middle slider under Input Levels to the right to brighten the shot a bit and match the other Studio clips in the sequence.
9. To see the subtle changes that you’ve made to this shot, click the “Toggle the effect on or off” button for the Three-Way Color Corrector in the Effect Controls panel. Make sure that this button is left on after reviewing.

10. Press Command+S (Ctrl+S) to save your project.
About SpeedGrade
Adobe SpeedGrade is a high-end, color-grading application that is a recent addition to the Adobe Creative Suite of applications. Adobe SpeedGrade lets you handle technical grading tasks like matching shots and creating consistent color across a scene. The GPU-accelerated, 64-bit LumetriTM Deep Color Engine delivers real-time playback as you grade footage regardless of its resolution or frame size. SpeedGrade supports file-based workflows and includes support for raw and high dynamic range (HDR) footage. HDR support retains the bit-depth of your image files, whereas the ability to work directly with raw images—recorded straight from the camera sensor—lets you pull details from blacks and highlights that might otherwise have been crushed or blown out.
Adobe SpeedGrade does not yet Dynamically Link with other Adobe applications, but it will in future releases.
Using color-correction presets in SpeedGrade
Color grading is a specialized skill that requires knowledge of advanced color-compositing techniques. This book will not explore SpeedGrade’s more advanced features, but we’ll briefly cover how to take advantage of one of its simpler features, applying a Look preset to a clip. Get ready to do that now!
1. In your Adobe Premiere Pro Project panel, in the Live folder, find the clip Live_06.mp4. Double-click this clip to display it in the Viewer. Play the clip to see how it looks without a color correction adjustment.
2. With this clip selected, go back to the Project panel and choose File > Send to Adobe SpeedGrade. A file navigation window opens.
3. Navigate to the Lesson 08 folder, and then click Save.
A progress bar window appears as Adobe Premiere Pro renders out all of the frames in this clip as .dpx image files. SpeedGrade will open automatically.
4. Once in SpeedGrade, you’ll encounter a user interface that looks different when compared to the other applications in the Adobe Creative Suite. Click the Monitor tab at the top of the interface to see the clip you’ll be working on.
Below the Monitor is a row of Transport buttons, a Timeline, and a row of tabs that allow you to view and apply various settings.

5. In the Timeline, click on the gray bar that represents the video clip.
6. Click the Look tab. You should see a row of buttons labeled Overall, Shadows, Midtones, and Highlights. Choosing one of these buttons determines which range of color luminance you want to affect. Leave Overall highlighted.
Luminance values of any video frame can be broken down to three categories. Darkest regions are shadow areas, brightest are highlights, and everything in between is midtone range.
At the bottom of the Look panel is a row of tabs for preset Look Examples that includes Cinematic, Desaturation, Style, and Temperature.
7. Choose any one of the preset Look Examples, and then select any preset within. To apply the chosen preset, you must press Return (Enter).
These presets are a series of color correction adjustments saved into presets and can be applied to a shot to achieve a specific look. Using presets saves you time and you don’t need to make multiple adjustments manually.
Now you need to output your clip from SpeedGrade. You’ll also need to do an intermediate render, because SpeedGrade does not yet Dynamically Link objects in its Timeline with Adobe Premiere Pro or After Effects.
8. At the top right of the interface, click the Output tab to see all of the Output settings.

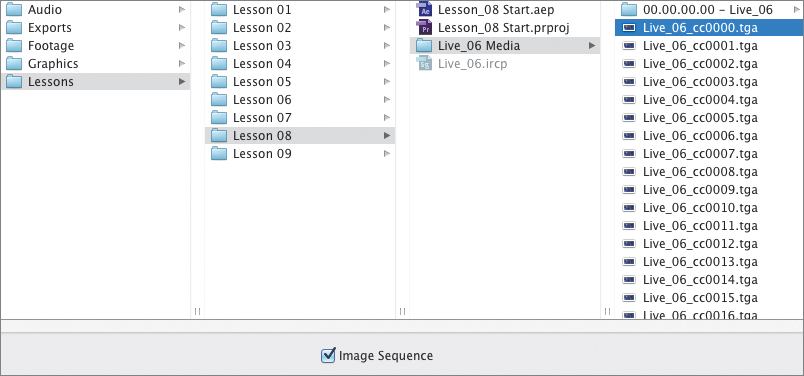
9. You need to tell SpeedGrade where to save your rendered frames. In the Folder settings, click the arrow to the right of the Desktop icon to show a folder navigation menu that will list the hard drives on your system. Choose the hard drive where your Adobe CS6 Project Assets folder is, and then continue clicking the arrow icons to the right as you navigate deeper into your system’s folder structure until you reach the folder Live_06 Media in the Lesson 08 folder.

10. Name the file Live_06_cc, and set the Format & Options to TGA (no alpha).

11. Click Render to render a new .tga image sequence. Doing this will render a .tga image file for every frame in the clip, and you’ll end up with many .tga images, all numbered chronologically according to their order of appearance in the clip.

Using a clip from SpeedGrade in Adobe Premiere Pro
Next, you’ll import your rendered .tga image sequence to Adobe Premiere Pro and perform a couple of simple operations so that you can use it to replace a clip that’s in your Timeline.
Do not get confused between an image sequence and an edited sequence in your Premiere Pro project. This lesson uses the term “sequence” to refer to both, but they are not the same.
Importing and interpreting an image sequence
To begin, follow these steps to import the sequence:
1. Switch back to Adobe Premiere Pro. Choose File > Import. Navigate to the Live_06 Media folder, and select the first frame that you rendered from SpeedGrade, Live_06_cc0000.tga. At the bottom of the Import window, select the Image Sequence check box and click Import.
2. The new clip appears in your Project panel. If you had any item in the Live bin selected, this .tga sequence will be put in the Live bin.
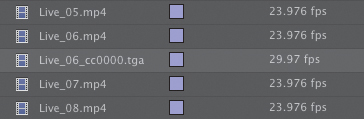
For any clip that you import to your Adobe Premiere Pro project, you want to make sure that its native frame rate matches the frame rate of the sequence that you would put it in.
Look at the Frame Rate column in the Project panel to confirm that, indeed, the imported .tga sequence has a frame rate of 29.97 fps.
3. Your edited sequence, however, has a frame rate of 23.976 fps. Confirm this by selecting your Timeline panel and then choosing Sequence > Sequence Settings.
4. In the Sequence Settings window, confirm your sequence’s frame rate at the top.

5. Click OK at the bottom of the Sequence Settings window to close it.
6. For your imported .tga sequence to conform to the different frame rate on your edit, you must modify it so that Adobe Premiere Pro interprets its frame rate as some rate different from its actual frame rate. Right-click on it in your Project panel, and then choose Modify > Interpret Footage.

7. In the Modify Clip dialog, select “Assume this frame rate,” and then enter 23.976 in the field next to it. Click OK.

Replacing a clip in your Timeline with a different source
Using a simple shortcut, you can replace a clip in your Timeline with a different clip in your Project panel. Any effects that are applied to the original clip are retained on the replacement clip.
1. Double-click Live_06_cc0000.tga in your Project panel to open it in the Viewer, and then play it to verify that the Look preset in SpeedGrade was rendered properly. Next, you’ll replace a clip in your Timeline with this clip.
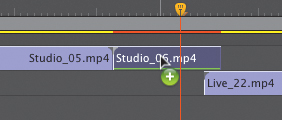
2. Scrub through your timeline and find the clip Live_06.mp4 on track Video 2. Select this clip.
3. Hold down the Option (Alt) key as you click on the video frame in the Source Monitor, and then drag into your Timeline.
This exercise was intended as a brief exposure to applying a preset to a clip in SpeedGrade. Because the color graded clip may not match the look and feel of the rest of your edited sequence, let’s remove it.
4. Press Command+Z (Ctrl+Z) to undo the clip replacement. Then select Live_06_cc0000.tga in your Project panel and press Delete.
Understanding compression and other factors for exporting files
When exporting a sequence, it is important to bear in mind the way you intend to share or broadcast the media, for example, whether you want to upload it to a streaming website or burn it to a DVD or Blu-ray Disc. The codec used to compress the video, the frame rate, and file size are all factors that need to be accounted for when exporting.
Compression
An infinite number of colors exist in light, but only so many can be captured by video cameras and represented on monitors. Because light carries such an incredibly unwieldy amount of visual information, it will always need to be compressed before it is practical for viewing and distributing as digital media content. To that effect, the highest quality that a video file can be is the quality of the initially captured and compressed source file. To understand video compression, you’ll focus on the exporting stage of media: from the editing platform to a self-contained media file. Through an understanding of how and why compression works, you can control the balance between the quality and size of your media, and also avoid unwanted outcomes in the process of exporting. Video compression is the process of compacting sound and image information, whether compressing it as a lossless file (no loss of quality from original) or a lossy file (some loss of image and sound quality).
During the process of editing footage in applications such as Adobe Premiere Pro and After Effects, the video does not undergo any compression in addition to the compression that inevitably occurred in-camera. Compression only occurs when the video is rendered or exported. When you export a video using lossless compression, the file experiences only “data compression,” a process of analyzing and eliminating redundancies on the binary level. It does not experience “image compression,” or a visible deterioration from the original quality. A lossless export yields a very large file size that is unwieldy for web sharing, yet is an essential part of rendering a master copy for screening, or for subsequent stages of compression in a variety of formats. It is important to note that you cannot improve the original quality of footage (create information) by any conventional methods; however, you can create information by adding graphics and effects.
Lossy compression, on the other hand, squeezes the sound and image information for more practical file sizes. When you export a video using H.264 or MPEG-4, you lose a certain amount of information but in varying degrees depending on the settings. Lossy, like lossless, puts the source files through routine data compression to conform the video to a self-contained file. Unlike lossless, however, lossy compression is also characterized by image compression. For example, a lossless image will store information for each pixel of each frame uniquely, whereas a lossy video export (depending on the amount that it is compressed) might lump clusters of color data together to make them easier to store and thus allow for a smaller file size. For example, instead of saving a multitude of different magenta hues as separate pieces of information, it may analyze them and decide to attribute them to the same color value, forever discarding the subtle differences between the unique colors to reduce the amount of memory needed to store the information. Depending on the codec, it may also compress across time, meaning that certain regions of the frame retain the same information over a series of frames. During lossy compression, the video codec analyzes the frame and compacts the information for playback and sharing convenience.
When evaluating the best settings to use when performing a lossy export, it is good practice to consider the file format at which it was captured to minimize unnecessary compression.
Format
As the demand increases for higher-quality video at quicker loading speeds, industries develop video format standards to continuously improve the way that digital video is viewed and shared. Different codecs and file formats use different methods to store color and light information. A standard video compression is H.264, which is used for web streaming on sites such as YouTube and Vimeo. It is the standard compression used in Blu-ray media and is the format that many HD video cameras natively record to, such as several of the latest DSLR models. In most cases, exporting in H.264 is ideal because of its versatility and quality in relation to its file size.
Frame rates
A video’s frame rate is indicative of the number of frames that are displayed sequentially during one second. For example, at a typical frame rate of 30 fps, 30 still images are projected in rapid succession in the duration of one second. Thirty frames per second has become the standard NTSC speed for video in DVD and online media, which was changed to 29.97 fps, because of a slight change in broadcast frequency to account for FM interference. The typical frame rate used in film cameras is 24 fps, which is the frame rate that many videographers choose to shoot at to emulate the consistency of film. When exporting video it is important to note the frame rate at which the video was originally shot, or else the export might have choppy playback.
File size
When exporting a video, one of the most important variables you want to control is the file size of the exported file. For instance, a normal DVD is capable of storing only 4.7 GB of information, and YouTube recommends a file size of 2 GB or less. If you want your video to load quickly, it needs to be relatively smaller than either of these examples. An easy way of controlling the size of the video file is to manually set the bitrate of the export in the Video tab at the bottom right side of the Adobe Media Encoder Export Settings interface. It’s important to note the duration of the video in proportion to your target file size when evaluating the best bitrate to use.
Exporting the final output with Adobe Premiere Pro
After editing your video, creating a motion graphic, finalizing your audio mix, and doing some color correcting, you’re ready to export your sequence as a movie file. Before you dive into the finer details of rendering, you’ll export the sequence directly from Adobe Premiere Pro using simple presets.
1. With the Afrolicious Promo Final Color Correction sequence in the Timeline panel, choose File > Export > Media to open the Export Settings window.

As its name suggests, this window allows you to apply settings to export your sequence in a range of file formats, frame rates, frame sizes, and video and audio compression settings. You can configure all of these settings manually, or you could choose from a list of presets. Let’s use presets for this simple render.
2. At the top right under Export Settings, choose H.264 from the list of presets in the Format menu. Choose HD 720p 23.976 from the Preset menu. Click on the filename next to Output Name, and name your output Afrolicious Promo Final. Navigate to the Exports folder (Adobe CS6 Project Assets > Exports) and click Save.
3. Without changing anything else, click Export at the bottom of the Export Settings window.
An Encoding window appears with a progress bar that shows how much time remains for the render to finish.
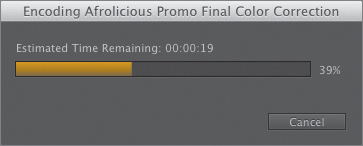
Because the movie is just over one minute in duration, this render shouldn’t take very long. That said, render times will vary depending on the speed of your computer’s processor(s), how much RAM is installed in your computer, and whether or not your computer has a supported graphics card for the Mercury Graphics Engine, among other factors.
When your render is finished, you’ll find the Afrolicious Promo Final.mp4 movie file in the Exports folder on your computer’s hard drive. You should be able to open this file with the Apple QuickTime player or other supported media player software.
This movie file was rendered using a preset for web video compression. But what if you wanted to render your Adobe Premiere Pro sequence as an archival quality copy plus other versions using different export settings without having to render them one at a time directly from Adobe Premiere Pro? That’s when you’d use Adobe Media Encoder CS6.
About Adobe Media Encoder
Adobe Media Encoder (AME) CS6 is a separate, 64-bit software application that saves you time by automating the process of creating multiple encoded versions of source files, Adobe Premiere Pro sequences, and After Effects compositions. The new Preset Browser, improved batch-encoding performance, more new presets, and user interface enhancements in Adobe Media Encoder CS6 make outputting your work to multiple formats and devices a faster, more intuitive process.
Adobe Media Encoder CS6 has a new yet familiar “panelized” user interface like that of Adobe Premiere Pro and other Adobe Creative Suite applications. For example, you can group panels in frames; position, size, and float panels and frames to your liking; and save workspace configurations.
Rendering master files
It’s a good idea as an editor to have a final export of your edit that could serve as the master file that other copies can be made from. Simply by copying this master file, you can easily and quickly make other copies without having to do all of the raw rendering for each, particularly if your sequence requires a long render.
Therefore, your master file should be of the highest possible quality, because a master file cannot make copies that are of higher image quality than itself. Once image quality of a movie file is lost as a result of data compression or reduction in frame size, it cannot be regained. And, in a worst-case scenario, if your raw project files get lost or corrupted, you would at least have your master movie file.
In this exercise, you’ll render a master file of your final Adobe Premiere Pro sequence, but this time you’ll use Adobe Media Encoder CS6. You’ll also render other versions of your movie—one for mobile devices and one for the web—using AME.
1. In Adobe Premiere Pro, with the Afrolicious Promo Final Color Correction sequence in the Timeline, choose File > Export > Media. The Export Settings window appears. Let’s create a preset for minimal data and image compression, and no audio compression.
2. Under Export Settings, choose QuickTime from the Format menu. QuickTime is an industry-standard movie file format that is compatible with most nonlinear editing systems, including Adobe Premiere Pro CS6.
If you are using a Windows system, you must have the QuickTime Player installed to export QuickTime files from AME. To download the QuickTime Player go to http://support.apple.com/downloads/#quicktime.
If you want to export using QuickTime for Windows, you’ll need to purchase the Pro version of QuickTime.
3. In the Video tab below Export Settings, set Video Codec to Animation.
A codec is a data compression algorithm that can yield a movie file that still has high-image quality even though the actual movie file size isn’t unmanageably large. Codecs, like the popular H.264, have allowed high-definition video to stream on the Internet while maintaining good image quality.
The Animation codec applies minimal compression to the movie’s file size and to its image quality, thereby making it suitable for yielding a master file. Be warned, however, that because of minimal compression, the output file size will be huge.
4. Under Basic Video Settings, uncheck the box next to the Width and Height dimensions to unlock their proportions. Set Width to 1280 and Height to 720. These dimensions denote the frame size of the rendered movie, which you want to be no smaller than your sequence frame size in Adobe Premiere Pro.
5. Set Frame Rate to 23.976. Again, this was the frame rate in your Adobe Premiere Pro sequence, and you want to maintain that.
6. Set Aspect to Square Pixels (1.0). This refers to whether or not the pixels would be stretched horizontally to meet certain video broadcast standards.

7. Click the Audio tab to access all of the Audio Export settings. Set Audio Codec to Uncompressed. Set Sample Rate to 48000 Hz, Channels to Stereo, and Sample Size to 16bit. These are all standard settings for audio in a movie file that yields optimum quality.
Saving a preset
Now let’s save all of the settings we configured as a preset that can be used again later.
1. At the top of the Export Settings window, for Output Name, save this movie as Afrolicious Promo Final Master in the Exports folder (Adobe CS6 Project Assets > Exports). Next to the Preset menu, click the Save Preset button.

2. In the Choose Name window that appears, name this preset QuickTime Lossless 1280x720. Click OK.
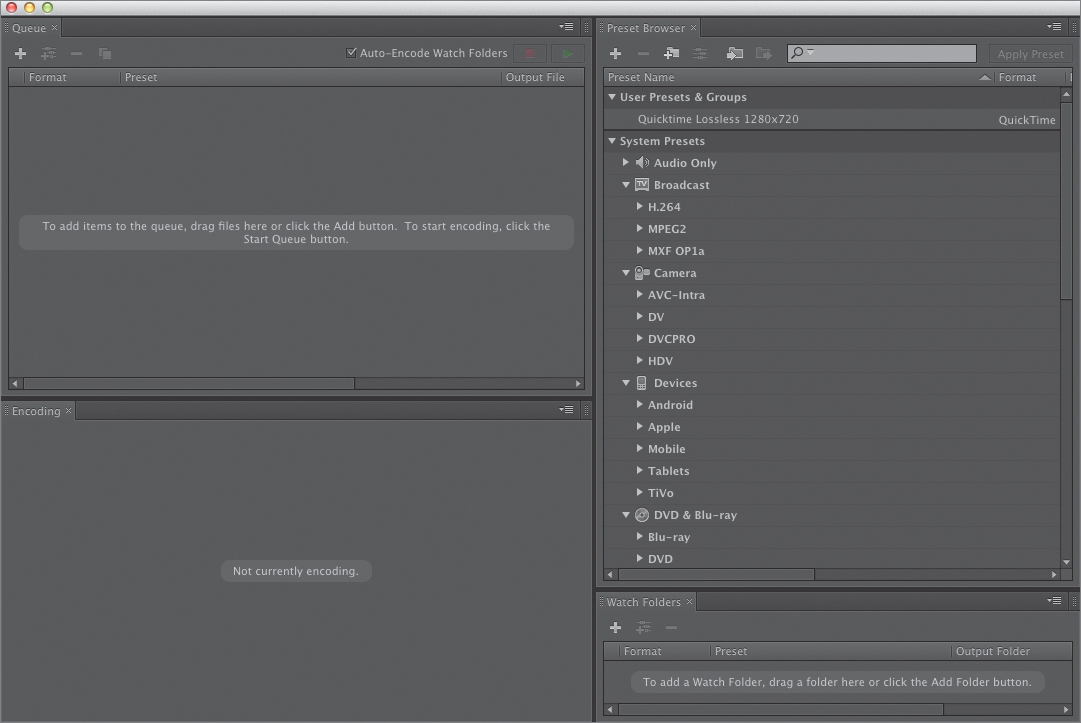
3. At the bottom of the Export Settings window, next to the Export button, click the Queue button to open Adobe Media Encoder CS6.
A Queue panel lists your Afrolicious Promo Final Color Correction sequence from Adobe Premiere Pro. The Queue in AME allows you to render several movies at the same time. Not only that, but AME can use the Dynamic Link between it and other applications in the Adobe CS6 Production Premium Suite. This means that you can have sequences from Adobe Premiere Pro in the Queue as well as compositions from After Effects.
Next to the Queue is the Preset Browser where you can choose among dozens of render presets for various devices and outputs.
Before you render your master file, let’s add a few more renders to the Queue using various presets.
Encoding video for web and mobile
There was a time not too long ago when the dominant devices for viewing movies were televisions and film projection systems in movie theaters. Today, movies can not only be produced by anybody with a video camera and a computer, but can be shown on a variety of different devices, including high-definition computer monitors, tablet devices, and smartphones.
To ensure that your movie will download as quickly as possible and look as good as it possibly can on any given device, it’s best to create separate rendered movie files that are intended to play on specific types of devices. Because screens for mobile devices and computer monitors vary in size, and because higher-quality movie files are larger files to download, you want to give the end users options so they can make efficient use of their bandwidth and the capabilities of their movie viewing devices.
Encoding a movie file to be played on a variety of devices requires compressing the raw video in your edited Adobe Premiere Pro sequence to yield a movie file that can be streamed or downloaded as fast as reasonably possible from the Internet, yet still maintain maximum image quality.
In this exercise, you’ll apply a variety of export presets in AME to your final edited sequence in Adobe Premiere Pro to create separate exports for different types of devices.
1. With the Afrolicious Promo Final Color Correction sequence in the Queue, select it, and then browse through the Preset Browser. Let’s apply a render preset to the Queue for Android tablet devices.
2. Under Devices, twirl open Android, and then double-click on the preset Android Tablet - 720p 23.976. Doing so creates another render instance in the Queue for your Adobe Premiere Pro sequence. Click on the Output File name for this new render, navigate to the Exports folder, and name this Afrolicious Promo Final - Tablet. Click Save.
3. Let’s add a render for smartphones. Also under Devices, twirl open Apple, and then double-click on the preset Apple TV, iPad, iPhone 3G and newer - 360p Widescreen 23.976. This should create yet another render instance. Click on the Output File name for this render, navigate to the Exports folder, and name this Afrolicious Promo Final - Smartphone. Click Save.
4. Now let’s add another render that could easily be uploaded to YouTube. Select Afrolicious Promo Final Color Correction in the Queue. Under Web Video, twirl open YouTube, and then double-click on the preset YouTube HD 720p 23.976. Another instance will appear. Click on its Output File name, navigate to the Exports folder, and name it Afrolicious Promo Final - YouTube. Click Save.
5. Under Web Video again, twirl open Flash, double-click on the preset Web - 1280×720, 16×9, Project Framerate, 4500kbps, and Format F4V. A fifth instance appears in the Queue. Click on its Output File name, navigate to the Exports folder, and name it Afrolicious Promo Final - Flash. Click Save.

Adding an After Effects composition to the Queue in AME
As mentioned earlier, AME allows you to queue up not only Adobe Premiere Pro sequences but also After Effects compositions.
In this exercise, you’ll add an After Effects composition to your Queue in AME and render it as a master file.
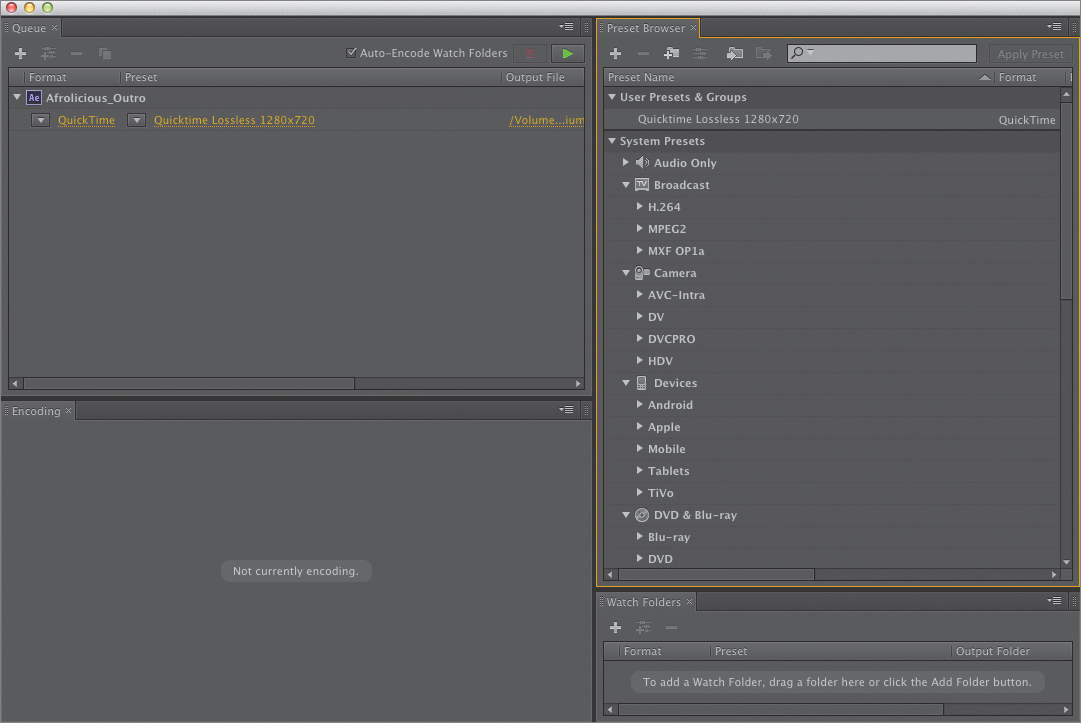
1. Click the Add Source button at the top left of the interface to bring up a navigation window. Navigate to the Lesson 06 folder, select Lesson_06_Finish.aep, and click Open.

2. In the Import After Effects Composition window that appears, you need to choose which composition in this project you want to add to the Queue. Click the disclosure triangle next to Comps to twirl it open, and then select Afrolicious_Outro. Click OK.
This After Effects composition will now be in the Queue under the five render instances you added previously.
3. Each item in the Queue has two down arrow menu buttons. Under Afrolicious_Outro, click the left menu button and choose QuickTime. Click the menu button to the right and choose the preset you made, Quicktime Lossless 1280×720.
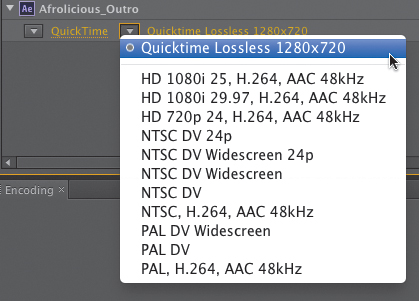
4. Click on the queued item’s Output File name, and navigate to the Exports folder. Name this render Afrolicious_Outro Master.mov, and then click Save.
5. Click the Start Queue button. You should see multiple progress bars in the Queue panel as each of the movie files renders.

6. When the renders are complete, navigate to the Exports folder and verify that they are there.
As you’ve witnessed, Adobe Media Encoder CS6 allows you to easily set up exports of an Adobe Premiere Pro sequence and an After Effects composition using a library of export presets, so that you can make master copies for your archives as well as copies that will play on a variety of web and mobile devices.
Rendering your compositions in After Effects
With its multiprocessor rendering engine, After Effects CS6 has the power to tackle even the most complicated compositing and motion graphics render tasks, saving you time and allowing you to meet your deadlines.
1. Open After Effects CS6. Choose File > Open Project, navigate to your Lesson 06 folder, select Lesson_06 Start.aep, and click Open. Now let’s open the Render Queue.
2. Press Command+Option+0 (Ctrl+Alt+0) to bring up the Render Queue. Much like the Queue in AME, the Render Queue in After Effects allows you to line up multiple compositions to be rendered and/or multiple instances of the same composition to be rendered.
3. In the Project panel, open the Comps folder, and then select and drag the Afrolicious_Outro composition into the Render Queue.
4. Any composition that is added to the Render Queue is given default settings. Click the disclosure triangles next to Render Settings and Output Module to twirl them open and see these defaults.
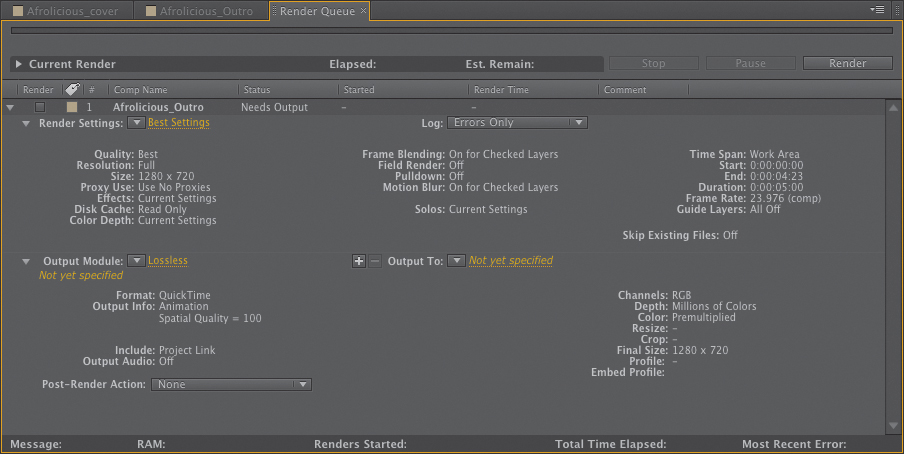
For the sake of simplicity, let’s use a preset.
5. Click the menu button next to Output Module and choose H.264 from the menu.
6. Click on the “Not yet specified” text next to Output To, navigate to the Exports folder, and name this render Afrolicious_Outro - h264.mp4. Click Save.
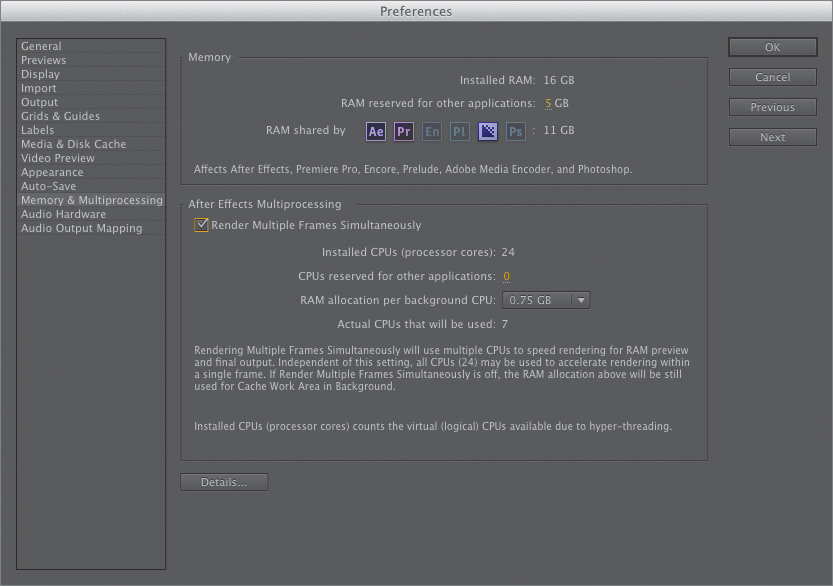
After Effects CS6 has a render engine that gives you the option to use all of your CPU cores—not just one—and allocate a specified amount of your computer’s RAM to each core. This enables After Effects to render multiple frames simultaneously, dramatically increasing the speed of your render.
7. Choose After Effects > Preferences > Memory & Multiprocessing (Edit > Preferences > Memory & Multiprocessing) to activate the multiprocessor render engine in After Effects CS6. Select the Render Multiple Frames Simultaneously check box. The RAM allocation per background CPU setting determines how much RAM will be allocated to each CPU core. Set this to 0.75 GB and click OK.
8. In the Render Queue, click Render. When Multiprocessor Rendering is turned on, it may take a few moments for the rendering to start. Once it starts, you should see a yellow progress bar move across the top of the Render Queue. When the yellow line gets all the way across, your render is finished.

Sometimes you might need to render an After Effects composition but simultaneously continue to do other work in After Effects. In this case you could add an After Effects composition to the Queue in AME and have that render while After Effects is free to do other work.
Review questions
1. How would you perform white balancing to a video clip in Adobe Premiere Pro?
2. How do you send a clip from Adobe Premiere Pro to Adobe SpeedGrade?
3. How do you export a sequence from Adobe Premiere Pro?
4. How do you apply multiple preset render instances to a queued sequence or composition in Adobe Media Encoder?
5. How do you render a composition in Adobe After Effects?
6. How do you add an After Effects composition to the Queue in Adobe Media Encoder?
Review answers
1. One way would be to use the Three-Way Color Corrector effect. Use the Highlights eyedropper to sample an area of the video frame of an object that, in reality, is pure white and is intended to look pure white in the frame.
2. You would select the clip in your Project panel in Adobe Premiere Pro, and then choose File > Send to Adobe SpeedGrade.
3. Choose File > Export > Media, apply Export Settings, and then click Export.
4. Select the queued item, and then double-click on a preset in the Preset Browser.
5. Add the composition to the Render Queue, apply Render and Output settings, and then click Render.
6. Click the Add Source button, choose the After Effects project file, and then select the desired composition.