
Discover how to organize your site—save time and keep your Web site consistent. You will also find out how to update your site easily by taking advantage of GoLive’s site tools.
Some of the best features come together in the site creation and management tools in GoLive CS2. A Web site is a collection of pages, images and other resources that are linked in a way that makes it easier for the viewer to find the information they need. The site features in GoLive CS2 allow you to organize these files and maintain valid links to your resources.
In this lesson, you’ll learn how to do the following:
Create a new blank site.
Create new pages for a site.
Add files to a Site Folder.
Save an image file from Photoshop into the web-content folder.
Close and re-open a site window.
Create a site from existing files.
Organize a site.
Create a site color palette.
A site is a location on the World Wide Web. Each Web site contains a home page, which is the first document users see when they enter the site. The site might also contain additional documents and files that are linked using hyperlinks to the home page.
In GoLive you can take advantage of features to help assure that an organized site is created and posted to the World Wide Web.
A GoLive site mimics how the structure will appear when the site is posted—a structure that includes navigation links from the main home page to other pages, and other assets that can include image, PDF, Flash, QuickTime, and other types of files.
These are some of the benefits of working in a GoLive site:
You can keep site assets, such as images and HTML pages, organized and accessible to the creator. New Folders can be created, as well as renamed, in the site window.
The GoLive site window tracks changes and automatically updates any link name or location changes.
The site window keeps you informed of unreferenced files. The Used column in the site window shows which assets are being referenced by html pages in the site.
You can keep the look of a site consistent and make updating easier by using features available only when working with site files. See Lesson 10, “Using Stationeries, Components, Page Templates, and Snippets” for more information.
You can use site tools such as the In & Out Links palette that can track which files and links are being used, and by which pages.
The Color tab of the site window can help you to be more consistent by defining a color palette to be used throughout the site.

In this lesson, you will create a site using two methods: one without an existing home or main page, and one with an existing home page. The latter could be from a previously created site residing on your computer or on a server.
In this first example, you will create a blank site and import images. You will then use the site window to help you understand the organizational tools available when using a GoLive site.
To ensure that the tools and palettes function exactly as described in this lesson, delete or deactivate (by renaming) the Adobe GoLive CS2 preferences file. See “Restoring default preferences” on page 3.
Start Adobe GoLive CS2. Close the Welcome Screen if it appears.
Choose File > New to open the New options window.
Choose Site > Create Site and select Blank Site. Click Next.
In the Specifying a Site Name and Location window, type alumni in the Name text field.
Click on the Browse button beneath the Save To text field and locate the Lesson02 folder on your hard drive. Click OK (Windows) or Choose (Mac OS), then click Next.
The “Use a Version Control System?” window appears. Choose “Don’t Use Version Control.” Click Next. You can find out more about Version Cue in Lesson 13, “Using Version Cue and Bridge with GoLive CS2.”
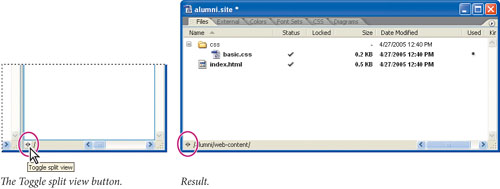
In the “Publish Server Options” window, choose “Specify Server Later.” Click Finish. The alumni.site window appears.

The index.html page is bolded, indicating that it is the home page, upon which all other navigation and links are based.
Note
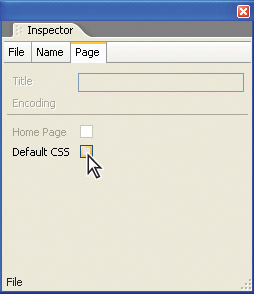
You can make any page your home page by selecting it in the Files tab and choosing the Page tab of the File Inspector. Check the Home Page checkbox. The selected page is bolded, indicating that it is now the home page for this site.
A GoLive site includes many parts. In the site window, you see the index.html page and a css folder. As a default, the index.html is a blank page. Cascading Style Sheets can be an integral part of Web sites. GoLive CS2 provides you with a few initial CSS selector names ready for you to customize. Cascading Style Sheets are discussed briefly in this lesson, but you can discover more in Lesson 5, “Adding and Formatting Text.”
Leave the site window open.
Beyond what you see in the site window, GoLive created three folders and a .site file within a project folder in your directory system. Notice that GoLive provides backups for the site file in case of corruption. The folders reside in the Lesson02 folder on your hard drive, into which you saved the alumni site.

The .site file is the file you select to open a site. It contains important information about your site and should always be open when you are working on pages that are part of a Web site.
The web-content folder contains the files that you see in the Files tab of the GoLive site window. This includes the contents of your site, such as pages, images, PDFs, and Flash files. These are the source files that are typically loaded to the FTP server when the site is complete. Save files to this folder when adding new assets to your site.
The web-data folder is where you will find GoLive Extras. When in a site window, these items are found on the Extra tab on the right side. They are found in your directory system inside the named site folder. Many of these items will be used throughout the book.
The web-settings folder is used to store settings you make in the site window and the Site Settings dialog box.
Note
![]() As a default, your site window is in split view. If at any time during this lesson you prefer to see more of the Files tab, you can click on the Toggle split view button in the lower portion of the site window, or uncheck Show Split View from the Site palette menu.
As a default, your site window is in split view. If at any time during this lesson you prefer to see more of the Files tab, you can click on the Toggle split view button in the lower portion of the site window, or uncheck Show Split View from the Site palette menu.
GoLive organizes a site into ten tabs to handle different aspects of site management. Listed below are brief descriptions of each tab and its function.
Files—. Contains HTML, XHTML, XML, media, and other files, as well as folders that you can use to organize the files. This tab will be discussed in detail throughout this lesson.
External—. Displays external URLs and e-mail addresses referenced by the site files. This tab is discussed at the end of this lesson.
Colors—. Contains a collection of colors used in your site. You will use the Colors tab in this lesson to create a site color palette.
Font Sets—. Contains a collection of font sets used in your site. The font sets are lists of alternative fonts that you use to override the browser’s default display font settings. Font sets are discussed in Lesson 5, “Adding and Formatting Text.”
CSS—. Contains a list of the External Style Sheets, classes, and identifiers (IDs) used in your site. The CSS tab also lists the number of times a style sheet, class, or identifier is defined in the site and how many times it’s used. Learn more about Cascading Style Sheets in Lesson 5, “Adding and Formatting Text.”
Diagrams—. Contains diagrams with a graphical view of possible site implementations. Diagrams are discussed in detail in Lesson 11, “Using Site Diagrams.”
You can also show and hide the right pane of the site window that contains these additional tabs:
Publish Server—. Displays the site on a remote server while GoLive is connected to a publish server (an FTP, WebDAV, or local file server). You will discover how to publish your site in Lesson 12, “Managing and Publishing Web Sites.”
Collections—. Displays custom sets of one or more files that you select manually or define as a result of a query, syntax check, or find operation.
Errors—. Contains missing files, orphan files, Smart Object warnings, and files that have a name that doesn’t meet your file name constraints. An orphan file is referenced in a link, but GoLive can’t find it if the file is outside the web-content folder. If you manage files in the site window, you can avoid creating orphan files. Click a file in the Errors tab to open the Error Inspector.
Extras—. As discussed earlier in this lesson, the Extras tab contains all the files and folders in the site’s web-content folder and web-data folder.
The default tab that you see in your site window is the Files tab. It may look similar to the directory system of your computer. Use the Files tab when updating file names, creating new folders and deleting files. GoLive alerts you if a file is being used, and where it is located, and it can even update link names and locations in any pages using the changed files.
Now that you have created a site, you will create pages and add them to the Files tab of the site window.
Make sure that the new alumni.site window you created earlier is still open. If not, choose File > Open Recent and choose alumni.site. Select the Files tab. You can also choose File > Open and navigate to Lesson02 > alumni > alumni.site.
Choose File > New. The New options window appears.
Choose Web > Pages > HTML page. Click OK. A new, blank HTML page is created.
Click the cursor in the upper left of the page window and type Homecoming information coming soon! and then choose the Center Align button (
 ) from the Main toolbar.
Click the arrow to the left of Head to see that any new pages created while the alumni site window is open, are automatically linked to the external styles stored in the Files tab of the site window. This feature can be deactivated. Read more about CSS and how this may affect your page in Lesson 5, “Adding and Formatting Text.”
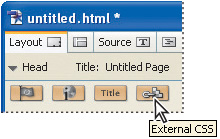
Double-click on the External CSS link in the head section to access the style sheet and make a change. The basic.css window appears.
Click on the style selector named body. The right side of the window updates to show attributes for the contents that are in the body tag.
Note
The <body> tag contains the visible section of an HTML page; any changes to this style will apply to the text you add to the new page. Since you are editing an external style, any changes made in the basic.css window will reflect on every page within your site. See how this can be overridden with an Internal Style Sheet in Lesson 5, “Adding and Formatting Text.”
Click on the Font Properties tab (
 ) on the right side of the basic.css window. Specific attributes for the font appear.
Type 14 px in the Size text field. Press Enter. The text changes to 14 pixels.
Click and hold on the Create new font family button (
 ) and select the Helvetica Set. The text changes to a sans serif face.
Click the Close box in the basic.css window, and choose Yes (Windows) or Save (Mac OS) to save the changes you made.
Keep the untitled HTML page open for the next part of the lesson.
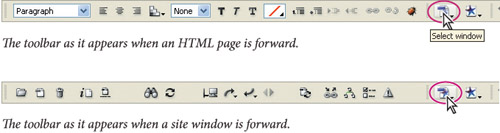
The Main toolbar is contextual. The options change depending upon whether you have a page or site window forward. Choose the Window menu item. Notice that you can select any open pages or sites from the list at the bottom. You can also use the Select window button from the toolbar to toggle between the page and site window.
When creating sites, you must be very careful to keep your site content together. Otherwise, you may create a page whose links are not current when uploaded to the server. GoLive helps you to keep the files together by providing you with options in the Save As window.
Choose File > Save. In the Save As window, type homecoming in the File name text field.
Click on the Site Folder button (
 ) and choose Root (Windows) or Root folder (Mac OS) from the drop-down menu. By choosing Root, you are navigated automatically to the web-content folder for the alumni site.
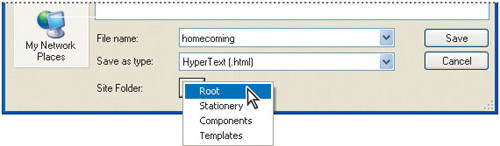
Choose Save.
GoLive recognizes that you have not provided this page with a title. A Set title alert window appears.
In the Enter a new title text field, type VirtechU Homecoming, then press Set. The page is now titled correctly, and the file is saved. It also appears in the Files tab.
Choose File > Close to close the saved page. Your alumni.site window should still be open.
Though you are creating a new site, there could be many assets for the site that are already created. This might include logos, images, or even existing HTML pages that are to be incorporated into this site. In this part of the lesson, you will add them to the Files tab.
Make sure the alumni.site window is still open and choose File > Import > Files to Site. The Add to site window appears.
Navigate to the Lesson02 folder on your hard drive. Open the folder named add_to_blank. There are two files in this folder.
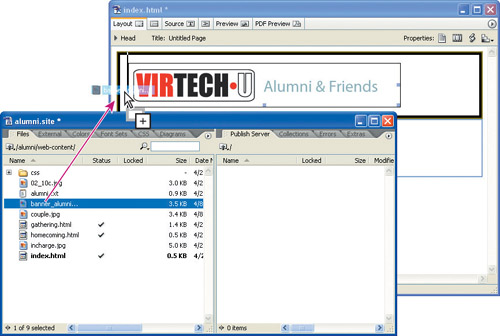
Click on the first file, banner_alumni.gif, and Shift+click on the other file, gathering.html to select the files. Click Open (Windows) or Choose (Mac OS).
A Copy Files alert window appears, indicating that the gathering.html is going to change the reference for a link when the file is relocated. Click OK.
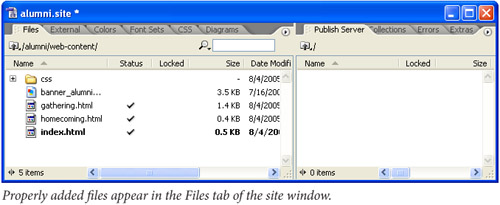
The files are added to the files tab of the alumni.site window.
Leave the alumni.site window open.
When working in other applications, you may wish to add files directly to your Files tab. In this section you will use Photoshop, or any other application capable of re-sizing an image and saving it as a JPEG. If you do not have an image editing program, read this section without doing the steps.
Launch Adobe Photoshop or any other editing program able to save a JPEG. Choose File > Open. Navigate to the Lesson02 folder on your hard drive and open the file named incharge.jpg.
In Photoshop, re-size the image by selecting Image > Image Size. Make sure Resample Image is checked and the method selected is Bicubic.
Change the number in the Pixel Dimension Width text field to 125 and click OK.

Note
Resolution does not affect the image when used for on-screen presentation. What is important is the Pixel Dimension area in the top portion of the Image Size window.
After resizing the image, you will apply the Unsharp Mask filter. The Unsharp Mask filter makes an image crisper. This next step can be skipped if your image editing program does not have an Unsharp Mask feature.
Double-click on the Zoom tool (
 ) to zoom the image to Actual Pixel size. It is best to preview filters in Photoshop when an image is at its actual pixel size.
Choose Filter > Sharpen > Unsharp Mask. Enter these settings:
Amount, 200; Radius, 1.0; Threshold, 10. The Threshold setting allows the image to become crisp without adding sharpening to areas that should remain smooth. Click OK.

Choose File > Save for Web. The Save for Web window appears. Click on the 2-up tab to compare the original image (left) to the optimized image (right).
Since this is a continuous tone image, it is best saved as a JPEG. From the Presets drop-down menu, choose JPEG Medium, then Click Save.
In the Save Optimized As window, locate the Lesson02 folder on your hard drive. Inside the Lesson02 folder is the alumni project folder created when you created the site. Open the alumni folder and then the web-content folder.
Confirm the File Name is “incharge” and click Save.
Choose File > Close. Choose “Don’t Save” when the Adobe Photoshop alert window appears.
Exit Photoshop and return to GoLive. The file is listed in the Files tab of the alumni.site window

Leave the site window open for the next section.
Keep your site consistent by using a standard color palette for your pages. By using the Colors tab of the site window, you can access, rename, and change colors site-wide.
Before starting this lesson, open the file gathering.html by double-clicking on it in the Files tab. Note that this page has a cell colored blue. GoLive will start the site colors with this color.

If the site window is not forward, choose the Select window button (
 ). Choose the Colors tab.
Select Site > Update > Add used > Colors. A Scanned colors folder appears with the colors used on the gathering.html page.
The colors can be renamed to help you identify and select colors more easily. The hexadecimal value for the colors (what is used for the source code) is listed to the right of the name.
Select the untitled light blue color. If the Inspector is not visible, choose Window > Inspector. In the Name text field, rename the file corporate blue and press Enter to update the named color.

Choose Site > New > Color. An untitled color appears in the Colors tab.
Choose Window > Swatches, the Swatches palette appears.
From the Swatches palette menu (
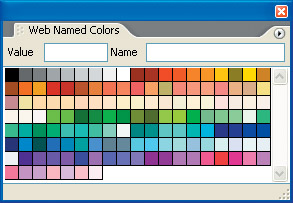
 ), choose Open Swatch Library. Scroll and release on Web Named Colors.
The Web Named Colors palette appears.
Using the Web Named Colors palette menu, choose List View to view the names of the colors.
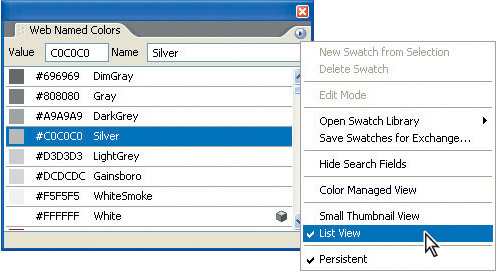
Choose the color named Silver. The untitled color in the site window is assigned the silver color. Click on untitled color and use the Inspector to change the name to corporate silver. Click Return or Enter to confirm the name.
As you create a site, you can access all site colors on their own palette by choosing Open Swatch Library > Site colors from the Swatches palette menu. This helps you to consistently use the same colors throughout the entire site. Read more about colors in Lesson 6, “Working with Color.”
Click the Close button on the Web Named Colors palette and return to the Files tab of the alumni.site window.
One of the benefits of using a GoLive site is that it monitors and tracks the usage of each file. In this lesson, you will create some simple links from the index.html page to the gathering.html page. You will also place some of the provided images.
With the alumni.site window open, click on the Files tab and double-click on the index.html page. A blank index page appears.
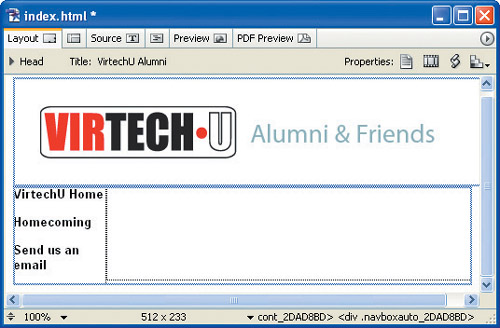
Select the Title text field and type VirtechU Alumni. Press Enter.

If the Objects palette is not visible, choose Window > Objects, or use the keyboard shortcut Ctrl+2 (Windows), Command+2 (Mac OS). Choose CSS from the palette menu.

You will create a simple CSS layout before elements are added to this page.
Select the Padded Box object (
 ) and drag it to the blank index.html page. A CSS object is added to the page.
Now select the Two Columns: Fixed Left object (
 ) and drag and drop it onto the index.html page.
Use the Select window button (
) in the Main toolbar to bring the alumni.site window forward so that you can see the named items on the Files tab. If the window is maximized, resize it so that you can see the index.html page behind it.Select the file named banner_alumni.gif and drag it to the top CSS padded box you created on the page.
There are many methods that you can use to place images on a GoLive page. Read Lesson 7, “Using Graphics in GoLive,” for more information.
Click on the index.html page to bring it forward.
Using the Standard Editing tool (
 ), click in the left column of the Two Columns: Fixed Left CSS object you dragged on to the page. Type the following:
VirtechU Home
Homecoming
Send us an email
If the Inspector palette is not open, choose Window > Inspector, or Ctrl+1 (Windows), Command+1 (Mac OS). Select the word Homecoming; the Inspector is now a Text Inspector palette.
Click on the Fetch URL button (
 ) in the Inspector and drag to the Select window button in the Main toolbar. Don’t let go! This brings the alumni.site window forward.
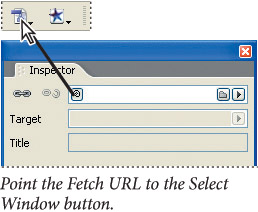
Continue dragging the Fetch URL path down over the Files tab and point to the page named gathering.html. Release. This creates a link from the highlighted text to that page.

Make sure that the index.html page is forward, then choose File > Save. Choose File > Close.
Make sure that the alumni.site is open and that the Files tab is active.
If you are in split view, click on the Toggle split view button (
 ) to expand the left side of the site window.
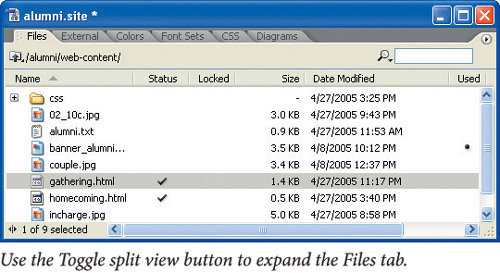
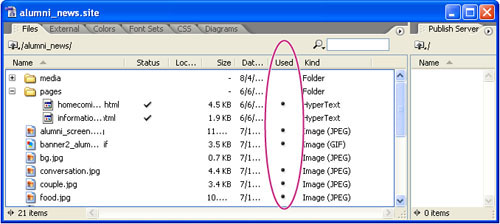
Notice that you can use the scrollbar at the bottom of the site window to see more information about each file. There is a black dot under the Used column if the file is being used in the site.
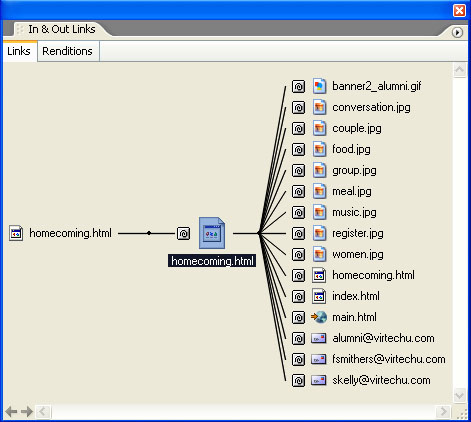
Another method to find out whether a file is used is to utilize the In & Out Links palette.
Select the index.html file and choose the Open In & Out Links palette button (
 ) from the Main toolbar. The Links tab of the In & Out Links palette appears.
Incoming links to the file appear on the left side of the In & Out Links palette, and outgoing links or file references from the file appear on the right. For non-file items, the files that reference or use the selected item appear on the left. As you move the cursor over a file in the In & Out Links palette, a tooltip appears showing information about the file.
Close the In & Out Links palette, and select the file named gathering.html in the Files tab of the site window.
Using the File tab of the File Inspector palette, change the name gathering.html to social.html. Press Enter.
A Rename File alert window appears, indicating that the source code on the index.html page needs to be updated to maintain the link to the page. Click OK.
The file name has been changed and the link on the index page has been changed to look for the file named social.html.
As a default, a file deleted from a GoLive site is stored in a separate GoLive Trash folder. This is helpful if you ever need to retrieve a file.
Select, by clicking once in the alumni.site window, the file you created named homecoming.html.
Click once on the Delete selected item button (
 ) in the upper left of your Main toolbar.
A GoLive CS2 alert window appears, verifying that you want to delete the selected file. Click Yes (Windows) or Move (Mac OS).
Choose Extras from the Site palette menu (
). The Extras appear on the right side of the site window.
Open the SiteTrash folder to reveal the location of any deleted files. You can choose to delete again to put the file in your system trash, or drag the file back into the Files tab if you discover that it is needed. For this example, you will leave the file in the SiteTrash.
Note
If you would rather send your deleted files directly to your system’s Trash, choose Edit > Preferences (Windows) or GoLive > Preferences (Mac OS), then select Site. In the When Removing Files section, choose Move Them to the System (Windows) or Finder (Mac OS) Trash radio button. Click OK.

Once a site file is created, you should have it open as you create new pages or modify existing pages. It helps to eliminate errors and provides access to all your site assets in one location. In this lesson, you will close the site file and re-open it.
Choose the close box on the site window or choose File > Close when the alumni.site window is forward.
An Adobe GoLive CS2 alert window appears, verifying that you want to close the site file. Choose OK.
To re-open the alumni site, you can choose File > Open Recent. Site files are listed in the upper section, pages are listed in the middle, miscellaneous files such as CSS, SVG, and others are listed at the bottom. Choose alumni.site.
Choose File > Close to close this site. Click OK on the Adobe GoLive CS2 alert window. If social.html is still open choose File > Close to close that document.
Perhaps there is no existing GoLive site file due to the fact that the site was not originally created in GoLive or that you are creating the site from files of an existing site. In this section you will create a site file for an existing site that already includes an index.html page.
Choose File > New. The New options window appears.
In the Site Creation Wizard, choose Site > Create Site. Select “Site from Existing Content.” Click Next.
In the “Creating a Site from Existing Content” window, choose “From a Local Folder of Existing Files.” Click Next.
In the “Selecting a Local folder of Existing Files” window, select the top Browse button under the heading of Folder. Navigate to the Lesson02 folder on your hard drive and select the folder named alumni_news. Select OK (Windows) or Choose (Mac OS), then click Next.
In the “Specifying a Site Name and Location” window, click Finish. As a default, the necessary folders discussed earlier in this lesson are added at the same directory level as the containing folder.
The site window appears with the files from the containing folder.

In this next part of the lesson you will create new folders and organize the files in the site window.
With the alumni_news.site open, select the Create new folder button (
 ) in the Main toolbar. An untitled folder appears in the Files tab.
Name the folder media. Press Enter.
Select the file named alumni_screen.jpg and drag it on top of the media folder to place it inside.
A Move Files alert window appears, indicating that the image is used on the index.html page and that the source code needs to be revised. Click OK. The reference to the new location of the image file is updated on the index.html page.
Hold down the Ctrl (Windows) or Command (Mac OS) key to select the remaining nine JPEG files and one GIF file in the site window.
Do not select the two Photoshop images (food.psd and incharge.psd), as we will put these files in a dedicated folder.
With the ten files selected, drag them into the media folder. Click OK when the Move Files alert window appears.

When a folder contains data, a plus sign (+) (Windows) or an arrow (![]() ) (Mac OS) appears to the left of the named folder.
) (Mac OS) appears to the left of the named folder.
Click on the plus sign, or arrow, to the left of the media folder to show the contents of the folder in the site window.
Double-click on the media folder to open the folder and reveals its contents.
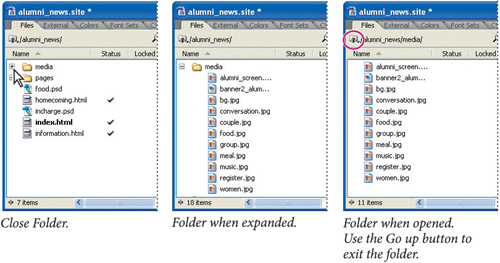
Click the Go up button (
 ) to go up one level in the folder structure.
Click on the minus sign (Windows), or arrow (Mac OS), to the left of the media folder to hide the contents of the folder in the site window.
Click on the Create new folder button (
) on the Main toolbar. Change the folder name from untitled_folder to pages. Press Enter.Select the file named homecoming.html and Ctrl+click (Windows) or Command+click (Mac OS) on the file named information.html. Drag the selected files into the pages folder.
When the Move Files alert window appears, click OK.
You were introduced to Smart Objects in the Tour lesson. Smart Objects are native files to which you want to keep an active link, but they do not need to be part of your Files tab. They will not be uploaded to your FTP server when the site is complete.
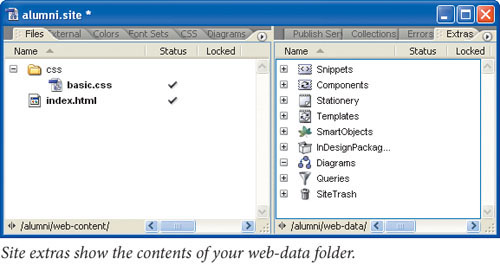
As mentioned earlier in this lesson, a Smart Objects folder was automatically created, and resides in the Extras tab of the GoLive site window.
Click on the Extras tab on the right side of the GoLive site window. The site extra folders are shown, including the Smart Objects folder.
In the Files tab of your site window, select the files named food.psd and incharge.psd.
Click and drag the selected files on top of the Smart Objects folder in the Extras tab.
The Smart Objects are now accessible but no longer in your active Files tab.

Your site is now organized. Keep the alumni_news site window open for the next part of this lesson.
Use the Navigation View to investigate the site as a map. This can help you to keep track of the organization of the entire site.
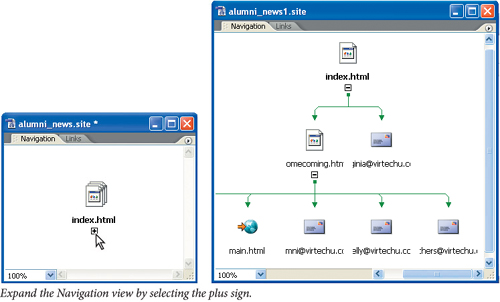
With a new imported site, the Navigation View shows the structure of the site as a tree-like hierarchy descending from the home page. With a new blank site, the Navigation View shows a single home page.
The hierarchy comprises logical pair relationships between pages in which a page is either a child, a parent, a previous sibling, or a next sibling. A typical parent-child relationship is between a home page and the pages it links to.
With the alumni_site window open, choose the Open Navigation View button (
 ) in the Main toolbar.
The alumni_news.site Navigation palette appears.
Click on the plus sign to expand the view and see the navigational links that are established in this Web site. As a default, links to internal and external references, such as other Web sites and e-mail addresses, show up in the window.
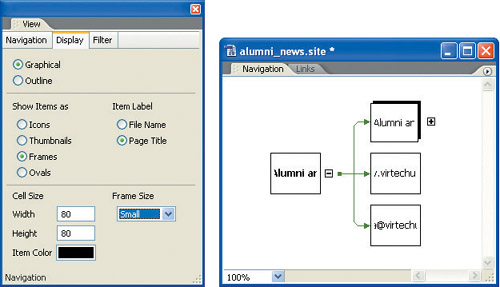
Choose Window > View. When you have the Navigation view open, you can change the visible details using the View palette.
Click on the Display tab of the View palette and experiment with different display options. In our example below, frames and the page title were options selected.
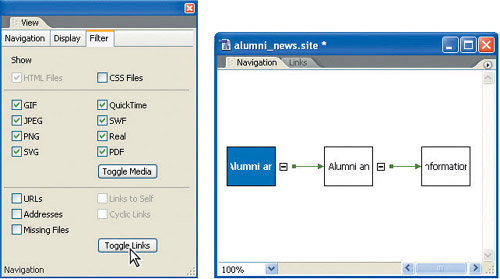
Click on the Filter tab of the Navigation palette. Use this tab to turn off the view of objects you do not want visible in the hierarchy. In our example, we selected the Toggle Links button to show only the pages within the alumni_news.site.
To help you plan future and manage present links, you can choose to print the Navigation View.
Choose File > Print Preview to see how the Navigation View will print on a page with your present settings.
If you want to change the settings, close the Print window and choose File > Page Setup.
In the Page Setup window you can change the orientation and size of your page and select a printer. For this example, you will select only a printer.
If you have a printer connected, select the Printer button in the lower right of the Page Setup window. Select the printer to which you wish to print your Navigation View, and click OK to exit the printer Page Setup window and OK again to exit the Page Setup window.
Choose File > Print, and click Print.
Congratulations! You have finished the lesson.
You have discovered that GoLive’s Site controls contain powerful organizational tools for you to take advantage of. Experiment with the site window by trying the following on your own.
Create site assets, such as a .jpg or .gif, in Illustrator or Photoshop and save them into the alumni_news.site web-content folder.
Return to the Files tab in GoLive and use the Refresh button (
 ) from the Main toolbar if the items are not automatically listed.
Open a page and drag one of your new images onto the page. Choose File > Save and Choose Root or Root folder to save the page in the web-content folder of the site.
Using the Files tab, create a new folder and drag the image you placed into the folder.
The Site Features in GoLive are so powerful that they are covered in several lessons. In this lesson you learned how to create and organize your site. The site tools will be referenced throughout the lessons as they relate to each topic. When you are ready, you can read about taking your site to the publishing stage in Lesson 12, “Managing and Publishing Web Sites.”