
In this lesson you will learn how to customize your GoLive CS2 workspace using palettes and windows. You will also discover how to work more efficiently in GoLive by using keyboard shortcuts and by customizing preferences.
In this overview of the GoLive CS2 workspace you’ll learn how to do the following:
Work with the site and document windows.
Arrange palettes and use workspaces.
Use the toolbars and menus.
Use different view configurations.
Preview Web pages.
In this lesson, you will be working on an existing single HTML file. You will use this file to learn how to use the GoLive CS2 tools, palettes, and windows.
To ensure that the tools and palettes function as described in this lesson, delete or deactivate the Adobe GoLive CS2 preferences file. See “Restoring default preferences” on page 3.
Launch Adobe GoLive CS2. When started, Adobe GoLive CS2 displays a Welcome Screen with various options.
The Welcome Screen allows you to create a new document or open a previously existing document. You can also click on the link for Cool Extras to be linked to the Adobe GoLive CS2 In-depth Web page. Deselect the option “Show this dialog at startup” in the lower left corner if you do not wish to see the Welcome Screen again.
The Welcome Screen can be found through Help > Welcome Screen at any time.

In this lesson, you will be working on a single Web page. To access this page, you will first open a pre-existing site file. A site file should be thought of as the master directory. The site file keeps track of all the elements in a Web site: the HTML pages, the images, and the other source files. Although sites often consist of many pages, it is possible to have a site with only one page, as in this example.
Click the Close button in the bottom right corner of the Welcome Screen.
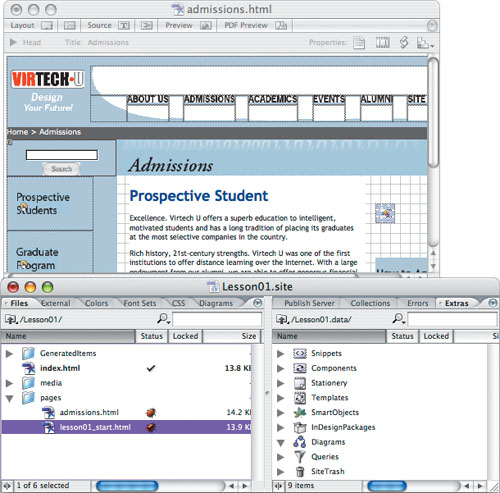
Choose File > Open and locate the file Lesson01.site in the Lesson01 folder, located on your hard drive. Click open and the Lesson01.site window appears.

The site window provides access to all the site files and assets. In this lesson you will maintain all your source files, data, HTML files, scripts, and media in the Lesson01.site window. The site window not only helps you avoid breaking links and creating orphan files, it also gives you easy access for fixing site file errors.
This site is organized in folders, just like your directory system. You can add, delete, rename, and relocate folders easily in the site window. By making these changes in the site window, GoLive can track paths to links and update them automatically, helping you avoid lost or broken links.
Notice that the pages folder has a link warning icon (
 ) to the right of the folder. A page in this folder has a broken link, or bug, which you will fix later in this lesson.
Double-click on the index.html page. This is the final version of what you will create in this lesson. You can leave this page open for reference or choose File > Close to close the file.
In the site window, double-click to open the folder named pages. Then double-click the file named lesson01_start.html. The document window containing the HTML file “lesson01_start.html” appears in the center of your screen.
Choose File > Save As and name the file admissions.html. Select the Site Folder button (
 ) from the bottom of the Save As window, and select Root (Windows) or Root folder (Mac OS). This directs you to the site’s root directory. Open the pages folder, and click Save.
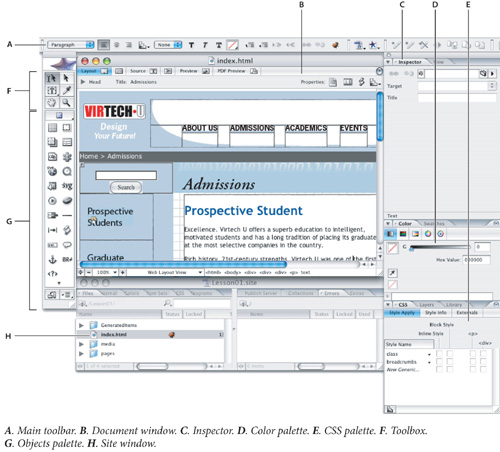
The GoLive work area
The GoLive work area includes the site window (one for every site project), document windows for each open Web page, and a variety of editors, toolbars, and palettes for working with everything in your site. You can stack or tile windows on your screen, and group, ungroup, or rearrange palettes, as well as save custom workspaces.
GoLive CS2 allows you to have precise control over the display of your workspace and documents using the View and Window menus. In general, commands in the View menu will give you control over your document, while commands in the Window menu will give you control over your workspace.
Choose View > Zoom Out to view more of your Web page, or click on the minus sign in the lower left of your document window. Based on the size of your monitor, you may not be able to view your entire Web page on your screen; working at 75% allows you to view more of your Web page. You can see your zoom value in the bottom left corner of the document window. Our zoom value is 75%.

Click on the black plus sign to the right of the zoom value in the document window to zoom in to 100%.
Use the horizontal and vertical scroll bars in the document window, if necessary, to scroll through your page so the logo in the top left corner is visible.
In addition to the View commands, you can use the Zoom tool to magnify and reduce the view of artwork. Use the View menu to select predefined magnification levels or to fit your artwork inside the document window.
Click the Zoom tool (
 ) in the toolbox to select the tool, and move the cursor into the document window. Notice that a plus sign (+) appears at the center of the Zoom tool.
Position the Zoom tool anywhere on the page and click once. The artwork is displayed at a higher magnification.
Click two more times; the view is increased again, and you’ll notice that the area you clicked is magnified. Next you’ll reduce the view of the artwork.
With the Zoom tool still selected, hold down Alt (Windows) or Option (Mac OS). A minus sign (-) appears at the center of the Zoom tool.
With the Alt/Option key still depressed, click in the artwork twice. The view of the artwork is reduced.
A much more controlled and effective zoom is achieved by dragging a marquee to magnify a specific area of your artwork.
With the Zoom tool still selected, hold down the mouse button and drag over some body copy on the page; watch as a marquee appears around the area you are dragging, then release the mouse button. The area that was included in the marqueed area is now enlarged to fit the size of the document window.
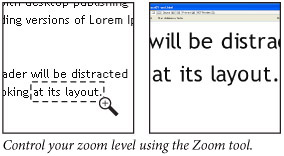
The percentage at which the area is magnified is determined by the size of the marquee you draw with the Zoom tool—the smaller the marquee, the larger the level of magnification.
Palettes and the Main toolbar are part of your main interface with GoLive CS2.
Choose the Window menu to view the list of windows. In GoLive, windows which are currently visible on-screen have a checkmark next to them. Hidden or unopened windows have no checkmark.

Choose Window > Tools to remove the toolbox and Objects palette from view. Choose Windows > Tools again to return the toolbox and Objects palette to view.
Choose Window > Actions to bring the Actions window into view. This window allows you to add JavaScript to your pages. Read more about Actions in Lesson 8, “Adding Interactivity: Rollovers and Actions.”
Close the Actions window by clicking the Close button. You also could have closed the Actions window by selecting Actions in the Window menu.
Upon first opening a project, GoLive will attempt to fit all the windows and palettes in the available space on your monitor. However, windows and palettes can be moved and resized according to your needs. If you have a specific arrangement of windows and palettes that you consistently want to use, GoLive CS2 allows you to create and save workspaces by using the Workspace command.
Note
Depending upon your screen resolution you may not see the GoLive palettes. If this is the case, choose Window > Workspace > Default Workspace.
On the right side of your screen, click on the Inspector palette tab and drag it all the way to the center of your screen, then release your mouse. The Inspector palette separates from the window.

Choose Window > Workspace > Default Workspace. The Inspector palette will snap back to its original location. This can be useful whenever you need to restore your palettes.
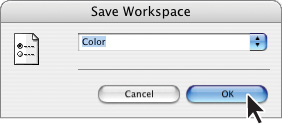
Place your cursor over the Color palette tab and click and drag it to the left to separate it from the window. Choose Window > Workspace > Save Workspace. In the Save Workspace window that appears, type Color and click OK. Now you can switch between workspaces when needed.
Choose Window > Workspace > Default Workspace to return to the default GoLive configuration.
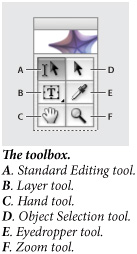
The toolbox, located on the left side of your screen, holds the tools and objects, which can be separate palettes, although they are, by default, joined together. The tools in the toolbox are used to select objects and modify them. Objects are added to your page by dragging them from the Objects palette to your page.
Place your cursor over the Standard Editing tool (
 ) and let the cursor sit for a moment; a tooltip appears with the name of the tool and the letter S in parentheses. S is the keyboard shortcut to access that tool.
Click on the Standard Editing tool and then click on the VirtechU logo in the upper left corner to select it. Now, using the same tool, click and drag over the text “How to Apply.” This tool allows you to select an object as well as edit text, if desired.
The Inspector palette is a contextual palette, the contents of which change depending upon which object is selected.
If the Inspector is not visible, choose Window > Inspector.
With the Standard Editing tool (
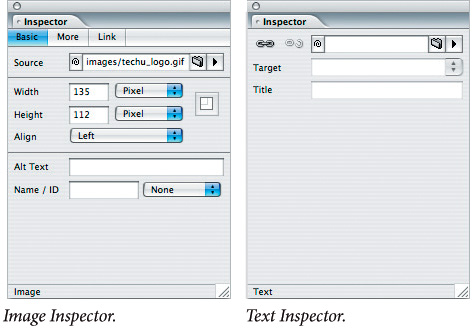
), click on the VirtechU logo in the upper left of the document window. The Inspector changes to an Image Inspector. The attributes listed in the Inspector pertain to values and attributes that relate to images, such as Source (where the image file is located), Width, Height, Alignment, and Alt Text. Read more about these attributes and values in Lesson 7, “Using Graphics in GoLive.”Still using the Standard Editing tool, double-click the word “Excellence” to select it. It is the first word in the body copy under “Prospective Student.” The Inspector is now a Text Inspector and the options are fewer.
While creating pages in GoLive, keep the Inspector palette open at all times to access the options relating to your active selection.
You will find that there are certain palettes that should be open most of the time. Use these keyboard shortcuts to view the most popular palettes. Also use the keyboard shortcuts to show and hide the palettes.
Function | Windows | Macintosh |
|---|---|---|
Show/hide Inspector palette | Ctrl+1 | Command+1 |
Show/hide Objects palette | Ctrl+2 | Command+2 |
Show/hide Colors palette | Ctrl+3 | Command+3 |
As a default, the Objects palette is docked to the toolbox. Throughout the lessons the Objects palette and toolbox in their default view will be referred to as the Objects palette. Tools in the toolbox are referred to individually as needed.
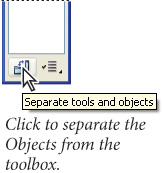
If you prefer to separate the Objects palette from the toolbox, click on the Separate tools and objects button (![]() ) at the bottom of the Objects palette.
) at the bottom of the Objects palette.
Use the Join tools and objects button (![]() ) in the upper right of the Objects palette to join the Tools and Objects palettes together again. For this lesson, keep the palettes in the joined position.
) in the upper right of the Objects palette to join the Tools and Objects palettes together again. For this lesson, keep the palettes in the joined position.
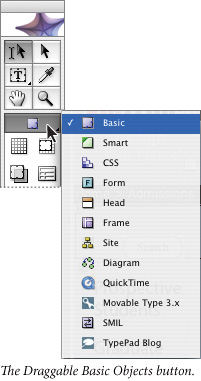
As mentioned earlier, objects are elements that you can add to a page. They are separated into categories: Basic, Smart, CSS, Form, Head, Frame, Site, Diagram, QuickTime, Movable Type 3x, SMIL, and TypePad Blog. In this part of the lesson, you will add an Image object from the Basic category to your page and then link it to an image.
Click and hold down the Draggable Basic Objects button on the Tools palette. A palette menu appears with a list of the different categories of objects available in GoLive. Each category contains related objects. Confirm that you have the Basic group of objects selected by releasing on Basic. The objects belonging to the Basic group appear in the Objects portion of the palette, under the toolbox.
Place your cursor over the Image object (
 ) in the first column. Look for the tooltip to appear to verify that you are over the Image object.
Click and drag the Image object from the Objects palette to your document window. Your final destination will be directly above the blue column on the right side of the page with the heading “How To Apply.” Release the image object. Once you release the image object, it becomes an image placeholder.

Using the Set Position fields in the upper left of Main toolbar, enter 596 into the Horizontal position and 208 into the Vertical position.

Note
 You can also place an object on a page by inserting your cursor where you want the object, then double-clicking the object in the palette. The object is inserted.
Note
The layout grid was previously added to this document, making the repositioning and aligning of the image object possible. You will learn how to create layout grids in Lesson 3, “Creating Page Layouts in GoLive.”
Now that you have an image placeholder in your page, you’ll link it to the source image file using the site window. There is more than one way to do this, but you will be using GoLive’s point-and-shoot method in combination with the site window. As you will discover, the site window is an integral part of the GoLive workflow, as it provides a central location of all the assets used in your document, such as HTML files, media files, images, and more.
You will learn how to create a site and use the site window in greater depth in Lesson 2, “Creating a GoLive Site.”
First, make sure your site window is available. Choose Window > Lesson01.site. If the site file is not listed at the bottom of the Window menu, choose File > Open and choose the Lesson01.site file in your Lesson01 folder on your hard drive. Click Open and the site window appears on your screen. Click and drag the site window to the bottom of your screen.
In the Main toolbar at the top of your screen, click and hold down on the Select window button (
 ). Do not release your mouse button. A menu appears listing the two available windows: admissions.html and Lesson01.site. Use this button to easily switch from one page to another in GoLive, or bring forward your site or page window.
Select the admissions.html option in the menu to make sure your document window is forward.
If necessary, click on the image object you added in the last exercise to select it. In the Inspector palette, make sure the Basic tab is selected. In the Source location of the Basic tab, place your cursor over the small spiral (
 ) in the EmptyReference! field. This is GoLive’s Fetch URL button, sometimes referred to as the pick whip. It allows you to point to objects to link them.
If you are in your pages folder of the site window, click on the Go up button (
 ) in the upper left of the Files tab to go up one directory level. The media folder should be visible in the site window.
Click and drag the Fetch URL button to the site window. Do not let go of the mouse, but point to the media folder, it will open. Release the mouse when the image a_student_photo.jpg becomes highlighted.

The student photo is now linked with the image object and appears in your document.

If necessary, choose the Object Selection tool (
 ). Click and drag the image to reposition it over the column.
If the Image Inspector is not visible, choose Window > Inspector or use the shortcut Ctrl+1 (Windows) or Command+1 (Mac OS) to show the Inspector palette.
Type student in the Alt Text field. Alt Text specifies alternate text that is rendered when the image cannot be displayed. The Alt Text is also conveyed to reader software that helps the disabled understand relevant information about an image they may not be able to view.
Choose File > Save to save your document. Leave the document window open for the next part of the lesson.
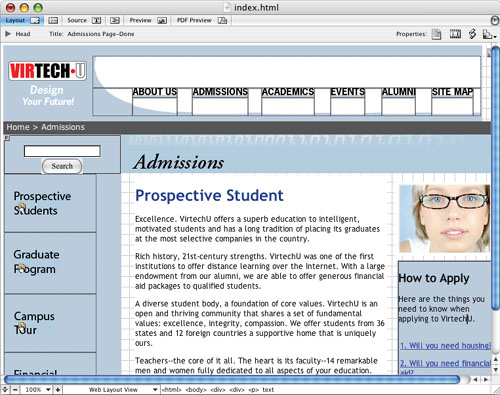
The site and document windows have equally important roles in GoLive. The site window gives you a bird’s-eye view of your entire Web site, whereas the document window allows you to view and work with the objects on a single page.
Within the document window are six separate tabs which allow you to view your Web page in different ways. There is the Layout Editor, the Frame Editor, the Source Code Editor, the Outline Editor, the Layout Preview, and the PDF Preview.

The default view, the Layout Editor allows you to manually position objects on a page such as CSS layout objects, images, tables, GoLive layout grids, and text boxes. When you are in this view, GoLive writes all the source code of your page for you. When you add text and select the Strong (![]() ) button from the Main toolbar, for example, GoLive generates the code automatically as you type in the Layout View. This view is sometimes referred to as WYSIWYG or “What you see is what you get.” It is important to note that this view may be similar to what you will see in a Web browser, but it is not identical. Certain elements such as the layout grid or image icons will be visible in the Layout Editor but not in the Web browser.
) button from the Main toolbar, for example, GoLive generates the code automatically as you type in the Layout View. This view is sometimes referred to as WYSIWYG or “What you see is what you get.” It is important to note that this view may be similar to what you will see in a Web browser, but it is not identical. Certain elements such as the layout grid or image icons will be visible in the Layout Editor but not in the Web browser.
The Frame Editor is similar to the Layout Editor in that it allows you to manually position objects on a page. However, the Frame Editor requires a frameset to be created first. Frames allow you to load two or more Web pages at the same time into a single screen.
Frame sets are available from the Frames Object category and can be dragged onto a page when in the Frame Editor.
This view allows you to view and edit the source code of your Web page. HTML is a tag-based language, and before the advent of programs such as GoLive, working in a text editor to edit was the primary method for creating Web pages. Working with the source code is a much different experience than working in the Layout Editor. Source code requires a better understanding of tags, but it also offers a designer finer control over the objects in a Web page. Certain users may prefer to work more frequently with the source code, others not at all. GoLive allows the user to work in either mode, provides an easy way to switch between modes, and even allows you to work in both modes at the same time using the split view. Split View is discussed later in this lesson.
The Outline Editor allows you to view the HTML elements of a Web page in a structured, hierarchical view. Working in this view allows users to create code in their Web page without having to type. Additionally, users can perform other operations in this view, such as check the source code for missing links or visually identify code which may be incorrect.
The Layout Preview offers a quick way of previewing your page as it will appear in a Web browser. Whereas the Layout Editor and the Source Code Editor allow you to edit and rearrange the objects on your pages, the Layout Preview is there simply to display the pages. Additionally, functionality, such as image rollovers, will not work in the Layout Editor but will work in the Layout Preview.
You should currently have the admissions.html page open and be in the Layout Editor. If you are not, click on the Layout tab at the top of your document window.
In the toolbox, if not already selected, click on the Standard Editing tool (
) in the Tools palette and place your cursor after the text “Prospective Student” and click once. You will see a blinking insertion point; type the letter s to modify the text. While in the Layout Editor, you can add and delete text, among other things.Quickly click three times in the heading “Prospective Students” in order to select the entire line of text.

Click on the Source tab at the top of your document window to switch to the Source Code Editor. You will see the following line of code highlighted: <h1 align=“left”>Prospective Students</h1>. This is the source code which corresponds to the Heading in the Layout Editor. Objects selected or highlighted in the Layout Editor are automatically selected or highlighted in the Source Code Editor (and vice-versa).
Choose View > Document Mode > Layout to return to the Layout Editor. You can also use the View commands to switch between modes.
In the bottom left corner of the Document window, click on the Show/Hide split source button. This will split your screen with the Layout Editor on top and the Source Code Editor on the bottom.

If necessary, use the scroll bar on the right side of the document window and scroll to the top of the page until you can see the navigation bar at the top of the screen. In the Layout Editor, click on the button labeled “About Us” and notice how the corresponding code is highlighted in the Source Code Editor. This can be useful when you want to modify code by hand or simply learn how GoLive generates code automatically.
Press Ctrl+Y (Windows) or Command+Y (Mac OS) to return to the Layout Editor.
The Outline Editor is useful for those who are familiar with source code but would like some automatic features as well. If you’re unfamiliar with the concept of HTML, don’t be put off by the apparent complexity of this exercise; GoLive is a powerful tool because it can accommodate beginner, intermediate, and advanced Web users.
Click on the Outline Editor tab (
 ) in the area at the top of the Document window. This allows you to view your page in a hierarchical view. Because the “About Us” button is still selected from the last exercise, you see the button’s relationship to the rest of the document.
Use the scroll bar on the right side of the page and scroll up until you see the top of the page. Right-click (Windows) or Ctrl+click (Mac OS) on the second element at the page marked “html” to reveal a contextual menu.
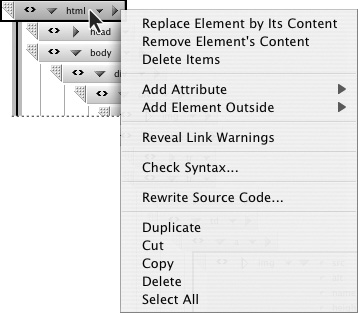
From the list of options in the contextual menu, choose Reveal Link Warnings. The form element of your page should be highlighted. This is GoLive’s visual indicator that this particular form (which is the search box in the upper left corner of the page) has no link associated with it, and therefore would not work. Right-click or Ctrl+click on the “html” element again and deselect the Reveal Link Warnings option.
Click on the Layout tab to return to the Layout Editor.
Select the Show link warnings button (
) in the Main toolbar. The Form is again highlighted. This is how you view link errors when in the Layout Editor.Click on the Form object symbol (
 ) in the upper left of the Search form. The Inspector now changes to a Form Inspector.
Replace the words (EmptyReference!) with a # (pound sign), and press Return or Enter. This produces a null link. It will not take the viewer anywhere, but will eliminate the link error.
Note
This is the field into which you would enter a script location or e-mail address to make the form active.

Choose File > Save.
The Layout Editor is helpful when designing Web pages; however, as the author or editor of a page you will also need to see the page from the perspective of the user. GoLive allows you to do this with the Layout Preview.
Click on the Preview tab at the top of your document window to enter the Layout Preview. Place your cursor over the navigation at the top of the screen and notice the black text turns to orange when the cursor is over it. This rollover behavior is visible in the Layout Preview and in a browser, but not in the Layout Editor. Additionally, the tools in the Main toolbar are greyed out because objects are not editable or movable when in Layout Preview.
Click on the Layout tab to return to the Layout Editor.
The View palette allows you to configure the look of your GoLive page as well as define which areas of your document you would like to investigate. For example, if there are areas of your document, such as an image, a link, or a form, which do not have links assigned to them, the View palette allows you locate those areas with a visual highlight.
Click on the View tab, docked with the Inspector palette, in the window at the right-hand side of your page. You could also choose Window > View. The View palette appears.
Click on the Options tab of the View palette, then deselect the option “Show Invisible Items” to turn off this selection. Seeing invisible items is useful when authoring your Web pages; however, there may be times when you want to turn them off.
Select the “Show Invisible Items” option to turn them back on.
The Layout Preview is useful for quickly determining the look and functionality of your pages. However, because the user will be viewing your pages in a Web browser, you should get into the habit of using a browser to determine how your site looks. Furthermore, the same page may look different in different browsers; GoLive CS2 allows you to specify what browser is being used and allows you set default and alternative browsers based on what’s available on your system. The default method for previewing a page is GoLive’s Live Rendering browser.
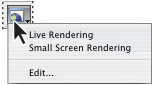
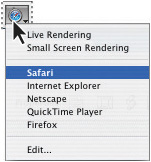
In the Main toolbar at the top of your screen, click and hold down on the Preview in Browser button (
 ). A menu appears with various options. As a default, GoLive CS2 has Live Rendering and Small Screen Rendering options.
Note
If the browser preferences in GoLive have been previously configured, your button may appear with a browser icon, such as the logo for Internet Explorer or Safari. The options may be different as well.
Choose the Edit option to open the Preferences screen. You will now instruct GoLive to locate all browsers on your system and add them to your browser list.
Click the Find All button at the bottom of the preferences screen. It may take a few moments for GoLive to scan your system, but all browsers visible by GoLive will be added to the list.
Note
You can add browsers that GoLive may not have found by clicking the Add button and browsing your hard drive. Alternatively, older or duplicate browsers on your system can be removed from the list by clicking on the browser name and clicking the Remove button.You can also choose which browsers you would like to designate as the default browser (or browsers) when previewing your pages.
Click on the checkbox to the left of the browser you would like to use as your default browser. For this lesson, we chose Safari, the default browser for Mac OS X. If you are on a PC, you may wish to choose Internet Explorer or alternative browsers on your list. Checking multiple browsers on the list will force multiple browsers to open when you click on the Preview in Browser button. When you are done, click OK to commit the change.
Click and hold on the Preview in Browser button. Based on your system, you should see the list of browsers your system found in step 3. Selecting any browser from the list will preview your page in that particular browser.
Choose your default browser and place your cursor over the navigation at the top of the screen. Similar to the Live Rendering option, rollovers are visible in the browser, but they are not visible in the Layout Editor.
Close your browser and click on the Layout Editor tab to return to this mode.
GoLive CS2 allows you to convert Web pages to Adobe’s PDF format. PDFs traditionally have provided a standard form for storing and editing documents for print publishing. Documents saved in .pdf format retain the author’s formatting and can easily be seen and printed by users on a variety of computer and platform types. PDF files are typically created with Adobe Acrobat; however, GoLive will also make a PDF based on your open document.
Click on the PDF Preview tab to enter this mode. It may take a few moments for GoLive to create the preview page. When it is finished, you will see the GoLive default preset for converting Web pages to 8.5″ by 11″ documents (standard letter size). Based on your layout, this may not be the ideal format for print, as Web pages are usually designed for computer screens, which are often wider than a standard letter page. GoLive’s default behavior is to scale a page to the document size, but these parameters can be changed in the Inspector palette.
In the Inspector palette, click on the Landscape button (
 ) to the right of the Size drop-down menu. Also, check the Use Single Page layout box. Selecting these two options will place your page on a landscape-oriented letter page and force all the content onto a single page.
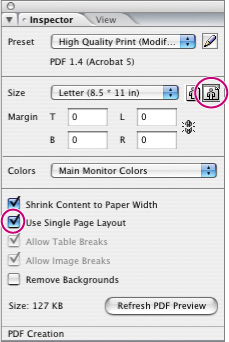
Click the Refresh PDF Preview button in the Inspector palette to view the new layout. Each time you make a change to the settings, you must click the Refresh button to see the new layout.
Click on the Save as PDF button (
 ) in the top left corner of your Main toolbar. This will open the Export PDF File window. Navigate to your Lesson01 folder and click Save to save the .pdf file. After saving, the admissions.pdf file will open in GoLive. Scroll to the bottom of the document, if necessary, to locate the hyperlink site made with Adobe GoLive CS2. Place your cursor over the link, but do not click. A pop-up will preview the URL of the hyperlink. Links created in GoLive are translated to links in the PDF.
Close the admissions.pdf file by clicking the Close button.
GoLive allows you to set a number of preferences which give you control over many aspects of the program. As you become more advanced with the program, you may find that you need to change the way the program functions. One simple example might be to open your documents in Source view, if you are more comfortable working in code. Although these settings are generally more useful for advanced users or those familiar with source code, it’s a good idea to know where to access them.
Choose Edit > Web Settings (Windows) or GoLive > Web Settings (Mac OS) to open the Web Settings window. This window allows you to change some of GoLive’s code-writing abilities. There are five separate tabs: Global, Markup Language, Characters, Browser Profiles, and File Mappings. Close the Web Settings window by clicking on the Close button.
Choose Edit > Preferences (Windows) or GoLive > Preferences (Mac OS) to open the preferences window. On the left side of the window is a list of the different categories of preferences. Click on General preferences if not currently selected. In the Default Mode section, click on the menu to view the various options available. Advanced users might want to open all documents in the Outline Editor, for example. Make sure the default Layout option remains selected. Click OK.

Save your file and close this document.
Congratulations! You have finished the tour of the workspace.
Using the View and Window menus, practice zooming in and out of a page.
Highlight an image or some text in your final document and switch between the Layout Editor and Source Code Editor using the tabs at the top of your document window. Delete or modify objects in the Layout View and note how the associated code in the Source view is affected.
If you have more than one Web browser on your system, preview your Web pages on different browsers. Doing this will help you understand how differently the same Web page appears on older or alternative browsers.