
Chapter 8. Workflow Management

Making a movie is like going to war...(they) are always putting obstacles in your way.
—Norman Jewison
With the growing variety of acquisition systems and formats used in equally diverse production projects, optimal production workflow means something different to nearly every user of Adobe’s Digital Video applications. In this chapter I won’t be talking as much about procedure as perspective.
Information on the functionality of Adobe applications is widely available, but it can be helpful to work through the process of evaluating how everything from what format you’re shooting in to how to plan to divide tasks among colleagues and collaborators to come up with the best, most practical approach to completing your project.
This chapter is full of larger and smaller pieces of the workflow puzzle. It’s not attached to a single project; instead, it’s meant for you to implement in your own projects. As you think about applying some of these techniques, it is crucial that you consider doing two things: Write out your workflow from camera to delivery and then actually test to make sure things work the way you intend.
Protect Your Assets
You can’t start postproduction if your footage is damaged or lost before it returns from the field. Although most of the following list may seem painfully basic, keep in mind that once the director calls a wrap for the day, the only product you have to show for all that expense may be a couple of gigabytes of data on a small bit of disposable media.
Consider these guidelines when handling camera data:
![]() Have multiple versions of your raw footage is obviously the best way to protect your considerable investment in acquiring it. Making two or, better yet, three copies on separate storage drives immediately when transferring from camera media in the field is standard practice.
Have multiple versions of your raw footage is obviously the best way to protect your considerable investment in acquiring it. Making two or, better yet, three copies on separate storage drives immediately when transferring from camera media in the field is standard practice.
![]() Vault and maintain your camera media. If you need to recycle camera media for continuing production, it should never be erased until the data is verified in more than one location.
Vault and maintain your camera media. If you need to recycle camera media for continuing production, it should never be erased until the data is verified in more than one location.
![]() Transfer media as soon as you have the chance instead of waiting until the media is full. Every moment that you have recorded material in the camera is a moment when you have only one copy, and a camera malfunction or power glitch has the potential to wipe out whatever hasn’t been transferred. If there is downtime on the set for a scene or a lighting change, why not transfer the data in the camera at that point and reduce your vulnerability?
Transfer media as soon as you have the chance instead of waiting until the media is full. Every moment that you have recorded material in the camera is a moment when you have only one copy, and a camera malfunction or power glitch has the potential to wipe out whatever hasn’t been transferred. If there is downtime on the set for a scene or a lighting change, why not transfer the data in the camera at that point and reduce your vulnerability?
![]() Don’t trust any digital storage, ever. Hard drives are cheap and they fail. Most nonproprietary camera media is cheap and it fails. Your expectations of durability have to align with the cost of the device. With the cost of hard drive storage so low relative to even a modest shooting budget, there is no reason to risk your work product due to not having enough backup copies.
Don’t trust any digital storage, ever. Hard drives are cheap and they fail. Most nonproprietary camera media is cheap and it fails. Your expectations of durability have to align with the cost of the device. With the cost of hard drive storage so low relative to even a modest shooting budget, there is no reason to risk your work product due to not having enough backup copies.
![]() Store data copies in separate locations, not in the same place. Unfortunately, luggage gets lost or damaged, equipment cases fall into rivers, and occasionally, the production assistant on your medical shoot forgets that the first letter in MRI stands for “magnetic” when he decides where to park your gear cases. Try to keep your drive copies apart from each other whenever you’re not transferring, preferably in different physical locations.
Store data copies in separate locations, not in the same place. Unfortunately, luggage gets lost or damaged, equipment cases fall into rivers, and occasionally, the production assistant on your medical shoot forgets that the first letter in MRI stands for “magnetic” when he decides where to park your gear cases. Try to keep your drive copies apart from each other whenever you’re not transferring, preferably in different physical locations.
![]() Make a plan for data organization and stick to it. Keeping the drives safe and then not being able to find the media you’re looking for is more frustrating than losing the drive. Housekeeping may seem like a minor point, but maintaining some system for how the camera data will be organized on the transfer drives is critical. It doesn’t need to be complex to be effective. Something as simple as saving transferred media in directories by shoot date and/or location may be all you need to be able to find the shots you need later.
Make a plan for data organization and stick to it. Keeping the drives safe and then not being able to find the media you’re looking for is more frustrating than losing the drive. Housekeeping may seem like a minor point, but maintaining some system for how the camera data will be organized on the transfer drives is critical. It doesn’t need to be complex to be effective. Something as simple as saving transferred media in directories by shoot date and/or location may be all you need to be able to find the shots you need later.
![]() Notes
Notes
When video and audio editing on computers really started to take off in the mid 1990s, an external 9 GB hard drive was the size of a safe deposit box, weighed several pounds, and could cost as much as $4,000.00 USD, and that was still a small fraction of the value of the data it contained. It can be easy to forget that the convenience of small, inexpensive camera media like a 64 GB SDXC card at 1 percent of the cost actually holds seven times the data of that old hard drive at risk. (And those 9 GB drives couldn’t be lost in a cup of coffee or left in your pocket on laundry day.)
Organizing for Post
Once you reach postproduction with your footage, you have a number of paths to choose from to create an Adobe-based workflow that makes sense for you and your project. If you set up everything right, before touching anything in Adobe Creative Cloud, and if you’re organized, you’ll have the greatest level of ease in post. There is no “universally optimal” process that will be right for everyone. In this section, I won’t be present step-by-step procedures as much as examine your options to help you create the most efficient version of your workflow.
Starting in Adobe Premiere Pro
In the context of postproduction workflow, moving your field footage and other assets directly into Adobe Premiere Pro involves project setup and organization, which were outlined thoroughly in Chapter 2. Because Adobe Premiere Pro handles what may be the industry’s largest list of formats, this is probably the easiest route to start postproduction.
For larger projects with multiple collaborators or even multiple editors, properly organizing your media to make each step as efficient as possible is certainly possible in Adobe Premiere Pro alone, but Adobe Prelude does fill in some gaps for many users.
Working in Adobe Prelude
Adobe Prelude, as the name implies, was designed to work at the beginning of the postproduction process or at the end of the field production process depending on your perspective. The application is designed to deal with the tasks that exist (and are often overlooked) between the camera and the edit system.
Adobe Prelude does more than just transfer and back up footage from cameras. It can add metadata (such as location), markers to help speed the editorial process, and even create a rough cut, which is fantastic for an on-set quick assembly of footage.
Transferring and transcoding footage
In the field, you can use Adobe Prelude to transfer tapeless camera footage to multiple storage destinations simultaneously. Using the Ingest function, you can specify a primary destination, and then add as many destinations as you desire for redundancy.
Adobe Prelude will also transcode your assets to a variety of different codecs if you choose to do so. Some codecs are meant to be used for “proxy” or low-quality editorial and be relinked later to high-quality footage. Some codecs (such as DNxHD) are ideal as a postproduction codec, also known as a mezzanine codec, and are meant to permit flexibility and are no longer dependent on highly compressed camera masters. For more on transcoding, see the “Transcode or Not to Transcode” sidebar in Chapter 1 and the section “Using Mezzanine Formats” later in this chapter.
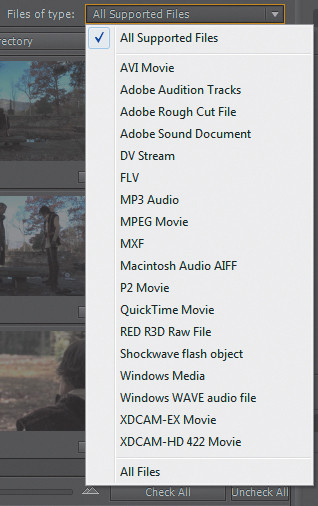
In a new Prelude project, press Command+I (Ctrl+I) or click Ingest at the top of the interface to enter Ingest mode. The Ingest dialog opens (Figure 8.1). If you want to restrict the file types the dialog displays, specify the file types using the Files of Type menu at the top of the dialog (Figure 8.2).

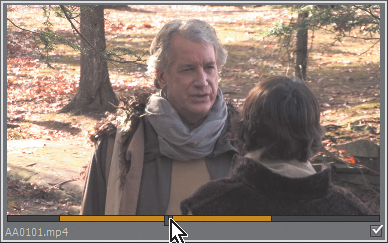
You can also designate an In and Out point on a clip using the I and O keys to do a partial ingest of a clip, although you have to choose to transcode the asset to make a new file of the selected portion (Figure 8.3).
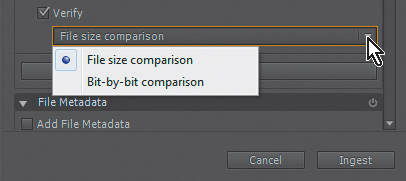
Although it will take a bit more time, using the Verification feature (Figure 8.4) for straight camera media (non-transcoding) transfers is highly recommended to ensure that the data is being transferred completely. The bit-by-bit comparison option does a CRC check, verifying the file checksum, and is the most thorough method. If time is extremely pressing, running the File size comparison method is still better than not running verification at all
You can specify your transfer destinations and details, and add additional destinations by clicking Add Destination and providing the necessary detail of where your second copy belongs (usually a different drive). For workflows in which you will be converting camera files to a mezzanine and/or a proxy format for editing and post, Adobe Prelude can transcode assets as well.
Transcoding is likely something you would do at some point after the shoot as opposed to during your initial camera data transfers on location. Transcoding does involve more time than doing simple data transfers, depending on the source and destination formats chosen. When you need to transcode (Figure 8.5), you can choose the format and a preset target file specification for each destination.

Figure 8.5 Ingest transfer parameters are ready to transfer and transcode assets to DNxHD 36, a proxy format.
![]() Tip
Tip
Although transcoding can be done to the files targeted for each destination, keep in mind that keeping at least two versions of your camera assets in their original format is always a good idea.
Adding metadata and file renaming during ingest
Adding file metadata or file renaming during ingest requires you to create a preset. After you’ve set up your parameters and saved the preset, you can recall the preset during a later ingest session(Figure 8.6).

You have options to add metadata fields to your footage for all destinations or for just a particular destination. You could, for instance, add some sort of tag to some proxy footage that will go to the editor and leave the full-quality original footage targeted for other destinations unaltered. These presets easily can add a given set of metadata to every clip during ingest.
![]() Tip
Tip
The new Relink dialog is far more intelligent than it was. Once you find one element, it’ll see how much of the other elements match in relative file paths. Pay close attention to the fact that you can make it ignore file extensions—meaning that it’s trivial to relink from DNxHD MXF proxy files to RED R3D files with the same name but different extensions.
If you plan on using this for scene designations or something that changes frequently, you’ll need to ingest only the appropriate clips for that metadata preset. Alternatively, you can add more specific shot-by-shot information after the footage is ingested.
Renaming files during ingest can also be applied to a specific destination or all destinations. Note that using renamed files will add complications when relinking media to camera originals if there is a loss of data or when moving from proxy editing to finishing. So make sure you think through your full workflow before throwing this switch.
![]() Tip
Tip
You can ingest footage without moving it when you’re starting a Prelude project to work on footage in place by deselecting the Transfer Clips to Destination check box.
Adding metadata and file logging
When you’re ready to start assessing dailies, making log notes, and adding any further descriptors to the metadata of the footage you’ve ingested, you can switch the Prelude Workspace to Logging by clicking the Logging button at the top of the interface or by pressing Option+Shift+2 (Alt+Shift+2) (Figure 8.7 on the next page).

The advantage of this logging workspace (both here in Adobe Prelude and also in Adobe Premiere Pro) is the focus on seeing all the metadata (and adding to it) that belongs to a clip.
![]() Notes
Notes
Be aware that any changes you make in a clip’s metadata (markers included) will be written in an XMP “sidecar” file, which is external to the clip file in most cases (QuickTime is one exception; it can store the metadata internally). If you need to move or reorganize media, these metadata sidecar files will need to stay next to the media files they apply to.
The basic operating principle in Adobe software is to be nondestructive wherever possible; thus, Adobe Prelude does selections and notations with markers instead of making any physical changes to the source media.
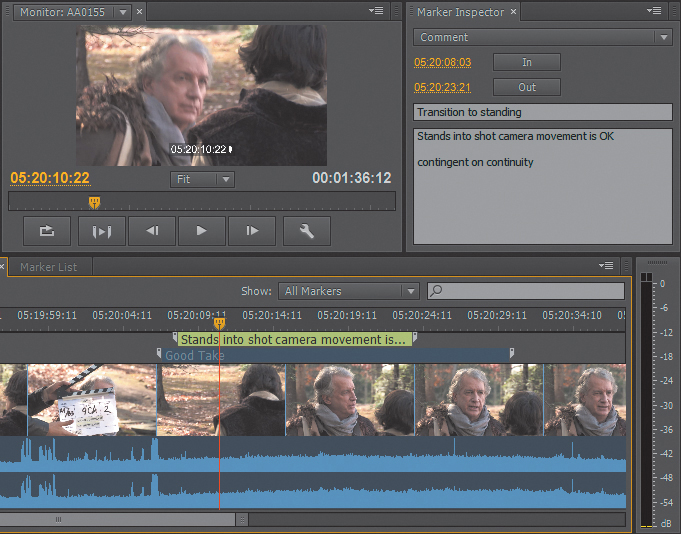
Using markers
When you double-click a clip in the Adobe Prelude Project panel, the interface displays the clip on a Timeline. Unlike an editing Timeline, this Timeline is strictly for one clip. To mark up the clip, you can utilize several marker types, which are listed in the Marker Type panel (Figure 8.8) and appear on the Timeline in corresponding colors.

By positioning the playhead on the Timeline where you want a marker to start and clicking on the marker type or typing the appropriate number (1=Subclip, 2=Comment, etc.), you set the In point for that marker. Moving the playhead where you want the marker to end and typing O will set an Out point for the marker. You can move any marker by dragging it right and left with the mouse or by positioning the playhead and typing I or O to move the selected marker’s In or Out point to that position.
You can use several layers of various and overlapping markers as necessary. The two marker types most commonly employed for video postproduction are the Subclip and Comment types (Figure 8.9). You can also use custom markers.
Here’s a little more detail about some smart marker uses:
![]() Subclips. A Subclip marker creates a new subclip in the Project panel when you save the project. Updates and changes to the subclip’s settings update at the next save.
Subclips. A Subclip marker creates a new subclip in the Project panel when you save the project. Updates and changes to the subclip’s settings update at the next save.
When you send the Prelude project (or the individual subclip) to Adobe Premiere Pro, it will appear in the Adobe Premiere Pro Project panel as a subclip, and it is editable in Adobe Premiere Pro the same way a subclip created in Adobe Premiere Pro would be.
If you send the entire Prelude project to Adobe Premiere Pro, the Comment markers will be visible on any full clips and subclips, but note that subclip markers will not be visible on the original source clip.
![]() Comments. A Comment marker is used for any notes that you may want to make on a shot that don’t fit into the other marker type categories. With the marker selected, use the Marker Inspector panel to make any appropriate notes.
Comments. A Comment marker is used for any notes that you may want to make on a shot that don’t fit into the other marker type categories. With the marker selected, use the Marker Inspector panel to make any appropriate notes.
![]() Custom markers. You may find that you use one type of marker repeatedly, say a Subclip marker for “Good Take” or something similar.
Custom markers. You may find that you use one type of marker repeatedly, say a Subclip marker for “Good Take” or something similar.
Save some time by saving the specific marker as a template. Select the marker you want to create the template from, and from the Marker pull-down menu, choose Save Marker as Template (Figure 8.10).

Figure 8.10 Click on the marker that you want to make into a template and choose Marker > Save Marker as Template.
You can make different libraries of custom markers for different types of projects and save the custom marker set using the text header at the top of the Marker Type panel (Figure 8.11).

Figure 8.11 After you name the custom marker, it is added to the Marker Type panel. Here, Good Take is added as number 7 in the list.
Creating rough cuts
Adobe Prelude can also help you create rough cuts of footage. An assistant can line up good takes in a sequence instead of the editor taking the time to sort out footage. The editor can then get to the work of fine-tuning faster, accelerating the editing process. You can make a new rough cut in Adobe Prelude by pressing Command+N (Ctrl+N) or just by clicking the New Rough Cut icon in the lower-right corner of the Project panel (Figure 8.12).

Figure 8.12 Right-click on the clip you want to add to the rough cut, and choose Append to Rough Cut.
Exporting to Adobe Premiere Pro
When you’ve completed your work in Adobe Prelude, you can send the project to Adobe Premiere Pro directly if Adobe Premiere Pro is installed on the same machine (Figure 8.13). You can also export the project as an Adobe Premiere Pro project file or a Final Cut Pro XML file for use by an editor on a different system.

Figure 8.13 Right-click on a clip, subclip, or rough cut in the Prelude Project panel and send it to Adobe Premiere Pro.
Postproduction Planning
Adobe Premiere Pro is a very flexible application when it comes to file handling for postproduction. But flexibility is often the rope you hang yourself with. Using that flexibility wisely within Adobe Premiere Pro to set up your project appropriately to your assets and your project requirements is covered thoroughly in Chapter 2, especially in the section called “Media Setup Outside of Adobe Premiere Pro.” Chapter 2 also has a section on configuring other tools in Adobe Creative Cloud to maximize performance.
Setting up a truly efficient and flexible post workflow involves anticipating not only the final needs of the finished project, but also the needs of the process along the way, and there are a few big issues that seem to keep surfacing for many editors and postproduction supervisors.
The Big Issues
Should you use a mezzanine (post) codec? Or should you use the camera’s raw files? Should you optimize for Smart Rendering? What about working with any of the newer formats that are larger than HD (given that HD is the common deliverable)? Let’s explore these questions.
Using mezzanine formats
Postproduction formats that utilize codecs such as Apple’s ProRes, Avid’s DNxHD, and GoPro’s CineForm are often called mezzanine codecs. The original material, often very lossy, highly compressed h.264, is often transcoded to one of these mezzanine formats. The general trade-off is larger file size for smaller processing demands.
Because Adobe Premiere Pro is designed to load native format camera media as its primary working method, you can load most camera data file formats without excessive processing or file duplication, which of course can save time and an immense amount of storage space.
In other cases, projects where Adobe Premiere Pro interacts with other software, either collaborating on an edit with another manufacturer’s nonlinear editor (NLE) or even just using various postproduction applications for effects work, knowing the optimal file formats that each application handles will help you determine if you need to use a mezzanine (or intermediate) format to make your assets more portable across multiple applications and computer platforms and operating systems.
There really isn’t one best approach for every situation, and in many cases the most widely compatible formats are also the largest stored files sizes, so this decision is a significant one. Of particular concern are situations in which you’re working with some type of camera raw footage. Often, these files are huge and require very fast media access. There is no single camera raw format; frequently, each camera manufacturer maintains its own raw format. Many visual effects and editing applications don’t handle native camera raw formats as well as Adobe Premiere Pro (if at all).
Therefore, one solution would be to convert camera raw to some type of high-color precision format for postproduction, which would make the files more accessible to a wider variety of applications and make handling the footage a bit more “conventional.” However, the trade-off in flexibility means a compromise in maintaining the original format of the clip. There will be a compromise compared to keeping the clips in their original pristine form.
If your project footage is camera raw, the consideration may not be so much “if” but “when” to transcode. The benefits to editing the camera raw footage and converting only selected segments is discussed later in this section.
Smart Rendering
One advantage to utilizing certain mezzanine codecs is Adobe Premiere Pro’s ability to use Smart Rendering. Those of you who depend on codecs like DNxHD or ProRes as the backbone of your workflow can now edit the format that you export. Then, by selecting the Smart Rendering option in the Export dialog (Figure 8.14), you can export to that same codec without having to re-encode the frames that already exist in the proper format, saving you significant time. This is mentioned in Chapter 2 in the section “Smart Rendering codecs yield faster exports.”
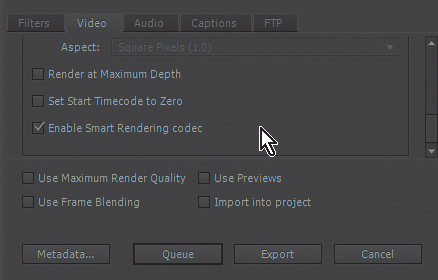
Figure 8.14 You may have to scroll down to reveal the Enable Smart Rendering codec check box in the Video tab in the Export dialog.
Decisions about frame size
As camera acquisition frame resolution moves from high definition past 2k to UltraHD, 4k, 5k, and beyond, acquisition formats are becoming a different frame size than the delivery spec (HD), or even the master final format for the project. A constant question is where in the process to accommodate the frame size conversion, or whether to do it all. Certainly, a 4k mastered program has more flexibility for the future than HD. But maintaining frame sizes that are four or five times larger than the specified delivery spec increases the stress on your postproduction chain at every step. There are two approaches to resolve this situation: edit at the native size and downconvert when finished or work at the delivery frame size (usually HD).
When you’re shooting material for final framing and composition, you can simply edit the material in Adobe Premiere Pro in its native frame size. At the end you can then export the footage to the desired format and frame size, delaying the down conversion (and the inherent quality reduction) until the very end of the process. The edited project can then be archived with the original media and retrieved and remastered by exporting it at a different frame size in the future. So, if something was shot in 4k, it could be edited in 4k and delivered in HD with the flexibility that if 4k delivery became easy, you’d have the option to deliver the content again in 4k. Many production facilities did this with HD. They’d shoot HD and edit in SD, knowing one day they could deliver the materials again in HD.
Alternatively, using a sequence designed around the current delivery specification allows you to choose between using the original framing or “pushing in” to a larger frame to recompose the shot, which adds a significant degree of visual flexibility to the edit (Figure 8.15).

One drawback to working in the final delivery form is that the entire project is now edited at the delivery frame spec, which is often HD. As a result, future opportunities to deploy the program at larger frame sizes (UltraHD is well on its way to a living room near you) will involve significant rework, including reframing.
Even if you don’t see the need for a higher-resolution version of the project in the future, there is another issue to consider. Any compositing or effects work benefits from the highest possible resolution source images. If that effects work is designed to be downstream from the edit in your workflow, any 4k selects you send from your HD frame edit sequence will have already been reduced to a quarter of their original resolution.
The choice is to consider this question prior to entering post and try to plan for the optimal results from each link in the postproduction chain. Even if you’re delivering an HD program, using 4k will provide higher-quality effects. Elements like keying will likely be easier with the extra resolution.
Using camera raw files
If you’re working with a camera raw format that Adobe Premiere Pro can load in its native form, the optimal pathway through post would be to edit the material natively in Adobe Premiere Pro.
Some camera raw formats have their own primary color grading capability built in to the metadata of the file. RED R3D files can be altered in Adobe Premiere Pro by accessing each clip’s Source Settings by right-clicking on the clip in the Project panel or the sequence. Changes made to RED clips in this way will stay with the clip if you choose Save to RMD (RED Metadata) in the upper right of the RED Source Settings panel (Figure 8.16 on the next page). ARRIRAW frame sequences can also be altered using Source Settings, although the tools are basic by comparison.

Other camera raw formats may have alternate methods for making adjustments to clip metadata. GoPro’s CineForm formats can be altered via an external application/utility that can run simultaneously outside of Adobe Premiere Pro. Any changes made to a clip in metadata would then be carried with the clip, which would eliminate the need to render frames out of Adobe Premiere Pro’s edit Timeline to retain the changes. The most important consideration when you’re editing camera raw files is that they can’t be altered and rewritten in their native form by an Adobe application in the vast majority of cases.
As discussed in the “Using Mezzanine Formats” section, the point where you convert camera raw footage to even a high-quality mezzanine format in your post process should be planned for so you can take full advantage of the flexibility of the raw format before the footage is flattened.
Working with Adobe SpeedGrade
Adobe SpeedGrade is a dedicated color grading tool that has become an integral part of the Adobe Premiere Pro editing process with the addition of Direct Link (see “Minimalist Adobe SpeedGrade” in Chapter 6). Whereas Adobe Premiere Pro is like a Swiss army knife, Adobe SpeedGrade’s single job is to speed the job of the colorist.
Features such as shot-to-shot matching, Secondaries (correcting portions of an image like sky or flesh tones), and a huge library of professional “looks” are just a few advantages of working with Adobe SpeedGrade. Because it is built on the Lumetri color engine, a sequence sent to Adobe SpeedGrade via Direct Link will place a single Lumetri effect on each clip when the sequence returns to Adobe Premiere Pro.
Using SpeedGrade upstream from Adobe Premiere Pro
SpeedGrade can be used on individual clips if you want to create color lookup tables (LUTs) based on dailies prior to editing. The list of formats that SpeedGrade will load is in its manual, which is available for download at http://helpx.adobe.com/pdf/speedgrade_reference.pdf.
Adobe SpeedGrade can be used directly as Lumetri effects on clips in an Adobe Premiere Pro sequence. By first generating color LUTs (saved as .look files) saved out of Adobe SpeedGrade, the LUT can act as a basic starting point, which is particularly useful with cinema cameras.
Most cinema cameras shoot “flat”—the image looks fairly terrible until a LUT is applied. This is to maximize the amount of light captured in-camera. The LUT helps make the image look “normal” while retaining all the extra data. This technique of adding a LUT can be even applied to the raw clips and burned into transcoded clips permanently for use as mezzanine clips or for proxy files.
To save a .look file of your correction in SpeedGrade, make sure the correction layer with the settings you want to save is selected (you may want to hide any correction layers that aren’t selected to ensure that the change you’re seeing is the one you want to save as a .look file). In the Look Management panel at the bottom below the HSL wheels, the correction layers are shown on the left. Keep in mind that you can only select one correction layer on the Timeline; however, all the layers of correction in the Layers list that apply to that correction layer will be part of the .look file. Below the Layers list is the Save .Look icon (Figure 8.17). When you click it, a new preset appears in the Look Management panel (Figure 8.18) to the right.

Figure 8.17 Select the correction layer you want to save in the Timeline, and then click the Save .Look icon at the bottom of the Layers panel in SpeedGrade.

Figure 8.18 If you don’t see the Looks Management panel, it’s probably collapsed below the correction tools. Click the icon on the bottom right of the panel to reveal it.
The ZIP file that is created when you export a LUT from SpeedGrade provides a convenient way to move the LUT data around as a unit. But in order to load it (for instance, in Adobe Premiere Pro’s Lumetri effect), you’ll need to extract the ZIP archive.
You can click on the name of the preset in the Looks Management view and type in an appropriate name. To access the .look file later, you may want to store it outside of SpeedGrade’s preset library. To do this, simply right-click on the preset and choose Export Look (Figure 8.19).
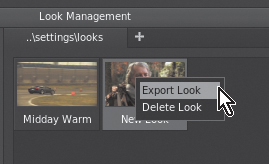
Figure 8.19 Many of the looks are stored internally to Adobe SpeedGrade. By right-clicking on the .look file, you’ll have the option to export the look and save it anywhere on your system.
Once you’ve chosen Export Look, a dialog appears (Figure 8.20) displaying the compatible versions that will be saved in a ZIP file. These alternative versions of the LUT can be extremely helpful to maintain maximum compatibility across a variety of software and hardware.

Figure 8.20 You can choose the LUT types that will be part of the exported file by selecting the check boxes and specifying additional types from the list.
If you load a Lumetri Look preset and change your mind, you can still use the Setup icon in the Effect Controls panel to load a custom .look file without having to delete the effect and reapply the basic Lumetri effect.
Using .look files in Adobe Premiere Pro’s Lumetri effect
In Adobe Premiere Pro, you can utilize .look files through the Lumetri effect without opening Adobe SpeedGrade to create them. You can either apply the basic Lumetri effect, which asks you to load a .look file to apply, or you can use one of the presets in the Lumetri Looks folder (Figure 8.21). You can use either effect with an adjustment layer to audition different looks, or toggle the track off during editing to accelerate response on laptops or less powerful systems.

If you really want to push the LUT workflow to the limit, these can be attached in Adobe Media Encoder to a preset (on the Filter tab). Presets built in Adobe Media Encoder appear in both Adobe Premiere Pro Export Media and in the Ingest dialog in Adobe Prelude. Once you’ve picked or adjusted a LUT, you could transfer your proxy files with the LUT “burned in” wherever you want to do the conversion: in Adobe Prelude (probably your best choice), in Adobe Media Encoder (you could even use a watch folder!), or in Adobe Premiere Pro.
Adobe Premiere Pro Direct Link to SpeedGrade
The procedure for using Direct Link to Adobe SpeedGrade is addressed in detail in “Minimalist Adobe SpeedGrade” in Chapter 6. For purposes of workflow, saving SpeedGrade changes by saving them to the Adobe Premiere Pro project as the applied Lumetri effect simplifies the workflow by creating fewer files to track. Saving your .look files into a common location is a good practice should you want to utilize them later.
Working with Adobe After Effects
Adobe After Effects has been a staple of postproduction graphics and compositing for two decades. The close relationship between Adobe Premiere Pro and After Effects is most evident when you’re using Adobe’s Dynamic Link. See the end of Chapter 5 for more on Dynamic Link.
Sequence vs. clip frame size considerations
After Effects compositions created through Dynamic Link are based on the frame size and rate of your current sequence, or you can replace a given clip with an After Effects composition based on the current sequence settings.
If you’re editing 4k on an HD sequence, the After Effects comp created to replace the clip in that sequence will have the frame rate and size of the HD sequence instead of the source clip (Figure 8.22).
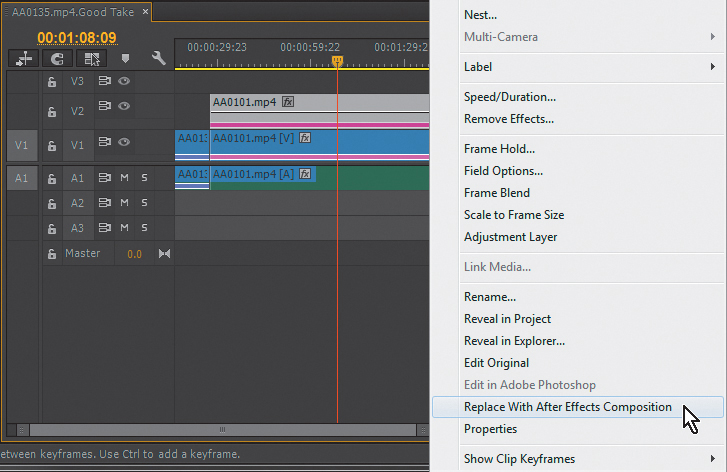
If you need to create an After Effects composition based on a different size than the edit sequence you’ve set up, you can use Dynamic Link to create a new composition and set the specifications in the dialog. Of course, you can create a composition in After Effects the “old-fashioned” way, and then import the composition in Adobe Premiere Pro through Dynamic Link. You can choose any of these options from the Dynamic Link option in the pull-down menu in Adobe Premiere Pro. You can also replace a clip on the Timeline with an After Effects composition containing that clip by right-clicking on it and choosing from the menu.
When you require many Dynamic Linked After Effects compositions, you can improve your editing response in Adobe Premiere Pro by keeping the Dynamic Linked After Effects comps on their own video track. You can then switch off that track’s output when you don’t need to work with all the comps, or you can enable/disable individual comps on a clip-by-clip basis.
Even when edit performance is not an issue, you may want to consider rendering the After Effects comps and importing the finished clips. You can place the rendered clips on a video track above the Dynamic Linked comps. By doing so, not only will you gain some performance, but you’ll also have actual media to archive with the project versus needing to restore all the After Effects projects, plug-ins, and so on to be able to complete simple changes to the project in the future (Figure 8.23).

Figure 8.23 Adobe Premiere Pro Timeline with V2 (containing Dynamic Linked After Effects comps) disabled and the rendered movies on V3.
Working with Adobe Audition
Adobe Audition is to audio what Adobe SpeedGrade is to color. In the course of specialized audio work on your video project (Chapter 4 covers audio in depth), there will probably be times when even Adobe Premiere Pro’s competent audio capabilities may be insufficient. There are two ways to handle the migration from Adobe Premiere Pro to Adobe Audition. You can send either an individual clip you’ve selected to Audition for audio work or send the entire sequence (make sure the sequence is the panel with the focus) by choosing Edit > Edit in Audition and then choosing Clip or Sequence as appropriate. You can also select an individual clip in the sequence, right-click, and choose to edit that clip in Audition (Figure 8.24).

Figure 8.24 Right-click on an audio clip in your sequence and select Edit Clip in Adobe Audition to modify a single clip.
The Audition disadvantage
The big difference in how Adobe Audition works versus the video applications is that it’s destructive. It has to render an altered file to compete its changes. For this reason, the Edit clip in Audition functions creates working copies of the audio you send to Audition so that the original media files remain untouched. These files will be labeled as “<filename> Audio Extracted.” When you send a clip to Audition from Adobe Premiere Pro, you’ll notice that the audio changes its name on the sequence. This indicates that the Audition-processed audio has replaced the original audio. Conveniently, the new extracted file is now linked to its corresponding video clip in the sequence. If you send a sequence to Audition, the audio in the existing edit sequence will not be changed (Figure 8.25).

Figure 8.25 The dialog for sending an Adobe Premiere Pro sequence to Audition has options for including a preview video, rendering any audio effects you’ve already applied in Adobe Premiere Pro, and choosing whether you want any volume keyframe metadata from your sequence to travel with the audio.
These extracted audio files will be written to the directory you’ve identified in Project Settings (File > Project Settings) for captured audio (Figure 8.26). Keep this in mind for archiving purposes because these clips are now critical components of your project and will be necessary to alter your edit in the future.

Figure 8.26 Audio files created when sending a clip or sequence to Audition for processing will be saved in the location designated for Captured Audio.
If you send an entire sequence to Audition, the audio in the existing edit sequence will not be changed because a copy of all the audio is made for Audition to work on. After sending a sequence to Audition, you can make your edits and then bring back a finished audio track to insert into your sequence. Often, creating new audio tracks at the top of the sequence to accommodate the finished audio tracks and muting all the raw audio tracks underneath allows you to have the sequence ready for master output but keep the original components on the Timeline in case future changes are necessary.
Exporting Media
Most experienced users know that Adobe Premiere Pro has a rather sophisticated media export function that is a specialized link to Adobe Media Encoder. Once you’ve set up your export parameters, you have two choices for executing the task. You can click Export (Figure 8.27), which dedicates the full resources of the machine to the export process, enabling you to return to editing once the export is complete.
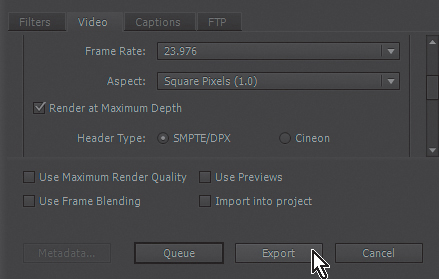
Figure 8.27 Click Export to encode directly from Adobe Premiere Pro, or click Queue to launch Adobe Media Encoder and send the sequence to the Adobe Media Encoder.
Alternatively, you can send the export job to the Queue. Clicking Queue opens Adobe Media Encoder and puts the export job in Adobe Media Encoder’s Queue list, allowing you to continue editing or even set up additional export jobs and send them to the Queue. When planning your workflows, it’s best to consider how you’ll handle exporting (should you tie up your system?) and what the final archive format for the future should be.
Exporting While Editing
If you ever run Adobe Media Encoder to batch process some video files and look at the CPU activity, you’ll notice that no matter how many CPU cores you have, Adobe Media Encoder uses nearly 100 percent of them to do its work. But you’ll see a significant difference in system performance charting when Adobe Media Encoder is processing an Adobe Premiere Pro sequence.
Because Adobe Premiere Pro utilizes the GPU for so many functions, an Adobe Premiere Pro sequence in the Queue needs to do the same to render frames into the encoding process. Even when you continue to edit while the Adobe Media Encoder Queue is set to run, there is another version of Adobe Premiere Pro running in the background to handle the Adobe Premiere Pro sequence being encoded. When Adobe Premiere Pro is technically running in two places, it keeps resources prioritized for the editor who is continuing to work; therefore, the background version of Adobe Premiere Pro pauses every time the editor who is currently working in the foreground moves the mouse or plays back video, pausing the encoding process as well.
![]() Tip
Tip
If you have a selection of output file types you require consistently, you can also make a Watch Folder for Adobe Media Encoder. Whatever files are placed in the folder are automatically encoded to the specified output profiles.
When Adobe Media Encoder is running processing clips from the Queue directly, it will run constantly even while Adobe Premiere Pro is editing in the foreground; however, the performance of both applications will depend on the hardware resources available.
Creating the most efficient workflow means something different to everyone. For some, completing the export as quickly as possible is worth the pause in editing necessary to do a direct export from Adobe Premiere Pro. For others, the time it takes to do the encoding in the Queue as it starts and stops is perfectly acceptable if editing progress continues. And if your project needs to be delivered in multiple distribution formats, you might consider making a master quality file. This should be a post codec such as DNxHD or Apple ProRes.
If you export a master file, you’ll no longer depend on Adobe Premiere Pro, meaning less resources wasted and improved performance. And in Adobe Media Encoder you can just set up this file and have all the output profiles you require, utilizing the master file as the source for each one.
DPX Files for Ultimate Media Flexibility
The problem with outputting to architectures such as QuickTime, MXF, or AVI are the unique limitations in each type. Instead, for the greatest future flexibility, you can generate DPX files. DPX (Digital Picture eXchange) format files are huge, uncompressed still frames.
In workflows where extensive effects work is necessary, there may be a wide variety of applications playing roles in completing complex effects. Many specialized visual effects programs do not accept the wide variety of video formats of Adobe digital video applications.
Adobe Premiere Pro (and Adobe Media Encoder) has the ability to export DPX frame sequences in a wide variety of specifications and frame sizes up to 10-bit log color precision, allowing a wide variety of post effects applications to access very information-dense versions of your footage (Figure 8.28).

Because DPX files can have a black point set above 0 and white point below 1023, color values beyond this range can also be stored in the file, which can prove useful for effects work where maximizing the available grayscale information can aid in masking and keying operations during compositing (Figure 8.29). If you’re working in other effects pipelines, using DPX might be the easiest and smartest method for interoperability.

Figure 8.29 Under the DPX Format setting, you’ll find a wide variety of supported frame sizes and color precision settings.
Archiving a Project
As any editor who has had to edit out two minutes of every episode of a 1990s TV series resurrected for syndication can tell you, nothing in the industry goes away forever. Ensuring future access to your media and your project is important, and having a solid approach to archiving is critical.
Chapter 2, “Setup and Organizing,” talked about organizing a project at the outset. Storing your assets where you can find them is as important at the end of the project as when you started. Multiple copies of the data are also important to have at the archiving stage, just as in the beginning of the project.
Because data storage is currently so inexpensive and disposable, not having two (or three) copies of your data is akin to not having it saved at all when that inexpensive hard drive fails (and they all do at some point). An updated version of a popular saying might be: There are only three things constant in this world: death, taxes, and hard drive failure.
If you were organized based on suggestions in Chapter 2, great. If not, the Project Manager can collect everything for you for easy backup and transfer. Or if you just want to copy part of a project, again, the Project Manager is the tool for these uses.
![]() Notes
Notes
If you have draft sequences that are no longer relevant or perhaps some “scratch” sequences used for working outside the primary edit, you may or may not want to include them—or any otherwise unused media in them—in the final archive.
Using the Project Manager
Every type of editing project is a bit different. A project with a few assets isn’t particularly difficult to manually archive, but archiving larger projects with hundreds or thousands of individual assets can be more challenging.
Using the Project Manager is an easy way to gather your assets in a given project and move them all to a specific destination for archive storage. When you launch the Project Manager from the File menu, a dedicated panel opens (Figure 8.30). At the top of the panel you’ll see the sequences in your project listed. You can choose which sequences you want to archive by selecting or deselecting the corresponding check box.
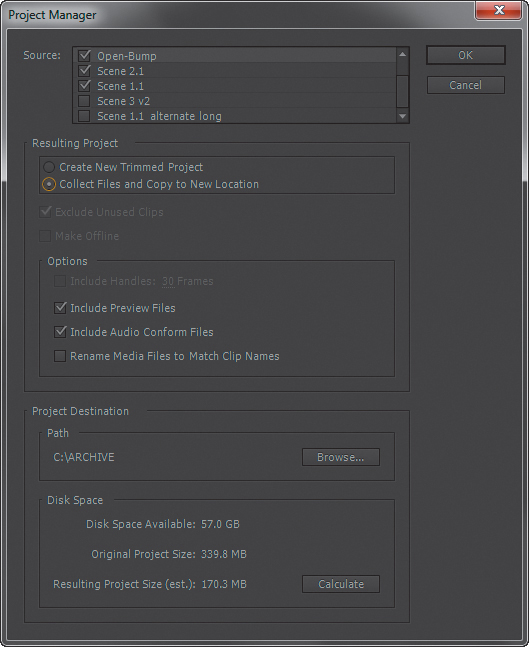
The Resulting Project options allow you to simply copy all the project assets to a specific location, or you can trim the project (Figure 8.31). When you trim the project, Adobe Premiere Pro trims the copies of only the parts of any video assets that you used, plus some extra frames based on the Include Handles option. You can select the Exclude Unused Clips option, and any assets inside the project that are unused will not be copied.

![]() Tip
Tip
If you don’t select all the sequences in a project for archiving, the option to Exclude Unused Clips is automatically selected whether you are trimming a project or simply moving it.
The options to keep Preview and Audio Conform files are available as well. Keep in mind that Adobe Premiere Pro can rebuild the previews and conform files easily when the project is retrieved. Keeping them is rarely necessary, and they can take up considerable hard drive space in larger projects. A good reason to keep them would be for a “quick” restoration of a project. That way you could save the time in re-rendering. Everything is a trade-off.
![]() Notes
Notes
Not every video format can be trimmed by the Project Manager. Any proprietary media format, like RED or ARRIRAW, that can’t be written by your editing workstation can’t be trimmed because a new file can’t be created. Many formats that use temporal compression (often referred to as “long-GOP”) also can’t be trimmed, although you can still elect to include or exclude individual clips. Trimmed Panasonic P2 media can be retrieved and used with Adobe Premiere Pro, but the trimmed files are not “P2 camera” compatible.
You should carefully consider whether or not to select the Rename Media Files to Match Clip Names option. In Adobe Premiere Pro, many editors will name camera data files more intuitively in the sequence, because many camera formats have clip names that are anything but intuitive to human beings. However, keep in mind that changing the names of the clips in your archived project may make the footage difficult to track down should you need to retrieve the project in a year to find a particular shot in the raw camera archive. In that situation, maintaining the original name of the media in your archive project would come in awfully handy.
After choosing a destination for the project, you can click the Calculate button to have the Project Manager show you how much disk space the resulting project will consume relative to the original.
Some files require manual backup
As convenient as the Project Manager is when consolidating and moving or archiving a project, Adobe Premiere Pro doesn’t gather every file pertinent to reconstructing your entire edit project:
![]() The Dynamic Linked After Effects comp in Adobe Premiere Pro will be included in a Project Manager consolidation. But the Adobe After Effects project that contains the data for the composition exists outside the Adobe Premiere Pro project. If any media or assets were added in Adobe After Effects, they will need to be manually copied, because they weren’t in the Adobe Premiere Pro project. (After Effects has its own methods for gathering project assets from inside the project.)
The Dynamic Linked After Effects comp in Adobe Premiere Pro will be included in a Project Manager consolidation. But the Adobe After Effects project that contains the data for the composition exists outside the Adobe Premiere Pro project. If any media or assets were added in Adobe After Effects, they will need to be manually copied, because they weren’t in the Adobe Premiere Pro project. (After Effects has its own methods for gathering project assets from inside the project.)
In After Effects you can access the project consolidation features by choosing File > Dependencies. After Effects offers several options, which range from simply collecting files to removing unused footage or finding missing footage (Figure 8.32).
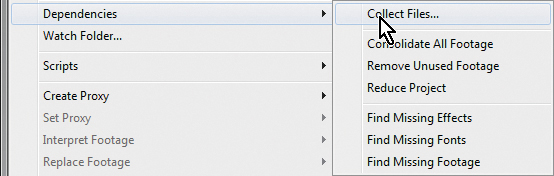
Figure 8.32 Collect and consolidate After Effects project files by using the After Effects interface.
![]() Adobe Audition projects and any audio assets you may have used in Audition but did not import into Adobe Premiere Pro directly also need to be manually collected and moved. This does not include the “Audio Extracted” (replaced) audio files because those are assets included in the Adobe Premiere Pro project and they will be included as assets in the trimmed project.
Adobe Audition projects and any audio assets you may have used in Audition but did not import into Adobe Premiere Pro directly also need to be manually collected and moved. This does not include the “Audio Extracted” (replaced) audio files because those are assets included in the Adobe Premiere Pro project and they will be included as assets in the trimmed project.
![]() Keeping all the additional audio production work and assets in one directory (the Common Media folder specified in Chapter 2 is an excellent location for this) makes moving them a simple process when the time comes.
Keeping all the additional audio production work and assets in one directory (the Common Media folder specified in Chapter 2 is an excellent location for this) makes moving them a simple process when the time comes.
![]() Adobe Photoshop and Illustrator assets, such as other files you reference that are not imported to Adobe Premiere Pro, will not be managed. Therefore, you’ll need to keep track of them and move them as warranted.
Adobe Photoshop and Illustrator assets, such as other files you reference that are not imported to Adobe Premiere Pro, will not be managed. Therefore, you’ll need to keep track of them and move them as warranted.
![]() Adobe SpeedGrade corrections you applied through Direct Link will be saved within your Adobe Premiere Pro project as settings in the Lumetri effect. However, it’s still a good practice to save your .look files separately in cases where you have color corrections that may be useful in the future.
Adobe SpeedGrade corrections you applied through Direct Link will be saved within your Adobe Premiere Pro project as settings in the Lumetri effect. However, it’s still a good practice to save your .look files separately in cases where you have color corrections that may be useful in the future.
One method of keeping all your files and assets organized is explained in the section “Media Setup Outside of Adobe Premiere Pro” in Chapter 2.