
Chapter 5. Using local databases
In chapter 3, you learned how to work with the file system. Using a file system allows you to store data in a persistent fashion and organize that data in a variety of ways. Writing data to files is a great solution in some cases. For example, files are ideal for writing binary data such as images or videos that your application will need to load at runtime. Files are also great for portability. If you want to output text to a format that a user can easily send to a friend, a file is good for that. But as useful as files may be, they’re not a panacea for all things data. In this chapter, we’ll look at a more efficient way to work with some types of data: local databases. A database allows you to store data persistently. Most databases also have a language that allows you to store and retrieve data in an efficient way. AIR uses a type of database called SQLite, and SQLite databases use a language called Structured Query Language, which is usually written as SQL.
Note
SQL is pronounced differently by different people. Some prefer to spell out the letters, as in Ess-Cue-El. Others prefer to pronounce SQL just like the word sequel. In this book we’ve chosen the latter option. That means you’ll see us refer to a SQL statement instead of an SQL statement.
Using SQL, you can work with sets of data in a much more efficient way than if you had to write custom code to parse through it. Throughout this chapter, we’ll look at all you need to know to work with local databases from AIR applications. We’ll talk about creating new databases, writing data to databases, reading data from databases, updating existing data, and more. We’ll also build a few example applications, including updating the AirTube application to support offline mode using a local database.
Note
AIR allows you to create nonpersistent databases that are stored in memory while an application is running. These databases are deleted from memory when the application exits. Although these sorts of databases are possible using AIR, our focus in this chapter is strictly on persistent databases that are written to disk. Persistent databases are generally far more useful simply because the data lives for much longer (until it’s explicitly deleted).
A basic knowledge of SQL is critical to understanding much of how to work with databases in AIR. We recognize that you might not have much knowledge of SQL. Therefore, where appropriate, we’ll give you tips on basic SQL statements for all the behaviors we mention. If you’re already a SQL expert, you can feel free to skip over these sections.
Note
While we do provide some basic SQL information throughout the chapter, it isn’t intended to be a comprehensive SQL tutorial. For that, we recommend you read a book dedicated to the topic. You might also find some tutorials on the Web that are helpful in that regard. One such excellent resource can be found at www.w3schools.com/sql.
Before we start talking about all the implementation details, we first need to talk about what a database is and why you’d want to use one. You’ll find all that information in the next section.
5.1. What is a database?
As with several sections in this chapter, if you’re already a database and SQL expert and you want to get right to the implementation details, you can skip this section entirely. For the rest of us who could use a brief introduction or refresher on some basic database concepts, we’ll take just a few minutes to talk about what databases are and what they can do for us.
Simply put, a database is a collection of information organized in some fashion, usually into groups known as records. Each record has a uniform set of data. For example, a record in a database that stores addresses might have the following pieces of data: street address 1, street address 2, city, province, postal code, and country. Most often it’s convenient to think of these records as rows, much like the rows in a spreadsheet (which is a simple sort of database). Figure 5.1 shows a visual representation of a record for an address.
Figure 5.1. Databases organize data in records such as the one shown in this image.
![]()
There are a variety of ways in which databases can be modeled, including hierarchical, network, and object models. The SQLite engine used by AIR is a relational database engine, meaning that it uses a relational model of tables—a popular database model, and one that’s easy to grasp conceptually. A table is composed of columns and rows. Columns in a table are sometimes called attributes, but more often they’re simply called columns. For example, the attributes or columns shown in figure 5.1 are StreetAddress1, StreetAddress2, City, Province, PostalCode, and Country. The rows of a table are the records, and a record is the smallest unit that can be inserted or deleted from a table. (You can’t insert an entry from one column without inserting the entire row.)
Note
You can learn much more about SQLite by going to the official web site at www.sqlite.org.
Each database can have more than one table as well, and the data in the tables can have relationships, hence the term relational database. These relationships are usually based on keys. A key allows you to uniquely identify a record. For example, we could add an ID column to the table from figure 5.1. Figure 5.2 shows what this would look like.
Figure 5.2. Use an ID column as a primary key.
![]()
A key used as the unique identifier within a row in this way is called a primary key. Primary keys allow you to easily establish relationships between data in tables. We can extend our example to illustrate how this might work. Figure 5.3 shows the address table with a second record added to it.
Figure 5.3. We can add more than one record to a table.

We’ll next add a new table for employees that contains the employee ID, name, and title. Figure 5.4 shows this table.
Figure 5.4. The employees table shows the employee ID, name, and title.

Next we can establish a relationship between the data in the two tables by adding another table. This new table tells us which employee works at which address. Figure 5.5 shows the table. As you can see, some of the employees work at more than one address. For example, Pan (the employee with ID 2) works at both addresses.
Figure 5.5. Create relationships between records using the primary keys.

The SQLite database engine used by AIR writes all these tables to a file or files on the system. All of the writing to and reading from files is managed through the use of SQL. That includes creating new tables, deleting existing tables, inserting data, updating data, and deleting data. You can read more about the SQL you’ll need for these operations in section 5.2.
Now that you’ve had a chance to see how databases are structured, you may next be wondering how to determine when to use one. Although there are no fixed rules for making this determination, here are a few guidelines you might find helpful:
. If the AIR application uses data that’s relational in nature, it’s a good idea to use a database.
. When you want to be able to search data based on various criteria, a database can be a good way to store the data because SQL supports lots of ways to filter, group, and sort data sets.
. A local database is a great way to cache data retrieved from an online source, allowing an AIR application to continue to run from local data even when not online. When the application reconnects to the internet, it can update the local data.
. For an AIR application that connects to internet resources for writing data, a database allows an application to store data that a user inserts or updates even if the application isn’t connected to the internet. When the user next connects to the internet, the AIR application can read the data from the local database and write it to the remote resources.
Next we’ll take a look at the language you can use to work with AIR databases: SQL.
5.2. Understanding SQL
As we mentioned earlier, the topic of SQL is far too broad for us to cover comprehensively in this chapter. But we want to make sure that, even if you’re not already familiar with SQL, you’ll still be able to get the most out of this chapter. Therefore, in this section you can learn about many of the basic SQL commands you can use. If you’re already familiar with these commands, jump ahead to the next section. Or you may still find it useful to quickly read the following information to learn about the SQLite-specific details.
If you’re new to SQL or even if you just want to follow along, you may find it helpful to use the SQLTutorial AIR application that you can download from this book’s official web site at www.manning.com/lott. The SQLTutorial application looks like figure 5.6.
Figure 5.6. The SQLTutorial application allows you to follow along with SQL examples in the following sections.

The SQLTutorial application automatically creates a database to use and allows you to run SQL statements on that database. The upper-left portion of the application displays all the tables available. When you first run the application, there are no tables, just as in figure 5.6. In the following section, you’ll add a table to the database. Once you have tables available, you can select one at a time, and the table’s contents are shown in a data grid on the right. In the lower portion of the SQLTutorial application window is a text area that allows you to input SQL commands, and you can click the Run button to execute those commands.
5.2.1. Creating and deleting tables
As we’ve already mentioned, one of the most basic units of a database is a table. In fact, you can’t store data without at least one table. Therefore, creating tables is one of the most primary of SQL commands. You can create a table using the CREATE TABLE command. The command looks like the following:
CREATE TABLE tableName (column[, column, ...])
The following is a concrete example of a CREATE TABLE statement that creates a new table called musicTracks with the following columns: id, title, artist, album, length, and originalReleaseYear:
CREATE TABLE musicTracks (id, title, artist, album, length, originalReleaseYear)
SQLite uses a concept of storage classes. A storage class allows the database to store data in an efficient way because it only sets aside enough storage space for the type of data it’s storing. SQLite supports the following storage classes:
- NULL— Only for null values
- INTEGER— Signed integer values
- REAL— Floating-point numeric values
- TEXT— Text stored in the database encoding such as UTF-8
- BLOB— Data stored literally (that is, you can store binary data)
In order to help the database engine know which storage classes to use for which columns, you can create columns with an affinity. Affinity means that the database engine gives preference to a particular data type by trying to coerce data to that type before inserting it. For example, if you specify a column affinity of type INTEGER and you try to insert a string value, the database engine will try to first convert it to an integer. The affinities you can use are as follows:
- TEXT— The engine attempts to convert the data to text before inserting it. That means numeric values are inserted as strings.
- NUMERIC— If possible, the engine converts strings to integers or floating-point numbers and stores them using the appropriate storage class. Null or blob values aren’t converted.
- INTEGER— The primary difference between this and NUMERIC is that a string that can be converted to a number with a nonsignificant decimal value (for example, 5.0) will be converted into an integer.
- REAL— All numeric values are converted to floating-point values, even if the value after the decimal point is nonsignificant.
- NONE— No conversion is attempted. This is the default affinity if no other value is specified.
You can declare affinities when creating a table by adding the affinity after the column name. The following example creates the table with id, length, and originalRelease-Year as INTEGER and the rest using TEXT:
CREATE TABLE musicTracks (id INTEGER, title TEXT, artist TEXT, album TEXT, length INTEGER, originalReleaseYear INTEGER)
Clearly you can only create a table if it doesn’t already exist. If you attempt to create a table with the same name as one that already exists, you’ll receive an error. However, you can use the IF NOT EXISTS clause in the CREATE TABLE statement to avoid this error. The following creates the musicTracks table only if it doesn’t already exist. If it does exist, then nothing happens:
CREATE TABLE IF NOT EXISTS musicTracks (id INTEGER, title TEXT, artist TEXT, album TEXT, length INTEGER, originalReleaseYear INTEGER)
You can also add column constraints by adding a constraint to each column definition right after the affinity. SQLite supports a variety of constraints, but for the purposes of this book we’ll only be interested in the PRIMARY KEY constraint. This constraint requires that the value in the column be unique for each record. (You can only create one primary key column per table.) You can also add the keyword AUTOINCREMENT following the PRIMARY KEY constraint if the affinity is INTEGER. When AUTOINCREMENT is enabled, the value of the column is automatically inserted when adding a row, and it’s 1 greater than the previously inserted value. The following creates the table with id as an autoincrementing primary key:
CREATE TABLE IF NOT EXISTS musicTracks (id INTEGER PRIMARY KEY AUTOINCREMENT, title TEXT, artist TEXT, album TEXT, length INTEGER, originalReleaseYear INTEGER)
If you’d like to test this out for yourself, enter the preceding command in the SQLTutorial application text area and click the Run button. You should see the music-Tracks table show up in the tables list. If you select the table from the list, you’ll see the columns displayed in the data grid as shown in figure 5.7.
Figure 5.7. After creating a table and selecting it, you can see the columns in the data grid.

Creating tables is half the story as far as tables are concerned. The other half of the story is deleting them. Deleting is considerably simpler than creating. To delete a table, you use the DROP TABLE statement, specifying the table you want to delete. For example, the following deletes the musicTracks table:
DROP TABLE musicTracks
You can also add an IF EXISTS clause (the analog to the IF NOT EXISTS clause for CREATE TABLE) in order to avoid an error if the table doesn’t exist:
DROP TABLE IF EXISTS musicTracks
Note
If you’re testing the DROP TABLE code in SQLTutorial, you should make sure to re-create the table before moving on to the next section.
That covers the basics of creating and deleting tables. Next we’ll look at how to work with tables by adding data to them.
5.2.2. Adding data to tables
Tables are merely containers for data. Once you have tables created, the next step is to add data to them. In SQL, adding data is called inserting, and you insert data using the INSERT command.
The INSERT command looks like the following:
INSERT INTO tableName (column[, column, ...]) VALUES (value[, value, ...])
The number and order of columns and values must match. For example, the following statement inserts a new record into the musicTracks table. Note that the column list and the values list both have five items and the order of the items is the same:
INSERT INTO musicTracks(title, artist, album, length, originalReleaseYear) VALUES("Just Another Day", "Oingo Boingo", "Dead Man's Party", 243, 1985)
One thing you might notice from this example is that we’ve omitted the id column in the INSERT statement. That’s because we placed a PRIMARY KEY AUTOINCREMENT constraint on the id column. Therefore the database engine automatically assigns a value to the id column when inserting a new record.
Another thing you’ll notice from this example is that we’ve placed quotation marks around the text values. If you don’t place quotation marks around text values, the database engine tries to interpret the values as column names rather than as literal values. Therefore you must enclose text values in quotation marks. (Either single or double quotation marks work.) You shouldn’t place quotation marks around numeric values.
If you’d like to test the code for yourself, go ahead and run the preceding SQL command using SQLTutorial. If you run the code, you’ll see the new record show up in the data grid as depicted in figure 5.8.
Figure 5.8. Insert a record into a table and it shows up in the data grid.

Once you’ve inserted data, you can’t reinsert it to make changes to it. Instead you need to update the data using the command discussed in the following section.
5.2.3. Editing data in tables
Editing existing records in SQL is known as updating, and you use the UPDATE command. The UPDATE command syntax is as follows:
UPDATE tableName SET column = value[, column = value, ...] WHERE expression
The SET clause consists of a list of columns and new value assignments. Typically you follow that with a WHERE clause that indicates which rows to update. If you omit the WHERE clause, all rows are updated, which isn’t typically the intended result. The following example updates the musicTracks table by setting the length column to 242 for the record with an id value of 1 (because id is a primary key, this will only update one record):
UPDATE musicTracks SET length = 242 WHERE id = 1
If you want to create compound WHERE clause expressions, you can use the operators AND and OR. For example, if we wanted to update the artist name for all tracks on the Oingo Boingo album Dead Man’s Party, we can use the following command:
UPDATE musicTracks SET artist = "OINGO BOINGO" WHERE artist = "Oingo Boingo" AND album = "Dead Man's Party"
You may have noticed that, in these examples, we surround text values with quotation marks just as we did with text values in INSERT statements.
Again, if you’re following along using SQLTutorial, run the preceding SQL statement. When you do, you’ll see that the artist name updates from Oingo Boingo to OINGO BOINGO. If you’d inserted other records with the artist name Oingo Boingo but different album names, those records would remain unaffected.
Now that you’ve seen how to insert and update data, the next step is deleting data, which we’ll discuss in the next section.
5.2.4. Deleting data from tables
You can delete data from tables using the DELETE command. The syntax for the DELETE command is as follows:
DELETE FROM tableName WHERE expression
Although the WHERE clause isn’t strictly required in the DELETE statement (just like it’s not required for an UPDATE statement), it’s almost always used. If you omit the WHERE clause, the DELETE statement will delete all the records from the specified table. Generally, you only want to delete one or a few records. The WHERE clause allows you to limit the deletion to only those records that meet the criteria in the expression. For example, the following deletes only the record with the id of 1:
DELETE FROM musicTracks WHERE id = 1
You can also use compound expressions just as you would with an UPDATE statement. For example, the following deletes all records where the artist is either Devo or Oingo Boingo:
DELETE FROM musicTracks WHERE artist = "Devo" OR artist = "Oingo Boingo"
We’ve now covered all the basics of inserting, updating, and deleting data, but we haven’t yet shown you how to retrieve data from the database. We’ll talk about that in the next section.
5.2.5. Retrieving data from tables
Retrieving data from a database can be simple or complex depending on the requirements. For example, retrieving all the records from a table is simple, but retrieving the sum of the values from one column for a particular group of records is more complex. We’ll look at how to retrieve data, starting with the simplest examples and moving to more complex examples. If you want to follow along with the examples in this section, you can by using the SQLTutorial application. If you’d like to get exactly the same results as we show in this section, you can run a special command in SQLTutorial that will initialize the musicTracks table with the same values as our sample data set. All you need to do is run the command INITIALIZE musicTracks in SQLTutorial, and you’ll see that it creates (if necessary) the musicTracks table and adds data to it. Even if you’ve already created musicTracks, you can start over by first running the DROP musicTracks command before running INITIALIZE musicTracks.
Note
INITIALIZE musicTracks is a special command just for SQLTutorial and isn’t a part of standard SQL.
The data set that we’ll be working from for the examples in this section is shown in table 5.1.
Table 5.1. The data set for all the examples in this section
|
id |
title |
artist |
album |
length |
originalReleaseYear |
|---|---|---|---|---|---|
| 1 | Just Another Day | Oingo Boingo | Dead Man’s Party | 243 | 1985 |
| 2 | I Scare Myself | Thomas Dolby | The Flat Earth | 299 | 1984 |
| 3 | Senses Working Overtime | XTC | English Settlement | 270 | 1984 |
| 4 | She Blinded Me With Science | Thomas Dolby | The Golden Age of Wireless | 325 | 1982 |
| 5 | Heaven | The Psychedelic Furs | Mirror Moves | 250 | 1984 |
| 6 | Dance Hall Days | Wang Chung | Points on the Curve | 258 | 1984 |
| 7 | Love My Way | The Psychedelic Furs | Forever Now | 208 | 1982 |
| 8 | Everybody Have Fun Tonight | Wang Chung | Mosaic | 287 | 1986 |
We’ll use this data set for all the examples that follow in this section. Now we’re ready to learn about all the basics for retrieving data.
Using a Select Statement
Regardless of how simple or complex the requirements are for how you want to retrieve data, all data retrieval occurs by way of a SELECT command. In its simplest form, the SELECT command syntax is as follows:
SELECT column[, column, ...] FROM tableName
You can simplify things even further by using the * wildcard in place of the column names. The * wildcard allows you to select all the columns from the specified table. For example, the following command retrieves all the columns from all the records from the musicTracks table:
SELECT * FROM musicTracks
It’s always more efficient from the database engine perspective if you list all the columns rather than using the wildcard. Also, listing the columns allows you to control which columns are returned as well as the order in which they’re returned. For example, if you wanted to retrieve just the title and artist columns for all the records in the musicTracks table, you could use the following command:
SELECT title, artist FROM musicTracks
The result would be what is shown in table 5.2.
Table 5.2. The title and artist columns returned for all the records
|
title |
artist |
|---|---|
| Just Another Day | Oingo Boingo |
| I Scare Myself | Thomas Dolby |
| Senses Working Overtime | XTC |
| She Blinded Me With Science | Thomas Dolby |
| Heaven | The Psychedelic Furs |
| Dance Hall Days | Wang Chung |
| Love My Way | The Psychedelic Furs |
| Everybody Have Fun Tonight | Wang Chung |
You can also add a WHERE clause to a SELECT statement. Adding a WHERE clause allows you to filter the results based on an expression. For example, if we want to retrieve all the track titles where the artist is Thomas Dolby, we can use the following command:
SELECT title FROM musicTracks WHERE artist = "Thomas Dolby"
The result of this command is shown in table 5.3.
Table 5.3. The titles from musicTracks where the artist is Thomas Dolby
|
title |
|---|
| I Scare Myself She Blinded Me With Science |
You can use compound expressions as well. For example, the following command retrieves all the tracks that were released in 1984 where the length is greater than 260:
SELECT title FROM musicTracks WHERE originalReleaseYear = 1984 AND length > 260
The results of this command are shown in table 5.4.
Table 5.4. You can select data based on compound expressions
|
title |
|---|
| I Scare Myself Senses Working Overtime |
That sums up the basics of working with SELECT statements. In the sections that follow, we’ll look at other ways you can further modify a SELECT statement to create more complex queries.
Eliminating Duplicates
As you’ve seen, by default all the results meeting the criteria are returned. But sometimes you want to exclude duplicate values. For example, if you were to request all the artists from the musicTracks table using the following command, you’d get duplicate values:
SELECT artist FROM musicTracks
Table 5.5 shows the results of this command.
Table 5.5. Sometimes result sets can include duplicate values
|
artist |
|---|
| Oingo Boingo Thomas Dolby XTC Thomas Dolby The Psychedelic Furs Wang Chung The Psychedelic Furs Wang Chung |
If you’d like to exclude duplicate values, you can use the DISTINCT keyword with the SELECT statement as in the following command:
SELECT DISTINCT artist FROM musicTracks
The results of this command don’t contain any duplicate values, as you can see in table 5.6.
Table 5.6. Using the DISTINCT keyword eliminates duplicate values
|
artist |
|---|
| Oingo Boingo Thomas Dolby XTC The Psychedelic Furs Wang Chung |
Now that you know how to eliminate duplicate values, you’re probably wondering how you can sort all the results. Good thing that’s what we’re going to talk about next.
Ordering Results
When you retrieve a data set from a database frequently, you may want to order that data in a particular way. For example, when retrieving records from the musicTracks table, you may want to order the results alphabetically by artist name or chronologically by release year. Whatever the case, you can achieve these sorts of results by using an ORDER BY clause with a SELECT statement.
The ORDER BY clause allows you to specify one or more columns by which to sort the data, and you can specify the order: either ascending (default) or descending. Here’s an example of a basic ORDER BY clause:
SELECT album, originalReleaseYear FROM musicTracks ORDER BY originalReleaseYear
This statement orders the results in ascending order based on the release year. The results are shown in table 5.7.
Table 5.7. Use the ORDER BY clause to sort the data
|
album |
originalReleaseYear |
|---|---|
| Forever Now | 1982 |
| The Golden Age of Wireless | 1982 |
| Points on the Curve | 1984 |
| Mirror Moves | 1984 |
| English Settlement | 1984 |
| The Flat Earth | 1984 |
| Dead Man’s Party | 1985 |
| Mosaic | 1986 |
You can explicitly instruct the database engine to sort the data in ascending order using the ASC keyword, or you can specify DESC to indicate that the data should be sorted in descending order. The following statement would sort the results starting with the most recent year:
SELECT album, originalReleaseYear FROM musicTracks ORDER BY originalReleaseYear DESC
You can add additional columns to the sort expression by using a comma-delimited list. The first column in the list exerts the largest effect because it determines how everything is first sorted. After the data is sorted by the first column, the next column is used to determine how to sort the data more granularly. For example, you may notice that in table 5.7 the data is sorted by release year, but there doesn’t seem to be an obvious pattern to how the data is sorted within each release year. The result set has four records with release years of 1984, but the records aren’t sorted in any obvious order at that level. We can tell the database engine to sort first by release year and then by album name using the following command:
SELECT album, originalReleaseYear FROM musicTracks ORDER BY originalReleaseYear, album
The results are shown in table 5.8.
Table 5.8. Results are now sorted by release year
|
album |
originalReleaseYear |
|---|---|
| Forever Now | 1982 |
| The Golden Age of Wireless | 1982 |
| English Settlement | 1984 |
| Mirror Moves | 1984 |
| Points on the Curve | 1984 |
| The Flat Earth | 1984 |
| Dead Man’s Party | 1985 |
| Mosaic | 1986 |
Not only can you order data, but you can also run functions to retrieve specific values from a database, as we’ll see in the next section.
Running Functions
SQL allows you to run functions in queries. The full list of functions allowed by SQLite is documented at www.sqlite.org/lang_expr.html. We’ll just show a few examples in this section.
Suppose you want to find out the average length of a song from the musicTracks table. You could retrieve all the records and use ActionScript to calculate the average. But using the SQL avg() function is a lot simpler. All you need to do is use the function in a SELECT statement as follows:
SELECT avg(length) FROM musicTracks
This statement will return a result set with one column called avg(length) that has a value of 267.5. The column name avg(length) in the result set isn’t very friendly. If we want the query to return a result set with a nicer column name, we can specify an alias using the AS keyword. An alias allows us to refer to any element in the columns list (whether a function or not) using the alias we specify. For example, we can use an alias of averageLength as follows:
SELECT avg(length) AS averageLength FROM musicTracks
What if, instead of getting the average length of all the songs in the table, you wanted to get the average length of a song by each artist? That sort of behavior is possible using the GROUP BY clause. The GROUP BY clause allows you to specify a column to use to filter how the aggregate function (such as avg()) is run:
SELECT artist, avg(length) as averageLength FROM musicTracks GROUP BY artist
The results of this statement are shown in table 5.9.
Table 5.9. Using a GROUP BY clause we can affect how the aggregate function is applied
|
Artist |
averageLength |
|---|---|
| Oingo Boingo | 243 |
| The Psychedelic Furs | 229 |
| Thomas Dolby | 312 |
| Wang Chung | 272.5 |
| XTC | 270 |
If you’d like to further filter which results are returned, you can add a HAVING clause as well. The HAVING clause allows you to specify an expression that determines which results to return. For example, the following specifies that the command should only return results where the average length is greater than 250:
SELECT artist, avg(length) as averageLength FROM musicTracks GROUP BY artist HAVING averageLength > 250
The results are shown in table 5.10.
Table 5.10. Results with average length greater than 250
|
averageLength |
|
|---|---|
| Thomas Dolby | 312 |
| Wang Chung | 272.5 |
| XTC | 270 |
That wraps up working with functions in your SQL statements.
Note
Thus far we’ve only seen how to work with data in one table. Working with data in more than one table is important for many applications of moderate or greater complexity. While this information is beyond the scope of this book, you can find many good resources on the subject, including the free online resource we mentioned earlier, www.w3schools.org/sql.
Now that we’ve covered all the basics of working with SQL, we can next look at the specific implementation details for working with SQL from your AIR applications.
5.3. Creating and opening databases
Consider for a moment that you want to rent a movie from a local video store. You know that you’d like to rent a movie starring your favorite actor, Humphrey Bogart. You want to know which movies the video store has in stock. What do you do? You might pick up the phone and call the video store. Once the clerk answers, you can ask if they have any movies starring Humphrey Bogart in stock. Upon getting your answer, you can thank the clerk and hang up the phone. Believe it or not, this is analogous to working with a database. When you work with a database, the first thing you must do is make a connection. Once you’ve established a connection, you can execute statements (such as making queries), and when you’re done, you can disconnect from the database. In this section, we’re going to look at the first and last steps: opening and closing connections to databases.
SQLite databases are written to files. In chapter 3, you learned how to work with files, and when you work with databases, you’ll be leveraging some of those skills. The first thing you need to do when you work with a database is create a File object referencing the database file to use. As we’ll see in a minute, we can ask AIR to automatically create the file when trying to open the database connection. Therefore the File object doesn’t need to reference a file that already exists. All you need to do is create a File object that points to the file where data is stored or where you want to store data. The following example creates a File object that points to a file named example.db in the application storage directory:
var databaseFile:File = File.applicationStorageDirectory.resolvePath("example.db");
Once you’ve created a File object that points to the file in which to store the data, you next must create a flash.data.SQLConnection object. You’ll use the SQL-Connection object to create the connection to the database file, and all SQL statements must have a SQLConnection reference in order to run. The SQLConnection constructor doesn’t require any parameters. The following shows how to construct a new SQLConnection object:
var connection:SQLConnection = new SQLConnection();
The next step is to connect the object to the database file. You can open a SQLConnection object’s connection to the database file synchronously or asynchronously. You can open a connection synchronously using the open() method. If you open a connection synchronously, all SQL statements will execute on that connection in a synchronous fashion. Generally this isn’t advisable for the same reasons that most synchronous operations aren’t advisable if they could potentially take a long time to run. (See the discussion in chapter 3 for more detail.) A far better alternative is to open a connection asynchronously using the openAsync() method. Both methods require the same parameter: a reference to the File object that points to the database file. For example, the following code will open a connection to the database file that we created earlier in this section:
connection.openAsync(databaseFile);
When you open a connection, you have the option to specify what mode the connection should use. There are three modes: read, update, and create. The read mode specifies that the connection can only be used to read existing data from the database. The update and create modes both allow for both reading and writing of data, but the create mode will create the database file if it doesn’t already exist, while the update mode will fail. The default mode is create. If you want to explicitly set the mode, you can pass a second parameter to the open() or openAsync() method using one of the three flash.data.SQLMode constants of READ, UPDATE, or CREATE. For example, the following opens a connection in read mode:
connection.openAsync(databaseFile, SQLMode.READ);
When you open a connection asynchronously, you must listen for an open event before executing any SQL commands. The open event is of type flash.events.SQLEvent.
Once you’re done with a database connection, you should close it. Closing a connection is as simple as calling the close() method.
5.4. Running SQL commands
In the previous section, we talked about the three basic steps in working with a database: opening a connection, running commands, and closing the connection. We used an analogy in which you wanted to find out which movies your local video store has in stock. In that analogy, the step in which you ask the clerk which movies are in stock is analogous to running SQL commands on a database. That is what we’re going to look at next: how to run SQL commands once you’ve established a connection to a database.
All SQL statements (CREATE TABLE, INSERT, DELETE, SELECT, and so on) should be run using an instance of the flash.data.SQLStatement class. In the next few sections, we’ll look at working with SQLStatement objects.
5.4.1. Creating SQL statements
When you want to run a SQL statement, the first thing you should do is create a new SQLStatement object using the constructor. The constructor requires no parameters. Therefore, the following shows how to construct a new SQLStatement object:
var statement:SQLStatement = new SQLStatement();
When you want to run a statement, you must tell the SQLStatement object what SQL-Connection object to use. You do that by setting the sqlConnection property as in the following code snippet:
statement.sqlConnection = connection;
Next you need to specify the SQL statement that you want to run. You can do that by assigning the string value to the text property of the SQLStatement object. For example, the following assigns a SELECT statement to the text property of a SQL-Statement object:
statement.text = "SELECT DISTINCT album FROM musicTracks";
That’s all there is to setting up a basic SQL statement to run. Next we’ll look at how to actually run it.
5.4.2. Running SQL statements
Running a SQL statement is as simple as calling the execute() method. When you call the execute() method synchronously, either it runs successfully (and any results are available immediately following) or it throws an error. If you run execute() when using an asynchronous connection, the effect isn’t immediate. Instead it results in one of two events: a result event or an error event. When you call the execute() method with no parameters, you must register listeners for these events directly with the SQL-Statement object. For example, the following registers a listener for a result event:
statement.addEventListener(SQLEvent.RESULT, statementResultHandler);
It’s also possible to use a flash.net.Responder object to handle the effect of running a SQL statement. When you use a Responder object, you don’t listen for result or error events on the SQLStatement object. Instead, you pass the Responder object to the execute() method as a parameter. The execute() method allows for two parameters. The first is a paging parameter that we’ll look at in section 5.4.5. For now, we’ll just use the default value of -1 to always return all the results. The second parameter is the Responder object. The following shows how to call the execute() method using a Responder object:
statement.execute(-1, new Responder(statementResultHandler, statementErrorHandler));
That is all there is to running a SQL statement. Next we’ll look at how to retrieve the results of a SELECT statement.
5.4.3. Handling SELECT results
You should listen for error and result events for most if not all statements. It’s generally important that an application be capable of knowing when a statement executes successfully or throws an error. That way, the application can respond appropriately. For example, if an error occurs, the application may need to alert the user or retry the statement. However, SELECT statements are the type of SQL statements that always require that you handle the result. After all, if you don’t handle the result of a SELECT statement, how will you know when the data you just requested is available?
When you handle the result of a SELECT statement, you’ll want to retrieve the resultant data set, which you can do by calling the getResult() method of the SQLStatement that just executed. The getResult() method returns a flash.data.SQLResult object, which contains a data property that’s an array of the data returned. By default, the elements of the array are of type Object, and each element has properties with the names of the columns returned in the data set. For example, the following code shows a method that handles a result event and uses a trace() statement to write the album names to the console or output window. You can assume this method handles the result of the SQL statement SELECT DISTINCT album FROM musicTracks:
private function statementResultHandler(event:SQLEvent):void {
   var statement:SQLStatement = event.target as SQLStatement;
   var result:SQLResult statement.getResult();
   if(result != null && result.data != null) {
      var dataset:Array = result.data;
      for(var i:Number = 0; i < dataset.length; i++) {
         trace(dataset[i].album);
      }
   }
}
As we just said, by default all results are generic Object instances. However, in the next section, we’ll see what other options might exist.
5.4.4. Typing results
Sometimes when you write data to a database, you are serializing custom ActionScript types. For example, if you were writing data to a musicTracks database table, you might be writing instances of a custom ActionScript class called MusicTrack that you’ve written for your application. The MusicTrack class might have the following properties: id, title, artist, album, length, and originalReleaseYear. You then write the objects to the database by writing the properties to the columns with the same names. This is a typical workflow. Therefore, when you retrieve the data by executing a SELECT statement, it would be convenient if you could get AIR to automatically convert the results to objects of type MusicTrack. And AIR allows you to do just that.
In order to get AIR to automatically convert results to typed objects, all you need to do is set the itemClass property of the SQLStatement object prior to calling the execute() method. You should assign the itemClass property a reference to the class of objects that you want AIR to use to automatically type all the results. For example, the following tells AIR to type the results for the SQLStatement object to MusicTrack:
statement.itemClass = MusicTrack;
In order for this to work, the names of the columns in the result set and the names of the properties of the class must be the same. That doesn’t mean the names of the columns in the database table must be the same as the names of the properties of the class, because you can use column aliases to map table column names to different names in the result set.
5.4.5. Paging results
Thus far, we’ve seen how to retrieve all the results of a SELECT statement at once. However, for really large data sets, it may be more practical to retrieve only the records needed at any point in time. For example, if a query could potentially return hundreds of thousands of records but your application only uses 100 at a time (perhaps displaying them to the user), there’s no sense in retrieving all the records until and unless the user explicitly requests them. You can tell AIR to retrieve a maximum number of records when you call the execute() method by passing that number as the first parameter. The default value of -1 tells AIR to retrieve all the records, but a positive number tells AIR to retrieve only up to that many records. For example, the following tells AIR to retrieve only up to 20 records:
statement.execute(20);
When you limit the number of possible results in this way, you need a way to page through the rest of the results. You shouldn’t call execute() again in order to do that. Instead, you should call the next() method for the same SQLStatement object. The next() method accepts the same parameters as execute() and causes the same events. The difference is that execute() always retrieves just the first set of records, whereas next() retrieves the next set from that which was most recently retrieved. For example, if you call execute() with a value of 20, then when you call next() with a value of 20, AIR will retrieve records 21–40 (if there are that many). You retrieve the result of a next() method call just as you would the result of an execute() method call: once the result event occurs, you call getResult() on the SQLStatement object. Each call to next() adds another SQLResult object to the queue, and getResult() always returns the first SQLResult on the queue until there are no more in the queue, at which point getResult() returns null.
5.4.6. Parameterizing SQL statements
When running SQL statements, frequently you’ll draw on variable values. For example, you may want to insert a new music track into a table based on user input. As a Flash or Flex developer, this probably seems like a remedial task to you: clearly all you need to do is take the variables and put them together in a string, as in the following example.
statement.text = "INSERT INTO musicTracks(album, artist) VALUES('" + albumInput.text + "', '" + artistInput.text + "')";
However, this approach potentially opens up your application to malicious or accidental negative effects, because it allows the user to indirectly inject code into a SQL statement. A better approach is to parameterize SQL statements using the built-in AIR SQL statement parameterization technique.
To parameterize a SQL statement, use @ or : as the initial character to denote a parameter in a SQL statement that you want to assign to the text property of the SQL-Statement object. For example, we can rewrite the preceding statement as follows:
statement.text = "INSERT INTO musicTracks(album, artist) VALUES(@album, @artist)";
Then you can use the parameters property of the SQLStatement object to define the parameter values. The parameters property is an associative array to which you can add properties and values. The properties should be the names of the parameters used in the SQL statement, and the values should be the values to use in place of the parameters:
statement.parameters["@album"] = albumInput.text;
statement.parameters["@artist"] = artistInput.text;
AIR automatically makes sure that none of the values assigned to the parameters property are going to cause unintended problems.
What we’ve just looked at is how to use named parameters. If you prefer, you can also use ordered parameters instead of named parameters. Ordered parameters are denoted by the ? character in the SQL statement. For example:
statement.text = "INSERT INTO musicTracks(album, artist) VALUES(?, ?)";
Then you can specify an ordered array of values for the parameters property:
statement.parameters[0] = albumInput.text;
statement.parameters[1] = artistInput.text;
In addition to removing malicious characters and SQL code, this type of statement parameterization (both named and ordered) helps to improve application performance in some cases. The first time that a SQL statement is run, it must be compiled by the AIR application, which takes a small amount of time. Subsequent calls to the statement run faster. However, if you change the text property value, the statement must be recompiled. If you parameterize a statement, you can change the values of the parameters without causing AIR to recompile the statement.
5.4.7. Using transactions
Normally when you run a statement, it runs autonomously, and for many scenarios that’s appropriate. But there are also cases when it’s advantageous to group statements together to run as a batch. A common example is when you want to insert a record into a table, retrieve the new record’s ID, and then use that ID to insert a record into another table. Although this requires at least two SQL statements, it’s one logical group of statements, and it makes sense to run it all together if possible. That way, if any error occurs at any point, it would be possible to undo any changes. Consider what would happen if you ran all the statements as normal:
- The first statement runs successfully, inserting a record.
- The second statement fails.
In this scenario, the record for the first statement is still in the database even though logically it shouldn’t be, because the entire batch of statements didn’t complete successfully. You could write your own code to handle such exceptions by removing the first record if the second statement fails. However, a much simpler and more efficient way to deal with this sort of scenario is to use a feature built in to AIR: SQL statement transactions.
A transaction allows you to group together statements that run using the same SQLConnection object. The way that you can create a transaction is as follows:
- Call the begin() method of the SQLConnection object.
- Handle the begin() method of the SQLConnection object, and execute SQL statements using the SQLConnection. Execute these methods normally.
- If an error occurs at any point, call the rollback() method of the SQLConnection object.
- If all the statements execute successfully, call the commit() method of the SQL-Connection object to write the results to disk.
As you can see in these steps, all SQLStatement objects that run using a particular SQL-Connection object get grouped together from the point that begin() is called. All those SQLStatement objects run in memory only. The transaction continues until one of two things happens: either the rollback() method gets called or the commit() method gets called. Either method stops the transaction. The rollback() method cancels all the statements that had already run in the transaction, never writing the results to disk. For example, if the first four statements in a transaction all are INSERT statements, then none of those records will actually get written to the database file if a rollback() method gets called. The commit() method, on the other hand, stops the transaction and writes the results to disk.
Another advantage to using transactions is that you can lock the database you want to use over the course of the transaction. This ensures that no other process can modify the database and potentially affect the results of your operation. One example of the usefulness of this would be a case where two pieces of code need to read and modify the same record in a table. If both processes read and then write to the record at the same time, the edits of one process might be lost.
You can lock the database by passing an optional parameter to the begin() method. You have the option of making the database read-only for other connections or making the database completely inaccessible for other connections. You can also defer locking the database until your transaction needs to read or write from the database. You can use constants of the flash.data.SQLTransactionLockType class for these values: DEFERRED, EXCLUSIVE, and IMMEDIATE. Table 5.11 describes these values. You would lock the database in a begin() method call as follows:
connection.begin(SQLTransactionLockType.IMMEDIATE);
Table 5.11. Transaction lock types
|
Constant |
Description |
|---|---|
SQLTransactionLockType.DEFERRED |
Lock the database on the first read or write operation. |
SQLTransactionLockType.EXCLUSIVE |
Lock the database as soon as possible. No other connection can read or write to the database. |
SQLTransactionLockType.IMMEDIATE |
Lock the database as soon as possible. No other connection can write to the database, but reading is still possible. |
Now that we’ve covered all the basics of running SQL statements, we’ll next put this all to use by building a sample application.
5.5. Building a ToDo application
In this section, we’re going to build an application that puts all of the database knowledge we just learned to use. The ToDo application allows users to add and edit to-do items to a database, or delete those items if they want. The application also displays all the current items. Figure 5.9 shows what the application looks like.
Figure 5.9. The ToDo application lists to-do items, and allows the user to add new items and edit or delete existing items.

To build this application, we’ll take the following steps:
1. Build a data model class for a to-do item.
2. Create a component to display each to-do item.
3. Create the database.
4. Create an input form.
5. Add the SQL statements.
In the next section, we’ll tackle the first step.
5.5.1. Building the to-do item data model class
We’ll create a simple ActionScript class to model each to-do item. For our application, each to-do item has the following properties: an ID, name, description, priority, and a date by which it must be complete. Listing 5.1 shows the ToDoItem class.
Listing 5.1. The ToDoItem class is the data model class for to-do items
package com.manning.todolist.data {
   import flash.events.Event;
   import flash.events.EventDispatcher;

   public class ToDoItem extends EventDispatcher {

      private var _id:int;
      private var _name:String;
      private var _description:String;
      private var _priority:int;
      private var _mustBeDoneBy:Date;

      [Bindable(event="idChanged")]
      public function set id(value:int):void {
         _id = value;
         dispatchEvent(new Event("idChanged"));
      }

      public function get id():int {
         return _id;
      }

      [Bindable(event="nameChanged")]
      public function set name(value:String):void {
         _name = value;
         dispatchEvent(new Event("nameChanged"));
      }

      public function get name():String {
         return _name;
      }

      [Bindable(event="descriptionChanged")]
      public function set description(value:String):void {
         _description = value;
         dispatchEvent(new Event("descriptionChanged"));
      }
      public function get description():String {
         return _description;
      }

      [Bindable(event="priorityChanged")]
      public function set priority(value:int):void {
         _priority = value;
         dispatchEvent(new Event("priorityChanged"));
      }

      public function get priority():int {
         return _priority;
      }

      [Bindable(event="mustBeDoneByChanged")]
      public function set mustBeDoneBy(value:Date):void {
         _mustBeDoneBy = value;
         dispatchEvent(new Event("mustBeDoneByChanged"));
      }

      public function get mustBeDoneBy():Date {
         return _mustBeDoneBy;
      }

      public function ToDoItem() {
      }
   }
}
The ToDoItem class doesn’t do anything unusual. It merely creates private properties as well as accessors and mutators for each of the properties. We also add [Bindable] metadata tags to enable data binding in Flex.
5.5.2. Creating a to-do item component
As you can see in figure 5.9, we display each to-do item in a list in the upper portion of the application. We’ll next create the MXML component for that purpose. The ToDoListRenderer component is this component, and we’ll save it in a directory called com/manning/todolist/ui/ToDoListRenderer.mxml. The code is as follows in listing 5.2.
Listing 5.2. The ToDoListRenderer component displays a to-do item
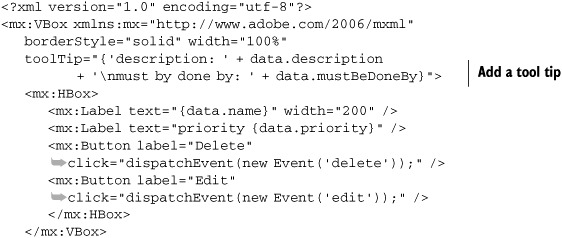
As you can see, all this code does is display the values from the data property. In this case, we’re assuming that the data property is always going to be assigned a ToDoItem object.
5.5.3. Creating the database
Now we need to create the database. The database in this case is simple. It has just one table with the following columns: id, priority, name, description, and mustBeDoneBy. Notice that the columns of the table are identical to the properties of the ToDoItem class. This allows us to easily retrieve data from the table as typed objects later on.
For this application, we simplify everything by placing all the SQL code in the application MXML file. Therefore, we place the database creation code in the application MXML file, which we’ll call ToDo.mxml. We start by adding the code shown in listing 5.3 to ToDo.mxml.
Listing 5.3. The ToDo.mxml file creates the database and its table

Note that in this code we use the CREATE TABLE IF NOT EXISTS statement to only create the table if it doesn’t already exist. Now that we’ve created the table (if it doesn’t yet exist), we can next add the code for inserting, updating, retrieving, and deleting items.
5.5.4. Creating an input form
We’ll next create an input form, allowing the user to enter values for the to-do item. Then we’ll add a view state that allows the user to use the same form to edit data. In the edit state, the labels on the form change and the button calls a different method. Listing 5.4 shows the updated code.
Listing 5.4. Adding an input form to the application


In the code, we defined a form
![]() that contains input elements for all the values of a to-do item. The default state of the form is for a new to-do item. We
also defined a state for editing
that contains input elements for all the values of a to-do item. The default state of the form is for a new to-do item. We
also defined a state for editing
![]() an item. In this state, we need to change the form heading
an item. In this state, we need to change the form heading
![]() and button label
and button label
![]() to reflect that the action is different. Then we set the button’s click handler
to reflect that the action is different. Then we set the button’s click handler
![]() to call a different method. In the code at this point, we’ve defined methods to handle when the user clicks the button to
add an item
to call a different method. In the code at this point, we’ve defined methods to handle when the user clicks the button to
add an item
![]() or edit the item
or edit the item
![]() , but we haven’t actually written the code that runs the necessary SQL statements yet. We’ll do that next.
, but we haven’t actually written the code that runs the necessary SQL statements yet. We’ll do that next.
5.5.5. Adding SQL statements
Next we’ll write the code that adds new items to the database, as well as the code that edits and retrieves existing data. Listing 5.5 shows the code that we’re adding to ToDo.mxml.
Listing 5.5. Code to add, edit, retrieve, and delete records


In this code, we fill in the addItem() and updateItem() methods with parameterized SQL statements
![]() that draw on the data from the input form. We also add a method that contains a SQL statement that retrieves all the items
from the database. We added an event listener on startup
that draw on the data from the input form. We also add a method that contains a SQL statement that retrieves all the items
from the database. We added an event listener on startup
![]() that calls the selectoToDoItems() method once AIR either creates the database table or verifies that it already exists. And we told AIR to use ToDoItem as the type for all items returned by the SELECT statement
that calls the selectoToDoItems() method once AIR either creates the database table or verifies that it already exists. And we told AIR to use ToDoItem as the type for all items returned by the SELECT statement
![]() . At this point, the selectHandler() method
. At this point, the selectHandler() method
![]() is empty. When we retrieve the data, we want to display it using the MXML component we created previously. Therefore, we’ll
need to add a container to the layout code, to which we can add the items. Listing 5.6 shows what ToDo.mxml looks like with the addition of the container and the update to selectHandler().
is empty. When we retrieve the data, we want to display it using the MXML component we created previously. Therefore, we’ll
need to add a container to the layout code, to which we can add the items. Listing 5.6 shows what ToDo.mxml looks like with the addition of the container and the update to selectHandler().
Listing 5.6. Adding a display container and handling SELECT results


This code uses getResult()
![]() to get the data set. It then loops through the records
to get the data set. It then loops through the records
![]() , creates new ToDoListRenderer component instances, and assigns each record to the data property of a component
, creates new ToDoListRenderer component instances, and assigns each record to the data property of a component
![]() . When the user clicks on the Edit or Delete buttons in the component, we handle those events. Thus far, we haven’t specified
the code for those methods. Next we’ll fill them in. Listing 5.7 shows what these methods look like.
. When the user clicks on the Edit or Delete buttons in the component, we handle those events. Thus far, we haven’t specified
the code for those methods. Next we’ll fill them in. Listing 5.7 shows what these methods look like.
Listing 5.7. Deleting and editing items
private function deleteItem(event:Event):void {
   var item:Object = event.currentTarget.data;
   var sql:SQLStatement = new SQLStatement();
   sql.sqlConnection = _connection;
   sql.text = "DELETE FROM todo WHERE id = @id";
   sql.parameters["@id"] = item.id;
   sql.addEventListener(SQLEvent.RESULT, selectToDoItems);
   sql.execute();
}

private function editItem(event:Event):void {
   var item:ToDoItem = event.currentTarget.data;
   _selectedItem = item;
   currentState = "Edit";
}
You can see that deleteItem() merely creates a parameterized statement to delete the selected item. The editItem() method simply sets the _selectedItem property and changes the current state.
That wraps up the ToDo application. At this point, you can add new items and view them in the list. You can then edit or delete those items.
5.6. Working with multiple databases
These days, most phone companies offer phone plans and options that allow for three-way calling or conference calling, where lots of people can speak together in one phone conversation. This feature isn’t appropriate for every phone call. Sometimes you want to have a conversation with just one person. But sometimes it’s useful and appropriate to gather many people in one phone conversation. For example, you may be working on a project with several people. While you could talk with each of them individually, it might be more productive if you could all talk together at the same time. Then you can share information and make decisions more quickly. The same is true with databases. In many cases, you only need to connect to one database. But there are other times when your application will need to connect to more than one database. In this section, we’ll look at strategies for connecting to more than one database.
Using what you’ve already learned, you could open a connection to a second database using a second SQLConnection object. However, there are at least two significant drawbacks to that:
- If you use two SQLConnection objects, you can’t use both databases in one SQL statement. (For example, you can’t select values from across tables in both databases at the same time.)
- SQL connections are expensive from a processing perspective. Therefore, it’s generally better to open multiple databases using the same SQLConnection object. You always open the first connection in the way you’ve already learned: using the open() or openAsync() method. For subsequent connections, you can use the attach() method.
You always need to specify a name for the database when you attach it. The name isn’t the name of the database file. Instead, it’s the name by which you’ll reference the database in SQL statements. Although we haven’t mentioned it up to this point, the main database has a name as well: main. You can reference the main database using its name in SQL statements. For example, the following SQL statements are equivalent where musicTracks is a table in the main database:
SELECT album FROM main.musicTracks
SELECT album FROM musicTracks
Note
It’s actually more efficient to always reference the database name as well as the table name in SQL statements. If you want your AIR applications to run at top speed, be sure to include the database name, even if it’s otherwise assumed.
When you attach a database, you reference its tables using the alias you specify as the first parameter for the attach() method.
Most commonly, when you use the attach() method, you’re opening a connection to a different database than the main database and therefore want to specify a second parameter for the attach() method as well: a File object pointing to the database file. You can’t specify a mode as you can with open() or openAsync() because any databases attached using attach() automatically use the same mode as the main database. That means that, if you use the create mode for the main database, all attached databases also use the create mode. The following example attaches a database with an alias of userCustomData:
connection.attach("userCustomData", File.applicationStorageDirectory.resolvePath("userdata.db"));
Although you may not use the attach feature often, it’s useful when you need it.
5.7. Adding database support to AirTube
Now that we’ve learned all the basic skills for working with databases, and we’ve even put them to work in a ToDo application, we can update our AirTube application with a database-dependent feature. In chapter 3, we allowed the user to download a video file locally. But at that time we didn’t know how to work with databases in AIR. Therefore we didn’t add the functionality that would allow users to also store the data for the video and search and play back offline videos within the application. That is what we’ll do in the following sections. To accomplish this, we’ll need to do the following:
- Add online property to ApplicationData.
- Add UI button to toggle online/offline.
- Add service methods to handle offline mode.
We’ll start with the first step: updating ApplicationData.
5.7.1. Updating ApplicationData to support online/offline modes
Up to now, the AirTube application has only had one mode: online. We’d like to allow the user to select between online or offline mode. In order to support this, we need to add a property to the ApplicationData class. This property, which we’ll call online, is a Boolean value indicating whether the application should run in online or offline mode. Listing 5.8 shows what ApplicationData looks like with this added property.
Listing 5.8. Adding an online property to ApplicationData
package com.manning.airtube.data {

   import flash.events.Event;
   import flash.events.EventDispatcher;

   public class ApplicationData extends EventDispatcher {

      static private var _instance:ApplicationData;

      private var _videos:Array;
      private var _currentVideo:AirTubeVideo;
      private var _downloadProgress:Number;
      private var _online:Boolean;

      [Bindable(event="videosChanged")]
      public function set videos(value:Array):void {
         _videos = value;
         dispatchEvent(new Event("videosChanged"));
      }

      public function get videos():Array {
         return _videos;
      }

      [Bindable(event="currentVideoChanged")]
      public function set currentVideo(value:AirTubeVideo):void {
         _currentVideo = value;
         dispatchEvent(new Event("currentVideoChanged"));
      }

      public function get currentVideo():AirTubeVideo {
         return _currentVideo;
      }

      [Bindable(event="downloadProgressChanged")]
      public function set downloadProgress(value:Number):void {
         _downloadProgress = value;
         dispatchEvent(new Event("downloadProgressChanged"));
      }

      public function get downloadProgress():Number {
         return _downloadProgress;
      }

      [Bindable(event="onlineChanged")]
      public function set online(value:Boolean):void {
         _online = value;
         dispatchEvent(new Event("onlineChanged"));
      }

      public function get online():Boolean {
         return _online;
      }

      public function ApplicationData() {

      }

      static public function getInstance():ApplicationData {
         if(_instance == null) {
            _instance = new ApplicationData();
         }
         return _instance;
      }
   }
}
The online property is straightforward. We merely create a private Boolean property and then create a standard accessor and mutator for it along with typical Flex data-binding metadata. Now that we’ve added the property, we next need to create a way for the user to toggle between modes, which we’ll do in the next section.
5.7.2. Adding a button to toggle online/offline modes
We can now edit AirTube.mxml, adding to it a button that allows the user to toggle the mode between online and offline. Listing 5.9 shows this code.
Listing 5.9. Updating AirTube.mxml with a button to toggle modes
<?xml version="1.0" encoding="utf-8"?>
<mx:WindowedApplication xmlns:mx="http://www.adobe.com/2006/mxml"
   layout="absolute" width="800" height="600"
   creationComplete="creationCompleteHandler();"
closing="closingHandler();">
   <mx:Script>
      <![CDATA[
         import com.manning.airtube.data.AirTubeVideo;
         import com.manning.airtube.windows.HTMLWindow;
         import com.manning.airtube.windows.VideoWindow;
         import com.manning.airtube.services.AirTubeService;
         import com.manning.airtube.data.ApplicationData;

         static private var _instance:AirTube;

         private var _service:AirTubeService;
         private var _videoWindow:VideoWindow;
         private var _htmlWindow:HTMLWindow;

         static public function getInstance():AirTube {
            return _instance;
         }

         private function creationCompleteHandler():void {
            _service = AirTubeService.getInstance();
            _service.key = "YourAPIKey";
            _instance = this;
            _videoWindow = new VideoWindow();
               _htmlWindow = new HTMLWindow();
         }

         private function getVideosByTags():void {
            _service.getVideosByTags(tags.text);
         }

         private function playVideo():void {
            var video:AirTubeVideo = videoList.selectedItem as AirTubeVideo;
            _service.configureVideoForPlayback(video);
            if(_videoWindow.nativeWindow == null) {
               _videoWindow.open();
            }
            else {
               _videoWindow.activate();
            }
         }

         public function launchHTMLWindow(url:String):void {
            if(_htmlWindow.nativeWindow == null) {
               _htmlWindow.open();
            }
            else {
               _htmlWindow.activate();
            }
         }

         private function closingHandler():void {
            for(var i:Number = 0; i < nativeApplication.openedWindows.length; i++) {
              nativeApplication.openedWindows[i].close();
            }
         }

         private function changeOnlineStatus():void {
            ApplicationData.getInstance().online = !ApplicationData.getInstance().online;
         }

      ]]>
   </mx:Script>
   <mx:VBox width="100%">
      <mx:Label text="AirTube: Adobe AIR and YouTube" />
      <mx:HBox>
         <mx:Label text="tags:" />
         <mx:TextInput id="tags" text="Adobe AIR" />
         <mx:Button label="Search For Videos"
            click="getVideosByTags();" />
         <mx:Button label="Online" toggle="true"
            selected="{ApplicationData.getInstance().online}"
            click="changeOnlineStatus();" />
      </mx:HBox>
      <mx:TileList id="videoList"
         dataProvider="{ApplicationData.getInstance().videos}"
         width="100%" height="400"
         columnCount="2" horizontalScrollPolicy="off" />
      <mx:Button label="Play Selected Video" click="playVideo();"
         enabled="{videoList.selectedItem != null}" />
   </mx:VBox>
</mx:WindowedApplication>
The preceding code adds just one button component and one method. The button is a toggle button in which the selected state is bound to the online property of ApplicationData. When the user clicks the button, the event handler method merely toggles the value of the ApplicationData instance’s online property.
That’s all that we need to do as far as the user interface is concerned. Next we’ll update the service code to support both online and offline modes.
5.7.3. Supporting offline saving and searching
The majority of the new code we need to write to support online and offline modes is in the AirTubeService class. Listing 5.10 shows the code. Although there’s a fair amount of new code, don’t be concerned. We’ll explain it all in just a minute. All we’re adding is basic database code for creating a connection, creating a table, and adding and retrieving data.
Listing 5.10. Updating AirTubeService to include offline support


Although we’ve added a lot of code, it should mostly be clear to you now that you’ve worked with AIR databases throughout
the chapter. Initially we need to create a connection to the database
![]() . Once we’ve connected to the database, we need to create the table for the data if it doesn’t already exist
. Once we’ve connected to the database, we need to create the table for the data if it doesn’t already exist
![]() . In this case, we’re creating just one table with id, title, url, and tags as the columns. Next, in the method that searches
videos, we need to test for the current mode
. In this case, we’re creating just one table with id, title, url, and tags as the columns. Next, in the method that searches
videos, we need to test for the current mode
![]() . If the mode is online, then we can search online videos as normal. Otherwise, we now want to search all the offline videos.
We compose a SELECT statement
. If the mode is online, then we can search online videos as normal. Otherwise, we now want to search all the offline videos.
We compose a SELECT statement
![]() based on the keywords that the user has specified. Once the results are returned, we loop through each of the records (which
we’ve typed as com.adobe.webapis.youtube.Video objects) and wrap them in AirTubeVideo objects
based on the keywords that the user has specified. Once the results are returned, we loop through each of the records (which
we’ve typed as com.adobe.webapis.youtube.Video objects) and wrap them in AirTubeVideo objects
![]() . On the flip side, when the user saves a video to offline, we now need to do more than just save the video file. We also
need to save the data for the video to the database
. On the flip side, when the user saves a video to offline, we now need to do more than just save the video file. We also
need to save the data for the video to the database
![]() .
.
And that’s all there is to this stage of the AirTube application. When you test the application now, you should be able to save videos locally, and then toggle to offline mode and search for those videos (and play them back).
5.8. Summary
In this chapter, you learned about using the local database feature of AIR. Using local databases, you can store data persistently, and you can read and write it using SQL, a standard language for working with data. You learned that AIR uses a database engine called SQLite, and how to use this database engine to create databases and tables, write data to the database, read the data, update the data, and delete the data. Not only did you learn the theory of working with databases, but you had an opportunity to put it into practice when we built a ToDo application, as well as when we updated the AirTube application to use a feature that uses local databases.
As you read earlier in this chapter, one of the ways in which you can use local databases is to store data for sometimes-connected applications so that they can run when offline. You’ve now learned everything you need to know about local databases to store and retrieve data for that purpose. But you don’t yet know how to detect network connectivity. Proceed to chapter 6 to learn about this topic.