11 Creating Motion Graphics Templates
Lesson overview
In this lesson, you’ll learn how to do the following:
Add controls to the Essential Graphics panel.
Create checkboxes to select a background image.
Protect portions of a project from time-stretching.
Export a Motion Graphics template (.mogrt) file.
Create master properties for layers in nested compositions.
Work with a Motion Graphics template in Adobe Premiere Pro.
Create master properties.

This lesson will take about an hour to complete. If you haven’t already done so, download the project files for this lesson from www.adobepress.com/AfterEffectsCIB2020, following the instructions in the Getting Started section under “Accessing the lesson files and Web Edition.”
PROJECT: MOTION GRAPHICS TEMPLATE FOR TV SHOW TITLE SEQUENCE
With Motion Graphics templates, you can preserve the style and settings for a project while giving colleagues control over specific editorial decisions in Adobe Premiere Pro.
Getting started
Using the Essential Graphics panel in After Effects, you can create Motion Graphics templates that let your colleagues edit aspects of the composition in Adobe Premiere Pro. You decide which properties are editable as you create the template, and then you can share the template using Creative Cloud libraries or by sending your colleague the Motion Graphics template (.mogrt) file.
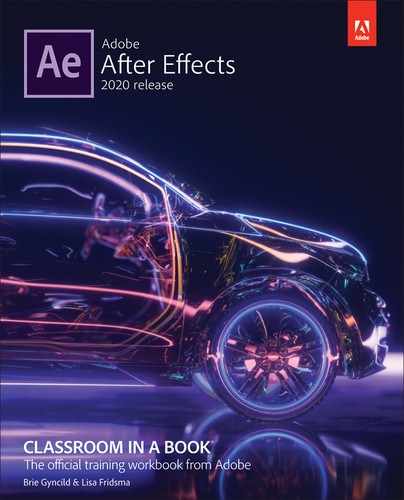
You’ll create a Motion Graphics template for the title sequence of a noir television show in which the main title text needs to remain constant but the episode subtitle, background images, and effect settings can change.
First, you’ll preview the sample movie and then set up the project.
Make sure the following files are in the Lessons/Lesson11 folder on your hard disk, or download them from www.adobepress.com now:
In the Assets folder: Embrace.psd, Holding_gun.psd, Man_Hat.psd, and Stylized_scene.psd
In the Sample_Movies folder: Lesson_11.avi, Lesson11.mov
Open and play the Lesson11.avi sample movie in Windows Movies & TV or the Lesson11.mov sample movie in QuickTime Player to see what you will create in this lesson. When you are done, close Windows Movies & TV or QuickTime Player. You may delete the sample movies from your hard disk if you have limited storage space.
When you begin this lesson, restore the default application settings for After Effects. See “Restoring default preferences” on page 3.
Start After Effects, and then immediately hold down Ctrl+Alt+Shift (Windows) or Command+Option+Shift (macOS). When prompted, click OK to delete your preferences. Click New Project in the Home window.
After Effects opens to display an empty, untitled project.
Choose File > Save As > Save As.
In the Save As dialog box, navigate to the Lessons/Lesson11/Finished_Project folder. Name the project Lesson11_Finished.aep, and click Save.
Preparing a master composition
To create a template, you first need to create an After Effects composition upon which the template will be based. You’ll create a master composition that contains the background image assets and an animated title and subtitle.
Creating the composition
First, import the assets, and create the composition.
Double-click an empty area of the Project panel to open the Import File dialog box.
Navigate to the Lessons/Lesson11/Assets folder on your hard disk, and then Shift-click to select all four PSD files. Click Import or Open.
Click the New Composition button in the Composition panel.
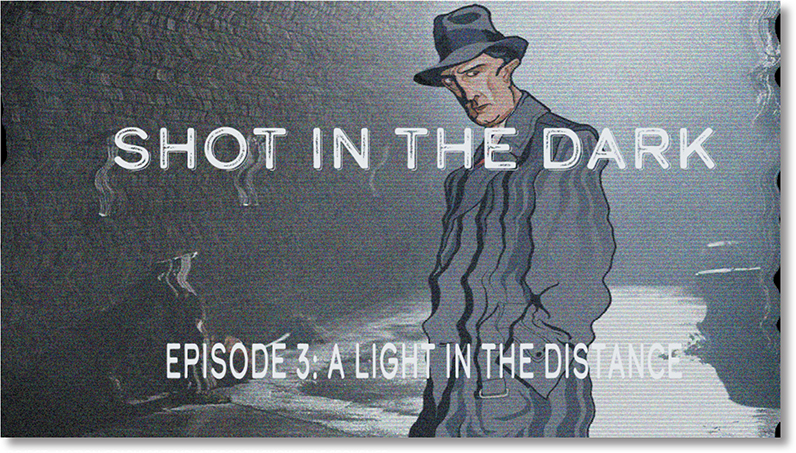
In the Composition Settings dialog box, do the following, and then click OK:
Name the composition Title sequence.
Choose HDTV 1080 25 from the Preset menu.
Enter 10:00 for the Duration.
Select black for the Background Color.
Drag the Embrace.psd file into the Timeline window.

Displaying a background file will make it easier to position your text.
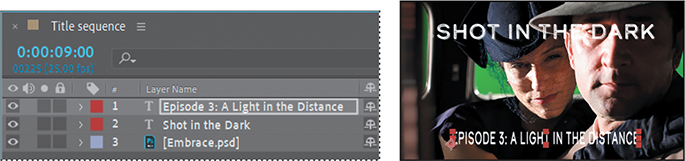
Adding animated text
The project includes a series title that appears at the top of the screen and moves down as it grows larger, and an episode title that appears letter by letter and then later explodes off the screen. You’ll create both layers and animate them.
Select the Horizontal Type tool (
 ) in the Tools panel, and click an insertion point in the Composition panel.
After Effects adds a new layer to the Timeline panel and opens the Character panel.
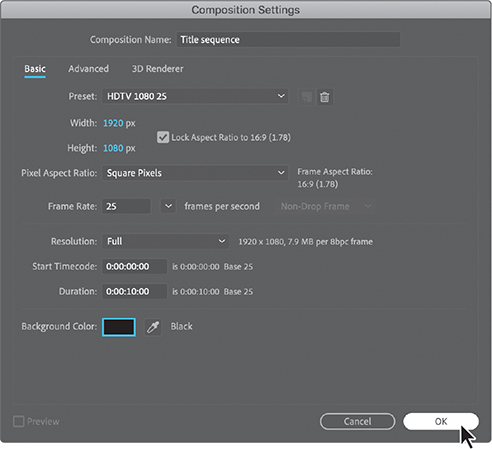
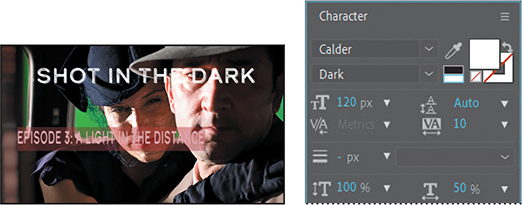
Type Shot in the Dark in the Composition panel.
In the Character panel, click next to the font name to open the font menu. If you do not already have Calder Dark Grit Shadow and Calder Dark fonts on your system, click Add Adobe Fonts, and then activate the fonts using Adobe Fonts. Or choose a different font in the following step.
With the text selected in the Composition panel, select the following settings in the Character panel:
Font Family: Calder
Font Style: Dark Grit Shadow
Fill Color: White
Stroke: None
Font Size: 140 px
Tracking: 10%
Select the Selection tool (
 ), and then position the title in the center of the top half of the scene in the Composition panel.
Go to 2:00. With the Shot in the Dark layer selected, press P and then Shift+S to see both the Position and Scale properties. Click the stopwatch next to each of the properties to create initial keyframes.

Press the Home key to go to the beginning of the time ruler. Change the scale to 50%. With the Selection tool, drag the title so that it is centered at the top of the Composition panel. After Effects creates keyframes for the Scale and Position properties.
Go to 2:10. Then, select the Horizontal Type tool in the Tools panel again, and type Episode 3: A Light in the Distance in the Composition panel.
 Note
NoteIf you didn’t activate Calder Dark from Adobe Fonts in step 3, activate it now, or choose a different font in step 9.
Select the text in the Composition panel, and then make the following changes to settings in the Character panel:
Font Family: Calder
Font Style: Dark
Font Size: 120 px
Horizontal Scale: 50%
Go to 9:00. In the Effects & Presets panel, type explosion in the search bar. Then select the Explosion 2 animation preset, and drag it onto the Episode 3 layer in the Timeline panel.
Go back to 2:10. In the Effects & Presets panel, type typewriter in the search bar. Then select the Typewriter animation preset, and drag it onto the Episode 3 layer in the Timeline panel.

Go to 9:00 again. Select the Selection tool in the Tools panel, and then center the text in the bottom third of the screen.
Press the Home key or move the current-time indicator to the beginning of the time ruler. Then press the spacebar to preview the movie. Press the spacebar again to stop playback.

Hide the properties for both text layers, and then choose File > Save to save your work so far.
Animating a background image
You’ve animated the text, but the background image just sits there. Because this is a noir series, you’ll add an unsettling effect. You’ll use an adjustment layer to apply the effect only after the text has appeared on the screen.
Select the Embrace.psd layer in the Timeline panel.
Choose Layer > New > Adjustment Layer. Rename the layer Background effect.
After Effects creates a new adjustment layer immediately above the layer you selected. The adjustment layer will affect all layers below it.
Go to 5:00. Then press Alt+[ (Windows) or Option+[ (macOS) to trim the layer so that its in point is at 5 seconds.

In the Effects & Presets panel, type bad TV in the search bar. Then select the Bad TV 3 - weak animation preset, and drag it onto the Background effect layer in the Timeline panel.

Press the Home key or move the current-time indicator to the beginning of the time ruler. Then press the spacebar to preview the movie. Press the spacebar again to stop playback.
The series title slides down, the episode title appears, and then the image becomes distorted. Near the end of the time ruler, the episode title explodes off the screen. The image is challenging to see once the effect is applied. You can change a setting in the effect to make the image clearer.
In the Effect Controls panel, choose Smooth Noise from the Wave Type menu. Then preview the sequence again to see the difference.

Choose File > Save to save your work so far.
Setting up a template
You use the Essential Graphics panel to build custom controls and share them as Motion Graphics templates. Drag properties into the panel to add controls you want to make editable. In the panel, you can customize the names of controls, and you can group them to help others understand their function. You can open the Essential Graphics panel separately, or select the Essential Graphics workspace to open the panels you’re most likely to use in creating a template, including the Effects & Presets panel.
Choose Window > Workspace > Essential Graphics.
In the Essential Graphics panel, choose Title sequence from the Master menu. Your template will be based on the Title sequence composition.
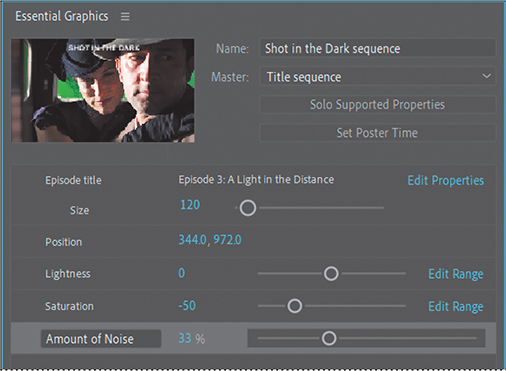
Type Shot in the Dark sequence for the template name.

Adding properties to the Essential Graphics panel
You can add the controls for most effects, transform properties, and text properties to Motion Graphics templates. You’ll give your colleagues options to replace the episode title and adjust it, and to adjust the settings of the Bad TV - weak effect.
Making the text editable
The episode title for this title sequence will change for each episode, so the editor needs to be able to edit the text. For every text layer, there is a source text property that you can add to the Essential Graphics panel.
In the Timeline panel, expand the Text properties for the Episode 3 layer.
Drag the Source Text property into the Essential Graphics panel.
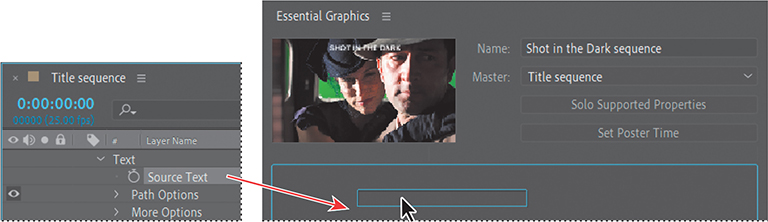
Click the Source Text label in the Essential Graphics panel, select the text, and then type Episode title.
NoteYou can add dropdown menus to motion graphics templates for most properties that you might use checkboxes or sliders for. Dropdown boxes require some scripting. See After Effects Help for more information.
Click Edit Properties next to the Episode title property, select Enable Font Size Adjustment, and click OK.
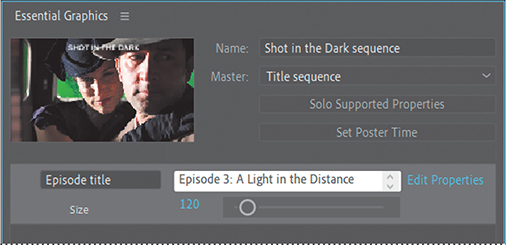
A text size slider appears beneath the Episode title property in the Essential Graphics panel.
In the Timeline panel, select the Episode 3 layer, and press P to display the Position property. Then, drag the Position property into the Essential Graphics panel.
The episode title text, font size, and position will be editable to Motion Graphics template users; other attributes are protected from editing.
Adding effects properties
Many effects properties can be included in Motion Graphics templates. You can see which properties in a composition are compatible with the Essential Graphics panel by clicking Solo Supported Properties. You’ll add properties to change the appearance of the effect, which may need to be lighter or darker depending on the background image selected.
In the Essential Graphics panel, click Solo Supported Properties to display only the properties you can add in the Timeline panel.
In the Timeline panel, hide the properties for the Shot in the Dark and Episode 3 layers, because you don’t need to add any more text properties to the template.
Under the Color Balance properties for the Background effect layer, drag Lightness into the Essential Graphics panel. Then, drag Saturation into the Essential Graphics panel.
Under the Noise properties for the Background effect layer, drag Amount of Noise into the Essential Graphics panel.
Drag the sliders in the Essential Graphics panel to see how the appearance of the effect changes. Press Ctrl+Z or Command+Z to undo any changes you made.
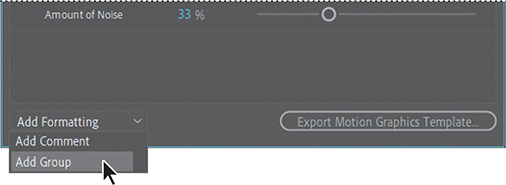
Grouping properties
It’s hard to tell what the properties currently in the Essential Graphics panel affect. You could change each of their names to make their effect clear, but it’s easier to group them. You’ll create groups for properties related to the episode title and those related to the background effect.
Choose Add Group from the menu at the bottom of the Essential Graphics panel. (By default, it says Add Formatting.)
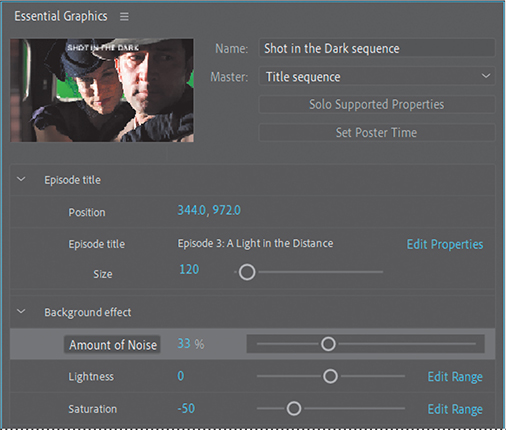
Name the group Episode title, and then drag the Episode title and Episode title position properties into the group. The Size slider travels with the Episode title property.
Deselect all properties, choose Add Group from the menu again, and then name the new group Background effect.
Drag the Saturation, Lightness, and Amount of Noise properties into the Background effect group.
Hide the properties for all layers in the Timeline panel, and then choose File > Save to save your work so far.
Creating master properties
The Essential Graphics panel lets you create Motion Graphics templates. However, you can also use it to create master properties, which give you access to specific properties within nested compositions. Using master properties, you can retain quick access to properties you need to edit frequently without having to open the nested composition and find the properties for a specific layer.
To specify master properties, open the nested composition. In the Essential Graphics panel, choose the nested composition from the Master menu. Then drag properties from layers in the composition to the Essential Graphics panel. You can rename them and group them just as you do when creating a template.
To use the master properties, just expand the properties for the nested composition in the Timeline panel, and then expand Master Properties. They appear just as you’ve set them up in the Essential Graphics panel.

Providing image options
For this template, you want to provide editors with a choice of background images that are appropriate for different episodes. There are multiple ways to do this, but you’ll add checkboxes so they can toggle the visibility of each image.
First, you’ll add the images to the Timeline panel.
Select the Project tab to bring the panel forward. Then drag the Holding_Gun.psd, Man_Hat.psd, and Stylized_Scene.psd files to the bottom of the Timeline panel.
The adjustment layer named Background effect will affect all the layers beneath it in the Timeline panel.
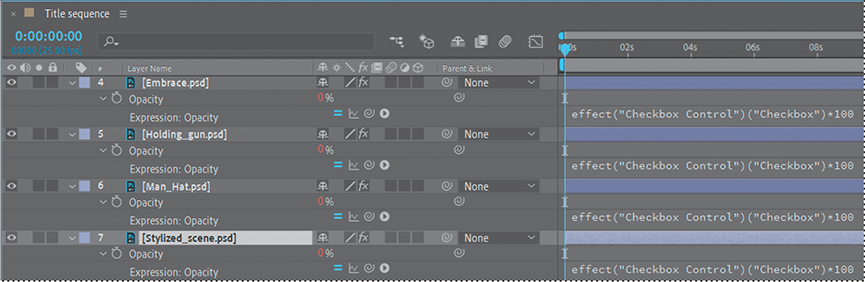
In the Timeline panel, select the Embrace.psd layer, and then Shift-select the Stylized_scene.psd layer to select all four image layers. Then, choose Effect > Expression Controls > Checkbox Control.
After Effects adds the Checkbox Control effect to each of the selected layers.
With all four layers still selected, press T to display their Opacity properties.
For each layer, you’ll create an expression that ties the Opacity property to the appropriate checkbox.
Deselect all layers, and then select the Embrace.psd layer.
Drag the pick whip for the Opacity property in the Embrace.psd layer to the Checkbox property in the Effect Controls panel.
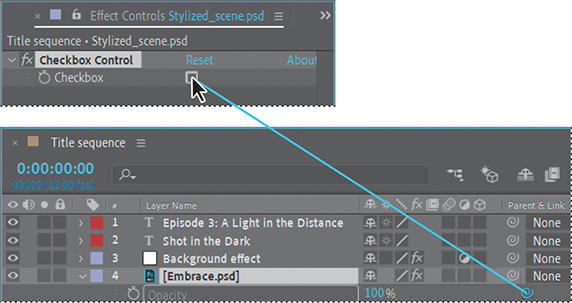
Expand the Opacity property to see the expression.
After Effects created the default expression effect (“Checkbox Control”)(“Checkbox”), which identifies the related effect. You want to set the opacity to 100% when the checkbox is selected, so you’ll add that instruction to the expression.
Type *100 at the end of the existing expression.
Repeat steps 4–7 for each of the other image layers.
Now you’re ready to add the controls to the Essential Graphics panel.
Select all four image layers in the Timeline panel, and press E to display the effects for each layer.
In the Embrace.psd layer, expand the Checkbox Control properties to see the Checkbox property. Then drag the Checkbox property into the Essential Graphics panel.
Rename the Checkbox property Embrace.
Repeat steps 10–11 for each of the other layers, renaming the Checkbox properties Holding gun, Man in hat, and Stylized, respectively.
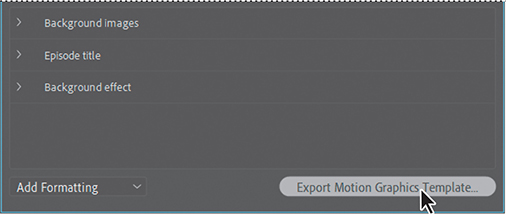
Choose Add Group from the menu at the bottom of the Essential Graphics panel, and name the group Background images.
Drag the image checkboxes into the Background images group.
Choose Add Comment from the menu at the bottom of the Essential Graphics panel. Then, type Toggle on the image you want to use.
Drag the comment to the top of the Background images group, and then drag the Background images group above the Background effect group.
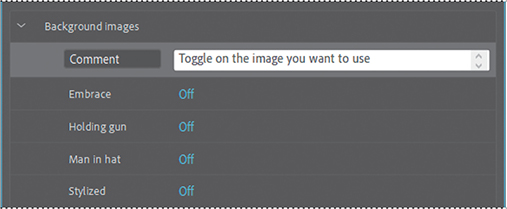
Now the template controls are tidy and easy to understand.
Select one of the checkboxes to display a default background image.
Hide the properties for all layers in the Timeline panel, and then choose File > Save to save your work so far.
Protecting the timing of a section
The Responsive Design features in After Effects and Premiere Pro let you author adaptive motion graphics. The Responsive Design – Time feature, specifically, preserves the duration of time in a particular region of a composition in a Motion Graphics template while enabling time stretching in unprotected regions. You can preserve the timing of specific areas in compositions you export as Motion Graphics templates or in nested compositions within After Effects.
You’ll protect the duration of the episode title’s transition. That way, an editor in Premiere Pro will be able to shift the timing of other areas, such as shortening the time before the text explodes, but speeding up or slowing down time elsewhere won’t affect the protected area.
In the Timeline panel, drag the Work Area Start marker to 2:00.
Drag the Work Area End marker to 5:00.
You’ve reduced the work area to the area that you want to protect from time-stretching.
Choose Composition > Responsive Design – Time > Create Protected Region From Work Area.
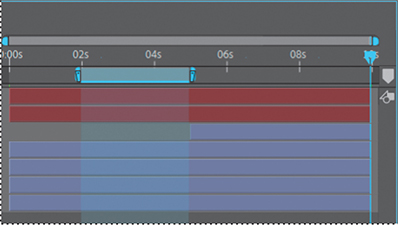
The protected area is shaded in the Timeline panel.
Choose File > Save.
Exporting the template
You’ve added properties to the Essential Graphics panel, renamed them to make sense to an editor in Adobe Premiere Pro, and tested their effects. Now you’re ready to export the template so that your colleagues can use it. You can share it through a Creative Cloud library or save it to a local drive as a Motion Graphics template (.mogrt) file to distribute yourself. The template includes all the source images, videos, and properties.
![]() Tip
Tip
If you don’t have the original project file available, you can open a .mogrt file as a project file in After Effects. When you select the .mogrt file in the Open Project dialog box, you’ll be prompted to select a folder for the extracted files. After Effects extracts the components and recreates the project file.
Click Export Motion Graphics Template in the Essential Graphics panel.
In the Export As Motion Graphics Template dialog box, make sure Local Templates Folder is selected, and click OK.
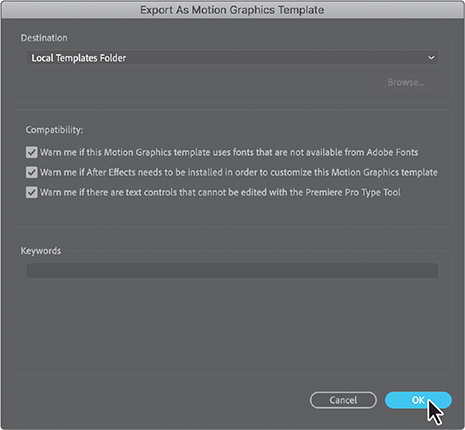
By default, Premiere Pro looks for Motion Graphics templates in the Motion Graphics Templates folder on your local computer. However, you can choose to save the template to a different folder on your computer or to a Creative Cloud library, which you can access from other devices.
Choose File > Save, and then close the project.
Extra credit
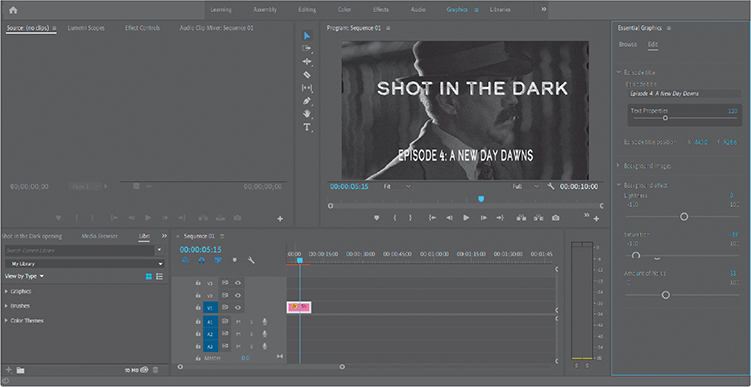
Using a Motion Graphics template in Adobe Premiere Pro
You can use the template to edit the title sequence in Premiere Pro.
Open Premiere Pro. Click New Project in the Home window.
Name the project Shot in the Dark opening, and save it in the Lessons/Lesson11/Finished_Project folder. Click OK.
Choose Window > Workspaces > Graphics to open the Essential Graphics panel and other panels you’re likely to use with it.
Choose File > New > Sequence, select the HDV > HDV 1080p25 preset, and click OK.
Make sure Local Templates Folder is selected in the Essential Graphics panel, and scroll to the template you created. Premiere Pro includes several standard templates; they’re listed alphabetically.
Drag your template from the Essential Graphics panel onto the new sequence in the Timeline panel. If prompted, click Change Sequence Settings to match the clip.

As the template loads, Premiere Pro displays a media offline message.
When the template has loaded, press the spacebar to preview the clip, and then go to 5:15 so you can see the episode title text and the effect.
Click the Edit tab in the Essential Graphics panel, double-click the Program Monitor panel if you don’t see the template controls in the Essential Graphics panel, and then make changes to the settings in the Essential Graphics panel. Press the spacebar to see the changes you made.
In the Timeline panel, drag the layer to extend it, and then preview again. The title animation at the beginning is extended, as is the timing of the effect on the image. But the episode title animation timing is preserved.
Make any other changes you like, save the file, and close Premiere Pro.
Review questions
1 Why would you save a Motion Graphics template from After Effects?
2 How do you add controls to the Essential Graphics panel?
3 How can you organize controls in the Essential Graphics panel?
4 How can you share a Motion Graphics template?
Review answers
1 Saving a Motion Graphics template lets you give your colleagues the ability to edit specific attributes of a composition without sacrificing stylistic control.
2 To add a control to the Essential Graphics panel, drag a property from the Timeline panel.
3 To organize controls, group them. Choose Add Group from the menu at the bottom of the Essential Graphics panel, name the group, and drag controls into it. You can also add comments to help users understand your intention.
4 You can share a Motion Graphics template by exporting it to a shared Creative Cloud library, the local templates folder on the same computer, or a .mogrt file that you distribute to your colleagues.