
8. Working with Text, Lists, and Tables
Lesson overview
In this lesson, you’ll create several webpages from your new template and work with headings, paragraphs, and other text elements to do the following:
Enter heading and paragraph text.
Insert text from another source.
Create bulleted lists.
Insert and modify tables.
Spell-check your website.
Search and replace text.
This lesson will take about 3 hours to complete. To get the lesson files used in this lesson, download them from the webpage for this book at www.adobepress.com/DreamweaverCIB2021. For more information, see “Accessing the lesson files and Web Edition” in the “Getting Started” section at the beginning of this book.
Dreamweaver provides numerous tools for creating, editing, and formatting web content, whether it’s created within the program or imported from other applications.
Previewing the completed file
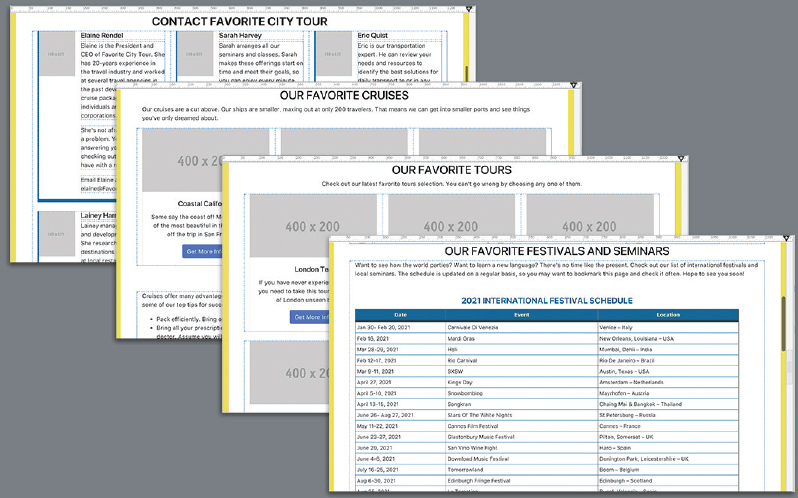
To get a sense of the files you will work on in this lesson, let’s preview the completed pages in Dreamweaver.
Launch Adobe Dreamweaver CC (2021 release) or later, if necessary. If Dreamweaver is already running, close any open files.
Define a new site for the lesson08 folder, as described in the “Getting Started” section at the beginning of the book. Name the new site lesson08.
 Note
NoteTo open consecutive files, hold the Shift key before selecting. If the files are not listed consecutively, Ctrl/Cmd-click to select the files.
If necessary, press F8 to open the Files panel. Select lesson08 from the site drop-down list.
Dreamweaver allows you to open one or more files at the same time.
Open the lesson08/finished folder.
Select tours-finished.html.
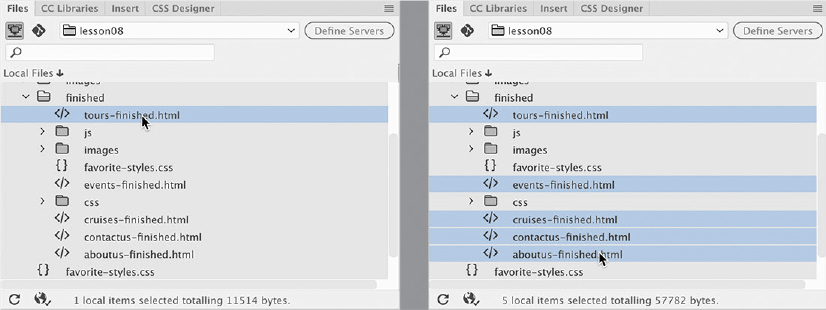
Hold Ctrl/Cmd, and then select events-finished.html, cruises-finished.html, contactus-finished.html, and aboutus-finished.html.
By holding Ctrl/Cmd before you click, you can select multiple nonconsecutive files.
NoteFiles may be displayed differently than shown.
Right-click any of the selected files. Choose Open from the context menu.
All four files open. Tabs at the top of the document window identify each file.
NoteBe sure to use Live view to preview each of the pages.
Click the tours-finished.html tab to bring that file to the top, and switch to Live view if necessary.
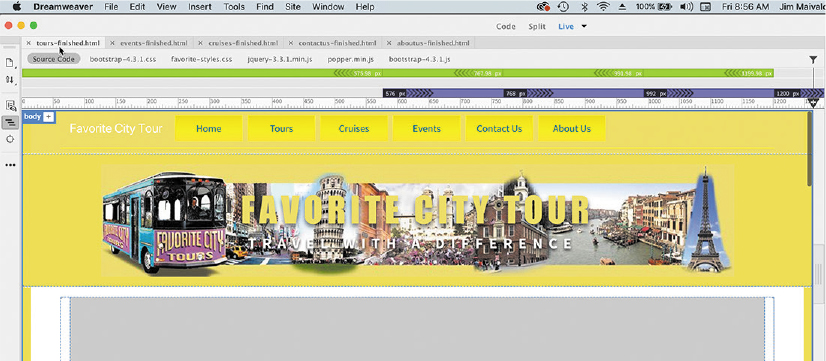
Note the headings and text elements used.
Click the cruises-finished.html document tab to bring that file to the top.
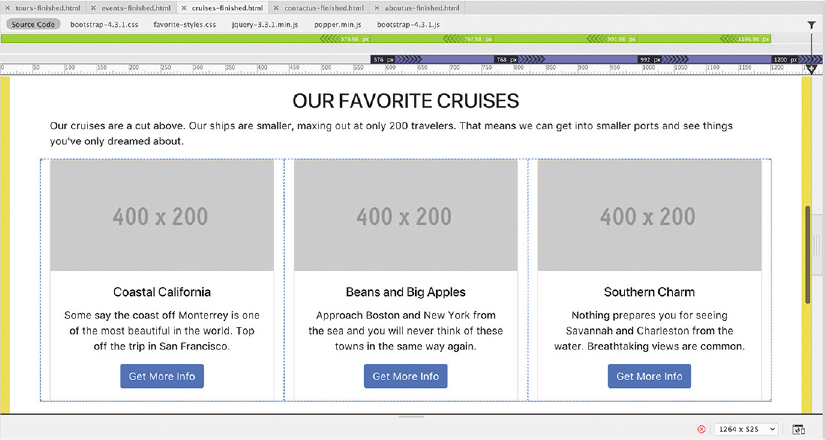
Note the bulleted list elements used.
Click the events-finished.html tab to bring that file to the top.
Note the two HTML-based tables used.
Click the contactus-finished.html tab to bring that file to the top.
Note that the text elements are formatted with custom borders.
Choose File > Close All.
In each of the pages, a variety of elements are used, including headings, paragraphs, lists, bullets, indented text, and tables. In the following exercises, you will create these pages and learn how to format each of these elements.
Creating and styling text
Most websites are composed of large blocks of text with a few images sprinkled in for visual interest. Dreamweaver provides a variety of means for creating, importing, and styling text to meet any need.
Importing text
In this exercise, you’ll create a new page from the site template and then insert heading and paragraph text from a text document.
Choose Window > Assets to display the Assets panel. Click the Templates category icon. Right-click favorite-temp and choose New From Template from the context menu.
 Tip
TipThe Assets panel may open as a separate, floating panel. To save screen space, feel free to dock the panel on the right side of the screen, as shown in Lesson 1, “Customizing Your Workspace.”
NoteThe Templates tab of the Assets panel appears only in Design and Code views when documents are open or when no documents are open at all.

A new page is created based on the site template.
Save the file as tours.html in the site root folder. Make sure the document window is at least 1200 pixels wide.
TipThe Property inspector may not be visible in the default workspace. You can access it in the Window menu and dock it to the bottom of the document window.
When you create a file, it’s a good idea to immediately update or replace the various metadata placeholder text elements in the new page. These items are often overlooked or forgotten in all the hubbub around creating the text and images for the main content. First, you’ll update the page title.
If necessary, choose Window > Properties to display the Property inspector.
The Document Title field is featured in the Property inspector most of the time you are working in a document and when no page elements are selected.
In the Document Title field, select the placeholder text Insert Title Here. Type Our Favorite Tours and press Enter/Return to complete the title.

Each page also has a meta description element, which provides valuable information about your page content to search engines. You can edit it in Code view or using the Property inspector with help from the DOM panel.
Choose Window > DOM to display the DOM panel, if necessary.
The meta description is located in the
<head>section of the page.Expand the
headelement in the DOM display.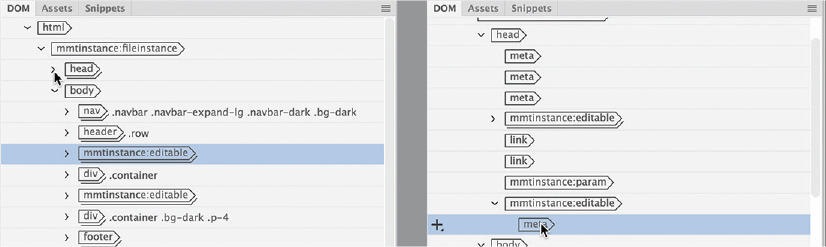
When the
headsection expands, you should see the various elements contained within it. There are threemetaelements, two links, and two editable regions. One editable region contains the title, which may be visible. The other contains the meta description.Expand the second editable region.
You should see a
metaelement within the editable region.Click to highlight the
metaelement in the DOM panel.The content of the
metaelement appears in the Property inspector.Select the text add description here and type the following: We worked hard to develop these tours for you. They are guaranteed to be your favorite, too!

Once the metadata is updated, you can start working on the main content.
In the Files panel, double-click favorite-tours.rtf in the lesson08/resources folder.
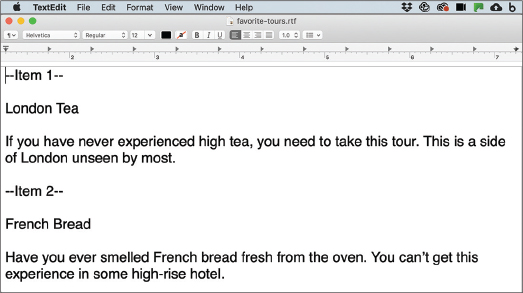
Dreamweaver automatically launches a program that is compatible with the file type selected. The text is unformatted and features extra lines between each paragraph. These extra lines are intentional. For some reason, Dreamweaver swaps out single paragraph returns for
<br>tags when you copy and paste them from another program. Adding a second paragraph return in your source text forces Dreamweaver to use paragraph tags instead of the break tag. TipWhen you use the clipboard to bring text into Dreamweaver from other programs, you can then use Live or Design view if you want to honor the paragraph returns.
This file contains nine tour descriptions that you will use to populate the card-based content section.
In the text editor or word-processing program, position the cursor before the text London Tea.
Drag to select the heading.
Press Ctrl+X/Cmd+X to cut the text.
Switch back to Dreamweaver.
Switch to Live view, if necessary.
The sample page has three card-based placeholders in the middle content section, each titled Product Name. The content you cut from favorite-tours.rtf will be inserted into the first placeholder.
In the card-based section, select the text ADD HEADLINE HERE. Type OUR FAVORITE TOURS to replace it and press Enter/Return to create a new line.
TipStarting in this version of Dreamweaver, you can directly edit text in Live view.
When you press Enter/Return in Live view, Dreamweaver automatically creates a new
<p>element.Type Check out our latest favorite tours selection. You can’t go wrong by choosing any one of them.
The introductory text would look nicer centered under the heading. You may remember applying the Bootstrap class
.text-centerto center the placeholder heading in the previous lesson.In the Element Display on the new paragraph, click the Add Class/ID icon
 .
.Type .text-center and press Enter/Return to apply the class to the
<p>element.
Select the text Product Name in the first card-based element.
Press Ctrl+V/Cmd+V to paste the text from favorite-tours.rtf that you cut in step 13.

The heading London Tea replaces the placeholder text.
Switch to favorite-tours.rtf. Select the tour description for Item 1.
Press Ctrl+X/Cmd+X to cut the description.
Switch to Dreamweaver and select the placeholder description in the first card-based element.
TipWhen selecting the text, be sure you don’t grab the paragraph return. This will add an extra blank line to the card.
Press Ctrl+V/Cmd+V to paste.
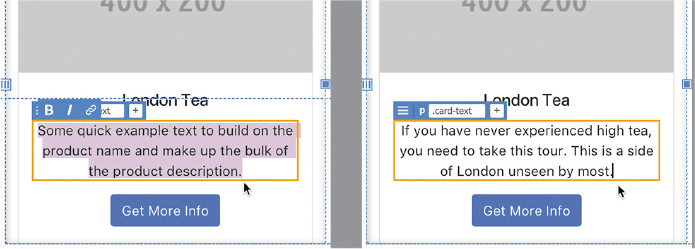
The description is replaced by the text from favorite-tours.rtf.
The text in the first card-based element has been replaced.
Switch to favorite-tours.rtf. Repeat steps 22–25 to move items 2 and 3 to tours.html.
Save tours.html.
The three card-based elements are populated by the tour titles and descriptions. Next, you’ll create two additional rows of tour descriptions that you can then fill with the remaining text in favorite-tours.rtf.
Duplicating Bootstrap rows
The row-and-column scheme that Bootstrap uses to support various screen sizes can be very tedious to build by hand. Fortunately, Dreamweaver provides a built-in interface that makes this a simple point-and-click task. In this exercise, you will learn how to create additional rows in your Bootstrap structure.
Select any of the image placeholders in the card-based section.
Select the
div.row.text-centertag selector.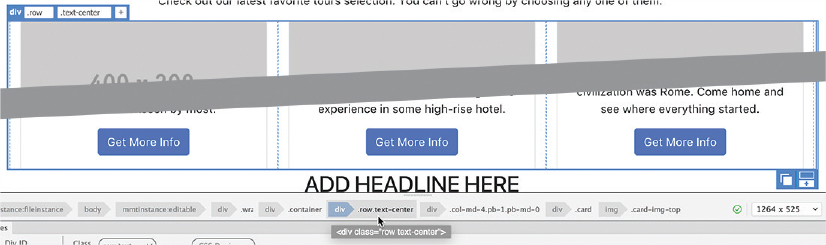
When the element is selected, the Element Display shows two additional icons on the lower- or upper-right corner of the element. The icons enable you to create a new Bootstrap row or to duplicate it. If you were to click the Add A New Row icon
 , you’d have to re-create all the elements used in the card-based elements. Since the first row already has all the elements we need, let’s just duplicate it to save a lot of time and effort.
Click the Duplicate Row icon
 .
.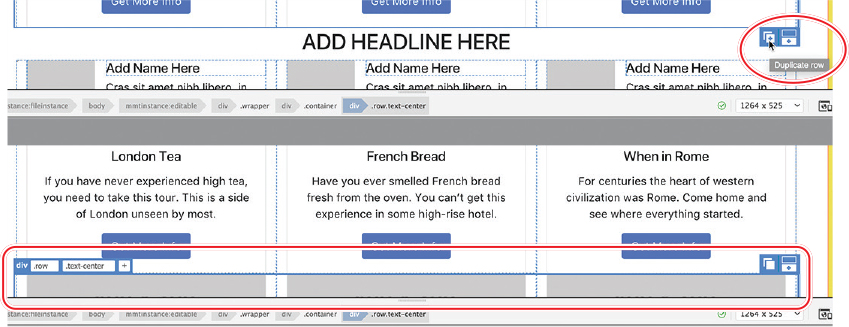
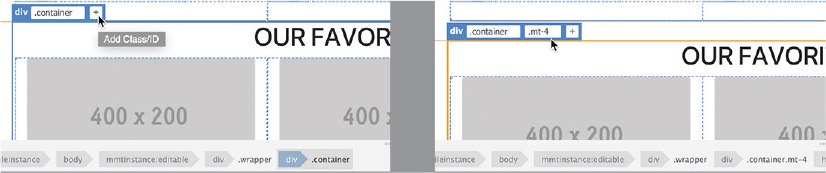
A new row appears below the selection, with duplicate content and structure. Notice that the new row is butting up to the first row. It could use a little spacing. You may have noticed the Bootstrap class
.mt-4applied to various elements in the layout. This class adds amargin-topproperty to an element.Select any of the image placeholders in the second row of the card-based section.
Select the
div.row.text-centertag selector.In the Element Display on the new paragraph, click the Add Class/ID icon
.Type .mt-4 and press Enter/Return to apply the class.

The entire row moves down. Once you have created and formatted the second row, you might as well add the third row. Depending on where the new row displays in the document window, the Duplicate Row icon may appear at the top or bottom of the selection.
Click the Duplicate Row icon
. NoteIf the selected element displays an orange border, the duplicate command will not work. Click the Element Display to display the blue border.

A duplicate row appears below the second row. Now you can bring over the remaining content.
Move the remaining tour titles and descriptions from favorite-tours.rtf.

Close but do not save favorite-tours.rtf.
By not saving the file you will be able to access the content later if you want to redo this lesson.
Save tours.html.
Once the text has been moved over and the content is complete, you can delete the content elements you do not need.
Deleting unused Bootstrap components
The template was set up with an image carousel and three content sections. For tours.html you used the card-based content section. In Lesson 9, “Working with Images,” you’ll learn how to add images to the carousel, so we’ll leave the carousel in the template. The text-based section under the carousel and the list-based section are unused and unneeded, so let’s delete them.
Select the text ADD HEADLINE HERE in the text-based section.
Select the
div.containertag selector and press Delete. Tip
TipLook for the blue border when deleting selected elements. The orange border indicates that the content is selected. Click the tag selector again or the Element Display itself to activate the blue border. You can also use the DOM panel to easily delete elements.
The text-based section is deleted. The card-based section moves up, butting up against the link section under the carousel. It could use a bit of spacing above it. You can use the
.mt-4class again.Select the headline OUR FAVORITE TOURS.
Select the
div.containertag selector.Using the Element Display, add the class .mt-4.

The element moves down.
Select the text ADD HEADLINE HERE in the list-based section.
Select the
div.containertag selector and press Delete.
Notice the blue border around the element before pressing Delete. The entire list-based section is deleted, and the layout is complete for now.
Save the file and close it.
Next you’ll learn how to create HTML lists.
Creating lists
Formatting should add meaning, organization, and clarity to your content. One method of doing this is to use the HTML list elements. Lists are the workhorses of the web because they are easier to read than blocks of dense text; they also help users find information quickly.
In this exercise, you will learn how to make an HTML list.
Open the Assets panel. In the Templates category, right-click favorite-temp. From the context menu, choose New From Template.
NoteThe Template category is not visible in Live view when a document is open. To create, edit, or use Dreamweaver templates, you must switch to Design view or Code view or close all open HTML documents.
A new page is created based on the template.
Save the file as cruises.html in the site root folder. Switch to Live view, if necessary. Make sure the document window is at least 1200 pixels wide.
In the Property inspector, select the placeholder text Insert Title Here in the Document Title field. Type Our Favorite Cruises to replace the text, and press Enter/Return.
Switch to Code view. Locate the
meta descriptionelement.Select the text add description here.
Type Our cruises can show you a different side of your favorite cities and save the file.

The new description replaces the placeholder.
In the Files panel, double-click cruise-tips.rtf in the resources folder of lesson08.
The file opens outside Dreamweaver. The content consists of a list of tips on how to make your cruise experience better.
In favorite-tips.rtf, press Ctrl+A/Cmd+A. Press Ctrl+X/Cmd+X to cut the text. Close, but do not save changes to, cruise-tips.rtf.
You have selected and cut all the text.
Switch back to Dreamweaver. Switch to Live view.
Select ADD HEADLINE HERE in the text-based content section under the image carousel. Type TOP TIPS FOR CRUISERS to replace it.
Click the text Add content here.
The Element Display appears focused on the
pplaceholder element, but the border around the text may be orange.If necessary, press the Esc key to obtain the blue element border. Otherwise, skip to step 12.
When the blue border is visible, you have the HTML element selected.
Press Ctrl+V/Cmd+V.

The text from cruise-tips.rtf appears below the placeholder element. Before we deal with the new text, let’s delete the placeholder.
Select and delete the entire placeholder element Add content here.
The text from cruise-tips.rtf is currently formatted entirely as HTML paragraphs. Dreamweaver makes it easy to convert this text into an HTML list. Lists come in two flavors: ordered and unordered.
Creating an ordered list
In this exercise, you will convert some of the paragraph text into an HTML ordered list.
Select all the text, starting with Cruises offer many advantages. In the Property inspector, click the Ordered List icon
 .
.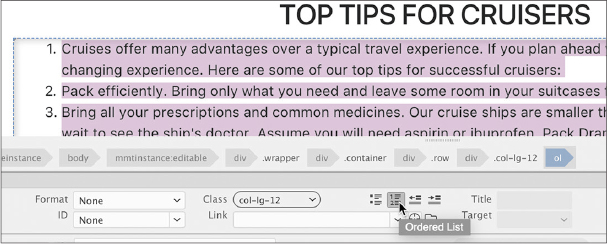
An ordered list adds numbers automatically to the entire selection. Semantically, it prioritizes each item, giving them intrinsic values relative to one another. However, this list doesn’t seem to be in any particular order. Each item is more or less equal to the next one, so it’s a good candidate for an unordered list—used when the items are in no particular order. Before you change the formatting, let’s take a look at the markup.
Switch to Split view.

Observe the list markup in the Code section of the document window.
The markup consists of two elements: <ol> and <li>. Note that each line is formatted as an <li> (list item). The <ol> parent element begins and ends the list and designates it as an ordered list. Changing the formatting from numbers to bullets is simple and can be done in Code view or Design view.
Before changing the format, ensure that the formatted list is still entirely selected. You can use the <ol> tag selector, if necessary.
Creating an unordered list
In this exercise, you will convert the ordered list into an unordered list.
In the Properties panel, click the Unordered List icon
 . Tip
. TipYou could also change the formatting by editing the markup manually in the Code view window. But don’t forget to change both the opening and closing tags.
TipThe easiest way to select the entire list is to use the
<ol>tag selector.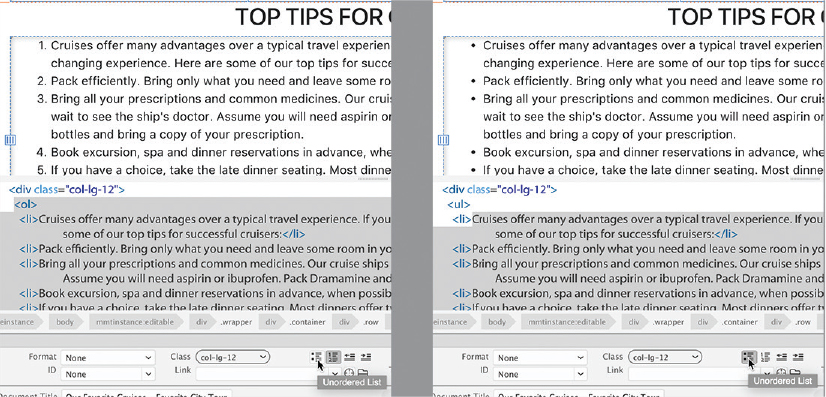
All the items are now formatted as bullets.
If you observe the list markup, you’ll notice that the only thing that has changed is the parent element. It now says
<ul>, for unordered list.Before you close this file, let’s complete the rest of the page.
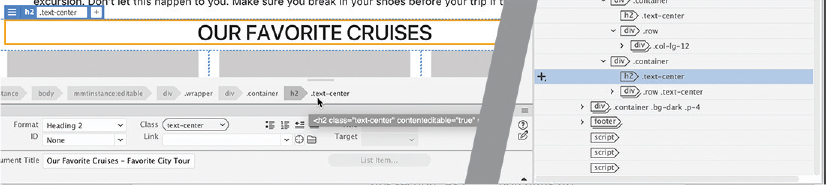
In the card-based content section, select the placeholder heading ADD HEADLINE HERE.
Type OUR FAVORITE CRUISES to replace the selection.
In the Files panel, double-click favorite-cruises.rtf in the lesson08/resources folder.

The favorite-cruises.rtf file opens. The text should be inserted in the card-based content section.
Copy and paste the text into the appropriate placeholders in the card-based content section.

The three card-based elements are now populated with cruise descriptions. Once the content is in place, it’s time to delete the unneeded placeholder elements. The carousel will be updated with cruise photos in Lesson 9, but you can delete the list-based content section.
Select and delete the list-based content section.

The layout is nearly complete. Since the page is focused on selling cruises, it makes sense to put the cruise descriptions above the tips content. The DOM panel makes it easy to move elements around in the layout.
Select Window > DOM, if necessary, to display the DOM panel.
In the document window, select the headline TOP TIPS FOR CRUISERS.
The
h2element in the DOM panel is highlighted. You can see the structure of the text-based content section. The parent element for the entire section isdiv.container.Select the headline OUR FAVORITE CRUISES.
The
h2in the card-based content section is highlighted. Like the text-based section, the card-based section is also based ondiv.container. By dragging one of these elements, you can swap the two sections in the layout.At the moment, the two HTML structures are expanded. Collapsing the parent elements can help make moving the elements a bit easier.
Collapse the structure display for the two
div.containerelements.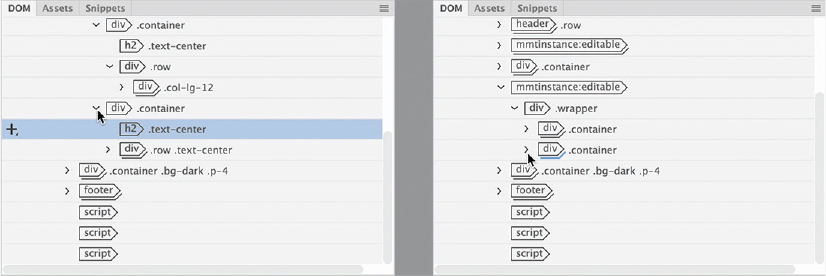
When collapsed, the elements are stacked one above the other at the same level of the structure. Seeing the two elements this way simplifies the change.
Drag the card-based section above the text-based section.

A green line indicates where the element will appear. The cruise descriptions now appear above the cruise tips section. As before, the card-based OUR FAVORITE CRUISES section butts up against the links and needs a bit of spacing.
NoteWhen you’re dragging the element, Dreamweaver might expand the structure.
Select the headline OUR FAVORITE CRUISES. Select the
div.containertag selector. Add the class .mt-4 todiv.container. TipIf the element appears in the wrong position, choose Edit > Undo and try again.
The tips section could also use some extra space.
Select the headline TOP TIPS FOR CRUISERS. Select the
div.containertag selector. Add the class .mt-4 todiv.container.The layout is complete.
Save and close cruises.html.
Close favorite-cruises.rtf without saving any changes.
You’ve learned how to use lists in the traditional way. But lists can also be used to build elaborate content structures. The template features such a content section.
Basing content structures on lists
Semantically, lists sequentially display a series of words or phrases of a related topic, usually one over the other. But in HTML, lists can feature much more complex content, including multiple paragraphs of text, images, and more. To the search engines this is a totally valid structure.
In this exercise, you will use the list-based content section in the template to create the company’s employee contact list. The list will be composed of six individual bios, stacked two high in three columns.
Create a new page from the favorite-temp.dwt. Save the page as contact-us.html.
Select the
titleplaceholder in the Property inspector. Type Meet our favorite peopleThe new page has three content sections. You will use the list-based section at the bottom. Before we get to that, you will remove all the components that are unneeded. Let’s start with the image carousel.
Switch to Code view.
The carousel is part of the optional editable region. You control its display by changing a value in an HTML comment in the
<head>section.Locate the comment in the
<head>section (around line 13).The comment currently says
value="true".Select the value
trueand type false to replace it.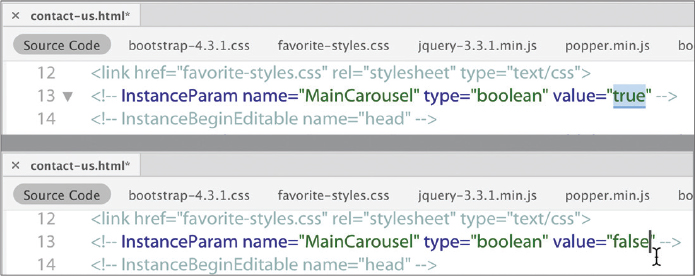
Choose Tools > Templates > Update Current Page.
The carousel is removed from the layout. While you are in Code view, you should edit the meta description.
In the meta description, select and replace the text
add description herewith Meet the staff of Favorite City TourLet’s remove the text-based content section next.
Switch to Live view.
Since the carousel was removed, the text-based section is now at the top of the layout.
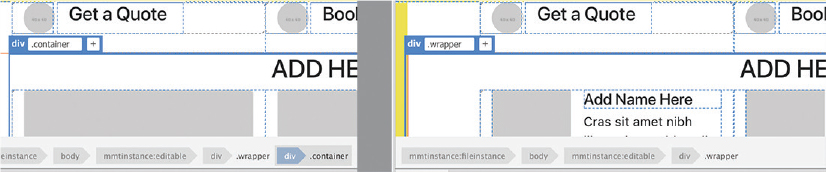
Select the
div.containertag selector for the text-based section.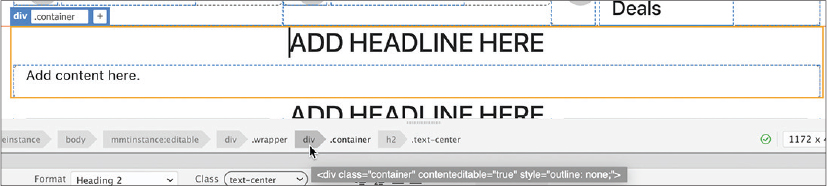
The Element Display appears around the selection. If the border is blue, you can skip to step 11.
TipIt may be difficult to get the blue border in Live view at times. Use the DOM panel if you have any trouble deleting elements.
Click the Element Display.
The border displays in blue.
Press Delete.

The text-based section is deleted.
Repeat steps 9–11 to select and delete the card-based section.
Only the list-based section is still part of the layout.
Select the placeholder text ADD HEADLINE HERE. Type CONTACT FAVORITE CITY TOUR to replace the selection.
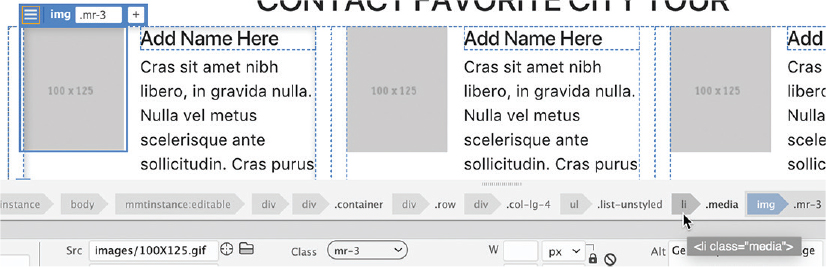
Click an image placeholder in one of the list-based items. Examine the tag selectors at the bottom of the document window.
Note that the
<img>element is a child of an<li>element.Select the
li.mediatag selector.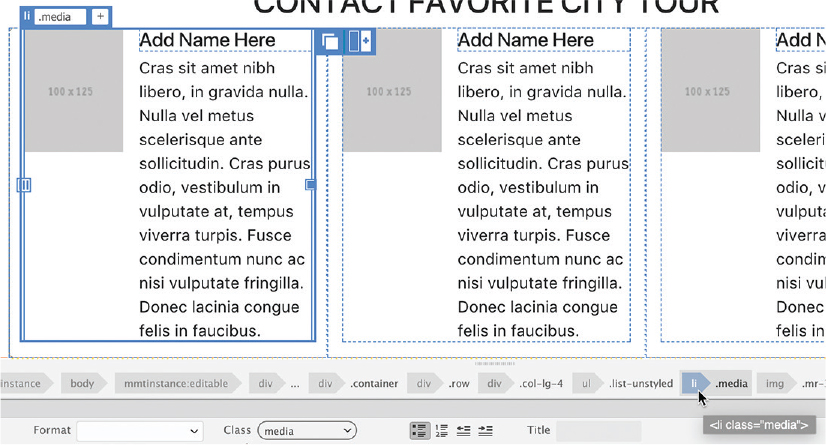
The
<li>element is composed of a heading, an image placeholder, and a paragraph of text.Select the
ultag selector.The
<ul>element comprises one column in the section. You will populate these elements with content in a text file.Open contactus-text.txt from the lesson08/resources folder.

The text file opens in Dreamweaver itself. It contains the bios for the Favorite City Tour staff.
Select the name Elaine Rendel and copy it.
Switch to contact-us.html. Select the text Add Name Here in the first item and paste to replace it.

Elaine’s name appears in the <h5> element. Next you’ll move the three paragraphs of Elaine’s bio into the element. But you’ll have to learn a new trick for pasting multiple elements in Live view.
Pasting multiple elements in Live view
Dreamweaver presents some challenges to pasting multiple elements when using Live view. If you are used to working in Design view, you’ll have to learn a few tricks and have a keen eye before you can successfully paste two or more elements.
Switch to contactus-text.txt and copy the three paragraphs under the name Elaine Rendel.
Switch to contact-us.html in Dreamweaver. Select the placeholder text under Elaine’s heading.
Note the orange box around the selection. This indicates you are in text-editing mode. This mode does not support pasting multiple paragraphs. If you paste the text copied in step 1, it will come in as one continuous block. There’s a simple trick to pasting multiple paragraphs in Live view.
Press Delete.
The placeholder text is deleted. The Element Display may appear on the
<h5>element or on<div.media-body>. If the border is blue, skip to step 5.Click the Element Display on the
<h5>element.The border displays in blue. When an element is selected this way in Live view, you can paste one or more elements and preserve the HTML structure.
Press Ctrl+V/Cmd+V to paste.
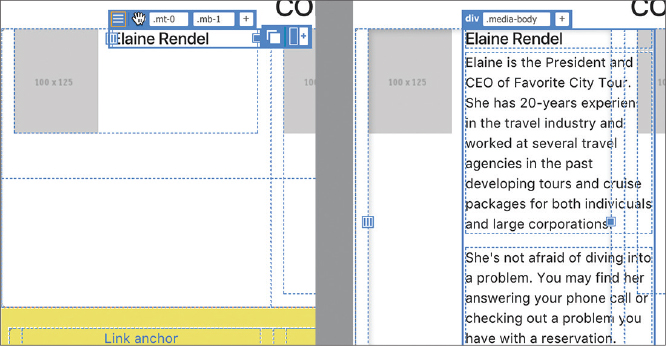
The three paragraphs copied in step 1 appear below the heading within the <li> structure, as desired. In Live view the paragraphs seem to extend beyond the borders of the <div>. Don’t worry—they will display properly in the browser. The first staff bio is complete. Next, you’ll create a second row to add another bio.
Creating new list-based items
If you were to look at the structure of the list-based bio, you would quickly see how complex it is. Since it uses a Bootstrap structure, Dreamweaver provides a simple way to create a second row in the first column.
![]() Note
Note
The Bootstrap controls may appear at the top right or bottom right of a selected element, depending on the space available in the document window.
Select the
li.mediatag selector for Elaine’s bio.When it’s selected in Live view, you should see the Bootstrap element interface you used to build the tour descriptions earlier. It sounds counterintuitive, but to add a second row you will click the icon labeled Duplicate Column.
Position the cursor over the Bootstrap controls at the bottom of the selected element. Click the Duplicate Column icon
.
An exact duplicate
<li>element appears below the first. Note that the new element butts up against the first. Let’s use the.mt-4class to put a little space between them.Select the
li.mediatag selector for the duplicate bio. Apply the class .mt-4 to the element.
The two bios are now separated nicely.
Copy the content from item 2 in contactus-text.txt and replace the text in the duplicate bio.
Use the text for items 3 and 4 for the second column. Use the text for items 5 and 6 for the third column. Create duplicate
<li>elements as needed.The six bios are now in place. Note that the list-based section butts up against the row of links at the top. Let’s add the
.mt-4class to it.Select the
div.containertag selector. Apply the .mt-4 class to the element.Finally, we’ll add a bit of style to the layout by adding some borders to the individual bios. To make sure the styling is applied only to these employee profiles, you’ll need to create a custom class that you can assign to them.
Select the
li.mediatag selector containing Elaine’s bio. Click the Add Class/ID icon.Type .profile as the new class name.
NoteDon’t forget to type the period at the beginning of the class name.
As you type, the hinting list appears and displays the names of existing rules. The class .
profiledoesn’t exist yet, but the Element Display enables you to create it on the fly.Press Enter/Return once.

The CSS Source pop-up window appears.
Whenever you enter a new class or id in the Element Display that does not exist in a linked or embedded style sheet, the CSS Source pop-up window will appear. This pop-up enables you to create a new matching selector in any style sheet embedded in the file or linked to it. You can even use it to start a new style sheet, if necessary.
Since the site template is already linked to an external style sheet, favorite-styles.css appears in the Select A Source drop-down menu.
Press Enter/Return a second time.
Because you pressed Enter/Return again, the selector
.profileis created in the selected style sheet. If you do not want to create a selector for the class or id entered, press the Esc key instead. Once the selector is created, you can use it to style the content.Display the CSS Designer. Click the Current button.
TipWhen creating specifications manually, enter the property name in the field and press Tab. A value field will appear to the right. When Show Set is enabled, hinting may not appear in the value field.
The class
.profileappears at the top of the list of selectors. If you look at the Properties pane, you can see that no styles are set.Enter the following properties for the rule
.profile:border-left: 3px solid #069 border-bottom: 10px solid #069

Borders appear on the left and bottom of Elaine’s bio. The borders help to visually group the bio text under its heading. You can now style the other bios in the same way.
Apply the class
.profileto the other staff bios.
The list-based content section is complete for now.
Save and close all files.
Next, you’ll learn how to create and work with HTML tables.
Creating and styling tables
Before the advent of CSS, HTML tables were often used to create page layouts. At that time, it was the only way to create multicolumn layouts and maintain some control over the content elements. But tables proved to be inflexible and hard to adapt to the changing internet, as well as just being a bad design choice. CSS styling provides so many more options for designing and laying out a webpage that tables were quickly dropped from the designer’s toolkit.
That doesn’t mean tables are no longer used on the web at all. Although tables are not good for page layout, they are good, and necessary, for displaying many types of data, such as product lists, personnel directories, and timetables, to name a few.
Dreamweaver enables you to create tables from scratch, to copy and paste them from other applications, and to create them instantly from data supplied from other sources, including database and spreadsheet programs such as Microsoft Access or Microsoft Excel.
Creating tables from scratch
In this exercise, you will learn how to create an HTML table.
Create a new page from favorite-temp. Save the file as events.html in the site root folder.
Enter Fun Festivals and Seminars to replace the Title placeholder text in the Property inspector.
Select the meta description placeholder and type Favorite City Tour supports a variety of festivals and seminars for anyone interested in learning more about the world around them to replace it.
Switch to Live view, select the ADD HEADLINE HERE placeholder heading in the text-based section, and type OUR FAVORITE FESTIVALS AND SEMINARS to replace it.
Although the festivals and seminars lists will be displayed in tables, it’s always nice to introduce such information with a paragraph of text or two.
Select the placeholder text Add content here.
Type the following text: Want to see how the world parties? Want to learn a new language? There’s no time like the present. Check out our list of international festivals and local seminars. The schedule is updated on a regular basis, so you may want to bookmark this page and check it often. Hope to see you soon!

You are now ready to add a table.
Choose Insert > Table.
The Position Assist dialog appears.
Select After.
The Table dialog appears.

Although CSS has taken over most of the design tasks formerly done by HTML attributes, some aspects of the table may still be controlled and formatted by those attributes. The only advantage HTML has is that its attributes continue to be well supported by all popular browsers, both old and new. When you enter values in this dialog, Dreamweaver still applies them via HTML attributes. But whenever you have a choice, avoid using HTML to format tables.
Enter the following specifications for the table: Rows: 2 Columns: 3 Table Width: 95% Border Thickness: 1
You would normally set the border thickness to 0 (zero), but that setting makes the table structure basically invisible in Live view. You will change the border thickness later, after the table is complete.
 Tip
TipWhen first creating tables, set the border thickness to 1 to make it easier to work with. You can change it to 0 (zero) after entering data.
Click OK to create the table.
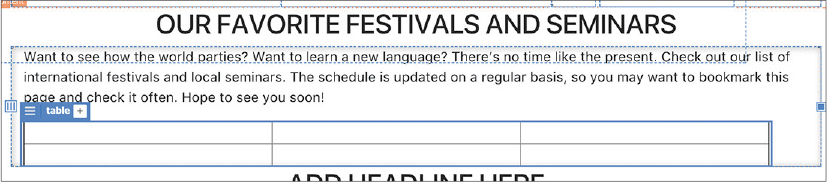
A three-column, two-row table appears below the main heading. The table is ready to accept input. You could enter the data right now, but Live view is not optimized for data entry. If you have large amounts of data to enter, you’re better off using Design view.
Adding data to a table
In this exercise, you’ll learn how to add data to a table manually.
Switch to Design view.
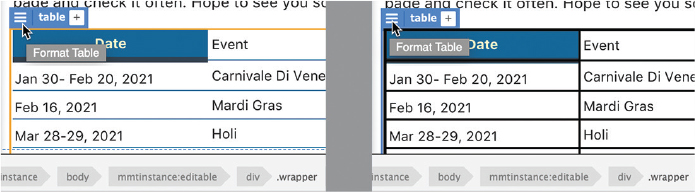
Insert the cursor in the first cell of the table. Type Date and press the Tab key.
The cursor moves into the next cell of the same row.
TipWhen your cursor is in a table cell in Design view, pressing the Tab key moves the cursor to the next cell on the right. Hold the Shift key before pressing the Tab key to move to the left, or backward, through the table.
In the second cell, type Event and press Tab.
NoteDesign view does not display complex CSS styling properly. The sidebars may overlap the tables. If the preview is too hard to work with, try adjusting the width of the document window.
The text appears and the cursor moves to the next cell, but you may find it hard to see it. In some cases, you may need to adjust the size of the document window.
Type Location and press Tab.

The cursor moves to the first cell of the second row.
In the second row, type May 1, 2021 (in cell 1), May Day Parade (in cell 2), and Meredien City Hall (in cell 3).

When the cursor is in the last cell, inserting additional rows in the table is easy.
Adding rows to a table
Dreamweaver provides several ways to add rows and columns to an existing table. In this exercise, you will learn how to add rows to a table.
If necessary, insert your cursor in the last cell of the second row. Press Tab.
A new blank row appears at the bottom of the table. Dreamweaver also allows you to insert multiple new rows at once.
Select the
<table>tag selector. TipIf the Property inspector is not visible, choose Window > Properties. Dock the panel to the bottom of the document window.
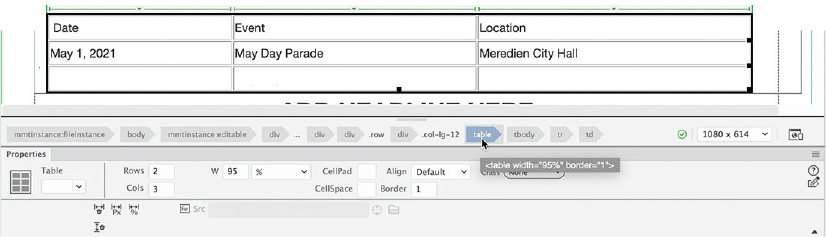
The Property inspector fields create HTML attributes to control various aspects of the table, including table width, cell width and height, text alignment, and so on. It also displays the current number of rows and columns and even allows you to change the number.
Select the number 3 in the Rows field. Type 5 and press Enter/Return.

Dreamweaver adds two new rows to the table. You can also add rows and columns to the table interactively using the mouse.
Right-click the last row of the table. Choose Table > Insert Row from the context menu.
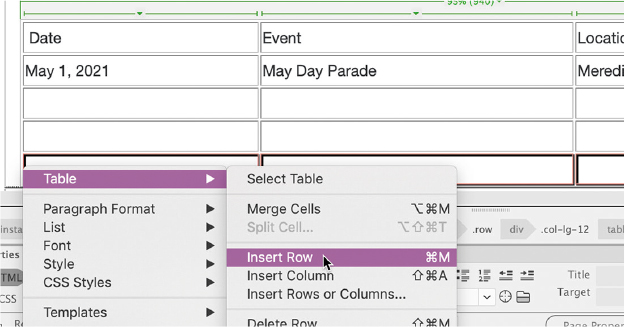
Another row is added to the table. The context menu can also insert multiple rows or columns at once.
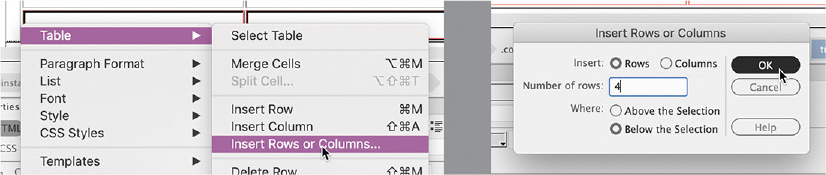
Right-click the last row of the table. Choose Table > Insert Rows Or Columns from the context menu.
The Insert Rows Or Columns dialog appears.
Insert four rows below the selection and click OK. Four more rows are added to the table, for a total of 10 rows.
Save all files.

Creating tables from scratch is a handy feature in Dreamweaver, but in many cases the data you need already exists in digital form—say, in a spreadsheet or even another webpage. Luckily, Dreamweaver provides support for moving such data from one page to another or even for creating tables directly from it.
Copying and pasting tables
Although Dreamweaver allows you to create tables manually inside the program, you can also move tables from other HTML files, or even from other programs, by using copy and paste.
Open the Files panel and double-click festivals.html in the lesson08/resources folder to open it.
This HTML file opens in its own tab in Dreamweaver. Note the table structure—it has three columns and numerous rows.
When moving content from one file to another, it’s important to match views in both documents. Since you were working in Design view in events.html, you should use Design view in this file too.
Switch to Design view, if necessary.
Insert the cursor in the table. Click the
<table>tag selector. Choose Edit > Copy or press Ctrl+C/Cmd+C. NoteDreamweaver allows you to copy and paste tables from some other programs, such as Microsoft Word. Unfortunately, copy and paste doesn’t work with every program.

Close festivals.html.
In events.html, insert the cursor in the table. Select the
<table>tag selector. Press Ctrl+V/Cmd+V to paste the table.
The new Festivals table completely replaces the existing table elements. This workflow will work in Design and Code views. But you must match views in both documents before you copy and paste.
Save the file.
If you look carefully at the text in the table, you can see that it appears larger than the text in other parts of the page. This usually indicates that the default Bootstrap styling has its own set of CSS properties. In cases like this, you’ll want to override the defaults and set your own properties.
Styling tables with CSS
In this exercise, you will create CSS styling for the content of the table.
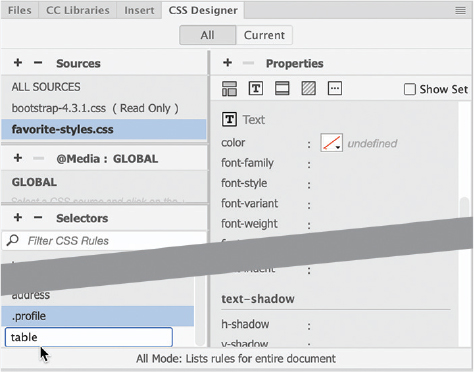
Switch to Live view. Click the table. Select the
tabletag selector.In the CSS Designer, click the All button. Select favorite-styles.css in the Sources pane. Create a new selector: table
The text in the table is larger than the other text on the page. You can use the new rule to control the size of the text.
If necessary, deselect the Show Set option.
Click the Text category icon
 .
.Create the following property for the rule
table: font-size: 90%
The text in the table reduces in size. When you set the width property as a percentage, the browser allocates the space based on the size of the parent element—in this case, the containing
<div>element. This means the table will adapt automatically as the parent structure changes too.CSS can control all aspects of the table formatting. When creating properties, you can use the extended interface in CSS Designer or you can enter properties manually. Once you get comfortable with the CSS specifications, this method can be much faster and more efficient.
If necessary, select the Show Set option.

The Property pane now filters the properties showing only options that are set within the rule. At the bottom of the Properties pane is a field labeled More. New properties have to be entered manually into this field.
Type width: 95% into the field and press Enter/Return to create the property.
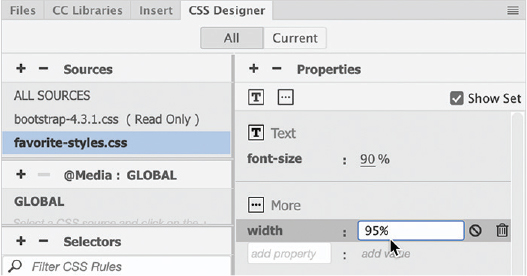
The table resizes, assuming 95% of the width of its parent element.
Create the following properties in the rule
table:margin-bottom: 2em border-bottom: 3px solid #069 border-collapse: collapse

A blue border and an extra space are added to the bottom of the table.
Choose File > Save All.
The rule you just created formats only the overall structure of the table, but it can’t control or format the individual rows and columns. In the next exercise, you will turn your attention to a table’s inner workings.
Styling table cells
Just as with tables, column styling can be applied by HTML attributes or CSS rules. Formatting for columns can be applied via two elements that create the individual cells: <th>, for table header, and <td>, for table data.
It’s a good idea to create a generic rule to reset the default formats of the <th> and <td> elements. Later, you will create custom rules to apply more specific settings.
Create a new selector in favorite-styles.css: td, th
NoteRemember that the order of the rules can affect the style cascade, as well as how and what styling is inherited.
By adding a comma, the selector targets both tags. Since
tdandthelements have to be in tables anyway, there’s really no need to puttablein the selector name.Create the following properties for the new rule:
padding: 4px text-align: left border-top: 1px solid #069

Once you’ve added a border to the rows, the HTML border attribute is no longer needed.
TipIf you have any problems editing the table properties, try switching to Design view.
Select the
tabletag selector.The Properties panel should display the table properties. If you do not see the table properties, click the tag selector until you see them.
Change the Border value to
0(zero). NoteThe display of HTML table attributes is a holdover feature in Dreamweaver. CSS styling will override these settings in most modern browsers, but it doesn’t hurt to set these to zero and prepare the tables for older browsers or devices.
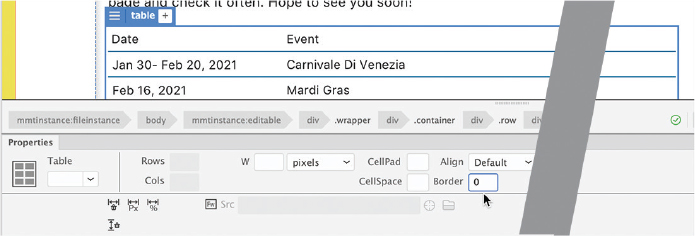
Once the border attribute is set to zero, the residual HTML styling of the table is removed in the document window. A thin blue horizontal border displays above each row of the table, making the data easier to read. The vertical borders are gone. As you format the table, the goal is to make the data easier to find and read.
Adding header rows to tables
Long columns and rows of undifferentiated data can be tedious to read and hard to decipher. Headers are often used to help the reader identify data. In some browsers, the text in header cells is formatted in bold and centered by default to help it stand out from the normal cells. But this default styling is not universally honored, so don’t count on it. You can make the headers stand out by giving them a touch of color of their own.
Create a new rule: th
NoteThe standalone
thrule for the<th>element must appear after the rule stylingthandtdelements in the CSS or some of its formatting will be reset.Create the following properties in the rule
th:color: #FFC text-align: center border-bottom: 6px solid #046 background-color: #069

The rule is created, but it still needs to be applied. There are no headers in the table yet. Dreamweaver makes it easy to convert existing
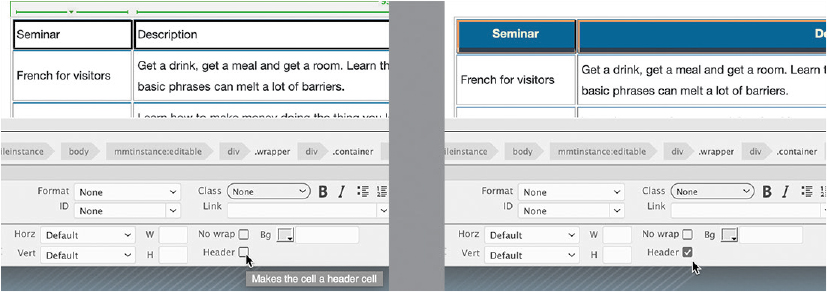
<td>elements into<th>elements.Click the first cell of the first row of the table. In the Property inspector, select the Header option. Note the tag selector and Element Display.

The cell background is filled with blue. The Element Display changes from the
tdelement toth.When you click the Header checkbox, Dreamweaver automatically rewrites the markup, converting the existing
<td>tags to<th>and thereby applying the CSS formatting. This functionality will save you lots of time over editing the code manually. In Live view, to select more than one cell, you have to use the enhanced table-editing function.Select the
tabletag selector.The Element Display appears focused on the
tableelement. To enable the special editing mode for tables, you must first click the sandwich icon in the Element Display.Click the sandwich icon
 .
.
When you click the icon, Dreamweaver enables an enhanced table-editing mode. Now you can select two or more cells, entire rows, or columns.
Click the second cell of the first row and drag to select the first row.
In the Property inspector, select the Header option to convert the table cells to header cells.
The whole first row is filled with blue as the table cells are converted to header cells.
Save all files.
Controlling table display
Unless you specify otherwise, empty table columns will divide the available space between them equally. But once you start adding content to the cells, all bets are off. Tables seem to get a mind of their own and divvy up the space in a different way. In most cases, they’ll award more space to columns that contain more data, but that’s not guaranteed to happen.
To provide the highest level of control, you’ll assign unique classes to the cells in each column. Creating them first makes it easier to assign them to the various elements later.
Choose favorite-styles.css. Create the following new selectors:
.date .event .location

Three new rules appear in the Selectors window but contain no styling information. Even without styling, the classes can be assigned to each column. Dreamweaver makes it easy to apply classes to an entire column.
Using the enhanced table-editing mode, position the cursor at the top of the first column of the table. Click to select the entire column.
NoteIf you have difficulty working with tables in Live view, you can perform all these actions in Design view.

The column borders turn blue, indicating that the column is selected.
Click to open the Class menu in the Property inspector.
A list of classes appears in alphabetical order. Since the Bootstrap style sheet is linked to this page, the list of selectors and classes will be very long.
Choose date from the list.
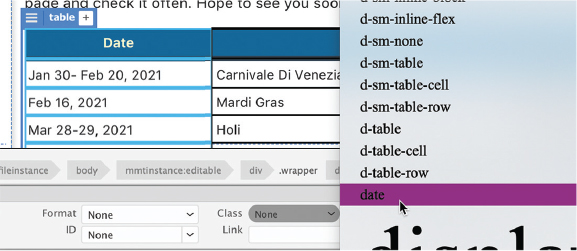
The cells in the first column should now have the class
.dateapplied to them. But after applying the class to the first column, you may notice that Dreamweaver has returned the table to normal mode again.Select the
tabletag selector. Click the sandwich icon in the Element Display. Apply the .eventclass to the second column.Repeat step 5 to apply the
.locationclass to the remaining column. NoteEven if you apply a width that’s too narrow for the existing content, by default a cell can’t be any smaller than the largest single word or graphic element contained within it.
Controlling the width of a column is quite simple. Since the entire column must be the same width, you can apply a width specification to only one cell. If cells in a column have conflicting specifications, typically the largest width wins. Since you just applied a class to each column, any settings added to the class will affect every cell in that column.
Add this property to the rule
.date: width: 25%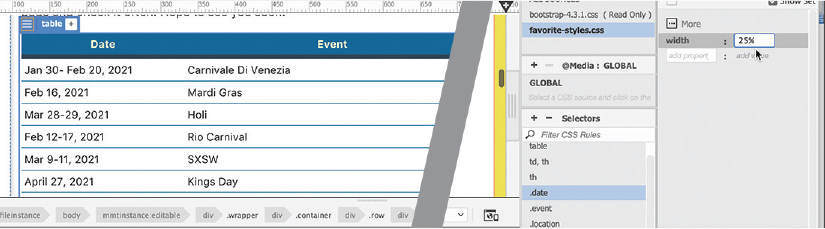
The Date column resizes. In this case, the parent of the Date column is the
<table>element itself. It will occupy 20 percent of the overall table width. In turn, the remaining columns automatically divvy up the space left over.Add the following property to the rule
.location: width: 30%The Location column resizes to a width of 30 percent of the entire table. Since the outer two columns have specific widths set, there’s no need to set the width of the Event column.
Save all files.
Now, if you want to control the styling of the columns individually, you have the ability to do so. Note that the tag selectors and the Element Display show the class names for each cell, such as th.location or td.location.
Inserting tables from other sources
In addition to creating tables by hand, you can also create them from data exported from databases and spreadsheets. In this exercise, you will create a table from data that was exported from Microsoft Excel to a comma-separated values (CSV) file. The import feature does not work in Live view.
Switch to Design view. Insert the cursor in the existing Events table. Select the
tabletag selector.Press the right arrow key.
In Design view, this technique moves the cursor after the closing
</table>tag within the code.Choose File > Import > Tabular Data.
The Import Tabular Data dialog appears.
Click the Browse button and select seminars.csv from the lesson08/resources folder. Click Open. Select Comma in the Delimiter menu, if necessary.
Enter the following values in the Import Tabular Data dialog: Table Width: 95% Border: 0

Although you set the width in the dialog, as you did for the Events table, remember that the table width will actually be controlled by the
tablerule created earlier. HTML attributes will be honored in browsers or devices that do not support CSS, although this is rare. Because this is the case, make sure that the HTML attributes you use don’t break the layout.Click OK.
A new table—containing a seminar schedule—appears below the first. Note that the first row of the table is a header row. In Design view you can select table rows and columns directly.
In the Seminars table, position the cursor near the left edge of the first row.
A black arrow should appear at the edge of the row. Depending on whether you are in Windows or macOS, the arrow may point right or down. It works the same way regardless of which direction it points. Note that the first row is highlighted with red borders.
Click to select the first row.
Click the Header option in the Property inspector.
The header cells now display in blue with white text. The new table is complete.
Semantically, the two tables do not relate to each other. Although human visitors may be able to distinguish where one table ends and another begins, adding a semantic structure to your content makes it easier for search engines and assistive devices to derive sense from the content. The tables should each be placed in their own separate HTML structures.
Creating semantic text structures
Adding semantic structures should be your goal whenever possible. This is encouraged not only to support accessibility standards but also to improve your SEO ranking. In this exercise, you will insert each table into its own <section> element.
In Design view, select the
tabletag selector for the Festivals table.Choose Insert > Section. Select Wrap Around Selection from the Insert menu. Click OK to insert the
<section>element.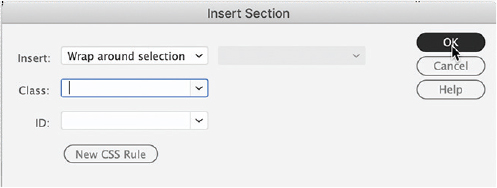
The Festivals table is inserted into a
<section>element. You should be able to see the new element in the tag selector interface. Now, let’s take care of the Seminars table.Select the
tabletag selector for the Seminars table.Choose Insert > Section. Select Wrap Around Selection from the Insert menu. Click OK to insert the
<section>element.Both tables are now in their own
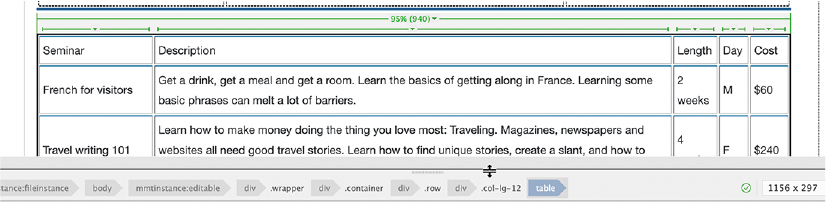
<section>elements.The Seminars table has two more columns than the Festivals table. The text is wrapping awkwardly in the last three columns. You will fix this display issue by creating some additional CSS classes.
In the CSS Designer, create a new selector: .cost Add the following properties:
width 10% text-align: center

In the Seminars table, select the Cost column. Apply the class .cost to the selection.

The Cost column widens noticeably. We can use the same specifications on the other two columns, but you’ll make custom rules for each one.
In CSS Designer, right-click the rule
.cost. Choose Copy All Styles from the context menu.Create a new selector: .length Right-click the new selector. Select Paste Styles from the context menu.
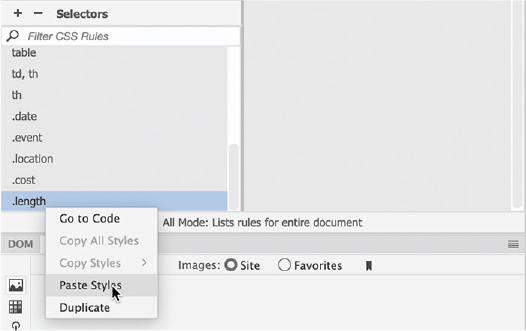
The new rule now has the same styling as the
.costrule.Repeat step 6 to apply the
lengthclass to the Length column in the Seminars table.Dreamweaver also provides an option for duplicating rules.
Right-click the rule
.length. Choose Duplicate from the context menu. Enter .day as the new selector.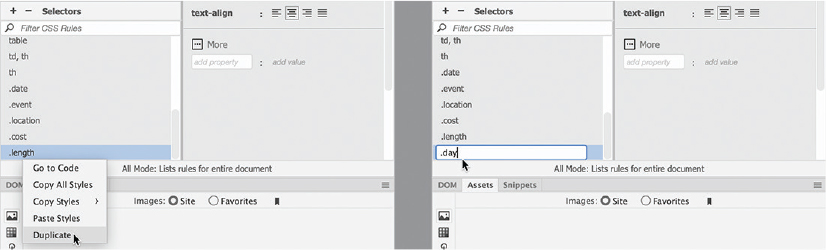
Apply the
.dayclass to the Day column in the Seminars table, as in step 9.By creating and applying custom classes to each column, you have the means to modify each column individually in the future. You need to make two more rules: one to format the Seminar column and the other to format the Description column.
Duplicate the rule
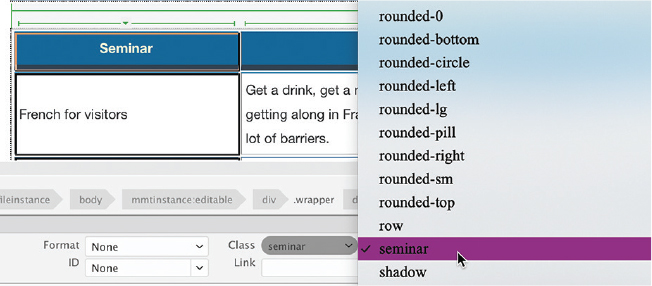
.date. Enter .seminar as the new rule name.Duplicate the rule
.event. Enter .description as the new name.At the moment, these rules have no styling properties assigned to them. But you can use them in the future to control all aspects of these columns.
Apply the .seminar class to the Seminar column. Apply the .description class to the Description column.
All columns in both tables now have custom CSS classes assigned to them.
Save all files.
Tables should have descriptive titles or captions that help visitors and search engines differentiate between them.
Adding and formatting caption elements
The two tables you inserted on the page contain different information but don’t feature any labels or titles. Let’s add a title to each. The <caption> element was designed to identify the content of HTML tables. This element is inserted as a child of the <table> element itself.
Open events.html in Live view, if necessary. Make sure the document window is at least 1200 pixels wide.
Insert the cursor in the Festivals table. Select the
tabletag selector.Note the color of the element display. If the border is blue, you can skip to step 4.
Click the Element Display.
The border of the Element Display changes to blue.
Switch to Code view.
By selecting the table first in Live view, Dreamweaver automatically highlights the code in Code view, making it easier to find.
Locate the opening
<table>tag. Insert the cursor directly after this tag. Press Enter/Return to insert a new line.Type <caption> or select it from the code-hinting menu when it appears.
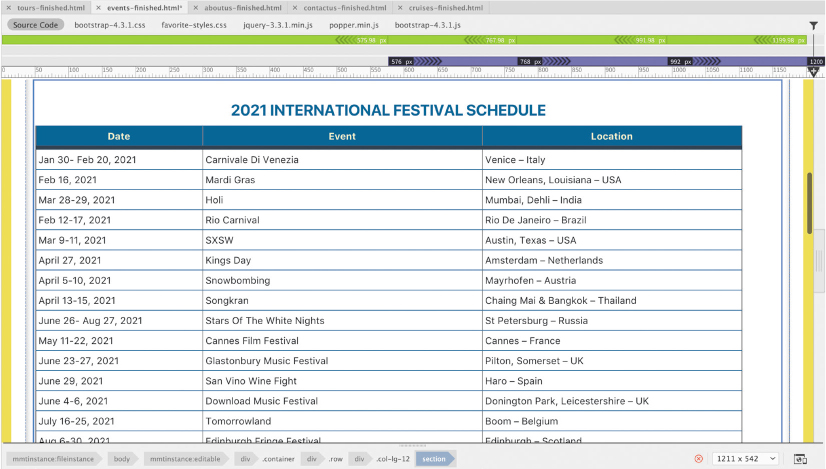
Type 2021 INTERNATIONAL FESTIVAL SCHEDULE and then type </ to close the element, if necessary.

Repeat steps 2 through 6 for the Seminars table. Type 2021 SEMINAR SCHEDULE and then type </ to close the element, if necessary.

Switch to Live view.
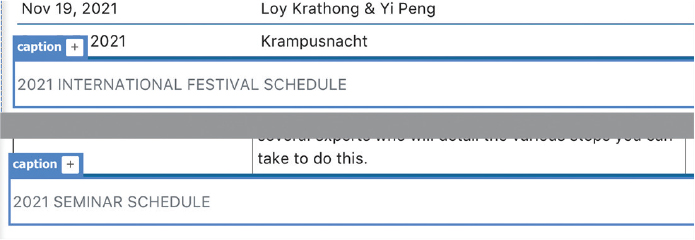
The default captions appear at the bottom of the tables and are relatively small and understated. The captions are lost amid the color and formatting of the table. Let’s beef them up a bit with their own custom CSS rule and move them up to the top of the tables.
Create a new selector: table caption
Create these properties for the rule
table caption:margin-top: 20px padding-bottom: 10px color: #069 font-size: 160% font-weight: bold line-height: 1.2 emtext-align: center caption-side: top

The captions now appear at the top of the tables, sufficiently large and impressive.
Save all files.
Formatting the tables and the captions with CSS has made them much easier to read and understand. Feel free to experiment with the size and placement of the captions and with the other specifications affecting the tables.
Spell-checking webpages
It’s important to ensure that the content you post to the web is error-free. Dreamweaver includes a robust spell-checker capable of identifying commonly misspelled words and of creating a custom dictionary for nonstandard terms that you might use on a regular basis.
Open contact-us.html, if necessary.
Switch to Design view. Insert the cursor at the beginning of the heading CONTACT FAVORITE CITY TOUR. Choose Tools > Spell Check.
NoteThe spell-checker runs only in Design view. If you are in Code view or Live view, the command will be grayed out.
The spell-checker starts wherever the cursor has been inserted. If the cursor is located lower on the page, you will have to restart the spell-checker at least once to examine the entire page. It also does not check content locked in noneditable template regions.
The Check Spelling dialog highlights the word Rendel, which is the CEO’s last name. You could click the option Add To Personal to insert the word into your custom dictionary, but for now you will skip over other occurrences of the name during this check.
Click Ignore All.
Dreamweaver’s spell-checker highlights Elaine’s name in her email address.
Click Ignore All again.
Dreamweaver highlights the domain for the email address [email protected].
Click Ignore All.
Dreamweaver highlights Lainey’s name. For real names in your own company or website, you may want to click the Add button to insert the names permanently into the dictionary.
Click Ignore All for Lainey and any other proper names.
Dreamweaver highlights the word busines, which is missing an s.
To correct the spelling, locate the correctly spelled word (business) in the Suggestions list and click Change.

Continue the spell-check to the end. Correct any misspelled words and ignore proper names, as necessary. If a dialog prompts you to start the check from the beginning, click Yes.
Dreamweaver will start spell-checking from the top of the file to catch any words it may have missed.
Click OK when the spell-check is complete. Save the file.
It’s important to point out that the spell-checker is designed to find only words that are spelled incorrectly. It will not find words that are used incorrectly. In those instances, nothing takes the place of a careful reading of the content.
Finding and replacing text
The ability to find and replace text is one of Dreamweaver’s most powerful features. Unlike other programs, Dreamweaver can find almost anything, anywhere in your site, including text, code, and any type of whitespace that can be created in the program. You can search the entire markup, or you can limit the search to the rendered text or to the underlying tags.
Advanced users can enlist powerful pattern-matching algorithms known as regular expressions to perform sophisticated find-and-replace operations. And then Dreamweaver takes it one step further by allowing you to replace the targeted text or code with similar amounts of text, code, and whitespace.
If you are a user of older versions of Dreamweaver, you will see some significant changes in the Find And Replace function.
In this exercise, you’ll learn some important techniques for using the Find And Replace feature.
Open events.html, if necessary.
There are several ways to identify the text or code you want to find. One way is to simply type it in the Find field. In the Events table, the word visitor was used. The word traveler was a better choice. Since visitor is an actual word, the spell-checker won’t flag it as an error and give you the opportunity to correct it. So you’ll use Find And Replace to make the change instead.
Switch to Code view, if necessary. Choose Find > Replace In Current Document.

The Find And Replace panel appears at the bottom of the document window. If you have not used the feature before, the Find field should be empty.
Type visitor in the Find field.
As you type, Dreamweaver finds the first occurrence of visitor and indicates how many matches it has found in the document.
Type traveler in the Replace field.

Click Replace.
Dreamweaver replaces the first instance of visitor and immediately searches for the next instance. You can continue to replace the words one at a time, or you can choose to replace all occurrences.
Click Replace All.

When you click Replace All, the Search Report panel expands to list all the changes made.
Right-click the Search Report tab and select Close Tab Group from the context menu. Click the Close icon
 on the Find panel to recover the screen space.
Another method for targeting text and code is to select it before activating the command. This method can be used in either Design or Code view.
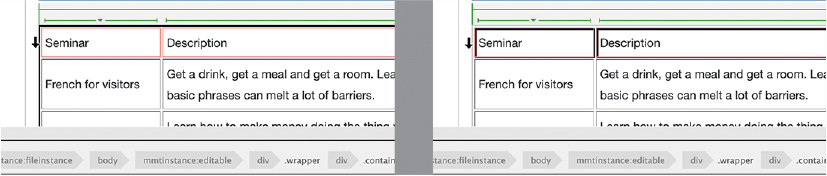
In Code view, locate and select the code
<div class="wrapper">, around line 105.Superpowerfindelicious!
Find And Replace is one of the most powerful features in the program. It allows you to target, or limit, the search to the source code, to text only, to be based on case, and to whole words, and it gives you the ability to use regular expressions and to ignore whitespace. I could write an entire book on all the ways you could use this feature.
Press Ctrl+F/Cmd+F.
NoteThe Find And Replace panel typically appears with the Replace function hidden.
The Find And Replace panel appears. The selected text is automatically entered into the Find field by Dreamweaver. This technique will work with small snippets of text or code. With the text selected like this, Dreamweaver will find the occurrence of this code element in the current file. But we want to find it throughout the entire site.
Choose Find > Find And Replace In Files.
TipIn the Find And Replace dialog, the Basic tab should be displayed by default; if not, go ahead and click it.

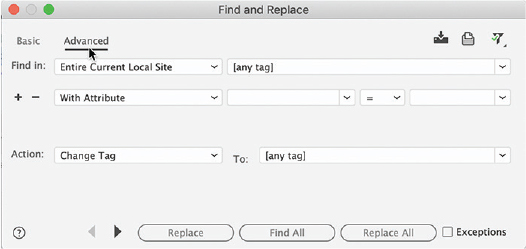
The Find And Replace dialog appears. The selected code is automatically added to the search field. Note that the Find In field should be targeting Entire Current Local Site.
Click Find All.

The Search panel appears, displaying all instances of the selected code within the site. The selected
<div>element contains all the primary content of the site. Semantically, the page structure should use the<main>element instead. But we cannot just change the opening tag. We need to change both the opening and closing tags.Choose Find > Find And Replace In Files again.
The Find And Replace dialog appears. The code
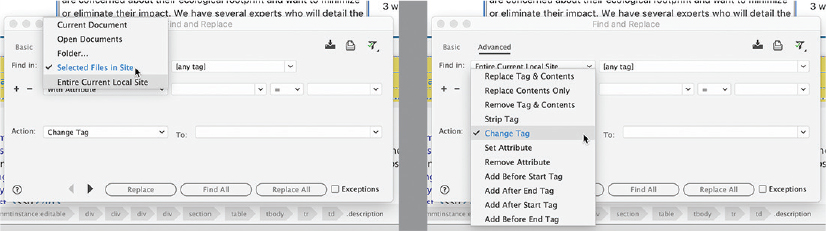
<div class="wrapper">appears in the search field. Dreamweaver has identified all instances of the tag we need to change, but if you tried to replace the tag now it would simply swap out the opening tag. Instead, we need to use the advanced features of the dialog.Click the Advanced tab in the Find And Replace dialog.
Dreamweaver may automatically populate the attribute field with the
wrapperclass name. It’s a good idea to target the exact tag whenever possible.In the Find In field, select
divfrom the drop-down menu on the right. If necessary, selectWith Attributeandclassfrom the appropriate drop-down menus. Enter wrapper in the class drop-down menu.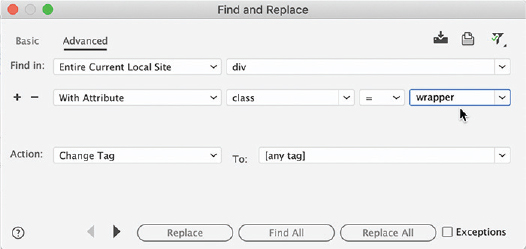
Next you can target the tag you want to end up with.
In the Action field, choose
Change Tag, if necessary. Choosemainfrom the To drop-down menu.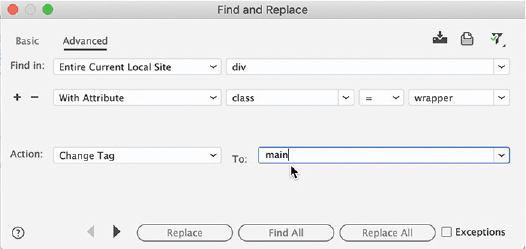
Click Replace All.

An unnamed dialog appears, reporting that the replace operation cannot be undone in any closed documents.
Click Yes.

The Search Results panel displays the list of elements replaced in the site. It should show five pages in the list. The
<div class="wrapper">element is replaced, in all the documents where it was found, with<main class="wrapper">.Right-click the Search Results tab and select Close Tab Group from the context menu.
When searching for text and code, you have seen that you can enter text into the search field and select text prior to activating the Find command. Unfortunately, there’s a limit to the amount of text Dreamweaver will add to the field automatically. For larger blocks of text and code, Dreamweaver also allows you to copy and paste into the search field.
In Code view, insert the cursor in the Seminars table. Select the
tabletag selector.The entire
<table>element is selected, which represents nearly 100 lines of code.Press Ctrl+C/Cmd+C to copy the selected code.

The Search panel appears, but notice that the Find field is empty. The selected code is just too much for the automatic feature. This is where copy and paste comes in handy.
Press Ctrl+F/Cmd+F.
Insert the cursor in the Find field. Press Ctrl+V/Cmd+V to paste the selected code.

The entire markup of the table appears in the Find field. But this power is not limited to the Find field.
Click to expand the Find panel to show the Replace field.
Insert the cursor in the Replace field. Press Ctrl+V/Cmd+V, or right-click in the field and choose Paste from the context menu, to paste the code.
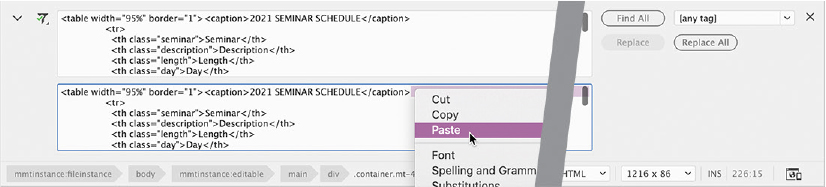
The entire table markup appears in the Replace field. As you can see, Find And Replace enables you to search for almost any type of markup or content and replace it wherever it appears in the site.
If necessary, close the Find And Replace panel. Save all files.
In this lesson, you created four new pages and learned how to import text and data from multiple sources. You formatted text as headings and lists, and then styled it using CSS. You inserted and formatted two tables and added captions to both. And you reviewed and corrected text and code elements using Dreamweaver’s spell-checker and Find And Replace tools.
Review questions
1. Explain how to turn paragraph text into an ordered or unordered list.
2. Describe two methods for inserting HTML tables into a webpage.
3. What element controls the width of a table column?
4. What items will not be found by Dreamweaver’s spell-checker?
5. Describe three different ways to insert content in the Find field.
Review answers
1. To create an ordered or unordered list, highlight the text with the cursor and click the Ordered List or Unordered List button, respectively, in the Property inspector.
2. You can copy and paste a table from another HTML file or from a compatible program. Or you can insert a table by importing the data from a delimited file.
3. The width of a table column is controlled by the widest <th> or <td> element that creates the individual table cell within the specific column.
4. The spell-checker finds only words that are spelled incorrectly, not those that are used incorrectly.
5. You can type text into the Find field, you can select text before you open the panel and then allow Dreamweaver to insert the selected text, or you can copy the text or code and then paste it into the field.