Lesson 5. Graphics
You can draw or import graphics to add graphic interest to a page design or to illustrate your document. You can also specify graphic properties such as fill pattern, pen pattern, line width, and color, and you can resize, reshape, rotate, and rearrange graphics.
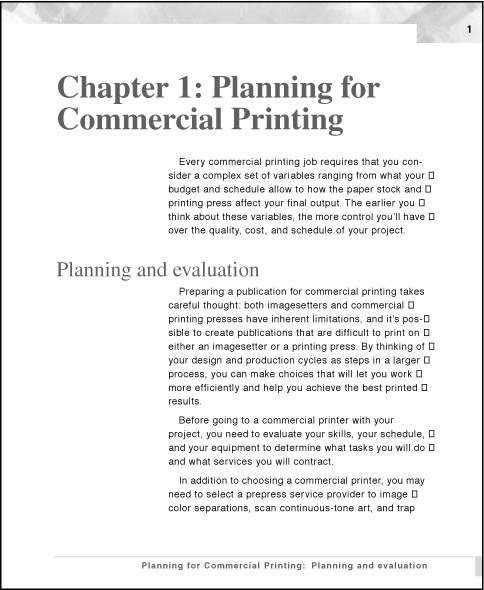
In this lesson, you’ll add master page graphics to complete the page design of the sample chapter you’ve been working on. You’ll import one graphic and draw the rest. When you’re finished, the graphics you add to the master pages will appear on each body page.
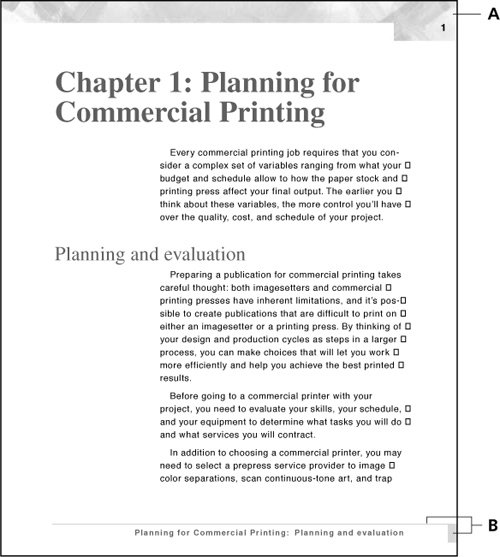
A. Imported graphic B. Drawn graphics
You’ll learn how to do the following:
• Adjust frames for graphics.
• Import a graphic.
• Mask part of an imported graphic.
• Draw lines and rectangles.
• Change drawing and graphic properties.
• Move, resize, align, distribute, and group graphic objects.
Adjusting header and footer frames for graphics
Before adding graphics to them, you’ll reposition the header and footer frames on each master page.
1. If necessary, copy the Lesson05 folder from the FrameMaker 7.0 Classroom in a Book CD and start FrameMaker 7.0.
2. If FrameMaker 7.0 is not in standard mode, choose File > Preferences > General, and then select FrameMaker from the Product Interface pop-up menu.
3. Open Graphics.fm in the Lesson05 folder.
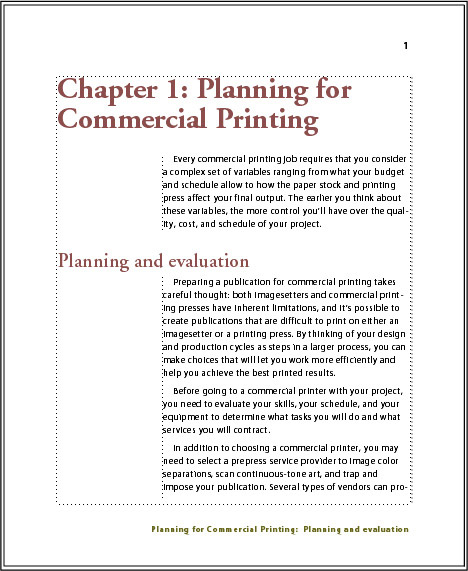
4. Choose File > Save As, enter the filename Graphics1.fm, and click Save.
The Graphics1.fm file uses the page design you created in the previous lesson. It also contains definitions for two additional colors (FooterColor and PageRule). One of these colors has already been applied to the page footers.
The document is set to 100% zoom. Don’t change it for now. If the header and footer appear as gray bars rather than as text, don’t worry. The text is just greeked —that is, it’s represented by a substitute for the real text at this magnification. You’ll zoom in later.
In this lesson, the graphics are added to background frames on master pages, which determine their fixed position and appearance on body pages. Lesson 9 provides information on placing graphics in anchored or unanchored frames directly on body pages.
Changing the Right master page
The header and footer text frames on the master pages were positioned automatically by FrameMaker 7.0 when the document was created. You’ll reposition the header and footer on the Right master page.
First you’ll move the page header closer to the edge of the page. You’ll use the rulers at the top and left side of the document window to help you position the header text frame. The ruler markings are in picas. (Six picas equal one inch or 12 points. There are 72 points in an inch.)
1. Choose View > Master Pages. FrameMaker 7.0 displays the master page of the body page you were on. In this case, the Right master page is displayed.
Before you reposition objects, you’ll make sure that the snap grid is on. (Objects snap to the grid as you drag or resize them.)
2. Click the Graphics menu and choose Snap, if it is not already turned on. A check mark or filled-in check box next to the Snap menu item indicates the Snap command is on.
3. Do one of the following to select the header text frame:
• (Windows and UNIX) Control-click the header text frame.
• (Mac OS) Option-click the header text frame.
Handles appear around the header text frame.

4. Place the pointer inside the header text frame (not on a handle). The pointer changes to a hollow arrow.

5. Shift-drag the header text frame to the right until the right edge of the text frame is at the 36-pica mark on the top ruler. Holding down Shift as you drag constrains the movement to horizontal or vertical.
Vertical lines appear below the ruler as you drag, to indicate the left side, center, and right side of the frame.

The header text frame still needs to move a little more to the right, so you’ll adjust its position slightly.
6. Do one of the following to move the header text frame four points to the right:
• (Windows) Press Alt-Right Arrow four times (using the arrow key to the left of the numeric keypad).
• (Mac OS) Press Option-Right Arrow four times.
• (UNIX) Press Control-Right Arrow four times.
Next you’ll move the header text frame closer to the top of the page.
7. With the header text frame still selected, Shift-drag it upward until the top of the text frame is 2 picas below the top of the page. Here you can use the horizontal lines next to the ruler to line up the frame as you drag it.

8. Click in the page margin to deselect the header text frame.
Finally, you’ll reposition the footer text frame.
9. If necessary, scroll down until you see the footer text frame.
10. Do one of the following to select the footer text frame:
• (Windows and UNIX) Control-click the footer text frame.
• (Mac OS) Option-click the footer text frame.

You’ll move the footer text frame a total of 12 points, so you’ll use a key combination that moves the text frame 6 points at a time.
11. Do one of the following to move the footer text frame down 12 points:
• (Windows) Press Alt-Shift-Down Arrow twice (using the arrow key to the left of the numeric keypad).
• (Mac OS) Press Option-Shift-Down Arrow twice.
• (UNIX) Press Control-Shift-Down Arrow twice.
12. Save the document.
![]() The actual distance moved depends on the current zoom setting, so that you can do finer work when you’re zoomed in closer. For example, at 200% magnification, using the keyboard shortcut moves an object 6 points. At 100% magnification, the object would move 12 points. And at 50% zoom, the object would move 24 points.
The actual distance moved depends on the current zoom setting, so that you can do finer work when you’re zoomed in closer. For example, at 200% magnification, using the keyboard shortcut moves an object 6 points. At 100% magnification, the object would move 12 points. And at 50% zoom, the object would move 24 points.
Changing the Left master page
Now you’ll reposition the header and footer text frames on the Left master page to make the left and right pages symmetrical.
1. Click the Previous Page button (![]() ) in the status bar to display the Left master page.
) in the status bar to display the Left master page.
![]()
2. Do one of the following to select the header text frame:
• (Windows and UNIX) Control-click the header text frame.
• (Mac OS) Option-click the header text frame.
3. Shift-drag the header text frame to the left until the left edge of the frame is at the 2-pica mark on the top ruler.

4. With the header text frame still selected, Shift-drag it upward until the top of the frame is 2 picas below the top of the page.

5. Click in the page margin to deselect the header text frame.
6. Select the footer text frame, scrolling down the page if necessary.
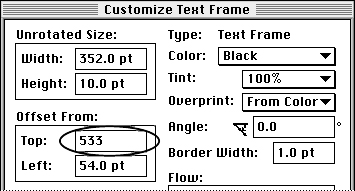
You could use the arrow keys to move the footer text frame as you did on the Right master page. This time, though, you’ll use a dialog box to position it.
7. Choose Graphics > Object Properties.
8. In the Offset From area, change the Top offset to 533 and click Set.
9. Save the document.
Importing a graphic
The page design used with this document calls for a graphic to appear at the top of each page. The graphic was created in another application and saved in TIFF format. You’ll import the graphic and position it on the page.
Two ways to import graphics
There are two ways to import a graphic: by copying it into the document or by creating a reference to it.
When you import a graphic by copying, a copy of the original graphic is stored in the document. There are two advantages to this method:
• If you move the document—for example, to bring it to a print shop—the graphics are already contained in the document.
• You don’t have to depend on the original graphic file. The original graphic can be changed, moved to a different directory, or deleted without affecting the copies in your document.
When you import by reference, the graphic file isn’t stored in the document. Instead, the document contains a pointer to the original graphic file. There are two advantages to this method:
• When you import by reference, the document doesn’t contain any image; instead, it contains only a pointer to the stored graphic file on the disk. This can greatly reduce the size of a file. (If you import by copying on both the Left and Right master pages, the document contains the same image twice, increasing the file size.)
• When you import by reference, the graphic in the document will be updated automatically whenever the stored graphics file is changed. (If you import by copying and then change the graphic file, you need to reimport the graphic to update the image stored in the document.)
In this lesson, you’ll import the graphic by reference.
1. If necessary, scroll up until you see the top of the Left master page.
2. Click in the page margin to make sure that nothing is selected on the page and that there’s no insertion point.
3. Choose File > Import > File.
4. Open the Art folder in the Lesson05 folder.
5. Select Import by Reference, then select Banner.tif in the scroll list.
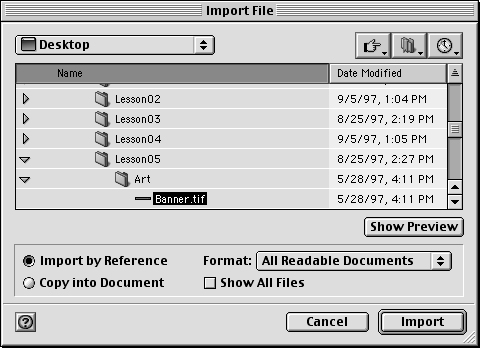
6. Click Import. The Imported Graphic Scaling dialog box appears.
7. Select 72 dpi (dots per inch) to set the scaling for the graphic, and click Set.
![]() The best printed results are obtained if you choose a dpi value that divides evenly (or with a small remainder) into the resolution of your printer. The best screen representations are achieved with a dpi value that divides evenly into your monitor’s screen resolution.
The best printed results are obtained if you choose a dpi value that divides evenly (or with a small remainder) into the resolution of your printer. The best screen representations are achieved with a dpi value that divides evenly into your monitor’s screen resolution.
The graphic is centered on the page.
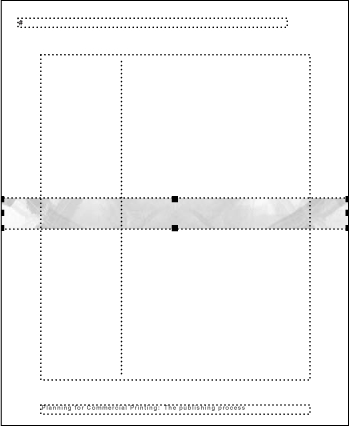
If the graphic is cropped by a text frame, appears in an anchored frame, or doesn’t appear at all, you probably had an insertion point when you chose File > Import > File. Choose Edit > Undo, click outside the text frames, and try again.
Next, you’ll reposition the graphic at the top of the page.
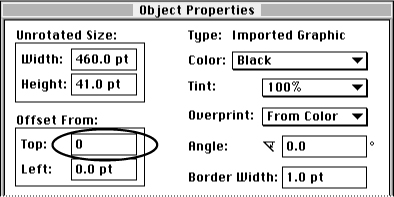
8. With the graphic still selected, choose Graphics > Object Properties.
9. In the Offset From area, change the Top offset to 0 (zero) and click Set. The graphic moves to the top of the page.
10. Save the document.
Masking part of a graphic
Next, you’ll mask part of the graphic at the top of the page by placing a white rectangle over part of the graphic.

A. Imported graphic B. White rectangle masking part of graphic
First you’ll draw the rectangle.
1. At the right side of the document window, click the Tools button (![]() ) to display the Tools palette.
) to display the Tools palette.

The Tools palette contains the following items:
• Selection tools that control how you select text and objects.
• Drawing tools for drawing various objects.
• Pop-up menus for changing an object’s drawing properties.
![]()
2. Click the rectangle tool (![]() ) on the Tools palette.
) on the Tools palette.
3. Click the Fill pop-up menu and choose White.
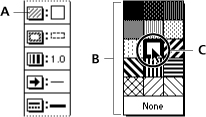
A. Fill pop-up menu button B. Fill pop-up menu C. Selected fill
4. Click the Pen pop-up menu and choose Solid.
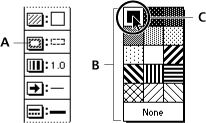
A. Pen pop-up menu button B. Pen pop-up menu C. Selected fill
You’ll change the pen pattern to white later, but for now it’s handy to be able to see the rectangle’s border.
5. Move the pointer to the document window. The pointer changes to a cross hair (+).
6. Drag from the left side of the document window to draw a rectangle 396 points wide and 18 points high. The width and height appear in the status bar as you drag. (If you don’t get it exactly the right size by dragging, in the next steps you’ll have a chance to enter the specific width and height in a dialog box.)

Now you’ll position the rectangle.
7. With the rectangle still selected, choose Graphics > Object Properties.
8. In the Offset From area, change the Top offset to 24 and the Left offset to 64. (If you didn’t get the width and height you wanted by dragging, change the Width to 396 and the Height to 18 in the Offset From area.) Click Set.
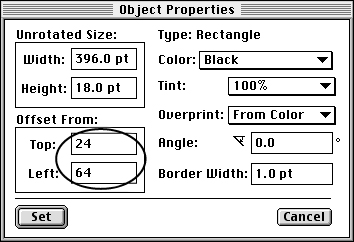
9. On the Tools palette, choose White from the Pen pop-up menu. The rectangle remains selected, but its border disappears.

Last, you’ll group the imported graphic and the rectangle, so you can manipulate them as a single object.
10. With the rectangle still selected, Shift-click the imported graphic to add it to the selection. Handles now appear around both the rectangle and the imported graphic.

11. Choose Graphics > Group. One set of handles now appears around the grouped set of objects.

![]() It’s a good habit to group graphic objects that you want to treat as a single object. This ensures that moving and copying will be consistent.
It’s a good habit to group graphic objects that you want to treat as a single object. This ensures that moving and copying will be consistent.
12. Save the document.
Copying the graphics
You’ll use the same graphic at the top of every page, so you’ll copy the grouped graphics to the Right master page. However, you’ll flip the graphic for a symmetrical look.
1. With the grouped objects still selected, choose Edit > Copy.
2. Click the Next Page button (![]() ) in the status bar to display the Right master page. Don’t click anywhere on the page, because if you click inside a text frame, the graphic will be pasted inside the frame instead of at the top of the page.
) in the status bar to display the Right master page. Don’t click anywhere on the page, because if you click inside a text frame, the graphic will be pasted inside the frame instead of at the top of the page.
3. Choose Edit > Paste. The graphic appears at the top of the page, in the same position as on the Left master page.

The page header disappeared, because the graphic was pasted in front of the header text frame.
4. With the graphic still selected, choose Graphics > Send to Back. The header text frame reappears.

To make the notch in the graphic (created by the white rectangle you drew in the previous section) appear on the left, you’ll flip the graphic.
5. With the graphic still selected, choose Graphics > Flip Left/Right.

6. If you want, choose View > Body Pages to display the first page of the document, and then scroll through the document to see the modified headers and footers. When you’re finished, choose View > Master Pages and make sure the Right master page is displayed.
7. Save the document.
Drawing lines and rectangles
The last part of the page design involves creating a line and a rectangle that will appear at the bottom of each page.

A. Line B. Rectangle
Because the Snap grid is on and is set to 6 points, when you draw an object, it will “jump” in size in 6-point increments. For finer control, you’ll turn off the Snap command now.
1. Choose Graphics > Snap to turn off Snap.
Now you’ll draw the line.
2. If necessary, scroll down until you can see the footer on the Right master page.

3. Click the line tool (![]() ) on the Tools palette.
) on the Tools palette.
4. Choose Solid from the Pen pop-up menu.
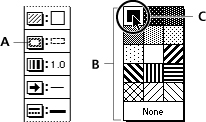
A. Pen pop-up menu button B. Pen pop-up menu C. Selected fill
5. Choose the second line width from the Line Width pop-up menu.
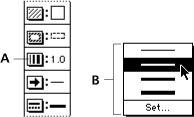
A. Line Width pop-up menu button B. Line Width pop-up menu
The default value for the second line width is 1.0 point.
If the line is thicker than 1 point, choose Set on the Line Width pop-up menu, click Get Defaults, and choose the second line width from the Line Width pop-up menu again.
6. On the Tools palette, make sure that the line end is set to no arrows, the line style is set to solid, the color is set to PageRule, and the tint is set to 100%.
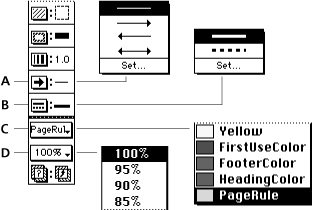
A. Line end: no arrows B. Line style: solid C. Color: PageRule D. Tint: 100%
7. Move the pointer to the document window. The pointer changes to a cross hair (+).
8. Shift-drag from just above the left side of the page footer to draw a horizontal line that extends to the right edge of the page. (Don’t drag beyond the edge of the page.)

The line appears a few points above the text frame.
9. If you want to adjust the vertical position of the line, do one of the following to move the line 1 point at a time:
• (Windows) Press Alt+Up Arrow or Alt+Down Arrow (using the arrow keys to the left of the numeric keypad).
• (Mac OS) Press Option+Up Arrow or Option+Down Arrow.
• (UNIX) Press Control+Up Arrow or Control+Down Arrow.
![]() You can set drawing properties before you draw the object or select the object after it is drawn and change its properties. Whatever property you select remains the current property until you change it.
You can set drawing properties before you draw the object or select the object after it is drawn and change its properties. Whatever property you select remains the current property until you change it.
Now you’ll draw the rectangle.
10. Click the rectangle tool (![]() ) on the Tools palette.
) on the Tools palette.
11. Choose Solid from the Fill pop-up menu.
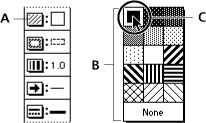
A. Fill pop-up menu button B. Fill pop-up menu C. Selected fill
12. In the document window, drag to draw a rectangle below the right side of the horizontal line. The rectangle should be approximately 8 points wide and 18 points high. (The dimensions appear in the status bar as you drag.) Don’t worry about the exact placement of the rectangle. You’ll fix that next.

13. Close the Tools palette.
Aligning and distributing objects
You have the graphics you need (the line and the rectangle), and the line is in the position you want. Now you need to place the rectangle correctly in relation to the line. FrameMaker 7.0 provides two commands, Align and Distribute, that change the positions of objects with respect to each other. You’ll use these commands now.
1. With the small rectangle you created in the previous section still selected, Shift-click the horizontal line to add it to the selection.

Rectangle and line selected
2. Choose Graphics > Align.
You’ll align the right sides of the rectangle and line.
3. In the Top/Bottom area, select As Is to leave the vertical alignment unchanged.
4. In the Left/Right area, select Right Sides and click Align.
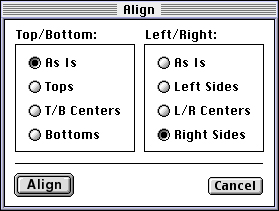
The right side of the rectangle is aligned with the right endpoint of the line. (The last object selected—the line—doesn’t move. Other selected objects—in this case, the rectangle—move until the objects are aligned with the last-selected object.)
5. Make sure the rectangle and line are both selected, choose Graphics > Distribute.
6. In the Horizontal Spacing area, select As Is, so that you don’t change the horizontal spacing.
7. In the Vertical Spacing area, select Edge Gap and make sure the edge gap is set to 0.
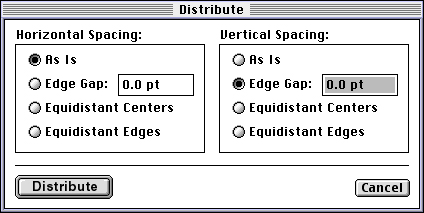
8. Click Distribute. The rectangle moves up until it touches the line (that is, the gap between them is 0).

9. Choose Graphics > Group to group the two objects. A single set of handles appears around the grouped set of objects.
10. Save the document.
Copying the graphics
To complete the page design, you’ll copy the line and rectangle to the Left master page.
1. With the grouped objects still selected, choose Edit > Copy.
2. Click the Previous Page button (![]() ) in the status bar to display the Left master page. As before, don’t click anywhere on the page. (If you click inside a text frame, the graphic will be pasted inside the frame instead of at the bottom of the page.)
) in the status bar to display the Left master page. As before, don’t click anywhere on the page. (If you click inside a text frame, the graphic will be pasted inside the frame instead of at the bottom of the page.)
3. Choose Edit > Paste. The graphic appears at the bottom of the page, in the same position as on the Right master page.

Next, you’ll flip and move the graphic to position it correctly.
4. With the grouped objects still selected, choose Graphics > Flip Left/Right.

5. Choose Graphics > Object Properties.
6. In the Offset From area, change the Left offset to 0 and click Set.
The page design is finished.
7. If the header and footer appear as gray bars rather than as text, click the Zoom In button (![]() ) in the status bar until the header and footer appear as text.
) in the status bar until the header and footer appear as text.
8. Choose View > Body Pages to display the first page of the document, and then scroll through the document to see the modified page design.
9. Save and close Graphics1.fm.
Moving on
You’ve completed this lesson. For in-depth information about graphics, see Chapter 9, “Graphics,” chapter 10, “Anchored Frames,” and Chapter 18, “Importing, Linking, and Exporting,” in the Adobe FrameMaker 7.0 User Guide.
Review questions
1. How large is a point? A pica?
2. What does the Snap command do?
3. What is the difference between importing a graphic by copying it into the document and importing a graphic by reference?
4. Name an advantage of each method.
5. What is the function of the Tools palette?
6. What does the Group command do?
Answers
1. There are 72 points—or 6 picas—in an inch. There are 12 points in a pica.
2. The Snap command makes objects snap to an invisible grid as you draw, drag, or resize them.
3. Importing a copy of a graphic places a copy of the original graphic into the document. Importing a graphic by reference links the document to the original graphic.
4. When you import a graphic by copying, you can move the document without regard to the original source graphic. You can also modify, move, or delete the original graphic without affecting the copy in the document. When you import by reference, you can greatly reduce the document’s file size compared to importing the graphic by copying. Importing by reference also updates the graphics in the document whenever the original graphics are updated.
5. The Tools palette contains selection tools that control how you select text and objects, drawing tools for drawing various objects, and pop-up menus for changing an object’s properties.
6. The Group command groups two or more objects into a single object. This makes it easier to move, modify, and copy the objects together.
