
In this lesson, you’ll learn how to do the following:
Use Adobe Bridge to add metadata and keywords.
Search across a collection of files with Bridge.
Label, rank, and sort images in Bridge.
Enhance images for analysis and presentation.
Create a custom dashed-line border.
Use the Measurement tool.
Record measurement data in the Measurement Log panel.
Export spreadsheet data from the Measurement Log panel.
Measure in perspective using the Vanishing Point feature.
Animate a presentation.
This lesson will take about 90 minutes to complete. Copy the Lesson13 folder onto your hard drive if you have not already done so. As you work on this lesson, you’ll preserve the start files. If you need to restore the start files, copy them again from the Adobe Photoshop CS4 Classroom in a Book CD.
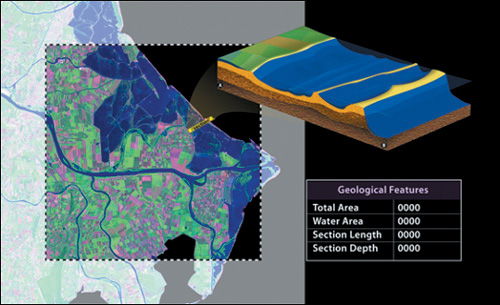
Many professionals use Photoshop for highly technical, precise work. In this lesson, you will assemble an informational graphic on water levels and land masses using graphics provided by the U.S. Geological Survey. You will learn how Bridge is a valuable tool for organizing and identifying images as well as creating a presentation.
Start Photoshop and then immediately hold down Ctrl+Alt+Shift (Windows) or Command+Option+Shift (Mac OS) to restore the default preferences. (See “Restoring default preferences” on page 4.)
When prompted, click Yes to confirm that you want to reset preferences.
Choose File > Browse In Bridge to open Adobe Bridge.
In this lesson, you’ll work with very large files, selecting only the area you need to make measurements and comparisons of data. You’ll learn that working with very large files in Photoshop is really no different than editing other, smaller images.
This lesson also introduces you to Photoshop Extended, a version of Photoshop CS4 that includes all the features in the standard edition of Photoshop, plus functions for specialized markets—technical image analysis, film and video work, and three-dimensional design. Some exercises in this lesson require Photoshop Extended measurement and data analysis tools. If you don’t have Photoshop Extended, you can complete this lesson up to “Measuring objects and data,”, and then read through the remaining lesson or skip to the review questions.
As you’ve seen in previous lessons, Adobe Bridge helps you navigate your image files and folders. But Bridge is much more than a navigator. A cross-platform application included with Adobe Creative Suite components, Bridge also helps you organize and browse the assets you need to create print, web, video, and audio content. You can start Bridge from any Creative Suite component (except Adobe Acrobat), and use it to access both Adobe and non-Adobe assets.
You’ll try out some of these management capabilities as you explore and customize the Bridge browser window. You’ll also organize map sections for use in your infographics project.
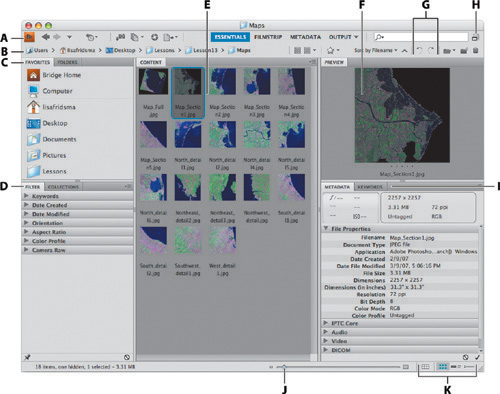
The panels in Adobe Bridge help you navigate, preview, search, and manage information for your image files and folders. The ideal arrangement and relative sizes of items and areas of Bridge depend on your work style and preferences. Depending on the tasks you’re doing, it may be important to see which images are in a file; at other times, viewing information about the file may take priority. You can customize Bridge to increase your efficiency in these different situations.
In this procedure, you’ll try out some of the custom views you can use in Adobe Bridge. The following figure shows the default configuration of Adobe Bridge areas, although you won’t see these particular thumbnails on your screen yet.
In the upper-left corner of the Bridge browser window, click the Folders tab, and navigate to the Lessons/Lesson13/Maps folder that you copied to your hard disk from the Adobe Photoshop CS4 Classroom in a Book CD. To navigate, either click the arrows to open nested folders or double-click the folder icons in the Folders panel.
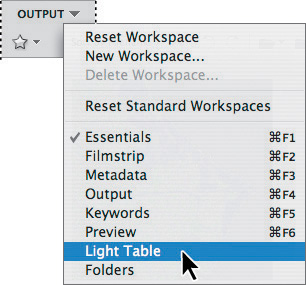
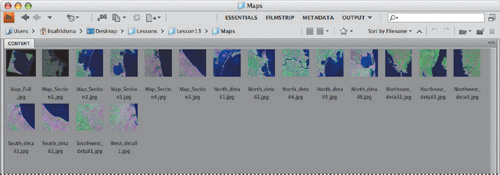
In the upper-right corner of the Bridge window, click the arrow to expand the Workspace pop-up menu, and choose Light Table.
Bridge displays only the Content panel, with thumbnails of the images in the Maps folder.
At the top of the Bridge window, click Essentials. Bridge returns to the original workspace.
The Bridge Preview panel updates interactively, showing you thumbnail previews of selected asset files. Adobe Bridge displays previews of image files such as those in PSD, TIFF, and JPEG formats as well as Adobe Illustrator vector files, multipage Adobe PDF files, and Microsoft Office documents.
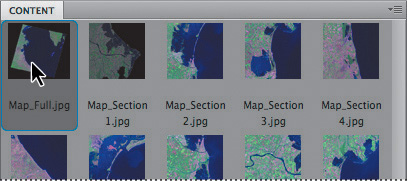
In the Content panel, select the Map_Full.jpg thumbnail.
This is one of a series of aerial photographs taken of the northeastern coast of Italy, near Venice. Other images show section details from this map.
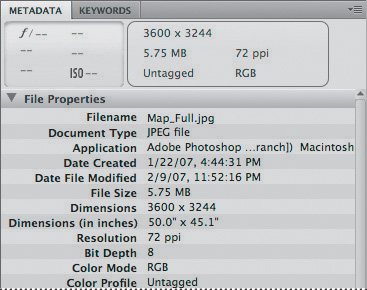
On the right side of the browser window, review the information at the top of the Metadata panel, including the image file size and resolution.
In the Metadata panel, review the contents of the File Properties area. It displays additional information about the image, including the file type, date it was created and modified, dimensions, bit depth, and color mode.
This 3600-x-3244-pixel image is relatively compact in file size (5.75 MB), but physically very large: the image measures 50 inches by 45.1 inches. You’ll see how easily you can work with very large images using the precision tools in Photoshop.
At the bottom right of the Bridge window, drag the thumbnail slider to the right to enlarge the thumbnail previews. Enlarging the preview acts as a loupe, letting you zoom in on an image and inspect it more closely. Drag the slider to the left to reduce the size of the thumbnails.
Select different workspaces using the workspace buttons at the top of the Bridge window (such as Essentials and Filmstrip) and the Workspace pop-up menu. Each workspace emphasizes different information, such as the Metadata panel or the Preview panel, so that you can easily access the information you need for a particular task.
Click the Essentials button at the top of the Bridge window to return to the default workspace.

Tip
In Bridge CS4, you can quickly search your entire computer for specific files. Enter a keyword or file name in the search box in the upper-right corner of the Bridge window.
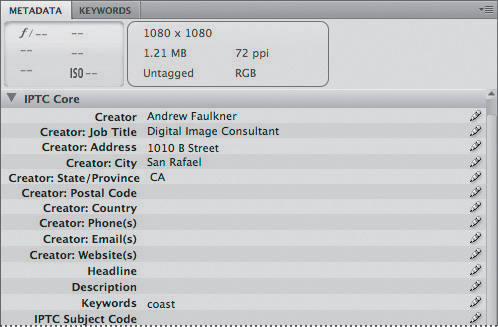
You can quickly see file information in one of several ways: by keywords, by filtered information, or by metadata. Now you will look more closely at the metadata information. Metadata is a set of standardized information about a file, such as author name, resolution, color space, copyright, and keywords applied to it. You can use metadata to streamline your workflow and organize your files.
Make sure that you’re using the Essentials workspace.
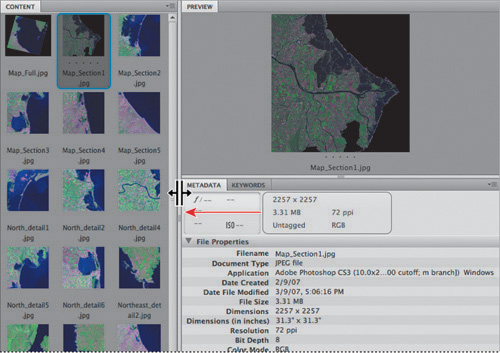
In the Content panel, select the Map_Section1.jpg thumbnail.
Drag the right panel’s splitter bar to the left, to expand the Preview and Metadata panels.
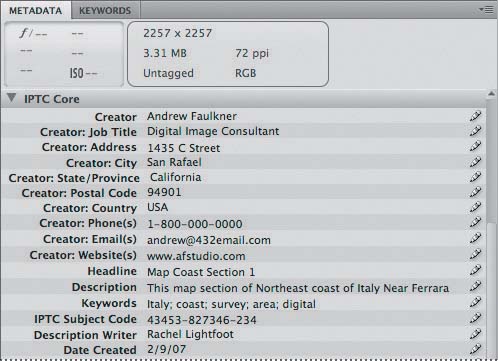
In the Metadata panel, click the triangle (
 ) next to the IPTC Core heading to expand it, if it isn’t already expanded.
The information in the Metadata panel is nested under headings that you can expand or collapse. In Bridge, you can directly edit only some of the IPTC metadata.
Review the information under the IPTC Core heading. Information has been entered about the file, including the file creator’s name and address, a description of the image, and keywords. Pencil icons (
 ) appear on the right side of items that you can edit.
Now you’ll add some metadata to a different image.
In the Content panel, select the Map_Section3.jpg thumbnail. You may have to scroll down to see it.
In the IPTC Core area of the Metadata panel, click the pencil icon (
) next to the first field, named Creator. White fields appear, indicating that you can enter information.For Creator, type your name. Then enter information in the following fields, pressing Tab to advance to the next text box:
For Job Title, type your professional title.
For Address, type your address.
For Keywords, type coast.
Click the Apply button (
 ) at the bottom of the Metadata panel to apply the changes you made.
You’ll search for other images containing the same keyword.
Drag the splitter bar to the right to restore the size of the Metadata and Preview panels.
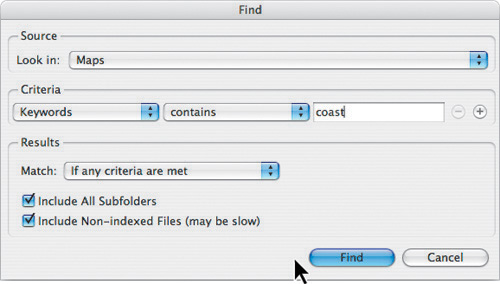
To search all images with the keyword “coast,” choose Edit > Find. In the Find dialog box, choose Maps from the Look In pop-up menu. Then, in the Criteria area, choose Keywords from the first pop-up menu, Contains from the second pop-up menu, and type coast in the text box. Leave the other settings unchanged, and click Find.
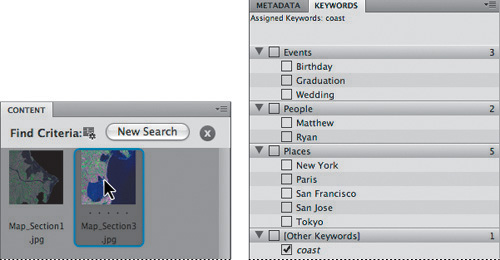
Two images with the keyword “coast” appear in the Content panel.
On the right side of the Bridge window, click the Keywords tab to show the Keywords panel. Then click an image in the Content panel to display the keywords assigned to it in the Keywords panel.

You can organize images in Bridge using labels, including stars or colors, or by stacking related images.
In the Content panel, Shift-click to select both images with the keyword “coast.”
Choose Label > Approved. A green bar appears below the images to indicate their status. You can also rank images in ascending or descending order using the star labels (1 through 5 stars).
In the top-left corner of the Bridge window, click the Go Back button (
 ) to display all the images in the Maps folder again.
Now you’ll label the best images in the group.
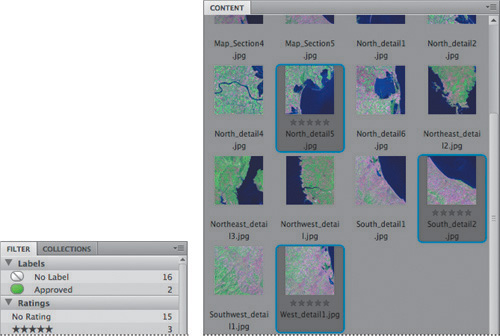
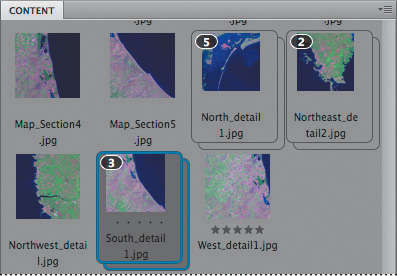
In the Content panel, Control-click (Windows) or Command-click (Mac OS) to select the North_detail5.jpg, South_detail2.jpg, and West_detail1.jpg thumbnails. Remember that you can resize the thumbnails in the Content window to see more images.
Choose Label, and select five stars to label all of the images with five stars.
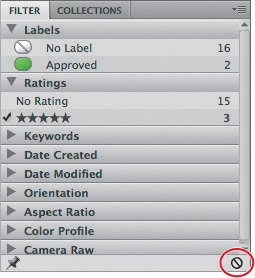
On the left side of the Bridge window, notice that the Filter panel displays three images with 5-star ratings.
Click the 5-star rating under the Filter heading to display only the three ranked images in the Content panel. Once you’ve ranked images, it’s easy to filter your view of the pertinent images for your work.
Click the Clear Filter button (
 ) at the bottom of the Filter panel to display all of the images in the Maps folder again, including those marked with the 5-star rating. You can also just click the 5-star rating again to deselect it and return to the view of all the images.
Rating images helps you sort through a large number of images quickly.
Now you’ll group related images into stacks, so that you can view and retrieve them more easily. Stacks are a convenient way to group files together visually.
Shift-click to select all five of the North_detail thumbnails—North_detail1.jpg through North_detail6.jpg (there’s no North_detail3.jpg thumbnail). Then choose Stacks > Group As Stack. Click in a blank area of the Content panel to deselect the group you just created.
The number in the upper-left corner of the thumbnail indicates the number of files in the stack.
Repeat Step 8 for the two Northeast and one Northwest_detail thumbnails. You can use the keyboard shortcut to create the stack quickly: select the thumbnails and press Ctrl+G (Windows) or Command+G (Mac OS) to group them.
Create a third stack that includes the two South_detail and one Southwest_detail thumbnails.

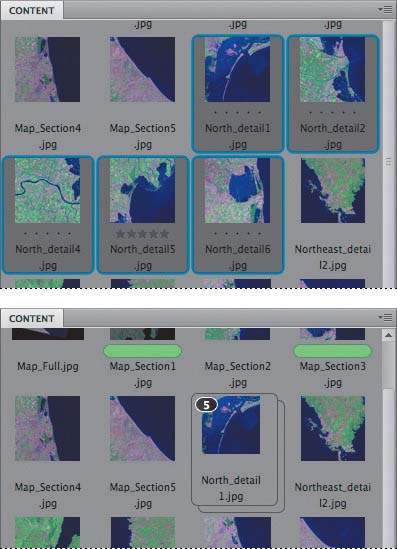
Now you can easily identify the map sections by region when you need to locate them for your work. To open a stack, click the number in the upper-left corner; to collapse the stack, click the number again.
You’ll view information about the file you’re about to open, to find out what you’ll be working with.
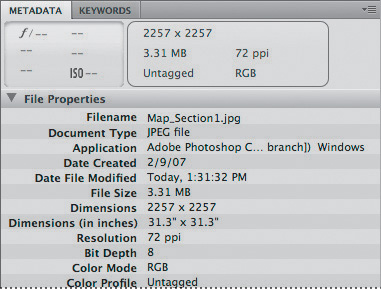
In the Content panel, select the Map_Section1.jpg thumbnail.
Bridge lists myriad information about a selected file in the File Properties area of the Metadata panel.
Select the Metadata tab, and view the File Properties area. (Expand File Properties or scroll to see the area if it’s not visible.)
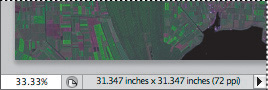
As you review the information about the file, you can see that it is a JPEG image, 31.3 inches square, with a 72-ppi resolution, bit depth of 8, in RGB mode. You can find this same information in Photoshop, but Bridge displays it more concisely.
In the Content panel, double-click the Map_Section1.jpg thumbnail to open the image in Photoshop. Although it’s very large in dimension—almost 3 feet square—this image appears like any other image onscreen, though it opens at a 25% to 33% view.
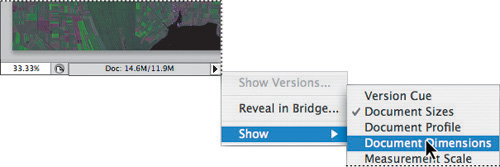
Another way to view file information is using the status bar in Photoshop.
In the status bar at the bottom of the image window, click the triangle to display the pop-up menu, and choose Show > Document Dimensions.
Photoshop displays the dimensions in the status bar.
Select other options from the Show menu to display additional file information, including the document profile (untagged RGB), measurement scale (currently set at the default of 1:1 pixels), scratch sizes (representing the amount of memory currently used by Photoshop to display all open images, and the total amount of RAM available for processing images, respectively), and the current tool.
Choose File > Save As. For Format, choose Photoshop, rename the file 13Working.psd, navigate to the Lesson13 folder, and click Save.
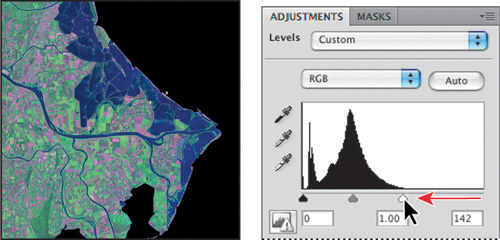
Before you dive into your measuring project, you’ll spruce up the image that you’ll work with throughout this exercise. This image is a bit dark and lacks detail. You want to brighten it to bring out more of the details, and boost the color so that it doesn’t look so washed out.
Click the Levels button in the Adjustments panel to create an adjustment layer.
The histogram shows most of the image’s pixels clustered in the shadows and midtones.
Drag the white Input Levels slider to the left, to about the point where the pixels begin clustering, or a value of about 142. We used Input Levels of 0, 1.00, and 142.
Tip
Instead of moving sliders, you can select the appropriate eyedropper and drag it across the image window to adjust shadows, highlights, or midtones.
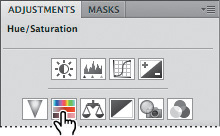
The image still looks a little washed out. You’ll correct that.
Click the Return To Adjustment List button (
) at the bottom of the Adjustments panel.Click the Hue/Saturation button in the Adjustments panel to create another adjustment layer.
Increase the Saturation to +20, and then click the Return To Adjustment List button again.
Choose File > Save to save your work so far. Click OK in the Photoshop Format Options dialog box.


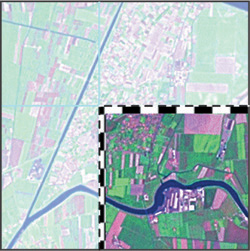
To begin creating an infographic from this map segment, you’ll select a specific, 25-kilometer-square quadrant in the map using a fixed-size selection marquee, and add a border to it.
The map you’ll work on has a predetermined scale of 1605 pixels to 25 kilometers. First, you need to set the proper unit of measure, and then you can find the center of the image using rulers.
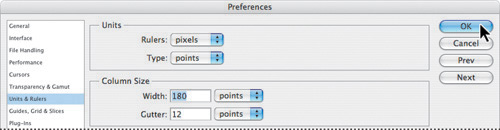
Choose Edit > Preferences > Units And Rulers (Windows) or Photoshop > Preferences > Units And Rulers (Mac OS). In the Units area, choose Pixels from the Rulers pop-up menu. Click OK.
You’ll add guides to help you measure.
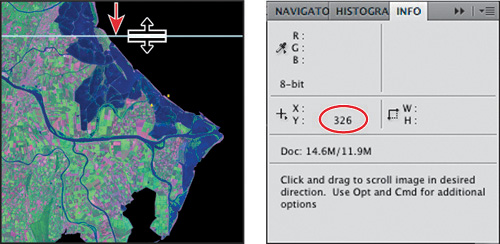
Choose Window > Info to open the Info panel.
Choose View > Rulers to display rulers across the top and left side of the image window. Drag a guide from the top ruler down until the Y value in the Info panel reads 326 pixels. (Zoom in if you have difficulty moving to exactly 326 pixels.)
Note
If you position the guide in the wrong spot, press Control (Windows) or Command (Mac OS) and drag the guide out of the image window. Then drag a new guide to the correct location.
The 326-pixel border plus 1605-pixel-square inset equals the size of the 2257-pixel-square image. You can verify this measurement by selecting the image in the Content section of Bridge and reviewing its metadata.
Drag a guide from the left ruler to the right until the X value in the Info panel reads 326 pixels.
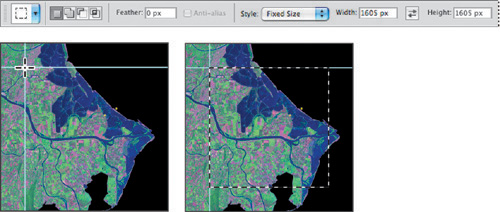
Select the Rectangular Marquee tool (
 ) in the Tools panel. In the options bar, choose Fixed Size from the Style pop-up menu. Type 1605 px in both the Width and Height boxes. According to the map’s scale, this value is equivalent to 25 kilometers.
At the top-left corner where the guides intersect, click the Rectangular Marquee tool to set a selection marquee 1605 pixels square. Now your selection area is exactly centered within the image.
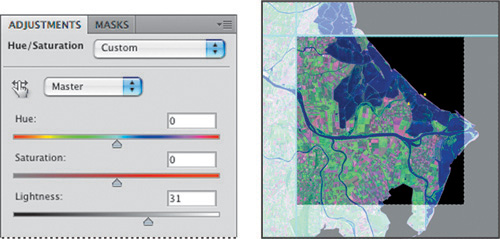
You’ll lighten the area around the centered square to bring focus to your work area. First, you will invert the selection, so that it’s the border area that’s selected.
Choose Select > Inverse.
Select the Background layer in the Layers panel. Then click the Hue/Saturation button in the Adjustments panel to create an adjustment layer. Increase the Lightness to +31, and click the Return To Adjustment List button (
) at the bottom of the Adjustments panel.Choose File > Save to save your work.
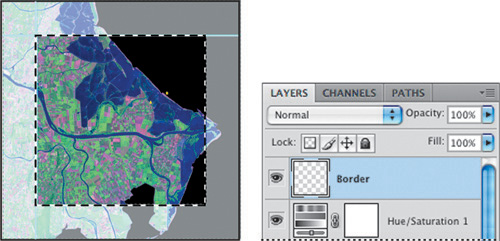
You’ll add a custom border to the selection to make the image pop a bit.
Select the Background layer again, and click the Marquee tool in the corner of the inset to select it again.
In the Layers panel, select the top Hue/Saturation adjustment layer, and then click the New Layer button (
 ) at the bottom of the panel. A new, empty layer appears at the top of the panel. Select the layer name and rename it Border.
First you’ll outline the border, so that you can apply a dashed line to the outline.
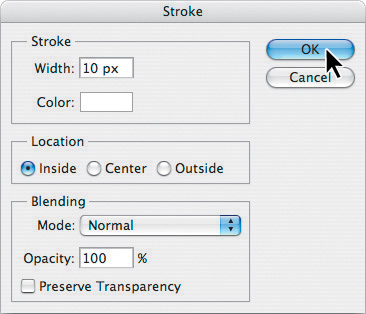
Choose Edit > Stroke, type 10 px for Width. Then, click the Color swatch, and click the upper-left corner of the color picker to select white. Click OK to close the color picker. For Location, select Inside. Click OK.
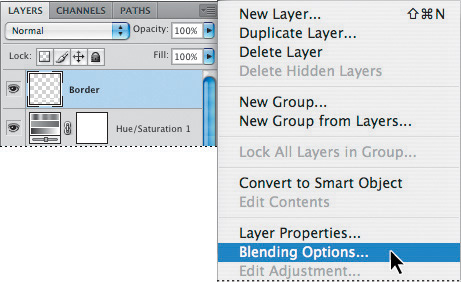
You’ll complete the border by applying a dashed-line pattern to the white outline.
Choose File > Open, navigate to the Lesson13 folder, and open the Dashed Line.psd file.
Choose Edit > Define pattern. In the Pattern Name dialog box, the default pattern name is Dashed Line.psd. Delete .psd so that the pattern name is Dashed Line. Click OK. Then close the Dashed Line.psd file.
Select the 13Working.psd tab to make the image active. With the border selection active, choose Blending Options from the Layers panel menu.
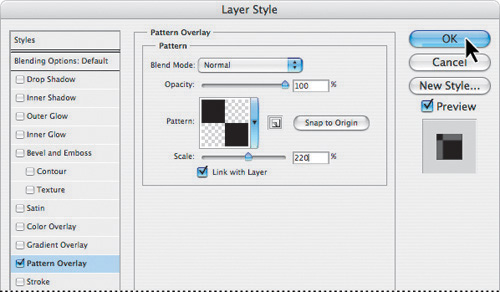
In the Blending Options dialog box, click Pattern Overlay in the list on the left. The Pattern Overlay options appear in the center of the Layer Style dialog box.
Click the arrow next to the Pattern swatch to display the pattern picker. Select the Dashed Line pattern you just created, and then click away from the pattern picker to close it. Set the Scale to 220%.
Click OK to apply the pattern to the border.
Zoom in on the dashed line in the image window to examine it more closely by pressing Ctrl+spacebar (Windows) or Command+spacebar (Mac OS) and clicking the image.
Zoom back out by pressing Alt+spacebar (Windows) or Option+spacebar (Mac OS) and clicking the image.
Choose File > Save to save your work. Do not deselect.

You may already be familiar with the Ruler tool in Photoshop, which lets you calculate the distance between any two points in the workspace. The Measurement feature in Photoshop Extended is much more sophisticated: it lets you measure any area defined with the Ruler tool or with a selection tool, including irregular areas selected with the lasso, Quick Selection, or Magic Wand tools. You can also compute the height, width, area, and perimeter, or track measurements of one image or multiple images. Measurement data is recorded in the Measurement Log panel.
The Measurement tool is available only in Photoshop Extended, a version of Photoshop CS4 with additional functionality. If you don’t have this version of Photoshop, you can read the next sections to learn about the tool or skip to the review questions.
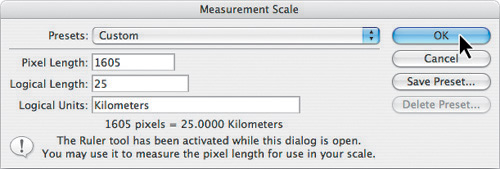
The first step in working with measurements and the Measurement tool is to set the scale. A measurement scale sets a specified number of pixels in the image equal to a number of scale units, such as inches, millimeters, or microns—or, in this case, kilometers. Once you’ve created a scale, you can measure areas and receive calculations and log results in the selected scale units.
In the Layers panel, select the Background layer.
Choose Analysis > Set Measurement Scale > Custom.
This map has a scale of 1605 pixels equal to 25 kilometers. You’ll use those values now to create a custom scale.
In the Measurement Scale dialog box, type 1605 for Pixel Length, 25 for Logical Length, and Kilometers for Logical Units.
Click OK to set your scaling.
Another way to set the scale is to use either the overall dimensions of your image or a measurement from within the image. You then enter these values in the boxes in the Measurement Scale dialog box. Or, you can select a preset scale from the Presets menu.
You’re ready to begin measuring the map. You’ll start your measurements with the 25-kilometer-square selection, as a control measure against which you can check your work.
Make sure that your 1605-pixel-square selection is still active. If you accidentally deselected the selection, reselect the map inset by clicking with the Rectangular Marquee tool at the top-left intersection of the guides.
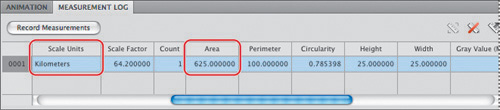
Choose Analysis > Record Measurements. The Measurement Log panel appears at the bottom of the image window.
View the columns of data in the Measurement Log panel, using the scroll bar at the bottom of the panel if you need to. Note that the Area measurement is 625.000000 and Scale Units are kilometers—exactly what they should be.
You can customize the Measurement Log columns, sort data within columns, and export data from the log to a spreadsheet file.
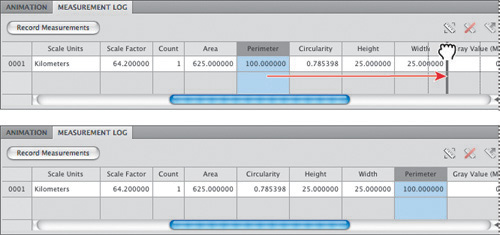
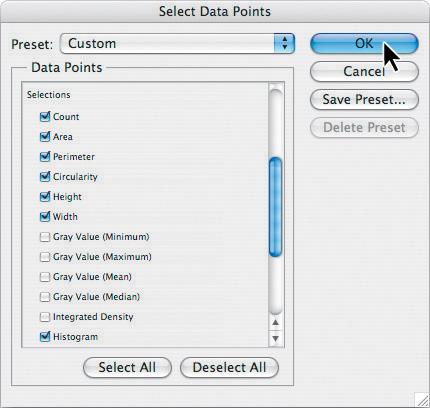
In the Measurement Log, Ctrl-click (Windows) or Command-click (Mac OS) to select the Circularity, Integrated Density, and four Gray Value columns. You can reorder any column heading by clicking its name and dragging it to the right or left.
You can easily reorder the columns so that they display information in the best order for you. Just as easily, you can control which parameters, or data points, are calculated and shown.
Choose Analysis > Select Data Points > Custom. Scroll down to the Selections area, and deselect all of the Gray Value options and the Integrated Density option. You won’t use these options, so you don’t need to record them. Click OK.
You won’t do this now, but you can save these settings as presets for future projects. You can even create multiple measurement scale presets. However, only one scale can be used in a document at a time.
Control-click (Windows) or Command-click (Mac OS) to select the Circularity, Integrated Density, and four Gray Value columns in the Measurement Log. Click the Delete button in the upper-right corner of the panel to remove them. You won’t need them for this lesson. Click Yes in the confirmation dialog box.
Choose File > Save to save your work so far.
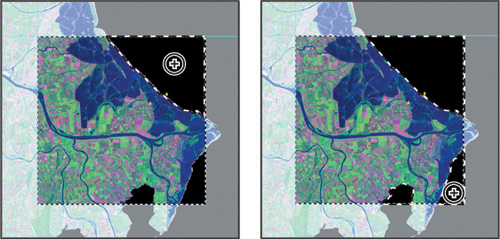
Now you’ll calculate the area of an irregular shape, the water inside the 25-kilometer square area, but outside the breakers. As you measure, the Measurement Log tracks this data.
Choose Select > Deselect so that nothing is selected.
Select the Quick Selection tool (
 ) in the Tools panel, and select Sample All Layers in the options bar.
Select one of the three black water areas. The Add To Selection option is automatically selected in the options bar.
Click each of the other two black areas to select them.
In the Measurement Log panel, click Record Measurements. Photoshop Extended records the area of all three individual selections plus the total of the three selected areas.
Look at the results in the Measurement Log panel. You can drag the top bar of the Measurement Log panel up to expand it. The log details each of the three selections for the water area as a line item; the top item, indicated by a Count of 3, totals the three measurements.
Your measurements here and in the remaining procedures may vary from those we recorded, depending on the accuracy of your selection.
Choose Select > Deselect to deselect the selection of the three seas.

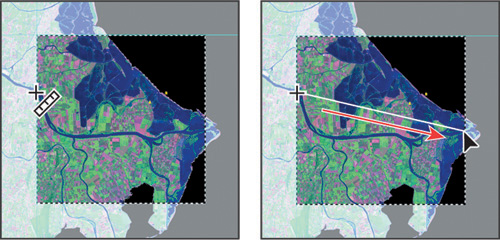
Measuring lines with the Measurement tool in Photoshop Extended is similar to measuring with the Ruler tool in the Tools panel.
Choose Analysis > Ruler Tool.
Position the tool pointer at the end of the river on the left side of the map, just within the selection, and drag a line to the right end of the river at the boundary of the selected area.
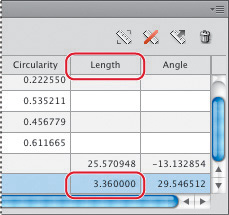
In the Measurement Log, click Record Measurements. The distance appears as a Length of about 25 kilometers and an Angle of –13 degrees in the log. This is the length of the river “as the crow flies.”
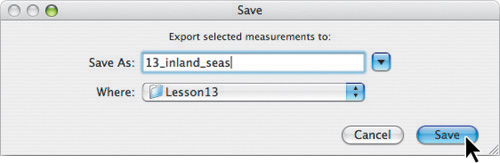
You can export selected measurements as a tab-delimited file that can be opened in a spreadsheet application, such as Microsoft Excel. You can then use the spreadsheet application to perform further calculations on your data. You’ll use the data you’ve recorded so far later in this lesson.
Return to the Measurement Log panel.
Shift-click the measurements to select all of the items in the list. You can also choose to select only some of the items.
Choose Export Selected (
 ) from the Measurement Log panel menu.
In the Save dialog box, rename the file 13_inland_seas, navigate to the Lesson13 folder, and click Save.
Now you’ll add a little dimension and color. In this part of the lesson, you’ll import a three-dimensional graphic that represents a cross-section view of the coastline. Then you’ll measure the cross-section in two and three dimensions.
Switch to Bridge, navigate to the Lesson13 folder, and double-click the Cross-section.psd thumbnail to open the file in Photoshop.
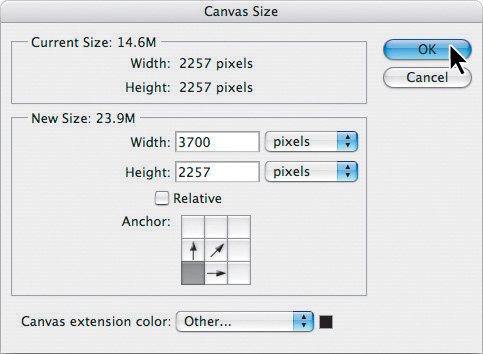
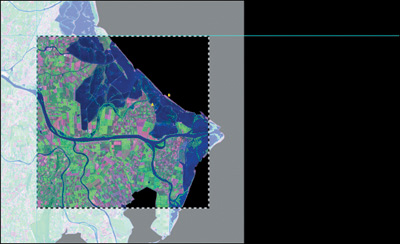
Click the 13Working.psd tab to make the image active. You’ll increase its canvas size to create a black area to its right.
Choose Image > Canvas Size. Set the width to 3700 pixels. Click the lower-left corner of the proxy so that the additional space will be added on the right. For Canvas Extension Color, choose Black. Click OK.
A black area about 1/3 the width of the image window is added to the right of the image.
Choose View > Show > Guides to hide the guides. Select the Border layer in the Layers panel.
Click the Arrange Documents button (
 ) in the application bar, and choose a 2 Up option so that both the Cross-section.psd and Working.psd files are visible. Click the Cross-section.psd tab to make the file active.
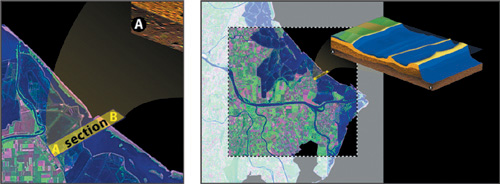
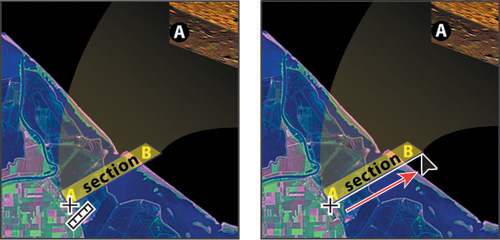
You’ll reposition the cross-section in the upper quadrant of the map, aligning its section letters to the map’s section letters.
Select the Move Tool (
 ) in the Tools panel, and drag the illustration onto the 13Working.psd image. Position the illustration as shown in the following figure, so that the gold bar labeled Section overlaps the letters “A” and “B” in the upper-right quadrant of the map.
For design aesthetics, the three-dimensional rectangular cross-section is rotated relative to its two-dimensional representation, the gold bar.
If you were to fit the 3D cross-section into the 2D gold bar of the map like a puzzle piece, you would rotate the cross-section towards the top-left corner of the map by about 90 degrees, matching the letter “A” on the cross-section to that on the map. (The gold semitransparency swath represents this rotation.)
You’ll make several measurements of the cross-section, starting with the length of its 2D representation.
Close the Cross-section.psd file without saving any changes to it.
Choose Analysis > Ruler Tool.
Using the Ruler tool, click a corner of the gold bar labeled Section, and drag the length of its side to measure the section’s length.
In the Measurement Log panel, click Record Measurements. Note the length: ours was 3.36 kilometers long.
You’ll use this value in the next part of the lesson.
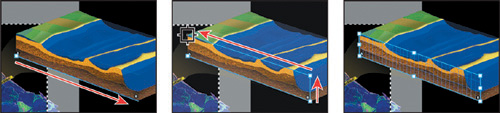
Now you’ll take some measurements of the cross-section itself, this time in three dimensions. The ability to measure in three dimensions is especially helpful for measuring topographic information from a similar map, an architectural CAD drawing—or any object in space whose dimensions you need to determine.
In the Layers panel, make sure that the Section layer is selected.
Choose Filter > Vanishing Point. The Vanishing Point dialog box appears, with the Create Plane tool selected.
You’ll draw a plane on the front side of the cross-section.
Using the Create Plane tool (
 ), click the lower-left corner of the section to set the first anchor point. Then click the lower-right corner, the upper-right corner of the section, and then the upper-left corner to draw a plane on the side of the cross-section.
In the Vanishing Point dialog box, select the Measure tool.
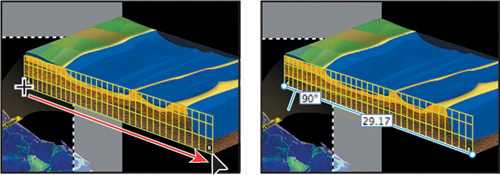
Position the pointer over the left-bottom edge of the cross-section. Make sure that your pointer is over the grid (a cross with a ruler icon will appear). Click the left-bottom edge of the cross-section to set the first measuring point. Then, drag to the right-bottom edge.
In the Length box at the top of the window, enter 3.36 or the value you ascertained in the previous procedure, when you measured the cross-section with the Ruler tool. This is the length in kilometers of the section.
Now you’ll measure the depth of the section by measuring vertically along the left edge of the cross-section.
Drag again along the bottom edge of the cross section. A readout appears of the length of the cross-section (3.36) and the angle (90 degrees).
Using the Measure tool, click the top-left edge, and then drag downward to the bottom-left edge. The length and angle of the vertical line appear in the window, based on the length you entered in Step 6. The line shows the depth of the cross-section, 0.3 (kilometer) in our measurement.
Note the section depth value (0.3 kilometer in our measurement). You’ll use this value later.
Click OK in the Vanishing Point dialog box to close it.
With your measurements done, you’re ready to add the data to the infographic.

You’ll complete the infographic by creating a legend for it, using the measurements you’ve taken.
Switch to Bridge. Navigate to the Lesson13 folder, and double-click the Legend.psd file to open it.
Click the Arrange Documents button in the application bar, and choose a 2 Up layout. Make sure the Legend.psd file is active. Then, from the Layers panel, drag the Legend Group layer group onto the 13Working.psd image. Close the Legend.psd file without saving any changes.
Zoom out so that you can see the entire 13Working.psd image.
Using the Move tool (
), position the Legend artwork in the lower third of the black background on right.If you have a spreadsheet application, such as Excel, start the application. Navigate to the Lesson13 folder, and double-click to open the 13_Inland_Seas.txt file.
In Photoshop, select the Type tool (
 ) in the Tools panel.
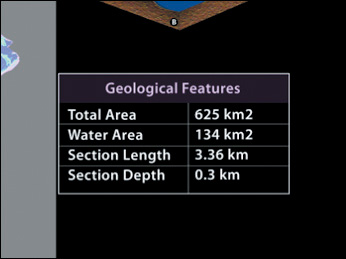
Refer either to the measurements displayed in the spreadsheet file, 13_Inland_Seas, or to the values you noted earlier. Many of the values are in the Measurement Log panel. Select the “0000” next to each entry, and type the correct information into the legend table. Our measurements are below. You can substitute your own if they differ:
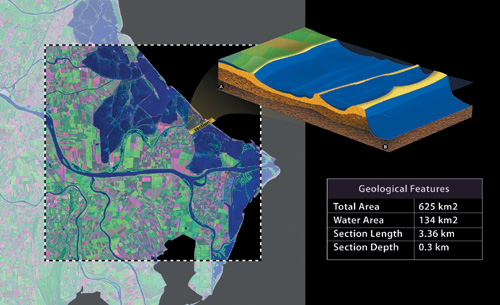
For Total Area, enter 625 km2.
For Water Area, enter 134 km2.
For Section Length, enter 3.36 km.
For Section Depth, enter 0.3 km.
Choose File > Save to save your work.
Your infographic is complete. After so much measuring and precise design work, it’s time to create a slide show to show off your beautiful graphic to your colleagues.
Switch to Bridge, and navigate to the Lesson13 folder. Drag the 13Working.psd file into the Maps folder.
Double-click the Maps folder to display its contents. Shift-click the five Map_Section files to select them, and then Control-click (Windows) or Command-click (Mac OS) the 13Working.psd file to add it to the slide show.
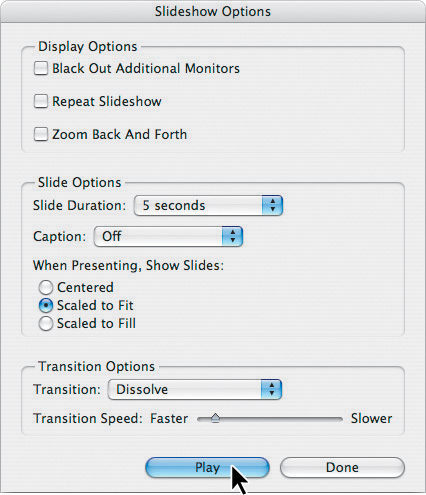
Choose View > Slideshow Options. You’ll set up your slide show to dissolve from one image into the next, starting with the infographic you created.
In the Slideshow Options dialog box, select Scaled To Fit for the When Presenting, Show Slides option; for Transition, choose Dissolve. Leave the other options as they are.
Click Play to play slide show. To stop the slide show, press the Esc key on your keyboard.
You can repeat the slide show by choosing View > Slideshow. To flip through the images, press the Right Arrow key on your keyboard; to move backwards through the images, press the Left Arrow key.
You’ve successfully created an infographic with accurate measurements. Now you’re ready to try out your measuring skills on other images in your portfolio.