
Chapter Seven. Working with Objects
No matter how comfortable you get with InDesign’s drawing tools (see Chapter 5, “Drawing Lines and Shapes”), you’ll want to modify nearly every object you create by applying a fill or a stroke; by scaling, rotating, or flipping horizontally or vertically; by moving or resizing, and so on. One of the most enjoyable benefits of using InDesign is that it allows you to change your mind as often as you want and modify objects in many ways. But before you can modify an object, you must first select it.
In this chapter you’ll learn how to use two tools to select objects. This chapter also explains how you can use many of InDesign’s most powerful features to modify objects and create eye-catching graphic elements.
#60 Selecting and Deleting Objects
InDesign’s Tools panel has two tools for selecting objects: the Selection tool and the Direct Selection tool. Understanding the difference between these tools is critical if you want to work efficiently.
In most cases, you’ll use the Selection tool ![]() to select objects. When you click an object with the Selection tool, the rectangular shape that encloses the object—its bounding box—is displayed with eight resizing handles around the perimeter and a center point in the middle. For rectangular objects, the bounding box and the shape of the object are identical. When you select a nonrectangular object with the Selection tool, you’re actually selecting the bounding box rectangle that surrounds the object within (Figure 60a). You can drag a handle to resize a bounding box and the object within, and you can click within the object and drag to move it.
to select objects. When you click an object with the Selection tool, the rectangular shape that encloses the object—its bounding box—is displayed with eight resizing handles around the perimeter and a center point in the middle. For rectangular objects, the bounding box and the shape of the object are identical. When you select a nonrectangular object with the Selection tool, you’re actually selecting the bounding box rectangle that surrounds the object within (Figure 60a). You can drag a handle to resize a bounding box and the object within, and you can click within the object and drag to move it.
Figure 60a. When you select an object with the Selection tool, its bounding box is displayed with eight handles and a center point. Drag a handle to resize the object; click and drag within the object to move it. For an unassigned object that doesn’t have a fill color, click and drag its center point to move it.

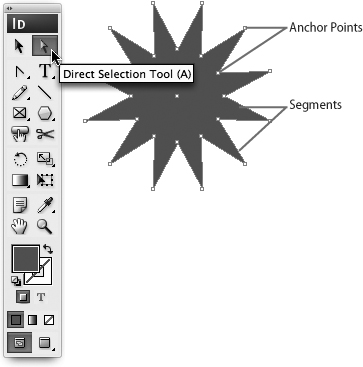
When you click an object with the Direct Selection tool ![]() , the object’s anchor points and segments are displayed, and you can drag them to change the object’s shape (Figure 60b). You can also use the Direct Selection tool to click and drag a graphic within a graphics frame.
, the object’s anchor points and segments are displayed, and you can drag them to change the object’s shape (Figure 60b). You can also use the Direct Selection tool to click and drag a graphic within a graphics frame.
Figure 60b. When you select an object with the Direct Selection tool, its anchor points and segments are displayed. Drag an anchor point or segment to reshape the object; click and drag within the object to move it. For an unassigned object that doesn’t have a fill color, click and drag its center point to move it.
For rectangular objects—most text and graphics frames are rectangles—it’s hard to tell the difference between an object and its bounding box. However, if you look closely at a rectangular frame selected with the Direct Selection tool, you’ll see that anchor points are displayed only at the four corners, in contrast to the eight handles that are displayed if you use the Selection tool.
Once you understand the difference between the Selection tool and the Direct Selection tool, you’ll choose and use the right tool without a second thought. Here are a few more details you should know about selecting objects:
• Several commands for selecting objects and their contents are available in the Object menu. Choose Object > Select to display a list of commands for selecting objects above and below the currently selected object. If a graphic or graphics frame is selected, the Content and Container commands let you choose the graphic or its frame. If a group is selected, the Next Object in Group and Previous Object in Group commands let you select other objects in the group.
• You have two options for manually selecting multiple objects. Hold down the Shift key as you click objects with the Selection or Direct Selection tool, or click an empty area of the pasteboard or page and then drag a rectangle that includes any portion of the objects you want to select.
• If the text insertion cursor is not flashing, choose Edit > Select All to select all objects on the page or spread.
• To temporarily switch to the Selection tool or Direct Selection tool when you’re using another tool, press and hold the Command key (Mac OS) or the Ctrl key (Windows). When you use this shortcut, InDesign switches to the tool (Selection or Direct Selection) that you most recently used.
• Use the Direct Selection tool to select an object that’s part of a group. After you select a grouped object, click within the object and drag to move it (click and drag the center point of an unassigned frame with no fill color); drag an anchor point or a segment to reshape the object. Switch to the Selection tool to select the object’s bounding box.
The easiest way to delete an object is to select it with the Selection tool, and then press the Backspace or Delete key. You can also choose Edit > Clear. Choose Edit > Cut if you want to delete the object from its current location and paste it elsewhere (Edit > Paste). A cut or copied object is saved to the clipboard until you cut or copy something else or quit InDesign.
#61 Moving and Locking Objects
One of the most common tasks you’ll perform when laying out pages is moving objects, which involves selecting text frames, graphics frames, or other graphic elements and then repositioning them within a page or moving them to another page.
You have two options for moving objects:
• Use the Selection tool to manually move objects by clicking and dragging. If you hold down the Shift key when dragging an object, its movement is restricted to vertical, horizontal, and 45° angles.
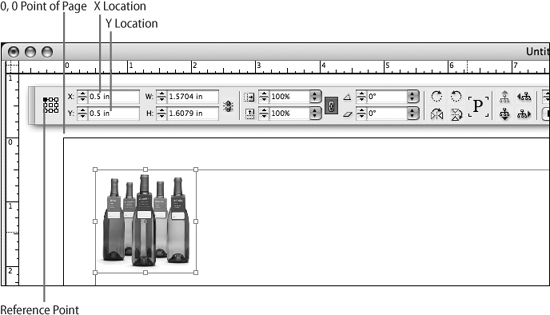
• To move objects more precisely, change the X and Y values that specify an object’s position relative to the zero point (the upper-left corner of the page by default). When an object is selected, the X Location and Y Location fields in the Control panel and Transform panel display the object’s coordinates (Figure 61). By default, the X value represents the horizontal distance from the zero point to the object’s center; the Y value represents the vertical distance from the zero point to the object’s center. If you don’t want to use an object’s center point as the reference point, click one of the nine handles in the Reference Point icon at the left of the Control and Transform panels.
Figure 61. In this example, the upper-left corner of the selected object is its reference point. The X location and Y location values in the Control panel show that the upper-left corner of the object is one-half inch inside the left edge of the page and one-half inch below the top edge.
You can use the up/down, left/right arrow keys on your keyboard to nudge objects vertically and horizontally in small increments. By default, each press of an arrow key will move the selected object one point. To change the increment, open the Units & Increments pane of the Preferences dialog box and specify a different value for Cursor Key.
While it’s possible to drag objects between adjacent pages, dragging objects to distant pages can get cumbersome. If you need to move an object to a different page, the Cut/Paste option is easiest.
- Select the object.
- Choose Edit > Cut.
- Navigate to the page where you want to place the object, and then choose Edit > Paste. If you want to place the object in the same position on the new page as it was on the original page, choose Edit > Paste in Place.
If you want to prevent an object from being moved, select the object and then choose Object > Lock Position. When an object is locked, it can’t be moved, either manually or by changing the X Location or Y Location value in the Control panel or Transform panel. You can, however, select and modify a locked object—for example, by applying a stroke or a background color. To unlock a locked object, select it, and then choose Object > Unlock Position.
#62 Filling Objects with Color
If you use InDesign to create color publications, adding color to objects and changing the color of objects are common tasks. You can apply a background color—or in InDesign terminology, a fill—to any object. For example, you can apply color to a text frame to provide a nonwhite background for the text within it. You can apply color to objects you’ve created using InDesign’s drawing tools. And in some cases, you can even apply a color to imported graphics.
You have two options for applying color to a selected object: the Swatches panel and the Color panel.
Using the Swatches Panel
The Swatches panel (Window > Swatches) lists a document’s colors and gradients (Figure 62a). (See Chapter 8, “Working with Color,” for information about creating colors and gradients.)
Figure 62a. The Swatches panel lists a document’s colors and lets you apply a color and a tint to selected objects. In this example, the object is filled with a 50% tint of Pantone 347.
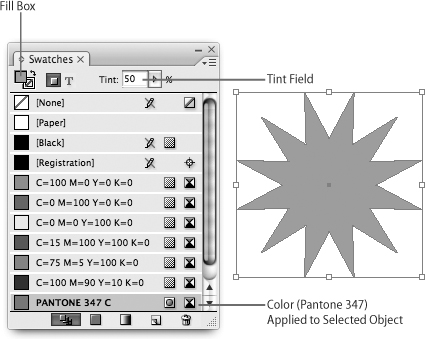
Click the Fill box in the upper-left corner of the panel, and then click a color in the list. The Swatches panel also includes Tint controls that let you create color tints from 0% to 100%.
Using the Color Panel
The Color panel (Window > Color; Figure 62b) lets you create colors on the fly—that is, without having to choose New Color Swatch from the Swatches panel menu. The downside is that these colors are not added to the document’s color list, which means they don’t show up in the Swatches panel, and you can’t apply them to other objects unless you save or re-create them. (To save a color you’ve created with the Color panel, choose Add to Swatches from the panel menu or drag the swatch from the Color panel to the Swatches panel.)
Figure 62b. The Color panel provides controls for creating CMYK, RGB, and Lab colors.
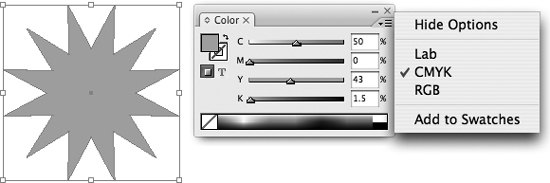
Click the Fill box in the upper-left corner of the panel and choose a color model—RGB, CMYK, or Lab—from the panel menu. Use the slider controls to specify a color. The controls vary depending on the color model you select.
In addition to the Fill boxes in the Swatches and Color panels, there’s a Fill box in the Tools panel. Clicking any of these Fill boxes selects all three.
To remove an object’s fill color, select the object and then click None or Paper in the Swatches panel. If you click None, the object is transparent. If you click Paper, the object is opaque white (unless you’ve modified the Paper swatch).
#63 Adding a Stroke to Objects
Adding a stroke to an object can mean the difference between a mere graphic element and a graphic element that stands out on a page. For example, a stroke around a sidebar can set it apart from the surrounding elements and draw the reader’s attention. Similarly, a stroke around a graphic can both contain the image within and isolate it from other graphic elements.
The Stroke box is paired with the Fill box in the Swatches panel, Color panel, and Tools panel, and the two work similarly. To add a stroke to a selected object, first click any Stroke box. (Note: By default, the Rectangle, Ellipse, and Polygon tools create objects with a one-point stroke.)
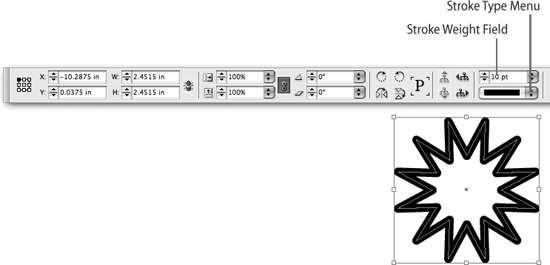
When you apply a stroke to an object, you may not be able to see it if it has no width or no color. The easiest way to specify a stroke’s width is to choose a weight from the Weight menu in the Control panel or enter a weight value in the accompanying field (Figure 63a). The Stroke Type menu in the Control panel lets you choose a stroke style. (See #64 for information about adding custom stroke styles.)
Figure 63a. The Weight field in the Control panel specifies a 10-point-wide stroke. Below the Weight field, the Solid style is selected in the (Stroke) Type menu.
Use the Swatches panel or the Color panel to assign a color to the stroke. (See #62 for information about the Swatches and Color panels.)
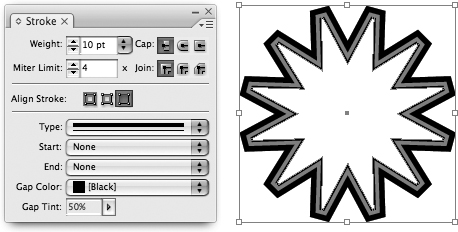
In addition to specifying a stroke’s weight, type, and color, you can use the Stroke panel (Window > Stroke) to modify several other stroke characteristics (Figure 63b). The Stroke panel includes controls for specifying how segments connect and where the stroke is placed relative to the edge of the object (Align Stroke to Center, Align Stroke to Inside, or Align Stroke to Outside). You can also specify a Gap Color and Gap Tint for dashed, striped, and dotted stroke styles. The Start and End menus are available only for open paths and let you choose among several graphic endpoints, including arrowheads, squares, and circles.
Figure 63b. The Stroke panel includes several controls for modifying the appearance of a stroke. In this example, a 10-point black stroke is applied to a polygon. A Thick-Thin (Stroke) Type is also applied, and the gap is a 50% tint of black.
Switching an Object’s Stroke and Fill
When applying fills and strokes to objects, it’s easy to accidentally switch the stroke and fill colors. If you find yourself in this situation, click the Swap Fill and Stroke button ![]() in the Swatches panel, Color panel, or Tools panel. This will switch the fill and stroke colors.
in the Swatches panel, Color panel, or Tools panel. This will switch the fill and stroke colors.
To remove a stroke from an object, select the object, and then set the stroke weight to 0. You can do this using the Weight field in the Control panel or the Stroke panel. You can also set the stroke color to None to remove a stroke from an object.
#64 Creating Custom Stroke Styles
InDesign has 18 built-in stroke styles, ranging from stripes to dots, dashes, and hash marks. If these aren’t enough for you, you can also create your own custom stroke styles.
To create a custom stroke style:
- Choose Stroke Styles from the Stroke panel menu.
- Click New in the Stroke Styles dialog box.
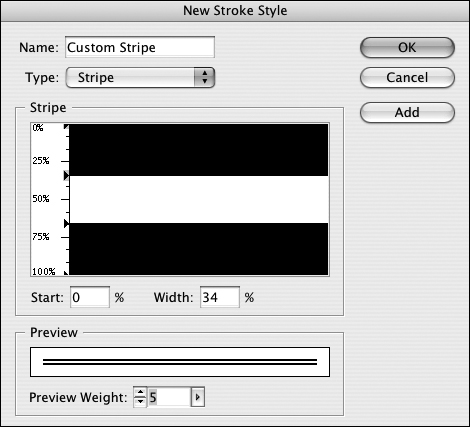
- In the New Stroke dialog box (Figure 64), enter a name for the style and choose a Type: Stripe, Dotted, or Dash. Use the controls in the New Stroke Style dialog box to specify the appearance of the style, and then click OK to close the dialog box and save the style, or click Add to save the style and continue creating new styles.
Figure 64. The controls for creating a custom stripe. The controls are slightly different for Dash and Dotted strokes.
There are too many controls in the New Stroke Style dialog box to explain each one in this book. Fortunately, they’re intuitive and easy to use. A few minutes of creative fiddling and you’ll be comfortable.
After you create a new stroke style, it’s displayed in the (Stroke) Type menu in the Control panel and the Stroke panel, and you can choose it when applying a stroke to an object or text.
If you want to modify the appearance of a custom stroke style, choose Stroke Styles in the Stroke panel menu, select the style in the list, and then click Edit. Make your changes, and then click OK to close the Edit Stroke Style dialog box. Click OK to close the Stroke Styles dialog box.
#65 Transforming Objects
InDesign provides many features that let you modify the appearance of an object. Four of these features are grouped together and referred to collectively as transformations:
• Rotate: Rotate objects from -180° to 180°.
• Scale X Percentage: Lengthen or shorten objects horizontally as a percentage of the current width.
• Scale Y Percentage: Lengthen or shorten objects vertically as a percentage of the current height.
• Shear: Specify a shear angle between –90° and 90° to slant an object along its horizontal axis.
As is true for many features, InDesign offers several methods for applying these transformations to selected objects:
• Transform controls in the Control panel: In addition to the four basic transformation controls—Rotate, Scale X Percentage, Scale Y Percentage, and Shear—the Control panel also includes controls for changing the location of an object (X and Y fields), as well as its Height and Width (H and W fields), for applying a stroke weight and style, and more (Figure 65a). The Control panel menu offers several additional commands for modifying objects, including Flip Horizontal, Flip Vertical, and Flip Both. The Control panel is the most versatile option for applying basic transformations and making other common changes to objects.
Figure 65a. When an object is selected, the context-sensitive Control panel offers controls for modifying the position, size, and appearance of the object.

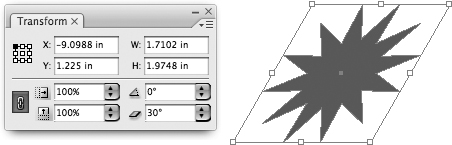
• Transform panel: The controls in the Transform panel (Window > Transform; Figure 65b) are a subset of the controls in the Control panel, which is a good reason to use the Control panel unless you have a particular affinity for the Transform panel.
Figure 65b. The Transform panel contains a subset of the controls available in the Control panel, including the four basic transformations: Rotate, Scale X Percentage, Scale Y Percentage, and Shear. In this example, a 30° shear angle is applied to the object.
• Tools panel transformation tools: The Tools panel contains four transformation tools: Rotate tool, Scale tool, Shear tool, and Free Transform tool. There are two ways to use the Rotate tool, Scale tool, and Shear tool: 1) Select one of the tools, click an object to select it, and then click and drag; or 2) Select an object, and then double-click one of the tools. A dialog box is displayed with controls for specifying transformations. To use the Free Transform tool, select it, and then click an object. Drag a bounding-box handle to scale the object. To rotate the object, move the pointer just outside a corner handle to display a rotation pointer![]() , and then click and drag.
, and then click and drag.
• Transform commands: The Transform commands in the Object menu provide yet another option for making basic transformations. Choose Object > Move, Scale, Rotate, or Shear to display a dialog box with controls for transforming the selected object.
To maintain an object’s proportions when scaling it horizontally or vertically, make sure the linked chain icon (not the broken chain icon) is displayed for the Constrain Proportions button in the Control and Transform panels. The Constrain Proportions button has two states represented by two icons: 1) When the feature is enabled, the icon is a linked chain. 2) When the feature is disabled, the icon is a broken chain. Clicking the button toggles between the two states.
#66 Special Effects for Objects
If you’re a Photoshop user, you’ve probably modified images by applying special effects such as blending modes, opacity, shadows, glows, and feathered edges. InDesign includes several Photoshop-like creative effects, and you can apply them to any object. You even have the option to apply these special effects independently to a frame, or to its fill, stroke, or content (text or graphic).
Collectively, these features are called transparency effects because they add see-through effects to what would otherwise be opaque objects, and they let you create eye-catching special effects without having to switch to Photoshop.
To apply a blending mode or change opacity:
1. Select an object.
2. Choose Window > Effects to open the Effects panel (Figure 66a).
Figure 66a. In this example, an opacity value of 50% is applied to one of two black rectangles, making it both lighter and translucent.

3. Choose a blending mode from the Blending Mode menu or change the Opacity value. If you select Stroke, Fill, Text, or Graphic in the Effects panel, you can apply a blending mode and specify opacity for that component of the selection. (Note: As you decrease the opacity percentage, an object becomes lighter and more transparent. An object with 0% opacity is invisible.)
The rest of the creative effects—Drop Shadow, Inner Shadow, Inner and Outer Glow, Bevel and Emboss, Satin, Basic Feather, Directional Feather, and Gradient Feather—are available in the Object menu (Object > Effects) and the Effects panel. To apply an effect:
- Select an object.
- Choose Object > Effects, and then choose Transparency or any of the effects. (You can also display a list of effects by clicking the fx button at the bottom of the Effects panel.)
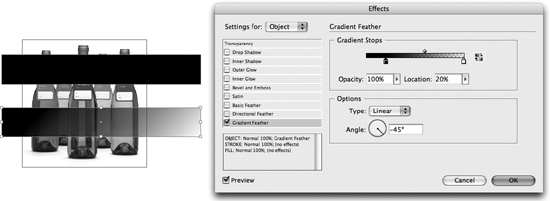
- In the Effects dialog box, check Preview, and then adjust the controls for the selected effect until you achieve the desired result (Figure 66b).
Figure 66b. In this example, a gradient feather is applied to the lower of the two black rectangles to create a gradient that fades from opaque black to transparent at a 45° angle.
By default, a creative effect is applied to an entire object (its stroke, fill, and content). If you don’t want to apply an effect to an entire object, choose an option other than Object from the Settings For menu (Stroke, Fill, Text, or Graphic) in the Effects dialog box.
To remove an effect from an object, uncheck the effect in the Effects dialog box (Object > Effects > Transparency). To remove all effects from an object, select the object, and then choose Object > Effects > Clear Effects. To remove all effects, as well as any applied blending mode and opacity value, choose Object > Effects > Clear All Transparency. These commands are also available in the Effects panel menu.
#67 Using Object Styles
The ability to format text using character and paragraph styles is one of InDesign’s most useful and powerful features. Object styles let you quickly format objects in much the same way character and paragraph styles let you format text. For example, if you create a newsletter that regularly uses sidebar text frames that include strokes, fills, and text insets, you can create an object style with these settings, and then use the object style to quickly format new sidebar frames.
The easiest way to create an object style is to first modify an object manually so that it includes all the settings you want to include in the object style—fill color and tint, stroke weight and style, drop shadow, and so on. After the object is correctly formatted:
1. Open the Object Styles panel (Window > Object Styles) and choose New Object Style from the panel menu.
2. The New Object Style dialog box (Figure 67a) displays the settings applied to the selected object. Name the object style, if you want, assign a keyboard shortcut (in the General pane), and then click OK. The new object style is displayed in the Object Styles panel.
Figure 67a. When you create a new object style, the settings applied to the selected object are used. In this example, the text frame has a tinted fill, a stroke, a drop shadow, and text insets.

You don’t have to modify an object before you can create an object style. If you choose New Object Style from the Object Styles panel when nothing is selected, you can create the new object style from scratch by changing the settings in the Object Style Options dialog box.
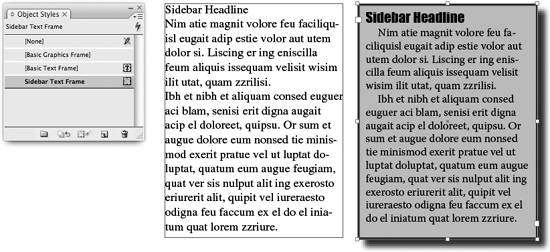
To apply an object style, select an object, and then click the name of the object style in the Object Styles panel (Figure 67b) or use the keyboard shortcut, if you assigned one.
Figure 67b. In this example, the Sidebar Text Frame object style was used to format the text frame on the right. The other text frame is the original, unstyled frame. Notice how the object style formatted both the frame and the text within. Because an object style can include a paragraph style, you can use object styles to format both text frames and the text within.
#68 Grouping Objects
There are times when you’ll want to handle multiple objects as if they were a single object. For example, if you’ve placed a caption next to a photograph, you’ll want to keep them together if you decide to move the photo. Or if you’ve created an illustration or a logo using several objects created with InDesign’s drawing tools, you’ll want to treat them as a single object when scaling, rotating, or shearing. The most efficient way to work with multiple objects at once is to create a group. In general, a group of objects behaves like a single object; however, you can still select and modify individual objects within a group.
To create a group, select two or more objects, and then choose Object > Group. (See #60 for more about selecting objects.) That’s it.
To select a group, click any object with the Selection tool (Figure 68). A selected group is contained within a bounding box that has eight resizing handles and a center point. Click and drag any object to move the entire group. If you apply transformations, such as rotate, scale, shear, or flip horizontal/vertical, they’re applied to the group as a whole rather than to each object individually.
Figure 68. When you select a group, a rectangular bounding box with eight resizing handles is displayed around the perimeter of the grouped objects.

Selecting an object within a group can be a little tricky. You can’t simply click it with the Selection tool because that selects the entire group. To select an object that’s part of a group, click the object using the Direct Selection tool. If you want, you can then switch to the Selection tool, in which case the object behaves as though you selected it with the Selection tool in the first place.
If you click within a graphics frame using the Direct Selection tool, you select the graphic, not the frame. The easiest way to select a graphics frame within a group is to click the edge of the frame using the Direct Selection tool. If necessary, you can then switch to the Selection tool.
When an object that’s part of a group is selected, the Select command (Object menu) displays two choices for selecting other objects within the group: Select Previous Object in Group and Select Next Object in Group. When a graphic or graphics frame is selected, you can choose Object > Select > Content and Object > Select > Container to select the graphic or the frame (whichever isn’t selected).
To ungroup a group, select it, and then choose Object > Ungroup.
#69 Aligning Objects
You’re probably already familiar with the concept of text alignment. InDesign provides several paragraph alignment options, including left-aligned, center-aligned, right-aligned, and justified. In much the same way as you control the alignment of lines in a paragraph, you can control the alignment of objects.
If you like icon-based user interfaces, you’ll love the Align panel (Window > Object & Layout > Align). When two or more objects are selected, the 12 buttons in the Align panel let you control the placement of the objects relative to each other (Figure 69). Each button icon indicates graphically what will happen to the selected objects when you click the button.
Figure 69. The original, unaligned objects are on the left. Clicking Align Horizontal Centers in the Align panel produced the middle set. Clicking Distribute Vertical Centers produced the aligned and evenly spaced result on the right.
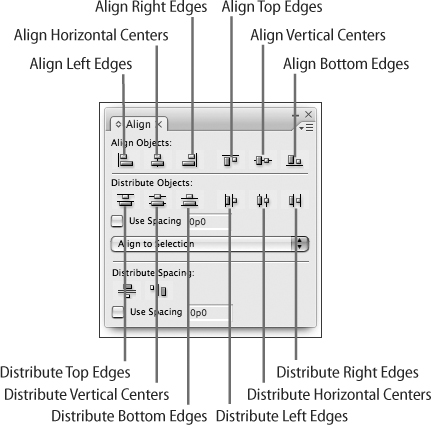

The six Align Objects buttons let you align objects along a vertical or horizontal axis. The six Distribute Objects buttons let you place a specified amount of space between objects along a horizontal or vertical axis. The Align Objects buttons in the Align panel are also available in the Control panel when multiple objects are selected.
Getting the results you want using the Align panel takes a little practice. If you click one of the align/distribute buttons and don’t like the results, you can always undo the action (Edit > Undo).
#70 Duplicating Objects
Sometimes in life, you have to do the same job more than once. Mowing your lawn and washing your clothes, for example. Fortunately, as an InDesign user, you never have to create the same object twice.
InDesign provides several options for making copies of objects. The method you choose depends on the number of copies you need and where you want to place them.
• The Duplicate command in the Edit menu creates a single copy of whatever’s selected. The copy is placed 1 pica below and to the right of the original unless you’ve used the Step and Repeat command (see the last bullet item in this list).
• Hold down Option (Mac OS) or Alt (Windows) when you drag an object with the Selection tool or Direct Selection tool to create a duplicate of the object (Figure 70a). The copied object is placed where you release the mouse button; the original object is unchanged. If you hold down the Shift key when you Alt/Option+drag an object, you can drag only in directions that are multiples of 45°.
Figure 70a. If you hold down the Option key (Mac OS) or the Alt key (Windows) when dragging an object with the Selection tool or Direct Selection tool, a pair of arrow pointers is displayed as you drag. The white one indicates that you’re dragging a copy of the original object. If you pause briefly before Alt/Option+dragging an object, the duplicate is displayed as you drag.

• The Copy and Paste commands in the Edit menu provide more options for duplicating an object. Whatever you copy with the Copy command is saved to the clipboard until you copy or cut something else. The Edit menu also provides three choices for pasting copied objects: 1) Choose Paste to place copied objects in the middle of the currently displayed page; 2) choose Paste Into to place the copied object into a selected frame and create a nested object; or 3) choose Paste in Place to place the selected objects using the X and Y offsets of the original objects. The latter option comes in handy if you want to copy something onto a new page while retaining the position of the original.
• The Step and Repeat command in the Edit menu lets you create multiple copies of an object and specify the placement of the copies relative to the original (Figure 70b). (Note: the Horizontal Offset and Vertical Offset values used most recently in the Step and Repeat dialog box are used when you choose Edit > Duplicate.)
Figure 70b. The Step and Repeat command (Edit menu) lets you create multiple duplicates in a single operation. In this example, the settings in the Step and Repeat dialog box produced the final result at the right from a single frame.

#71 Changing the Stacking Order
Every object on a page occupies a specific place in the page’s stacking order. The first object you create on a page is placed at the bottom of the stack of objects. Each new object is placed successively higher in the stack.
If objects don’t overlap, their stacking order is not important; however, if objects overlap, the stacking order determines which object is visible in the overlapping areas. You may find that you need to move objects forward or backward in the stacking order to create the desired result (Figure 71).
Figure 71. Four objects are stacked upon each other (left). The text frame is at the top of the stack; the empty circular frame is at the bottom. Selecting the circular frame and choosing Object > Arrange > Bring to Front produced the result on the right.

The Arrange command (Object menu) displays four options for changing the position of the selected object in the stacking order:
• Bring to Front: Moves an object to the top of the stack.
• Bring Forward: Moves an object one level higher in the stack.
• Send Backward: Moves an object one level lower in the stack.
• Send to Back: Moves an object to the bottom of the stack.
Layers have their own stacking order just like objects. (For more about layers, see #82.) When you choose any of the four Arrange commands (Bring to Front, Bring Forward, Send to Back, and Send Backward), the selected object moves forward or backward only within its own layer. This means, for example, that if you choose Object > Arrange > Bring to Front, the selected object may not be the frontmost object if it’s on a layer that’s below another layer. To place an object in front of all other objects, move it to the front of the frontmost layer.
If you place objects on a master page, they’re placed at the bottom of the stacking order behind objects that you place on the same layer on a document page. If you want to place master objects in front of objects on document pages, create a layer for the master objects and place that layer on top of the layer you use for objects on document pages.
#72 Using Libraries
InDesign libraries provide quick access to objects you use repeatedly—such as logos, boilerplate text, house ads, frequently used graphics, and so on. A library file is essentially a collection of objects, and an open library file is displayed as a panel with thumbnail previews of the objects it contains. It’s easy to place objects into libraries, and it’s just as easy to place copies of library objects onto pages.
Using libraries requires three steps:
1. Create a library. Choose File > New > Library. Name and save the library. Library files are automatically assigned an .indl extension to differentiate them from InDesign layouts, which are assigned an .indd extension. After you click Save, an empty library window is displayed with the name you assigned in the tab. You can create as many different library files as you want. For example, you might have one library named “Frequently Used Corporate Logos” that contains nothing but logos and another named “Disclaimer Text” that contains nothing but text frames with different kinds of legal copy.
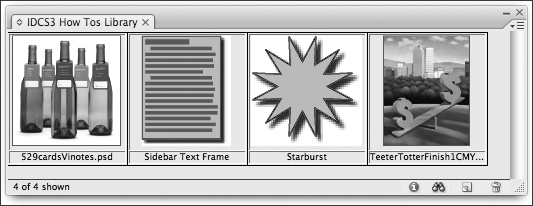
2. Add objects to the library. Select one or more objects, and then drag them into the library panel (Figure 72a). Generally, you’ll want to add objects that you’re likely to use repeatedly. You can add any object or multiple-selected objects to an open library, and there’s virtually no limit to the number of objects a library can contain.
Figure 72a. A library panel displays thumbnails of the objects it contains. Click and drag a thumbnail onto a page or the pasteboard to add a library object to a document.
3. Place library objects into documents. Click and drag a thumbnail from the library panel onto a page or the pasteboard. You can navigate to a different page, open a new document, or switch to a different document window if multiple documents are open. In each case, simply drag a thumbnail from the library panel to the document window to add the object to the document.
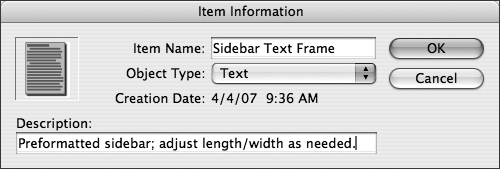
Double-click a thumbnail in a library panel to display the Item Information dialog box, where you can assign a name to the object, add a comment, and assign any of seven object types (Figure 72b). You can sort and search for library objects based on their name and other information.
Figure 72b. You can assign a name to a library object, add a description, and choose an object type, and you can use this information to sort and locate objects within a library.
The library panel menu includes several other useful commands for working with libraries:
• Add Item: Adds the selected object to the library.
• Add Items on Page: Adds all objects on the currently displayed page to the library as a single object.
• Add Items on Page as Separate Objects: Adds all objects on the currently displayed page to the library as separate objects.
• Update Library Item: If you drag a thumbnail from a library panel to a document and then change the object in the document, click Update Library Item to apply the changes you made to the library object.
• Place Item(s): Places the objects selected in the library panel into the active document.
• Delete Item(s): Removes the objects selected in the library panel from the library.
• Sort Items: Lets you sort library objects based on Name, Oldest, Newest, and Type.
#73 Using Snippets
Snippets are similar to libraries in that you can use them to save and share InDesign objects. A snippet is a file that contains one or more InDesign objects. Snippet files are much like graphic files—for example, you can import or drag and drop them into InDesign layouts; however, you create snippets with InDesign rather than a graphic program, such as Photoshop or Illustrator. A snippet stores not only InDesign objects—text frames, graphics frames, lines, and so on—but their page location and other information as well. This means that when you place a snippet into a layout, you can choose whether the objects it contains retain their original positions.
As with libraries, you must create a snippet before you can use it in other InDesign documents or share it with other InDesign users. To begin, select one or more objects that you want to save and reuse. You can then use any of three methods to create a snippet:
• Choose File > Export to display the Export dialog box and then choose InDesign Snippet from the Format menu (Mac OS) or the Save as type menu (Windows). Name the file and choose a storage folder. Snippet files are automatically assigned the extension “.inds.”
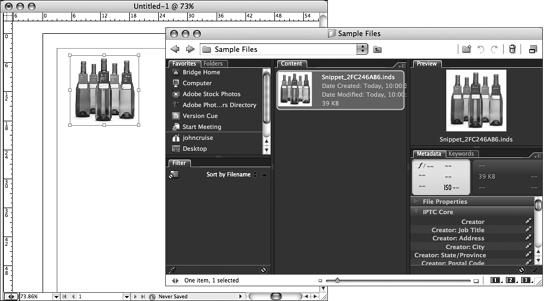
• Drag the selected objects into the Bridge window and drop them onto a volume or folder icon or into the open volume or folder (Figure 73). The snippet file is automatically given a name that begins with “Snippet.” You can change the name of the file, but you should keep the .inds filename extension.
Figure 73. The graphics frame in the InDesign document window on the left was dragged into the Bridge window on the right to create a snippet.
• Drag and drop the selected objects onto the desktop or onto a volume or folder icon on the desktop. The snippet file is given a name beginning with “Snippet.” You can change the name of the file, but you should keep the .inds extension.
After you create a snippet, you can use it repeatedly in your InDesign layouts or share it with other InDesign users. You have two options for placing a snippet into a layout:
• Use the Place command (File menu) to import a snippet the same way you import a graphic.
• Drag a snippet file from the Bridge window, the Mac OS Finder, or Windows Explorer and drop it into an InDesign document window.