
Chapter Three. Working with Text
InDesign can do everything from serving as your primary word processor to importing text from other programs to automatically applying specialized formatting. In InDesign, text is placed inside text frames or it flows along type paths, both of which can be any size and any shape. Text frames and type paths can be linked (or threaded) to each other to flow text through a document.
When it comes to formatting text, you have a variety of options for applying character and paragraph attributes, including character styles or paragraph styles for automated formatting. InDesign also provides expert options for setting tabs, creating bulleted and numbered lists, and inserting variable text such as dates and cross references. For word processing, InDesign provides a story editor, spell check features, and search-and-replace functions.
In this chapter you’ll learn how to create text frames and type paths, and then how to add, format, and edit text.
#17 Creating Text Frames
Most of the text you see in an InDesign layout—headlines, articles, figure captions, ad copy, and so on—is contained by invisible, rectangular text frames. You can, however, draw text frames of any shape, and you can use the master text frame you specify in the New Document dialog box.
Drawing Text Frames
To create a rectangular text frame, select the Type tool ![]() on the Tools panel. Click and drag to draw a text frame. Use the rulers and the X, Y, W, and H values in the Control panel to judge the size and placement of the text frame (Figure 17a).
on the Tools panel. Click and drag to draw a text frame. Use the rulers and the X, Y, W, and H values in the Control panel to judge the size and placement of the text frame (Figure 17a).
Figure 17a. While dragging with the Type tool to create a rectangular text frame, you can use the rulers and Control panel to judge its size and placement.

To create a round or irregularly shaped text frame, use any of the drawing tools (see #49 for more information). Then, simply click it with the Type tool to enter text (Figure 17b). You can also click any frame using the Selection tool or Direct Selection tool and choose Object > Content > Text to convert it to a text frame.
Figure 17b. To place text in a round text frame, draw an elliptical graphics frame with the Ellipse Frame tool, click it with the Type tool, and then start typing.

Note
If clicking a text frame with the Type tool doesn’t convert it to a text frame, check Type Tool Converts Frames to Text Frames in the Type pane of the Preferences dialog box.
Using the Master Text Frame
If you’re importing long blocks of text onto pages—for a book chapter or annual report, for example—you don’t have to draw a text frame on each page. You can automatically place a text frame on each document page by checking Master Text Frame in the New Document dialog box (File > New > Document, Figure 17c). The values in the Columns areas control the number of columns in the master text frame and the amount of space between columns (the gutter). The master text frame is placed within the boundaries specified in the Margins area.
Figure 17c. Checking Master Text Frame in the New Document dialog box automatically places a text frame on document pages according to the values in the Columns and Margins areas.

To enter text in the master text frame on document pages, select the Type tool and Command+Shift-click (Mac OS) or Ctrl+Shift-click (Windows) on the text frame.
Note
The master text frame is placed on pages based on the default master page, A-Master. If you create new master pages, they will contain the master text frame as well (although you can delete it). See #79 for more information about master pages.
#18 Modifying Text Frames
So what good are text frames, considering that you can’t see them? While their primary purpose is to contain text, you can also modify text frames to complement your layout. A magazine article, for example, generally features a rectangular text frame with a stroke around it, two columns of text inset from the edges of the stroke, and possibly a fill (background color). To achieve these effects, you can control the positioning of text within text frames (specifying the number of columns, for example), and you can format text frames like any other object (applying a stroke, fill, and drop shadow, for example). To format text frames, select them with the Type tool, the Selection tool, or the Direct Selection tool.
Setting Up Columns
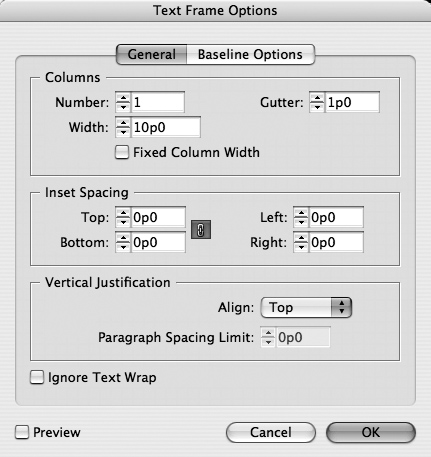
To modify the number of columns in a text frame, select the frame and choose Object > Text Frame Options. Options in the Columns area in the General tab (Figure 18a) work as follows:
1. Enter the number of columns for the text frame in the Number field and the amount of space you want between columns in the Gutter field.
2. If you want the columns to be a specific width, enter a value in the Width field. You don’t have to be a math wiz here—if the number of columns, the width, and the gutter you specify won’t fit in the text frame, InDesign will automatically adjust the text frame.
3. Check Fixed Column Width to keep the width of the columns the same—even if the text frame is resized. Rather than adjusting column width, InDesign will change the number of columns and the frame will be automatically resized to accommodate the specified column width. For example, suppose you try to make a two-column text frame a tiny bit wider. If Fixed Column Width is checked, when you widen the frame it will automatically jump from two columns in width to three.
Figure 18a. The General tab in the Text Frame Options dialog box lets you specify the position of text within the frame.
Specifying Text Inset and Vertical Alignment
The General tab in the Text Frame Options dialog box also lets you adjust the amount of space between the edges of a text frame and the text. The need for this value is not apparent, however, until you stroke the edges of a frame and realize that the text is touching the stroke. To adjust text inset, type values in the Top, Bottom, Left, and Right fields in the Inset Spacing area.
Note
For nonrectangular text frames, such as elliptical text frames, you can have only one inset value.
InDesign provides even more control over the placement of text relative to the top and bottom of the frame. You can specify how lines of the text are placed vertically using the Vertical Justification area in the General tab in the Text Frame Options dialog box. For example, you can specify that text is centered vertically within the frame—an option that works well for cards, invitations, ads, and so on.
Formatting Text Frames
To make a text frame visible in a design, you can apply a stroke to its edges, apply a fill or gradient to its background, add a drop shadow, and more. For more information, see #62, #63, and #66.
Using the Baseline Grid
A baseline grid consists of horizontal lines that text “sits” on. Setting up a baseline grid for an entire document or an individual text frame makes it easy to align text horizontally across columns regardless of varying leading and spacing values before and after paragraphs. Generally, the distance specified between gridlines in the baseline grid is the same as the leading value for body text (around 12 points, for example). Some graphic designers swear by the baseline grid for carefully positioning text, whereas others sneer at its use, likening it to a paint-by-the-numbers painting.
You can set up a baseline grid for a document in the Grids pane in the Preferences dialog box. In addition, you can use the Baseline Options tab in the Text Frame Options dialog box to set up grids for individual text frames. Once you set up a baseline grid, you still need to “snap” paragraphs to it by selecting them and clicking Align to Baseline Grid in the Paragraph panel or Control panel (Figure 18b). The View > Grids & Guides submenu lets you show and hide the baseline grid.
Figure 18b. When paragraph options are displayed in the Control panel, you’ll find the Align to Baseline Grid button at the far right.

#19 Threading Text Frames
Right away you’ll notice that all your text doesn’t always fit into one frame. Plus, you may not want all your text crammed into a single frame. To solve this dilemma, InDesign lets you link text frames to each other through a process called threading. When text frames are threaded, one long block of text—such as a newspaper story or a series of one-paragraph catalog descriptions—flows from one frame to the next.
All the text within a series of threaded frames is referred to as a story. Working with a story—as opposed to multiple unthreaded text frames containing text—has many advantages. You can edit stories in the Story Editor; limit a spell check or search-and-replace function to only the text in a story; or select all the text in a story to reformat it, export it, or copy and paste it. All the advantages of working with stories make threading text frames particularly important.
You can thread two or more empty text frames, and you can thread text frames to an existing frame. You cannot, however, add text frames that contain text to a thread. Unlike other text-related activities, which require the Type tool, you thread text frames using the Selection tool or the Direct Selection tool.
Preparing to Thread
To start threading text frames, you need to be able to see them to understand what you’re doing. Choose View > Show Frame Edges to see outlines of the text frames. Then, choose View > Show Text Threads so you can see the links between frames. With the Selection tool, click a text frame to make its in port and its out port visible (Figure 19a). You’ll use these ports to link one text frame to another.
Figure 19a. The upper-left corner of each text frame contains an in port and the lower-right corner contains an out port.

Threading Two Frames
To thread text frames, click the out port of the first text frame and then click the in port of the second text frame.
1. To thread two existing text frames, click the Selection tool or the Direct Selection tool.
2. Click the text frame you want to start threading from—this frame may or may not contain text.
3. Click the text frame’s out port in the lower-right corner; the loaded text icon ![]() displays.
displays.
4. Navigate to the second text frame, even if it’s on another page. When the cursor is over another text frame, the thread icon ![]() displays.
displays.
5. Using the thread icon, click anywhere in the text frame that you want to add to the thread (Figure 19b). In addition to clicking an existing text frame, you can also click and drag to create a new text frame that is threaded to the first frame.
Figure 19b. To thread text frames, click a text frame’s out port using the Selection tool. Then, click within another text frame.

6. Notice the line (or thread) between the two text frames (Figure 19c). To link additional text frames, repeat this process.
Figure 19c. A line between two ports indicates threaded text frames.

Tip
Threading is not limited to text frames. You can thread type paths to each other, thread type paths to text frames, and thread text frames to type paths. For example, you can flow a headline along a type path and then thread it to a text frame containing an article.
Working with Threaded Text Frames
Once you thread text frames, you’re not stuck with the sequence you’ve created—you can add frames within a thread, reroute threads, delete threaded text frames without losing text, and break threads.
• To insert a text frame into a series of threaded frames, simply click the out port of the preceding text frame and click in the new text frame.
• To reroute threads, click an out port and then click in the frame to which you want to reroute the text.
• To delete a frame within a series of threaded text frames, select it and choose Edit > Clear. Text is automatically reflowed into the remaining threaded text frames. Deleting a text frame from a series of threaded frames does not delete the text within the frame.
• To break a text thread, double-click an out port or an in port. The thread between the two text frames will be broken, and the text after the broken thread will become overset (see the Overset Text sidebar).
The master text frame, specified in the New Document dialog box (File > New > Document), is automatically threaded from page to page.
#20 Creating Type Paths
Text is not restricted to placement inside frames: You can flow text along any shape path, including along a straight line, a curved line, or a circle or square. Once text is on the path, you can create special effects by flipping the text, creating a stair-step or rainbow effect with the characters, and more (Figure 20a).
Figure 20a. Using the Type on a Path tool, we placed text on a circle, flipped it, and repositioned it. We then placed a picture on top of the circle.

Placing Type on a Path
You can use any InDesign object, created with any tool, as a type path. Simply draw the shape and fill it or apply a stroke to it if you want (see Chapter 5 and Chapter 7 for information about drawing and formatting objects). Once you have a path, click and hold the Type tool to display a pop-out menu, and then select the Type on a Path tool (Figure 20b).
Figure 20b. Click and hold the Type tool to display a pop-out menu and select the Type on a Path tool.

With the Type on a Path tool selected, click the path where you want to start the text. While this sounds simple, it works only when the cursor is directly over a path and a plus sign is displayed next to it (Figure 20c). Once the blinking text insertion point displays, start typing to add text. Change the font, size, color, alignment, and indents as usual (see #23 for more information).
Figure 20c. To create type on a path, select the Type on a Path tool and point at a path. When a plus sign (+) is displayed to the right of the cursor, click to start adding text to the path.

In addition to typing to add text to a path, you can import a text file (File > Place) or you can paste text from the clipboard. You can use either the Type on a Path tool or the Type tool to work with type on a path.
Positioning Type on a Path
To create various effects, you can control where the text is placed relative to the path. Select the path with either the Selection tool or the Type on a Path tool and choose Type > Type on a Path > Options. The Type on a Path Options dialog box lets you choose a special effect for the characters, change how the text aligns with the path, adjust the spacing of characters, flip the text to the opposite side of the path, and more (Figure 20d).
Figure 20d. The Type on a Path Options dialog box lets you control how text is oriented to the path, including creating special effects, such as Rainbow, with the characters.

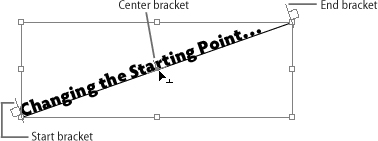
To adjust where text starts on the path, click the path with the Selection tool. Notice the blue bracket on each end of the text. These are similar to text frame edges in that they establish the left margin and the right margin for the text. You can drag these brackets with the Selection tool to reposition the start or end point of text on the path (Figure 20e). Also available is a center bracket, which you can drag across the path to flip text to the other side of the path or along the path to move all the text.
Figure 20e. To change the starting position of text on a path, drag the start bracket to the left of the text. You can also drag the end bracket to compress the text area.
Tip
You may need to zoom in to see and select the brackets.
Deleting Type on a Path
If you decide you no longer want type on a path, you can simply select the text and delete it. When the path is selected with the Selection tool or Direct Selection tool, you can choose Type > Type on a Path > Delete Type from Path. The text is deleted but the path remains on the page. If you don’t want to keep the type or the object, select the object and press Delete or Backspace.
#21 Importing Text
Since most people compose documents in word processors, InDesign makes it easy to import Microsoft Word files and other text files. When importing text, you can customize how the text is imported (with or without formatting, for example), and you have several options for flowing it through a document. You can do almost anything from importing raw text with no formatting to bringing in fully formatted text that includes inline graphics, tables, a table of contents, an index, and footnotes.
Placing a Text File
You can import text into an existing frame or type path—the frame doesn’t even have to be a text frame because InDesign will automatically convert it. In addition, you can “load” the cursor with the imported text and create a new text frame. To import a text file:
1. If you want to import text into an existing object, select the Type tool or the Type on a Path tool. Click in the frame or on the text path that you want to contain the text. Otherwise, you can select any tool—just make sure no objects are selected.
Note
To flow text into the master text frame, press Command+Shift (Mac OS) or Ctrl+Shift (Windows) to select it.
2. Choose File > Place. In the Place dialog box (Figure 21), locate and select the Microsoft Word or text file.
Figure 21. The Place dialog box (File menu) lets you select Microsoft Word files and text files to import.

Tip
You can select multiple files to import. To select a range of files, Shift+click the first and last file. To select noncontinuous files, Command+click (Mac OS) or Ctrl+click (Windows) the files. InDesign will “load” the cursor with all the selected text files and let you place them one after the other.
3. To customize how the text is imported, check Show Import Options. This gives you control over which formats and other elements are imported with the text.
4. If the selected frame contains text or a graphic and you want to replace it, check Replace Selected Item. If you uncheck this option, InDesign loads the cursor so you can create a new text frame.
5. Click Open.
If the Missing Font alert displays when you import text, you can generally click OK to bypass the alert since you will be using formatting specified in InDesign. If, however, you plan to use the formatting in the file, note which fonts are missing and activate them using your font manager. You can also click the Find Font button to replace the fonts with active fonts.
Tip
In addition to using the Place command (File menu), InDesign lets you import both text and graphics files by dragging file icons from your computer desktop onto a page. If a frame is selected, the text or graphic is imported into the frame. If nothing is selected, a text frame is automatically created roughly where you drop the file.
Setting Import Options
If you check Show Import Options in the Place dialog box, the Microsoft Word Import Options or Text Import Options dialog box displays. For Microsoft Word, you can use this dialog box to control whether the table of contents, inline graphics, formatting, and styles are imported along with the text and to resolve any style conflicts. For text files, you can clean up the text by removing extra paragraph returns and specifying other options.
Flowing Text Through a Document
When you import text into a selected frame, the text in the file fills the frame and automatically flows into all the frames threaded to it. If you selected the master text frame, pages and text frames are added as necessary to contain all the text.
If no frames are selected when you import text, the loaded text icon displays ![]() . At this point, you have three options:
. At this point, you have three options:
• Click in a text frame or type path to flow the text into it.
• Click and drag to create a new text frame.
• Option+Shift-click (Mac OS) or Alt+Shift-click (Windows) to automatically create a text frame (within the margin guides) and flow the text into it. Any remaining text is overset. InDesign refers to this as fixed-page autoflow.
If all the text doesn’t fit into the frame—as indicated by a red plus sign in the lower-right corner of the text frame—you have overset text. To flow the overset text through the document, you have several options:
• Manual text flow: Click an out port on the text frame to load the cursor again, and then create another text frame or thread this one to an existing text frame (see #19 for more information). With manual text flow, you need to continually reload the cursor and create new text frames or threads until all the text fits.
• Semi-autoflow: Option-click (Mac OS) or Alt-click (Windows) the out port of the text frame containing the overset text to automatically reload the cursor. Thread text frames until all the text flows through the document.
• Autoflow: Shift-click with the loaded text icon to add pages and text frames (based on the master text frame) until all the text fits.
You can use the keyboard shortcuts for semi-autoflow and autoflow when you first load the cursor if you know all the text you are importing will not fit into a frame. You do not need to first create overset text.
Once you flow text, you may need to bump certain paragraphs or sections to a different column or page. Rather than using extra paragraph returns to do this, use the options in the Type > Insert Break Character submenu (such as Column Break or Page Break).
#22 Entering and Editing Text
Our first tip for entering and editing text is mandatory: You must use the Type tool or the Type on a Path tool. Our second tip is voluntary but extremely helpful: Choose Type > Show Hidden Characters. This displays nonprinting characters such as spaces, tabs, and paragraph returns so you can make precise text selections, cut and paste more accurately, and prevent formatting errors (Figure 22). Other than these two tips, editing text in InDesign is rather similar to using a word processor or even an e-mail program.
Figure 22. You can see a variety of hidden characters at work here: spaces are indicated by dots, tabs by double arrows, paragraph returns by the traditional symbol ¶, and more.

Positioning the Insertion Point
To start entering or editing text in a frame or on a type path, you need an insertion point. To get the insertion point, select the Type tool and click within any empty text frame or within the text in a text frame. If the Selection tool or Direct Selection tool is selected, you can double-click a text frame to automatically select the Type tool and position the insertion point. To enter text in the master text frame, be sure to press Command+Shift (Mac OS) or Ctrl+Shift (Windows) while you click. Once you have an insertion point, you can begin typing or you can select text for editing and formatting.
Tip
If you cannot click in a text frame because it’s behind other objects, use the Selection tool and press Command (Mac OS) or Ctrl (Windows) while you click. Keep clicking “through” other objects until the text frame is selected, and then switch to the Type tool. If this is an ongoing problem, place the text frame on its own layer (Window > Layers) for easy access. You can also select the text frame with a selection tool and choose Object > Arrange > Bring to Front. When you’re finished editing text, use Object > Arrange > Send Backward as necessary to store the text frame’s original position.
Selecting Text
To select text using the Type tool or the Type on a Path tool, click and drag the mouse. Other options include:
• Click twice in a word to select it.
• Click three times to select a line.
• Click four times to select a paragraph.
• Choose Edit > Select All to select the entire active story.
Tip
You can also select a range of text starting from the insertion point to another point in the text. Click in the text and then Shift-click in another location, and the range of text is selected.
Editing Text
When text is selected, you can use standard Edit menu commands to Cut, Copy, and Paste the text to different locations. In addition, you can use the mouse to drag and drop text to different locations. Drag and drop is on by default for text in the Story Editor but off for text in layouts. To turn it on, open the Preferences dialog box, select the Type pane, and check Enable in Layout View in the Drag and Drop Text Editing area.
To drag and drop text, first select it. Then, point at the text with the mouse to display the drag-and-drop icon ![]() . Drag the text to a new location indicated by the insertion point, and release the mouse button to drop it. When dragging and dropping text, you can create a new text frame or drop a copy of the text.
. Drag the text to a new location indicated by the insertion point, and release the mouse button to drop it. When dragging and dropping text, you can create a new text frame or drop a copy of the text.
• To create a new frame for the text, press Command (Mac OS) or Ctrl (Windows) while you click and drag to create a new frame.
• To drop a copy of selected text, press Option (Mac OS) or Alt (Windows) when you release the mouse button to drop the text.
#23 Applying Character and Paragraph Attributes
Here’s where the fun starts—you get to start picking fonts, sizes, styles, and alignment to jazz up your text. InDesign’s text formatting comes in two distinct flavors: character attributes and paragraph attributes. Character attributes are attributes such as font and type size that you can apply to individual characters. In fact, each character in a document can have its own unique formatting, although this sort of ransom-note style is not generally what graphic designers are aiming for. Paragraph attributes are attributes such as indents and tabs that apply to entire paragraphs as opposed to individual characters. (If you can’t tell where paragraphs begin and end, choose Type > Show Hidden Characters and look for the paragraph symbol ¶.)
Character attributes and paragraph attributes generally work together to complement the actual content. For example, weekly newsmagazines often use serif fonts and justified text to indicate authority, whereas an invitation to a fundraiser might be centered in a script font for an elegant look. While character attributes account for the basic look of text—size, serif or sans serif font, style—the formatting you apply to paragraphs largely controls the “color” of the type. This is not literally “color” as in whether it’s black or blue, but the overall appearance (or value) of the type when you glance at a document or even look at it upside down. Are the blocks of text light and airy or dark and dense? Paragraph attributes achieve these results by controlling alignment, indents, space between paragraphs, hyphenation and justification, and more.
Applying Character Attributes
To apply character attributes, select the text using the Type tool. Or, you can simply click in a text frame or on a type path and set character attributes. The attributes will be applied when you start typing. All the character attributes are available in the Control panel’s character options (Figure 23a). If you’re not sure what an option does, point at it with the mouse to display its tool tip. Additional character formatting options are available in the Control panel menu.
Figure 23a. The character options in the Control panel provide quick access to all the character formatting controls available in InDesign.

If you prefer to work with the Character panel (Type menu), it offers a convenient place to specify basics: Font, Size, Leading, Kerning, and Tracking. Choose Show Options from the panel menu to expand the panel with more advanced options such as horizontal or vertical scaling and skewing (Figure 23b). The remaining character formatting options are available in the panel menu as well. The only character attributes you won’t find here are color and stroke (see #34 for more information).
Figure 23b. The Character panel (Type menu) provides comprehensive character formatting controls.

Applying Paragraph Attributes
To apply paragraph attributes, use the Type tool and click in a paragraph to select it or select multiple paragraphs. All the paragraph attributes are available in the Control panel’s paragraph options (Figure 23c). If you’re not sure what an option is, point at it with the mouse to display its tool tip. Additional paragraph formatting options are available in the panel menu. Most of the paragraph attributes are similar to those available in a word processor. InDesign, however, has a superior method of composing type, which is explained in #24.
Figure 23c. The paragraph options in the Control panel provide quick access to all the paragraph formatting controls available in InDesign.

In addition to using the paragraph options in the Control panel, you can use the Paragraph panel (Type menu). At its default size, it offers only alignment and indent controls, but you can choose Show Options from the panel menu to display more paragraph formatting controls.
#24 Composing Type
Many of InDesign’s character and paragraph formatting options are familiar to you from using a word processor—or even your e-mail program. But what really sets InDesign apart is its sophisticated method of text composition—of adjusting spacing and hyphenation to achieve evenly spaced type in a paragraph. The method is called the Adobe Paragraph Composer, and it works by considering spacing, hyphenation, and line breaks in all the lines in a paragraph in relation to each other. By contrast, the Adobe Single-line Composer and most other programs consider only one line at a time (Figure 24a).
Figure 24a. Although the difference between the Adobe Paragraph Composer and the Adobe Single-line Composer is subtle, the single-line method is more likely to produce inconsistent spacing. For example, at left, notice the spacing in the second line from the bottom—there are some gaps between words. At right, with the Adobe Paragraph Composer in use, you’ll see more consistent spacing overall and particularly in the second-to-last line.

The three primary factors affecting composition—Hyphenation, Justification, and Composer—are all paragraph attributes, and they are discussed here.
Hyphenation
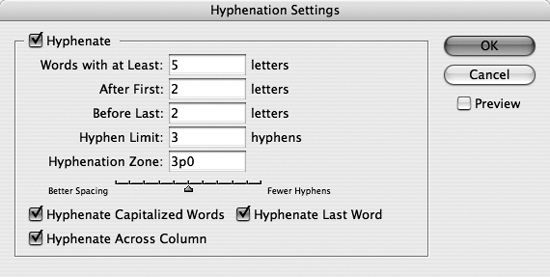
InDesign gives you far more control over automatic hyphenation than just turning it on and off for a paragraph. You can specify a limit to the number of lines in a row that end in hyphens, whether capitalized words can be hyphenated, the minimum number of letters a word must have to be hyphenated, the number of letters that must precede and follow a hyphen, and more. While these decisions impact the look of the text, they also have editorial implications, so you may want to set them with the help of an editor. For example, whether capitalized words should be hyphenated is often covered in the publisher’s style guide and is not at the designer’s discretion.
To set hyphenation, first select paragraphs with the Type tool. Then, choose Hyphenation from the Paragraph panel menu (Type > Paragraph) or from the Control panel menu when paragraph options are displayed. The Hyphenation Settings dialog box (Figure 24b) lets you customize settings for the selected paragraphs. To see how changes affect the paragraphs, check the Preview box.
Figure 24b. The Hyphenation Settings dialog box provides a slider for striking a balance between Better Spacing and Fewer Hyphens.
Tip
The paragraph options in the Control panel provides a Hyphenate check box so you can quickly turn hyphenation on and off.
Setting Justification
The Justification settings in InDesign control how spacing is adjusted in justified text, the leading, and which composition method is used. To set hyphenation, first select paragraphs with the Type tool. Then, choose Justification from the Paragraph panel menu (Type > Paragraph) or from the Control panel menu when paragraph options are displayed. In the Justification dialog box (Figure 24c), be sure to check Preview so you can see how your settings affect the text.
• Word Spacing, Letter Spacing, and Glyph Scaling: These fields control how spacing is adjusted and how characters are scaled when justifying text. (Therefore, these values do not apply to paragraphs that are right, left, or center aligned—only justified.)
• Auto Leading: This field controls the amount of space between lines in the selected paragraphs—if they use auto leading. The value is a percentage of the type size in use. So, if the Font Size is 10 points, and Auto Leading is 120%, the Leading is set to 12 points.
• Single Word Justification: In justified text, if a line consists of a single word, you can specify how that word is handled by choosing an option from the Single Word Justification menu. Your options are to fully justify the word (possibly leading to giant gaps within the word), align it with the left margin, center it, or align it with the right margin.
• Composer: Select the Adobe Paragraph Composer or the Adobe Single-line Composer from the Composer menu.
Figure 24c. The Justification dialog box lets you fine-tune the spacing within justified paragraphs.

Choosing a Composition Method
When paragraphs are selected with the Type tool, you can choose the Adobe Paragraph Composer or the Adobe Single-line Composer from the Control panel menu. You can also choose a composition method from the Composer menu in the Justification dialog box. The Adobe Paragraph Composer generally leads to better spacing, particularly in justified paragraphs.
#25 Creating Bulleted and Numbered Lists
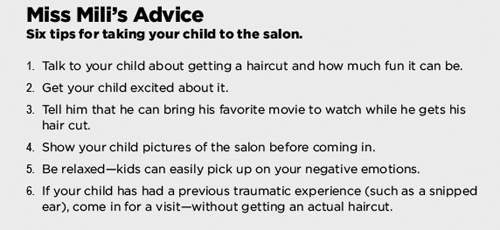
Lists are a great way to break up blocks of text and keep the reader interested with quick bits of information (Figure 25a). With features similar to those in Microsoft Word, InDesign makes it easy to create bulleted and numbered lists automatically. The feature, called Bullets and Numbering, is actually lifted from PageMaker. Aside from saving you the time of entering a bullet or number for each paragraph, formatting it, and specifying a tab and indent, the Bullets and Numbering feature creates lists that are easy to edit. For example, as you add paragraphs, bullets are added or numbers are inserted as necessary.
Figure 25a. Clicking the Numbered List button in the Command Bar (Window> Object & Layout) created this list.
To create a bulleted or numbered list:
1. Select the paragraphs with the Type tool.
2. Display the paragraph options in the Control panel.
3. Click the Bulleted List button ![]() or the Numbered List button
or the Numbered List button ![]() to apply the default formatting.
to apply the default formatting.
4. To fine tune the formatting of the list, keep the paragraphs selected and choose Bullets and Numbering from the Control panel menu.
5. In the Bullets and Numbering dialog box (Figure 25b), if you need to change a bulleted list to a numbered list or vice versa, choose an option from the List Type menu at the top: Bullets or Numbers.
Figure 25b. The Bullets and Numbering dialog box lets you customize the formatting of automatic bulleted and numbered lists.

6. Decide on the format of the bullets or numbers your list will use:
• Bullets: Select an option from the Bullet Character area or click Add to access other bullet characters (including bullet characters in other fonts). Use the Text After field and pop-out menu to specify the characters to follow the bullet (such as an em space or tab).
• Numbers: When defining a numbered list, you can specify a format (Arabic or Roman numerals, for example), use the Number field to define separator characters (such as a period and a tab), and choose a starting number from the Mode menu.
• Character Style: You can choose a character style for bullets and numbers in lists.
7. In the Bullet or Number Position area, specify the Alignment, Indents, and Tab Position to adjust the spacing around the bullets or numbers.
8. Check Preview to review the list, and then click OK.
After you’ve created a bulleted or numbered list, you can change any of the settings by selecting the paragraphs and opening the Bullets and Numbering dialog box again.
#26 Setting Tabs
You’re no doubt familiar with tabs from your typewriter days—if you are old enough to have experienced those days—but tabs are even more important in a page-layout environment. To align text, it’s important to use tabs rather than spaces for precision alignment. Unlike characters on a typewriter, the width of characters and spaces in computer fonts can vary, making it impossible to precisely align text.
InDesign provides default tab settings at every half inch, but you’re not stuck with those. You can override the default tabs and customize each tab stop by specifying how text aligns with it and adding leader characters (Figure 26a).
Figure 26a. This text is divided into three columns with three different tab stops. The first tab stop is left aligned with a dot leader; the second tab stop aligns to the decimal point in the prices; the third tab stop is right-aligned.

Specifying Tab Stops
Tabs are paragraph attributes, so they apply to selected paragraphs rather than to individual lines selected within a paragraph or to selected characters. To set tabs:
1. Choose Type > Show Hidden Characters to view tab characters in text. They look like double arrows.
2. Select the Type tool.
3. Select the paragraphs for which you want to set tabs.
4. Choose Type > Tabs to open the Tabs panel.
5. Click one of the alignment buttons at top left to specify how text aligns with the tab stop: left-justified, center-justified, right-justified, or align to decimal. If you click align to decimal, you can actually specify any alignment character, such as a comma, in the Align On field at right.
6. If you want to fill the white space created by the tab with a repeated character, you can enter up to eight characters in the Leader field. For example, if you want periods to lead the eye from a table of contents entry to its page number, enter a period in the field. For more space between the periods, enter a period and a space.
7. Click above the ruler where you want to place the tab. The X field displays the position. Once you set a tab stop, all the default tab stops to the left of it are cleared.
Modifying Tab Stops
To modify a tab stop, click its icon on the tab ruler and change any of its settings (for example, click a different alignment button). To delete a tab stop, drag its icon off the ruler. To delete all tab stops, choose Clear All from the Tabs panel menu.
Creating a Right-Indent Tab
InDesign provides a “Right Indent Tab,” which forces text over to the paragraph’s right-indent value. The Right Indent Tab is particularly useful for positioning an “end of story” character or an author’s initials (Figure 26b). To insert it, choose Type > Insert Special Character > Other > Right Indent Tab.
Figure 26b. To automatically align an “end-of-story” character with the right-indent of the paragraph, insert a Right Indent Tab rather than a standard tab.

#27 Working with Fonts
As you no doubt know from working on a computer, fonts define the look of characters. If you’re an experienced graphic designer, you may not need to know much about fonts other than how they’re handled in InDesign. If you’re new to graphic design, however, we’ll cover the basics of fonts for you.
Applying a Font
Fonts are character attributes that you apply as follows:
1. Select the Type tool.
2. Select the text you want to apply a font to.
3. Choose Type > Character.
4. At the top of the Character panel (Figure 27), choose an option from the Font menu or enter a font name in the field. The menu displays a preview of the font next to the name so you can see what it looks like.
Figure 27. The first two menus on the Character panel let you choose a font and style.

5. Below the Font menu, you can choose an option from the Style menu—for example, Bold, Semibold, Italic, or Oblique. These are the styles available for the font that are activated on your system—they are not produced by InDesign.
You can also choose fonts from the equivalent menus when the character options are displayed in the Control panel.
Checking Fonts
When you open a document, InDesign checks to see that all the fonts used in the document are active on your system. If they’re not, you’re notified so you can activate or replace them. When you’re ready for output, use File > Package to have InDesign collect copies of fonts to provide to the printer.
Tip
If you need to change a document’s fonts, you can use Type > Find Font to display a list of the fonts used in the document. You can then replace any missing fonts with fonts that are active on your system.
Font Basics
If you’ve ever uttered the sentence, “My computer doesn’t have that font” (and you’re not sure what’s wrong with saying that), this section is for you. Since many fonts come with your computer and even more come with programs you buy, it’s easy to think that fonts are part of the computer or a specific program. But it’s not true. Fonts are independent files that you can turn on (activate) and off (deactivate) through your system or a font management program. You can buy additional fonts from vendors such as Adobe, Linotype, and Bitstream and add them to your system.
Fonts come in a variety of formats, including PostScript, OpenType, and TrueType. Currently, the most widely used and accepted fonts are PostScript Type 1—in fact, you may encounter complaints from other users and printers if you don’t use them. OpenType fonts, however, are gaining ground because they can contain thousands of characters and are cross-platform (meaning the same file can be used on Mac OS and Windows systems).
Whichever fonts you use in whatever format, the most important thing to remember is consistency. It’s likely that your computer has multiple versions of the same font—Times, Helvetica, Palatino—in various formats from different vendors. To prevent text from reflowing, the exact fonts you use to design a document should be used each time you edit it. In addition, you need to send those same fonts to the printer with your documents (File > Package).
#28 Using Paragraph and Character Styles
When formatting an entire document, you’re certainly not expected to remember and consistently apply the hundreds of paragraph and character attributes InDesign provides. Instead, you can create paragraph styles and character styles to apply multiple attributes to text with a single click or keyboard shortcut. And, if you change an attribute in a style, it’s changed everywhere the style is used. For example, you can change a font in a style and it will automatically change throughout a document. Using styles has so many benefits in terms of speed and consistency that you’d never want to work on a long document such as a book, magazine, or newsletter without them.
Creating Styles
Paragraph styles are applied to entire paragraphs and include both paragraph attributes and character attributes. Character styles, on the other hand, specify only character attributes and are applied to selected text. Character styles are useful for local formatting within a paragraph. For example, corporate stock symbols in body copy are often formatted to stand out through the use of small caps, a sans serif font, and maybe a different color. You create paragraph and character styles in the same way, but from different panels.
Generally, the best way to create paragraph and character styles is to first format sample text that includes all the different styles you will need for a document, such as heads, subheads, indented paragraphs, paragraphs with no indent, bulleted lists, and so on. Then, use the formatted text as a basis for the styles. To create a style based on formatted text:
1. Using the Type tool, select formatted text.
2. Choose Type > Paragraph Styles or Type > Character Styles.
3. From the Paragraph Styles or Character Styles panel menu, choose New Paragraph Style or New Character Style.
4. In the Paragraph Style Options dialog box (Figure 28a) or the Character Style Options dialog box, enter a name for the style.
Figure 28a. The Paragraph Style Options dialog box lets you specify a name, shortcut key, and formatting for a new paragraph style.

5. To apply the style using a keyboard shortcut, click in the Shortcut field and press the shortcut keys you want to assign. Generally, it’s best to use the modifier keys and the numbers on the keypad as shortcuts.
6. All the options are already set according to the formatted text as summarized in the Style Settings area. Click in the scroll list at left to display panes of options and change any of the formatting.
If you’re not working with formatted text, you can create a new style by clicking the Create New Style button at the bottom of the Paragraph Styles or Character Styles panel. This creates a new style in the panel called Paragraph Style 1 or Character Style 1. The number reflects the creation order. Double-click the new style to name and modify it.
Tip
Character styles do not need to specify all possible character attributes; they can specify only what you want to change. For example, a character style might specify nothing but the color red. You can then apply the character style to any text you want to be red—without changing the font, size, or other character attributes of the text.
Applying Styles
Applying styles is easy: Select the text and click the style name or press its keyboard shortcut.
• To apply a paragraph style, click in a paragraph or select several paragraphs with the Type tool. Click the style name in the Paragraph Styles panel (Figure 28b) or press the keyboard shortcut shown for it.
Figure 28b. Click style names in the Paragraph Styles panel (left) and the Character Styles panel (right) to apply them to selected text.

• To apply a character style, select text with the Type tool. Click the style name in the Character Styles panel or press its keyboard shortcut.
Occasionally, you will modify a paragraph’s formatting after applying a paragraph style—and then change your mind about the changes. For example, you might try different indents or alignments, or you might tighten the tracking. Any formatting that does not match the style is called an “override.” To force a paragraph’s formatting to match its original paragraph style, select it and choose Clear Overrides from the panel menu. You can also Option-click (Mac OS) or Alt-click a style name. Note that this does not remove character styles applied within the paragraph.
Modifying Styles
To change the attributes specified in a style, you can double-click the style name or select the style name and choose Style Options from the Character or Paragraph panel menus. Or, as a shortcut, reformat some of the text that is formatting with the style, and then choose Redefine Style from the panel menu. The Character and Paragraph panel menus also provide options for duplicating, deleting, importing, and exporting styles.
#29 Inserting Variable Text
Variable text is text that automatically updates itself as needed. For example, you can insert a text variable for Modification Date so the current date is inserted in text every time you open and modify a document. You can also use a text variable to automatically update running headers and footers, add a file name and output date to the slug area when printing, or insert a cross reference to the last page in a document. InDesign provides a variety of variable text definitions for these purposes. You can also define custom variable text for use as a placeholder—for example, if you’re designing a birth announcement for an unnamed baby, you can insert variable text; one quick change to the variable text definition and the baby’s name appears everywhere it should.
Inserting Text Variables
Text variables are inserted into text just like other characters:
1. Select the Type tool and click in text.
2. Choose Type > Text Variables > Insert Variable.
3. Choose one of the default text variables in the submenu such as Creation Date (Figure 29a). This inserts the current date (according to your system settings) in the default format of MM/DD/YY.
Figure 29a. The Text Variables submenu lets you insert text variables into text.

Default Variables
InDesign provides a set of default variables with all new documents. You can modify the default variables to better suit your needs—for example, you can add explanatory text before and after the Creation Date variable, and you can modify the format of the date itself. The default variables work as follows:
• Chapter Number: Inserts a chapter number you define; this is useful for cross-references, headers, and footers.
• Creation Date: Inserts the date/time the document was first saved.
• Modification Date: Inserts the date/time a document was last saved; this is useful for tracking edits.
• Output Date: Inserts the date/time an output operation such as printing or PDF export started.
• File Name: Inserts the file name of the active document.
• Last Page Number: Inserts the last page number in document; this is useful for references such as “page 20 of 100” when the last page number is a moving target.
• Running Header: This inserts text from a specified paragraph or character style used to format heads; as the name implies, it is useful for creating running headers and footers.
Editing Text Variable Definitions
To edit a document’s text variable definitions, choose Type > Text Variables > Define. Use the New, Edit, and Delete buttons in the Text Variables dialog box (Figure 29b) to create, modify, and delete variables in the list.
Figure 29b. Use the Text Variables dialog box to customize the default text variables and create new ones.

#30 Using the Story Editor
Part of the beauty of working in InDesign is the way you can truly see your pages coming together—the way the type and graphics work together to communicate a message. However, sometimes you need to revise the text of the message, and all those graphics can get in the way. To get around this, InDesign provides the Story Editor, which lets you edit plain text in a separate window. If you’ve ever worked in PageMaker or reviewed galleys, the Story Editor will be familiar to you.
Using the Story Editor is particularly helpful when you’re working with overset text, reverse type, complex text wraps, or text placed behind other semitransparent objects. Anytime you’re having trouble working with text, select a text frame in the story and choose Edit > Edit in Story Editor (Figure 30). All the text in the story is displayed in a separate window that includes a list of paragraph styles applied to text, a vertical depth ruler, and an overset text indicator.
Figure 30. The Story Editor (Edit > Edit in Story Editor) makes it easy to focus on editing text while seeing the impact of the edits on the layout.
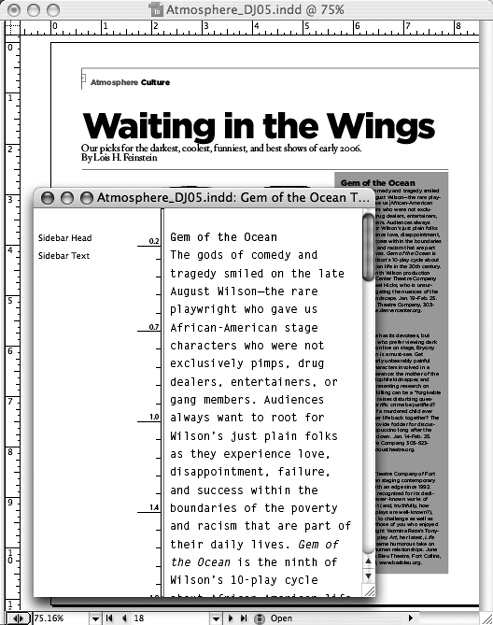
When you’re editing text in a Story Editor window, the Type tool is automatically selected so you can edit the text as usual. You will see only the most basic formatting attributes, such as bold and italics; tables, inline objects, footnotes, and the like are represented by icons. While you’re editing text in the Story Editor, you can see changes in the layout as well.
You can open multiple stories in their own Story Editor windows, including opening a Story Editor for a type path. The Story Editor windows work as follows:
• Drag the Story Editor window and document window as necessary for the most convenient positioning. For example, you might place them side by side to see how text changes affect a column in the layout.
• Each open Story Editor window is listed at the bottom of the Window menu. If the window you’re working on goes behind the document window, choose it from the Window menu to bring it forward.
• If you’re working with a text frame containing overset text, a line indicates where the text no longer fits in the frame.
• Use the View > Story Editor submenu to control what displays in the Story Editor: Style Name Column, Depth Ruler, and Footnotes. These commands affect all open Story Editor windows.
• If the Style Name Column is displayed, you can drag the divider to adjust the column width.
When you’re finished working in a Story Editor window, close it or choose Edit > Edit in Layout.
#31 Checking Spelling
InDesign’s spelling checker is incredibly sophisticated. You can check anything from a text selection to multiple documents, check against spelling dictionaries in most major languages, customize the spelling dictionaries, and more. In addition to flagging words that do not appear in its dictionaries, InDesign also flags duplicated words and possible capitalization errors. We have to warn you, though, that the spelling checker is not foolproof. It doesn’t know what words you intended to use—there, their, or they’re—and it doesn’t understand context. When making decisions about possible misspelled words, it’s best if you work with a copy editor or proofreader.
Performing a Spelling Check
You can check spelling in selected text, to the end of a story, in an entire story or document, and in all open documents. If you want to check a limited amount of text, you must first select a range of text with the Type tool, click within a story to check it from that point forward, or select a text frame to check the entire story.
To check spelling, choose Edit > Spelling > Check Spelling. Choose an option from the Search menu to specify the scope of the spelling checker: All Documents, Document, Story, To End of Story, or Selection. Then, click Start. When a word displays in the field at the top of the Check Spelling dialog box (Figure 31a), handle it as follows:
• If you think the word is spelled incorrectly: Select a word in the Suggested Corrections list or enter the correct spelling in the Change To field. Then, click Change to fix the first instance of the word or click Change All to fix all instances of the word without reviewing them.
• If the word is spelled correctly: Click Skip to continue to check spelling. If you know the word is used multiple times in the document and you don’t want to click Skip repeatedly, click Ignore All. To add the word to the dictionary, click Add.
Figure 31a. The Check Spelling dialog box helps you find the correct spelling for words.

The Check Spelling dialog box is actually a panel, so you can jump into the document and edit the text without closing it. When you’re finished checking spelling, click Done.
Customizing the Dictionary
If we know anything about a spelling checker, we know that it’s not infallible. For one thing, the dictionary rarely recognizes all the unique words in your content, including the names of people, places, brands, foods, and more. If you frequently work with the same content—and are constantly skipping or ignoring the same words—you can add those words to the document’s dictionary or to your user dictionary. Customizing the dictionary not only results in fewer flagged words, but it also helps ensure that you don’t misspell proper names.
You have two options for customizing the dictionary:
• While you’re in the Check Spelling dialog box, click Add. The word in the Not in Dictionary field is added to the dictionary listed in the Add To field. By default, this is your user dictionary, but you can choose to add the word to a dictionary that is unique to the active document. If the word requires specific capitalization—such as “LoDo,” the abbreviation for Denver’s Lower Downtown neighborhood—make sure Case Sensitive is checked when you click Add.
• Choose Edit > Spelling > Dictionary (or click Dictionary in the Check Spelling dialog box). In the Dictionary dialog box (Figure 31b), choose whether to edit the user dictionary or the document dictionary from the Target menu. Enter correctly spelled words in the Word field, check Case Sensitive or uncheck Case Sensitive, and then click Add. (When Case Sensitive is checked, the capitalization pattern in the Word field is added to the dictionary and used when checking spelling.)
Figure 31b. The Dictionary dialog box lets you customize the user dictionary or the document’s dictionary.

To edit words in the dictionary, select the word and click Remove. Then retype the word in the Word field and click Add.
Setting Spelling Preferences
By default, the InDesign Check Spelling command flags words that it thinks are misspelled, words it thinks should be capitalized, and duplicate words. If this results in too many flagged words, you can customize Check Spelling in the Spelling pane in the Preferences dialog box. The controls work as follows:
• Misspelled Words flags words that do not match words in the current language dictionary.
• Repeated Words flags duplicate words such as “in in.”
• Uncapitalized Words flags words that are capitalized in the dictionary but not in the document.
• Uncapitalized Sentences flags lowercase words following a period, exclamation point, or question mark.
You might, for example, uncheck Uncapitalized Words and Uncapitalized Sentences if a design-intensive document uses all lowercase text for a special effect.
#32 Correcting Spelling Automatically
If you’ve ever used Microsoft Word’s AutoCorrect features, you’ve probably noticed that as you’re typing it will fix blatant mistakes you make and underline words it doesn’t recognize. For example, if you type “teh,” it changes the text to “the.” If you type “InDesign,” it underlines it to let you know that it might be misspelled. InDesign works the same way—except the automatic spelling correction and the underlining of possibly misspelled words are both turned off by default. You can easily turn these features on and off as you need them, and they are both customizable.
Using Autocorrect
To automatically correct common misspellings as you type, choose Edit > Spelling > Autocorrect. You can also check Enable Autocorrect in the Autocorrect pane in the Preferences dialog box. The Autocorrect pane lets you edit InDesign’s default list of common misspellings as well. Note that Autocorrect is not retroactive—it will not go through existing text and correct it. It works only as you type.
Underlining Unrecognized Words
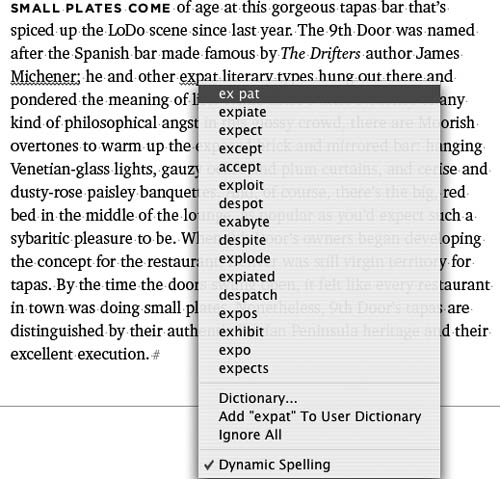
To have InDesign underline potential spelling errors, choose Edit > Spelling > Dynamic Spelling. By default, squiggly red underlines indicate potential spelling errors and squiggly green underlines indicate duplicated words and potential capitalization errors. For potential misspellings, you can Control-click (Mac OS) or right-click (Windows) the word to display a context menu (Figure 32). You can choose from a list of suggested spellings, add the spelling to the user dictionary, or ignore all instances of the spelling. If you choose Add or Ignore All from the context menu, the word is no longer underlined.
Figure 32. InDesign does not recognize “Michener” or “expat” so it underlines both words. Displaying a context menu lets you choose a different spelling, add it to your dictionary, or ignore it.
#33 Searching and Replacing Text
Nothing is more tedious than having to make global changes in text. Suppose that an editor suddenly decides that all instances of “5280” need to be “5,280.” Then suppose the designer decides that all instances of “5280” need to be in Cheltenham Red. The quickest, most foolproof way to handle these changes is through InDesign’s Find/Change Text feature.
Using Default Find/Change Queries
In addition to using the default queries, you can save your custom Find/Change criteria as queries as well. To do this, click the Save Query button ![]() next to the Query menu. Name the new query and click OK to save it.
next to the Query menu. Name the new query and click OK to save it.
You can also use Find/Change to search and replace GREP expressions (alphanumeric strings and patterns), Glyphs, and Object formatting. If you use the same or similar Find/Change operations repeatedly, you can save the criteria as queries.
Using Find/Change with Text
To open the Find/Change panel, choose Edit > Find/Change. The panel lets you click in text and edit it without closing the panel. To search and replace text:
1. In the Find What area, type the text you want to find. To enter special characters such as a Tab or Wildcards, click the ![]() to the right of the field to display a menu. You can combine text with options from the menu—for example to search for a “1” followed by a tab character. To simply change formatting, leave the field blank.
to the right of the field to display a menu. You can combine text with options from the menu—for example to search for a “1” followed by a tab character. To simply change formatting, leave the field blank.
Tip
If you want to find multiple variations of text, select a Wildcard character from the @ menu. For example, to find “run” and “ran,” replace the vowel with the Wildcard for Any Letter. The text will look like this: r^?n.
2. In the Change To area, type your replacement text. As with the Find What area, you can click the ![]() menu to specify special characters such as Quotation Marks and Break Characters.
menu to specify special characters such as Quotation Marks and Break Characters.
3. Choose an option from the Search menu to specify the scope of your search: All Documents, Document, Story, To End of Story, and Selection. (If necessary, you can jump into the document and click in text to specify a starting point, select a story, or select text to search.)
4. To further refine the scope, click the buttons under the Search menu:
• Click the following buttons to include the text in these areas in a search: Include Locked Layers ![]() , Include Locked Stories
, Include Locked Stories ![]() , Include Hidden Layers
, Include Hidden Layers ![]() , Include Master Pages
, Include Master Pages ![]() , and Include Footnotes
, and Include Footnotes ![]() . Point at the buttons to display their tool tips.
. Point at the buttons to display their tool tips.
• Click the Case Sensitive button ![]() to find only text with the exact capitalization pattern shown in the Find What field. When this option is checked, the capitalization in the Change To field is used for changes.
to find only text with the exact capitalization pattern shown in the Find What field. When this option is checked, the capitalization in the Change To field is used for changes.
• Click the Whole Word button ![]() if you don’t want to find variations of the Find What text (such as plurals).
if you don’t want to find variations of the Find What text (such as plurals).
5. If you want to consider character and/or paragraph formatting in the search, click the More Options button to expand the Find/Change panel (Figure 33).
Figure 33. This search will find all instances of “Wine Spectator Magazine” in the document and replace them with “Wine Spectator magazine” in a different italic font.

6. Click the Specify Attributes to Find button ![]() next to the Find Format field to specify the attributes to find. The attributes you specify are listed in the Find Format field.
next to the Find Format field to specify the attributes to find. The attributes you specify are listed in the Find Format field.
7. Click the Specify Attributes to Change button ![]() next to the Change Format field to specify the new attributes. The attributes you specify are listed in the Change Format field.
next to the Change Format field to specify the new attributes. The attributes you specify are listed in the Change Format field.
8. Click Find to start the search. When you locate the found text, click Change to replace it with the Change To text and formatting or click Find Next to skip it.
9. Click Find Next to continue the search. After you click Change and confirm that the changes are correct, you can click Change All to change all instances within the search scope.
When you’re finished with the Find/Change panel, click Done.