
In traditional photography, a filter is a glass element that you put on the front of the lens to affect the final image. In Photoshop, a filter works in a similar way in that it creates a new way to display the image. In contrast to traditional photography, with Photoshop you can apply and blend multiple filters in unique ways to deliver unlimited filtering possibilities.
Photoshop filters are used for a wide array of functions, from practical production tasks like sharpening to creative special effects like adding motion blur. Regardless of the task at hand, you use the same basic workflow steps to add and apply any kind of filter.
It’s important to keep in mind that filters are multifaceted and can be applied in many different scenarios. To address them comprehensively would require many pages. This chapter focuses on only the essentials of filtering. However, as you’re reading through it, try to get into the habit of continually envisioning other scenarios in which you might use a particular filter. When you have completed the chapter, take the time to experiment with the other filters: Experimenting is the best way to learn the many facets of each.
The Smart Filters feature gives you the ability to apply just about any Photoshop filter in a nondestructive manner. Exceptions include the Extract, Liquify, Pattern Maker, and Vanishing Point filters.
Nondestructive Smart Filters do not permanently modify pixels. Instead, when you apply a Smart Filter to an image, a set of “instructions” is recorded; when the image is displayed onscreen or output in some other manner, the output image is altered according to the instructions. The original pixel data, however, is preserved. You can modify, hide, or delete the instructions, and the filter effect is removed without affecting the original image.
To apply a Smart Filter, follow these steps:
1. Select a layer in the Layers panel.
2. Choose Filter > Convert for Smart Filters, and click OK in the dialog box that appears.
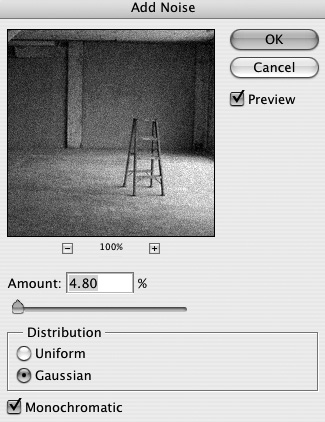
3. Apply a filter. For example, choose Filter > Noise > Add Noise.
4. Choose settings for the filter and click OK (Figure 64a).
When a layer has a Smart Filter applied, the filter appears below the layer in the Layers panel (Figure 64b). By default, the Smart Filter contains a mask filled with white that reveals the entire filter effect. To collapse or expand the list of Smart Filters, click the triangle at the right edge of the layer to which the Smart Filter is applied.
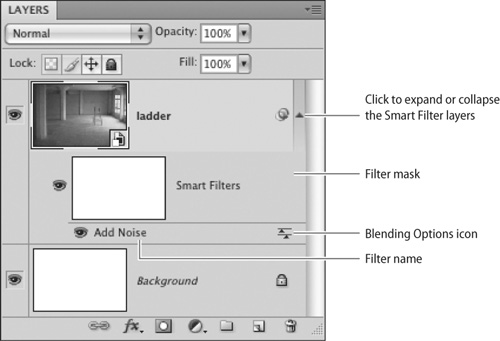
To restrict the effect of the filter to a portion of the image, paint with black on the filter mask (for more on masking, see Chapter 10, “Masking”). To edit the filter settings, double-click the name of the filter to reopen its dialog box.
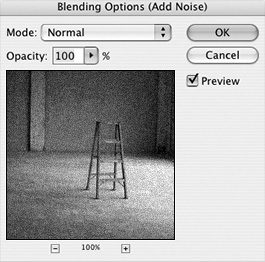
You can also choose a blending mode for each Smart Filter:
A plethora of techniques exists for adding blur in Photoshop. Rather than cover all these techniques, this chapter focuses on a few Photoshop blur filters that seek to replicate photographic blur: Gaussian Blur, Motion Blur, and Radial Blur.
Gaussian Blur is useful for softening details in an image.
1. Select a layer in the Layers panel.
2. Choose Filter > Blur > Gaussian Blur to open the Gaussian Blur dialog box.
3. Drag the Radius slider to the right to increase the softening and blurring effect. The actual amount of the radius will depend on the image resolution. For low-resolution images like the one pictured in Figure 65a, try a low radius. For a high-resolution image, try a higher setting.
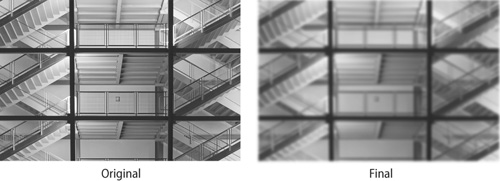
4. Click OK to apply the Gaussian Blur. Not surprisingly, the image becomes blurry.
Traditional photographers create motion blur by taking a photograph of a moving object with an extended exposure time.
In Photoshop, the Motion Blur filter can be used to produce a similar blur effect. Here’s how:
1. In the Layers panel, select the layer to which you want to apply motion blur.
2. Choose Filter > Blur > Motion Blur. The Motion Blur dialog box opens.
3. Specify a blur direction by entering a value in the Angle field (between –360° and +360°) and an intensity value in the Distance field (between 1 and 999). For this image, I have chosen a 21-degree angle and an intensity of 14.

The Radial Blur filter using the Spin option simulates the soft blur created by a rotating camera.
1. Select a layer in the Layers panel.
2. Choose Filter > Blur > Radial Blur to open the Radial Blur dialog box.
3. Specify the amount and quality of the blur you want, and then select the Spin Blur Method. The actual amount setting will depend on the image resolution. For my image, I have set the amount to 17 and selected Good for the Quality setting.
4. Click OK. The filter applies a rotational blur to the image (Figure 65c).

The Radial Blur filter with the Zoom option selected simulates the effect of a zooming camera to produce a soft blur.
1. Select a layer in the Layers panel.
2. Choose Filter > Blur > Radial Blur to open the Radial Blur dialog box.
3. Select the Zoom Blur method, choose an amount, and select a quality option. The actual amount will depend on the image resolution. In the example image in Figure 65d, I have chosen 17 for the amount and Good for the Quality setting.
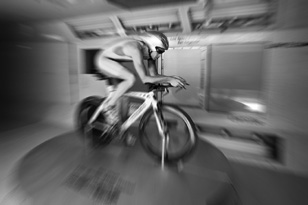
4. Click OK. The filter applies a blur that mimics the effect of a camera zooming in on the image.
Recently, a friend of mine and editor of one of the world’s major adventure sport magazines said, “Sometimes, digital is too perfect. I miss the texture, the personality, the grit, the life of film grain.” Certain images can benefit from adding film grain, which sometimes adds more personality, dimension, depth, and nostalgia to an image. One way to reproduce the effect of film grain is to use the Film Grain filter, which applies an even pattern of noise to the image; a smoother pattern is used in the highlight areas.
1. In the Layers panel, select a layer.
2. Choose Filter > Artistic > Film Grain. The Filter Gallery opens with the Film Grain filter selected (Figure 66a).
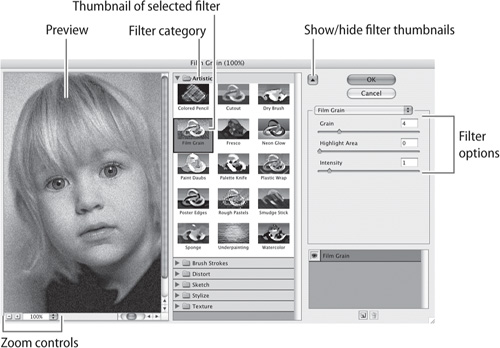
3. Change the image preview zoom amount by clicking the plus (+) or minus (–) icons in the lower-left corner of the dialog box.
4. Adjust the Filter options by dragging these sliders:
• Grain to increase or decrease the density of the grain.
• Highlight Area to increase or decrease the percentage of the image treated as highlights.
• Intensity to control the degree of the highlight brightening The actual slider values will depend on the image resolution. To create a more subtle effect, use lower values. In my example image, I have chosen Grain, 4; Highlight, 0; and Intensity, 1.
5. Click OK to apply the Film Grain filter.
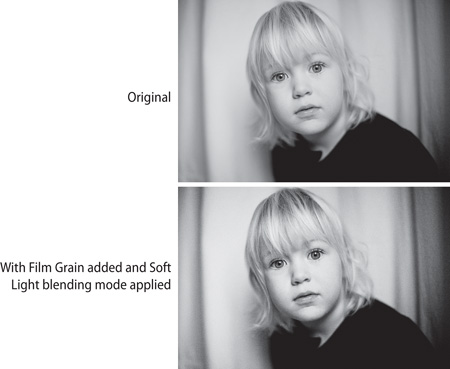
After applying the Film Grain filter to a new layer, try using one of the blending modes on a duplicate layer (Chapter 7) or painting on the filter mask (Chapter 10) to limit the grain to specific areas. This will make the grain look more realistic. In Figure 66b, I duplicated the Background layer, added film grain, and then applied the Soft Light blending mode.
In this chapter, so far, enhancement and effect filters have been covered. Now let’s shift gears and examine a corrective filter.
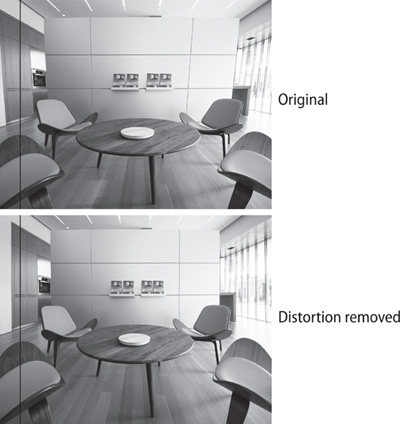
The Lens Correction filter fixes common lens flaws, such as barrel and pincushion distortion, vignetting, and more. This filter is especially helpful with architectural photography, or in general when shooting with wide-angle lenses, or when shooting at a low position looking up (or a high position looking down). The results of this filter can be dramatic or subtle. Keep in mind that often it is the subtle improvements that differentiate a decent photograph from an amazing one.
For example, in Figure 67a, the Lens Correction filter was used to correct the image on the bottom. This is especially noticeable when you look at the black overlay lines I included to highlight the differences. Take note of the difference in the wood paneling on the left side and the back wall on the right in the before and after versions of the image.
To apply the Lens Correction filter:
1. Select a layer in the Layers panel.
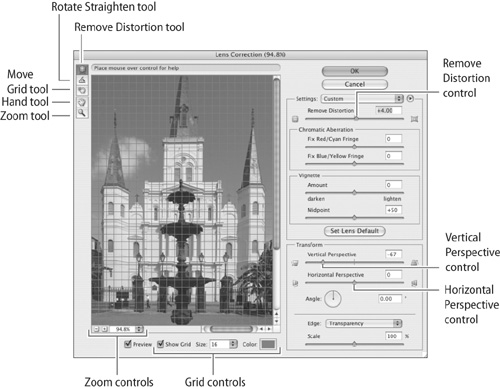
2. Choose Filter > Distort > Lens Correction. The Lens Correction dialog box opens (Figure 67b).
3. Select Show Grid at the bottom of the dialog box.
4. Use the Size setting to adjust the grid spacing and the Color box to change the color of the grid.
5. Choose the Move Grid tool and drag the grid so that it aligns with the lines in the image. By comparing the grid with the lines in your image, you can determine how much correction is needed.
6. Adjust the Lens Correction sliders to correct the image. Here are the slider controls you will use most often:
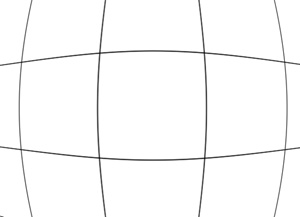
• Remove Distortion corrects two of the most common problems of lens distortion: barrel or pincushion distortion. Barrel distortion is a lens defect that causes straight lines to bow out toward the edges of the image (Figure 67c). Pincushion distortion is the opposite effect in which straight lines bend inward (Figure 67d). Drag the slider to the left to correct pincushion distortion or to the right to correct barrel distortion.

Tip
Choose or target the Remove Distortion control and drag on the image toward the center to correct for barrel distortion and toward the edge of the image to correct for pincushion distortion.
• Vertical Perspective corrects image perspective caused by tilting the camera up or down. This correction is especially helpful when shooting tall buildings from a low perspective. Drag the slider to make vertical lines in an image parallel.
• Horizontal Perspective corrects image perspective, making horizontal lines parallel.
• Angle rotates the image to correct for camera tilt.
• Edge specifies how to handle the blank areas that result from corrections. For the majority of situations, choose Transparency for the best results.
• Scale increases or decreases the image size.
7. Click OK to apply the filter.