My older brother and I used to love running around wearing our favorite Spiderman, Batman, or Zorro masks when we were little. Masks are fun, especially for kids, because they hide a portion or all of your face. Photoshop layer masks work in a similar way in that they can be used to partially or entirely hide something, particularly the contents of a layer.
And here’s the really good news. While masking isn’t easy, it definitely isn’t rocket science. Once you master the basics of masking, the efficiency of your Photoshop workflow will grow by leaps and bounds.
This chapter presents the fundamental concepts that will help you better understand and work with masks. As you read through it, keep the following in mind:
• Because masking is so important, slow down, absorb the information, and then make sure you practice each of the how-tos presented here. Don’t just read along.
• While this chapter presents just the essentials of masking, you can apply the techniques to a wide range of simple and advanced image edits and enhancements.
• If you feel like masking is difficult, don’t give up. Your efforts will pay off when you see the results!
One way to use a mask is to attach it to a specific layer. Masks can be added to any type of layer: image layers, adjustments layers, type layers, shape layers, layer groups, and so on. The advantage of using a layer mask is that when you add a mask to a layer and hide a portion of it, you are not actually deleting pixels; instead, you are simply hiding them. So if you make a mistake or change your mind, you can always go back and modify the mask.
To add a mask to a layer, select the layer and do one of the following:
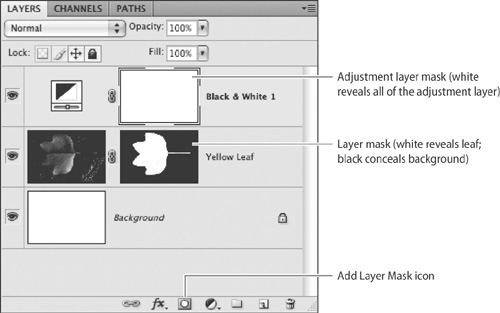
• Click the Add a Layer Mask icon in the Layers panel (Figure 78a) or in the Masks panel (Figure 78b).
• Choose Layer > Layer Mask > Reveal All or Hide All.
The key to understanding masks is that white reveals and black conceals. You can click on a mask to select it, and then paint on it using white or black to show or hide the contents of the layer.
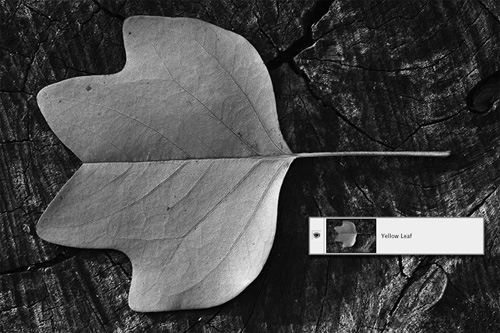
For example, in Figure 78c, I want to select the leaf to remove it from its background. I used the selection tools to select everything but the leaf (in other words, the background) and then painted the selection black. The result is the leaf by itself (Figure 78d).
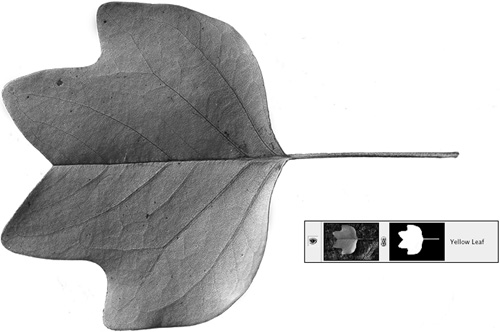
Keep in mind that no pixels were harmed using this technique. I can also return and modify or remove the mask at anytime by painting with black or white (see #79 for more information).
Modifying layer masks is easy and rewarding. If you know how to choose a color in the Toolbox and paint with the Brush tool, you know how to modify a layer mask—that’s all it initially takes!
To modify a layer mask:
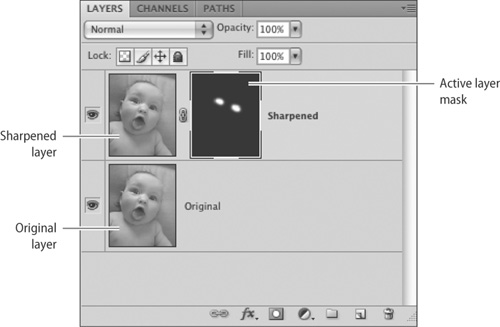
1. In the Layers panel, click the layer mask thumbnail (located to the right of the layer icon). Once you have clicked it, a bracketed border appears around the mask thumbnail indicating it is active (Figure 79a).
2. Choose an editing or painting tool.
3. Paint or fill with one of the following:
• White to reveal the layer contents.
• Black to conceal the layer contents.
• Gray to make the layer contents partially visible. Darker grays conceal more; lighter grays reveal more.
Figure 79b, a fun photograph of my youngest daughter, is a good example of an image in which modifying a layer mask is the best way to improve it.

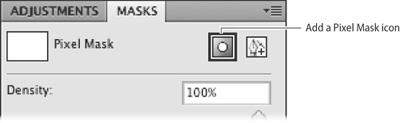
To sharpen the eyes in the image, I first copied the Background layer and then applied the Smart Sharpening filter (see Chapter 13, “Sharpening”), which sharpens the entire image. Then I created a mask filled with black to conceal the sharpening (Alt-click [Windows] Option-click [Mac] the Add a Pixel Mask icon). I chose the Brush tool and then chose white as the foreground color (click the Foreground Color box in the Toolbox and choose white from the Color Picker). I painted on the eyes with the Brush tool, adding white to the layer mask and revealing the sharpened layer beneath.
The eyes ended up being much sharper, making the overall image much more compelling.
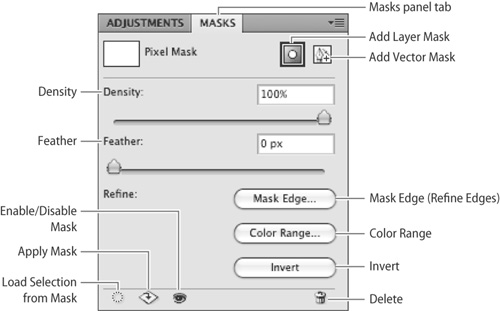
For more advanced layer mask controls, navigate to the Masks panel. To open the Masks panel (Figure 79c), click on the Masks panel tab. Use these essential controls as follows:
• Move the Density slider to control the opacity of the mask. In other words, the Density slider allows you to lower the intensity of what it blocks. A lower percentage means more of the underlying layer is visible.
• Modify the Feather slider to create a softer transition between the masked and unmasked areas.
• Click the Mask Edge button to open the Refine Edges dialog box, which will help you improve the edge areas of the mask (for more information on Refine Edges see #54).
• Click the Color Range button to open the Color Range dialog box; make a selection and then a mask based on color (for more information on Color Range see #55).
• Click Invert to reverse the mask so that black becomes white and white becomes black.
Tip
Because layer masking is integral to your work in Photoshop, be sure to look for the free tutorial video on http://tv.adobe.com.
Sometimes you need to remove color from an image to enhance it. Using a layer mask to accomplish this gives you increased control and flexibility.
Although this how-to is very specific, keep in mind that the process and techniques described here are actually more important than the project. In other words, what you learn in this how-to can be applied to a wide variety of image-enhancement scenarios.
This particular masking technique is very easy to understand, and as a result, it often helps people learn how masks actually work. Many of my photography students finally experience the “masking a-ha moment” when they practice removing color in this way.
For your first try at removing color using a layer mask, choose an image from which it’s simple to remove color. In this example, I’m using an image of an orange California poppy against an out-of-focus purple and green background of wildflowers. Let’s focus on removing all the color in the image except for the main object. So, in the example, the poppy color will remain.
To remove color using a layer mask:
1. Click the Adjustment Layer icon at the bottom of the Layers panel and choose Hue/Saturation from the menu (Figure 80a). A Hue/Saturation adjustment layer is added to the image.
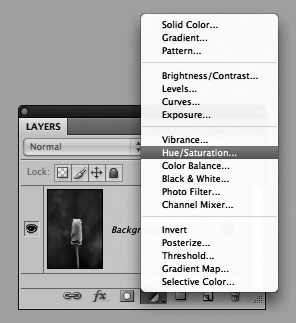
2. In the Hue/Saturation dialog box, decrease the saturation by 100 points to remove all the color. Click OK. The image is now in grayscale.
By default, when you create an adjustment layer, a layer mask filled with white is automatically created along with it. Thus, the entirety of the adjustment is revealed.
3. Click the mask thumbnail to activate the mask. With the Brush tool, paint with black on the area that you want to restore to full color (Figure 80b).
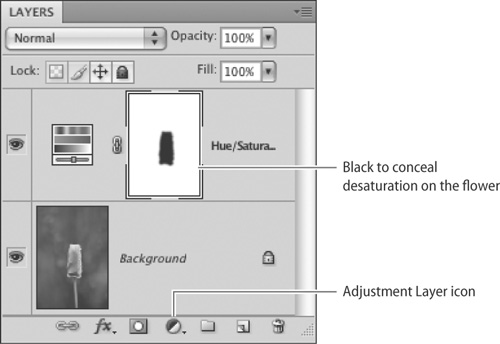
After you have finished painting with black on the mask, the image is complete. In the example, the color of the California poppy stands out boldly from the gray background. Because this book isn’t printed in color, you’ll need to use your imagination to fully visualize the effect.
One of the more common uses of masking is to blend multiple images together to create a photographic collage. The advantage of using masking for this purpose is that you can blend without actually deleting pixels.
To blend images using a mask:
1. Open multiple images in Photoshop.
2. Choose the Move tool.
3. Drag the images into one document. Each image will occupy a separate layer. Figure 81a uses four images of a very happy child.

4. Use the Move tool to position the images.
5. Select an image layer and click the Add a Pixel Mask icon in the Layers panel.
6. Repeat step 5 for each image layer.
7. Choose the Brush tool; then in the options bar, choose a brush with soft edges.
8. Paint around the edges of each of the images to soften their sharp edges. This helps to blend the layers into a unified image (Figure 81b).
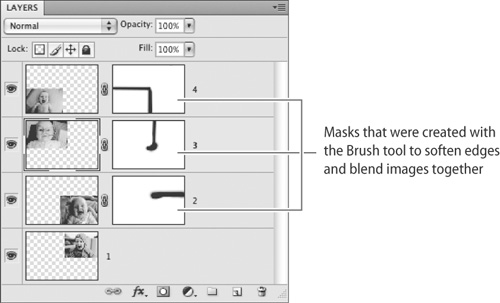
When you are finished, the final image should be a more compelling and cohesive collage as a result of the masking (Figure 81c).

If you enjoy being able to make “selections” by painting on a layer mask, you will really like using Quick Mask mode. As the name implies, this mode gives you the ability to make a mask quickly. Think of Quick Mask as a temporary way to make a painted or mask-based selection.
Here’s how to use Quick Mask mode:
1. Do one of the following:
• Select part of the image that you want to change—you will then refine the selection in Quick Mask mode.
• If you want to wait until you’re in Quick Mask mode before creating the selection, do nothing.
2. Click the Quick Mask icon in the Toolbox (Figure 82a) or press the Q key. If you have an active selection, a red color overlays the unselected (protected) parts of the image, signifying that Quick Mask mode is enabled. The red color represents the mask.
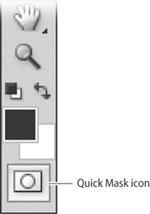
3. To edit the mask, paint with the Brush tool. Paint with white to select more of an image (the color overlay is removed from areas painted with white). To deselect areas, paint over them using black.
4. When you are finished painting, exit Quick Mask mode by clicking the Quick Mask icon in the Toolbox or by pressing the Q key.
After exiting Quick Mask mode, the clear (non-red) area will turn into a selection.
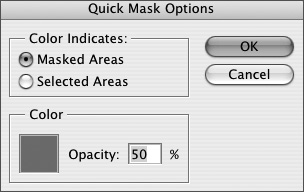
For more Quick Mask options, double-click the Quick Mask icon in the Toolbox to open the Quick Mask Options dialog box (Figure 82b).