Installing PyGame
For the later adventures in the book you will need to install PyGame in order to run the programs. Instructions for installing PyGame are given here; just find the section for the operating system you are using and follow the steps.
Windows 8
If you are using Windows 8, follow these steps to install PyGame:
- Open a web browser (such as Internet Explorer, Chrome or Firefox).
- In the address bar, type
pygame.org/download.shtmland press the Enter key. - When the page loads, scroll down to the Windows section.
- Click on the
pygame-1.9.1.win32-py2.7.msilink to begin downloading the file (see Figure A-1).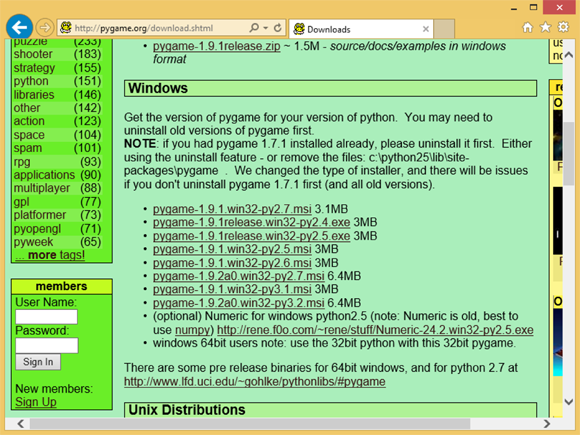
FIGURE A-1 Installing
PyGameon Windows 8 - Wait for the download to complete and then open the file.
- When the installer is open, leave the default choice to Install for all users and click Next.
- Click Next again.
- If you are asked if you want to allow the program to make changes to your computer, click Yes.
- Wait for the installer to complete then click Finish.
PyGameis now ready to be used (see Figure A-2).
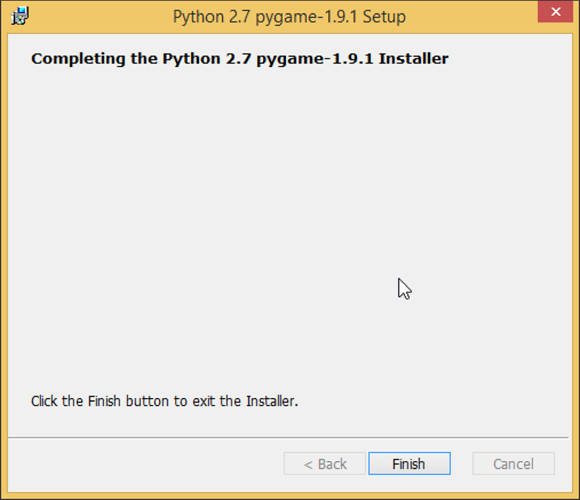
FIGURE A-2
PyGame ready to be used on Windows 8
Windows 7
To install PyGame on Windows 7, follow these steps:
- Open a web browser (such as Internet Explorer, Firefox or Chrome).
- In the address bar, type
pygame.org/download.shtmland press the Enter key. - When the page has loaded, scroll down to the Windows section and click on the
pygame-1.9.1.win32-py2.7.msilink to downloadPyGame(see Figure A-3).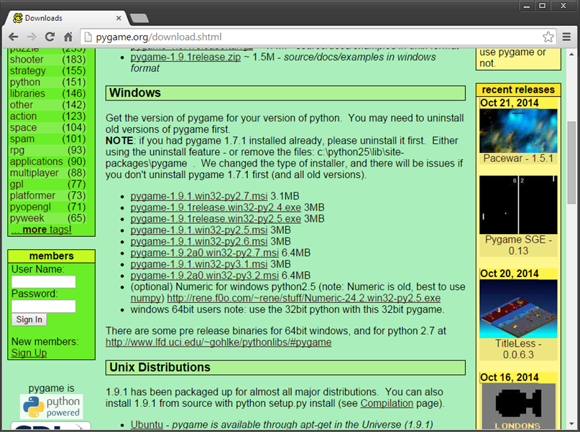
FIGURE A-3 Installing
PyGameon Windows 7 - Once the file has downloaded, open it.
- When the installer opens, leave the default choice to Install for all users and click Next.
- Click Next again.
- If asked if you want to allow the program to make changes to your computer, click Yes.
- Wait for the installation to complete and then click Finish.
PyGameis now ready to be used.
Mac
To install PyGame on your Mac, follow these steps:
- Open a web browser (such as Safari, Chrome or Firefox).
- In the address bar of the web browser, type in
pygame.org/download.shtmland press Enter. - Once the webpage has loaded, scroll down to Macintosh.
- Double-click the first file, which is called
pygame-1.9.1release-python.org-32bit-py2.7-macosx10.3.dmg(see Figure A-4).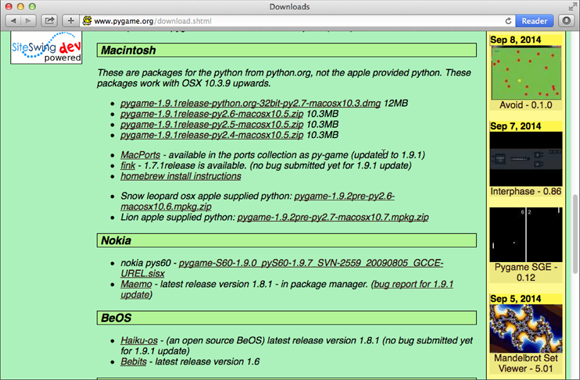
FIGURE A-4 Python packages for Mac
- Wait for the file to download.
- Once the file has downloaded, open the
Downloadsfolder. - Double-click on the file you just downloaded.
- Right-click on the
mpkgfile and click Open With⇒Installer (see Figure A-5).
FIGURE A-5 Installing
PyGameon Mac - When the dialog box appears, click Open.
- Now that the
PyGameinstaller is open, click Continue. - Click Continue again.
- Click Install.
- If you’re asked for your password to give
PyGamepermission to install, enter your password. - Wait for
PyGameto install. PyGamehas now successfully installed (see Figure A-6).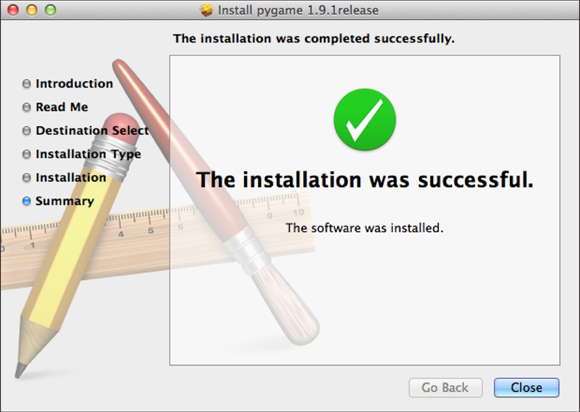
FIGURE A-6
PyGameready to be used on Mac- Go to the desktop and eject the
PyGamedisk image by right-clicking the disk image and selecting eject.
Linux (Ubuntu)
To install PyGame on Ubuntu Linux, follow these steps:
- Open the dashboard and search for the terminal.
- When the terminal has been found, click on it to open the terminal.
- Once the terminal has loaded, type in the following command:
sudo apt-get update && sudo apt-get upgrade
- If you are asked, type in your password.
- Press Y if you are asked if you want to install updates.
- Wait for the update to finish installing.
- Enter this command to install
PyGame(see Figure A-7):sudo apt-get install python-pygame
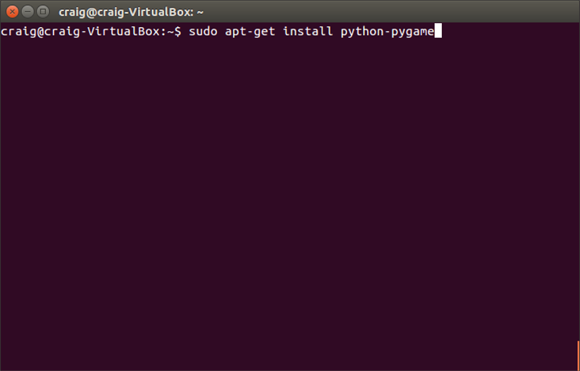
FIGURE A-7 Installing
PyGameon Linux - Once again, press Y if you are asked if you want to install the new software.
- Wait until the software finishes installation.
- When the installation is finished, you can use
PyGamewith your Python programs.
Raspberry Pi
If you are using Raspbian on your Raspberry Pi, you are in luck—PyGame is already installed by default. This means you don’t need to do anything else to use PyGame with Python.
Downloading the Files for Adventures 8, 9 and 10
For Adventures 8, 9 and 10, you are provided with pre-made image and sound files. So that you can use these files with your programs, you need to download them and store them in the same folders/directories as your Python programs. To download the files on your computer, go to the section for your operating system and follow the instructions.
Windows 8
To download the files for your adventures on Windows 8, follow these steps:
- Open a web browser (such as Internet Explorer, Firefox or Chrome).
- In the address bar, type
www.wiley.com/go/adventuresinpythonand press Enter. - Scroll down to the link named Downloads and click on it to download the files.
- Open the folder that the file downloaded to.
- Right-click on the file and click Extract All…
- Click Browse and find the
Adventures in Pythonfolder that you created in the first adventure. - Click Extract.
- The folders and files are now in the correct location for Adventures 8, 9 and 10.
Windows 7
To download the files for your Adventures on Windows 7, follow these steps:
- Open a web browser (such as Internet Explorer, Firefox or Chrome).
- In the address bar type
www.wiley.com/go/adventuresinpythonand press Enter. - Scroll down to the link named Downloads and click on it to download the files.
- Open the folder that the file downloaded to.
- Right-click on the file and click Extract All…
- Click Browse and find the
Adventures in Pythonfolder that you created in the first adventure. - Click Extract.
- The folders and files are now in the correct location for Adventures 8, 9 and 10.
Mac
To download the files for your Adventures on Mac OS X, follow these steps:
- Open a web browser (such as Safari, Firefox or Chrome).
- In the address bar, type
www.wiley.com/go/adventuresinpythonand press Enter. - Scroll down to the link named Downloads and click on it to download the files.
- Open the folder that the file downloaded to.
- Right-click on the file, move the mouse over Open With and click Archive Utility.
- Drag the
Adventure 8,Adventure 9andAdventure 10folders to theAdventures in Pythonfolder that you created in the first adventure. - The folders and files are now in the correct location for Adventures 8, 9 and 10.
Linux (Ubuntu)
To download the files for your Adventures on Linux, follow these steps:
- Open a web browser (such as Firefox or Chromium).
- In the address bar, type
www.wiley.com/go/adventuresinpythonand press Enter. - Scroll down to the link named Downloads and click on it to download the file.
- Open the folder that the file downloaded to.
- Right-click on the file and click Open With Archive Manager.
- Click Extract and find the
Adventures in Pythonfolder that you created in the first adventure. - Click Extract.
- The folders and files are now in the correct location for Adventures 8, 9 and 10.
Raspberry Pi
To download the files for your Adventures on Raspberry Pi, follow these steps:
- Open a web browser (such as Midori or Chromium).
- In the address bar, type
www.wiley.com/go/adventuresinpythonand press Enter. - Scroll down to the link named Downloads and click on it to download the files.
- Open the folder that the file downloaded to.
- Right-click on the file and click Open With Archive Manager.
- Click Extract and find the
Adventures in Pythonfolder that you created in the first adventure. - Click Extract.
- The folders and files are now in the correct location for Adventures 8, 9 and 10.