WITH PROGRAMMING IN Python, you can create a huge range of things, from games to scientific data analysis programs, and from 3D modelling tools to robot controllers. In Adventure 1, you learned how to use some basic Python code to make a spaceship command console. Now you’re going to try something a bit more visual.
Creating images with Python is a fun and powerful way to learn how to program. What’s great about it is that you can create complex images with programs that use only a few lines of Python code.
In this adventure, you’ll learn how to use numbers and Turtle Graphics to make drawings with Python. Figure 2-1 shows a drawing made with Turtle Graphics.
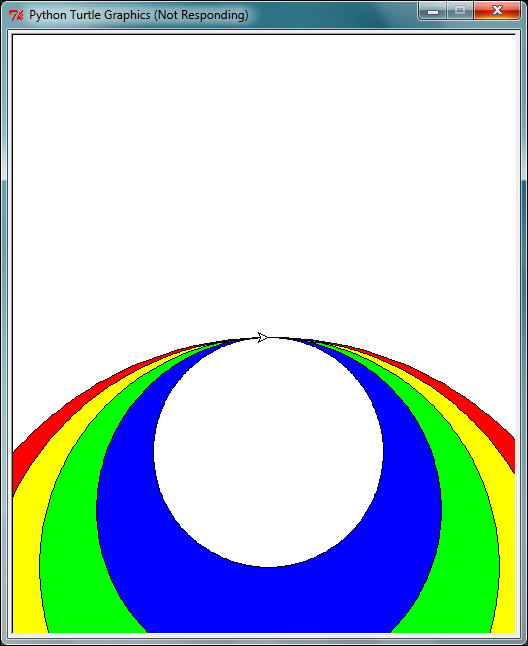
FIGURE 2-1 An example of a drawing made with Turtle Graphics.
Getting Started with Turtle
In this adventure, you’ll use the turtle module in Python. A module is a set of pre-written and reusable commands that extend what you can do with Python. Recall that you used the time module in Adventure 1 to make your program wait a number of seconds before proceeding. The turtle module allows you to create basic shapes and drawings in Python.
When you draw in Turtle Graphics, the cursor on your screen is referred to as a turtle, even though the default icon for the cursor doesn’t look like a turtle! It actually looks like an arrow—but it is still called a turtle. You can imagine a turtle walking across your screen, leaving a trail behind it to create shapes and images. You’ll most often use the turtle module simply to draw lines. By creating lots of lines, turning the turtle round, changing colours and filling in shapes, you’ll discover that you can generate some really cool and complex images using only a few lines of Python.
Time to get started.
- Open a Python shell by opening IDLE. (Remember that you can tell you are using the shell, rather than a text editor, as the shell has a command prompt (
>>>) at the start of the line.) -
To use the
turtlemodule in your program, the first thing you need to do is import it. Type the following command into the shell to import theturtlemodule:import turtle - Next, you’re going to move the turtle (cursor) forward. To do this, you use the
turtle.forward()command and include an argument to tell it how many steps to take. In this example, you’ll start by moving the turtle 100 steps. When you put the 100 in between the brackets, you do not need to use speech marks as you’re using numbers, not strings (more on this in a bit):turtle.forward(100) - Press Enter. A new window will appear and a small arrow will move across the window, leaving a line behind it. This arrow is the “turtle,” and it’s just drawn a line 100 steps long, as shown in Figure 2-2.
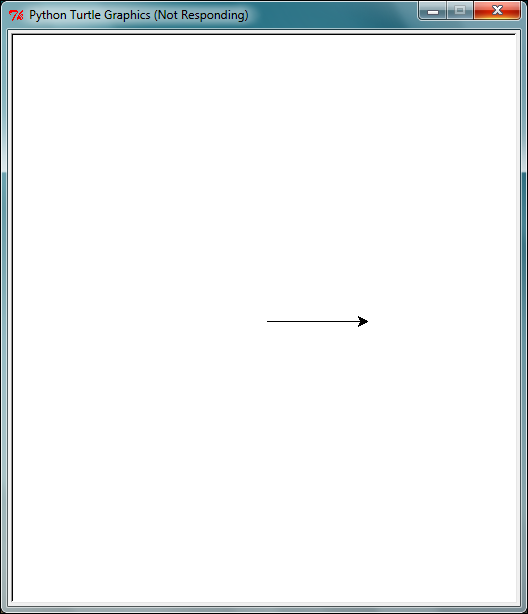
FIGURE 2-2 The turtle after moving 100 steps
- You can continue to give the turtle commands from the shell. Type in the following code on the next line:
turtle.right(90)Press Enter, and the turtle turns 90 degrees to the right.
- Now enter the following commands into the shell one at a time, pressing Enter at the end of each line:
turtle.forward(50)
turtle.right(90)
turtle.forward(100)
turtle.right(90)
turtle.forward(50)
turtle.right(90)
Et voila! The turtle will have drawn a rectangle. It should now be back where it started, as shown in Figure 2-3.
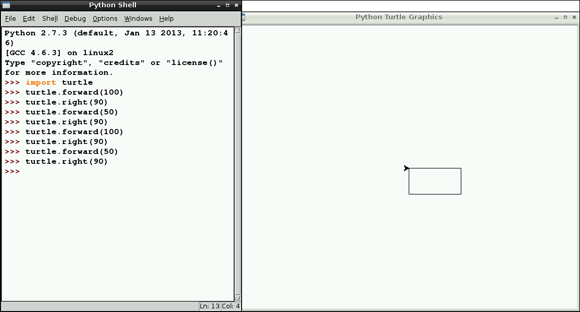
FIGURE 2-3 The turtle drew a rectangle.
You can of course change the arguments that you give the right() and forward() functions.
You have used integers in this program. Integers are whole numbers (that is, numbers with no decimal place) and can be either positive or negative. For example, 10, 92, 3, -78 and -831,789 are all integers.
Using Variables to Change Angles and Lengths
The values used for arguments in the turtle functions can be swapped for variables. This next program uses variables for two things: the length of the sides; and the angles. The turtle will draw a zigzag line in this program. You’ll also notice a new command, left(), which, as you might have guessed, makes the turtle turn left.
- Open a new file editor by going to File⇒New Window.
- As you know, whenever you use a module you need to import it. Add this line of code to import the
turtlemodule:import turtle - Create a variable called
lengthand another calledangleand set their values to 20 and 45, respectively:length = 20
angle = 45 - You want the turtle to move and turn to create a zigzag. Type this code:
turtle.forward(length)
turtle.right(angle)
turtle.forward(length)
turtle.left(angle) - Highlight the four lines of code that you just wrote, copy it and paste them in your file at least four times.
-
Run the program with Run⇒Run Module. Create a folder named
Adventure 2and save the file in it aszigZag.py. Now when you run the program it will draw a zigzag as in Figure 2-4, making each length 20 steps and each angle 45 degrees.
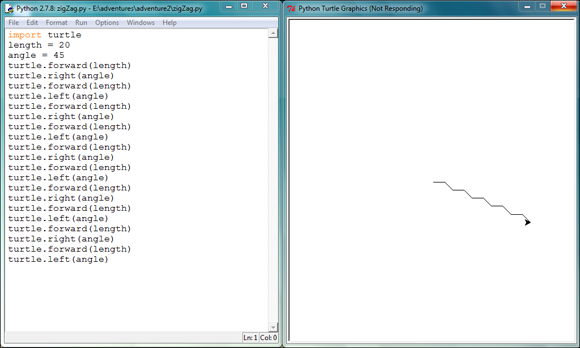
FIGURE 2-4 A zigzag drawn with the turtle
One of the most useful features of variables is that you can change the value that they store. Here’s an example for you to try, which should demonstrate the power of variables.
- Open the program you just wrote (the one you saved as
zigZag.py). - Change the
anglevariable so that it has the value of 90, instead of 45:angle = 90
When you run the program you should see that the angle of each zigzag is now 90 degrees, as in Figure 2-5. This is because the value of the angle variable has been changed.
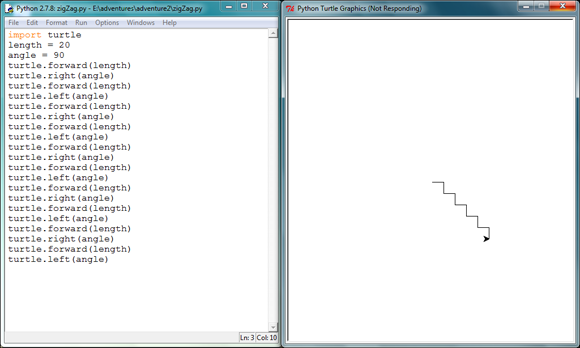
FIGURE 2-5
The updated code with a new value for the angle variable
Change the value of the length variable and run the program to see how this affects the shape of the zigzag.
Using Addition to Draw a Spiral
As you have just seen, you can change the value of a variable to change the result of your program. But there’s a lot more you can do—you can also change the value using addition, subtraction, multiplication and division. You’re now going to use addition to draw a spiral with the turtle.
- Create a new file editor in IDLE using File⇒New Window.
- Import the
turtlemodule and set thelengthandanglevariables with the following code:import turtle
length = 10
angle = 90 - Now add this code to make the turtle move:
turtle.forward(length)
turtle.left(angle) - Next add the following code to make the length of the side increase by 10:
length = length + 10 - Copy the last three lines of code and paste them at least 10 times, each set below the other. Now when you run the program, the length of the line will increase by 10 steps every time the turtle moves. The result? A spiral.
- Save the program as
spiral.pyin theAdventure 2folder and run it with Run⇒Run Module. You should see a spiral like the one shown in Figure 2-6.
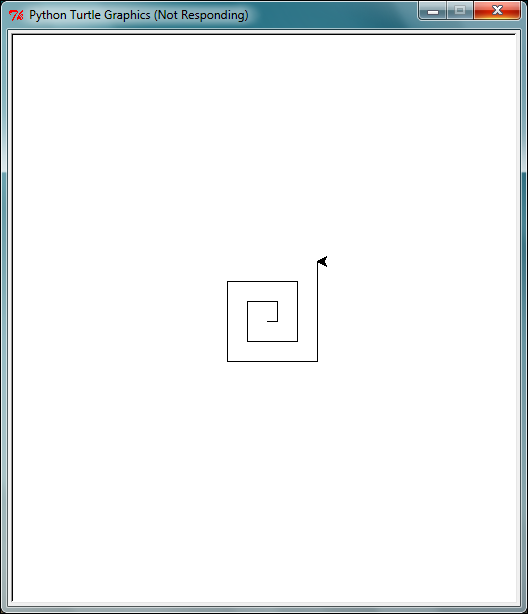
FIGURE 2-6 A spiral
Saving Some Space with Loops
It’s not a good idea to copy and paste a block of code many times in a program. What happens if you want to change something? If you’ve pasted the code lines in 20 times, you would have to make 20 changes! You might be able to do it quickly if you’ve only got a few commands, but it soon gets very time consuming if there are lots of lines of code, and you may sometimes have hundreds or even thousands of lines. So much repeated code also makes the program harder to read and understand. There is a simpler way to it.
As you learned in Adventure 1, loops are an efficient way to repeat blocks of code. In this next example, you use a loop to create a spiral instead of copying and pasting the lines of code over and over again.
- As before, create a new file editor in IDLE using File⇒New Window.
- Import the
turtlemodule and createlengthandanglevariables:import turtle
length = 0
angle = 90 - Next, add a loop to make the steps repeat:
while length < 200:
    turtle.forward(length)
    turtle.right(angle)
length = length + 10 - Save the program as
betterSpiral.pyin theAdventure 2folder. - Run the program with Run⇒Run Module. When the program starts, the turtle will start drawing a spiral, and you should end up with a new, improved spiral like the one in Figure 2-7.

FIGURE 2-7
An even better spiral, made with a while loop
Notice how your program can draw a lot more than it did in the previous example, while using fewer lines of code.
The while loop in this code uses a less than comparator. It checks that the length of the line being drawn is less than 200. The body of the loop will repeat only when the length is less than 200. If it is equal to 200 or greater than 200, the loop will stop running. You can change this number to make a bigger or smaller spiral.
There are six types of comparators that you can use in your own programs:
- Equal to (
==): Checks whether two values are the same - Not equal to (
!=): Checks whether two values are not the same - Less than (
<): Compares a value to see if it less than another value - Less than or equal to (
<=): Compares a value to see if it is less than or the same as another value - Greater than (
>): Compares a value to see if it is greater than another value - Greater than or equal to (
>=): Compares a value to see if it is greater than or the same as another value
All of these comparators can be used with if statements and while loops.
A Shape with 360 Sides: Drawing a Circle
So far, the programs that you’ve written have only used straight lines. But what about circles? They don’t use straight lines, just a single curved line. How can the turtle program create a curved line?
There’s a simple solution to this: you create a curve simply by using lots and lots of very short straight lines with small turns. If your program creates 360 lines and 360 turns of 1 degree, it will result in a circle. Try it out for yourself:
- Open a new file editor window in IDLE using File⇒New Window.
- Save the file as
circle.pyin theAdventure 2folder. - Type the following code into the file editor:
import turtle
repeats = 0
while repeats < 360:
    turtle.forward(1)
    turtle.right(1)
repeats = repeats + 1 - Run the program using Run⇒Run Module. The turtle should draw a circle like the one shown in Figure 2-8.
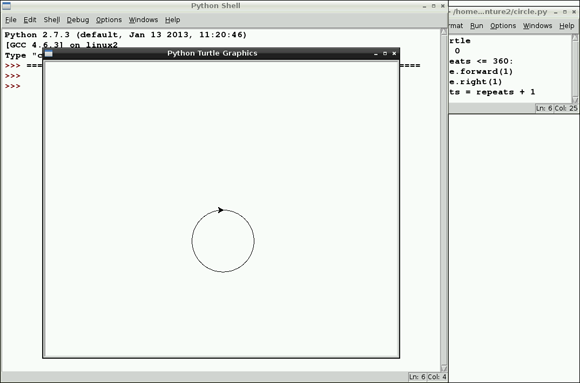
FIGURE 2-8 A circle drawn with the turtle
Controlling the Number of Sides Using for Loops
You can create quite an array of shapes by adapting the code from the example you just completed. You could change the program so that it creates a square or a triangle, for example. Can you work out how to do this? This next program uses input so that you can tell it how many sides you want your shape to have. The program uses a prompt that asks that very question.
- Open IDLE and create a text editor using File⇒New Window.
- Save your program as
shapes.pyin theAdventure 2folder. - The next piece of code will produce a prompt asking you for input. The input value is used to determine how many sides your shape will have. Copy this code into the file editor:
import turtle
sides = int(raw_input("Enter the number of sides for
          your shape: "))
angle = 360.0 / sides
length = 400.0 / sides


for side in range(sides):
    turtle.forward(length)
    turtle.right(angle)
turtle.done() - Run the program using Run⇒Run Module. When you are prompted to enter the number of sides for your shape, type 7. Figure 2-9 shows the result.
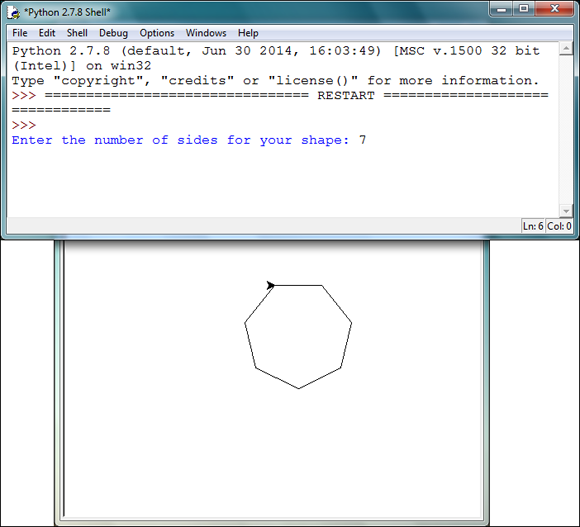
FIGURE 2-9
A seven-sided shape drawn with the shapes.py program
In this program, you have used a few things you haven’t seen so far. Look at Step 3. On lines 3 and 4 the numbers have decimal places—in other words, they are not whole numbers, or integers but a different data type called a floating point number, or float. A float is the name for any number in Python that has a decimal place. Because floats and integers are both types of number, you can add, subtract, multiply and divide them.
On line 2 of the program, the raw_input() function is inside an int() function. The raw_input() function returns any data you input as a string—but your program needs to use your input as an integer, not a string. You therefore use the int() function to convert your input from a string to an integer. Converting one data type to another in this way is known as type conversion.
The code divides the total number of degrees in a circle (360) by the number that was input. This determines the degrees of each angle in the shape. The length of each side is determined by dividing 400 by the number that was input. These variables are then used to make the shape on the last four lines of the program.
You have already come across one type of loop, the while loop. For loops are another type of loop that repeats a block of code. The for loop will repeat a number of times, determined by the argument inside the range() function. The range() function is very commonly used with for loops. You can also use for loops with lists, which you will learn about later. In the code you have just written, the loop will repeat the same number of times as is input for the number of sides. The argument of the range() function can be changed to another number to make the loop repeat a different number of times. For example, you could change the number of sides to four by using this code:
for sides in range(4):
    [etc…]
The last line of the program, turtle.done(), keeps the window open even after the shape has been drawn. Without it the program would close immediately after the shape has been drawn.
Changing the Fill Colour in a Shape
Now you’ve drawn a simple shape, what can you do to liven it up a bit? Add a bit of colour, that’s what. With a simple change to the program, you can get your turtle to fill in the shape with colour. Here’s how.
- Open your
shapes.pyprogram, if it isn’t open already. - On the line before the
forloop, add the following lines of code:turtle.fillcolor("blue")
turtle.begin_fill() - Next, on the second to last line of your program, add this line of code:
turtle.end_fill() - Save the program and run it with Run⇒Run Module. The turtle should draw a shape according to your input, but now the shape should be filled in with blue, as in Figure 2-10.

FIGURE 2-10 The turtle has drawn a shape with a fill colour of blue.
In the first Python statement you added, turtle.fillcolor("blue"), you selected the colour you wanted the turtle to use. There are a range of colours that you can use, including red, green, black and orange.
Try using different colours in your shapes; remember that they need to be written as a string. You will return to colours in a later adventure, when you learn more about using them, including how to create colours of your own.
Creating Functions to Reuse Your Code
If you are starting to think like a computer programmer, you’ll now be thinking: How can I save time? And how can I make more of my programs reusable? When you used the raw_input() function in Adventure 1, you learned that functions are one way that code can be made to be reusable. Now you’re going to learn how to create your own functions to reuse code that draws shapes.
In the next example, you will use two functions to create shapes and move the position of the turtle.
- Open a new file editor in IDLE using File⇒New Window.
- Import the
turtlemodule:import turtle - Now, add the following code to create a function that will draw a shape that can be any number of sides, with sides of any length, depending on the values you assign to the
sidesandlengtharguments. Type this code below theimportcommand in the file editor:def drawShape(sides, length):
angle = 360.0 / sides
for side in range(sides):
turtle.forward(length)
turtle.right(angle) - Next add the following bit of code to let you move the turtle to a specific location on the screen:
def moveTurtle(x, y):
turtle.penup()
turtle.goto(x, y)
turtle.pendown() - Now that you have created the two reusable functions, the program can call them to draw shapes and move the turtle. Add the following code to your program:
drawShape(4, 10)
moveTurtle(60, 30)
drawShape(3, 20)
turtle.done() - Save the program as
reusableShapes.pyin theAdventure 2folder and run the program with Run⇒Run Module. You can see the output in Figure 2-11.
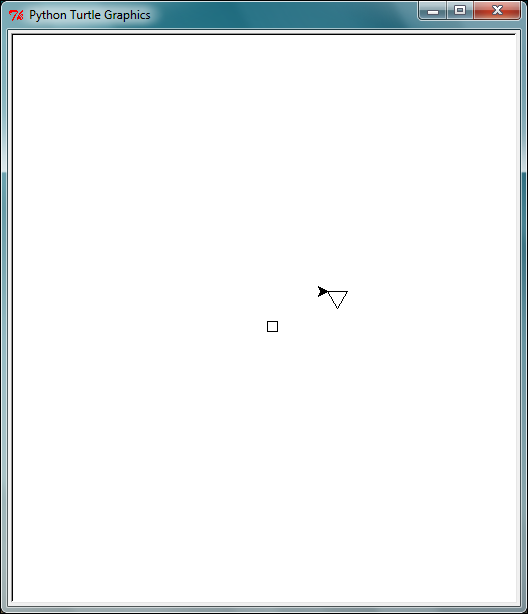
FIGURE 2-11 The program has drawn a couple of shapes.
You can now draw more shapes by calling the functions as many times as you want, using whatever arguments you like. This code uses the functions you just made to draw a shape with five sides and another shape with 10 sides. Add this code above the turtle.done() line:
moveTurtle(-100, -60)
drawShape(5, 100)
drawShape(10,100)
Shape Presets
Shapes with a predetermined number of sides, like triangles, circles, squares and pentagons, are very common. Instead of having to recreate the shape every time with the drawShape() function, wouldn’t it be cool to add some code so that the common shapes have their own functions? For example, you could create a drawSquare() function that would instantly draw a square. Here’s how:
- Open the
reusableShapes.pyprogram that you just created. Underneath themoveTurtle()function add the following code:def drawSquare(length):
drawShape(4, length) - This code creates a new function to draw a square automatically. It reuses the
drawShape()function and gives thedrawShape()function the value of 4 for thesidesargument. By doing this, the functions are reused so that your program uses fewer lines of code and is easier to read. - Add the following code to create functions for drawing triangles and circles:
def drawTriangle(length):
drawShape(3, length)
def drawCircle(length):
drawShape(360, length) - Now that you have created the functions to draw the shapes, the program can call them. To call all the shapes for which you have created a function, add the following code before the
turtle.done()line in your program:moveTurtle(-100, 20)
drawSquare(30)
moveTurtle(- 10, 20)
drawCircle(1)
drawCircle(2)
moveTurtle(75, -75)
drawTriangle(60) - Save the program and run it using Run⇒Run Module. The results should look something like Figure 2-12.
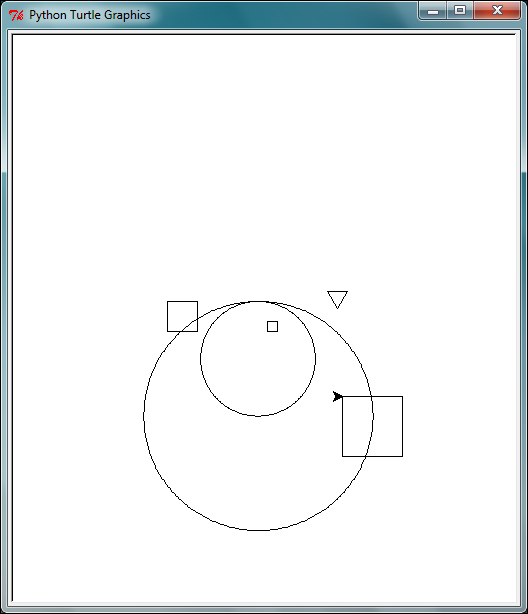
FIGURE 2-12 Shapes created using the functions and the example code
Adding Randomly Generated Pictures
Now that your program can reuse functions to create images, this is where things get interesting! You can easily change the code to draw some cool things. You can use the functions to quickly draw complex shapes with only a few lines of Python, or draw pictures by combining the different functions.
The next thing you’re going to do is make your turtle draw completely random shapes all over the screen, a bit like in Figure 2-13.
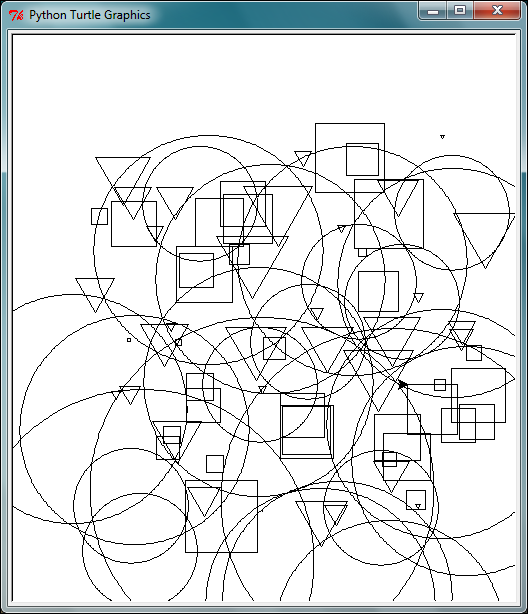
FIGURE 2-13 A randomly generated picture
- Open the
reusableShapes.pyprogram and save it asrandomShapes.pyin theAdventure 2folder. - Delete all the lines that contain function calls. Once you’ve done that, the only thing left in the program will be the following Python code:
import turtle
def drawShape(sides, length):
    angle = 360.0 / sides
    for side in range(sides):
        turtle.forward(length)
        turtle.right(angle)
def moveTurtle(x, y):
    turtle.penup()
    turtle.goto(x, y)
    turtle.pendown()
def drawSquare(length):
    drawShape(4, length)
def drawTriangle(length):
    drawShape(3, length)


def drawCircle(length):
drawShape(360, length)In other words, what’s left are all the functions that you created in the program.
- Next, add this line of code at the very start of the program to import a new module,
random:import randomAdd the following function to create a random shape at a random location:
def drawRandom():
    x = random.randrange(-;200, 200)
    y = random.randrange(-;200, 200)
    length = random.randrange(75)
    shape = random.randrange(1, 4)


    moveTurtle(x, y)


    if shape == 1:
        drawSquare(length)
    elif shape == 2:
        drawTriangle(length)
    elif shape == 3:
        length = length % 4
drawCircle(length) - Finally, at the end of your program, add this loop to generate 100 random shapes and add the
turtle.done()function:for shape in range(100):
drawRandom()
turtle.done() - Now save the program and run it using Run⇒Run Module. Your turtle will set off as if it has a mind of its own, drawing random shapes in random locations on the screen.
For further adventures with Turtle Graphics, use the commands in the following quick reference table to experiment.
Python Command Quick Reference Table |
|
Command |
Description |
|
This statement imports the |
|
This command moves the turtle forward a number of steps and makes it draw a straight line. |
|
This command turns the turtle a number of degrees to the right. |
|
This command turns the turtle a number of degrees to the left. |
|
Whole numbers in Python use the integer data type; 5, 237 and 21 are all examples of integers. |
|
Integers can be stored in variables. This allows the value of the variable to be reused and changed as the program runs. |
|
The addition operator is used to add two number values together. The result is usually stored in a variable like this: |
|
The < comparator compares two values. If the first value is less than the second, it evaluates to |
|
The |
|
The |
|
Floats are a data type used to represent numbers with decimal places; 6.8, 11.51 and 574.96 are all examples of floats. |
|
The division operator divides one number by another. The result is often stored in a variable like so: |
|
A |
|
These functions are used in the |
|
Functions are created using the |
|
The modulo operator divides one number by the other and returns the remainder of the division. For example, |
|
The |
|
The |

Achievement Unlocked: Creator of splendid shapes using the turtle module.