Chapter 3. Aerial Stills Photography
Virtually every camera drone is capable of capturing both video and still images, and some can even shoot both stills and video at the same time. The drone industry changes quickly, but most camera drones can be reliably placed into one of two categories: drones that use integrated cameras and drones that use third-party, stand-alone cameras.
GoPro HERO action cameras are by far the most popular stand-alone cameras used in aerial imaging; their performance-to-weight ratio is excellent, and they can be carried by quadcopters that fit into backpacks and small cases. Larger cameras, including point-and-shoot models, mirrorless cameras, and SLRs, are also used in the air, but they are usually paired with much larger multirotors that aren’t typically purchased ready to fly.
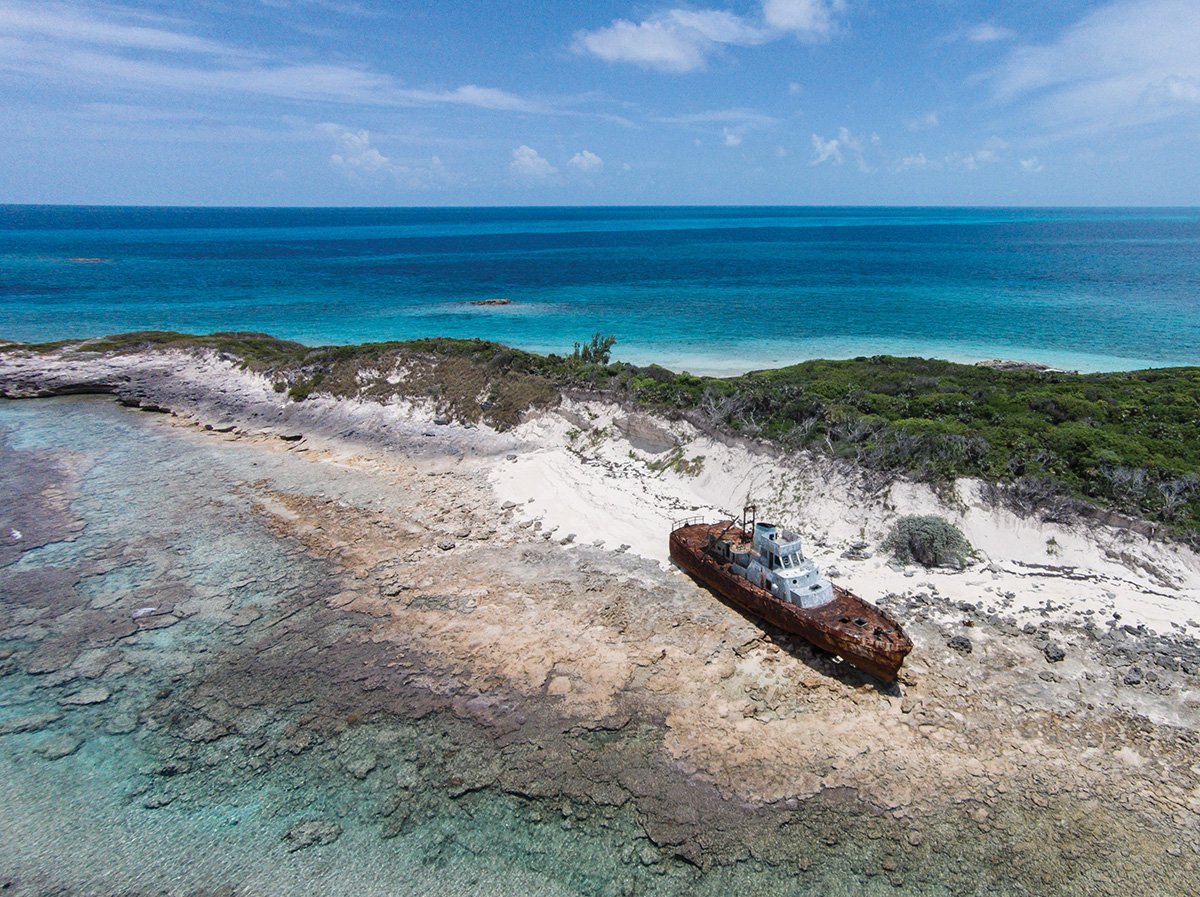
In this chapter, I will focus on ready-to-fly quadcopters that use integrated cameras (such as the DJI Phantom 2, shown in FIGURE 3.1) and quadcopters designed to be used with GoPros. I chose to feature GoPro because the vast majority of small gimbals sold for third-party cameras are made for GoPros, and these gimbals can be put on virtually any drone, whether they are distributed ready-to-fly or in kit form.
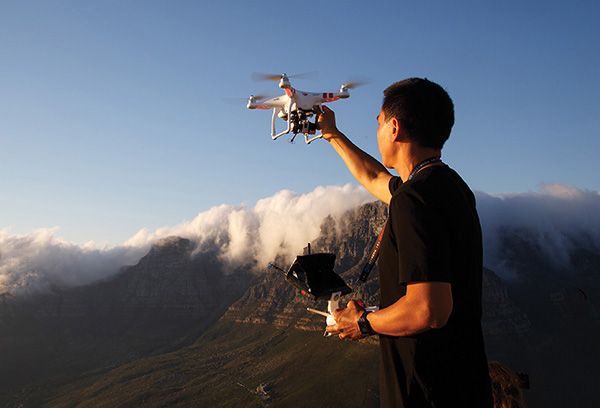
FIGURE 3.1 In this image, I’m preparing for an aerial imaging flight near Cape Town, South Africa, using a DJI Phantom 2 and gimbal-stabilized GoPro HERO3+ Black Edition. Photo courtesy Phil Sokol.
Integrated cameras can offer the pilot full remote control of a camera, which gives power to aerial imagers to change camera settings on the fly and to even play back captured imagery while a drone is still in the air. Third-party cameras tend not to communicate well with remote pilots, and most third-party cameras are used by starting the capture of video or time-lapse stills before a flight starts. However, things might be starting to change.
The first drone that talks directly to a GoPro for remote access to the camera is the 3DR Solo. 3DR made a deal with GoPro, which opened up camera control via its cameras’ HERO bus port. This precedent suggests that stand-alone camera manufacturers might be willing to work with drone manufacturers to allow direct access to camera functions. However, it is likely that integrated cameras will always feature tighter integration and better user interfaces. As a result, most aerial imagers currently prefer working with camera drones that feature fully integrated cameras.
The most important thing for you to remember as an aerial photographer is that what you are doing, first and foremost, is still photography. No matter what camera drone you use, basic photographic techniques all still apply. Camera drones simply allow you to extend your reach from a composition standpoint and to capture scenes that you might only have been able to imagine before.
Camera Settings
During my many years of experience as a professional photographer, I have been asked hundreds of times for camera settings. Camera settings are obviously important for the success of a given shoot, but the correct answer really is, “Whatever the shot requires.” One shooting scenario might require vastly different camera settings from another, especially if a photographer has a specific creative look in mind.
In the air, photographers have traditionally been limited in available camera settings, and even the latest integrated camera drones offer settings comparable only to what a typical point-and-shoot camera might feature. However, as integrated cameras improve, you can expect to start to see parity in camera settings support and even new advanced settings focused around camera movements.
General Settings
Most aerial cameras, whether they are integrated or stand-alone, allow photographers to change exposure, white balance, resolution, and more. The latest GoPro HERO cameras support quite a few settings, but only exposure compensation, ISO, resolution, and interval shooting (time-lapse) are really of interest to most aerial photographers using a GoPro. The new 3DR Solo expands the usable settings palette by enabling shutter control; suddenly, being able to access a GoPro’s Continuous Photo Mode (for example) becomes useful.
The latest integrated camera drones from DJI allow photographers to treat a flying camera almost like a land camera. Settings for full manual exposure control are accessible, as well as settings for burst mode, bracketing, time-lapse, and more. The DJI Phantom 3 and Inspire 1 also feature shooting to Adobe’s DNG raw format, which is desirable for photographers looking to capture the most information possible.
Raw Capture
Consider shooting in raw if your integrated camera drone offers raw capture. All of DJI’s integrated drones support Adobe’s DNG raw format, which means that pictures are saved with the most information possible (FIGURE 3.2). When pictures are saved in raw, the file includes unprocessed sensor data that must be “converted” by software before a viewer can see the captured picture. Luckily, pretty much all viewing software on computers (such as Photos.app for OS X, Picasa, and Lightroom) will handle DNG raw conversion without any problems, so it isn’t much of a burden to capture to DNG.
FIGURE 3.2 Choosing to save in JPEG+RAW using the DJI GO app while flying a DJI Phantom 3
The advantages of shooting in raw over JPEG are the same whether you’re shooting in the air or on land. JPEGs are designed to save disk space and use lossy compression, which means that data is thrown away when a picture is saved to a drone’s microSD card.
Advantages of raw capture include the following:
• Best image quality possible
• Ability to change white balance in post
• Ability to recover lost highlights in post
• Ability to take advantage of better raw converters as they improve over time (images become “upgradeable”)
Disadvantages for raw capture vs. JPEG capture include the following:
• Larger file sizes (about five times larger, in the case of images shot by a DJI Phantom 3).
• Raw files are not natively supported everywhere (mobile devices and web services may not recognize the files as being images).
The main reason a photographer might want to shoot in JPEG instead of raw is that JPEGs are natively supported everywhere. In a situation in which a photographer’s workflow requires rapid delivery of imagery, JPEGs usually are preferred. A JPEG can be pulled off a card or transferred over Wi-Fi for delivery without requiring raw conversion in post.
Luckily, DJI’s camera drones feature simultaneous capture of DNG and JPEG, giving you the best of both worlds at the cost of a using a bit more disk space. DNG+JPEG is what most photographers I know tend to shoot because it gives them capture in the best possible quality while retaining flexibility for instant sharing. Those of you who are worried about using too much disk space should consider that a 16GB microSD card costs less than $10 and holds more than 500 Phantom 3 pictures saved as DNG+JPEG.
Exposure
In the (brief) times of aerial drone photography during which gimbals were not standard, it was often difficult to take sharp pictures from multirotors because of the aircraft’s potentially extreme movements during flight. Gimbals keep the camera level and stable and make a huge difference not only for video capture but also for still photography. They stabilize at many hundreds of times per second, which effectively cancels out the effects of airframe movements that are caused by navigation and/or stabilization. Well-balanced camera drones that are flying without a gimbal can typically shoot sharp pictures at shutter speeds of 1/250 second or so, as long as proper vibration damping is used (discussed later in this chapter). However, when I am taking stills using a camera drone without a gimbal, I tend to target 1/500 second or faster, if possible, to ensure that my resulting images are sharp.
Camera drones with gimbals are altogether a different story when it comes to minimum shutter speed: A camera drone with a good three-axis gimbal can often shoot sharp pictures with a shutter speed of a few seconds or more. The first time I put a DJI Inspire 1 in the air at night, I took a sharp picture with an exposure time of eight seconds. The fact that long exposures like this are possible without a tripod can make a seasoned photographer’s head explode and are a good example of the powerful enabling effects of new technology applied to an old art form.
Gimbals are great for large airframe movements, but it’s the spinning motors and propellers that can cause real damage to images. If you look at a typical camera drone’s gimbal, you’ll notice that it is attached rather loosely to the drone’s frame via a vibration damping system—usually, four rubber balls of varying rigidity, depending on the weight of the camera and gimbal. The damping balls serve to prevent high-frequency vibrations caused by unbalanced motors and propellers from reaching the imaging system.
Normally, one might assume that a fast shutter speed could solve the problem, but most cameras currently being flown in the air use CMOS sensors and rolling shutters. A rolling shutter results in images being captured by scanning across the sensor, and the time required to make the scan can be much slower than typical shutter speeds used in aerial photography. For example, you might be shooting with a shutter speed of 1/1000 second for the purposes of achieving the right exposure, but your camera will be scanning across the frame much more slowly when capturing the frame (1/60 to 1/30 second is typical).
The end result is that vibrations enter an aerial imaging system, creating horizontal shearing artifacts that wreak havoc on images. In video, this effect is called jello for the wiggling look of the artifacts—like shaking jello on a plate (FIGURE 3.3). In still imagery, you’ll see this as horizontal blurs that occur in stripes across the image.

FIGURE 3.3 An example of CMOS rolling shutter artifacts, more commonly known as jello.
A good integrated camera drone has been designed and tested with a solid gimbal and effective vibration damping. If you’re building your own camera drone, make sure you’re using proper vibration damping and a well-balanced gimbal. Once camera stabilization is ensured, determine your aerial exposures the same way you’d consider exposures when shooting on the ground. Here are some general guidelines to use when choosing exposures in aerial stills imaging:
• Use the lowest ISO possible. Most aerial cameras currently use small sensors, which make them susceptible to noise when higher ISOs are used.
• Choose a fast shutter speed, especially if your drone is moving.
• Watch out for overexposure. Many aerial cameras use fixed apertures (often, at f/2.8). If this is the case, your shutter speeds might be extremely short. Sometimes, images might even be overexposed because the camera can’t shoot fast enough. Consider adding a neutral density (ND) filter, if necessary, but make sure you use a filter that many other people use for the same purpose. Most gimbals are not designed to support the extra weight of a filter, and some may burn out because of the extra load on the motors. Gimbal manufacturers might not honor warranties if a filter is used.
• Pay attention to the general composition of your scene and adjust exposure compensation accordingly. For example, if you’re taking pictures over snow, you might need to overexpose to compensate for the camera trying to make the snow gray. If you’re taking pictures over the ocean, you might need to underexpose because the camera might try to brighten the water automatically.
Note that cameras like GoPros offer only limited control of exposure. See the “GoPro” section later in this chapter for details.
Focus
Unless you’re using a professional camera drone, it’s unlikely that you will ever have to focus your aerial camera. Most aerial cameras have small sensors and fixed apertures. They’re prefocused at the hyperfocal distance, which means that very close objects might not be in sharp focus.
Some integrated camera drones are now shipping with larger sensors and variable-aperture lenses that do need to be focused. If you have one of these drones, treat focus as you would when using a land camera: Think about it before you shoot. Many people who have been shooting using current camera drones have stopped thinking about focus in the air, and it will take some time to remember that most photography does actually require thinking about focus (or having an intelligent camera do it for you).
Frame Grabs from 4K Video
Many current camera drones are capable of capturing 4K video (including high-end consumer drones from DJI, and all drones that use the latest GoPro HERO cameras). We’ll talk specifically about shooting aerial video in the next chapter, but it’s also important to note that 4K video can be useful for capturing stills, as well. The resolution of 4K video is typically either 4096×2160 pixels (“4K”) or 3840×2160 (“4K UHD”), both of which are over 8 megapixels. This means you can extract reasonable still images from 4K video by exporting screen grabs from the original video.
You’ll achieve the best results by shooting video at fast shutter speeds when your drone is moving slowly. Fast shutter speeds will freeze any motion in your scene, and a slow-moving drone will prevent rolling-shutter artifacts from making vertical lines slant during movement.
One of my most popular aerial still images is on the cover of this book and was actually created by exporting a frame grab from a 4K video (FIGURE 3.4)!
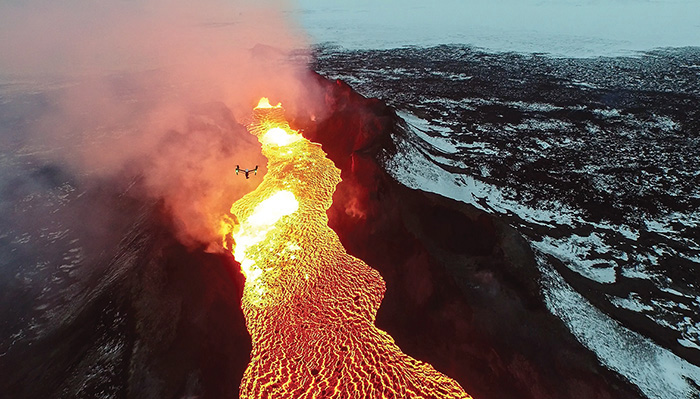
Shared photo credit: Eric Cheng / DJI & Ferdinand Wolf / Skynamic.
FIGURE 3.4 This image of a DJI Inspire 1 flying over the Holuhraun volcanic eruption in Iceland in January 2015 is actually a frame grab from an aerial 4K video taken with a second Inspire 1.
You can export a frame grab using various methods, depending on whether you’re viewing the video on a computer or smart device. If you don’t know how to do this, do a Google search for screen shot video [platform], replacing [platform] with the kind of computer or smart device you are using.
Integrated Cameras
At the moment, DJI’s Phantom 3 series and Inspire 1 are the most popular camera drones on the market. Their integrated cameras are comparable in image quality to the GoPro HERO4 (they use the same sensor and internal processor) but feature the integration advantages listed previously. Because DJI’s integrated cameras are so popular, I’ll use the DJI GO mobile app to illustrate all the camera settings in this section.
Integrated camera drones offer many benefits to users, especially in feature set and user interface, but many models are not upgradable, meaning that you cannot swap out the camera for a better one later. The DJI Inspire 1, however, does feature a modular drone camera mount—the first of its kind.
Remote Control
Integrated drones have cameras that can be controlled remotely by physical interfaces on the remote controller and/or via a mobile app. First-generation integrated drones like the DJI Phantom 2 Vision and Vision+ had cameras that could be controlled only by mobile app (aside from gimbal pitch, which could be controlled by a lever or dial on later revisions of the drones). These were great first steps in how integrated drones might work, but mobile app-controlled cameras proved cumbersome because photographers had to remove their hands from the sticks in order to take a picture.
Modern integrated drones like the DJI Phantom 3 and Inspire 1 feature custom remote controllers with buttons and dials that allow for full camera control. These newer drones are starting to feel like remote cameras rather than drones that happen to carry cameras. The Phantom 3’s and Inspire 1’s controllers have buttons for taking a picture and starting/stopping video recording, as well as dials you can use to change all exposure variables (supporting full-manual exposure) and pitch the gimbal up and down (FIGURE 3.5).

FIGURE 3.5 The DJI Phantom 3 remote controller includes physical buttons and dials for all camera controls.
Integrated, physical camera controls are among the main benefits of integrated camera drones. Photographers can plan compositions, take only the pictures they want to take, and change settings between shots, just like they do when using a land camera. Nonintegrated cameras tend to be used in interval shooting mode (also sometimes called time-lapse mode) and left to continue shooting during the entire flight. Changing settings is difficult or impossible because you can’t get physical access to the camera without landing the drone.
When I use an integrated camera drone, I feel like I’m operating a camera that happens to be in the air, instead of a drone that happens to be carrying a camera. Approaching aerial imagery this way once you’ve mastered drone operation will greatly improve the quality of the images you capture during flight.
Exposure Control
Integrated camera drones typically offer exposure control that can be set during flight. In earlier DJI models like the Phantom 2 Vision and Vision+, exposure control was a single slider in the DJI Vision mobile app. This interface was one of the first in a consumer product to allow for live exposure control during a camera drone flight; earlier and competing products required physical access to a third-party camera, requiring pilots to land to change exposure. Although being able to change exposure while in the air was convenient, pilots still had to access the controls via a smartphone, which meant that they had to take their hands off the control sticks, leaving the drone in a hover or allowing only for awkward piloting with the use of only one hand.
Newer drones have moved nearly all camera controls to the remote controller itself (FIGURE 3.6). Full manual exposure control (ISO and shutter speed; aperture is fixed), gimbal tilt (and roll, on the Inspire 1), shutter control, and playback can all be done without removing one’s hands from the sticks.

FIGURE 3.6 The DJI GO app for DJI Phantom 3 and Inspire 1 features all the camera settings you’d expect to find in a land camera.
In addition, the DJI GO app features a rich set of touchscreen exposure control actions, including the following:
• Tap to auto-expose
• Tap and hold to lock exposure
• Tap and drag to move gimbal
Burst Mode
Some integrated camera drones can shoot in small bursts. The DJI Phantom 3 series and Inspire 1 can shoot in rapid bursts of up to seven pictures in a row. You can select burst mode by tapping and holding down the virtual shutter button in the DJI GO’s app’s camera screen and trigger bursts by tapping the virtual shutter button (FIGURE 3.7).
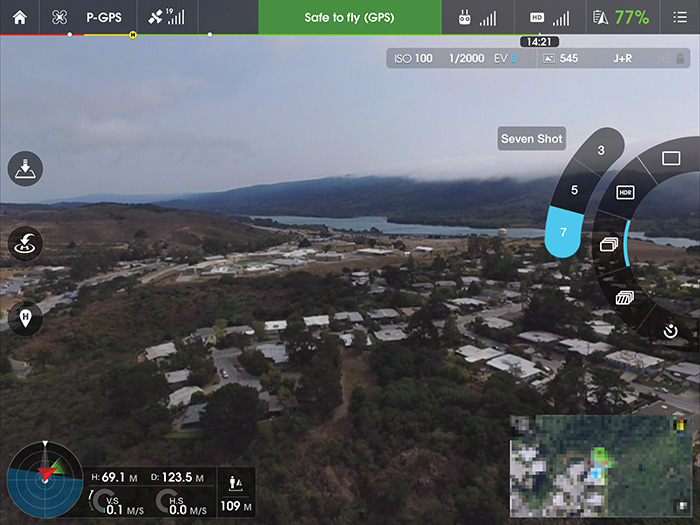
FIGURE 3.7 Burst mode controls in the DJI GO app for Phantom 3 and Inspire 1, with Seven Shot selected
Exposure Bracketing
The DJI Phantom 3 series and Inspire 1 also feature automatic exposure bracketing in three- or five-shot bursts with 0.7 stops between each pair of pictures (FIGURE 3.8). You can select exposure bracketing mode by tapping and holding down the virtual shutter button in the DJI GO app’s camera screen.

FIGURE 3.8 Automatic exposure bracketing in the DJI GO app for Phantom 3 and Inspire 1, with three- or five-shot brackets available
Interval Shooting
Just because an integrated camera drone has an explicit shutter release control doesn’t mean that it can’t be flown while automatically taking pictures.
Interval shooting (FIGURE 3.9) is useful when a pilot doesn’t want to think about taking pictures during flight or for creative shooting such as time-lapse photography (see “Advanced Techniques” later in this chapter).

FIGURE 3.9 Interval shooting (“Timed Shot”) in the DJI GO app for Phantom 3 and Inspire 1
Next-Generation Integrated Cameras
When DJI announced the Inspire 1 in November 2014, it was a sign of things to come. The Inspire 1 shipped with a relatively small camera nearly identical in specs to the camera on the Phantom 3 Professional, which shipped just half a year later, but what was important is that the Inspire 1’s camera mount is modular, promising flexibility in camera payloads that will likely become common in the future.
In September 2015, DJI released the Zenmuse X5, a modular camera with a Micro Four Thirds sensor and interchangeable lens support, featuring unprecedented image quality and lens flexibility for a relatively small camera drone. These kinds of constant improvements in technology are likely to continue to change aerial imagery at an unprecedented pace in the coming years.
GoPro
GoPro HERO action cameras are the most popular nonintegrated cameras used in aerial imaging on drones. GoPros are lightweight and offer high-quality video, acceptable stills capture, and a mounting system that has become a standard in action sports and behind-the-scenes shooting.
The vast majority of camera drones that use GoPros have no remote control of the camera while it is in the air, and still images, by necessity, are typically captured using GoPro’s excellent Time Lapse photos mode. However, 3DR’s new Solo features GoPro integration, which means that for the first time a GoPro can be controlled remotely while attached to a drone. Solo pilots can turn the GoPro on and off, trigger the shutter, and change shooting modes and settings.
Obviously, one benefit to using a GoPro or other third-party camera on your camera drone is that it is removable: You can leverage the camera for multiple purposes. One might expect price to be another factor, but integrated camera drones currently are less expensive than drones that use third-party cameras when you factor in the camera and gimbal cost.
Note For convenience, all settings screenshots in this section were taken using the GoPro app for iPhone. However, I strongly recommend turning Wi-Fi off when using GoPro cameras on drones because of potential radio interference. See the sidebar “Warning: Wi-Fi and Drones” for more information.
![]() Warning: Wi-Fi and Drones
Warning: Wi-Fi and Drones
Resolution and Field of View
GoPros max out at 12 megapixels when shooting still images (HERO4 Black and Silver), and the camera supports saving only to JPEG format. File sizes are not very large, so I recommend always shooting at a GoPro’s maximum resolution. The HERO4 Session and HERO+ shoot at up to 8 megapixels, and the HERO shoots at 5 megapixels.
Time Lapse Mode
For most aerial photography applications using GoPros, pilots will be using Time Lapse mode, which takes a picture at regular intervals until shooting is stopped by a second press of the shutter button. GoPro’s Time Lapse mode is versatile and supports shooting intervals as fast as one shot every 0.5 seconds (FIGURE 3.10). Note that GoPros are capable of shooting stills as quickly as 30 shots a second, but they can do that only in Burst mode, which requires that the shutter is triggered explicitly, and only for 1 second.
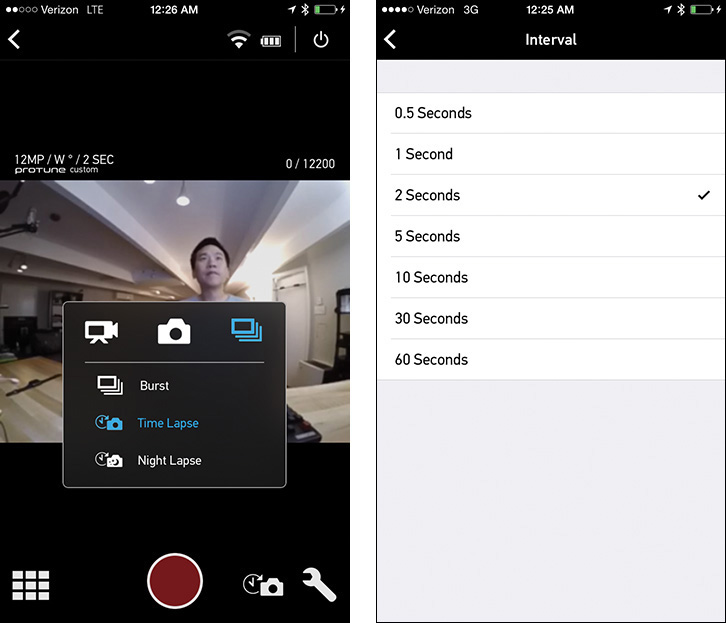
FIGURE 3.10 GoPro’s Time Lapse mode features interval shooting of 0.5 to 60 seconds between shots.
During all of my flights using GoPro cameras, I’ve found that a two-second interval works best. Taking a picture every two seconds is a good compromise: It ensures that you won’t miss any moments during your flight and also won’t end up with too many pictures to sift through.
At a 2-second interval, you’ll capture 300 pictures during a 10-minute flight. Each picture is about 2 MB, so each 10-minute flight would take up about 600 MB of microSD card space.
Night Lapse Mode
GoPro’s Night Lapse mode is similar to its Time Lapse mode but is designed for low-light and nighttime shooting, which might involve shutter speeds as long as 30 seconds. It features an extra interval option called “continuous,” which takes another picture as soon as the previous picture is taken. Long shutter speeds and continuous shooting could lead to some interesting low-light imaging experiments from camera drones.
Simultaneous Video + Photo
GoPro HERO4 Black and Silver cameras feature Simultaneous Video + Photo mode (FIGURE 3.11), which, as the name suggests, enables automatic photo capture while shooting video. Resolution and frame rates are reduced for both photo and video, maxing out at 1440p (1920×1440) at 24p, and five-second interval shooting.

FIGURE 3.11 GoPro’s Video + Photo mode features simultaneous capture of video and photos.
This is a popular shooting mode for GoPro cameras, especially when the versatility of capturing both video and stills is more important than capturing video with the best possible video quality.
Protune
ProTune is GoPro’s advanced image quality feature, and photographers who are interested in getting the best possible image quality should absolutely turn it on. Most photographers will recognize the various settings that become accessible once ProTune is toggled on, including White Balance, Color, ISO Limit, Sharpness, and EV Comp (FIGURE 3.12).

FIGURE 3.12 ProTune enables settings that should be familiar to most photographers.
The most important setting in the ProTune area is EV Comp, which is the only way you can change exposure when using GoPros. It wasn’t until late 2014 that GoPro enabled ProTune for still images, but photographers are happy that it’s now available. Previously, ProTune worked only in GoPro’s video modes, which drove still photographers to do things such as capture 4K video to export frame grabs as still images when they needed exposure compensation.
I also tend to set Sharpness to Low because GoPro photos look more natural when captured using this setting. Finally, I usually leave Color on GoPro Color because I also like the standard GoPro color and contrast (versus the other option, Flat).
Other Cameras
Obviously, other cameras (and camera drones) can be used for aerial imaging, and much of what I have discussed in the “Camera Settings” section of this chapter can be applied when appropriate. I rarely see cameras other than GoPros and integrated cameras being used in aerial imaging these days. The ubiquity of GoPro in nonintegrated drones has to do with the popularity of the form factor and availability of gimbals made specifically for GoPros, although the use of a GoPro clone that has the same form factor could be an option for folks on a budget.
Personally, I’ve been shooting stills with a DJI Phantom 3 and a modified DJI Phantom 2 that holds a Ricoh GR camera (a point-and-shoot camera with an APS-C sized sensor). The Phantom 3 feels like a camera that I can position arbitrarily in space. The modified Phantom 2 is much harder to fly because of the additional weight of the camera and older technology used in the Phantom, but the quality of the Ricoh GR camera makes the combination the highest-quality aerial-stills setup that fits into a backpack.
Accessories
A vibrant OEM and third-party accessories ecosystem is forming around consumer drones, including everything from custom retractable landing gear to typical photography accessories such as filters and lens hoods. Accessories aren’t always necessary for taking pictures from the air, but sometimes a filter can help you to create an image that works better to tell the story you are after.
Filters
In aerial imaging, ND filters and circular polarizers are sometimes used to slow down shutter speeds and cut glare from reflections. ND filters are more useful for video than they are for stills, but polarizers are useful for both, especially on nonfisheye cameras like the integrated cameras on DJI products (which have the FOV of a 20mm lens on a full-frame camera).
The integrated cameras on DJI Phantom 3 and Inspire 1 support threaded filters that use nonstandard thread sizes (FIGURE 3.13). DJI-branded filters and third-party filters from PolarPro are easy to find online.

FIGURE 3.13 PolarPro filters for DJI Phantom 3
Filters for GoPro cameras also exist, although there are a couple of factors to consider before using them.
First, polarizers are only as effective as light is streaming orthogonally from the lens direction (a 90° angle). Wide-angle lenses like those found on GoPros can capture light that is streaming straight into the lens (a 0° angle) and light that is nearly at a 90° angle in the same frame. This means that a polarizer will have a very different effect in different parts of the frame. To see this effect using a normal camera, put on a wide lens and a polarizer filter and take a picture of the sky when the sun is out.
Second, gimbals need to be balanced carefully, and the addition of a filter to the front of a GoPro’s lens (or any stabilized camera’s lens) will throw the system off-balance. If the gimbal is powerful enough, it will still be able to stabilize the camera. If it isn’t, the gimbal might perform poorly or even burn a motor out as it tries to adjust for the new imbalance.
Lens Hoods
Lens hoods in land photography are useful for helping to prevent flare from lights that aren’t actually being captured in frame. In the aerial imaging world, you’ll be more concerned with sunlight that happens to be passing through propellers. Because most of the cameras I am discussing use rolling shutters, light that passes through spinning props can cause strange horizontal striping in the resulting images. It’s obvious in video but can also be seen in still photos. Lens hoods can prevent this stray light from hitting the lens.
The issues with accessories and gimbals in the earlier “Filters” section also apply to lens hoods.
Aerial Photography Techniques
Aerial photography using camera drones is in its infancy. The first really usable camera drone was the original DJI Phantom (FIGURE 3.14), which came ready to fly with a GoPro mount on the bottom of it in January 2013. In just a couple of years, camera drones have evolved from decoupled systems, with drones and cameras operating completely independently, to totally integrated systems that are starting to feel like remote cameras.

FIGURE 3.14 Facebook’s global headquarters at 1 Hacker Way in Menlo Park, California. I shot this picture just a couple of months after DJI’s original Phantom quadcopter hit the market.
The most important thing to remember about using a camera drone is that the end goal is still storytelling through captured images. All of the tenets of traditional, land-based photography apply to aerial photography, and it’s through properly executed storytelling that the best aerial images are created. Composition, lighting, subject matter, and timing are the main elements that determine the effectiveness of a photograph, whether it was taken on the ground or in the air. Deep knowledge and constant practice with camera drones will help free you up to think about storytelling without becoming lost in the technical weeds. To be most effective as an aerial photographer, you need the piloting and operation of a camera drone to feel like instinct, just like what works best on the ground when using a land camera.
There are, however, some aerial-specific techniques and ideas to consider. Most of us aren’t used to thinking about the vertical dimension when we frame photographs.
![]() The First Aerial Photographer
The First Aerial Photographer
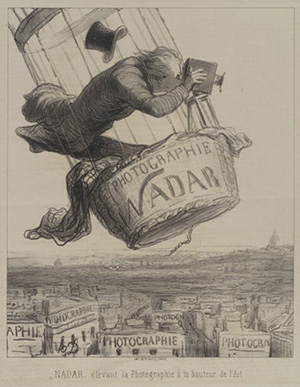
FIGURE 3.15 “NADAR élevant la Photographie à la hauteur de l’Art” (Nadar elevating Photography to Art), a lithograph by Honoré Daumier that appeared in Le Boulevard on May 25, 1863
Thinking in 3D
I have spent more than ten years as a professional underwater photographer. Navigating underwater while hauling around scuba diving equipment and large camera rigs with big optics and lighting doesn’t seem like it would be connected to aerial photography, but it very much feels the same to me. When we move underwater, we move freely in three dimensions. Moving up is as easy as starting to breathe a bit more deeply, and a deep exhalation from the lungs results in sinking.
Eventually, moving in the vertical dimension becomes automatic, and that freedom has had a profound effect on how one thinks about movement and photographic composition. On land, such freedom had historically been impossible; it wasn’t until camera drones were created that I felt similar freedom above water.
With enough time spent flying a drone while watching high-quality FPV video, you’ll find yourself beginning to visualize the world from all sorts of angles, even when you aren’t flying. This constant previsualization of potential stories from the air is a rewarding skill to develop. Personally, it presents me with regular ideas for aerial projects and also enriches my daily life as I wander the globe capturing stories.
Just Out of Reach
One of the first questions most consumer drone pilots are asked is, “How high can it fly?”
Aerial photographers hate that question because most interesting shots are taken at low altitude, and there is almost no reason to fly very high. Also, for regulatory reasons, many consumer drones are limited in how high they can fly by default (see Chapter 6).
The strength of a camera drone is that it can fly just out of reach in that unique altitude band between where large aircraft fly and the misguided reach of selfie sticks. When a camera is too high, the images it captures start to look like pictures taken from an airplane or satellite. These sorts of pictures can certainly be useful and beautiful, but they don’t create unique images that only camera drones could have taken (FIGURE 3.16).

FIGURE 3.16 Grjótagjá is a dramatic tear across the land near Lake Mývatn, but it’s almost impossible to see from the ground. I took these three shots from different perspectives. The top shot was taken from where I was standing on top of the broken earth. The middle was taken from about 20 feet up, using a DJI Phantom 2 and Ricoh GR camera. The bottom was taken from much higher. Both of the aerial images are interesting, but I prefer the one taken from low altitude.
Exploring low-altitude imagery also usually results in images that have a lot of depth to them. High-altitude imagery is flat and is essentially 2D in nature. At low latitudes, subjects that are closer look a lot bigger and can be used as more interesting parts of a composition.
Straight Down
Looking straight down from the air isn’t something humans get to do often. Usually, we are standing or sitting on something opaque when we are at altitude (and likely, looking out of a window), which is why such views are so rare. Luckily, camera drones are good at looking straight down (FIGURE 3.17), and it’s one of my favorite camera orientations while flying.

FIGURE 3.17 Hanging just above a forest of redwood trees, looking straight down. Phantom 2 with Zenmuse H3-2D gimbal and GoPro HERO 3+ Black (frame grab from video).
![]() Shortcut: Custom Buttons
Shortcut: Custom Buttons
One of my favorite ways to shoot straight down is to combine the camera orientation with staying at low altitude (see “Just Out of Reach” earlier in this chapter). Views straight down from too high up start to look like satellite maps, and flying a bit lower can yield perspectives that would be nearly impossible to capture by any other method.
Abstracts
Aerial photography is well suited to the capture of abstract images. Land is, because of the nature of its ownership and use by humans, divided into distinct geometric shapes that are clearly visible as soon as one’s perspective lifts off the ground a bit. On land, abstract imagery is often in the macro or micro scale or confined to visualizing just a small part of a larger object that might not be obvious out of context. From the air, abstracts tend to be collections of many whole objects, and often, scale is hard to determine.
Most aerial abstracts I’ve seen tend to be taken while shooting straight down, which serves to create the sort of regular, geometric patterns that lend themselves to the abstract (FIGURE 3.18).
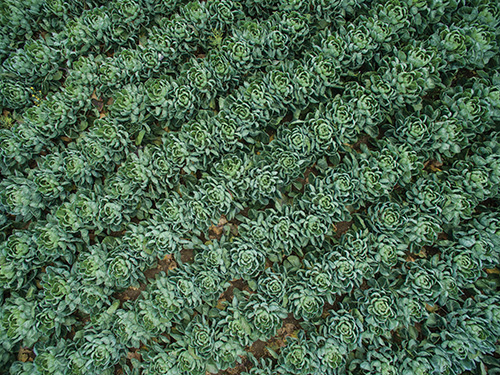
FIGURE 3.18 A low-altitude, straight-down shot at a farm in Northern California
Slow Shutter Speeds
Most current camera drones use cameras with fixed apertures of around f/2.8, and since most people fly drones during the day when there is plenty of sunlight, it is rare to see blurry aerial images. Shutter speeds are typically fast, and the ubiquity of camera gimbals further reduces the chances that a picture is blurry. But blurry elements in pictures have always been a staple in creative photography—think of moody shots of running water or a long nighttime exposure that makes car headlights into rivers of light.
Some of the most recent camera drones make slow shutter speeds fairly easy to accomplish. As I mentioned in the “Camera Settings” section earlier in this chapter, DJI cameras can be remotely controlled with full manual exposure. Shutter speeds can be as slow as eight seconds, which is plenty slow enough to achieve interesting creative effects. GoPro HERO4 cameras can be set to Night Mode or Multi-Shot Night Lapse Mode with shutter speeds as long as 30 seconds (FIGURE 3.19).
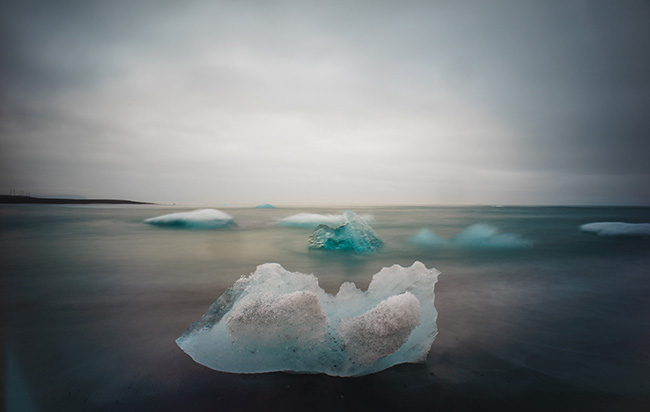
FIGURE 3.19 I left the shutter open for 30 seconds to record this (land-based) shot of icebergs in the surf at Jökulsárlón Glacier Lagoon in Iceland. Water movement has been averaged out into moody texture, allowing the iceberg in the center to present itself more effectively.
Modern gimbals are able to stabilize exposures from the air in ways that are surprising for photographers who are used to shooting on land. On land, most photographers expect to be able to handhold a wide-angle exposure for around 1/15 to 1/30 second (longer, if the camera or lens features image stabilization). Longer handheld exposures typically exhibit full-frame blur, in which no elements in the picture remain sharp. Most people look at such pictures and think, “That is a blurry picture.” On land, long exposures require the use of a tripod, if the goal is to have stationary objects rendered sharply in the photograph.
When a drone and gimbal are involved, the possibilities change for setting up long exposures (FIGURE 3.20). I have seen sharp exposures from a DJI Inspire 1 as long as eight seconds, but three to four seconds is typically more achievable, especially if there isn’t much wind and if multiple pictures are taken. Remember, these are for exposures without a tripod!
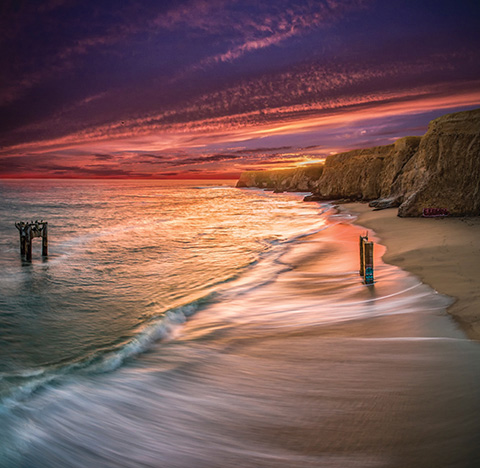
FIGURE 3.20 A 2-second exposure above the ruins of a pier in California turns the surf into streaks of texture. Photo courtesy Romeo Durscher, taken using a DJI Inspire 1 using a homemade ND64 filter.
From a technical perspective, you can maximize the chance of a sharp frame that still allows moving subjects to blur by doing the following:
• Use shutter speeds between 1/30 and 4 seconds.
• Move your drone far away from the stationary subjects you want to remain sharp in the frame. The farther away they are, the sharper they will be if there is any movement.
• Take as many pictures as you can. Not all the pictures will be successful, and the more you take, the higher the probability of having at least one succeed.
• Manually bracket your exposures, experimenting with how much movement you are blurring in the frame. Different subjects will require different exposure lengths.
• Shoot when the weather is calm. Gimbals do wonders to stabilize cameras, but long exposures are sensitive to even the smallest of movements.
• Use an ND filter to slow down shutter speeds. ND filters for drone cameras are available from camera manufacturers, PolarPro, Snake River Prototyping, and others.
Using a slow shutter speed can be challenging from the air and might not be the first thing that pops into your mind when you go for a flight, but if you manage to use this technique successfully, you’ll produce imagery that sets you apart from other aerial photographers.
Shallow Depth of Field
Blurred backgrounds and beautiful bokeh (the shape and quality of the background blur) are two factors that nonphotographers use implicitly to determine whether a picture “looks professional.” Blurred backgrounds are a result of focusing accurately and achieving a shallow depth of field, which is accomplished by using a large physical aperture in photography.
Although it might seem great, at first, that camera drones often use f/2.8 lenses, the physical size of the apertures are actually fairly small because focal lengths are quite short (a result of using small sensors). Compounding this, camera drone lenses are also usually wide angle, and shooting distances tend to be long because of safety requirements and the current state of drone technology (in other words, drones are still allowed to fly into things). Because of these reasons, it’s difficult to achieve shallow depths of field when using current consumer camera drones. Note that smartphones also have small-sensor challenges when it comes to achieving shallow depths of field, which is why you typically see blurred backgrounds captured with smartphones only when subjects are close to the lens.
It is, however, possible to shoot with a shallow depth of field from a drone. If you put a camera with a large sensor into the air, outfit it with a medium or long lens, and have the ability to focus while you are in flight, you can achieve a shallow depth of field. A heavy-lift hexacopter or octocopter can definitely lift a mirrorless camera or SLR, complete with a longish lens, wireless follow focus (or autofocus), and a good FPV system. Rigs like these have been used in aerial cinematography for much longer than normal consumers have been putting little drones into the air; obviously, they require more effort to fly and are most often flown with a dedicated pilot, a camera operator, and at least one spotter—a full crew.
Most recently, the Zenmuse X5, a gimbal-stabilized Micro Four Thirds camera, has been released for the DJI Inspire 1 which brings, for the first time, a relatively large sensor and interchangeable lenses to a medium-sized camera drone. A medium-length lens attached to such a camera drone could achieve a shallow depth of field at the closest range you’d want a drone to get to a subject. What’s more, unlike custom, heavy-lift systems, an Inspire 1 can easily be operated by one person, with aperture control, autofocus, and manual focus available as part of the DJI GO app and as shortcut options for the remote control’s customizable rear buttons.
As drones continue to become more and more integrated, custom, medium-sized camera drones will most likely disappear in favor of integrated models, which will be much smaller and lighter for the same sensor size in payloads.
Advanced Techniques
Virtually every advanced technique that land photographers use can be applied in some way to aerial photography using camera drones. In this section, I’ll discuss four advanced techniques that are particularly popular among aerial imagers.
Panoramas
Panoramas are popular in aerial photography because camera drones usually have unobstructed, panoramic views from wherever they happen to be hovering (FIGURE 3.21).

FIGURE 3.21 A six-shot panorama taken near Bellagio on Lake Como, Italy, with a Phantom 3 Professional, and stitched using Adobe Photoshop Lightroom
Shooting aerial panoramas is easy. To create one, just rotate your drone slowly, taking successive overlapping pictures, and drop them into a program that stitches them together automatically. You’ll find numerous online tutorials demonstrating stitching methods using various editing programs and cloud services. I’ll talk through a couple of them here, but if you need more information about stitching, spending five minutes doing web searches will get you far.
Shooting an Aerial Panorama
To take an aerial panorama, do the following:
1. If you’re shooting with a GoPro or other camera that you cannot control in flight, set an appropriate manual exposure (if possible) and start shooting using interval mode set to two to three seconds per shot.
2. Fly to wherever you’d like to take the aerial panorama from and make sure you’re in a stable hover using GPS position hold.
3. Pitch the gimbal to the angle you’d like to use for your panorama. If you’re shooting with a fisheye lens, like the lenses found on GoPro cameras, shoot close to horizontal to avoid having fisheye distortion cause stitching problems.
4. Set your exposure mode to manual and choose an appropriate exposure that is good enough to capture pictures along the entire planned panorama composition. I do this by pointing the drone at the brightest area and setting exposure there.
5. Start shooting, rotating the drone to the right or left between shots (or pitching the camera up or down for vertical panoramas), ensuring that you have 30 to 50 percent overlap between each image.
As an alternative to capturing stills, you can also shoot high-resolution video (preferably 4K) and rotate slowly in one direction. Later, in post, screenshots can be taken at the appropriate locations to create source imagery for stitching. But keep in mind that, in most instances, this approach will not yield a panorama that is as high in quality as one created from still images.
Processing a Panorama in Adobe Lightroom
I highly recommend using Adobe Photoshop Lightroom for image processing and library organization. As of mid-2015, Lightroom includes built-in panorama stitching.
To process a panorama using Adobe Lightroom, do the following:
1. Import the panorama picture fragments into Lightroom.
2. Make sure you have enabled profile corrections to account for lens distortion and vignetting by selecting the Enable Profile Corrections check box in the Develop dialog box (FIGURE 3.22). This is especially important if you are using a camera with a fisheye lens (like a GoPro).
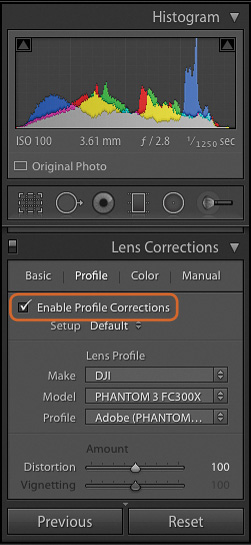
FIGURE 3.22 Enabling Profile Corrections in the Adobe Photoshop Lightroom Develop dialog box
3. Multiselect the frames.
4. Choose Photo > Photo Merge > Panorama from the menu (FIGURE 3.23).
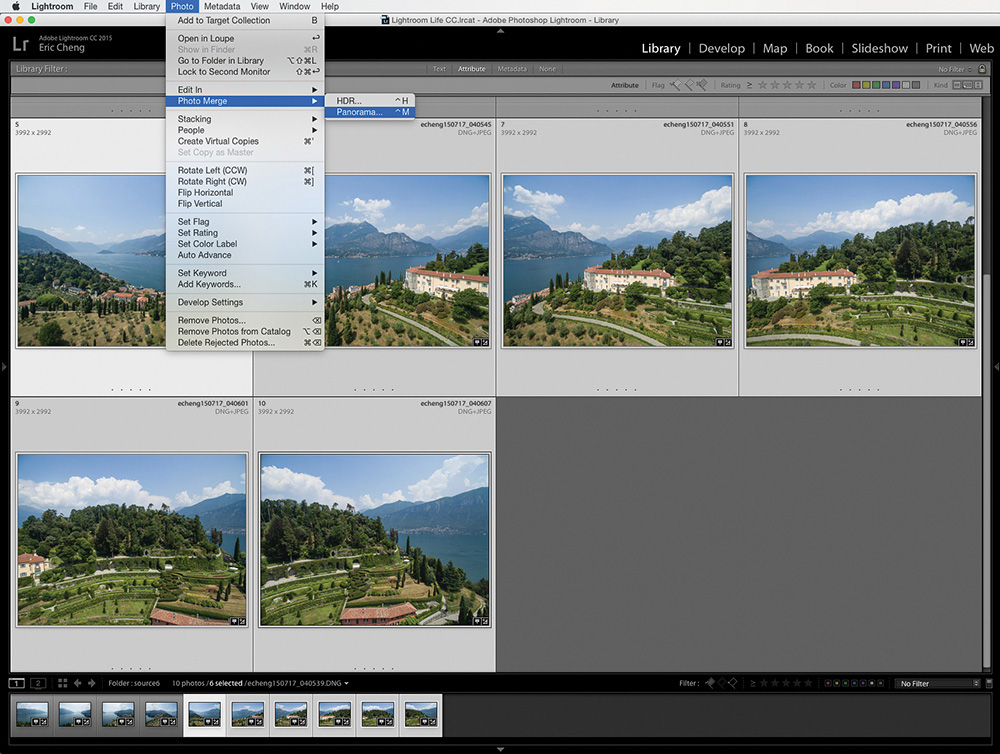
FIGURE 3.23 Choosing Panorama from the Photo Merge menu
5. Select Cylindrical as the projection, wait for the preview, and then click Merge in the Panorama Merge Preview dialog box (FIGURE 3.24).
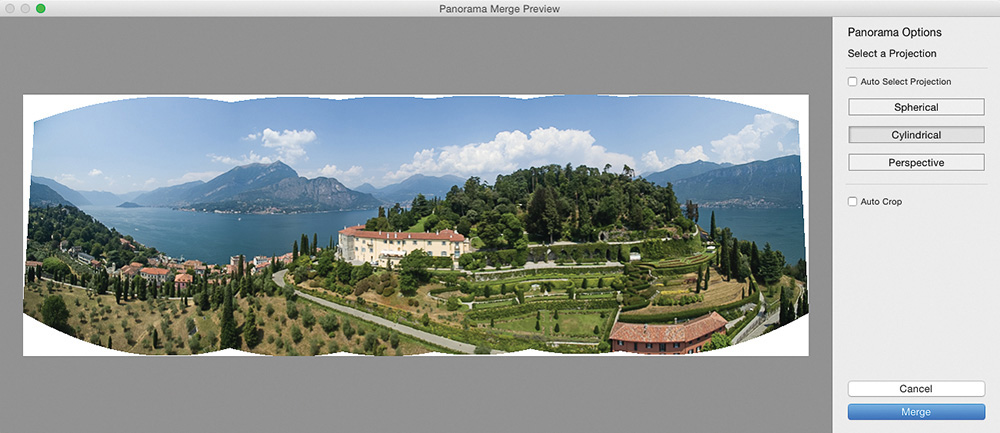
FIGURE 3.24 When you see your panorama preview, merge the images to create the panorama.
6. (optional) Crop out the irregular borders.
Process a Panorama in Google Photos
Google Photos’ Auto Awesome feature will detect panorama frames in uploaded pictures and automatically create panoramas for you. Simply upload all the panorama frames to your account at http://photos.google.com and wait. When Google decides that you should see your new panorama, it will appear in the Assistant feature.
Time-Lapse
Time-lapses are sequences of still images that are played back as a video, which effectively plays time back in fast motion. To make effective time-lapse movies, a chosen composition or subject must change over time. Common time-lapse sequences might involve the movement of celestial objects (sunrise, sunset, stars), clouds, tides coming in and out, and groups of cars or people moving in structured ways, such as on roads or paths.
Aerial time-lapses are not yet common, but the technology is here to make them happen, so I expect to start seeing more of them as users experiment with new perspectives from the air.
Capturing an aerial time-lapse works exactly like it does on land: Capture pictures at set intervals and then process them into a video. If you’re shooting using a third-party camera in interval mode, then you are already effectively capturing a time-lapse when you fly. If you’re using an integrated camera drone like a DJI Phantom 3, you can use the Timed Shot mode. A time-lapse using a moving camera is also called a hyper-lapse, a term that is becoming more popular.
Shot Intervals
The amount of time you choose between shots will determine how smooth your resulting time-lapse is and how much faster than real time it plays. GoPro cameras can shoot successive shots as quickly as 1 every 0.5 seconds, which is 120 shots per minute. When played back at 30 fps, that results in a 15x speedup over real time. So, a 15-minute drone flight will result in 1 minute of time-lapse video. DJI drones currently max out at 1 shot every 5 seconds (in JPEG mode; slower, in DNG+JPEG), but it’s likely that DJI will shorten this interval via a firmware update in the future. One shot every 5 seconds is only 12 pictures per minute, or a 150x speedup from real time. Suddenly, a 15-minute drone flight is only 6 seconds of video, which isn’t usually long enough to be interesting on its own. You could play it back at 15 fps, yielding 12 seconds of video, but playback quality might suffer. With limited flight time, a shot interval of a maximum of two to three seconds is recommended for useful time-lapse capture.
Shot intervals vary greatly by subject matter, and you’ll have to experiment to find the ideal interval for your particular project.
HDR
HDR stands for high dynamic range, and HDR images are needed when the dynamic range of a particular composition exceeds that which the sensor can capture in a single exposure (FIGURE 3.25). Typically, such scenes involve both the sun (or brightly illuminated objects) and shaded areas being in the same frame.

Photo courtesy Julian Cohen.
FIGURE 3.25 A normal picture taken with a DJI Phantom 3 Professional (left) compared to a picture taken using the built-in HDR feature (right)
Many cameras now include some form of HDR mode, including integrated camera drones like the DJI Phantom 3 and Inspire 1 (FIGURE 3.26). Typical HDR modes either do automatic exposure bracketing in a quick, multi-image burst, or shoot a raw frame, pull down blown highlights, and boost shadows. Both will process and tone-map the resulting picture in-camera, compressing the dynamic range back into a JPEG.

FIGURE 3.26 The DJI Phantom 3 supports HDR, which takes multiple pictures in a burst and processes them in-camera
Many photographers prefer to capture individual, exposure-bracket images and do HDR processing in post. Because some aerial cameras support both AEB and burst mode, it’s fairly simple to capture bracketed images that are shot in quick succession. The three- and five-shot AEB modes available on the DJI Phantom 3 and Inspire 1 make capturing aerial HDR images easy (FIGURE 3.27).
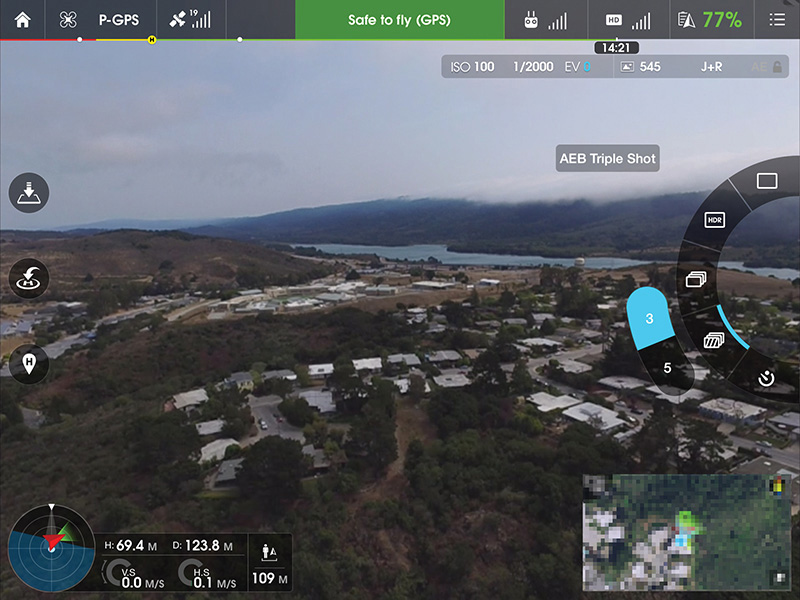
FIGURE 3.27 A DJI Phantom 3 and DJI GO app showing AEB Triple Shot, which will take a burst of three pictures, bracketing by 0.7 EV between shots
Processing HDR in post can be done using programs such as Adobe Photoshop, Lightroom, Photomatix, and others. I won’t go into processing technique here because there are so many HDR tutorials available on the Web. For example, try Trey Ratcliff’s tutorials, which are available at www.stuckincustoms.com/hdr-tutorial.
Photogrammetry
Photogrammetry is the science of using photography to measure things. In the aerial context, it usually means generating maps from aerial photography. In the past few years, consumer drones have created an entirely new industry around low-altitude mapping, and the results people are getting using low-cost drones have been extremely disruptive.
On the capture side, think of photogrammetry as requiring a series of overlapping panoramas with the subject being an area on the ground. The reconstruction algorithms merely require that the pictures have full coverage of all the points on the ground, and the more overlap, the better. Plentiful overlap is desired because programs can create not only 2D maps but also 3D models of the ground and any structures on it (FIGURE 3.28).

FIGURE 3.28 A program called Pix4D shows imported images from a DJI Phantom 3 flight near Bellagio, Italy, overlaid over the 3D model it created from the images. The blue spheres show where each picture’s GPS data says it was taken, while the green spheres show the computed GPS coordinates determined by processing the image data itself.
3D models can be created because any given point on the ground is seen by many cameras viewpoints at once. By using the angle between all the cameras and the matched point, programs can determine where it lives in 3D space. Furthermore, because drones have GPS data, each picture knows where it was taken from; this location data is used to create georeferenced orthomosaics, which are photographs that are geometrically corrected so they can be overlaid over maps and can be used for taking measurements (FIGURE 3.29).
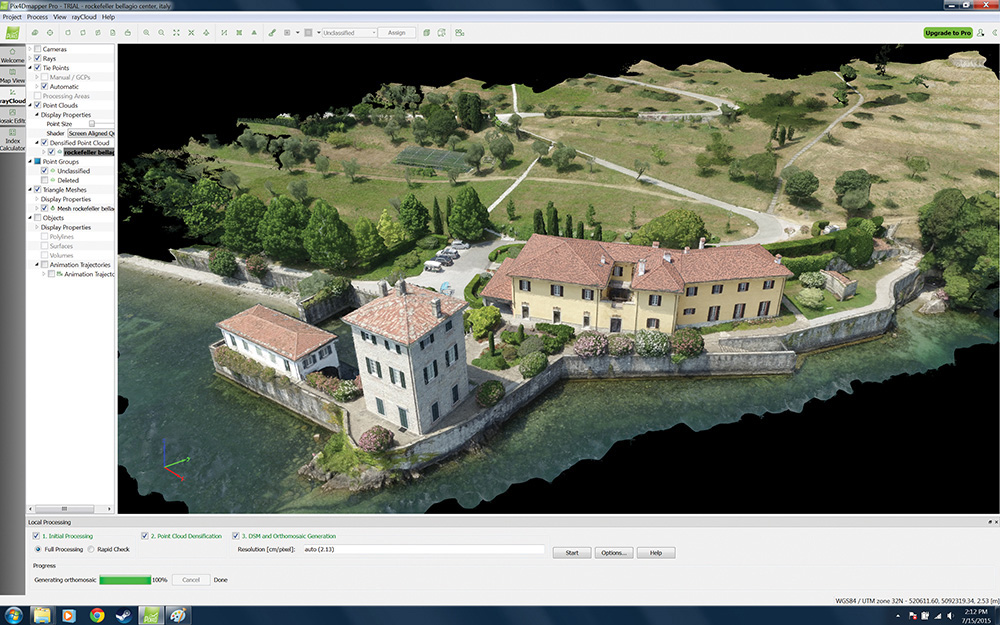
FIGURE 3.29 Pix4D shows the resulting 3D model that was created as a result of the DJI Phantom 3 flight shown in Figure 3.27.
Aerial mapping by camera drones is being used in a variety of industries including precision agriculture, construction, mining, utility inspection, conservation, search and rescue, humanitarian disaster response, and more. In the creative space, artists are using drones to generate 3D models of structures and importing the resulting point clouds and texture-mapped meshes into programs where they can be manipulated and even printed using 3D printers.
If you’re interested in doing some aerial mapping yourself, there are a few apps that can make it easy:
• Pix4Dmapper, https://pix4d.com/pix4dmapper-app/: A free mobile app that uses DJI, 3DR, senseFly, and other drones to automatically map any area you choose.
• DroneDeploy, https://www.dronedeploy.com/: A (currently) free mobile mapping app that uses your DJI Phantom, Inspire, or 3DR Iris+.
• Autodesk 123D Catch, http://www.123dapp.com/catch: A free app that generates 3D scans of any object or location. Upload aerial images captured using Pix4D or DroneDeploy or during manual mapping flights.
Note that even if you do not use an app that automatically flies your drone to do mapping, you can fly manual missions, capturing the overlapping images yourself, and upload and process the mapping data later.
Post-Processing
The applicable techniques used in processing aerial still images in post are identical to those used in processing pictures taken on land. The only potential difference arises if you’re using an integrated camera drone instead of a stand-alone camera attached to a drone. This is important only if you want to use a camera and lens profile during editing to correct for distortion and/or vignetting. Luckily, the most popular cameras used in the air, GoPro HERO cameras and DJI integrated cameras, feature profiles included in Adobe Photoshop and Adobe Photoshop Lightroom, as shown in Figure 3.22. If the programs do not automatically detect your camera, try updating to the most recent version.
What’s Next?
We’ve been thrown quickly into a new era of photography in which the vertical dimension has been unlocked by the mainstream availability of camera drones. We’re seeing traditional camera features migrating into the feature sets of integrated camera drones, and it’s likely that the trend will continue. As integrated camera drones become more functional and easier to use, it will become difficult for drones that use stand-alone cameras to compete with integrated drones for value.
There are also numerous software apps on the horizon that target both vertical industries and horizontal applications, suggesting that the software app economy for drones might be even more important in the future than the drones themselves. This is exactly what happened with smartphones, and we’re seeing many similarities in the evolution of the market as drones start to take off.
Third-party photography apps for drones will emerge, and you should expect to see camera app alternatives for the various drone platforms, as well as apps that tap into increased drone autonomy as sensors get better with each generation of drones. Manual piloting is currently a big part of aerial imaging, but as you’ve seen in the earlier chapters of this book, becoming a competent pilot can require quite a bit of work.
Future drones will most likely be able to navigate safely and beautifully by themselves, removing manual piloting from the equation. At that point, a photographer will be able to intuitively direct a drone into position for photography or even ask the drone to take pictures by itself. Photographers have never before had the ability to ask a robot to move around and take pictures by itself. This sounds like science fiction, but we are essentially already there, and it remains to be seen how such capabilities might change the nature of photography.