Chapter 4. Aerial Videography
In Chapter 3, you learned about taking still pictures from the air. Many of the settings and techniques I introduced there are relevant to aerial videography, so it’s worth reading even if you aren’t interested in still photography.
Aerial videography is the primary reason drones have burst into the mainstream and have been growing exponentially in popularity. At the end of 2012, there were not many drone videos shared on sites such as YouTube, and a search for the word drone resulted mostly in videos of military drones. In 2012, camera drones were available only to the few hobbyists who could configure, build, and repair them. Small stabilizing gimbals had not yet made it to the marketplace.
Hollywood, however, had been using scale-model helicopters and multirotor drones for years to carry cameras, although they had been doing it without much publicity, possibly attempting to fly under the radar of the FAA for legal reasons (see Chapter 6 for more about regulations and policy). The camera drones used by Hollywood were designed to carry large cameras, and gimbal technology was still relatively simple when compared to the products that would emerge only a few years later.
I’ve already talked about the first ready-to-fly camera drones and the ways they affected the industry. But it was likely the sharing of videos captured from the air that amplified growth exponentially. Those of us who fly camera drones know that we are effectively in the drone sales business. If someone sees you flying one, it’s likely that they will come over to see what you are doing, and chances are good that they will leave wanting one for themselves. In a given flight, you might influence a couple dozen people at the most, but millions of people might see a shared video gone viral, and some percentage of them will become drone video converts.
Telling Stories
When consumer drones first started to become popular, almost all aerial video from camera drones attracted attention. The low-altitude perspectives and the way drones could move with almost complete freedom were enough to keep a viewer’s attention. This kind of special attention happens only during periods of fast and dramatic technological change. During these moments, expectations are violated, and viewers are often as interested in the technology and novelty as they are in being pulled into a story.
One of my first popular videos was a short aerial cut of surfers in Santa Cruz taken with a DJI Phantom and a prototype Rotorpixel brushless gimbal for the GoPro HERO3 (FIGURE 4.1). The video went viral and was featured all over the Web and on many news networks around the world. I attempted some rudimentary storytelling in the video, but what made it really interesting was that the footage was incredibly smooth. It was some of the first good, gimbal-stabilized footage from a new kind of camera drone, and viewers were amazed.

Photo courtesy George Krieger.
FIGURE 4.1 A DJI Phantom with prototype gimbal captures footage of a surfer in Santa Cruz in July 2013
When technology is no longer novel, videos need more substance to impel viewers to watch, engage, and share, and we’ve already reached that point with camera drones. Most people have probably seen footage from a camera drone, and drones are in the media almost every day. These days, it’s no longer sufficient to show videos that do not have an interesting subject or tell a compelling story.
When I talk about storytelling, I’m talking about both the kind of stories that involve a plot of some kind and the kind of stories that might be only visual or abstract in nature but have a sense of place and progression. There always needs to be a journey in order for a story to work well.
If you aren’t interested in making movies that include people, you can still tell a story that explores space. A particular natural formation like the cliffs over a nice spot on the coast, a lake that reflects light just so in the hours before sunset, or the silhouette of a bunch of cacti in the desert all can be part of an interesting story if the right pieces are captured.
Here are some basic questions to ask while you are collecting footage for your video:
• Does your video have a clear beginning, middle, and end?
• Is there a sense of context? Are the subjects anchored, somehow, in an environment or feeling?
• Is the video satisfying to watch? Is it beautiful, evocative, disturbing, educational, and so forth?
• Do you care about the video? Did you spend time planning, capturing, and editing it?
Videos need to have a reason to be shared. Typically, if you can’t think of a reason to share a video or don’t care about it, others will also not care when they are watching it (if they watch any of it at all). I’m not saying that you shouldn’t capture as much video as you can—you certainly should capture footage for practice, to satisfy curiosity, or simply for fun, but you don’t need to share videos just for the sake of sharing them. A meandering video of a boring location is not something most people want to see. Spend time crafting stories, and you’ll be rewarded by the feedback you get from viewers who are affected in a positive way by your work.
Image Stabilization: Beating Jello
Modern camera drones are quite good at capturing aerial video, but they are still essentially cameras mounted on platforms that can move around violently during flight. In Chapter 1, we talked about the importance of vibration isolation, which reduces the amount of high-frequency shaking that reaches the camera sensor. Obviously, shaking a camera while recording video is not going to lead to great results, and even vibration that is too subtle for the human eye to see can lead to artifacts called jello that will ruin your video (FIGURE 4.2). To see examples of jello in aerial drone videos, do a YouTube search for drone jello.

FIGURE 4.2 An example of “jello” in an image captured from a vibrating camera
Luckily, good camera drones ship with effective vibration dampeners pre-installed and propellers that are pre-balanced from the factory. When flying in calm conditions, you should not see any jello in video, and in most cases, jello is caused by damaged propellers or problems resulting from a previous crash. If you see jello, inspect your motors to make sure they are not damaged, swap out or balance propellers, and make sure vibration dampeners are properly installed.
If you continue to see jello in your video even with a perfectly balanced camera drone, the vibration may result from environmental factors like wind. Gimbals and vibration dampeners are designed to withstand a certain amount of wind before they start to vibrate; the strength of a motor is a direct trade-off with weight, and manufacturers always have to strike a balance between stabilization strength and total weight.
In my own anecdotal experience, I’ve found that camera drones like the DJI Phantom 3 will not exhibit jello at maximum speed if there isn’t much wind. However, if the wind is blowing strongly (say, at 25 MPH or higher), a Phantom 3 may exhibit jello in its video if it is flying against the wind, both forward and backward. This is a bit confusing because a Phantom that is stationary against 35 MPH winds should be subjected to the same forces as a Phantom that is flying at 35 MPH in windless conditions. This confusion reflects how complex camera drone systems really are, and jello is just one of the potential issues that can occur if your camera drone is not properly tuned, either by a manufacturer or by a custom builder.
Using Gimbals
In early 2013, getting stabilized aerial video from small consumer drones was almost unheard of. By the end of 2013, two-axis stabilization (roll and pitch) via brushless gimbals had become standard, and these days, three-axis stabilization is required—and, expected—to capture usable aerial video. Luckily, most popular camera drones work well with modern three-axis gimbals, both integrated and stand-alone, and the silky-smooth video that comes from using them is not very difficult to get (FIGURE 4.3).

FIGURE 4.3 A 2-axis Zenmuse H3-2D gimbal keeps a GoPro level during a flight with DJI Phantom 2.
Gimbal Modes and Control
Gimbals that are used in the air have a few main operating modes that are useful.
• Follow Mode, in which the gimbal’s roll and pitch (tilt up and down) are fixed in orientation, but yaw (pan side to side) is allowed. Follow Mode is the default mode for most gimbals and is the only useful mode found on camera drones with fixed landing struts, such as DJI Phantoms. In Follow Mode, a pilot can fly the drone around and expect the camera to follow as the drone turns. All pitching and rolling of the aircraft due to stabilization or navigation are completely removed, and abrupt yaw motion is smoothed out, allowing only large yaw motions (navigation panning). The vast majority of drone videos are shot using Follow Mode.
• Free Mode, in which all three of the gimbal axes are fixed in orientation. In Free Mode, the gimbal prevents all aircraft movement from reaching the camera platform, regardless of aircraft orientation. Video footage captured in Free Mode from a nonmoving camera drone often looks like it was captured using a tripod. Free Mode is the most common gimbal mode for dual-operator flights, during which piloting and camera operations are separate duties, each controlled by a dedicated operator and remote controller. See http://ech.cc/gimbal-free-mode for an example of how effective a DJI Inspire 1’s Free Mode stabilizes its camera during aggressive flight.
• Advanced gimbal modes tied to smart flight modes. One example of a smart flight mode is Point of Interest, or Region of Interest, during which the gimbal is kept oriented toward a fixed point in space (such as a person standing on the ground). Another is Follow Me, during which the camera drone can be asked to keep a moving subject in frame using a combination of drone and gimbal orientation. DJI’s FPV Mode is used to simulate fixed-wing flight and to allow a pilot to see the roll orientation of the drone. In FPV Mode, rolling your drone to the side will result in rolling the gimbal (and the horizon will no longer be straight).
Note Follow Mode and Free Mode are the terms used by DJI. Other manufacturers may have different terms for equivalent modes.
Some camera drones include custom buttons on the remote controller that can be mapped to useful gimbal shortcuts. The 3DR Solo features two custom buttons on the front of the remote controller that are designed to be mapped to flight modes. Its remote also features dedicated gimbal controls. DJI remote controllers feature similar custom buttons that are most typically used by operators to control gimbal features (FIGURE 4.4). In dual-operator mode, the pilot and camera operator can each map their own custom functions to the custom buttons.

FIGURE 4.4 Some camera drone remote controllers feature custom buttons that can be mapped to gimbal modes, flight modes, and other useful settings.
The DJI Inspire 1 is a common camera drone for dual-operator flights because the landing gear retracts, giving the camera an unrestricted 360° range for panning. The versatility in motion gives the gimbal additional modes of operation, and custom buttons become extremely useful for accessing features that are used often.
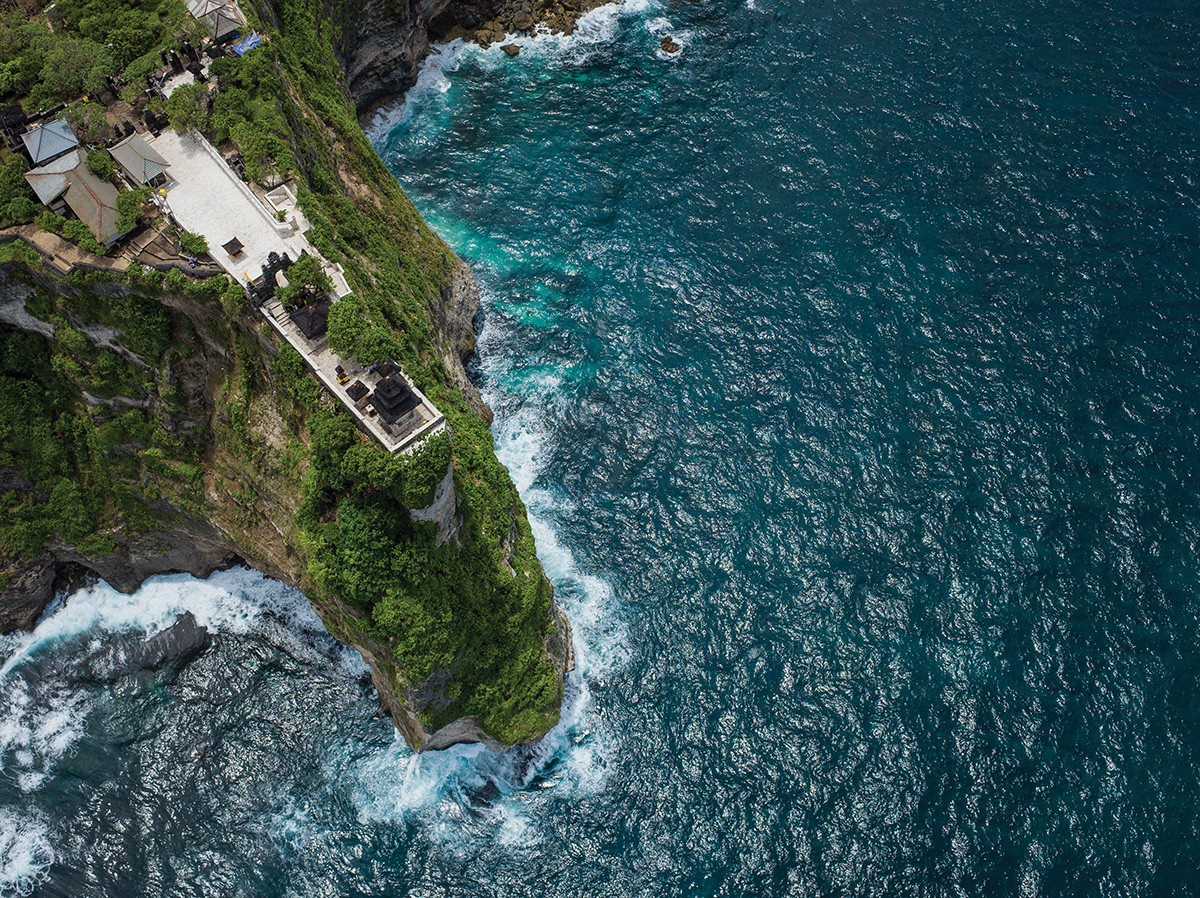
I like to configure my Inspire 1 custom buttons so C1 resets gimbal yaw and C2 toggles between Free Mode and Follow Mode (FIGURE 4.5). In typical use, I might fly in Follow Mode with the camera pointing forward until I see a subject I want to film. I will yaw the aircraft and pitch the gimbal until my composition is roughly where I want it to be. From here, I’ll sometimes press C2 to toggle from Follow Mode to Free Mode, which locks the gimbal orientation in place. This leaves me free to fly the Inspire 1 however I’d like to, and the camera orientation will never change. When I’m done, I can use C1 to reset the gimbal yaw so it’s facing forward again and press C2 to get back to Follow Mode.
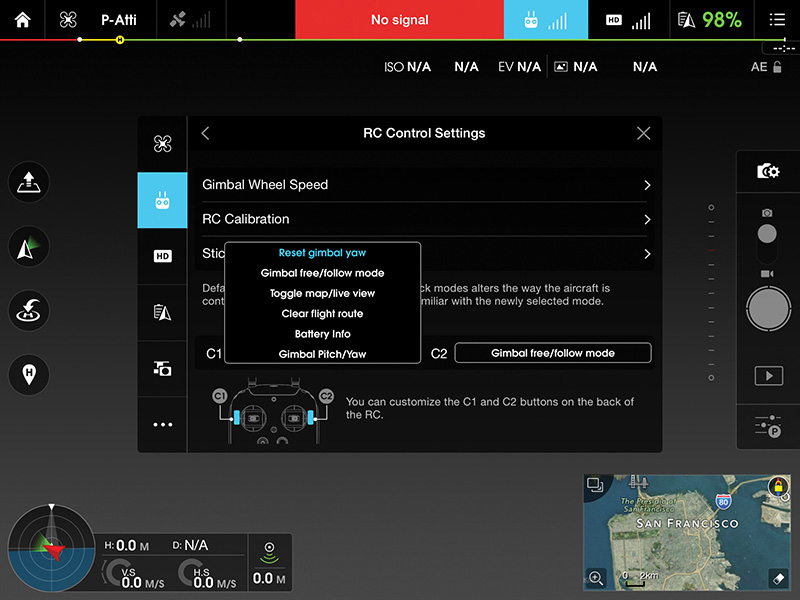
FIGURE 4.5 Mapping remote control custom buttons C1 and C2 for use with a DJI Inspire 1
Another commonly used custom setting is Gimbal Pitch/Yaw, which toggles the gimbal rocker wheel so it controls either pitch or yaw, so you can move the camera up and down or side to side (but not both at the same time).
If you need to control both pitch and yaw at the same time and don’t want to pilot the drone to control yaw while using the gimbal wheel for pitch, you can also tap and hold your finger down on the FPV display in the DJI GO app (FIGURE 4.6). You’ll see a white dot where you initially tapped and a turquoise circle at your finger’s current position. By dragging your finger around on the screen, you can move the gimbal in any direction, with its velocity controlled by the distance between where you originally tapped and your current finger position. This feature also works if you are using a DJI Phantom 3, but only pitch control is supported.
FIGURE 4.6 In the DJI GO app, tapping, holding, and dragging is an effective way to change the orientation of a DJI gimbal.
Camera drones that do not have retractable landing gear have fewer options when it comes to gimbal operation, but software is starting to evolve to compensate for the lack of gimbal freedom in the yaw direction. Some drones abstract the experience to simple camera control; the actual aircraft orientation becomes irrelevant to the pilot, who needs only to think about what camera movements are required. These control schemes are still in their infancy in the consumer camera drone market but are sure to develop quickly as demand escalates for simpler interfaces.
Gimbal Speed
Obviously, the quality of camera movements is extremely important when shooting video. Most movements should be slow, smooth, and considered, with fast movements used only when necessary (for example, in an action scene, when you might want to purposefully create excitement or discomfort). Manual gimbal controls are still fairly simple, with position-sensitive rockers and wheels that allow for variable-speed movements. These have not yet been tuned to the complete satisfaction of serious filmmakers who are accustomed to using dedicated remotes for gimbal control but are a huge step forward when compared to some of the first attempts, which used simpler mechanical controls or buttons on a screen. These older interfaces were impossible to use to create pleasing movements.
Most single operators using DJI products elect to turn down the maximum gimbal speed (FIGURE 4.7). This is known as the maximum rate in the RC world. This decreases the movement speed of the gimbal across the full range of the control wheel, giving pilots more gimbal control but removing the ability to turn a camera quickly. I like to set mine at somewhere between 30 and 50 (out of 100).

FIGURE 4.7 DJI GO allows pilots to limit the maximum speed a gimbal can move.
Dual-operator setups also support advanced customization of gimbal control, allowing for the control rates of various axes of movement to have curves applied to them (as opposed to a enforcing a linear response). These settings are usually labeled as “EXPO,” which is short for exponential curve, and are typically used to increase or decrease stick sensitivity near the center of a stick’s range and change responsiveness based on the selected curve when a stick is farther away from the center. Tuning EXPO is beyond the scope of this book, but there is plenty of online material that discusses EXPO and how to use it.
Automatic gimbal controls are starting to appear in smart flight modes and mobile apps released by both manufacturers and third-party app developers. Features designed for aerial videography use smooth, natural gimbal movements, with easing applied at the beginning and end of all movements. These new apps and flight modes will help new drone pilots execute the kinds of camera movements that experienced drone teams achieve through countless hours of practice and experience.
Gimbal Tuning and Calibration
Gimbals are complex systems and are comprised of a gimbal controller, inertial measurement unit (IMU), camera platform, electronic speed controls (ESCs), and brushless motors. Their components are similar to what comprises a drone, only instead of stabilizing an aircraft while flying, a gimbal stabilizes a camera platform. Gimbals work well only when they’re tuned to a particular configuration that includes the weight of the stabilized payload. Furthermore, balance is critical, and pushing the center of mass too far off any single axis can cause failure, sometimes resulting in a motor burning out.
Most gimbals currently in use either were designed as part of an integrated camera drone or were made specifically for one camera model (such as a GoPro) or a narrow range of camera types. These gimbals are typically pretuned at the factory and do not need any additional calibration or tuning to work well. However, a gimbal might sometimes need calibration, especially if it was bumped hard in a crash or during transit. Gimbals all ship with calibration tools, which range from being nearly unusable to being really simple to use.
There are two kinds of gimbal calibrations that aerial videographers might need to do in the field.
• Gimbal IMU calibration (usually just called gimbal calibration), during which a gimbal’s IMU measures acceleration and motion in all directions and declares, “I am now level.” This levels the gimbal and also prevents it from drifting. Early gimbals required special mounts to perform IMU calibration because the IMU had to be positioned exactly level, but newer gimbals are able to autocalibrate in a wide range of environments. The latest DJI camera drones can be auto-calibrated with a single tap, using the DJI GO app from a smartphone or tablet.
• Gimbal roll adjustment, during which an operator manually adjusts gimbal roll in order to level the horizon (FIGURE 4.8).
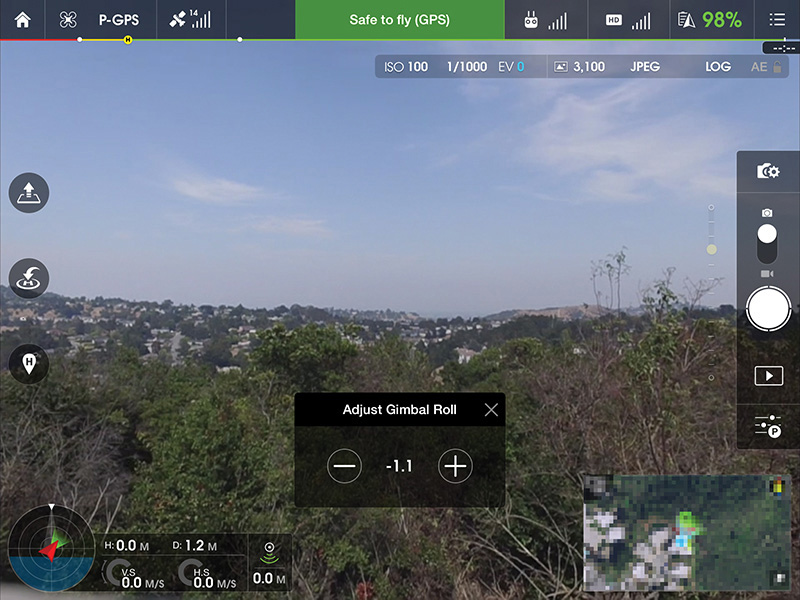
FIGURE 4.8 Manually adjusting the gimbal roll position during a DJI Phantom flight via the DJI GO app
Most gimbals that are purchased ready to use can be calibrated by users, but more serious tuning usually requires a trip to the manufacturer for repair. Homemade gimbals can be built using a variety of third-party gimbal controllers like SimpleBGC (FIGURE 4.9). These gimbal controllers have entire guides dedicated to tuning, and one can spend many hours to ensure perfect operation of such custom setups.

FIGURE 4.9 A BaseCam SimpleBGC gimbal controller and IMU
Gimbals and Filters
As I have mentioned, when using accessories such as lens filters on gimbaled cameras, you need to be careful that you are not upsetting the balance too much. There are a couple ways to help figure out whether a filter or other accessory will work well on a particular gimbal.
• If it’s made by the same manufacturer for use on an integrated gimbal, it is probably OK.
• If it’s made by a third-party manufacturer specifically for use on a gimbaled camera, it might be OK. Do a web search and read reviews to see whether others have had success.
In general, gimbals are built with a bit of latitude when it comes to payload weights and will support lightweight accessories, especially if they’re close to the centers of rotation. Because of mechanical advantage, a lightweight accessory far away from a center of rotation will require a lot more force to move than an accessory close to the center of rotation.
If you’re worried about gimbal balance, you can try to compensate by adding weight on the other side of the imbalance. Many hobbyists did this, for example, when adapting gimbals made for the GoPro HERO3 to work with the HERO4. They glued a single penny to the side of the gimbal’s pitch motor, which seemed to balance the 14-gram weight difference nearly perfectly. A word of warning: Making these modifications will likely void your warranty, so proceed with caution.
Camera Settings
Camera settings for videography differ from settings a photographer might use when shooting stills, but many of the fundamental issues are the same. If you haven’t yet read Chapter 3, I recommend going back and reading it before you continue. Chapter 3 includes a lot of discussion about the current state of integrated camera drones and the cameras used in aerial imaging. Many of the settings and techniques used in stills capture also apply to videography.
General Settings
Traditionally, digital cameras have treated video and stills separately, and pretty much all cameras feature distinct video captures modes with their own saved settings. Videos add time to the capture equation, and camera settings need to be evaluated for effectiveness both in a single frame and across multiple frames over time.
Video Size and Frame Rate
In consumer cameras, video size is typically described using between two and four variables. Most cameras include the resolution in pixels (horizontal and vertical or just vertical) and the frame rate. Frame rates can range from 24 fps to 240 fps or so, but some options might require changing a camera from NTSC to PAL, or vice versa. These two options seem like they should have gone away long ago but are still specified for output compatibility with video monitors and broadcast equipment in different global regions.
The additional two variables are usually scanning method, specified often by a p or i appended to the end of a vertical resolution number or frame rate; and less commonly, bit rate, which describes how much video data is stored per second.
Here are some common options for each variable:
• Resolution: 4K/UHD (4096x2160 or 3840x2160), FHD 1080p/i (1920x1080), HD 720p (1280x720), 480p (640x480)
• Frame rate: 24p, 25p (PAL) 30p (NTSC), 48p, 50p/i (PAL), 60p/i (NTSC), 120p, 240p
• Scanning method: Progressive scanning (“p”), interlaced scanning (“i”)
• Bit rate: A number in megabits per second (Mbps), not to be confused with megabytes per second (MBps). A lowercase b specifics bits, and an uppercase B specifies bytes. There are 8 bits in 1 byte (and 4 bits in 1 nibble). I’m not making this up.
It might be easier to look at a common camera drone’s video size options, as shown in FIGURE 4.10.
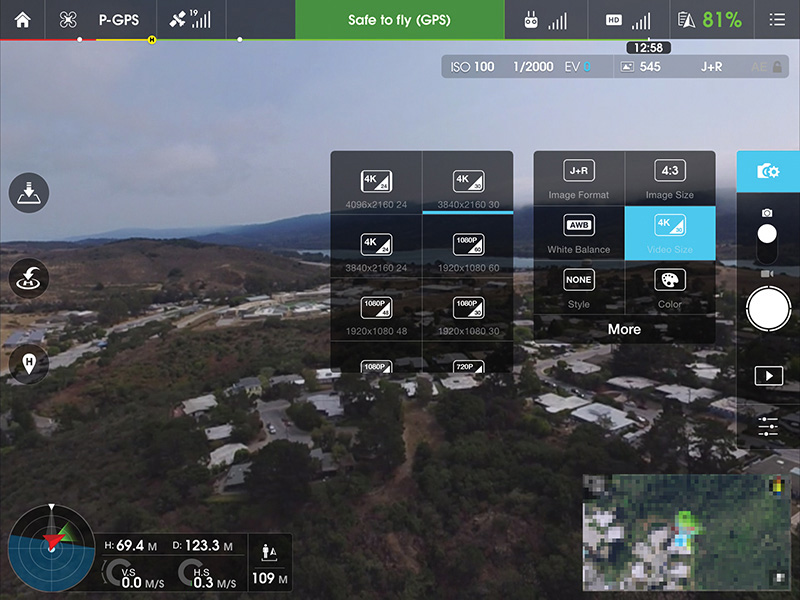
FIGURE 4.10 The DJI Phantom 3 Professional’s Video Size options
The Phantom 3 Pro, which has been set to NTSC mode here, offers various combinations of 4K at 24/30 fps, and 720p/1080p at 24/30/48/60 fps. Frame rates of 25/50 replace 30/60 fps when the camera drone is in PAL mode.
All of this can be pretty confusing for someone who is new to video, so I’ll make some recommendations for the various sizes and frame rates I like to capture. These settings are not camera-dependent, although a camera must obviously support the resolution and frame rate in order to select the size. There are some specific settings I like to use when I shoot GoPro cameras, which can be found in the “GoPro” section later in this chapter.
• 4K/30 fps: This is my default capture resolution and frame rate. It’s the highest resolution for video capture, and 30 fps plays back on computers and the Web in a pleasing manner. Capturing 4K video gives you plenty of resolution for exporting frame grabs to be used as still images and provides plenty of resolution latitude for video editing if you are targeting 1080p for output.
• 4K/24 fps: I shoot 24 fps when I want my footage to match other footage shot at 24p, which many people consider to be more cinematic in look. 24p is what you’re used to seeing in the theater, but it isn’t good when the camera is moving too quickly and can easily look jerky during such movements. In aerial video, the camera is almost always moving, so I tend to avoid 24p as much as I can. Also, most computers, phones, and tablets use a 60 Hz refresh rate, and if you do the math, 24 doesn’t fit into 60 evenly. This means that playing a video back at 24 fps on most devices will result in playback artifacts even if you shot your video perfectly.
• 1080p/60 fps: I like to shoot at 60 fps because it produces extremely smooth video, especially when played back on a computer, or via YouTube on Chrome, which has supported 60 fps since late 2014. 60 fps is the native frame rate of most playback devices. It’s also extremely versatile; it can be converted easily to lower-frame-rate video and can also be played back at a slower frame rate, which results in slow-motion video.
Exposure
Exposing for video is completely different from exposing for still imagery. In still imagery, the goal is usually to capture a frame that is as sharp as possible (unless you’re using blur as a creative effect). When you’re shooting video, you actually want some motion blur to avoid a staccato effect in motion during playback. The general rule is to expose at half your frame rate, so if you’re shooting at 30 fps, expose each frame for 1/60 second. If you are shooting at 60 fps, target a shutter speed of 1/125 second. Some people call this twice the frame rate because the number is doubled, and it’s also referred to as a 180° shutter angle for historic reasons relating to how shutters worked when exposing film.
Shooting at half the frame rate gives each frame a bit of motion blur, resulting in cinematic motion, considered to be natural in look. Longer exposures yield more motion blur and can make motion appear to be “smeary.” Short exposures will stop motion in each frame, making movement look staccato and strobed.
Most videographers shoot during the day using neutral-density (ND) filters, which block light out to allow for longer exposure times (FIGURE 4.11). A camera shooting at ISO 100 with a lens at f/2.8 might typically require a four-stop ND filter (also called an ND16 because 1 stop = 2x the light; 4 stops = 2^4, or 16x the light) to cut out enough light to hit shutter speeds of 1/60 second. If video is your main goal in learning how to use a camera drone, you should invest in a set of gimbal-compatible ND filters that vary between one and four stops. Polarizers also cut some light out and can be used on their own or in conjunction with an ND filter.

FIGURE 4.11 A set of six filters from Polar Pro, including ND, polarizing, and combination filters
At the moment, it’s mostly heavy-lift drones that carry land cameras that feature adjustable apertures. Most integrated and small camera drones use cameras with a fixed aperture of f/2.8, which is considered fairly light-sensitive. A camera shooting at f/2.8, ISO 100 will shoot only at 1/60 second without overexposing the scene after the sun has set. Before sunset, shutter speeds need to be much faster for a proper exposure. Getting to 1/60 second (or 1/125 second, if you’re targeting 60 fps) can be tricky, especially if you’re working with rapidly changing light levels, but you can also use ISO as a variable in exposure. Getting down to 1/30 second at ISO 100 means that you can shoot at 1/60 second at ISO 200, at the cost of a bit more noise in your footage.
Not having aperture as a variable is a temporary problem and is likely to change quickly as more sophisticated cameras begin to make their way into small and medium-sized integrated camera drones. DJI’s new Zenmuse X5 Micro Four Thirds camera, for example, features both interchangeable lenses and adjustable aperture (FIGURE 4.12), which means that photographers will again be free to use aperture as a variable in exposure and could achieve 1/60 second even on a bright-but-overcast day at around f/11, ISO 100. If pushed, an even smaller aperture could be used, but most videographers don’t like to stop down too far because the whole image starts to suffer from diffraction softness when the aperture becomes too small. At f/11 and a sensor resolution of 16 megapixels, a shot taken by a Micro Four Thirds camera is already theoretically beyond its diffraction limit.

FIGURE 4.12 DJI’s new Zenmuse X5 gimbal and Micro Four Thirds camera (prototype, with 15mm lens) brings interchangeable lenses and medium-sized sensors to integrated camera drones.
In the real world, diffraction needs to be balanced with depth of field and potential image degradation from ND filters, so you should do your own tests if you’re interested in figuring out how far you can stop down before your image starts to degrade. There is also a lot of web material about diffraction limits—it’s worth reading, if this is a topic that interests you.
Regarding exposure, locking it down and shooting manually is usually considered to produce video with a more cinematic feel; one rarely sees exposure changes during any single clip in a movie. Integrated cameras sometimes support full manual exposure (such as on DJI drones), but action cameras like GoPro HEROs typically support only exposure compensation and not full manual control. If you’re shooting a camera that will shoot only in auto exposure, the camera needs to have a good auto-exposure system and be able to transition from one exposure to another smoothly. The Phantom 2 Vision+ was the first integrated camera drone with a brushless gimbal. This offered a lot of convenience, but the camera was unable to move smoothly between exposure levels (it jumped), and as a result, any exposure change during a video essentially ruined its usability.
After all of this talk about manual exposure, ND filters, and 180° shutter angles, it should be noted that the vast majority of hobbyists and mainstream camera owners shoot video using extremely fast shutter speeds, especially during the day, and most shoot in auto exposure. Almost all smartphones use fixed apertures between f/1.8 and f/2.4, so it isn’t uncommon to have shutter speeds as 1/1000 second (or faster) in videos taken during the day. I don’t hear many people complaining about stroboscopic video; users’ tastes may be changing as a result of watching so much video with sharp individual frames.
Video shot from a modern $800 camera drone like the DJI Phantom 3 Standard often looks so good out of the box that it will be more than sufficient for most people’s needs, even when run in full auto. All of my most popular videos were shot during the day without using ND filters, and not a single person has complained about anything looking strange aside from the few who have noticed 30p to 24p conversion artifacts stemming from an editor’s creative desires.
White Balance
Most stills photographers don’t think much about white balance when they’re out shooting, especially if they’re saving to raw formats, which allow white balance (WB) to be changed in post without any loss of quality. But in video, white balance matters a lot. In all but the highest-end systems, video is not saved to raw, and getting it right in camera is important. It isn’t necessarily true that white balance can’t be changed in post, but it’s hard to color-correct when white balance is changing over time.
Most compact cameras used on camera drones do not have sophisticated auto white balance algorithms, and white balance can swing wildly as compositions change within the time and composition of a single clip. Correcting against a moving target is not easy, and it’s almost always better to capture using a fixed white balance setting (usually, anything but auto).
I usually set my camera to a “native” WB, if the setting is available like it is on GoPros, for example (FIGURE 4.13). Native WB settings are designed to allow the most information to be captured and stored, giving videographers the maximum latitude to color-grade in post. If a native setting isn’t available, choosing something close to the current conditions is good enough. Most cameras offer options including “sunny,” “cloudy,” “incandescent,” and custom white balance, which allows you to either point the camera at something that it should consider to be white, such as a white or gray card, or dial in a specific color temperature in degrees Kelvin.

FIGURE 4.13 White balance options on a GoPro HERO4 Black
Correct white balance is more critical if the footage you are shooting needs to be used immediately, either via a live broadcast (which I’ll discuss later in this chapter) or when timely delivery is critical. In those cases, choose a white balance that looks good out of the camera.
Slow Motion
Shooting in slow motion might seem like something reserved for dedicated high-speed cameras, but support is actually built into most recent cameras—even the ones found on relatively inexpensive camera drones. “Slow motion” really just means that footage can be reproduced at slower than real time. Since most video is played back between 24 and 30 fps, any capture at a faster frame rate than that can be played back in slow motion with no loss of quality. For example, video shot at 60 fps played back at 30 fps results in playback at 50 percent of real time, which is convincing as slow-motion footage.
The iPhone 6 and action cameras like the GoPro HERO4 Black can shoot as fast as 240 fps, and Sony’s new RX100 IV point-and-shoot camera can capture video at a staggering 960 fps. In these relatively inexpensive cameras, there is typically a compromise between frame rate and video quality. Cameras that were designed to shoot at high speed are expensive and heavy because they have the sensors and imaging pipelines required to capture high-quality, high-speed video.
Although slow motion is most obvious at 60 fps and faster, even shooting at 30p and slowing playback down to 24p (a 20 percent slowdown) can be effective in making movement seem more relaxed or regal.
Video capture at 60 fps+ is no longer a hurdle, but showing the video in slow motion can be difficult if you aren’t familiar with editing software. Most editing software, even free and entry-level programs such as iMovie and Windows Movie Maker (or GoPro Studio, for GoPro users), have rudimentary controls for slow-motion playback. iOS and Android apps make it easy to convert high-frame-rate video into slower-playback versions, but they aren’t really designed (yet) to work with videos that weren’t shot using the host device. For more advanced control of slow motion, I recommend subscribing to Adobe’s Creative Cloud and learning Adobe Premiere Pro CC, which has tools sophisticated enough for full film production (FIGURE 4.14).

FIGURE 4.14 In Adobe Premiere Pro CC, interpreting a clip as 29.97 fps instead of 59.94 fps results in slow-motion playback at 50 percent real-time.
In terms of camera motion and action, it’s usually more effective to fly a drone quickly and to capture motion that is also happening quickly. Attention span is a rare commodity these days, and if your clip doesn’t fit into 10 to 15 seconds, you’ll likely have lost the majority of your audience by the end.
If you decide you’re interested in capturing slow-motion video from the air, shoot at the frame rate that gives you the slowdown you desire, and familiarize yourself with the relevant adjustments in post-production using your chosen video editor. Once a video is slowed down in post and exported at normal frame rates, it will play back in slow motion everywhere, even if you upload it to YouTube or Vimeo for sharing.
Here are two links to sample slow-motion clips:
• Aerial rocks and surge, played back at 50 percent speed (shot with a DJI Inspire 1 at 60 fps and played back at 30 fps): http://ech.cc/droneslomo
• Ocean sparkles (land-based), shot with a $5,495 Edgertronic high-speed camera at 700 fps and played back at 30 fps (23x slower than real time): http://ech.cc/oceansparkles
Storage Speed
Capturing video, especially in 4K, is data-intensive, and some of the small cameras used in consumer camera drones capture video at up to 60 Mbps, which is 7.5 MBps. At that rate, an 8 GB media card will fill up in just under 18 minutes, and obviously, the media card needs to be able to sustain a write speed of at least 7.5 MBps. Some cameras will detect slow media cards and display a warning, but not all do. Most cameras will do just fine with an SD or microSD card that is labeled “UHS-1” or “Class 10,” both of which indicate that they can sustain writes of 10 MBps.
If you’re using higher-end cameras that capture video at bit rates higher than 60 Mbps, you will need to use even faster media.
Professional Capture Modes
Some consumer and prosumer cameras feature capture settings that are designed to retain the most information possible when shooting video so editors have the latitude to make adjustments in post. These capture formats usually bypass filters that are applied to video to make them look good to humans, resulting in video that is unsaturated, unsharp, and flat in appearance. A good editor can then shape the video into the desired style for the final product.
Both GoPro and DJI have professional capture modes built into their cameras; I’ll talk more in detail about these modes later in this chapter.
Integrated Cameras
Chapter 3 contains a great deal of information about the benefits and disadvantages of using integrated camera drones for aerial imaging. For video, one of the obvious benefits is that pilots can both start and stop video at will, capturing only footage that was meant to be saved. Full manual exposure and remote control of deep camera settings are other important benefits, as is integrated FPV.
Another difference is that the lenses currently used on camera drones like the DJI Phantom 3 and Inspire 1 are less wide than those commonly found on action cameras like GoPros. Most action cams use ultra-wide fisheye optics (FIGURE 4.15) because the cameras are designed to capture people doing things close to the camera (the cameras are often mounted on the people themselves to capture the user’s point of view).

FIGURE 4.15 A GoPro camera doing what it was designed to do: capturing content close to the camera. Wide-angle, fisheye distortion makes the horizon bubble-shaped.
Fisheye optics allow for a large field of view (FOV) using small optics, and the combination of wide-angle optics and small sensors provide a deep depth of field in which almost everything is in focus at the same time. In contrast, the DJI Phantom 3’s camera has an FOV of about 94°, which is similar to a 20mm, rectilinear lens on a full-frame camera (as opposed to the 170° lens on the GoPro HERO4). Rectilinear lenses yield straight lines with little to no barrel distortion and look more natural. Most serious aerial GoPro shooters remove distortion during post-processing or shoot in modes that are less wide, sacrificing some resolution in the process.
This lens difference is likely to be temporary; some of the latest action cameras are available with lenses that are less wide with less barrel distortion, and there will probably be many models to choose from in the future. But at this moment, one of the benefits of using integrated cameras is that the lenses yield more natural-looking images out of the camera.
Remote Control
I mentioned earlier in this chapter that the remote control of camera settings is an important feature of integrated camera drones. Using a DJI Phantom 3, you can, in a single flight, shoot a bunch of still images and record many videos in multiple resolutions, frame rates, and exposures, all without landing or feeling like you have to jump through hoops to change settings. The user experience in well-designed camera drones should make you feel like you’re operating a camera in your hands, and attention to detail makes a big difference.
DJI’s LOG Mode
DJI’s Inspire 1 and Phantom 3 camera drones feature a capture mode called LOG mode, which can be accessed in the Color settings of the camera via the DJI GO app (FIGURE 4.16). Shooting in LOG mode results in the standard log-mode effects: less saturation, less sharpening, and a flat look from a gamma curve that maximizes data in the resulting file.
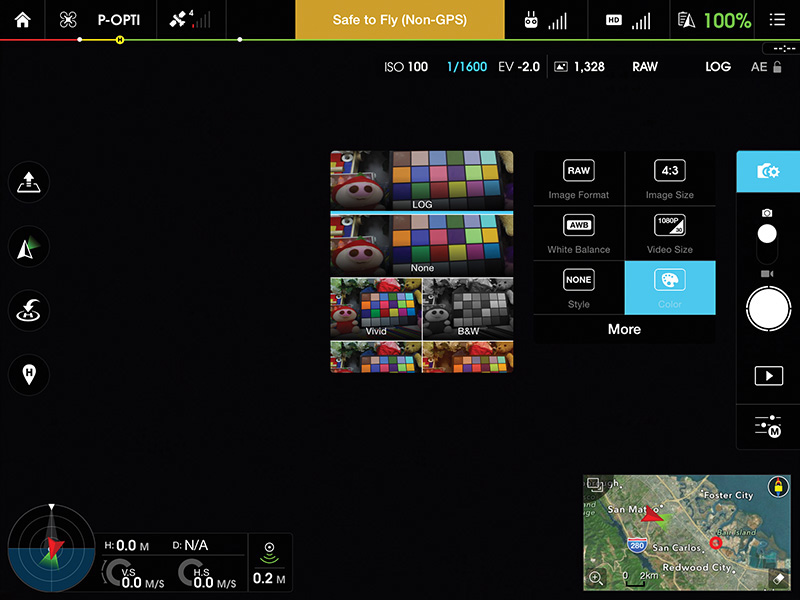
FIGURE 4.16 Selecting LOG mode in the DJI GO app
Competent editors can grade and sharpen this video to get it to look good, but you can also use DJI’s Inspire 1/Phantom 3 transcoding tool to add the punch back into the video, saving an intermediate file as high-bitrate Apple ProRes 422LT. Note that this makes for absolutely gigantic files—about 60 MBps for 4K footage, or 3.6 GB/minute. The transcoding tool is available from the download pages at dji.com.
Feedback from users suggests that learning to color grade in an editor like Adobe Premiere Pro yields equivalent results and a more convenient workflow than using the DJI transcoding tool to create an intermediate working file.
GoPro
Both integrated and third-party cameras have been used successfully to capture beautiful aerial video, and both kinds of cameras have benefits and disadvantages. With the ever-popular GoPro models, as with any camera, it’s important to make sure your settings match what is required to accomplish your aerial storytelling goals.
Protune
GoPro’s ProTune is a professional setting that enables higher-bitrate capture (up to 65 Mbps for 4K video) and settings to control white balance, color, ISO, sharpness, and exposure compensation (FIGURE 4.17).
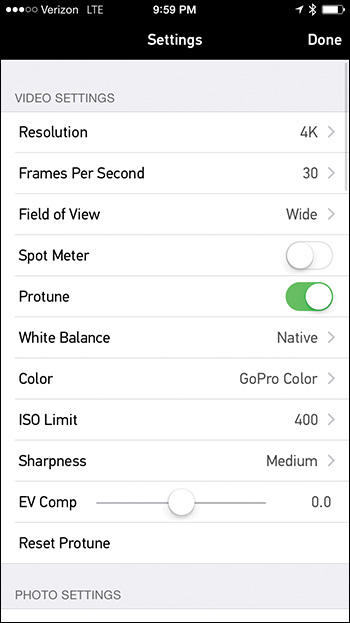
FIGURE 4.17 GoPro’s ProTune settings for video on a HERO4 Black
I always shoot in ProTune unless I need to deliver small files to someone immediately after a shoot. These days, computers are fast and hard drives are cheap, so there is almost no reason to skimp on capture quality.
Video Size and FOV
GoPro HERO cameras have a wide variety of video size variables that can be mixed and matched in different combinations. In the “Video Size and Frame Rate” section earlier in this chapter, I wrote about some of my favorite settings to use when shooting video from the air. GoPro cameras have another variable to consider: field of view, which can be set to wide, medium, or narrow. The various combinations of resolution and FOV settings result in a wide range of captured image quality and actual FOV. My favorite settings to use when shooting a GoPro HERO3+ Black or HERO4 Black in the air are the following:
• 4K (2.7K on HERO3+ Black), 30 fps, Wide FOV, Protune on, Native White Balance, GoPro Color, ISO Limit 400, Sharpness Low, EV Comp as needed: This is my default setting because it is the highest resolution for capture in the highest capture quality, with the exception of using GoPro Color instead of Flat. I find GoPro Color to be close to what I want my end product to look like, so I choose to allow the camera to make the video pop instead of forcing me to do it in post.
• 2.7K, 30 fps, Medium FOV, Protune on, Native White Balance, GoPro Color, ISO Limit 400, Sharpness Low, EV Comp as needed (HERO4 Black only): The 2.7K Medium setting on the HERO4 Black is a 1:1 crop from the center of the sensor and looks great. You might ask why you would shoot at 2.7K instead of 4K if the crop uses 1:1 subsampling (which would be similar to just cropping from the 4K image in post). The answer is that the available data rate is used for the 2.7K video frame, which means that video shot at 2.7K Medium is better than cropped video shot at 4K Wide.
• 1080p, 60 fps, Wide FOV, Protune on, Native White Balance, GoPro Color, ISO Limit 400, Sharpness Low, EV Comp as needed.
I have focused on the GoPro HERO3+ Black and HERO4 Black here, but you can use similar decision-making principles when determining what size, FOV, and other settings to choose on other cameras. If you do happen to be using a HERO4 Black, I highly recommend reading Cinema5D’s article “How to get best quality from GoPro HERO4 Black,” at www.ech.cc/gopro4best.
Isn’t the Earth Flat?
The fisheye barrel distortion that I mentioned earlier can easily be seen in the picture of Stanford University, which was taken with a GoPro HERO3+ Black on a DJI Phantom 2 and Zenmuse gimbal (FIGURE 4.18).
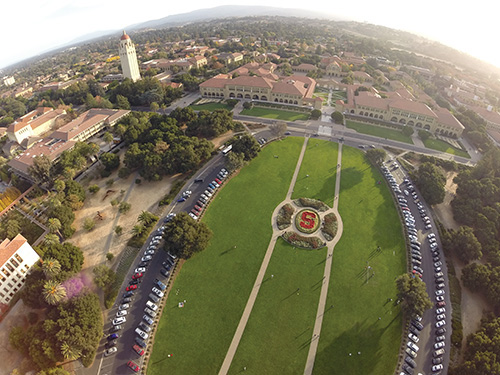
FIGURE 4.18 Fisheye barrel distortion from a GoPro
This kind of distortion is more pronounced the further from the center of the image you look. Near the top and bottom of each frame, horizontal lines bow outward aggressively, and near the left and right sides of the frame, vertical lines distort. In a still image, some folks might actually prefer this look, or at least not be bothered too much by it, and in close-up action videos in which the subject is close to the frame doing something crazy, one might not even notice. But in aerial video, the distortion is obvious, especially if a camera is pitched up or down at any point.
GoPro provides a Remove Fisheye option in its GoPro Studio desktop app, which is the most convenient way to correct for the distortion found in all videos captured by a GoPro. However, the fisheye removal process also transcodes the video, which can take a long time on slow computers and results in large intermediate files (FIGURE 4.19).

FIGURE 4.19 An aerial image of Google’s secret barge in Alameda, California, before and after fisheye distortion removal
Adobe Premiere Pro CC users can take advantage of built-in lens distortion removal presets for GoPro HERO2, HERO3 Black, and HERO3+ Black.
![]() GoPro Wireless and Drones
GoPro Wireless and Drones
Aerial Video Techniques
Aerial videography is exciting because it removes many of the limitations you face while tethered to the ground. Not only can cameras now be sent higher than the tallest of cranes, but they can pass through openings and between objects, all while shooting silky-smooth, gimbal-stabilized video.
Almost all the stills photography techniques and tips in Chapter 3 apply to aerial videography, and I recommend reading that section before continuing. These guidelines and tips are suited only to aerial video, mostly because they involve movement over time.
Tilt Up/Down
Tilt up/down (FIGURE 4.20) is one of the simplest maneuvers you can do using a camera drone, but it’s actually quite difficult to do in a way that looks natural. Using your drone’s gimbal pitch control, tilt your camera up or down. Remember that videography is all about storytelling. What can you accomplish by tilting the camera? You could be following a subject as it moves by you, tilting up to reveal an establishing shot, or tilting down from an establishing shot to focus on a specific area.
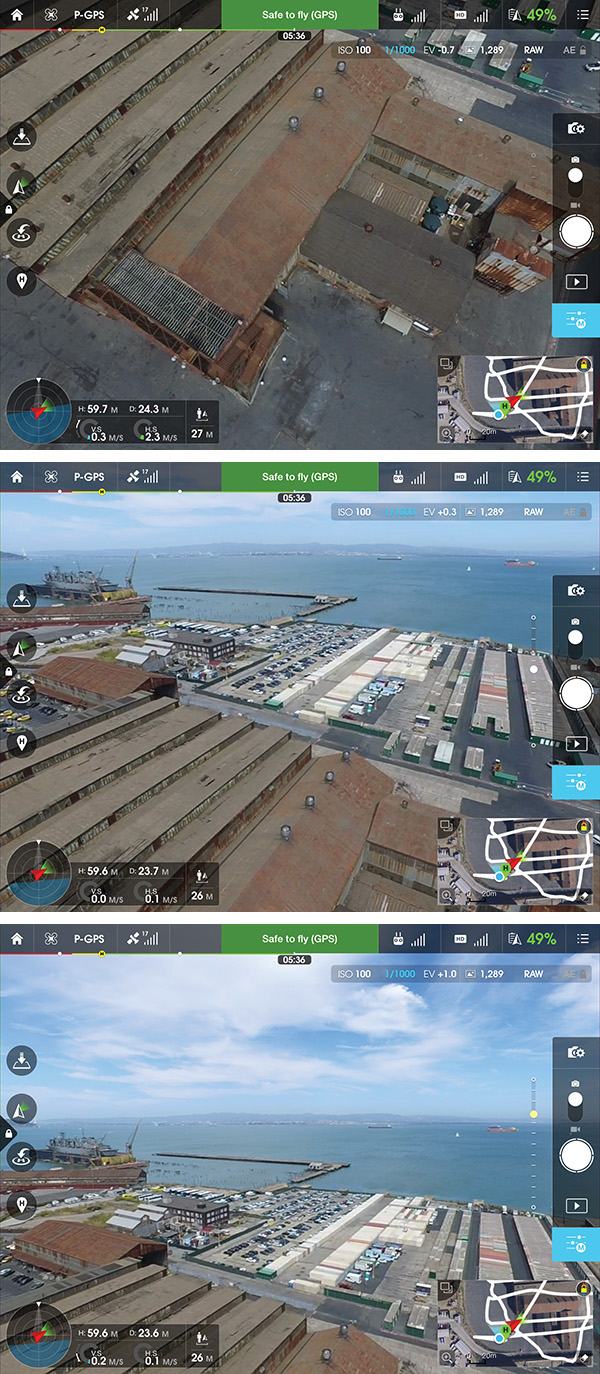
FIGURE 4.20 Tilting up from an aerial view of an abandoned warehouse shows its context in downtown San Francisco.
One technical issue that makes tilt up/down difficult is that single-operator gimbal controls are simple and don’t always offer an easy way to ease in and out of a camera movement. Some camera drones only have a virtual button on a touchscreen for moving a gimbal, and these kinds of movements feel extremely robotic. A dual-operator setup with a dedicated remote controller for a camera operator usually provides the right tools to achieve eased camera movements, but these setups cost more money and are more complicated to deploy.

Tracking Shot
In a tracking shot, the camera drone follows a subject, moving with it as it moves. If your subject is moving in a straight line and there are no obstacles for the drone to avoid (like trees), this shot is pretty straightforward to accomplish. However, tracking shots can also be difficult to pull off, especially in environments with many obstacles or when the tracking shot includes other elements such as camera angle and distance changes during the shot.
Accomplished pilots can execute a tracking shot without thinking and can even follow subjects whose movements are not planned, but this takes a lot of practice. If you can fly a figure eight (see Chapter 2), you should be able to track pretty much anything.
Dronie
In April 2014, Photojojo founder Amit Gupta showed Vimeo cofounder Zach Klein and New York Times writer Nick Bilton (and their three dogs) how to take a drone selfie on Bernal Hill in San Francisco. Bilton wrote about it in the New York Times’ Bits blog, and the rest was history. It wasn’t the first drone selfie ever shot, but the video went viral, and the word dronie was coined, short for “drone selfie.” You can see the original video at www.ech.cc/dronieorigin.
To take a dronie, fly your camera drone in front of you and turn it around so the camera is facing you. Making sure that you have plenty of space behind and above the drone, fly backward quickly while ascending. You might also have to slowly tilt the gimbal down as the drone ascends.
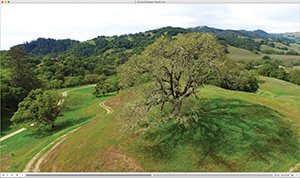
Crane Up/Down
In crane up/down (FIGURE 4.21), the camera drone moves straight up and down. This technique can be used to transition from a subject on the ground to a shot that shows the surrounding environment. It can also be used to start from a wide establishing shot up high, ending near the ground right in front of a subject. Crane up/down can also be combined with other techniques, such as tilt up/down. An effective combo technique is to crane up while tilting down. The subject stays in frame the entire time, but the camera moves up and ends in an overhead view.

FIGURE 4.21 A combination crane up/tilt down keeps the subject in frame as the drone ascends straight up in the air.
Orbit
An orbit, also called an arc or point of interest (POI), is a maneuver in which a drone flies in a circle around a subject, keeping the camera pointed inward the whole time. Orbit is one of the practice exercises in Chapter 2 and is considered an advanced piloting technique. Orbits are used in big films all the time because they are effective for showing a subject in a big environment in a dynamic and dramatic way.
Drones are effective in orbits because they are versatile. A drone can get close to a subject during the start of an orbit and pull out as it circles away, revealing the subject, the environment, and the relationship between the two.
These are just a few aerial video techniques I like to keep in my drone cinema “toolkit.” The real lesson is that camera drones are really just cameras that have freedom of motion in all directions. With enough practice, you’ll learn to pilot a drone and operate its camera without thinking, and like in all art forms that require both technology and technique, creativity really starts once the technology fades away from active thinking.

Advanced: Live Aerial Video Streaming
Live streaming video from drones has only recently become a possibility, and media outlets everywhere dream about the day they can have drones overhead to capture video of timely news. The regulatory policy here in the United States makes this complicated (see Chapter 6), but there is nothing currently stopping hobbyists from putting a drone up into the air and streaming video from it.
Using Video Out/HDMI
Live streaming is not new, but for some reason, live streaming from a drone is still novel. Services like Ustream, Google’s Hangouts On Air, and YouTube Live all enable just about anyone to push a video feed to the Web in real time (more or less). Streaming live from a drone just involves getting the video signal over to one of those services.
My first attempt to stream video from a drone was in May 2014, and it was not easy. I used a DJI Phantom 2 Vision+ camera drone, pulled an HDMI video feed out of my iPhone using an adapter, and fed it into Google’s Hangouts On Air using a specific USB HDMI capture dongle sourced from Taiwan. In the end, I managed to do a live drone broadcast using about $2,000 worth of equipment.
Not long after, I started doing live aerial streaming tests using DJI Lightbridge, which provided a local HDMI output with clean video. Using Lightbridge, I now had a generic video source like what any camera might output, except that my camera could be flown more than a mile away while still streaming video at HD 720p. I took this setup to Burning Man that summer to stream aerial drone footage to the Burning Man Ustream channel (FIGURE 4.22).

FIGURE 4.22 A Lightbridge ground unit in the Burning Man media container received wireless HD footage any time I put my Phantom 2 in the air. This is a picture of our first successful test, showing me, George Krieger, and Gerard Mattimoe with HDMI from the drone reaching the preview monitor.
In November 2014, DJI released the Inspire 1 camera drone, which included integrated Lightbridge. The remote controller had HDMI output, which now meant that every Inspire 1 owner could output HDMI to live streaming infrastructure.
In February 2015, I went to Iceland with ABC’s Good Morning America and put two DJI Inspire 1 camera drones on top of the Holuhraun volcano eruption, broadcasting live to six million people (FIGURE 4.23). As far as we know, this was the first large-scale live broadcast from a nonmilitary drone. The broadcast was a huge success for us and the network and even yielded the still image that we used for the cover of this book.
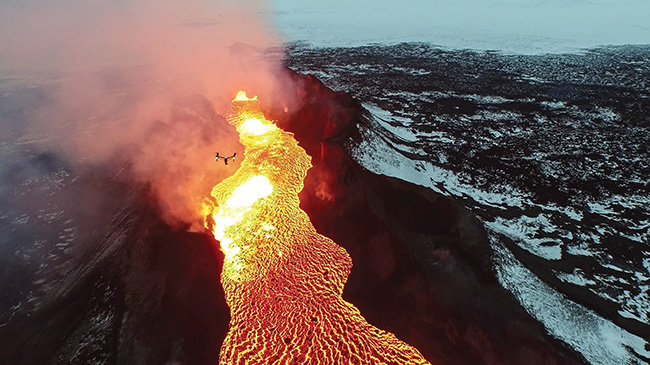
Photo courtesy Eric Cheng/DJI and Ferdinand Wolf/Skynamic.
FIGURE 4.23 A DJI Inspire 1 camera drone flies over the Holuhraun volcano eruption in Iceland as part of a live broadcast event with ABC’s Good Morning America. See the behind-the-scenes video at http://ech.cc/btsvolcano.
Now, there are a few camera drones that provide HDMI outputs from their remote controllers, including the DJI Inspire 1, DJI Phantom 3 (optional accessory), and 3DR Solo (FIGURE 4.24). In addition, stand-alone wireless digital transmissions systems for drones are available from Paralinx and Connex (FIGURE 4.25).
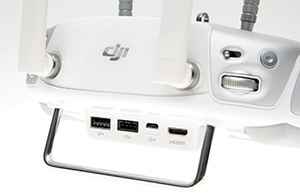
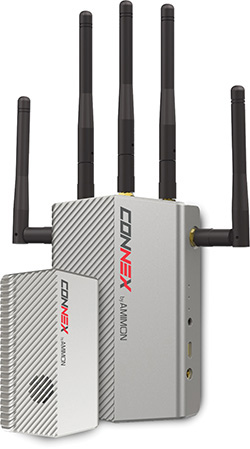
FIGURE 4.25 The Animon Connex is a zero-latency full-HD video transmission system designed for drones.
![]() DJI Lightbridge and Broadcasting
DJI Lightbridge and Broadcasting
Periscope and Other Apps
Periscope (FIGURE 4.26) is Twitter’s live streaming app for iOS and Android devices and is probably the easiest way to stream live video from phone. A week after Periscope launched (in March 2015), people attached smartphones to their drones in an attempt to be the first to live stream using Periscope from a drone. The video they captured is probably some of the worst video ever captured by a drone, but they do get to claim it as a first.

FIGURE 4.26 Screenshot of the April 3, 2015, live Periscope dronie, by Air-vid.com
Another common live broadcasting service is Shou.TV, which provides both Android and iOS apps that can live broadcast what the phone or tablet screen is showing. Android devices must be rooted to run Shou, and iOS requires a jailbreak for best performance.
Note that live streaming from a smart device that is connected to a drone over Wi-Fi is difficult unless one uses a video output (such as an HDMI adapter) because the Wi-Fi connection takes precedence over the LTE or 3G cell modem. When a Wi-Fi signal is active, the cell modem is not allowed to talk to the Internet. This will likely be fixed by a future version of iOS or Android, but in the meantime, it gives the advantage to drones that talk to smart devices using USB, like the DJI Phantom 3 and Inspire 1. Smart devices used with these drones can talk to the Internet over both Wi-Fi and LTE/3G while simultaneously communicating with the drone.
YouTube Live
The easiest way to broadcast live video footage from a drone is to use a camera drone with YouTube Live integration. The DJI Inspire 1 and Phantom 3 were the first camera drones to integrate YouTube Live (FIGURE 4.27), a feature that was announced at the Phantom 3 unveiling in April 2015.

FIGURE 4.27 YouTube Live streaming a DJI Phantom 3 flight using the DJI GO app
The current DJI GO app allows live streaming to YouTube Live with about 20 seconds of latency, during which time YouTube transcodes the video to many different formats and makes the stream available globally. Before you can stream live, DJI GO walks you through the steps required to enable YouTube Live in your YouTube account. This is, unfortunately, still a fairly rough process, but it’s sure to improve as YouTube puts more resources into consumer live streaming. Once YouTube Live is properly set up, you can initiate a live stream with just a few taps, with audio recorded from your mobile device.
Aerial live streaming has the potential to fundamentally change how news about noteworthy events is captured and delivered. YouTube already has countless videos of public events, natural disasters, protests, and many other situations in which live streaming could be beneficial for the general public. Citizen journalists’ efforts will most likely start to incorporate drone footage as they realize that live streaming from drones is as easy as it’s recently become.
![]() Flying Over Natural Disasters
Flying Over Natural Disasters
Post-processing and Sharing
Once you have transferred your aerial video files to a computer or smart device, they are now just videos, and post-processing works the same way it would for any project and associated video sources. Most modern integrated camera drones provide a way to copy pictures and videos directly to a smart device via a wireless signal, but it’s almost always faster to remove the memory card and transfer the media directly.
There are, however, some interesting efforts going on to help edit and share aerial videos quickly. DJI is particularly interested in this space, and the DJI GO app includes a built-in video editor that allows for quick selection and clipping of desired footage, followed by timeline layout and music selection based on templates (FIGURE 4.28). GoPro has also announced an interest in cloud-based video editing and sharing.
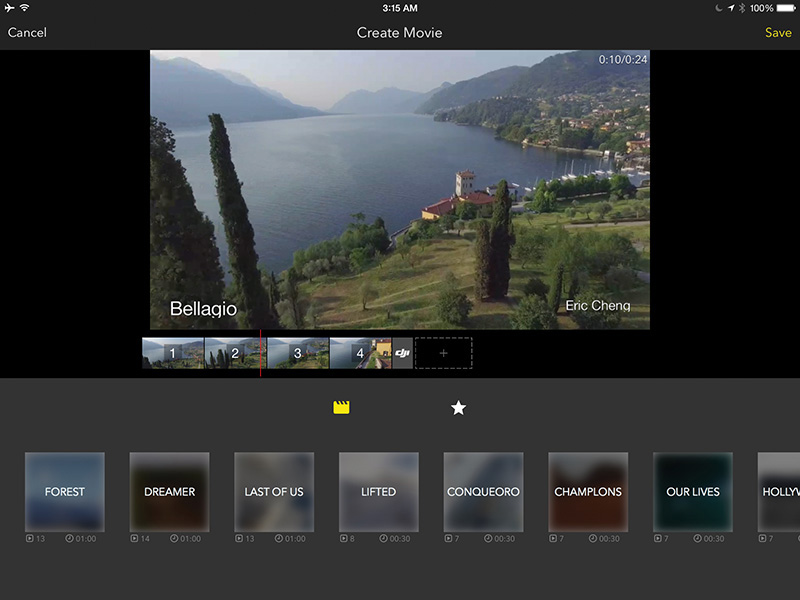
FIGURE 4.28 The DJI GO app includes a built-in video editor that can share directly to Skypixel, DJI’s hosted aerial imaging community, or save to the Camera Roll.
The DJI GO video editor does require that media be transferred to the app, which happens via Lightbridge when the drone and remote control are both powered on. Early efforts such as this are heartening because video editing and sharing are currently such painful and time-consuming processes. Most aerial videographers want to cut and share a quick edit of their flight, even if they plan to do a more considered, high-quality cut later. DJI GO’s editor bypasses the computer altogether and provides a quick path to share to Skypixel, DJI’s sharing platform, or to save to the Camera Roll for uploading to social sharing platforms via other methods.
The Future of Aerial Videography
The future of aerial videography is bright. Camera drones are in their infancy, and we don’t yet know how they will evolve in the future. Certainly, we’ll see hardware advances in every functional area of a drone: flight controller, sensors, batteries, propulsion systems, cameras, gimbals, wireless systems, and so on. In the short term, we can expect improvements in camera quality, system redundancy, flight time, and more.
It’s likely that a functioning sense-and-avoid system will appear sometime before the end of 2016 as sensors are embedded in drones to help them do real-time reconstruction of their environments. At the moment, drones are essentially flying blind, with little knowledge of their surroundings, which is why early efforts at automatic flight algorithms like Follow Me are so rough.
Speaking of automatic flight, we’re already seeing an evolution in ground station software; instead of relying on dumb waypoints that users put down on a 2D map, cinematic toolkits currently in development allow planning and previsualization of flight paths in 3D environments. When a drone operator is happy with the plan, she can simply put a drone on the ground and hit Play to execute the mission. Because the software is designed for cinematography, the appropriate timing and easing controls are integrated, allowing flexibility to account for timing variation between takes and smoothing all motion so everything looks natural.
Advanced autonomy in flight is certainly going to be part of how we capture aerial footage in the future, especially in cases that don’t require explicit path planning by a human. The ultimate Follow Me camera drone will appear at some point in the future, and it will be able to navigate in diverse environments without hitting anything.
Finally, we can expect camera drones to get smaller and smaller. There are already small and light drones that carry HD cameras, but the poor quality of both cameras and flight controllers prevents them from truly being useful. Once decent cameras shrink down in size and weight, we’ll see usable camera drones that weigh just a few ounces and can navigate by themselves.
Most of the challenges we’ll face in this industry are regulatory and cultural. We can already see technological progress accelerating exponentially, as it always does when something new becomes popular. Technology will not be an issue. However, people are not used to drones flying around, and much remains unclear about how regulatory and cultural issues will shape the direction of camera drone usage. I’ll talk about these issues in detail in Chapter 6.