
This chapter focuses on more technical aspects of Agile practices. They might not be linked directly to project management or product management, but they are great ways to enhance the quality of your coding efforts. In Chapter 3, you were given a brief overview of eXtreme Programming, or XP, as it is called. As you may remember, Scrum, for example, does not say how you should work using the Scrum framework. XP is much more practice oriented; it gives you hands-on advice on how you should work.
Agile testing
TDD and automated testing
CI/CD
Coding standards
Refactoring
Pair programming
You might be asking yourself: Why is he focusing on these practices only? Well, the answer is: Because they are code-quality enhancing and they are very common for developers to use in Agile projects. So, let’s start with Agile testing and move on from there.
Agile Testing
Agile projects can be challenging. If you have the mind-set that change will come and you embrace the changes, working iteratively and delivering incrementally, you have a better chance of delivering what the customer wants “now,” not what they thought they wanted several months earlier.
Delivering software incrementally at short intervals means you need to rethink the testing approach you use. Working with incremental development typically means you need to do lots of regression testing to make sure the features you developed and tested continue to work as the product evolves. You need to have an efficient test process or else you will spend lots of time in the life cycle of the project preparing for testing rather than actually running the tests.
Consider Amazon.com. I have read many times that they deploy to production every 11.6 seconds.1 Without knowing the actual process Amazon.com uses to accomplish this, I can only guess that they have a lot of automated testing in place to make sure that new code does not interfere with old code.
To solve the problems and challenges this deployment implies, you need to design your tests carefully. Maintain only those tests that give value to your product. As the product evolves through increments, so should the tests, and you can choose to add relevant tests only to your regression test suite. To make testing more efficient, automate the tests and include them in your CI/CD workflow to get the most value from the tests.
Acceptance Criteria
Acceptance criteria are to testing what user stories are to product owners. Acceptance criteria sharpen the definition of a user story or requirement. We can use acceptance criteria to define what needs to be fulfilled for a product owner to approve a user story.
This is very true indeed.
As a service repair person, I want to be able to view ticket details from the dashboard so that the tickets are easy to access when we’re with our customers.
Breaking down the story into several new stories
Adding acceptance criteria
How should the service rep view the tickets? Search? Filter?
In what way will the service rep access the tickets? Via the Web? Phone? Tablet?
Is the ticket read-only or can the service rep edit it? Assign to someone else?
- A service rep should
Be able to click the service ticket number in the list on the dashboard and see the details
Be able to search by customer, geography, and time
Be able to filter the result to get a better overview
- 1.
Test That: Start relevant acceptance criteria with the phrase “Test that . . . .” This gets people into a testing mind-set right off the bat. For each PBI, what will be tested to ensure the item is done?
- 2.
Demonstrate That: Start relevant acceptance criteria with the words “Demonstrate that . . . .” This gets people to think about the review and what they want to show the product owner and stakeholders.
- 3.
Given, When, Then: Given <a precondition>, when <a user action occurs>, then <the expected result>. This Gherkin syntax serves two purposes: documentation and automated tests. The text can be read by anyone, yet it is can also be parsed by test automation tools.
Hopefully, this discussion leads to more questions for the product owner, which will help to understand better what should be tested. The answers will help to define the product more clearly.
In TFS or Azure DevOps, you can collect all this important information in a PBI (or user story or requirement, depending on the process template you use).
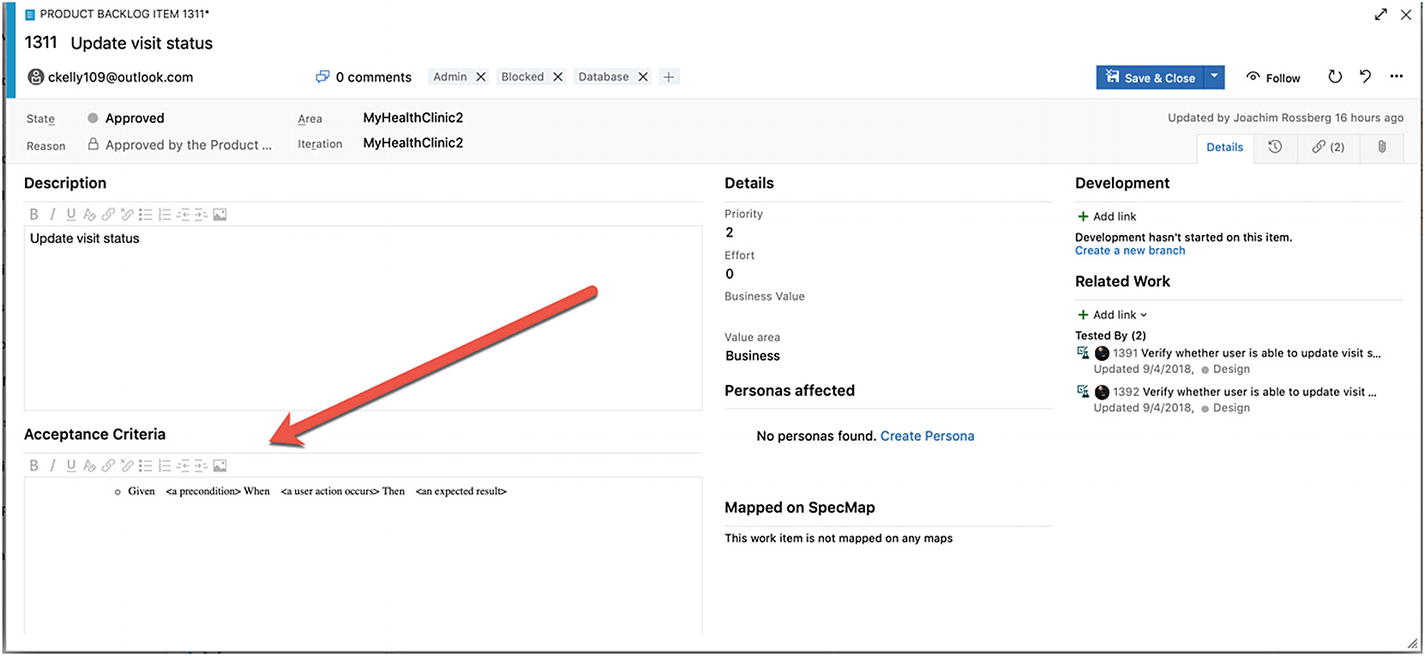
Documenting acceptance criteria as part of a PBI
Evolving Tests
In an Agile process, during which development is done in small increments, you also need to make sure the tests follow an iterative way of working. The tests need to sync with the flow of the application development; otherwise, you might run in to a lot of problems down the line.
Early in a project life cycle, little is known about a new feature, and you need to run tests against all acceptance criteria defined for the requirement. When a feature is completed, you should be confident it has been tested according to the test cases and that it works as expected. After that, you only need to run tests to validate changes in the requirement. This means you must have a process for knowing which tests to run.
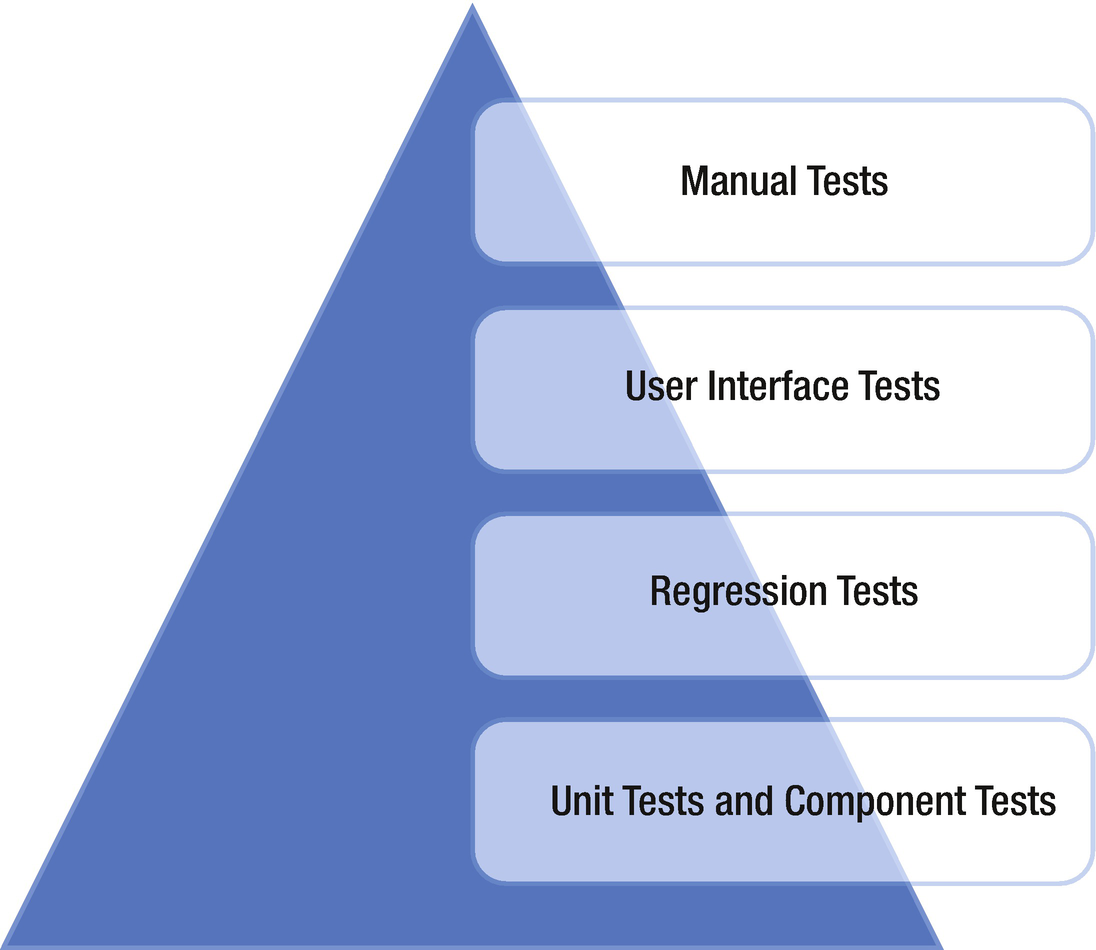
Proportions of types of tests
At the bottom of the pyramid are the unit and component tests, which are the main part of the testing effort. These tests are relatively cheap to create and maintain; but, to test the system as a whole, you probably need to add regression tests that run end-to-end tests as well.
Some of the regression tests should be implemented as user interface tests to simulate how an end user uses the system. However, user interface tests are more complex to design and maintain, and often it isn’t practical to have more than a small set of them. Most of these tests can and should be automated to provide an efficient way of maintaining changes in the product.
With this way of designing tests, you end up with a small number of manual tests at the top of the pyramid. This means manual tests are always necessary to some extent.
Now let’s talk a little about how TFS can help us manage our tests.
Clients for Managing Tests
- 1.
Microsoft Test Manager, or MTM, which is a desktop application
- 2.
Microsoft Web Test Case Manager, which is a web-based application inside the Azure DevOps GUI
Microsoft Test Manager
MTM is a stand-alone desktop application and was included in the Visual Studio family when TFS 2010 was released. View it as the Visual Studio for testers—the one-stop shop for the entire test process. A tester can do almost all testing activities within a single application.
Exploratory testing: Records actions while a test is performed without preplanned steps.
Planning of manual tests: Plans tests with the option of creating steps from recorded actions.
Running manual tests: Displays test cases on the side of the screen while tests are running. Records actions, screenshots, and other diagnostic data automatically for inclusion in test results and bug reports.
Specifying test platforms: Creates multiple versions of a test to be performed on different hardware or software configurations.
Collecting more diagnostic data in manual tests: Collects event logs, IntelliTrace data, video, and other diagnostic data while tests are performed.
Testing Windows Store apps: Collects diagnostic data and screenshots while tests are performed on a Windows 8 device or PC, with MTM running on a separate PC.
Copying and cloning test suites and test cases: Copies test suites or plans from one project to another.
Recording and playing back manual tests: Records keystrokes and gestures while tests are running, then repeats the actions rapidly on a later occasion.
Planning application tests from a Microsoft Excel or Microsoft Word document: Uses Microsoft Excel to edit test plans in bulk and synchronizes with plans embedded in Microsoft Word documents.
Testing in a lab environment: Gathers diagnostic data from servers while tests are running. Manages the assignment of server machines to testers. Sets up fresh test configurations quickly by using virtual machines.
Tracking software quality: Monitors the progress of a project by tracking the tests that pass or fail; manages bugs.
Automating system tests: Links test methods in code to emulate manual tests so they can be repeated regularly. Automates deployment of applications and tests to a lab environment. Sets up a completely automatic build–deploy–test workflow. Adds existing automated tests from Visual Studio to a test suite.
MTM will soon be deprecated. Microsoft’s goal is to have everybody switch to the web-based testing tools in Azure DevOps.
Azure Test Plans
The second option for working with test cases is Azure Test, which is found in the Azure DevOps web GUI. Azure Test was introduced with the TFS 2012 Update 2 release. Azure Test Plans is a lightweight solution when you want the integrated testing experience with TFS/Azure DevOps that offers most of MTM functionality. But let’s be honest here, most testers I have met just don’t think this is the best solution for their testing needs. Most turn to tools like ReqTest and such instead.
As a core part of TFS, the Test Hub enables you to create and run manual tests through an easy-to-use Web-based interface that can be accessed via all major browsers on any platform.
Customization of workflows with test plan, test suite, and test case work items
End-to-end traceability from requirements to test cases and bugs with requirement-based test suites
Criteria-based test selection with query-based test suites
Excel-like interface with a grid for easy test case creation
Reusable test steps and test data, with shared steps and shared parameters
Sharable test plans, test suites, and test cases for reviewing with stakeholders
Browser-based test execution on any platform
Real-time charts for tracking test activity
To use Azure Test, you must have a valid license for MTM.
TDD and Automated Testing
Test-Driven Development
TDD is a practice that originated with Kent Beck, who is credited with having developed or “rediscovered” the technique. TDD is one of the core practices in XP, but has created lots of general interest in its own right. So, even if you do not use XP, you can still use this practice as a way to help developers write better code.
TDD relies on the repetition of a very short development cycle. First, the developer writes an (initially failing) automated test case that defines a desired improvement or new function, then produces the minimum amount of code to pass that test, and then refactors the new code to acceptable standards. Kent Beck stated in 2003 that TDD encourages simple designs and inspires confidence.
Instead of designing a module, then coding it and then testing it, you turn the process around and do the testing first. To put it another way, you don’t write a single line of production code until you have a test that fails.
In traditional software development, tests were thought to verify that an existing bit of code was written correctly. When you do TDD, however, your tests are used to define the behavior of a class before you write it.
With TDD, you want your tests to run frequently to get continuous feedback about the written code. A change in code that breaks one or more tests is something that demands immediate notification. You can configure Visual Studio 2015 to run unit tests automatically after build so that as soon as the code is compiled, all tests the tests are run and feedback is generated regarding their results. This means the feedback loop is very short. The loop is the time it takes for (in this case) a developer to make a code change to when that developer gets feedback on whether the change was successful.
Working with Automated Tests
To achieve the goals of automated testing, you need to plan ahead and think about what you really want to get out of your automation efforts. Visual Studio 2015 helps you to set up your test environment and to select which test types to use.
Test Types Supported in Visual Studio 2015
Test types | Purpose |
|---|---|
Basic unit test | An empty unit test |
Unit test | A basic unit test with a test context and additional test attributes |
Coded user interface test | A coded user interface test |
Coded user interface test map | A user interface test map that can be used to split into smaller pieces the user interface definitions in a coded user interface test |
Generic test | A test that wraps an existing function into an Azure DevOps Test plans test |
Ordered test | A test used to control a set of tests. |
Web performance test | A test that records a web test using Internet Explorer |
Load test | A test that launches a wizard to generate a load test configuration |
The following sections on CI/CD are inspired by my boss, Mathias Olausson. He is an expert in this area, so make sure to check out his recent book about CD with Visual Studio ALM 2015 at http://www.apress.com/9781484212738?gtmf=s . It is a great reference for this topic.
Continuous Integration/Continuous Delivery
Continuous Integration
Continuous Integration is a software development practice where members of a team integrate their work frequently; usually each person integrates at least daily – leading to multiple integrations per day. 2
CI is a practice in XP that has come to be the defacto standard in Agile projects. Martin Fowler was the person who introduced it to the more general public, but it was first named and proposed by Grady Booch in 1991.3 CI is a practice that integrates the code base frequently. In combination with running automated unit tests in the developer’s local environment and verifying they all pass before committing to the mainline, CI aims to make sure the developer is not checking in code that breaks any other developers’ code. Over time, this practice has evolved, and now builds run on build servers that run the unit tests automatically and periodically—or even after every commit—and report the results to the developers. CI has spread outside the Agile community and is now used frequently in other types of projects as well.
In addition to running the unit and integration tests, you can also run static and dynamic tests, measure and profile performance, extract and format documentation from the source code , and facilitate manual quality assurance processes. In this way, you get continuous quality control of your software as well.
Testing: Because you develop your software incrementally in short iterations, you need to rethink how you test.
Cross-functional teams : Ideally, the team should be self-organized—meaning, more people should have the ability to deploy software.
Shippable product in every iteration: With short iterations (perhaps a two-week sprint), it is no longer possible to spend a week on installation. Hence, you need to automate tasks that were manual previously.
CI can help resolve these issues. In fact, Scrum has a solution for this; use the retrospective to find ways to improve.
Why Continuous Integration?
Reduces risks
Reduces manual routines
Creates shippable software
Improves confidence in the product
Identifies deficiencies early
Reduces time spent on testing
Improving project visibility
Keep in mind that CI is not free of costs. You need to maintain your CI solution, including the build environment, over time. It can also take quite some effort to introduce it into your organization. And don’t forget that CI has costs for setting up the new build and CI infrastructure as well.
Check in often: The CI process needs changes to work. The smaller the changes and the more specific they are, the faster we can react to things that go wrong.
Do not check in broken code: Checking in often is great, but don’t overdo it. Don’t check in code until it works, and never check in broken code. If you need to switch contexts, use the Suspend feature in TFS to put things aside for a while.
Fix broken build immediately: If you break something, it is your responsibility to fix it.
Write unit tests: The system needs to know what works and not. Unit tests and other inspection tools should be used to make sure the code does more than just compile.
All tests and inspections must pass: With inspections in place, you must pay attention to the results. Use feedback mechanisms to make people aware when something is broken.
Run private builds: If you can do a test build before check-in, you can avoid committing things that don’t work. TFS can build from a shelve set using a feature called Gated Checkin.
Avoid getting broken code: Last, if the build is broken, don’t get the latest code. Why go through the hassle of working on code that doesn’t work? Instead, use the version control system and get the latest version that worked.
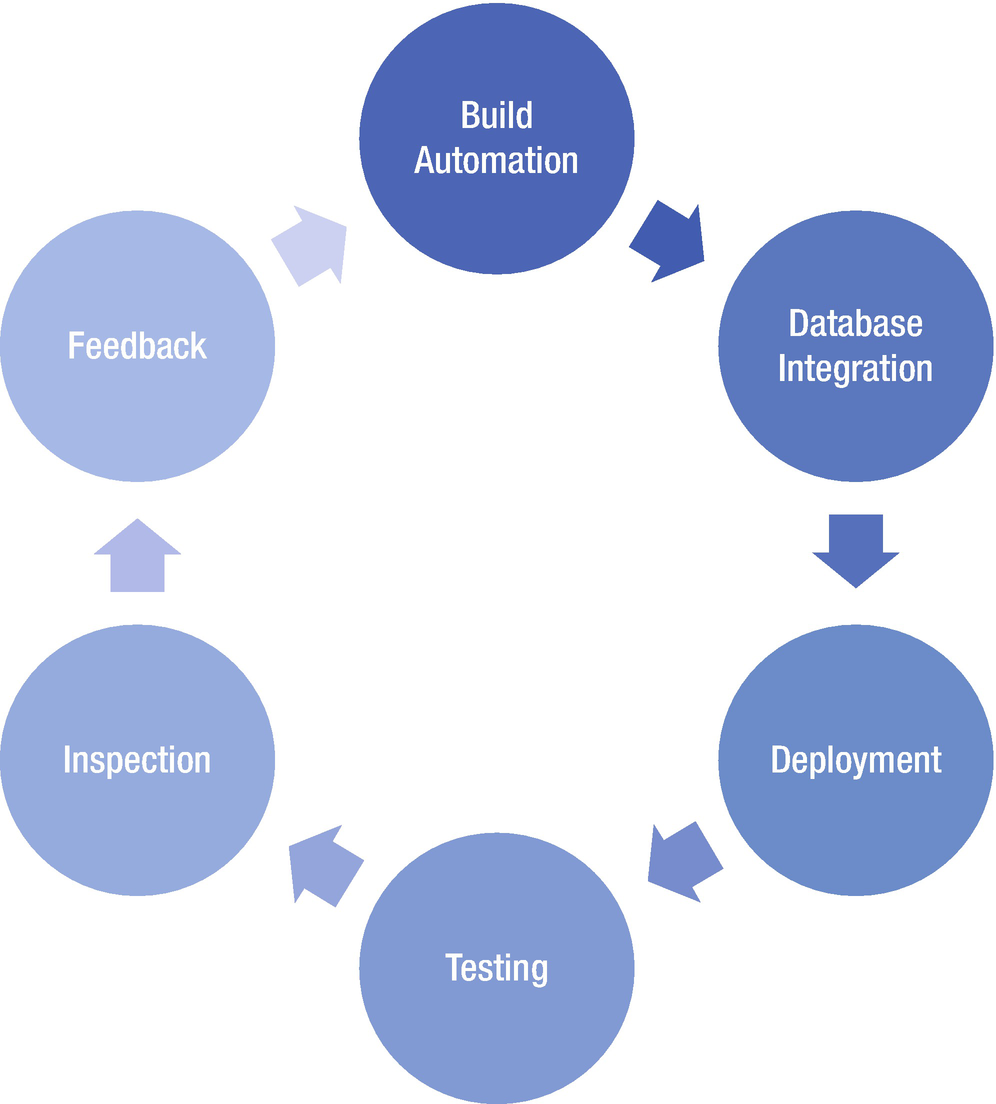
Components in the CI process
Continuous Delivery
The problem with CI is that it can be a solution to a nonexistent problem. Deployment as part of the CI flow is not just about automating the build, test, and release process. You really need to think about delivery to add value to the deployment process .
CI is great, and it supplies a framework for producing software efficiently in a controlled fashion. But, to get the most out of it, you need to look at how it fits into the overall process of delivering software. In an Agile project, you want to deliver working software in every iteration. Unfortunately, this is easier said than done. It often turns out that, even if you implement CI and get the build process to produce a new installation package in a few minutes, it takes several days to get a new piece of software tested and released into production. So how can you make this process work better?
Let’s start by asking the following simple question:
How long does it take to release one changed line of code into production?

A typical delivery process
- 1.
Look at the steps in the process. Which steps take the most time? What can be done to improve them?
- 2.
Look at the steps in the process? Which steps go wrong most often? What is causing this?
- 3.
Look at the sequence of steps. How should they be run in sequence?
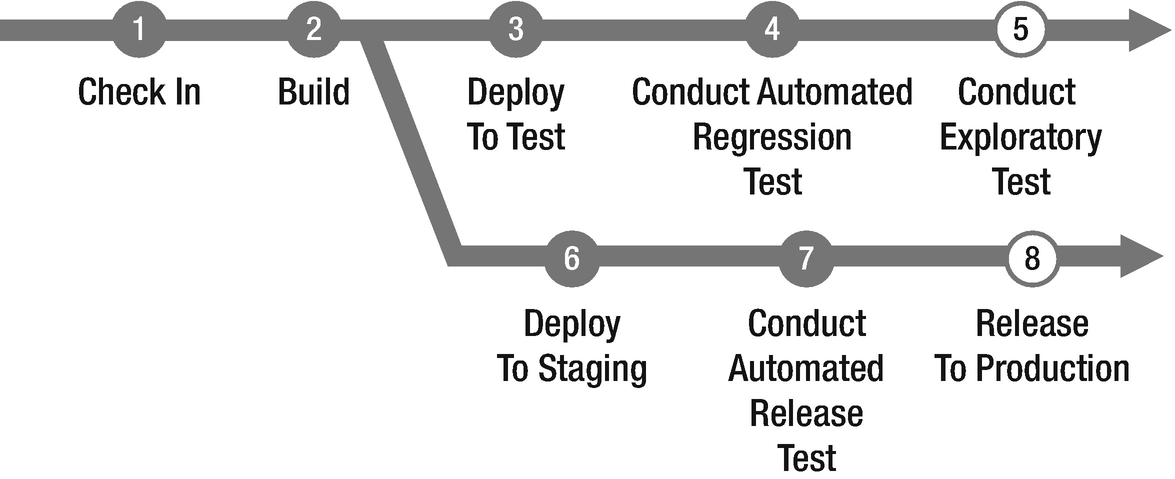
An optimized delivery process
With this model (Figure 6-5), the process is changed so that most steps are automated by implementing automated tests as well as automated build and deployment. Releasing to production automatically is not for the faint-hearted, so this would be done manually, but the same automated scripts as the automated deploy to test and staging environments should be used. It is possible to automate release to production, especially if you have had this step in place since the first iteration of the project. By doing so, you build confidence in the process and, having seen it work throughout the development cycle, you should trust the process at this critical stage. Also, in the model, parallelization the acceptance test and preparation of the production environment has occurred. By doing these steps in parallel, you can push the release to production as soon as the acceptance tests are green, instead of the traditional stage to production first after the acceptance tests have passed.
CD is a great practice to produce updates in a controlled and effective manner. But, without an intentional release management discipline, you can lose much of its value. What you need to add to the picture is how the release planning ties into the deployment process and then ensure you know which features you want to deploy where and when. This is not covered in the scope of this book, but please refer to Mathias Olausson’s book mentioned earlier for more details and best practices.
Azure Pipelines
With Azure DevOps, you can use the service Azure Pipelines to automate your CI/CD flow. You can build, test, and deploy Node.js, Python, Java, PHP, Ruby, C/C++, .NET, Android, and iOS apps. And, you can run in parallel on Linux, macOS, and Windows.
You can also build and push images to various container registries such as the Azure Container Registry or Docker Hub. Or, you can deploy your containers to individual hosts or Kubernetes, which is an open-source system for automating deployment, scaling, and management of “containerized” applications.
You can further use Azure Pipelines to implement your CD of software to any cloud, including Azure, Amazon Web Services (AWS), and Google Cloud Platform (GCP). Using Azure DevOps, you can visualize deployment to any number of interdependent stages as well.
Coding Standards
Coding standard is an agreed-on set of rules that the entire development team agrees to adhere to throughout the project. The standard specifies a consistent style and format for source code within the chosen programming language, as well as various programming constructs and patterns that should be avoided to reduce the probability of defects. The coding standard may be a standard convention specified by the language vendor (e.g., the code conventions for the Java Programming Language, recommended by Sun) or a custom defined by the development team.
XP backers advocate code that is self-documenting to the furthest degree possible, which reduces the need for code comments, which can get out of sync with the code itself. This can be especially useful if you have a new developer coming in to write code or if you use many consultants in the development. It will be easier to make sure that all developers adhere to the same coding standards so that the code is maintainable over time.
In Visual Studio, you can require that code analysis be run on all code projects in a team project by using the code analysis check-in policy. Requiring code analysis improves the quality of the code that is checked into the code base. The feedback loop is very short before developers find code that does not follow the standard.
Code analysis check-in policies are set in the team project settings and apply to each code project in the team project. Code analysis runs are configured for code projects in the project file for the code project. Code analysis runs are performed on a local computer. When you enable a code analysis check-in policy, files in a code project that are to be checked in must be compiled after their last edit, and a code analysis run that contains, at a minimum, the rules in the team project settings must be performed on the computer where the changes were made.
For managed code, you set the check-in policy by specifying a rule set that contains a subset of the code analysis rules. After you specify a check-in policy for managed code, team members can synchronize their code analysis settings for code projects to the team project policy settings.
For C/C++ code, the check-in policy requires that all code analysis rules be run. You can add preprocessor directives to disable specific rules for the individual code projects in your team project.
Refactoring
Code refactoring is the process of restructuring existing computer code—changing the factoring—without changing its external behavior. Refactoring improves nonfunctional attributes of the software. Advantages include improved code readability and reduced complexity, which can improve source code maintainability and create a more expressive internal architecture or object model to improve extensibility.
Typically, refactoring applies a series of standardized, basic smaller refactorings, each of which is (usually) a tiny change in a computer program’s source code that either preserves the behavior of the software or at least does not modify its conformance to functional requirements. Many development environments provide automated support for performing the mechanical aspects of these basic refactorings. If done extremely well, code refactoring may also resolve hidden, dormant, or undiscovered computer bugs or vulnerabilities in the system by simplifying the underlying logic and eliminating unnecessary levels of complexity. If done poorly, it may fail the requirement that external functionality not be changed and/or may introduce new bugs.
Why do we use refactoring? Well, we want the developers to think constantly about they can keep the code simpler and more easily maintained. Often, there is no need for gold plating on code. Product owners are more interested in the value to the organization the code adds, not how cool or complicated it is.
Pair Programming
Pair programming means that all code is produced by two people programming on one task on one computer. One programmer has control over the workstation (the driver) and thinks mostly about the coding in detail. The other programmer is more focused on the big picture and reviews the code continually that is being produced by the first programmer. Programmers switch roles after a while so both are in the driver’s seat at one time or another.
The pairs might not be fixed either. In many projects, programmers switch partners frequently so that everyone knows what everyone is doing. This practice also lets everybody remain familiar with the whole system, even the parts outside their skill set. Doing this improves communication and cross-functionality of the team.
Why is this a good practice? In my experience, pair programming reduces bugs with somewhere 15% to 50%. Reducing bugs by these numbers lowers the amount of time and effort spent chasing bugs in production.
Another benefit is that there are two pairs of eyes that go over the implementation of the requirement. The idea is that any misconceptions of the requirement on which the pair is working can be found quickly because two people are writing the code collaboratively. If there had been only a single developer writing the code, it would be harder to find such misconceptions. In addition, if using one developer, that developer might also write the unit tests included in the CD model, and they would run successfully because the tests were written by the same developer who wrote the code. In this scenario, we also would not see the misconceptions in the tests unless another set of eyes reviewed the code.
Are there any drawbacks to pair programming? Of course there are. One of the most discussed is that two programmers working at the same time cost twice as much as if only one developer did the job. This is true. But here you need to consider the cost reduction of finding defects early during the development process, not during production when the cost associated with fixing the defect is great. Our general advice is to use pair programming on complicated features, important features, or high-risk features for which there are greater quality standards than for some other code. Use pair programming wisely; don’t be afraid to use it.
Another way to enhance code quality is to have a peer review of important code. In this instance one developer writes the code then sends a code review request to a peer for a review. This is an effective way of working and does not require two developers full time.
SAFe in Azure DevOps
Because organizations are applying an Agile way of working more and more, many are asking themselves how they can get agility to work at scale. There are several frameworks available for scaling Agile such as LeSS and Nexus, but many organizations turn to SAFe. There is no process that supports SAFe out of the box in Azure DevOps, so you need to work with the ones you have got unless you want to create a custom process.
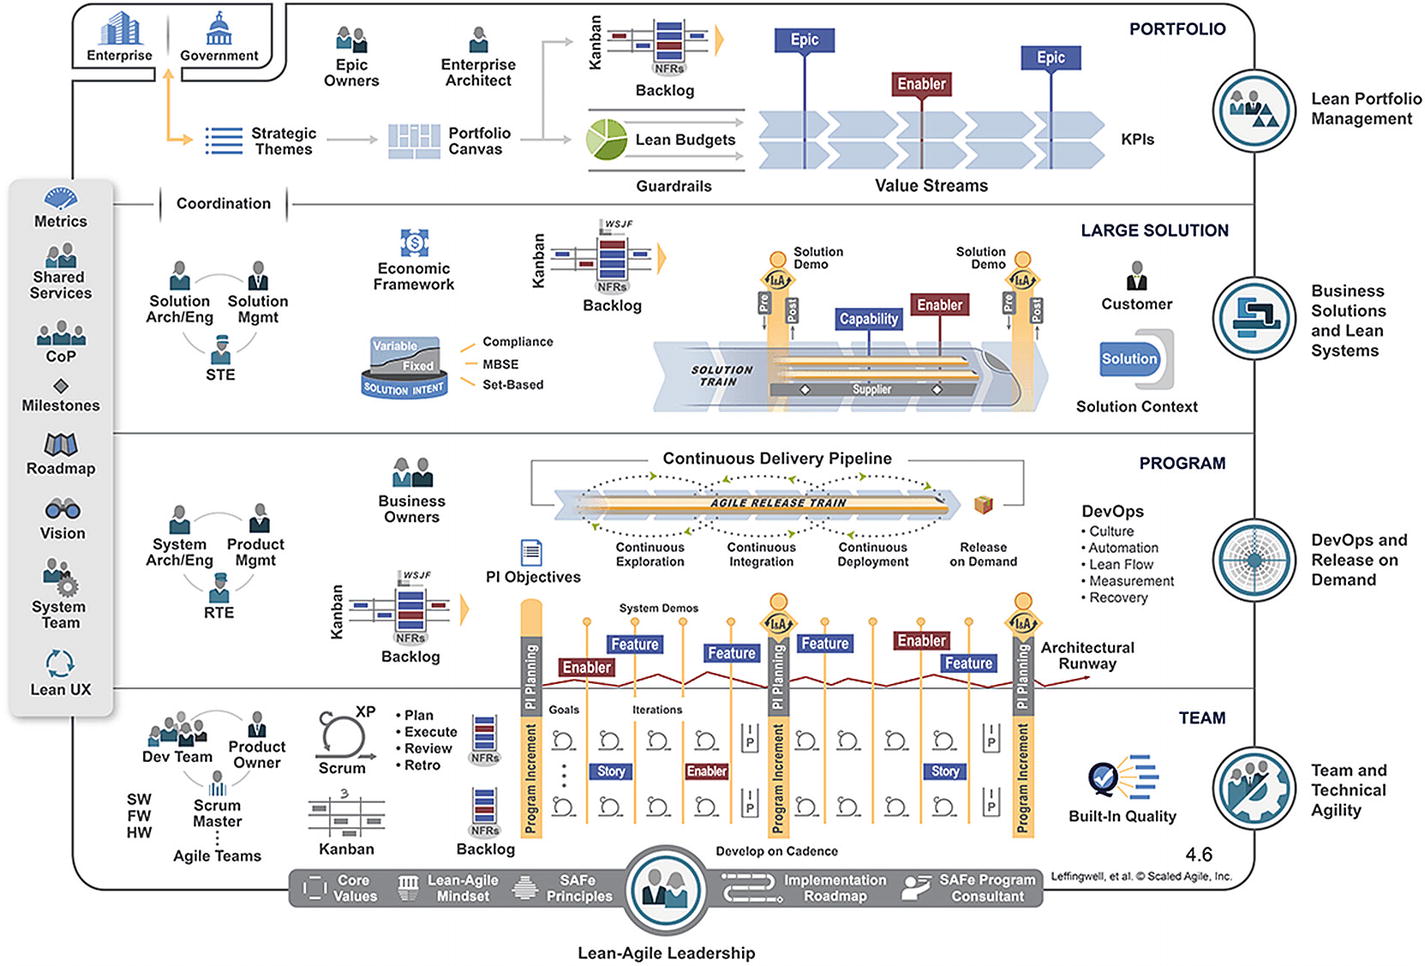
Full SAFe implementation
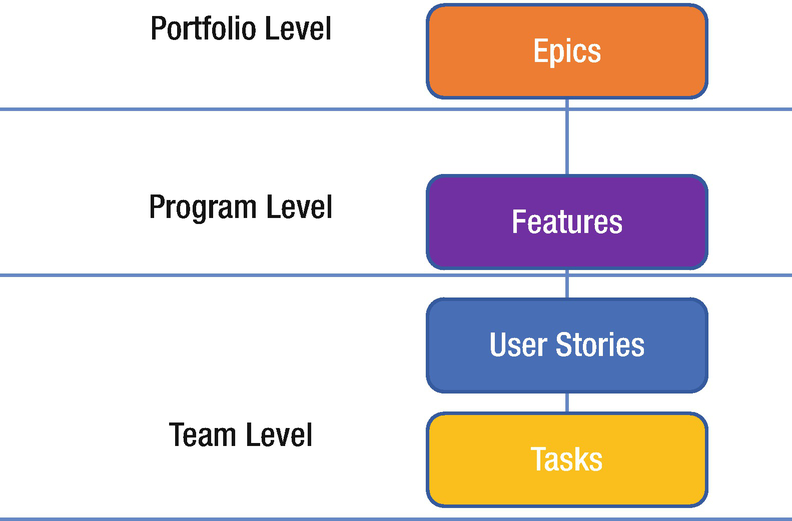
The relationship between SAFe levels and work items in Azure DevOps
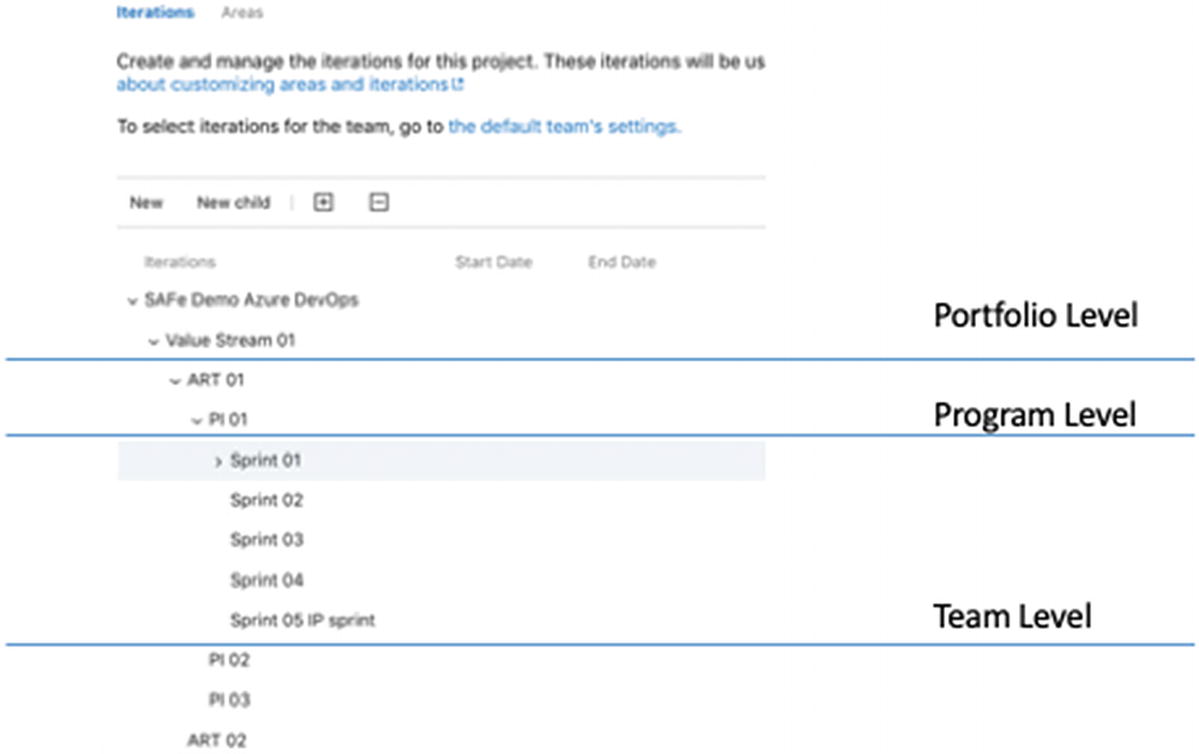
Configurating iterations for SAFe in Azure DevOps
You can see the overall Portfolio level (SAFe Demo Azure DevOps) with one value stream present (Value Stream 01). The value stream includes the ARTs (the Program Level)—in this case, ART 01 and ART 02—which lead to three program increments (PI 01, PI 02, and PI03), followed by the configured the sprints for each PI.
Because epics can span several release trains, the portfolio team probably wouldn’t be associated with any specific iterations. Program teams, on the other hand, track their features, which ship with a PI. The feature teams work in sprints to complete the stories chosen for the PI. Each team in turn chooses which iterations support them in tracking their deliverables.
Filter any backlog or Kanban board
Create queries based on tags, then filter query results by tags
Create progress and trend charts or reports based on tags
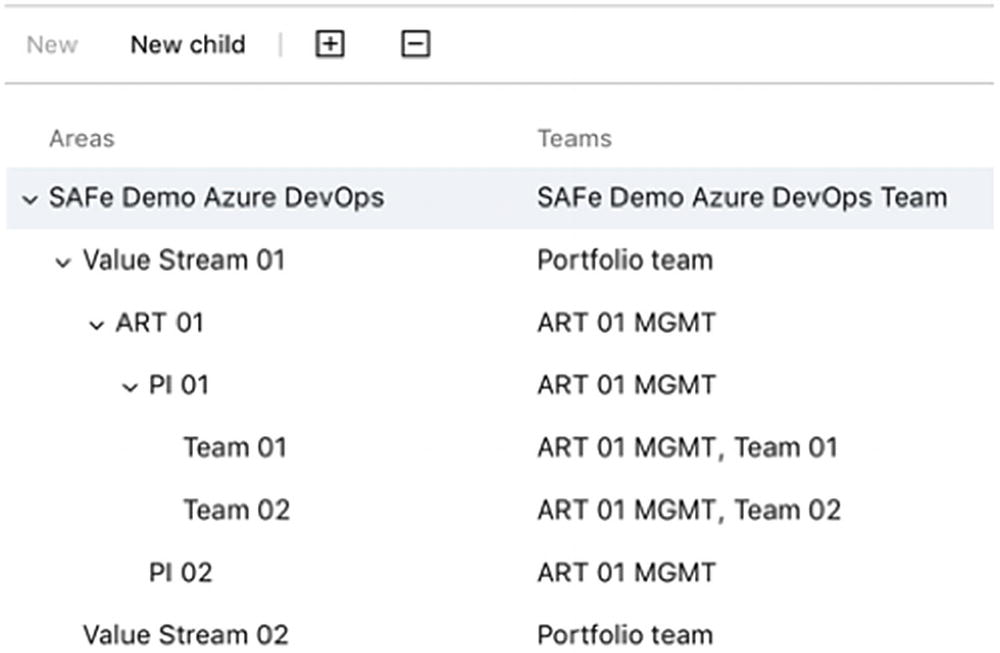
Configurating areas for SAFe in Azure DevOps
Working with areas enables different teams to see their individual Kanban boards

The ART 01 MGMT team follows progress on its backlog (or Kanban board)

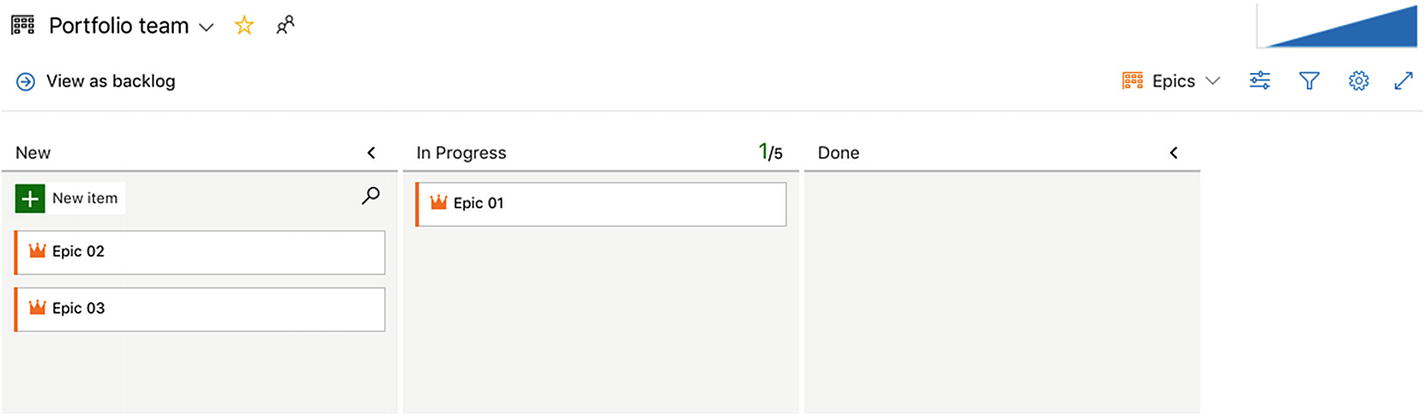
The Backlog for Team 01
This is one way of using Azure DevOps to support SAFe. Keep in mind that the flexibility of Azure DevOps and Azure DevOps Server makes it possible for to customize implementations. Before we leave this chapter, I want to say a few words about Nexus and Scaled Professional Scrum from Scrum.org.
Nexus in Azure DevOps
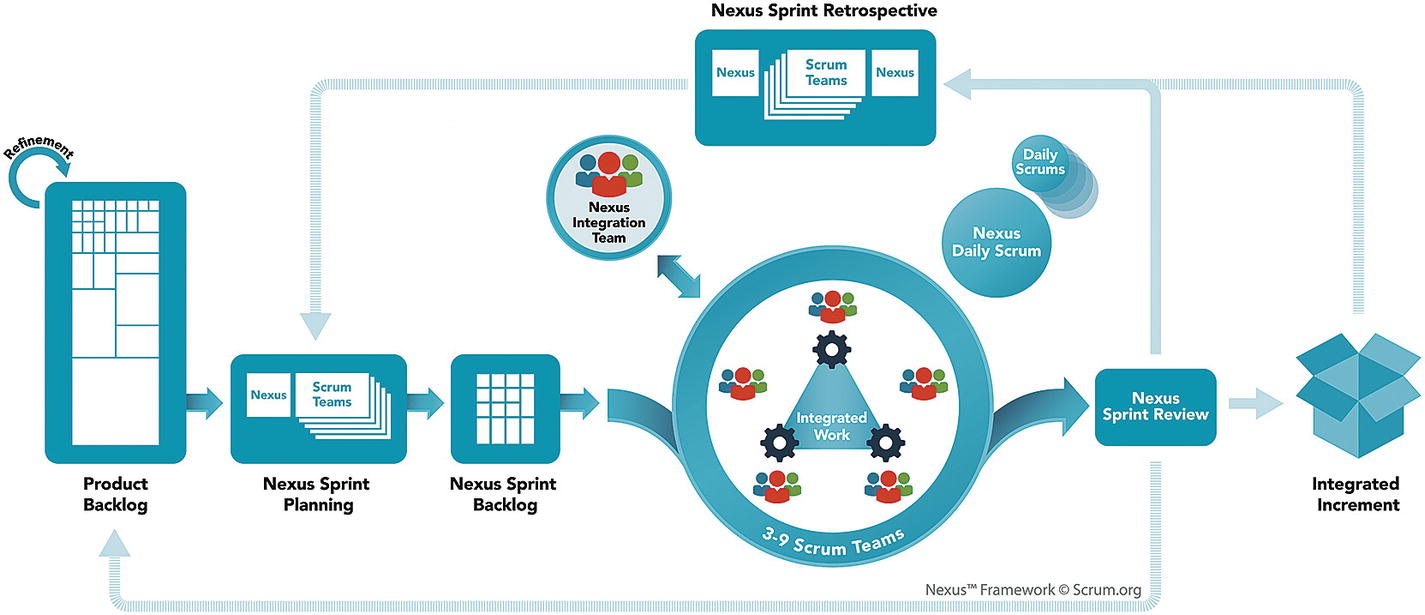
The Nexus framework revisited
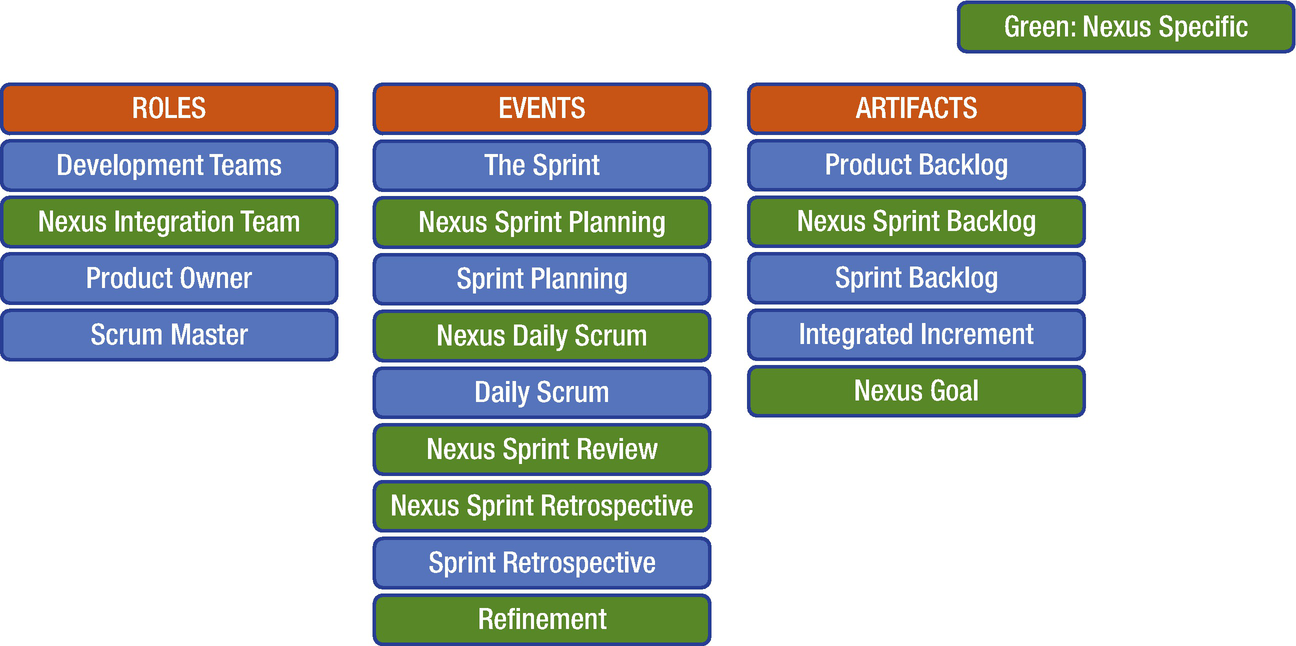
Differences between Scrum and Nexus
The neat thing with Nexus is that it requires no change to your process template in Azure DevOps because you are still doing Scrum! The new role, events, and the Nexus goal do not need to be modeled into your process template. The Nexus sprint backlog is just an aggregated view of all the individual team sprint backlogs. So, the only thing you need to do is set up your teams so they have one common aggregated “view of everything” and their own filtered team views, which is basically what everyone wants for any multiteam effort—and is supported out of the box by Azure DevOps.
- 1.
Go into Project settings and rename your existing team “Nexus.”
- 2.Select the Area Path root as Default area for this team and set “sub-areas are included” (Figure 6-15).
 Figure 6-15
Team settings for default area path
- 3.
Create a new team for each of the Scrum teams working on ProductX. Let the wizard create a Team area for each team (default choice).
- 4.
For each new team, go to Team configuration and select the same iterations as for the Nexus team.
And you are done!
For “anything Nexus,” such as Nexus sprint planning and Nexus sprint backlog, use the view of Nexus team. For team-specific stuff, use the individual team views, just as you did when there was only one team.
Why Not a Dedicated Team for the Nexus Integration Team?
The Nexus Integration Team is accountable for ensuring that a “Done” Integrated Increment (the combined work completed by a Nexus) is produced at least once every Sprint. The Scrum Teams are responsible for delivering “Done” Increments of potentially releasable products, as prescribed in Scrum. . . . Members of the Nexus Integration Team are often also members of the individual Scrum Teams in that Nexus. . . . Common activities the Nexus Integration Team might perform include coaching, consulting, and highlighting awareness of dependencies and cross-team issues. It might also perform work from the Product Backlog.
So, when trying to scale Scrum using Nexus, the Nexus integration team is a sort of semivirtual team with a “servant–leader” flavor. Although the last sentence of the quote says the team might perform work from the backlog, this should be rare and more of an emergency action than anything else. All in all, you are much better served by an aggregated “Nexus view” from which you can get an overview of the current situation.
Further Improvements
Use the predecessor/successor work item links to indicate dependencies.
- Check out various Azure DevOps extensions that might help you, such as the following:
Work Item Visualization for visualizing dependencies
Feature timeline and Epic Roadmap for visualizing dependencies
Dependency Tracker for tracking cross-team dependencies
Definition of Done to ensure all teams adhere to a common definition of done
And with these words, we end this chapter and thank Jesper for his input.
Summary
This chapter focused on some of the most common Agile practices. Many of them stem from XP and are great quality enhancers for development projects. Visual Studio and TFS has good support for implementing these practices. Keep in mind that these practices can be used in more “traditional” projects to increase quality.
In the next chapter, we discuss some key metrics that can be used to monitor the status of Agile projects.