
ALM Revisited
- 1.
Traceability of relationships between artifacts: Traceability can be a major cost driver in any enterprise if not done correctly. There must be a way of tracing the requirements all the way to delivered code—through architect models, design models, build scripts, unit tests, test cases, and so on. Practices such as TDD and configuration management can help, and these can be automated and supported by Azure DevOps.
- 2.
Automation of high-level processes : There are approval processes to control handoffs between analysis and design. There are other handoffs between build, deployment, testing, and so on. Much of this is done manually in many projects, and ALM stresses the importance of automating these tasks for a more effective and less time-consuming process.
- 3.
Visibility into the progress of development efforts: Many managers and stakeholders have limited visibility into the progress of development projects. Their visibility often comes from steering group meetings during which the PM goes over the current situation. Other interest groups such as project members may also have limited visibility of the whole project even though they are part of it. This often occurs because reporting is hard to do and can involve a lot of manual work. Daily status reports can, quite simply, take too much time and effort to produce, especially when there is information in many repositories.
Let’s now look in more detail how work items in Azure DevOps will help you accomplish traceability in your projects and organizations.
Traceability
Unfortunately, we have seen companies that have stopped making changes to their systems just because no one ever knew where a change (or bug fix) might have its impact. This is not a situation any organization wants to be in, yet it is quite common.
At the Swedish Road Administration some years ago, a new version of our system suddenly made old bug fixes disappear. The operators at the Traffic Management Center found themselves with no working phones because of an upgrade. This had the potential to make an accident worse than it already was, because the operators communicate with the rescue team and the police using phones. Having communications suddenly stop working can actually be a matter of life or death.
The vendor of that piece of software did not have control over its different software versions and did not have a good testing strategy. If the vendor had used automated tests, for instance, it would have discovered broken tests for the bug fix when the fix itself was not included in the next release. By checking which work items were associated with the failed tests, the vendor would have been able to see which of them contained the problem. This would have indicated why they created the test in the first place, so they could have fixed the problem more easily. This traceability would greatly improve their code.
And if they had used a good configuration management process, they would also have had the capability to trace all versions where the bug fix needed to be inserted, so they wouldn’t forget to include it in future releases.
Work item tracking in Azure DevOps can help you with traceability so you can avoid such problems. Let’s now see how the work item tracking system implements traceability.
The Azure DevOps Work Item Tracking System
Sometimes it seems like we can have tons of Post-its on our monitors and desks—each one containing at least one task we are supposed to do. Often, it just isn’t possible to track them with a tool. It could be that some tasks are connected with one project, and others with another. You could try writing them all down in an Excel spreadsheet and saving that to your computer, but soon you might find that the spreadsheet is located on your laptop, a customer’s computer, your desktop computer, on another customer computer, and so on. And you have no idea which one is the current version. This can be a real problem when you find you have no clue as to which version you should trust.
The same thing is often visible in projects. PMs have their to-do lists for a project, and they all have their own way of keeping them updated. Let’s say a PM uses Excel to keep track of the tasks—the status of tasks, to whom they are assigned, and so on. How can the PM keep the team updated with the latest to-do list? If the PM chooses to e-mail it, chances are that some won’t save the new version to disk or will just miss it in the endless stream of e-mails coming into their mailbox. Soon there are various versions floating around, and things are generally a mess.
One way to solve this could be to use a project web site running on Microsoft Office SharePoint Server or some other tool like that. This could help, although you could still be in trouble if people forget to save changes or check in the document after they have updated it.
Another problem may occur if, for example, an Excel sheet is updated by a tester who discovers a bug and changes the status of one entry in the task list to indicate that a developer should look at the task again and solve the bug. How can you alert the developer that the bug exists? You would want this action to take place automatically, right? That would be hard if you used only an Excel spreadsheet. The same thing occurs the other way around. When a developer has fixed a bug, you want the tester to be alerted that the problem has been resolved, so the tester can then check whether the bug issue can be closed.
What about requirements traceability? If the only place you keep track of the connection between requirements and the code is in a document, how do you know that the document is really updated? Can you trust that information?
Even if you purchase a separate tool to help you keep track of tasks, it is still be a separate tool for all categories of team members. There are tools for bug tracking, requirements management, test management, and so on—the list can go on for a while. Chances are that someone will forget to update the tool because it takes too long to open or is too difficult to work in or any other excuse for not doing the update. This could cost the project lots of money and time.
Work Items

Each work item has a unique ID
The ID lets you follow one work item, let’s say a requirement, from its creation to its implementation as a piece of executable software (component). Work item IDs are unique across all work item types in all team projects in a project collection. The work item type determines the work item fields available for tracking information, defaults defined for each field, and rules and constraints positioned on these fields and other objects that specify the work item workflow. Every change made to a work item field is stored in the work item log, which maintains a historical record of changes.

Creating a work item using Azure DevOps
Work items provide a great way for you to simplify task management during a project while at the same time enabling traceability. No more confusion as to which version of the task list is the current one. No more manual labor for gathering status reports on work progress that are used only at steering group meetings. Now you have a solution that lets you collaborate more easily with your teams and enables all members and stakeholders to view status reports whenever they want. You can also collaborate more easily with people outside the project group by adding work items via the Web.
Modifying a work item using Process Editor
When it comes to the Azure DevOps cloud version, you modify the process in a different way through the web interface. We come back to this later in the chapter.
The work items can contain information in different fields that define the data to be stored in the work item. This means that each field has a name and a data type. Data types supported in fields are the primitive data types such as string, integer, and double, as well some complex types such as DateTime, PlainText, HTML, and others. System fields are one example of a field (or more correct, a label for a group of fields) that must be present in every work item type, and represent the minimal recommended subset of fields that any custom work item template should contain. Having such a common subset allows reusing basic Work Item Query Language (WIQL) queries or reports from predefined templates for your custom templates.
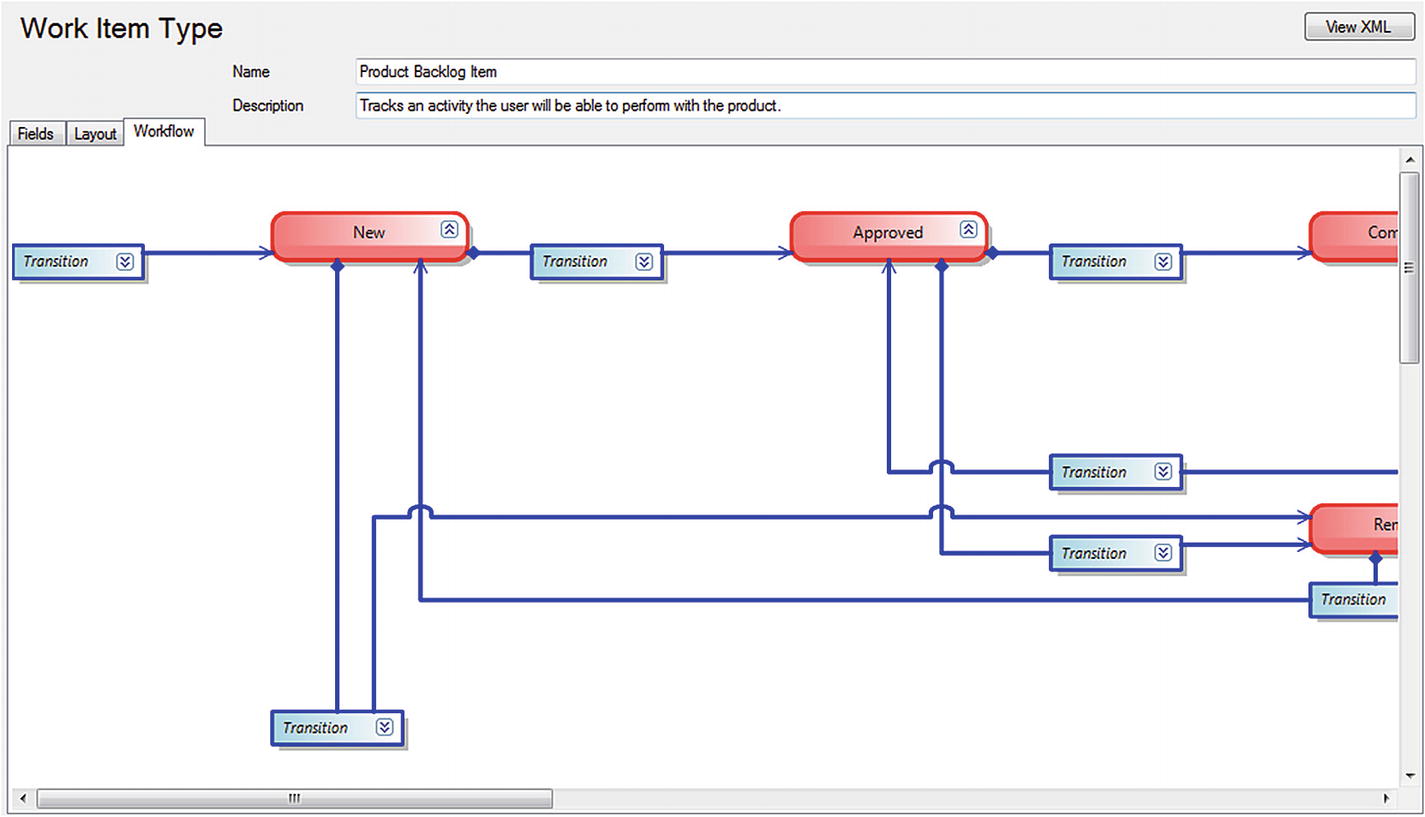
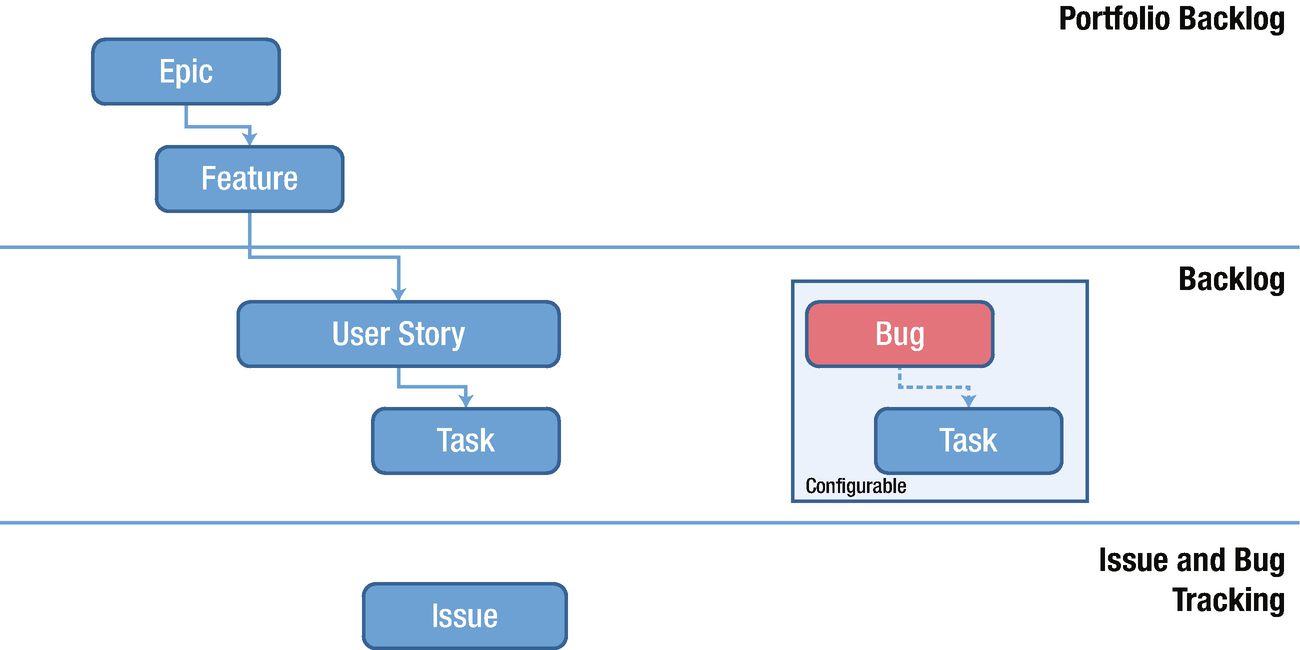
All work items can have different information attached to them. You can have information about to whom the work item is assigned and the status of the work at the moment (for example, a bug could be open, closed, under investigation, resolved, and so on). The State field can be modified (Figure 4-3) so that each work item type has its own state mechanism. This is logical because a bug probably goes through other states than a general task, for instance. You can also attach documents to the work item and link one work item to other work items. You can create a hierarchy of work items if you want. Let’s say you implement a requirement as a work item and this requirement contains many smaller tasks. You can then have the requirement itself at the top, and nest the other requirements below it so you know which work items belong to which requirement.
When a bug is discovered, for instance, you can quickly follow the original requirement by its work item ID and see in which places of the code you might have to make some fixes. You can also see the associated work items so that you can evaluate whether other parts of the code need to be changed as a result of this bug fix.
Because Azure DevOps saves information about the work item on the data tier, you can see the history of the work item. You can see who created it, who resolved it, who closed it, and so on. The information in the databases can be used for display on reports, allowing you to tailor them depending on your needs. One report could show the status of all bugs, for instance. Stakeholders can see how many open bugs exist, how many are resolved, and much, much more. It is completely up to you how you choose to use the work items.
For those of you familiar with and used to working with pivot tables, you can use Excel as well to drill down into the information in the Azure DevOps TFS server data warehouse. There are people who think it is better to use Excel to connect directly to these tables and who use very detailed information in their reports. If you want to do this from Azure DevOps in the cloud, you need to use Power BI and create your queries there instead.
The Work Item Form

The bug form in Microsoft Scrum
As you can see in Figure 4-4, the Bug work item type in Microsoft Scrum includes fields for many aspects of the bug. You can assign the bug to a specific person, set state (status), set severity, and much more. You can also add a description of the problem and attach files such as screenshots of the bug. There are other options as well, but they are not covered in this book.
The fields on the work item form can have properties set for them. You can let a field be read-only, required, automatically populated, and so on. Because you can also change the information included on this form by editing the XML, you can make sure it contains the information you want.
We have heard some customers say they have had problems using the process templates that Microsoft provides because the information required to fill in the forms is not the information they want to track or record. Instead of changing the work item types, they have tried to adapt to the work items. Don’t make this mistake! If you need other information besides what is included in the templates, or if you need the information in another way, change the template. That’s the whole point of having an open and flexible solution such as Azure DevOps. You can adjust the tool to fit your needs. I have, for instance, seen the Bug work item that Microsoft uses, and it looks nothing like what is included in any of the templates you get with Azure DevOps. Instead, Microsoft encourages you to adjust the tool to your needs. This includes adjusting the work items.
Work Item Traceability
As a manager, I want to search expense reports so I can get an overview of expenses easily.

Traceability starts with a work item in Azure DevOps

Linking work items to features, test cases, and tasks (other work items) enables you to achieve traceability
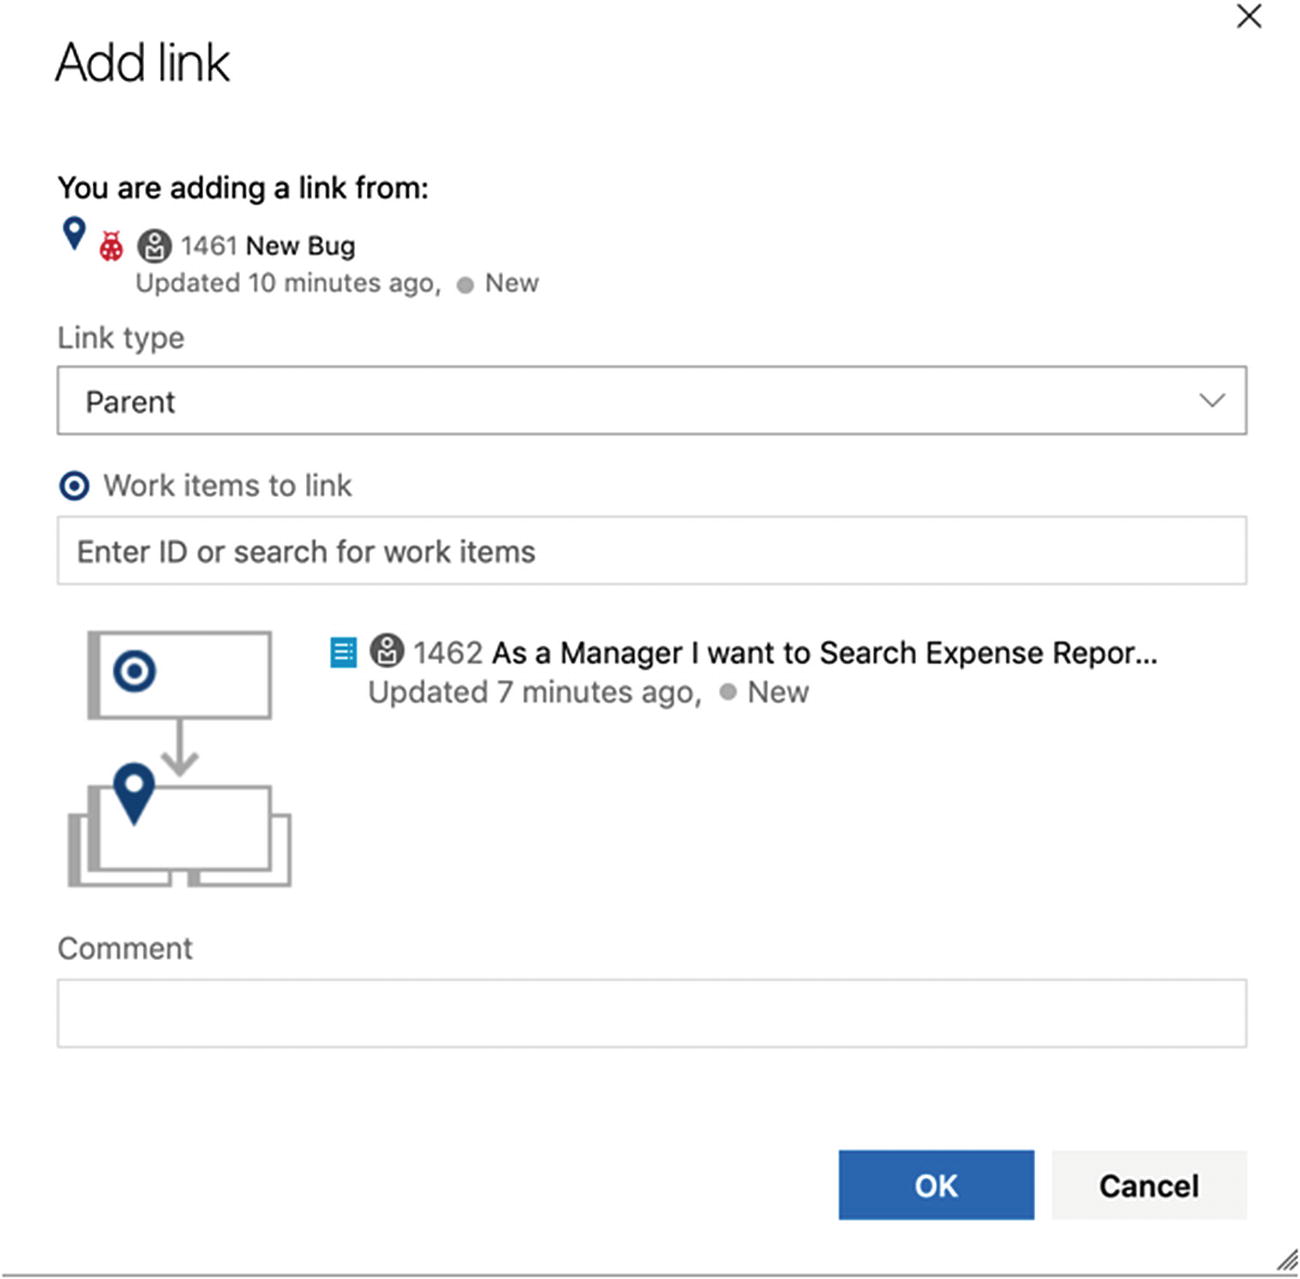
Linking work items to new or existing work items
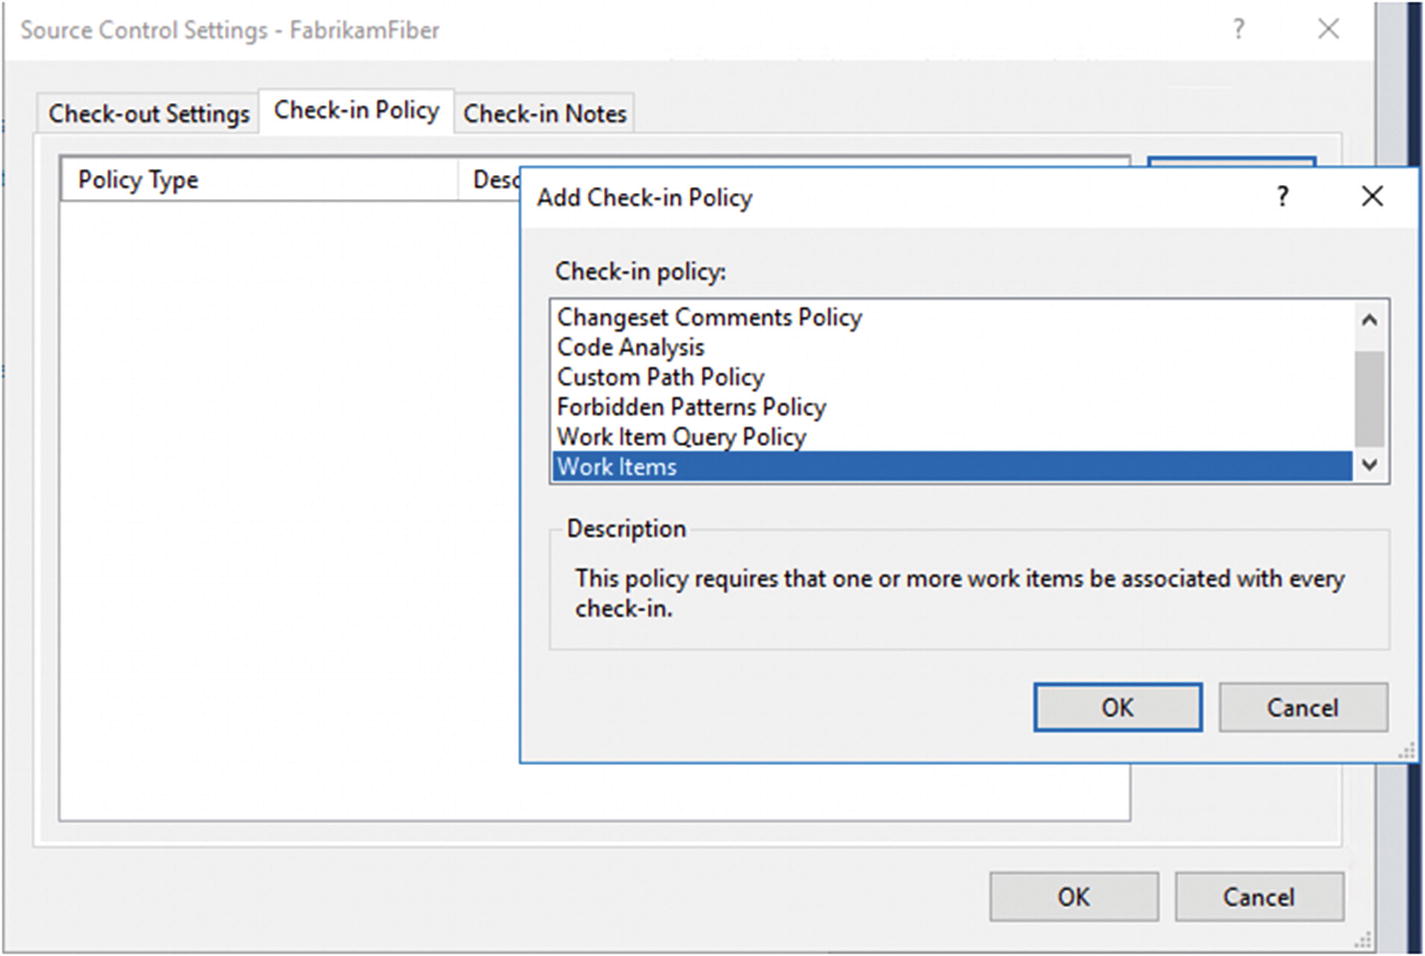
Linking a work item to a check-in can be required by a check-in policy
Source file and folder revisions (adds, renames, edits, deletes, moves)
Related work items (bugs and so on)
System metadata (owner, date/time, and so on)
Check-in notes and comments
By associating a build with a changeset, you create traceability from the original requirement (user story, in this case) to the built executable. This traceability can help you avoid problems such as the ones described at the beginning of this chapter.
By using the reporting functionality of Azure DevOps, you can see quickly what a work item is associated with and hence know that if you change some part of the code (like with a bug fix), this change affects a specific work item. Knowing this, you can see that some test cases will be affected by the change and that you need to run those tests again to determine whether the change broke anything. You can also get warnings from Azure DevOps that a check-in affects certain test cases.

Work item traceability
Work Item Queries

Work item queries in Azure DevOps
Depending on the process template you use, the work item queries supplied differ quite a bit. Microsoft Scrum has different work item queries than the Agile template, for instance. When we used the Agile template in some of my projects, we have found it necessary to add new work item types because the organization needed them for their ALM process. Queries to get information about these new work item types naturally don’t exist, so we had to make these queries ourselves. Some of these queries were built during the projects when the need arose, and many of them were later included in the process template so they are now part of all new projects.
Conclusions on the Work Item Tracking System
The work item tracking system is one of the core components of Azure DevOps. This system allows you to create work items and enable traceability. You can use the work items included with Azure DevOps from the beginning, you can adjust them to your needs, or you can even create your own work item types. Each work item has a unique ID (as you saw earlier in Figure 4-1) that you can attach to the things you do in Azure DevOps. This enables you to follow one work item—let’s say a requirement, for example—from its creation to its implementation as a piece of executable software. You can also associate one work item with others and build a hierarchy of work items.
When a bug is discovered, you can quickly follow the original requirement by its work item ID and see in which places of the code you might have to make some fixes. You can also see the associated work items, so you can evaluate whether other parts of the code need to be changed as a result of this bug fix.
If you implement a requirement as a work item, you can use the work item ID to track the requirement through source code to the final build of the executable system. By requiring all developers to add one or more work item IDs to the check-in using a check-in policy, you enable this traceability.
Our suggestion is that you look closely at the work item types supplied by Microsoft. Then you can decide which of these you can use for yourself and which you might adjust to suit your organization’s needs. If none of the ones supplied can be used, you can create your own work item types. Use this opportunity! Don’t adjust your way of working to the Microsoft templates. Adjust Azure DevOps to your needs instead.
The Process in Azure DevOps
When you create a new team project in Azure DevOps or TFS, you must choose a process for the project. The process was formerly known as the process template, but the name has changed. The process is a collection of files that defines the features, rules, behaviors, and work items associated with a specific process. Both Azure DevOps and VSTS have the same processes available, but there are some differences between the two.
The process defines the work item tracking system as well as other subsystems you can access from the web portal for an on-premises TFS or through Azure DevOps.
- 1.
Scrum
- 2.
Agile
- 3.
Capability Maturity Model Integration (CMMI)
Let’s now take a look at their features and differences.
Scrum, Agile, and CMMI
When you look at the processes, you can see they do not differ very much. The main difference is in the work item types they provide. We look at these processes in the following sections; but, simplified, we can say that Scrum is the most lightweight and CMMI offers support for a more formal process when formal change management is important.
I describe these now so that you can evaluate which model is right for you and your organization. But, before I go into them, let me just say that Microsoft is going to introduce another process we can use. It is called the Basic process. Until all details are revealed, I can only say a few words on this. A project that uses the Basic process has three work item types—epics, issues, and tasks—to plan and track work. We recommend you start by adding issues to track your user stories, bugs, or feature items. If you need to group them into a hierarchy, you can define epics. If you want to track additional details of work, you can add tasks to an issue. Within each work item form, you can describe the work to be done, assign work to project contributors, track status, and collaborate with others through the Discussion section. So, this is a simpler model, very much like the standard Jira setup. If you want more information, please check out https://docs.microsoft.com/en-us/azure/devops/boards/get-started/track-issues-tasks?view=azdevops&viewFallbackFrom=vsts .
Scrum
The Scrum process is built on the Scrum framework. Microsoft worked with Scrum.org when it developed the Scrum process for Azure DevOps/VSTS, and this is evident when you look at the terminology used in the process.

The Scrum process and some of its work items

Working with bugs at the backlog level

You can change the behavior of how bugs appear in the settings for backlogs and boards
Agile
The Agile process has been developed in collaboration with the Agile alliance. Originally, it was called the Microsoft Solutions Framework (MSF) for Agile, but now it is only referred to as the Agile process in Azure DevOps/VSTS.
The Agile process in Azure DevOps/VSTS

The requirements work item in the Scrum process (PBI)

The requirements work item in the Agile process (User Story)
Comparing these two figures, you can see similarities, such as the description and acceptance criteria. But, if you look at the details, you find things that differ. The field for estimating a requirement is called Effort in the Scrum process and Story points in the Agile process.
Another difference is in how you track your progress. In the Agile process, tasks support tracking Original Estimate, Remaining Work, and Completed Work; in the Scrum process, only Remaining Work is tracked. In my view, only the remaining work is important, but I do realize some organizations have a demand for tracking more than this.
Take some time and study the different work item forms in your own environment so that you choose which is best for your organization. Keep in mind that you can always customize the process if you want (see Chapter 5).
CMMI
The last process we discuss is called CMMI . CMMI is a more formal project methodology we can use.

The CMMI process
Furthermore, you can see that you have more work item types for tracking your projects: Change Request, Issue, Review, and Risk. Using this process you can implement a formal change management process, such as the one found find ITIL .
ITIL, formerly an acronym for Information Technology Infrastructure Library, is a set of practices for IT Service Management (ITSM) that focuses on aligning IT services with the needs of business. In its current form (known as ITIL 2011 edition), ITIL is published as a series of five core volumes, each of which covers a different ITSM life cycle stage. International Organization for Standardization (ISO) develops and publish many international standards. Although ITIL underpins ISO/IEC 20000 (previously BS15000), the International Service Management Standard for IT service management, there are some differences between the ISO 20000 standard and the ITIL framework. ITIL will be updated to version 4 in early 2019.
ITIL describes processes, procedures, tasks, and checklists that are not organization specific, but can be applied by an organization to establish integration with the organization’s strategy, to deliver value, and to maintain a minimum level of competency. ITIL allows an organization to establish a baseline from which it can plan, implement, and measure. ITIL is used to demonstrate compliance and to measure improvement.
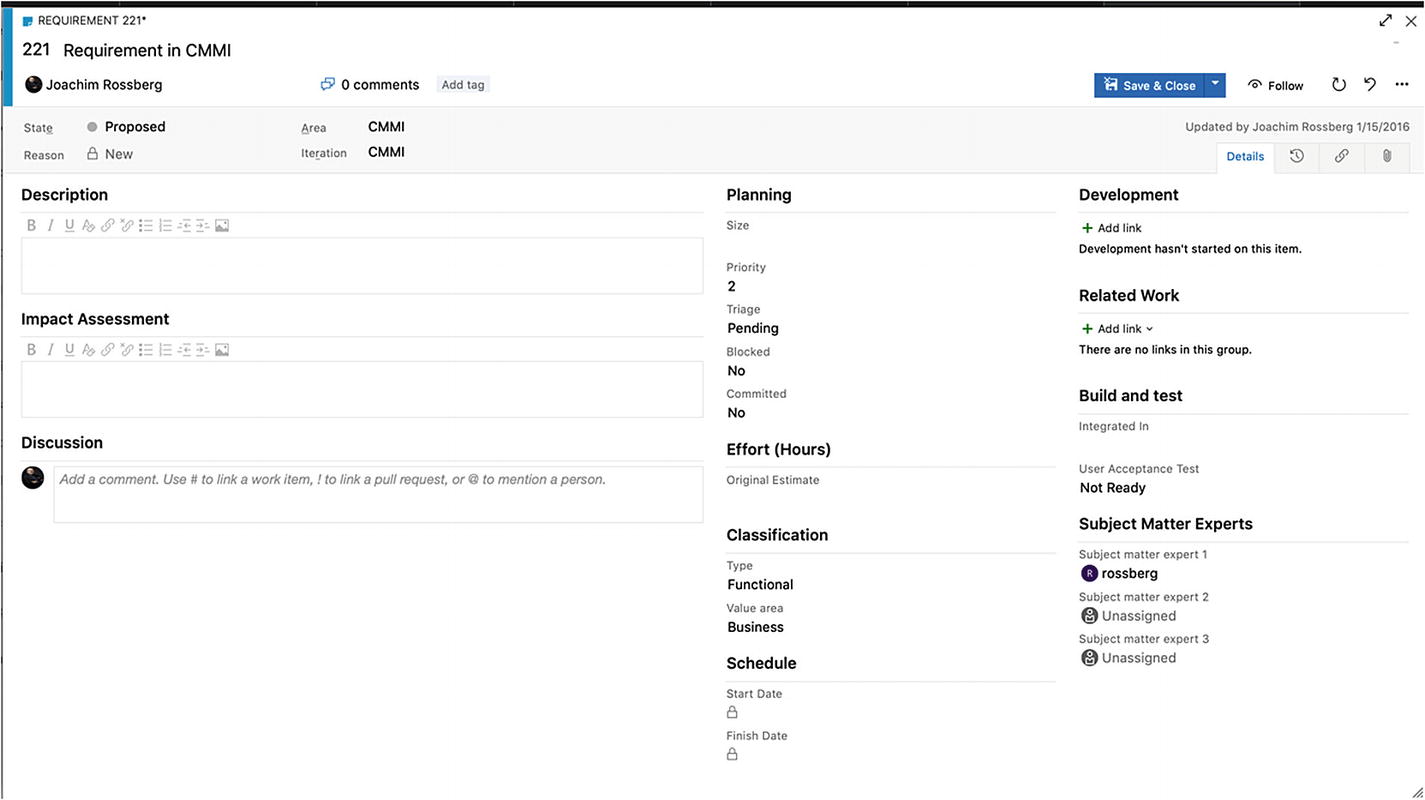
The Requirement work item in the CMMI process
There are other work item types in these processes that are the same for all processes. We take a look at them shortly, but first a few words on workflow states.
Workflow States

Workflow states and reasons
Workflow States for the Three Processes
Categories | Agile | Scrum | CMMI | Test WITs |
|---|---|---|---|---|
Proposed: Assign to states associated with newly added work items that should appear on the backlog. The first column on the Kanban or taskboard maps to a Proposed state. | New | New Approved To Do (Task) | Proposed | Design (Test Case) |
In Progress: Assign to states that represent active work. Work items assigned to states mapped to this category will appear in the backlog (unless you choose to hide them) and make up the middle columns on the Kanban boards. | Active Resolved (Epic, Feature, User Story) | Committed Open (Impediment) | Active Resolved (Epic, Feature, Requirement, Task) | Active (Test Plan) In Planning (Test Suite) In Progress (Test Suite) Ready (Test Case) |
Resolved: Assign to states that represent a solution has been implemented, but are not yet verified. Generally these states apply to bug WITs. Work items in a Resolved state appear on the backlog by default. The Agile tools treat the Resolved state category exactly the same as the In Progress state category. | Resolved (Bug) | n/a | Resolved (Bug, Issue, Review, Risk) | n/a |
Completed: Assigned to states that represent work has finished. Work items whose state is in this category don’t appear on the backlog and do appear in the last column of the Kanban board. Note that you can’t modify states in this category nor can you add states to this category. | Closed | Done | Closed | Closed (Test Case) Completed (Test Suite) Inactive (Test Plan) |
Removed: Assigned to the Removed state. Work items in a state mapped to the Removed category are hidden from the backlog and board experiences. Note: You should avoid using the Removed state and Removed state category as they are in the process of being deprecated. Instead, you should Delete work items to remove them from the backlog. | Removed | Removed | n/a | n/a |
Closed or Done: Closed or Done work items do not appear on the portfolio backlog and backlog pages. However, they do appear on the sprint backlog pages, Kanban board, and task board. Also, when you change the portfolio backlog view to show backlog items (for example, to view Features to PBIs), items in the Closed and Done states appear.
Removed: Work items in this state do not appear on any backlog or board.
Work items are maintained in a team project as long as the team project is active. Even if you set them to Closed, Done, or Removed, a record is kept in the data store, which means you can use this data to create queries or reports.
If you need to delete a work item permanently, you can use the witadmin destroywi command-line tool. This tool is not discussed in this book.
Most work items that appear on backlogs and boards support any-to-any transitions. This means you can update the status of a work item using a Kanban board or a task board by dragging it to its corresponding state column.
You can also change the workflow so that you can have the states, transitions, and reasons you need in your team or organization. (More on this in the Chapter 5).
Work Item Types for All Processes
- 1.
Support Microsoft Test Manager (MTM)
- 2.
Support rFeedback Request
- 3.
Support My Work and Code Review
Let’s now take a brief look at them.
Work Items That Support MTM
Our testers and test managers often work with these work item types. The goal of this book is not to discuss testing in general, but we will provide a brief example here. Many test efforts are structured like this:
A test plan is created for a sprint using MTM or Azure DevOps. The test plan contains the high-level view of the testing effort. There is a Test Plan work item type included in all processes.
One or more Test Suites (another work item type) are created and included in the test plan. The suites themselves includes one or more Test Cases (work item type). The test cases are used to describe, step by step, how a tester should test the application or functionality being developed. Test cases are often associated with a requirement so that you can see which tests cover a specific requirement.

Traceability of test work items
- 1.
Shared Steps: This work item type includes test steps that can be reused in many test cases. They help in removing redundant test steps by allowing you to reuse them.
- 2.
Shared Parameters : When you write a manual test, you often want to specify that the test should be repeated several times with different test data. For example, if your users can add different quantities of a product to a shopping cart, you might want to check that a quantity of 200 works just as well as a quantity of one. To do this, you insert parameters in your test steps. Along with the test steps, you provide a table of parameter values. These parameters can be used to create shared parameters, which can be reused in other test cases.
When you develop an application, you usually want stakeholders or end users to provide feedback on what you have done. Using the feedback functionality of Azure DevOps/VSTS, you can ask reviewers to provide videos, screenshots, type-written comments, and ratings. Their feedback is captured into work items that you can review and use to create a bug or suggest a new backlog item. The two work item types are called Feedback Request and Feedback Response.
The last two work item types we discuss are aimed at code reviews. Code reviews are a critical part of software development. They help you keep your defect count down, as well as give you the opportunity to learn from other people’s code. A third benefit is that code reviews also allow teams to communicate to their peers changes to the application.
- 1.
Code Review Request: This type is a request a developer creates and sends to a peer to ask for a review of some part of the code.
- 2.
Code Review Response: A response gets created when the code review request goes out. The reviewer can choose to accept or reject the review.
Summary
This chapter discussed many concepts regarding work items and processes in Azure DevOps and VSTS. You saw how the work item tracking system works and how work items can help you increase both visibility and traceability. Simply put, work items are the core of Azure DevOps/VSTS. Almost everything you do involves work items in one way or the other.
The work items at your disposal are determined by the process you choose for your project, such as Scrum, Agile, and CMMI. These processes have similarities and differences.
If a process is not sufficient for your needs, you learned that you can adjust it and add or remove things as you see fit.