
Chapter 7
Designing Your Application's Logic and Data
- Applying object-oriented design techniques and guidelines and design patterns in your Android app
- Incorporating your design into the Android framework and the Android Application Model
Earlier in this book, we illustrated the capabilities of the Android SDK. But simply showing you its capabilities leaves out an essential portion of your understanding — how you can, starting from just an idea about what your app is supposed to do, design and implement it. In other words, we walk you through the use of all the ingredients in your kitchen but don't show you how to cook something good to eat! Therefore, we now interrupt our regularly scheduled programming to segue into how to design an Android application.
This chapter is, in a sense, a complement of Chapter 3, where we explained what the Android Application Model and the Android framework are, using the Tic-Tac-Toe example as the medium). In this chapter, we show you how to design Tic-Tac-Toe from scratch and implement it within the Android framework.
Understanding Best Practices in Application Design
As college professors, we have seen literally thousands of students develop software. When we began writing this book, we pondered what special value we could bring to the project. We determined that we could best contribute by providing a lesson on how to write good software — in particular, software written within a framework such as the Android SDK.
When writing an app while learning to use a new framework, most programmers understandably focus on simply making it work. They might also focus on making the app look good, but concentrate on its user interface alone. After a programmer's first app or two begin to work, mastery of the framework becomes the programmer's next goal. This goal is a good one in itself. Also, because most frameworks are developed somewhat thoughtfully, following the framework's guidelines (implementing activities and views in the Android framework, for example) results in mostly good design. However, a framework takes you only so far because its guidance has to be generic because it's aimed at supporting all kinds of applications, not just yours. You have to design your app given the specific factors that make your app your app. Take plenty of time to complete this task and not only will your app have fewer bugs but you can also reuse and maintain more code.
The design techniques and guidelines you can use are object-oriented, or O-O, design techniques (see the following section) that fall under the general category of responsibility-driven design (a concept originated by Dr. Rebecca Wirfs-Brock). We also heavily borrow from documented standard software design practices known as design patterns.
Though we specify that you should follow the framework guidelines, simply following them doesn't result in a completely well-designed app, because the framework can offer only generic guidelines. These standard O-O techniques and design patterns also go only part of the way, for the opposite reason that they don't state how to fit these techniques into your technology framework. We try to address these gaps in this chapter. In other words, we show you how to design your app, in the context of the Android SDK and the Android Application Model, by using these well-established design techniques.
The progression of this chapter is as follows. First, we briefly cover standard object-oriented design techniques. Then we walk you through the design of the Tic-Tac-Toe example.
Applying object-oriented design
The idea behind object-oriented design is that programs are intended to solve problems in the real world. Basing software components on real world entities — both concepts as well as physical things — makes the software easier to figure out (analyze) as well as design. Further, because the components have been modeled on the real world, they're stable (they won't change quickly, because the real world isn't changing quickly) and more capable of capturing variation and evolving in a more understandable manner. This is because the variation that naturally happens in the real world is captured in the application.
We reiterate that, by real world, we don't necessarily mean only physical elements. For example, a tic-tac-toe game consists of a board, moves, players, and (X and O) symbols. Some elements are physical (such as players and the board), and some are not (such as moves). But all these elements are real world entities. O-O design specifies that when you write a software app to play tic-tac-toe, you have classes that represent these items — classes named Board, Game, and Symbol, for example.
Understanding the basic elements of object-oriented design
The following list reviews basic object-oriented terminology:
- Object: The primitive element of an object-oriented program. An object encapsulates (retains) data and provides methods (operations or functions) that implement what the class is supposed to do — its responsibilities. Thus, a Stack encapsulates the elements of the stack and provides push and pop methods to insert and extract elements in accordance with how the stack is supposed to work: Elements inserted last are extracted first.
- Class: Implements an object and contains the necessary data structures and method code (in our stack example, the method code is that which implements the push and pop operations).
- Type: An object specification that describes how to interact with it — by using its methods. An object essentially may have multiple types because its class can implement more than one related set of functionality. In Java, the type of an object is specified by the interfaces it implements. Because an object may implement multiple interfaces, an object has multiple types. (Incidentally, rather than think of an object as having multiple types, you can think of an object's single type as the union of the interfaces it implements.)
- Subclass: A class that inherits all functionality from another class (known as the superclass). A subclass can either override specific functionality by providing its own implementation of certain methods or it can extend the functionality of the superclass by providing additional methods and using additional member variables.
 Similarly, a type (that is, an interface) may also be extended by defining a subtype. In this case, no functionality is overridden; the subtype simply has more methods that any object of that subtype must implement.
 - Abstract and concrete classes: You cannot create objects from certain classes. These classes are known as abstract classes. Classes from which you can create objects are known as concrete classes. Of course, interfaces are always abstract.
- Collaborator: Objects (for example, instances of classes) interact with each other to implement the features of the application (an application is defined below). Thus, each class has a set of collaborators that it interacts with.
- Application: An application consists of a collection of collaborating classes of various types.
The tasks involved in using object-oriented design are identifying and defining appropriate classes and types and then designing their collaborations so that the application can do what it needs to do. Capiche? Simple enough? Read on.
Extracting and defining objects, classes, responsibilities, collaborators, methods, and signatures
In order to identify and define appropriate classes and types and then design their collaborations so that the application can do what it needs to do, you need to start with something that describes the application. Use whatever material you have available — a concept document, a requirements document, or a storyboard, for example, or even notes on a whiteboard. If you have none of these items, create them now. Trained software developers developing large applications do this task formally, in a process known as requirements analysis. For small apps and simple systems, however, informal methods work just fine. So simply write up a couple of pages on what you want your app to do, who its users are, and how you want them to interact with it. You can use paper or type a document into the computer. It's your call.
After you create the write-up, review it carefully to identify and record on paper the nouns; these nouns become candidate (not final) classes. Also identify and record the verbs; these verbs become candidate (not final) responsibilities. Systematically review the nouns and verbs you used and write down their definitions. If you have just a few nouns and verbs, you might even keep track of their definitions in your head. (Notice that we suggest only that you might track them in your head — we have to write everything down!)
If your definitions have two nouns or two verbs that have more or less the same meaning, remove the one that least captures the meaning you want to capture. If a noun doesn't have a single definition, try splitting the noun into two, to define each one cohesively. Repeat this process with the verbs.
Incidentally, feel free to rename nouns and rewrite verbs so that they better fit your definitions of them.
Also, reject any nouns and verbs that are in the environment in which your system operates (and, as a result, outside the context of your system).
Next, allocate the consolidated set of verbs (for example, the candidate responsibilities) among the nouns (for example, the candidate classes) so that every class has only the responsibilities that “properly” belong to it. To quickly test for proper allocation, ensure that the responsibilities don't cause the definition of the class to lose cohesiveness.
You test for cohesiveness of a class as follows. Ask the question (to yourself), “Who or what does this class represent?” If your answer indicates that it represents a single well-understood entity, then the class is cohesive.
Now create a few detailed scenarios that capture the essential capabilities of your app. Use these scenarios to identify the collaborations by walking through the steps of the scenario in detail, to identify which class and which method enable the step. You can also find missing classes and methods this way.
To ensure that every class is a good one, review the questions in this checklist:
- Does the class have a suitable name?
- Does the class represent exactly one well-understood entity?
- Does the class have responsibilities (methods)
- Does the class have collaborators
- Does the class (or its components) maintain state
The next step is to consolidate and clean up the class hierarchy. In this step, you look for classes that encapsulate similar data and responsibilities. You may create superclasses as needed to encapsulate common responsibilities (refer to the earlier section “Understanding the basic elements of objectoriented design”), but make sure that each superclass passes the cohesiveness test. The original classes can then inherit from and extend the superclasses.
Before you create a superclass, however, perform the “is a” test, by speaking the sentence ”The <subclass> is a <superclass>” (replacing the italicized placeholders with the names of the classes you're testing). If the sentence doesn't completely make sense, the creation of the superclass is incorrect.
As the final step, specify (or at least understand) what every method is supposed to do, what it creates as output, and what it needs as input in order to perform its function. In other words, working class by class, and method by method, define its input parameters and output result — known as its signature.
Applying design patterns
The 1994 book Design Patterns: Elements of Reusable Object-Oriented Software (published by Addison-Wesley and written by Erich Gamma, Richard Helm, Ralph Johnson, and John Vlissides — known as the IBM Gang of Four) strongly influenced the field of software design and became an important resource for learning object-oriented design. Because the book described common ways to design classes and their interactions for solving common software design problems, software developers could look up a “catalog” of designs to see whether a particular design pattern provided a template to begin their own designs. (Programmers could say, essentially, “Aha! My problem seems similar to the problem that this pattern is supposed to solve.”) However, note that a design pattern is not a canned solution that you can simply plug into your own code. It is (again) simply a place to start your design.
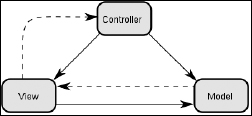
The well-known model-view-controller (MVC) design pattern, shown in Figure 7-1, shows itself in many different kinds of applications — in particular, in web applications. The idea behind this pattern is to isolate the domain logic of the application from the way the application is presented to the user (the application's user interface) so that these two vital application components can be designed, implemented, and maintained separately. For example, the logic of playing a tic-tac-toe game based on its game rules is the domain logic of the Tic-Tac-Toe application, and hence the model. The tic-tac-toe grid presented to users (for their interaction) is the user interface and, hence, the view. The controller is a component, interposed between the two, that
- Receives user actions (such as “The user clicked here”)
- Translates commands into actions on the model
- Updates the resulting model and notifies the user interface that it must update itself
Figure 7-1: The model-view-controller design pattern.
If this discussion makes sense at a high level but you're unsure how to connect it to development using the Android SDK and the Android Application Model, well, that's what the next section is for!
Understanding software frameworks
A software framework may be defined as follows:
A software framework is collection of related software components providing generic functionality that can be selectively overridden or refined by user-provided code or components, thus providing functionality specific to an application or domain.
In object-oriented software frameworks, the functionality provided by the framework can be “selectively overridden” or ”specialized,” by using a set of object-oriented techniques that implement the concept known as inversion of control. Inversion of control means that the program's flow of control — the way the program runs — isn't dictated by the user of the framework but, rather, by the framework itself (as default behavior). This default behavior is intended, however, to be extended or modified by code that the user supplies. The user supplies this code in the form of classes that extend the base classes of the framework (which are usually abstract classes) and either override certain methods or provide implementations of virtual methods. The user's classes may also implement specific interfaces that are then passed to and invoked by the framework. (Incidentally, this concept distinguishes frameworks from software libraries that simply provide computational capabilities that can be invoked from your application — such as the string manipulation routines provided by the java.lang package.)
 The Android SDK is, in fact, a framework. As we describe in Chapters 1 and 3, it provides a set of base classes that you extend with your own classes and code.
Among other things, the default functionality provided by frameworks implements patterns (or variations of patterns). For example, a core component of the Android framework (for example, the Activity class and its subclasses) implements the MVC pattern. The activity serves as the controller between its View and the application logic (the domain logic) that's supposed to take place in that activity. Although this domain logic can be implemented directly in the activity itself, if the domain logic is complex, a better option from a design perspective is to extract it into a separate class or set of classes, which essentially comprises the model.
So far we've given you a bunch of definitions. We now illustrate the concepts we covered in this section in the next section, using the Tic-Tac-Toe example.
Illustrating Android App Design by Using the Tic-Tac-Toe Example
In this section, we walk you through the process (outlined in earlier sections of this chapter) of designing the Tic-Tac-Toe app. The first step is to extract objects, classes, responsibilities, and collaborations from descriptions of the game and the application. We begin with a description of tic-tac-toe and add to it an informal specification of the software-based game to create the following description of the Tic-Tac-Toe app:
Tic-tac-toe, also spelled tick-tack-toe, or noughts and crosses, as it is known in the Commonwealth countries, is a pencil-and-paper game for two players, who take turns marking the spaces in a 3×3 grid with the symbols X and O, respectively. The X player usually goes first. The player who succeeds in placing three respective marks in a horizontal, vertical, or diagonal row wins the game. Tic-Tac-Toe for Android implements the tic-tac-toe paper game as an Android app. In it, human users can play tic-tac-toe against a computer. Multiple games can be played in a session, with either the computer or the human playing first on an electronic board that's displayed on the device's touchscreen. Session scores are accumulated. If the user quits the session, scores are reset.
Discovering classes, responsibilities, and collaborators for Tic-Tac-Toe
From the description of the tic-tac-toe game, you proceed in the following order:
- Examine nouns to extract candidate objects, classes, and attributes
- Examine verbs to extract responsibilities
- Identify collaborations
This process results in the following list:
- Nouns (candidate objects and classes): pencil, paper, game, nought, cross, player, X, O, space, symbol, grid, mark, vertical row, horizontal row, diagonal row, human user, human, computer, session, board, touchscreen, score
- Verbs (candidate responsibilities): take turn, mark, goes, place, win, implement, play, playing first, display, accumulate, quit, reset
From this list, merge, remove, and refine the nouns into classes, as described in the following list (we have omitted the rather obvious definitions):
- Pencil and paper are physical items that are not relevant to an Androidbased game. These are removed from the list of candidate classes.
- Observe that symbol and mark are identical and retain symbol.
- Observe that nought and O and cross and X are identical and, for simplicity, leave O and X. Further, note that O and X appear to be either instances or subclasses of Symbol.
- After comparing user and player, retain player as the player in the game (user is the person using the Android device). Note that human user and human might be identical concepts, and also note that they (and computer) are instances or subclasses of player.
- Realize that board and grid have similar enough meanings that one of them can be removed. In this example, keep grid and, in fact, rename it to game grid.
- Because touchscreen appears to refer to a physical component of the phone, your first inclination might be to remove it. On the other hand, you need a class to handle the visual display of the board. You can choose this element to be the board itself, or perhaps separate the data structure that represents the board from its visual manifestation. (We chose to retain it as the representative of the visual display, but renamed it board.)
- Consider row as a component of game grid and consider vertical row, diagonal row, and horizontal row as essentially different subclasses or instances of row. (You don't yet know which.)
- Consider session an instance of game, with score an attribute of either game or its two players.
Continue this process with the verbs:
- Remove take turn and goes as terms similar to play, and retain play. For now, retain playing first and the missing playing second as potential refinements of play. (The final design will show that they're unnecessary.)
- Remove the verb mark because it's similar to place. Retain place but rename it place symbol.
- Remove implement for not being a responsibility relevant to the game, but rather to the process of building it.
- Retain display, accumulate, exit, and reset as valid responsibilities.
The following potential classes, instances, and responsibilities remain:
- Classes: Symbol, Player, Human, Computer, Board, Row, and Game (with the attribute Score)
- Instances: O, X, of the class Symbol
- Responsibilities (which later become methods): play, place, display, accumulate (scores), quit, and reset
Now tentatively assign responsibilities to classes in a manner as rational as possible:
- The class Game is allocated the responsibilities play, accumulateScores, quit, and reset.
- The class Board has Display responsibilities.
- The class GameGrid has Place.
- The classes Symbol, Player, Human, Computer, and Row have no responsibilities (yet). You will find out in the next section, “Walking through scenarios to discover collaborators and missing classes and responsibilities,” whether to delete them.
Walking through scenarios to discover collaborators and missing classes and responsibilities
After you discover the classes, responsibilities, and collaborators for our Tic-Tac-Toe example, as described in the previous section, you can consider different scenarios to ensure that every one is supported by a method of a class (or, more accurately, a method of an object of the class). Also, as a side effect of this walk-through, you should identify and understand the collaborations.
Because tic-tac-toe is a simple game, we describe a single, simple, and somewhat generalized scenario. (When you build a complex app, be sure to have detailed scenarios, each exploring a new set of interactions with the app.)
Here's the scenario:
- Start a new game.
- Specify who plays first (human or computer). The first player is assigned the X as a symbol; the second player, the O.
- The first player places his (or its) symbol at an empty location on the board, followed by the second player placing his symbol.
Repeat this step until one player has three symbols in a row, column, or diagonal or until no more squares can be played, in which case the game ends in a draw.
- Accumulate players’ scores. The winning player has 1 added to his score. No change is made to a losing player's score. (Both players’ scores remain the same if the game ends in a draw.)
- If the user wants to start a new game, do so. Otherwise, quit.
The following list walks you through every step of the scenario to see which class will handle it:
- Start a new game.
Ouch! You ran into trouble in the first step. No class supports the responsibility of starting a new game. This responsibility doesn't seem to belong in either the Game or Board class, so you have to create a new GameController class to start a new game (by creating a new instance of Game). GameController and Game are thus collaborators (because GameController creates an instance of Game).
- Specify who plays first (human or computer). The first player is assigned the X as a symbol; the second player, the O.
Specifying who plays first and second can seemingly also be a responsibility of the GameController class. Because all these responsibilities are internal, they don't have to be implemented as externally visible methods of this class (although they can certainly be private methods).
- The first player places his symbol at an empty location on the board followed by the second player placing his symbol.
Repeat this step until one player has three symbols in a row, column, or diagonal or until no more squares can be played, in which case the game ends in a draw.
A symbol has to be (visually) placed on the board. Creation of the symbol is covered by the Symbol class. The Board class can cover placement of the symbol, if you add the method placeSymbol to it. Then Play is invoked on Game, which causes Grid to be updated.
After a symbol is placed, you have to evaluate whether the game has ended with a win or a draw. This looks like it is a Game responsibility, and because Game likely collaborates with GameGrid to see whether a row, column, or diagonal has been completed, Game needs a responsibility — checkResult. Note that the classes Board, GameGrid, and Game are now collaborators. If no win has occurred and the board still has empty locations, the game continues.
Next, you have to switch to the second player. If this player were the machine and you wanted to know what handles the logic, you would let Game handle it. To do this, Game must collaborate with GameGrid to produce a list of empty squares to choose from, so GameGrid needs the responsibility getEmptySquares.
- Accumulate players’ scores. The winning player has 1 added to his score. No change is made to a losing player's score. (Both players’ scores remain the same if the game ends in a draw.)
At first blush, you might want to make the Game class responsible for accumulating scores. However, you will probably quickly realize that the Game class represents a single game, and that scores are accumulated across games in a session. So Game doesn't seem a suitable class for accumulating scores, but perhaps GameController does. After you determine that this decision is appropriate, you rename GameController to GameSession. It creates a new game, specifies the players, plays the game, and accumulates scores.
- If the user wants to start a new game, do. Otherwise, quit.
It seems appropriate that GameSession handle starting a new game and quitting the session; this assignment gives the GameSession symmetric responsibilities. The updated scores have to be shown somewhere, perhaps by using the Board class. To do so, you add the ShowScores method to Board. With the assignment of ShowScores, Board represents more than the tic-tac-toe board. Hence, you rename it to GameView.
Now you have these classes, responsibilities, and collaborators:
- Game: Represents a single tic-tac-toe game.
- Responsibilities: play, checkResult
- Collaborators: GameSession, GameView, Grid
- GameView: Represents the visual display of a tic-tac-toe game.
- Responsibilities: placeSymbol, showScores
- Collaborators: Game
- GameGrid: Represents the 3 × 3 tic-tac-toe grid.
- Responsibilities: placeSymbol, getEmptySquares
- Collaborators: Game
- GameSession: Represents a tic-tac-toe session in which multiple games are played.
- Responsibilities: playNewGame, quit, decidePlayers, accumulateScores
- Collaborators: Game, GameView
- Symbol: Represents the tic-tac-toe symbol X or O.
- Responsibilities: None
- Collaborators: Game
Note the transition of responsibility names from English-like to Java-methodlike names.
Your final step is to run each class through the checklist below. We presented this checklist earlier in this chapter (in the section “Extracting and defining objects, classes, responsibilities, collaborators, methods, and signatures). Verify that every class has the items in the following list and that the class maintains — or its components maintain — state:
- A suitable name
- A cohesive description
- Responsibilities
- Collaborators
You will clearly see that the Tic-Tac-Toe classes meet these criteria.
Defining method signatures
When you have identified the classes and methods and you know which classes collaborate, the next step is to specify (or at least understand) what each method is supposed to do, what outputs it creates, and which inputs it needs. We explain this task class by class, method by method, starting with Game. (If you complete the scenario walk-throughs we describe in the earlier section “Walking through scenarios to discover collaborators and missing classes and responsibilities,” you can work in any order because you know what each method is responsible for.)
The first method in Game is play, which is called whenever an X or an O is played on a square, identified by its coordinates. Because this method needs a Grid, a Symbol, and a coordinate (x, y) position, its signature is play(Grid, Symbol, x, y). It can return two disjointed sets of values:
- An error code indicating whether the move was legal (and, therefore, successful) or illegal
- The state — Win, Draw, or Active — that the game remained in after the move
Play returns the Boolean value of true if the move was correctly played. It returns false if an incorrect move was made. (For example, by someone trying to play a square that was already filled.)
The second method in Game is checkResult. You need to examine the Grid, so its signature is checkResult(Grid). You want it to set the state of the game to Win (for the player who just played), Draw, or Active. Because you also want it to set the state of the game, you rename this method checkResultAndSetState(Grid). Finally, because you realize that you need methods that return the state of the game, you add the three methods isActive(), isWon, and isDrawn() to the class.
Systematically reviewing all classes identified so far produces the following set of methods and signatures:
- Game
- play (Grid, Symbol, x, y): Returns true for success or false for failure
- checkResultAndSetState (Grid): Returns nothing
- isActive(): Returns true or false
- isWon(): Returns true or false
- isDrawn(): Returns true or false
- GameView
- placeSymbol(Symbol, X, Y): Returns Success or Failure
- showScores(PlayerOneScore, PlayerTwoScore): Returns nothing
- Grid
- placeSymbol (Symbol, x, y): Returns Success or Failure
- getEmptySquares (): Returns a set of coordinates
- Symbol
- This class has no methods, and hence no signatures.
- GameSession
- playNewGame()
- quit()
- decidePlayers()
- accumulateScores(WinningPlayer)
There you have it: classes and methods with method signatures! Hooray! But if you're wondering whether you've finished designing so that you can start implementing, the answer is (unfortunately) “not yet!”
If you were the ancient Paladin of computing (have compiler, will travel) and were developing an application from scratch, you could potentially start coding (after you add a main program, incidentally). But you aren't the Paladin — you're a modern-day knight in Android armor and you must fit your design inside the Android Application Model to take advantage of the framework wherever possible but also to compromise wherever the framework doesn't quite fit your design (at least not without lots of extra work). In the following sections, we show you an example of how you might do this.
Incorporating your design into the Android Application Model
If you already read our spiel about design patterns and the model-view-controller (MVC) pattern in the earlier section “Applying design patterns,” this section will make more sense to you. An Android activity is simply an “Android-ization” of the MVC pattern, with generic view and controller capability provided by the Android framework. Views are supported by the View class (imagine that!), and the controller is supported by the Activity class. The model segment comes from you because it's a component that is specific to your app.
In case you're asking what the model, view, and controller components of Tic-Tac-Toe (Aha!) are, this list has the answers:
- GameView: The view
- GameSession: The controller
- Game: The model
In other words, Game will become a pure Java class, GameView will extend View, and GameSession will extend Activity.
In the following section, we describe these respective classes in the Tic-Tac-Toe code — you might want to follow along in Eclipse, too. By the way, for a refresher on all elements of the Android Application Model, read (or review) Chapter 3.
Understanding the model component of Tic-Tac-Toe
In this section, we present the model (the Game class), shown with only its member variables and its method skeletons:
package com.wiley.fordummies.androidsdk.tictactoe;

import java.util.ArrayList;

public class Game {

    private enum STATE { Inactive, Active, Won, Draw };
    private STATE state=STATE.Inactive;;
    private Symbol currentSymbol=null;
    private enum PLAYER {Player1, Player2};
    private PLAYER currentPlayer=PLAYER.Player1;
    private PLAYER winningPlayer=PLAYER.Player1;
    private String PlayerOneName=null, PlayerTwoName=null;
    private GameGrid gameGrid=null;
    private int playCount=0;

    Game(){ //Constructor – creates gameGrid, initializes game state}
    GameGrid getGameGrid(){// Accessor method for gameGrid}
    void setPlayerNames(…)(// setter for player names}
    String getPlayerOneName(){//accessor method}
    String getPlayerTwoName(){//accessor method}
    String getCurrentPlayerName{){//accessor method}
    String getWinningPlayerName(){//accessor method}
    public Symbol getCurrentSymbol(){//accessor method}

    public boolean play(int x, int y){// handles one turn of TicTacToe}

    private void checkResultAndSetState(){//used to check after each move if the
               game has been won or drawn and set the state of the game}

    boolean isActive(){//is the game still active – i.e. not been won or drawn}
    boolean isWon(){//the game has been won by a player}
    boolean isDrawn(){//the game has been drawn}
}
This class, which is a pure model of the tic-tac-toe game, has a bunch of getter methods prefixed with get. The setter method is setPlayerName. An important method here — play(int x, int y) — handles one turn in tic-tac-toe. It automatically alternates between players (which is why you don't need two play methods, one for each player) and calls the method check-ResultAndSetState() after every play to check on whether the game should continue or has been won, lost, or drawn. The checkResultAndSet-State() method is private because it is called only internally by play(…).
Next come the methods isActive(), isWon(), and isDrawn() (their function should be clear to you from their names or from the discussion in the previous section):
We now show you the implementations of the key methods play(…) and checkResultAndSetState(…). The play(…) method is shown first below:
public boolean play(int x, int y){
    boolean successfulPlay=false;
    if ((gameGrid.getValueAtLocation(x, y)==Symbol.SymbolBlankCreate())){
        successfulPlay = true;
        playCount++;
        gameGrid.setValueAtLocation(x, y, currentSymbol);

        checkResultAndSetState();
        if(gameState == STATE.Active){// if the game is still active
            // Swap symbols and players
            if(currentSymbol == Symbol.SymbolXCreate())
                currentSymbol=Symbol.SymbolOCreate();
            else
                              currentSymbol=Symbol.SymbolXCreate();
            if(currentPlayer==PLAYER.Player1) currentPlayer=PLAYER.Player2;
            else currentPlayer=PLAYER.Player1;
        }
    }
    return successfulPlay;
}
The method play(…) does four things:
- Places the symbol on the tic-tac-toe grid
- Increments the play count
- Determines whether the move caused the game to be ended (by being won or drawn)
- If the game is still active, swaps the players and the symbols in preparation for the next move
Finally, take a look at checkResultAndSetState(…):
private void checkResultAndSetState(){
     if(gameGrid.isRowFilled(0)||
        gameGrid.isRowFilled(1)||
        gameGrid.isRowFilled(2)||
        gameGrid.isColumnFilled(0)||
        gameGrid.isColumnFilled(1)||
        gameGrid.isColumnFilled(2)||
        gameGrid.isLeftToRightDiagonalFilled()||
        gameGrid.isRightToLeftDiagonalFilled()){
          winningPlayer = currentPlayer;
          gameState = STATE.Won;
    }else if (playCount==9){
          gameState = STATE.Draw;
     } /* else, leave state as is */
}
This chunk of code checks every row, column, and diagonal to see whether any are completely filled. If so, it sets the state of the game as won. If nine successful plays have been made without the game being won, the game is declared a draw.
Understanding the controller component of Tic-Tac-Toe
The controller component of Tic-Tac-Toe is the GameSession activity. Here are its member variables and method skeleton:
public class GameSession extends Activity {
    private Board board;
    private Game activeGame=null;
    private GameView gameView=null;
    int scorePlayerOne=0;
    int scorePlayerTwo=0;
    String firstPlayerName = null;
    String secondPlayerName = null;
    /** Called when the activity is first created. */

    public void onCreate(Bundle savedInstanceState){}

    private void startSession(){// a new session consists of multiple games }
    private void playNewGame(){//handles one complete game}
    private void setPlayers(Game theGame){// sets player names in the game}
    private void quitGame(){//abandon a game}
    private void proceedToFinish() {}
    private void accumulateScores(String winningPlayerName){}

    private void scheduleAndroidsTurn(){// introduces a random delay in machine
               play}
    private void androidTakesATurn(){//handles machine play}
    protected void humanTakesATurn(int x, int y){// handles a human's turn}


    public boolean onCreateOptionsMenu(Menu menu) {}
    public boolean onOptionsItemSelected(MenuItem item) {}
}
The onCreate(…) method is the one that's called when this Activity is kicked off by the Android framework. With regard to the Tic-Tac-Toe app, onCreate(…) kicks off a new game session.
The next set of methods in GameSession is specific to Tic-Tac-Toe. The role of several of these methods is straightforward, such as startSession(…), playNewGame(…), setPlayers(…), quitGame(…), proceedTo Finish(…), and accumulateScores(…). But three other methods are worth describing in more detail. We first examine the pair of methods schedule AndroidsTurn(…) and androidTakesATurn(…), which collaborate to handle machine play. Take a look at androidsTurn(…):
This method disables the screen so that the human cannot play and then posts a task (consisting of the method androidTakesATurn() that implements the machine play). The task is posted with a random delay, after which the task executes. This task enables the screen display again. Note that a new thread is needed in order to implement the delay so that the application remains active. Note also that input has to be enabled in the posted task and not in scheduleAndroidTurn(…), or else the screen becomes active before the machine completes its turn. Here's androidTakesATurn():
private void androidTakesATurn(){
    GameGrid gameGrid = activeGame.getGameGrid();
    ArrayList<Square> emptyBlocks = gameGrid.getEmptySquares();
    int n = emptyBlocks.size();
    Random r = new Random();
    int randomIndex = r.nextInt(n);
    Square picked = emptyBlocks.get(randomIndex);
    activeGame.play(picked.x(), picked.y());
    gameView.placeSymbol(picked.x(), picked.y());
    board.enableInput();
    if(activeGame.isActive())
        gameView.setGameStatus(activeGame.getCurrentPlayerName() + “ to play.”);
    else
        proceedToFinish();
}
As you can see, androidTakesATurn() first gets a list of empty blocks from the game grid and then picks one at random to play. Then it enables input to the screen and checks to see whether the game is still active. If the game is over, proceedToFinish(…) is called, which checks to see whether the session should continue or the user has finished.
Understanding the view component of Tic-Tac-Toe
Turn your attention to the view component of Tic-Tac-Toe. It's composed of the GameView class, which is small enough that we can show you the entire class:
package com.wiley.fordummies.androidsdk.tictactoe;

import android.widget.TextView;

public class GameView {
    private Board gameBoard=null;
    private TextView statusView=null;
    private TextView sessionScoresView=null;

    public void setGameViewComponents(Board theBoard,
                                      TextView theStatusView,
                                      TextView theSessionScoresView){
        gameBoard = theBoard;
        statusView = theStatusView;
        sessionScoresView = theSessionScoresView;
     }

    public void setGameStatus(String message){
        statusView.setText(message);
     }

     public void showScores(String player1Name, int player1Score,
                           String player2Name, int player2Score){
        sessionScoresView.setText(player1Name + “:” + player1Score +
                                  “…. ” +
                                   player2Name+“:”+player2Score);

     }

     public void placeSymbol(int x, int y){
      gameBoard.placeSymbol(x, y);
     }
}
Most of the work in this class is done by its components — Board and the two TextView components (covered in the next section). Also note that the GameView class is true to the principle that it's a view and only handles user interface responsibilities.
Understanding the support data structures in Tic-Tac-Toe
You now need to examine the supporting data structures used in Tic-Tac-Toe. You start with Symbol and GameGrid, which is shown here:
public class GameGrid {
    public static final int SIZE=3;
    private Symbol[][] grid=null;

    GameGrid(){// Constructor. Initializes the grid to blanks}
    public void setValueAtLocation(int x, int y, Symbol value{…}
    public Symbol getValueAtLocation (int x, int y){…}
    public boolean isRowFilled (int row){//Entire row has the same symbol}
    public boolean isColumnFilled (int col){//Entire column has the same symbol}
    public boolean isLeftToRightDiagonalFilled(){//Left diagonal has the same
               symbol}
    public boolean isRightToLeftDiagonalFilled(){(){//Right diagonal has the
               same symbol}
    public ArrayList<Square> getEmptySquares(){//Get the unfilled squares}
}
The GameGrid data structure is shared between Game, GameView, and GameSession. Game needs GameGrid to implement tic-tac-toe game logic, such as placing symbols and evaluating whether the game has been won or drawn or is still active. GameView needs GameGrid because it contains the symbols GameView needs to show on the screen. GameSession needs it to implement human- and machine-playing logic.
Here's the Symbol class:
package com.wiley.fordummies.androidsdk.tictactoe;

public class Symbol {
    private enum MARK { X, O, Blank }
    private MARK value=null;
    private static Symbol SymbolX=null;
    private static Symbol SymbolO=null;
    private static Symbol SymbolBlank=null;

    private Symbol(){/* Empty PRIVATE constructor to enforce Singleton */}

    public static final Symbol SymbolXCreate() {}
    public static final Symbol SymbolOCreate() {}
    public static final Symbol SymbolBlankCreate() {}
    public String toString(){}
}
You might wonder why you even need a class for representing Symbols. In other words, maybe you could have used Strings (using an X and an O to represent the tic-tac-toe characters). The reason you create a class is to illustrate two kinds of design elements:
- The first design element is a simple optimization to think about when you write code for resource-constrained mobile devices.
- The second design element is the use of another pattern (the Singleton pattern) to reduce the number of identical classes that are created and to make these instances easily accessible to all methods with a program.
The optimization that we want you to consider is the avoidance of string comparisons in your code. String comparisons are slow because they have to be done character by character. Instead, you use an enumerated type of comparison to represent an X and an O, which represents them as numbers (while still retaining expressivity). When you check to see whether a row is filled, for example, you're making numeric comparisons rather than string comparisons. Incidentally, there are string comparisons in many other places in the Tic-Tac-Toe code, but they were left in because they do not have much impact on performance, relatively speaking.
To ensure that you don't unnecessarily create large numbers of objects containing Xs and Os, we next introduce a scheme whereby only one instance of an X and one instance of an O is created and they're shared by all the code. To show you how to do it, check out the following code snippet (which uses ellipsis dots to separate the segments that don't appear together in the actual code):
private static Symbol SymbolX=null;
…
private Symbol(){/* Empty PRIVATE constructor to enforce Singleton */}
public static final Symbol SymbolXCreate() {
    if (SymbolX == null){
        SymbolX = new Symbol();
       SymbolX.value = MARK.X;
       return SymbolX;
    }
}
To begin with, the default constructor for Symbol is made private so that a Symbol class cannot be instantiated by using new Symbol() outside the class itself. Any instances of the Symbol class thus must be created by using one of the three methods SymbolXCreate(), SymbolOCreate(), or SymbolBlankCreate().
Now take a look at the code that implements SymbolXCreate(). The first time it's called, it creates and returns a new instance of an X (and saves it in SymbolX). Every subsequent time it's called, it returns the same instance. Note that each method thinks it's getting a new instance!
Note one last thing about Symbol: Because symbols must be displayed as strings in certain methods, you give the Symbol class a toString() method.
The following TextView class is a built-in Android class. Its use in the GameView class is shown here:
private TextView statusView=null;
…
public void setGameStatus(String message){
    statusView.setText(message);
}
You declare a TextView variable as shown in the code just above and then use the setText method to make it display a message.
Finally, the following snippet walks you through the skeleton of the Board class:
package com.wiley.fordummies.androidsdk.tictactoe;

import com.wiley.fordummies.androidsdk.tictactoe.R;

import android.content.Context;
import android.content.res.Resources;
import android.graphics.Bitmap;
import android.graphics.BitmapFactory;
import android.graphics.Canvas;
import android.graphics.Paint;
import android.graphics.Rect;
import android.graphics.Paint.Cap;
import android.util.AttributeSet;
import android.view.MotionEvent;
import android.view.View;

public class Board extends View {
    private final GameSession gameSession; // game context (parent)
    private float width;
    private float height; // will be same as width;
    private final float strokeWidth = 2;
    private final float lineWidth = 10;
    private GameGrid grid=null;
    private boolean enabled = true;

    public Board(Context context, AttributeSet attributes) {/* Constructor */}
    protected void onDraw(Canvas canvas) {/* Draws and re-draws the Board */}
    protected void onSizeChanged  (int w, int h, int oldw, int oldh){/* handles
               size changes of the Board */}
    public boolean onTouchEvent(MotionEvent event) {/* handles any interactions
               with the Board */}

    private void invalidateBlock(int x, int y) {/* marks a segment of the board
               as to be re-drawn */}
    protected void disableInput(){/* disables user input */}
    protected void enableInput(){/* Enables user input */}

    public void setGrid(GameGrid aGrid){/* Sets the gameGrid member variable */}
    protected boolean placeSymbol(int x, int y){/* places a symbol on the board
               */}

    public Bitmap getBitmapForSymbol(Symbol aSymbol){/* converts a Symbol to a
               bitmap – note: breaks abstraction! */}
}
Board is a subclass of the built-in View class. Also, as with GameView, all Board methods are related to the user interface. Board methods can be categorized into four sets of methods. The first set is composed of the methods that are required to be implemented by the View class — a constructor, Board(…), onDraw(…), onSizeChanged(…), and onTouchEvent(…). The constructor initializes the view and gains access to the GameSession object by looking up its context. The onDraw method draws the tic-tac-toe grid, and onSizeChanged(…) handles any size changes to the board.
The important method in this set is the onTouchEvent(..) method, shown here:
public boolean onTouchEvent(MotionEvent event) {
     if( !this.enabled ) return false;
     int posX = 0;
     int posY = 0;
     int action = event.getAction();
    switch (action){
         case MotionEvent.ACTION_DOWN:
            float x = event.getX();
            float y = event.getY();
            if( x > width && x < width * 2 ) posX = 1;
            if( x > width * 2 && x < width * 3 ) posX = 2;
            if( y > height && y < height * 2 ) posY = 1;
            if( y > height * 2 && y < height * 3 ) posY = 2;
            gameSession.humanTakesATurn(posX, posY);
            break;
     return super.onTouchEvent(event);
}
The onTouchEvent(..) method ignores all except one type of MotionEvent event — ACTION_DOWN. When onTouchEvent(..) receives this type of event, it converts its coordinates into tic-tac-toe grid coordinates and then invokes humanTakesATurn(…) on the parent gameSession object. (And now you know why it needed its context.)
The next set of methods — invalidateBlock(…), enableInput(…), and disableInput(…), respectively — mark a played square on the board to be redrawn (because its value has changed), and permit or disallow human input to the board (that is, when the machine is playing).
The final set of methods — setGrid(…) and placeSymbol(…) — provides a handle to the shared grid. The method placeSymbol(…) places a symbol on the grid. Note that placing a symbol only means invalidating the square on the grid so that it is redrawn.
Understanding design decisions and compromises made in Tic-Tac-Toe
This section explains the design decisions made in the game. These design decisions were the result of the object-oriented design process we described in this chapter. You will also see some of the compromises made in the game design, just so you see that it is okay to make compromises in less-important areas as long as the design of the main components is good.
With respect to data structures, you use a two-dimensional array (see grid in GameGrid) to represent the tic-tac-toe board but hide the use of the array inside an abstraction (GameGrid). You do this so that, if you want, you can change the implementation of the grid to a more efficient representation (such as a bitmap) without having to change the code that needed to use it.
You do not use String to implement symbol, because you don't want the overhead of string comparisons. You also illustrate the use of a Singleton class to reduce the overhead of creating many identical objects and to avoid requiring the passing of a common object to all methods in the program.
You break the Game abstraction by allowing access to and directly sharing the gameGrid instance. Note that the gameGrid is modified only in the Game class but that other classes need to read it. You can enhance the Game interface to provide read-only access to its grid, but you choose not to do so primarily for convenience and simply pass gameGrid around.
Look for design compromises in the application because of the Android framework. You break abstraction principles in at least one place. Note that Symbols are displayed in two ways: as strings (see the isRightToLeft DiagonalFilled(…) method in the GameGrid class) and as bitmaps (see the onDraw method in the Board class). However, the toString(…) method is placed (properly) with the Symbol class, but the getBitmapForSymbol(…) method is in the Board class (because the Android framework has no convenient methods to gain access to the resources for the application from inside a plain old class, such as Symbol). The Android framework essentially forces this design compromise on you. We say, “Just live with it!”
Another compromise of this type is that the controller (the GameSession class) also implements View components, such as the menu and the dialog boxes in proceedToFinish(…). The latter is a design principle broken essentially for convenience — you can implement the various dialog boxes in GameView, but the implementation of the menu callbacks in GameSession is caused by Menus and Activities being tied together in the sense that they're expected to be used together. (Oh, well!)
What comes next? In addition to designing and implementing the features of an application (the functional requirements), you also have to implement qualities such as reliability, scalability, maintainability, and, in particular, security, in order for your app to be considered professional quality. Chapters 8 and 9 walk you through that process.