Chapter 3
Making Apps Using the Android SDK
- Implementing a basic Android application
- Understanding the Android Application Model
- Creating a sample Tic-Tac-Toe application
If you read only one chapter in this book, this chapter is the one we suggest. We use the Tic-Tac-Toe sample application to illustrate the various components of the Android SDK and the Android Application Model. If you read this chapter in its entirety, you should have a working knowledge of all Android SDK components and capabilities. The main concept, however, is the Android Application Model: It gives you a sense of how other built-in components (such as activities, views, menus, preferences, intents, and intent filters) and capabilities (such as files and SQLite) work together within this model.
One quick note before we get into this chapter. To fully understand what is presented here, you must be familiar with the system architecture of an Android device and an Android application and the application model that Android applications must conform to, and you must know how to install the development tools, create a project for the application, recognize the various code and configuration files in the project, import code into the project, and, finally, build and run an application. We have covered these elements in Chapters 1 and 2, so either read them before reading this chapter, or refer back to them as needed.
 Also, the code examples in this chapter are from two Eclipse projects, namely, Tic-Tac-Toe and Tic-Tac-Toe-Using-Fragments (which you can download from the website for this book: www.dummies.com/go/android3sdkprogramming). In order to follow along with the examples, you may want to import and open these projects and browse their structure, the various source code, and other types of files as we present and discuss them (see Chapter 2 for how to import projects). We show you where to look for its files in the next section, “Walking Through the Eclipse Project for Tic-Tac-Toe.”
Walking Through the Eclipse Project for Tic-Tac-Toe
If you haven't already imported the code for the tic-tac-toe game, select the Downloads tab at www.dummies.com/go/android3sdkprogramming and download it. There are two projects that are of relevance to this chapter — Tic-Tac-Toe and Tic-Tac-Toe-Using-Fragments. Import both projects. Now open Tic-Tac-Toe. After you do this, you will see the elements shown in Figure 3-1.
Figure 3-1: The Tic-Tac-Toe project in Eclipse.
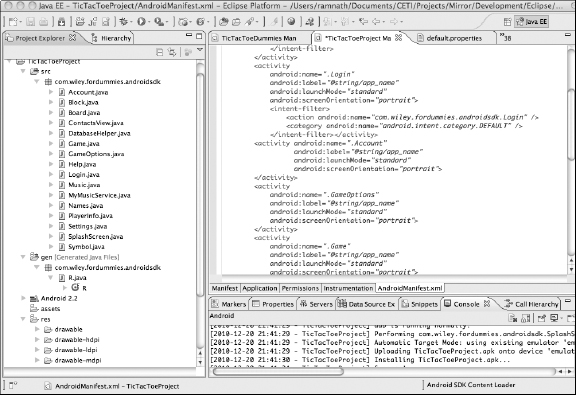
This list describes the project elements shown in Figure 3-1:
- The src tree: src stands for source. Expand this tree to see all developer-written source code (.java) files for the Tic-Tac-Toe project.
- The gen tree: gen stands for generated. You see one file containing Java code (R.java, generated by the Android Development Tools, or ADT, plug-in for Eclipse) consisting of references to all resources defined in the program.
- The Android SDK level tree: This tree contains the libraries that make up the Android SDK (as Java .jar files). The label on this tree is the version of the Android SDK you're building against. Our project is building against the 3.0 version of the SDK with the Google API add-ons for maps; hence this tree is labeled Google APIs [Android 3.0].
- The assets tree: The assets tree is used to hold application-specific types of resources for use by the application. (Resources are simply files containing data needed by your apps.) You most likely don't need to use this tree because most of the standard resource types you need (such as icons, strings, and menus) are placed in the res tree, described in the following bullet. You haven't used any assets in Tic-Tac-Toe.
- The res tree: res stands for resources. This tree contains the resources used by the Tic-Tac-Toe app. The res tree has additional sub-trees, as follows:
- layout: Contains files that specify the layouts of various screens in Tic-Tac-Toe.
- drawable: Holds icons used by the program, such as for Android devices with high- (hdpi), medium- (mdpi), and low- (ldpi) density screens, respectively.
- menu: Indicates the layout and values of the program menus.
- values: Holds several files, such as strings.xml and colors. xml, where the values for all constants (such as strings and colors) are defined. The R.java file in the gen subtree is generated from the information stored in this res tree.
- The AndroidManifest.xml file: We refer to this important configuration file several times in this chapter. For now, suffice it to say that it contains configuration information about the Tic-Tac-Toe application and all its externally visible components, such as its activities and services.
- The default.properties file: This auto-generated file stores all project settings.
Read on for details about developing the Tic-Tac-Toe application.
Developing the Tic-Tac-Toe Application
Our Tic-Tac-Toe example plays just like regular tic-tac-toe on paper, but is limited to a human playing the computer.
In addition to showing you how to implement game-playing functionality by using the Android SDK, we use our tic-tac-toe game to illustrate the full range of Android capabilities. Because we designed this game to have features in addition to simple game play, it can also
- Remain resilient to program termination: If your device crashes or is terminated by Android, for example, resources can be conserved.
- Separate your score from other people who use the device: It can implement a user ID plus a password-based account using a SQLite database.
- Play background music: The music can soothe you so that you don't become too agitated by losing or too excited by winning.
- Let you look up your friends’ contact information in your address book: Then you can send them e-mail or call them to gloat about your victories.
Understanding the Different Types of Android Programs
The primary kind of Android program that you will write is an application (or app). An app is intended to be the primary focus of the user. As a consequence, an app takes over and uses most of the entire screen of the device.
The initial program that starts up when an Android device is turned on is also an app — known as the Home app. All other applications (or apps) are launched (started) from the Home application. The Home application's user interface (UI) is known as the Home screen. Just like the UI for any app, the Home screen takes over most of the screen real estate on the device. Whenever an app is launched from the Home screen, the launched app's UI will take over the Home screen.
Services are programs that run in the background and need no UI of their own. You use services for activities such as playing music and automatically keeping track of user locations. To illustrate services within the context of Tic-Tac-Toe, we created an add-on — a music playback service named MyPlaybackService.
A third kind of Android program is an App Widget. We don't cover App Widgets in the book, but only mention them here for completeness. App Widgets are (seemingly) constantly running programs embedded in the user interface of an app and used to display changing information from the app, such as the time, the weather, or the user's location. You can think of an App Widget as a small, view-only user interface coupled to a service. When the App Widget is embedded in the Home application, it is also known as a Home screen widget.
Understanding Activities
After you understand the different types of Android programs, your next step in the application development process is to design and implement the activities in the application. As we explain in Chapter 1, an Android activity represents a cohesive step in an Android application and its corresponding user interface. In other words, activities are the building blocks of an Android application.
Figure 3-2 shows a selected portion of the activity flow through the Tic-Tac-Toe application.
Figure 3-2: Tic-Tac-Toe activity and screen flow.
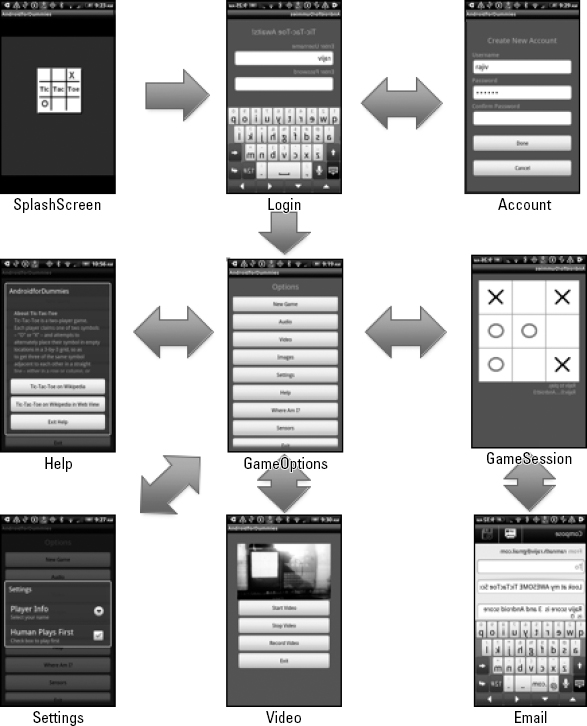
Below is a description of the Tic-Tac-Toe activities themselves:
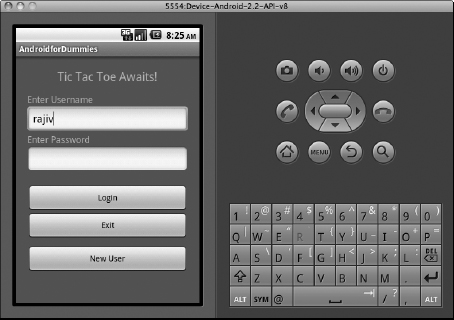
- SplashScreen: The first activity that runs in Tic-Tac-Toe. It first displays a picture, but then — when the user taps anywhere on the splash screen — it launches the next activity, which is Login, and disappears.
- Login: Allows the user to log in and then launches the GameOptions activity and exits. If the user has no account, Login lets her create one by launching the Account activity. The user then notices two behaviors:
- If the user proceeds to creating a new account (or decides not to create an account and taps the Cancel button), the user returns to this login page.
- However, after the user successfully logs in, he can't return to the login page unless he restarts Tic-Tac-Toe. This behavior is logical, of course, but it also serves to illustrate how the Android Activity Manager manages activities. We touch on managing activities in the “Managing the Activity Life Cycle” section later in this chapter.
- Account: Allows the user to create an account (required in order to play the game). To create an account, the user must provide a username and password, and the password must be entered correctly in both the Password and Confirm Password fields.
- GameOptions: The entry point into game-related actions. From here the user can launch the following (sub) activities (presented in the order in which they appear in the GameOptions user interface):
- GameSession: Encapsulates and manages Tic-Tac-Toe game play. This activity is launched when the user starts a new game.
- Audio: Allows the user to play and record audio. (This activity invokes the built-in audio recorder on the device.)
- video: Allows the user to play and record video. (This activity invokes the built-in video recorder.)
- Images: Allows the user to view images. (This activity invokes the built-in camera.)
- Settings: Allows the user to specify a “playing” name and decide whether to play first (or let the computer play first). If no playing name is set, it defaults to the username of the account.
- Help: Provides information about how to play the game.
- whereAmI: Allows the user to show points of interest or his own location on a map.
- Sensors: Shows how the built-in sensors on the device work (such as the accelerometer and the light sensor).
Specifying activities in the AndroidManifest.xml file
Every activity must have an entry in the AndroidManifest.xml file. Listing 3-1 shows a snippet of this file with the most useful entries for three activities in Tic-Tac-Toe: SplashScreen, Login, and Account.
Listing 3-1: Declaring Activities in the Manifest File
<activity android:name=“.SplashScreen”
    android:label=“@string/app_name”
    android:launchMode=“standard”
    android:screenOrientation=“portrait”>
    <intent-filter>
        <action android:name=“android.intent.action.MAIN”/>
        <category android:name=“android.intent.category.LAUNCHER”/>
    </intent-filter>
</activity>

<activity android:name=“.Login”
    android:label=“@string/app_name”
    android:launchMode=“standard”
    android:screenOrientation=“portrait”
    android:permission=
        “com.wiley.fordummies.androidsdk.tictactoe.LAUNCHACTIVITY”>
    <intent-filter>
        <action
            android:name=“com.wiley.fordummies.androidsdk.tictactoe.Login”>
        <category android:name=“android.intent.category.DEFAULT” />
    </intent-filter>
</activity>

<activity android:name=“.Account”
    android:label=“@string/app_name”
    android:launchMode=“standard”
    android:screenOrientation=“portrait”>
</activity>
As you can see, each activity is specified in an <activity> … </activity> XML block (or element). Every activity element defines a set of attributes: in this case, its name, launch mode, and screen orientation. (Note: These are the main attributes, but many others exist.) The name attribute is the same as the name of the Java class that implements it. The launch mode (see the later section “Managing the Activity Life Cycle”) can be standard, singleTop, singleTask, or singleInstance.
The SplashScreen and Login activities have an <intent-filter> element, which describes the invocation messages that the activity will respond to and handle. These invocation messages may originate from within the containing Tic-Tac-Toe application or another application, including the Home application. We explain this concept in the “Starting activities using intents and intent filters” section, later in this chapter.
Implementing activities
Every activity in an application is implemented by a Java class. This Java class must extend the Activity base class of the Android framework. To illustrate, look at the declaration of the Login and Game classes:
public class Login extends Activity implements OnClickListener{
  …
  …
}
public class GameSession extends Activity {
   …
   …
}
Note that Login, in addition to being a subclass of Activity, implements OnClickListener while GameSession does not. The reason is that Login implements its own user interface, whereas Game delegates the interactive component of its user interface (the Tic-Tac-Toe board) to the Board class. So now, let us show you how the user interface of an activity is implemented.
Implementing an Activity's User Interface
Activities within Android applications interact with users by displaying information and accepting input by way of a user interface. In Android, the UI is implemented by using objects of the View and ViewGroup classes. These and their related classes and subclasses are defined in the android.view package.
The Android SDK provides an extensive, built-in collection of UI components, also known as widgets (not to be confused with Home screen widgets) — such as scrollable windows, entry fields, buttons of various types, check boxes, and pull-down lists — that can be composed into a view. You can see, later in this chapter, a couple of examples of using these UI components, and you can find more detail about implementing UIs in Chapter 5.
Laying out a view
The Android SDK provides a way to specify the layout of a view without any programming by means of an XML file known as a layout file. Each entry in the layout file specifies either an aspect (such as the width and height) or a component (such as a button) of the user interface. The layout file for the Login activity is shown in Listing 3-2. It is named login.xml and resides in the layout sub-tree of the Tic-Tac-Toe project, within the res tree. Note: We matched the names of activities and other view classes with the names of their layout files. You don't have to match them, but doing so helps to clarify the correspondence between the activity class and its layout file.
Listing 3-2: Layout File for the login Activity
<?xml version=“1.0” encoding=“utf-8”?>
<ScrollView xmlns:android=“http://schemas.android.com/apk/res/android”
     android:background=“@color/background”
     android:orientation=“horizontal”
     android:layout_width=“match_parent”
     android:layout_height=“match_parent”
     android:padding=“20dip”>
    <LinearLayout android:orientation=“vertical
            android:layout_width=“match_parent”
            android:layout_height=“match_parent”>
            <TextView android:text=“@string/login_title”
                android:layout_height=“wrap_content”
                android:layout_width=“wrap_content”
                android:layout_gravity=“center”
                android:layout_marginBottom=“15dip”
                android:textSize=“20.5sp”/>
            <TextView
                android:text=“Enter Username”
                android:layout_height=“wrap_content”
                android:layout_width=“wrap_content”
                android:layout_gravity=“left”
                android:textSize=“15.5sp”/>
                         <EditText
                android:id=“@+id/username_text”
                android:singleLine=“true”
                android:layout_width=“match_parent”
                android:layout_height=“wrap_content”/>
           <TextView
                android:text=“Enter Password”
                android:layout_height=“wrap_content”
                android:layout_width=“wrap_content”
                android:layout_gravity=“left”

                android:textSize=“15.5sp”/>
            <EditText
                 android:id=“@+id/password_text”
                 android:singleLine=“true”
                 android:layout_width=“match_parent”
                 android:layout_height=“wrap_content”/>
            <Button
                 android:id=“@+id/login_button”
                 android:text=“Login”
                 android:layout_marginTop=“20dip”
                 android:layout_width=“match_parent”
                 android:layout_height=“wrap_content”/>
            <Button
                 android:id=“@+id/cancel_button”
                 android:text=“Exit”
                 android:layout_width=“match_parent”
                 android:layout_height=“wrap_content”/>
            <Button
                 android:id=“@+id/new_user_button”
                 android:text=“New User”
                 android:layout_marginTop=“10dip”
                 android:layout_width=“match_parent”
                 android:layout_height=“wrap_content”/>
     </LinearLayout>
</ScrollView>
You can see that the layout file consists of the elements described below:
- An outermost ScrollView element: Indicates that the highest-level (or root) window in this view is a scrollable window. This outermost window is a container — it contains other user interface elements.
- A LinearLayout element: This is nested inside the ScrollView, and it is also a container that indicates that its component elements are to be displayed in the order they are placed in the container. Nested inside the LinearLayout element are the following elements:
- TextView : This element corresponds to and describes the title “Tic-Tac-Toe Awaits!” (which is defined in res/values/strings.xml).
- TextView: This element corresponds to and describes the string Enter Username (which is defined in res/values/strings.xml).
- EditText: This element is a specification of the entry field where the user would enter a username.
- TextView: This element is a specification of the string Enter Password. Note that we have put the string directly in the layout file (just to show you that values of literals do not have to be in a separate file).
- EditText: This element is a specification of the entry field where the user would type in a password.
- Button: This element is a specification of the Login button.
- Button: This element is a specification of the Exit button used to exit the login screen (and, therefore, the game).
- Button: This element is a specification of the New User button used to enroll a new user.
The screen components that are specified in the layout file are shown in Figure 3-3.
Figure 3-3: The user interface of the Login activity.
The Android SDK has many more types of views than ScrollView (such as HorizontalScrollView), more layouts in addition to LinearLayout (including AbsoluteLayout, FrameLayout, and RelativeLayout), and more widgets in addition to TextView, EditText, and Button. Note the nested nature of the layout. Essentially, two base classes define views: the ViewGroup base class for UI elements that can contain other elements and the View base class for terminal UI components. The suitable composition of container classes that extend ViewGroup (such as LinearLayout) and elementary widgets that have View as their base class allow views to be nested to any appropriate level.
The layout files for the activities in an application are translated into Java code that resides within the resource R class in the res subtree in the project. This translation reduces the overhead of generating the view from its XML specification every time.
In the following section, we show you how to implement the functionality behind a view.
Implementing the user interface logic by using event listeners
An event listener is an object that is registered with a user interface and which responds to user events such as mouse clicks. In the Android SDK, an activity can act like an event listener object for events in its view. The following code segment, extracted from the Login class, shows how this is done:
public class Login extends Activity implements OnClickListener{
    …
    private EditText userNameEditableField;
    private EditText passwordEditableField;

    @Override
    public void onCreate(Bundle savedInstanceState) {
        super.onCreate(savedInstanceState);
        setContentView(R.layout.login);
        userNameEditableField=(EditText)findViewById(R.id.username_text);
        passwordEditableField=(EditText)findViewById(R.id.password_text);
        View btnLogin=(Button)findViewById(R.id.login_button);
        btnLogin.setOnClickListener(this);
        View btnCancel=(Button)findViewById(R.id.cancel_button);
        btnCancel.setOnClickListener(this);
        View btnNewUser=(Button)findViewById(R.id.new_user_button);
        btnNewUser.setOnClickListener(this);
    }
    …
}
The Login activity extends the Activity base class (as any activity should), and also implements the OnClickListener interface. This interface implements an activity that intends to interact with the user. Note the onCreate(Bundle) method of the Login activity. The Android framework calls this method when the activity is created. (For more on the activity life cycle, see the “Managing the Activity Life Cycle” section, later in this chapter.) In this onCreate(Bundle) method, the call to setContentView(R. layout.login) creates and initializes the user interface for Login.
After the view for the activity is created, variables such as userName EditableField and btnCancel are initialized to refer to the various widgets in the view (such as the field just below the Enter Username string in which the username is entered, and the Cancel button). Note how the reference to the widget is found by passing the resource that corresponds the id of the widget (such as R.id.cancel_button) to the findViewById(…) method. Finally, the Login activity (that is, this) is set as a listener on every button element the user interacts with (such as Login, Cancel, and NewUser). Whenever the user clicks on one of these buttons, the button object calls a standard method, named onClick, on each listener object (for example, on the Login activity object).
The onClick method for the user interface of the Login activity is shown here:
public void onClick(View v) {
    switch (v.getId()) {
    case R.id.login_button:
        checkLogin();
        break;
    case R.id.cancel_button:
        finish();
        break;
    case R.id.new_user_button:
        startActivity(new Intent(this, Account.class));
        break;
    }
}
The logic of the onClick(…) method is simple. The following list describes what happens when the user taps the buttons:
- Login: Calls checkLogin(…), which verifies the username and password and then launches the GameOptions activity
- Cancel: Simply finishes the current activity
- New User: Launches the Account activity to let the user create a new account
The pattern for handling other types of events is similar. These events can qualify as a touch (physically touching a touchscreen or clicking the mouse button on the emulator) or a key being pressed. You simply implement the onTouch(View) or the onKey(View) listener method in the activity and register it with the appropriate view by using setOnTouchListener and setOnKeyListener, respectively.
Implementing the user interface by implementing your own View class
The View base class can directly handle events. Therefore, you can also implement UI functionality by implementing your own View class, extending View (or one of its subclasses, such as Activity) and overriding one or more existing callback methods of the View to listen for specific events that occur within it.
To illustrate this concept, here's an example from the GameSession activity and the Board view in Tic-Tac-Toe. We start with the GameSession class, which is declared simply as a subclass of Activity, like this:
public class GameSession extends Activity {
…
}
Note that GameSession implements no other interface, such as onClickListener. Take a look at its layout file (named gamesession.xml in the res/layout directory) in Listing 3-3.
Listing 3-3: Layout of the GameSession Activity with Board As an Embedded View
<?xml version=“1.0” encoding=“utf-8”?>
<LinearLayout
               xmlns:android=“http://schemas.android.com/apk/res/android”
               android:layout_width=“match_parent”
               android:layout_height=“match_parent”
               android:orientation=“vertical”
               android:background=“#676767”
               android:gravity=“center_horizontal”
               android:padding=“20dip”>
    <com.wiley.fordummies.androidsdk.tictactoe.Board
        android:id=“@+id/board”
        android:layout_width=“match_parent”
        android:layout_height=“280dip”
    />
    <TextView
        android:id=“@+id/gameInfo”
        android:layout_width=“match_parent”
        android:layout_height=“wrap_content”
        android:text=“Loading…”
        android:gravity=“center_vertical”
        android:paddingLeft=“10dip”
    />
    <TextView
        android:id=“@+id/scoreboard”
        android:layout_width=“match_parent”
        android:layout_height=“wrap_content”
        android:gravity=“center_vertical”
        android:paddingLeft=“10dip”
    />
</LinearLayout>
This layout file can be considered to have three components: a LinearLayout ViewGroup containing a view element referring to a class named Board, a TextView field titled game info, and another TextView field titled scoreboard. The Board class referred to in the view element is a subclass of View and is declared as follows:
Board has been specialized from its parent View class by overriding the ontouchEvent(MotionEvent) method inherited from View and by giving this method an implementation that's specific to the Tic-Tac-Toe app. This method is shown in Listing 3-4.
Listing 3-4: The onTouchEvent Callback in Board View
public boolean onTouchEvent(MotionEvent event) {
    if( !this.enabled ) {
        System.out.println(“Board.onTouchEvent: Board not enabled”);
        return false;
    }
    int posX = 0;
    int posY = 0;
    int action = event.getAction();
    switch (action){
        case MotionEvent.ACTION_DOWN:
            float x = event.getX();
            float y = event.getY();
            System.out.println(“coordinates: ” + x + “,” + y);
            if( x > width && x < width * 2 ) posX = 1;
            if( x > width * 2 && x < width * 3 ) posX = 2;

            if( y > height && y < height * 2 ) posY = 1;
            if( y > height * 2 && y < height * 3 ) posY = 2;

            gameSession.humanTakesATurn(posX, posY);
            break;
    }
    return super.onTouchEvent(event);
  }
}
This onTouchEvent(…) callback receives the x,y coordinate positions of every touch, converts those x,y positions into the coordinates (0, 1, or 2) of the Tic-Tac-Toe square, and then calls the humanTakesATurn(…) method of the GameSession object with these coordinates. The Board view is created by the GameSession activity in its onCreate(…) method. This method also passes its GameSession activity to Board, which then enables Board to invoke humanTakesATurn(…) on GameSession.
Handling user interactions in the activity itself
Because an Activity is also a View, it can itself implement some of its own UI functionality. The requirement to do so arises if the activity must deal with user interaction outside the boundaries of any UI components in its view, such as in grayed-out areas near the edges. An example is in the SplashScreen activity in the Tic-Tac-Toe app, where any touch, no matter where it happens on the screen, is a signal from the user to interrupt the splash screen and continue. Take a look now at the code for the SplashScreen activity shown in Listing 3-5:
Listing 3-5: The SplashScreen Activity
public class SplashScreen extends Activity {
    protected boolean active=true;
    protected int splashTime=5000;
    protected int timeIncrement=100;
    protected int sleepTime=100;

    /** Called when the activity is first created. */
    @Override
    public void onCreate(Bundle savedInstanceState) {
        super.onCreate(savedInstanceState);
        setContentView(R.layout.splash);

        // thread for displaying the SplashScreen
        Thread splashThread=new Thread() {
            @Override
            public void run() {
                try {
                    int elapsedTime=0;
                    while(active && (elapsedTime < splashTime)) {
                        sleep(sleepTime);
                        if(active) elapsedTime=elapsedTime + timeIncrement;
                    }
                } catch(InterruptedException e) {
                    // do nothing
                } finally {
                    finish();
                    startActivity(new Intent(
                       “com.wiley.fordummies.androidsdk.tictactoe.Login”));
                }
             }
        };
         splashThread.start();
    }

    @Override
    public boolean onTouchEvent(MotionEvent event) {
        if (event.getAction()==MotionEvent.ACTION_DOWN) {
            active=false;
        }
        return true;
    }
}
When the SplashScreen activity is created, a new thread is launched. The thread sleeps for splashTime milliseconds while periodically awaking to check an active flag to see whether it needs to quit. At the same time, the original application thread (which, of course, was never authorized to knock off work) is still running. This main thread makes the activity active and then waits in an event loop for the user to interact with the splash screen. When the user interacts with it (specifically, by touching the screen before the timer runs out), an onTouch event is generated. This event is trapped by the onTouchEvent(MotionEvent) method in the Activity class, which in turn sets the (active) splash screen flag to false. This, in turn, terminates the timer and causes the splash screen activity to finish and start the next activity, which is Login.
Initiating actions from menus and the Action Bar
You can use menus and, starting in Android 3.0, the Action Bar to provide functionality similar to a sidebar that a user can access while using the primary capabilities of the app. Think of a capability as allowing the user to exit a game or find help at any time while playing the game. In this section, we discuss menus first and then the Action Bar.
Programming Options menus
Every Android device has a button labeled Menu that can be used to open an application menu known as an Options menu. A menu (activated by the Menu button) is considered a standard part of the user interface of an activity. Applications (and their activities) should make good use of menus because they're interface components that are always available when an activity is running, regardless of what it is doing. Finally, note that you can have different menus for different activities.
To implement menus, you must follow these three steps:
- Define the onCreateOptionsMenu() or onCreateContextMenu() callback method (or both) in the class that implements your activity.
- Declare the menu items, which you can do in XML. At the appropriate time, Android automatically calls this method to create the menu.
- Implement the methods onOptionsItemSelected() and onContext ItemSelected() in your activity.
That's it. Menus handle their own events, so you don't need to implement event handlers. Note that a menu is linked to the activity it belongs to in the onCreateOptionsMenu(…) method. (See Listing 3-6, later in this section.)
Tic-Tac-Toe implements menus in the activities GameSession and Game Options. Here's the layout file (named menu.xml) for the menu in the GameOptions activity:
<?xml version=“1.0” encoding=“utf-8”?>
<menu xmlns:android=“http://schemas.android.com/apk/res/android”>
    <item android:title=“Settings”
        android:id=“@+id/menu_settings”
        android:icon=“@android:drawable/ic_menu_preferences”
    />
    <item android:title=“Help”
        android:id=“@+id/menu_help”
        android:icon=“@android:drawable/ic_menu_info_details”
    />
    <item android:title=“Exit”
        android:id=“@+id/menu_exit”
        android:icon=“@android:drawable/ic_menu_close_clear_cancel”
    />
    <item android:title=“Contacts
        android:id=“@+id/menu_contacts”
        android:icon=“@android:drawable/ic_menu_view”
    />
</menu>
This layout file defines four obvious items: Settings, Help, Exit, and Contacts. Their identifiers are menu_settings, menu_help, menu_exit, and menu_contacts, respectively. The following icons for these items are standard in the Android SDK:
@android:drawable/ic_menu_info_details

@android:drawable/ic_menu_preferences

@android:drawable/ic_menu_close_clear_cancel

@android:drawable/ic_menu_view
The layout file is compiled into resources specified in the R class in the gen subtree of the Android project. You can see references to the R class in the code shown in Listing 3-6, which shows the menu-relevant code from the GameOptions activity.
Listing 3-6: Handling Menus in the GameOptions Activity
public class GameOptions extends Activity implements OnClickListener{
…
public boolean onCreateOptionsMenu(Menu menu) {
    super.onCreateOptionsMenu(menu);
    MenuInflater inflater=getMenuInflater();
    inflater.inflate(R.menu.menu, menu);
    return true;
}
public boolean onOptionsItemSelected(MenuItem item) {
    switch (item.getItemId()) {
    case R.id.menu_settings:
        startActivity(new Intent(this, Settings.class)); return true;
    case R.id.menu_help:
        startActivity(new Intent(this, Help.class));
        return true;
    case R.id.menu_exit:
        quitApplication();
        return true;
    case R.id.menu_contacts:
        startActivity(new Intent(this, ContactsView.class));
        return true;
    }
    return false;
}
…
}
In this chunk of code, the onCreateOptionsMenu(Menu) method creates the menu. You don't have to specifically call this method in any of your code: The Android runtime automatically calls it at the appropriate time, passes in the correct menu object to be created, and sets up the current activity as a listener on the menu. MenuInflater inflater=getMenuInflater() is a (factory) method that's called to get an object that can initialize this menu object with its items specified in the menu.xml file, which in turn is done by using inflater.inflate(R.menu.menu, menu).
When the user taps the menu and selects an item, onOptionsItem Selected(MenuItem) is called and the selected item is passed to it. In this method, the switch statement directs execution to launching either the Settings, the Help, or the Contacts activity — or, if Exit has been selected, the code that terminates the Tic-Tac-Toe app (see the method quitApplication(..)).
In addition to menus launched using the Menu button (known as Options menus), you can add Context menus that open whenever the user selects an item by pressing and holding the mouse button or trackball (or by holding down a finger on a device with a touchscreen). You can also add sub-menus to menus that appear as a floating list of menu items when the user touches a menu item that contains a sub-menu. For more on Context menus and sub-menus, see http://developer.android.com/guide/topics/ui/menus.html.
Using the Action Bar
Starting in Android 3.0, users have access to contextual options, navigation, widgets, and other types of content on the Action Bar, which is displayed at the top of the screen and is always visible when an application is running.
For the code examples in this section, refer to the Eclipse project Tic-Tac-Toe-Using-Fragments.
The coding for Action Bar items is exactly the same as for menus. All you do is implement the onCreateOptionsMenu(Menu) and onOptionsItem Selected(MenuItem) methods in exactly the same way as you do for menus. The difference is that you can then make a menu item appear on the Action Bar (rather than on the menu) by declaring the menu item with the additional attribute android:showAsAction with the value “ifRoom”, “never”, “withText”, or “always”. You can also combine these directives. In the example below, the Help menu from menu.xml has been declared as a menu to be shown on the Action Bar. The result of doing this is shown in Figure 3-4 where you can see the Help menu on the Action Bar, and the result of selecting it.
<item
    android:title=“Help”
    android:id=“@+id/menu_help”
    android:icon=“@android:drawable/ic_menu_info_details”
    android:showAsAction=“always|withText”
/>
Figure 3-4: Putting menu items on the Action Bar.
Setting application preferences
Most mobile applications have different modes of working, depending on user preferences. For example, a route-finding application might ask users to set their home locations, on the assumption that most user-requested routes begin from home. Also, games have preferences such as character icons and game levels. Because preferences are common features in mobile applications, Android provides you with built-in ways to set and read them as name-value pairs.
We illustrate this capability by using an example from Tic-Tac-Toe. Take a look at the Settings activity, which is an example of an activity that sets preferences. The Settings activity is started when a user taps the Settings menu item in the GameOptions activity. We show its implementation in Listing 3-7.
Listing 3-7: An Implementation of Settings, a PreferenceActivity
package com.wiley.fordummies.androidsdk.tictactoe;
import android.content.Context;
import android.os.Bundle;
import android.preference.PreferenceActivity;
import android.preference.PreferenceManager;

public class Settings extends PreferenceActivity {
    private final static String OPT_NAME=“name”;
    private final static String OPT_NAME_DEF=“Player”;
    private final static String OPT_PLAY_FIRST=“human_starts”
    private final static boolean OPT_PLAY_FIRST_DEF=true;

    @Override
    protected void onCreate(Bundle savedInstanceState){
        super.onCreate(savedInstanceState);
        addPreferencesFromResource(R.layout.settings);
    }
    public static String getName(Context context) {
        return PreferenceManager.getDefaultSharedPreferences(context)
                .getString(OPT_NAME, OPT_NAME_DEF);
    }
    public static boolean doesHumanPlayFirst(Context context) {
        return PreferenceManager.getDefaultSharedPreferences(context)
            .getBoolean(OPT_PLAY_FIRST, OPT_PLAY_FIRST_DEF);
    }
}
You can see that the onCreate(…) method is building the user interface for this activity in this line:
addPreferencesFromResource(R.layout.settings)
The user interface for this activity is then specified in an XML file named settings.xml, like this:
<?xml version=“1.0” encoding=“utf-8”?>
<PreferenceScreen xmlns:android=http://schemas.android.com/apk/res/android
    android:title=“Settings”
    android:background=“@color/background”>
    <EditTextPreference android:key=“name”
        android:title=“Player Info”
        android:summary=“Select your name”
        android:defaultValue=“Player 1”/>
    <CheckBoxPreference android:key=“human_starts”
        android:title=“Human Plays First”
        android:summary=“Check box to play first”
        android:defaultValue=“true”  />
</PreferenceScreen>
Note the difference between the names of the XML elements in this file and the names of other kinds of activities in layout files: They all end with Preference. Every element specifies four attributes of the preference:
- The name-value pair that defines the preference
- The form in which the preference is displayed
- A helpful description of the preference
- The default value of the preference
In the preceding XML file, therefore, the first preference is the name of the human player, which is a string to be displayed as an editable text field, with a default value of Player 1. The second preference is a Boolean value that specifies whether the human or the machine plays first. Whoever plays first uses the X symbol, and the human plays first, by default.
Back to the code itself — the first thing to notice about this code is (drum roll, please) that there's no code to save preferences! This process is handled automatically by the Android framework, by making Settings a subclass of the PreferenceActivity class, which implements all necessary callbacks to store the values.
However, the Settings activity still needs to make available methods to read preferences. In the Tic-Tac-Toe app, Settings does this by providing two static methods (see Listing 3-7):
- getName(..): Gets the name of the player
- doesHumanPlayFirst(..): Returns true if the player starts first and false if the machine is supposed to play first
These methods use two methods of the PreferenceManager class to get the preference values, namely getString(…) and getBoolean(…). The first parameter to these methods is the name of the preference. It should be the same as the value of the android:key attribute for the corresponding element in the settings.xml file. The second parameter to these methods (such as the Boolean variable OPT_PLAY_FIRST_DEF) is the default value to return if the key doesn't exist.
Building Rich User Interfaces for Larger Screens Using Fragments
Until Android 3.0, an activity and its user interface were coupled together. In the release of Android 3.0, the Android SDK introduced a new paradigm and a set of components, or fragments, for building user interfaces. The main reason for introducing fragments is to take advantage of the larger screens on Android tablets.
In this section, we explain what fragments are and show you a couple of examples. One quick thing; for the code examples in this section, refer to the Eclipse project Tic-Tac-Toe-Using-Fragments.
Understanding fragments
Fragments enable the separation of the user interface of an activity from the activity itself. A fragment has its own life cycle and receives its own input events. You can add or remove fragments while the activity is running, which lets you design a more complicated (and, possibly, better) interface, with its own flow. Of course, the user interface has to tie into the activity, but it ties into it in limited and well-defined ways that allow you to design both items separately. (The notion of separating the user interface life cycle and the business logic of the application isn't new. If you have done web development using Enterprise Java — specifically, using Java Server Faces — you should be quite familiar with this concept.)
Think of a fragment as representing a part of the user interface of an activity. You can use multiple fragments to build a user interface consisting of multiple stand-alone parts (known as a multi-pane user interface). You can also reuse a fragment in more than one activity.
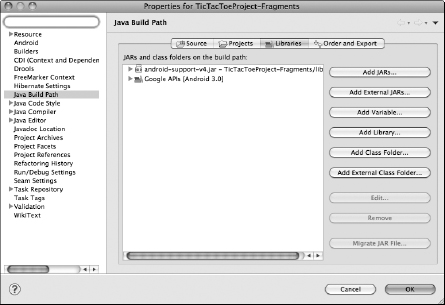
Fragment capability is supplied by a new set of components related to the user interface — namely, Fragment, its subclasses (DialogFragment, ListFragment, PreferenceFragment, and WebViewFragment), and its related classes (FragmentActivity, FragmentManager, and FragmentTransaction). Fragment-based functionality isn't in only the 3.0 and later versions of the Android SDK. Along with Android 3.0, Google also released the Android Compatibility Library (ACL), which lets you develop fragment-based user interfaces using SDK versions 1.6 through 2.3.3. Figure 3-5 shows how to add the ACL (and other, additional libraries) into the build path of your project. (We describe this process in more detail in Chapter 2.)
Figure 3-5: The Tic-Tac-Toe project with the ACL in its build path.
Let us now show you an example of how to use fragments from (what else?) the Tic-Tac-Toe app (once again, refer to the Eclipse project named Tic-Tac-Toe-Using-Fragments with regard to all the code examples in this section). The example first demonstrates the use of a fragment in creating a multi-pane interface for larger screens by showing you how to combine into a single activity the Login and New Account functionality, when the application is used in Landscape mode (such as on a tablet). However, when the application is in Portrait mode (on a smaller device, for example), the login and account creation are split across two activities. Figure 3-6 shows the user interface for the two modes.
Figure 3-6: The user interface in Landscape and Portrait modes, for logging in and creating a new account.
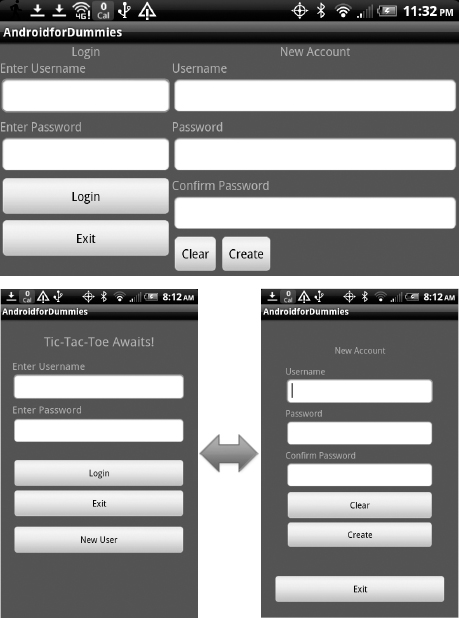
By looking at these screens, you can clearly see how the Tic-Tac-Toe app provides login and new account-creation capabilities in different ways in the two orientations. In the next example, we show you how it's done in a way that reuses the fragment. This example also illustrates a couple of other concepts: how a fragment can be incorporated into the user interface declaratively (via layout files) or programmatically (via coding). We also touch on how the life cycle of the fragment and the activity interact.
You start, though, by looking at the AndroidManifest.xml file. To create different looks and implementations for Portrait and Landscape modes, you must first set the android:screenOrientation attribute for the activity to be either unspecified or sensor. You set the specification of the login activity this way:
Embedding fragments in activity layouts
To understand the details of how to use fragments, you first have to incorporate the fragment in the layout of the activity. To see how it's done, look in res/layout-land/login.xml for the landscape layout of the Login activity, shown in Listing 3-8.
 The listings in this section are rather long, so we removed several entries that aren't relevant to this discussion. Of course, the entire chunk of code is available in the source code provided.
Listing 3-8: Landscape Layout File for the Login Activity
<?xml version=“1.0” encoding=“utf-8”?>
<LinearLayout
    xmlns:android=“http://schemas.android.com/apk/res/android”
    …
    android:orientation=“horizontal”
    android:layout_width=“match_parent”
    android:layout_height=“match_parent”
    android:textSize=“15.5sp”>
    <ScrollView
    xmlns:android=“http://schemas.android.com/apk/res/android”
    …
    android:orientation=“vertical”
    android:layout_width=“200dip”
    android:layout_height=“300dip”>
    <LinearLayout
        android:orientation=“vertical”
        android:layout_width=“match_parent”
        android:layout_height=“match_parent”>
        <TextView
            android:text=“Login”
            …/>
            <TextView
                android:text=“@string/enter_username”
                …/>
            <EditText

                android:id=“@+id/username_text”
                …/>
            <TextView
                android:text=“Enter Password”
                …/>
            <EditText
                android:id=“@+id/password_text”
                …/>
            <Button
                android:id=“@+id/login_button”
                android:text=“Login”
                …/>
            <Button
                android:id=“@+id/cancel_button”
                android:text=“Exit”
                …/>
        </LinearLayout>
    </ScrollView>
    <fragment class=“com.wiley.fordummies.androidsdk.tictactoe.AccountFragment”
        android:id=“@+id/titles” android:layout_weight=“1”
        android:layout_width=“0px”
        android:layout_height=“match_parent”
        android:background=“#00550033”/>
</LinearLayout>
Note the use of the fragment element in the layout file; note specifically how the class attribute has been initialized to the name of a fragment class. (We describe this class itself in the following section.) While you're looking at layout files, look at the one for the login activity while in Portrait mode (see Listing 3-9). You see that the first part of the file is quite similar to the previous one, except that the fragment element for adding a new user is missing (because a separate Account activity handles creating a new user) and a New User button is added (that launches the Account activity).
Listing 3-9: Portrait Layout File for the Login Activity
<?xml version“1.0” encoding“utf-8”?>
<ScrollView
    xmlns:android“http://schemas.android.com/apk/res/android”
    …
    android:orientation“vertical”
    android:layout_width“match_parent”
    android:layout_height“match_parent”
    android:textSize“15.5sp”
    …>
    <LinearLayout
        android:orientation“vertical”

        android:layout_width“match_parent”
        android:layout_height“match_parent”>
        <TextView
            android:text“@string/login_title”
            …/>
        <TextView
            android:text“@string/enter_username”
            …/>
        <EditText
            android:id“@+id/username_text”
            …/>
        <TextView
            android:text“Enter Password”
            …/>
        <EditText
            …/>
        <Button
            android:id“@+id/login_button”
            android:text“Login”
            …/>
        <Button
            android:id“@+id/cancel_button”
            android:text“Exit”
            …/>
        <Button
            android:id“@+id/new_user_button”
            android:text“New User”
            …/>
    </LinearLayout>
</ScrollView>
Look at the layout of AccountFragment in Landscape mode (shown in Listing 3-10) and Portrait mode (shown in Listing 3-11).
Listing 3-10: Landscape Layout File for AccountFragment
<?xml version=“1.0” encoding=“utf-8”?>
<LinearLayout
    xmlns:android=“http://schemas.android.com/apk/res/android”
    …
    android:orientation=“vertical”
    android:layout_width=“match_parent”
    android:layout_height=“match_parent”
    android:textSize=“15.5sp”>
    <LinearLayout
        android:orientation=“vertical”
        …
        <TextView
            android:text=“New Account”
            …/>

        <TextView
            android:text=“Username”
            …/>
        <EditText
            android:id=“@+id/username”
            …/>
        <TextView
            android:text=“Password”
            …/>
        <EditText
            android:id=“@+id/password”
            …/>
        <TextView
            android:text=“Confirm Password”
            …/>
        <EditText
            android:id=“@+id/password_confirm”
            …/>
        <LinearLayout
            android:orientation=“horizontal”
            …>
            <Button
                android:id=“@+id/cancel_button”
                android:text=“Clear”
                …/>
            <Button
                android:id=“@+id/done_button”
                android:text=“Create”
                …/>
        </LinearLayout>
    </LinearLayout>
</LinearLayout>
Listing 3-11: Portrait Layout File for AccountFragment
<?xml version=“1.0” encoding=“utf-8”?>
<LinearLayout
    xmlns:android=“http://schemas.android.com/apk/res/android”
    android:background=“@color/background”
    android:orientation=“horizontal”
    android:layout_width=“match_parent”
    android:layout_height=“match_parent”
    android:padding=“20dip”>
    <LinearLayout
        android:orientation=“vertical”
        …>
        <TextView
            android:text=“New Account”
            …/>
        <TextView
            android:text=“Username”

            …/>
        <EditText
            android:id=“@+id/username”
            …/>
        <TextView
            android:text=“Password”
            …/>
        <EditText
            android:id=“@+id/password”
            android:password=“true”
            …/>
        <TextView
            android:text=“Confirm Password”
            …/>
        <EditText
            android:id=“@+id/password_confirm”
            …/>
        <LinearLayout
            android:orientation=“vertical”
            …>
            <Button
                android:id=“@+id/cancel_button”
                android:text=“Clear”
                …/>
            <Button
                android:id=“@+id/done_button”
                android:text=“Create”
                …/>
        </LinearLayout>
    </LinearLayout>
</LinearLayout>
When you contrast Listing 3-10 and Listing 3-11 (which shows the portrait layout file), you see that the UI components are exactly the same. The only difference is that the Clear and Create buttons are one below the other in the portrait layout, and next to each other in the landscape layout (because vertical space is at a premium in Landscape mode).
Finally, we show you the portrait layout file for the Account activity (Listing 3-12). Again, note that this activity is the one that handles the addition of new users whenever the application is run in Portrait mode. This activity is not used when the device is in Landscape mode.
Listing 3-12: Portrait Layout File for the Account Activity
<?xml version=“1.0” encoding=“utf-8”?>
<LinearLayout
    xmlns:android=“http://schemas.android.com/apk/res/android”
    android:background=“@color/background”

    android:orientation=“vertical”
    android:layout_width=“match_parent”
    android:layout_height=“match_parent”
    android:padding=“20dip”>
    <FrameLayout
        android:id=“@+id/accountdetails”
        android:layout_weight=“2”
        android:layout_width=“match_parent”
        android:layout_height=“match_parent” />
        <Button
            android:id=“@+id/exit_button”
            android:text=“Exit”
            android:layout_marginTop=“20dip”
            android:layout_width=“match_parent”
            android:layout_height=“wrap_content”/>
 </LinearLayout>
Note that no mention is made of the fragment in the layout file. However, the FrameLayout element accountdetails defines a placeholder for it that the Account activity programmatically fills with AccountFragment. You can see how it's done in the following section.
Implementing fragments
To look at how to implement fragments, start with the code for Account Fragment, shown in Listing 3-13.
Listing 3-13: Implementation of AccountFragment
public class AccountFragment extends Fragment implements OnClickListener{
    private EditText etUsername;
    private EditText etPassword;
    private EditText etConfirm;
    …
    public View onCreateView(LayoutInflater inflater, ViewGroup container,
                             Bundle savedInstanceState) {
        // Inflate the layout for this fragment
        View v =  inflater.inflate(R.layout.accountfragment, container, false);
        etUsername= (EditText)v.findViewById(R.id.username);
        etPassword= (EditText)v.findViewById(R.id.password);
        etConfirm = (EditText)v.findViewById(R.id.password_confirm);
        View btnAdd= (Button)v.findViewById(R.id.done_button);
        btnAdd.setOnClickListener(this);
        View btnCancel= (Button)v.findViewById(R.id.cancel_button);
        btnCancel.setOnClickListener(this);
        return v;

    }

    private void CreateAccount(){
        …
    }

    public void onClick(View v) {
        switch (v.getId()) {
            case R.id.done_button:
                CreateAccount();
                break;
            case R.id.cancel_button:
                etUsername.setText(“”);
                etPassword.setText(“”);
                etConfirm.setText(“”);
                break;
        }
    }
}
AccountFragment looks much like an activity. One difference is that it has (obviously) an onCreateView(…) method rather than an onCreate(…) method, which an activity might have. The reason that this onCreateView(…) method might look like a life cycle method is that it is one. It's the method that's called after the fragment has been created. Other differences in this method are described in this list:
- To get a reference to the view of the fragment, the layout file for the fragment has to be inflated by using the following helper method from the inflater class (earlier in this chapter, we showed the use of a similar inflater method for menus):
View v = inflater.inflate(R.layout.accountfragment, container, false);
- The view in the preceding line must be used in order to get handles to the components of the view, as shown in the following example:
etUsername= (EditText)v.findViewById(R.id.username);
- The view has to be returned by the method. This view, in fact, is handed back to the enclosing activity to be made part of the activity's view hierarchy.
Incorporating fragments into activity behavior
In this section, we describe the code additions or modifications that are needed in the activities in order to use fragments. In the Login activity, there's just one code change due to the fact that fragments are being used. In the onCreate method, a test if (btnNewUser!=null) has been added, which tests whether the New User button exists. This test is needed because in the layout file for Login in landscape mode this button does not exist. Of course, do note that Login now extends FragmentActivity, rather than the Activity base class.
public void onCreate(Bundle savedInstanceState) {
        …
    android.view.View btnLogin=(Button)findViewById(R.id.login_button);
    btnLogin.setOnClickListener(this);
    android.view.View btnCancel=(Button)findViewById(R.id.cancel_button);
    btnCancel.setOnClickListener(this);
    android.view.View btnNewUser=(Button)findViewById(R.id.new_user_button);
    if (btnNewUser!=null) btnNewUser.setOnClickListener(this);
}
When the layout of the activity is inflated into the activity's view (when the activity is created), the inflator reads the class name in the fragment entry and creates an instance of the fragment. Then, by calling onCreateView(…) on the fragment instance, the inflator inflates its view as well. This view is returned by onCreateView(…) and hooked into the activity's view. The Android framework does all this under the hood and — voila! — your activity, its view, and its fragments are ready for service.
We also show you how to implement the Account activity where an AccountFragment isn't declaratively incorporated into the activity, but is instead incorporated by using code. Take a look at the code for the Account activity:
package com.wiley.fordummies.androidsdk.tictactoe;
import com.wiley.fordummies.androidsdk.tictactoe.R;
…
//Fragment specific imports
//For Android 3.0 and above comment out the lines below
import android.support.v4.app.FragmentManager;
import android.support.v4.app.FragmentTransaction;
import android.support.v4.app.FragmentActivity;

// For Android 3.0 and above uncomment the lines below
// import android.app.FragmentManager;
// import android.app.FragmentTransaction;
// import android.app.FragmentActivity;

public class Account extends FragmentActivity implements OnClickListener{
    public void onCreate(Bundle savedInstanceState) {
        super.onCreate(savedInstanceState);
        setContentView(R.layout.account);
        // Install the Account fragment
        // For Android 3.0 and above comment out the line below

        AccountFragment accountFragment = new AccountFragment();

        FragmentManager fragmentManager = getSupportFragmentManager();
        // For Android 3.0 and above uncomment the line below
        // FragmentManager fragmentManager = getFragmentManager();
        FragmentTransaction fragmentTransaction =
                                    fragmentManager.beginTransaction();
        fragmentTransaction.add(R.id.accountdetails, accountFragment);
        fragmentTransaction.commit();

        // Initialize the Exit button
        View buttonExit= (Button)findViewById(R.id.exit_button);
        buttonExit.setOnClickListener(this);
     }
    public void onClick(View v) {
        switch (v.getId()) {
        case R.id.exit_button:
            finish();
            break;
        }
     }
}
In this code example, start by noting the package imports needed for using fragments. We include two sets of imports: one for SDK versions earlier than 3.0 and the other for building apps against Android 3.0 or higher.
Now look at the code itself: Notice how the Account activity inherits from FragmentActivity. (By the way, we missed this crucial step and spent half a day trying to figure out why our code simply wouldn't work.) Then note how a new fragment is created that is similar to any standard Java object.
Then the good stuff happens: A fragment manager is provided by the get FragmentManager() method, and then the newly created fragment is added to the FrameLayout component, named accountdetails, of the Account activity's view. (If this component is unfamiliar to you, see the section “Embedding fragments in activity layouts,” earlier in this chapter.) Finally, note how the fragment is added within a transaction enclosed by fragment Manager.beginTransaction() and fragmentManager.commit() calls.
That's it — you're ready to work with fragments!
Managing the Activity Life Cycle
An activity is taken through several stages by the Android runtime from the time the activity is created to the time it is killed. These stages make up the activity's life cycle. As the activity goes through each stage, a set of standard methods is invoked. These methods are known (naturally) as the life cycle methods of the activity. You can insert application-specific functionality by overriding these methods and providing your own implementation for them. For example, you can save the current state of an activity to a file or database before it is destroyed. Then when a new instance of the activity is started, this new instance can read back the persistent state, so that the activity appears to start where it left off.
To begin with, an activity is launched by either the Home application or another activity. As shown in Figure 3-7, an activity is then in one of these four states:
- Created: The activity was just created.
- Active: The activity is running and visible to users.
- Paused: The activity isn't running temporarily, because another activity has been brought to the foreground and is still visible. In this state, all member variables and locations in its execution code are maintained.
- Stopped: The activity has been obscured by another activity. Its member variables and other elements are still being maintained, but it's vulnerable to being destroyed by the Android runtime, if resources on the device are running low.
Within this overall life cycle are several transitions. The first is the transition of the activity to being Created (from the Zen state of not existing). The subsequent transitions are from Created to Active, from Active to Paused, from Paused back to Active, from Paused to Stopped, from Stopped back to Active, and from Stopped to no longer existing.
At every transition, the Android framework calls one of these methods on the activity:
- onCreate(Bundle savedInstanceState): Called immediately after the activity is created. You should set up the activity within this method — for example, create its views and reinitialize its state from the Bundle object (described in the section “Saving the transient state of activities”) that's passed to it by the Android runtime.
- onStart(): Called just before the activity becomes visible to the user. At this stage, you might load current data into the activity. Immediately after onStart() is completed, the method named onRestoreInstanceState(Bundle savedInstanceState) is called, so you can restore any instance state needed.
- onResume(): Called just before the activity starts interacting with the user. At this point, the activity is in the Active state. onResume()is always called after onStart() (refer to Figure 3-7). Thus, you can choose either onStart() or onResume() in which to implement any processing needed before the object becomes visible — such as retrieving fresh data.
Figure 3-7: The life cycle of an Android activity.
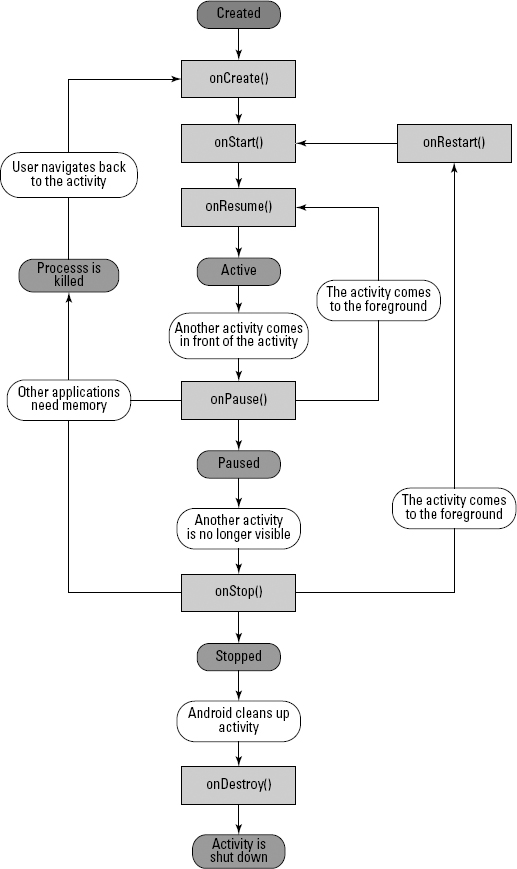
- onPause(): Called when Android decides to hide this activity, most often because it wants to start another one. This method is used to save any persistent data and gracefully return resources, such as threads and open files. onPause() should quickly do whatever it does because it's holding back the next activity from becoming active. Note that the process running an activity may be closed by Android in order to save memory and power. Thus, this method is the last of the methods guaranteed to be called by the Android runtime, and is thus often your last chance to save persistent activity state or clean up resources (such as open files).
- onStop(): Called when the activity is no longer visible to the user. This method will be called either because the activity is being destroyed or because a new activity has been started that is completely covering the original activity. This method might not be called if the process associated with the activity has already been destroyed by Android.
Incidentally, you might be wondering why both onPause() and onStop() are needed. The difference between the two is actually quite subtle. When one activity is launched over another, the newly launched activity may not cover the first activity completely. To see an example of this in Tic-Tac-Toe, launch the Help activity from the GameOptions activity. You will see that the Help UI doesn't quite cover the Game Options UI. In this case, onPause() will be called, but onStop() will not be. If the newly launched activity completely covers the current activity, then onStop() will also be called.
- onRestart(): Called just before the activity is started again from the Stopped state. If, by any chance, the process for the activity might have been destroyed, and its state lost, you need to restore the activity state in this method.
- onDestroy(): Called before the activity is destroyed. This method, which is the final call the activity receives, is called on two occasions:
- if finish() is called on the activity: For example, see the on Create method in the SplashScreen activity. You can see that finish is called on the SplashScreen activity itself after control is transferred to the Login activity.
- If the system is temporarily destroying this instance of the activity to save space.
You can distinguish between these scenarios by a call to the is Finishing() method. This method will return true for the first case or false in the second case.
Default implementations of these methods are provided in the Activity base class. Of course, you would need to override these default methods as necessary to customize the behavior activity. You will see that you must always override the onCreate() method. (We've always had to, anyway.)
Coordinating activities
When one activity starts another, the initiating activity pauses and can stop. The state transitions — and, therefore, the calls to the life cycle methods of the two activities — might need to be coordinated. Thus, the Android framework clearly defines the order of the life cycle methods:
- The current activity's onPause() method is called.
- The starting activity's onCreate(), onStart(), and onResume() methods are called in sequence.
- If the starting activity is no longer visible onscreen, its onStop() method is called.
Starting activities using intents and intent filters
Activities (within an application) are initiated by way of messages, known as intents. An intent contains an Intent object that specifies a desired action and is sent to the Android framework by a requesting activity. This Intent object is matched against a set of intent filters (registered with the Android framework by every activity that can be called by another). All activities that have intent filters matching the intent are activated and passed the intent object. These activities can examine and extract information from the intent and perform their function. The intent object can be retrieved by calling getIntent(…). If an existing activity is intended to handle a new intent, the Intent object will be passed to the activity by way of an onNew Intent() call.
The following list describes the four fields used for matching that can be set within an intent:
- The name of the component (optional): A field that explicitly specifies the target activity by using its fully qualified name (the package name plus the class name).
- The action to be performed: A string constant. The Android framework specifies a set of standard actions; the most common are shown in Table 3-1. If you “roll your own” string, make sure that it's guaranteed to be unique, by prefixing the package name to the string.
- The data to be sent to the activated object: The Uniform Resource Identifier (URI) of the data to be acted on and the MIME type of that data. (MIME is short for Multipurpose Internet Mail Extensions, a specification for describing how non-ASCII content — such as an image file — has been formatted).
- The category of the object to be activated: Essentially, additional information about this object, consisting of a string.
The common standard intents in Android are shown in Table 3-2. For a complete list of intent actions and categories, see http://developer.android.com/reference/android/content/Intent.html.
Table 3-1 Standard Intents, Targets, and Actions
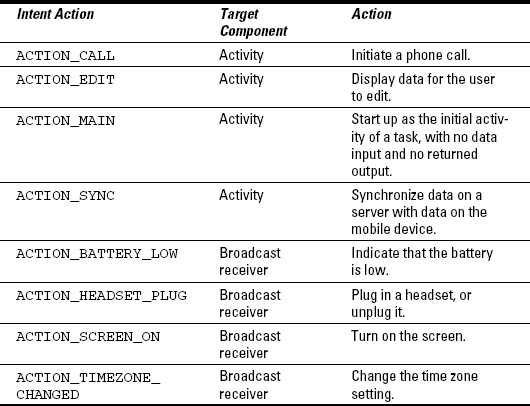
Table 3-2 Standard Intent Categories in Android
| Category | Meaning |
| CATEGORY_BROWSABLE | The target activity can be safely invoked by the browser to display data referenced by a link — for example, an image or an e-mail message, for example. |
| CATEGORY_GADGET | The activity can be embedded inside another activity that hosts gadgets. |
| CATEGORY_HOME | The activity displays the Home screen, the first screen the user sees when the device is turned on or when the HOME key is pressed. |
| CATEGORY_LAUNCHER | The activity can be the initial activity of a task and is listed in the top-level application launcher. |
| CATEGORY_PREFERENCE | The target activity is a preference panel. |
In the AndroidManifest.xml in the Tic-Tac-Toe application, you see that the SplashScreen activity (the initial activity in the Tic-Tac-Toe application) defines an intent filter with the action android.intent.action. MAIN and the category android.intent.category.LAUNCHER. Used together, these entries indicate that this activity is the first (or main) activity of the Tic-Tac-Toe application, and that it's launched from the Home application. The Login activity, on the other hand, is defining an intent filter with the string value “com.wiley.fordummies.androidsdk.tictactoe.Login”. This activity then responds to any invocation message containing this string. An intent is typically sent by a call to android.app.Activity.startActivity(Intent). Thus, the SplashScreen activity launches the Login activity by using the following call:
startActivity(new Intent(“com.wiley.fordummies.androidsdk.Login”));
The Account activity has no intent filter because this activity is invoked by a direct reference (specifically, by the Login activity). This is shown in the following call (from the onClick method of the Login activity):
startActivity(new Intent(this, Account.class));
Because all remaining activities within Tic-Tac-Toe are invoked using this direct strategy, these activities don't need intent filters and you don't need to define the filters in the AndroidManifest.xml file.
Saving the transient state of activities
Android tries to save the transient state of activities by shutting down applications that it believes aren't being used, such as applications that have been pushed into the background because the user has started up new ones. For example, a user playing Tic-Tac-Toe might be notified of an incoming e-mail message, causing him to switch to the Mail application to read the message. When the user returns to Tic-Tac-Toe, Android displays the screen that was previously open. Any data the user entered remains; in fact, the cursor even resumes blinking at the same spot.
A user who switches from the Tic-Tac-Toe application to spend time using the Mail application, for example, can still legitimately expect the game to return to the state it was in before the switch. After all, if Android shuts down Tic-Tac-Toe's process during the switch and preserves the state, why would the behavior be different simply because the user spent time using another application? In other words, the active state of all activities should be preserved when the application is shut down by Android, and then restored when the application is revisited. We're referring not to data that the application has saved to a file or database (also known as persistent state) but, rather, to the transient state, which changes as the application is used and ends when the user quits the application.
Incidentally, if the orientation of the device is changed, Android destroys and re-creates the current activity so that it can re-create its layout for the new orientation. Thus, to test whether transient state is being managed correctly, you can simply rotate the phone while the activity is still running to see if the pieces of data shown onscreen are retained after the orientation changes. This policy of destruction and re-creation upon change of orientation also means that you must ensure that the transient state is saved and restored whenever the orientation of the device changes.
To save and restore this transient state, you may simply use the built-in activities and views that the Android framework provides. Android saves the transient state of the user interface if Android kills your process, and then it restores the state when the user returns to the activity. To be precise, the base classes (Activity and View, PreferenceActivity, for example) implement onSaveInstanceState() and onRestoreInstanceState () methods that handle this save and restore.
If you implement your own views, you have to handle the transient state yourself, as described in this list:
- To capture the state before the activity is killed, you must implement an onSaveInstanceState(…) method for the activity. As we mention in the earlier section “Managing the Activity Life Cycle,” this method is called before onPause(…) is called.
- To extract and restore the saved state when the activity is started again, note that the saved state is passed to onCreate(…) and onRestore InstanceState(…). Both of these methods are called after onStart(…). Either method can extract the saved state and repopulate it in the activity.
The transient state is saved as name-value pairs in an o bject of the class Bundle that is passed to the re-created activity when it's restarted. To restore the activity's state, you must extract the value from the Bundle object and repopulate the activity's variables.
The following example is from the WhereAmI activity in Tic-Tac-Toe. Again, we show only the code that's relevant to state management:
package com.wiley.fordummies.androidsdk.tictactoe;
…
import android.os.Bundle;
…
public class WhereAmI extends MapActivity implements OnClickListener {
             …
    private String whereAmIString=null;
    private static final String WHEREAMISTRING=“WhereAmIString”;

    protected void onCreate(Bundle savedInstanceState) {
               …
    }

    public void onClick(View v) {
        switch(v.getId()){
        …
         case R.id.button_locate_me:
            Location myLocation=null;
            myLocation = myGeoLocator.getBestCurrentLocation();
             if(myLocation == null){
                myLocationField.setText(“GeoLocation not available. Retry#:”+
                                        locationQueryCount++);
             }else{
                …
               myLocationField.setText(whereAmIString=
                        myGeoLocator.getNameFromLocation(myLocation));
                …
             }
             break;
             …

         }
    }
         …
    protected void onSaveInstanceState (Bundle outState){
        super.onSaveInstanceState(outState);
        if (whereAmIString != null) outState.putString(WHEREAMISTRING,
               whereAmIString);
    }

    protected void onRestoreInstanceState (Bundle savedInstanceState){
        super.onRestoreInstanceState(savedInstanceState);
        whereAmIString = savedInstanceState.getString(WHEREAMISTRING);
        if (whereAmIString != null) myLocationField.setText(whereAmIString);
    }
}
Note that a descriptive name of the current location is being found in the onClick(…) method. This name is assigned to the private String variable whereAmIString. This string is saved to the Bundle outState passed in by the Android framework to the onSaveInstanceState(…) method. Finally, note that the string is extracted from the bundle in onRestoreInstanceState(…) and is assigned to the field myLocationField that displays the name of the location.
If the instance is intentionally destroyed (by the user tapping the Back key, for example), onSaveInstanceState(…) is not called. The user cannot return to the activity, so there's no reason to save the state.
Using tasks to manage the behavior of groups of activities
Whenever an activity is launched, Android places it inside a task — an Android entity that contains and manages groups of activities and runs inside (and corresponds to) a Linux process. A task is an implicit object because Android manages all tasks, and you as an application programmer cannot therefore create them (or gain access to them). However, you can control how specific activities behave within a task.
Because the information in this section is somewhat advanced, you're unlikely to need it in order to develop your first few Android applications. However, we mention the topic in this book for completeness — just so you know that this behavior exists.
An activity can be launched into a new task, such as when the Home application (also known as the Launcher) kicks off an application, or it can be launched into an existing task to cohabit with other activities already in that task. An activity can also move from one task to another after it has been launched into one task if it later finds a task that it likes better — or a task for which it has a greater affinity.
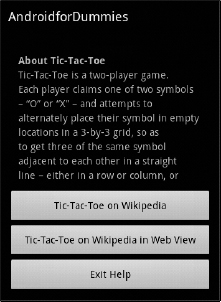
The activities in a task are arranged as a stack. If a task is active and a new activity is launched, it's typically placed on top of the stack in the same task and begins running. If the user taps the Back button, the new activity is popped off the stack (and stops running) while the previous activity in the task is brought to the top of the stack and resumes. You can clearly see this behavior when you click the Help button in the GameOptions activity: The Tic-Tac-Toe Help screen — that is, the Help activity — is launched on top of the GameOptions activity. Note that this Help activity is launched into the same task as GameOptions but placed on the top of the task stack. Note also, that because of the transparent user interface that the Help activity uses, you can see the GameOptions activity underneath it. When a user taps the Back button, the Help activity is popped off the stack and disappears, and the GameOptions activity becomes active again, as shown in Figure 3-8.
Figure 3-8: The GameOptions activity, covered by the Help activity.
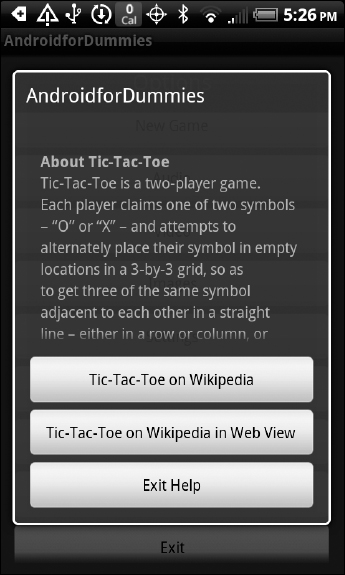
However, an activity might not necessarily be launched in the same task as the previously running activity. To determine in which task the activity is launched, you use a combination of two sets of directives:
- The intent that launches the activity: The intent can, for example (and we don't go into all the options here), request that the activity be launched into a new task, be moved to the top of the stack (if an activity of that class exists), or be reset to its initial state before processing the intent; or that a new instance of the activity be launched, but not if the activity is already running on top of the stack.
- Certain attributes of the launched activity as declared in the manifest file: An activity can declare an affinity for another in the AndroidManifest.xml by using the taskaffinity attribute. If it does so, an activity will be launched into an existing task if the task has an activity for which the new activity has declared an affinity.
An activity can also declare that it can have only one instance in any task via the launchmode attribute in the manifest file. This means that in addition to there being only one instance of the activity, it must be the only instance. Or an activity can declare that it can start in any task, but it must be moved to a task containing activities with which it has an affinity, if such a task were to be launched later. Finally, an activity can declare that it cannot be moved to another task once it has been launched in a particular task.
Implementing Services
You aren't likely to develop lots of services in comparison to the number of apps you develop, but every so often you need complementary functionality that is implemented as a service.
A service is intended to be run in the background, without the need for a user interaction, and hence no user interface. A service is meant to do its work behind the scenes, even as the user interacts with apps in the foreground. Thus, a service can be used to play music in the background, listen to events from the outside, or serve as an upload or download queue for print jobs, messages, or images.
Android provides two kinds of services:
- Local: Accessible only by a single application.
- Remote: Accessible by all applications on the device. (This type is also known as AIDL-supporting, AIDL, external, RPC, or bound service.)
We talk only about local services in this book, but you can find out more about remote services at
http://developer.android.com/guide/topics/fundamentals/services.
              html#CreatingBoundService
We illustrate how a local service is implemented by showing you an example of the MyPlaybackService in the Tic-Tac-Toe application, which plays music in the background. Here's the code for this service:
package com.wiley.fordummies.androidsdk.tictactoe;
import com.wiley.fordummies.androidsdk.tictactoe.R;
import android.app.Service;
import android.content.Intent;
import android.media.MediaPlayer;
import android.net.Uri;
import android.os.Bundle;
import android.os.IBinder;

public class MyPlaybackService extends Service {
    MediaPlayer player;
    @Override
    public IBinder onBind(Intent intent) {
        return null;
    }
    @Override
    public void onCreate() {
        player = MediaPlayer.create(this, R.raw.sampleaudio);
        player.setLooping(true);
    }

    @Override
    public int onStartCommand(Intent intent, int flags, int startId) {
        super.onStartCommand(intent, flags, startId);
        Bundle extras = intent.getExtras();
        if(extras !=null){
            String audioFileURIString = extras.getString(“URIString”);
            Uri audioFileURI=Uri.parse(audioFileURIString);
            try {
                player.reset();
                player.setDataSource(this.getApplicationContext(), audioFileURI);
                player.prepare();
            catch (Exception e) {
               // TODO Auto-generated catch block
               e.printStackTrace();
            }
        }
        player.start();
        return START_STICKY;
    }

    @Override
    public void onDestroy() {
        player.stop();
    }
}
The following list describes the main points in this listing (note that we cover only the service management aspects of this component — the functionality of this component with respect to playing music is covered in Chapter 11):
- As with activities, the Android framework calls the onCreate(…) method of the service after it has been created. This method is used to complete any setup needed for the service. In the service that's shown, this method creates a local member that is a MediaPlayer object. This object is used to play the music.
- When the service is started by using StartService(…) — see the following code sample — the method onStartCommand(…) of the service is called and the invocation parameters of StartService(…) are passed to the service. In this case, the URL of the audio file is passed in.
- When the service is terminated, onDestroy() is called so that the service can stop its activity (in this case, stop the audio player) and release any other resources.
Services versus threads
Threads, like services, work in the background. To determine when to use threads and when to use services, follow this rule of thumb: Use a thread whenever you have a single, timebounded task that's specific to a particular component of your application (such as a method listening for a touch to terminate a splash screen). In contrast, use a service to perform multiple tasks or tasks that are relevant to (or completed alongside) multiple components of your application, such as printing text or playing music.
Threads are more lightweight than services in that they consume fewer resources. They are also more vulnerable to being destroyed along with your app, if your app is killed by the operating system (for example, to free up memory). Services, on the other hand, are less likely to be killed along with the app. Because you can specify that a service be restarted if the operating system terminates it, the service is a more secure choice for large-grain activities, such as multiple uploads or downloads.
Note that a service runs in the main thread of its hosting process. If the service wants to perform a task in the background, it should spawn its own thread in which to do its work.
Shown next are extracts from the Audio activity that uses MyPlayback Service. The user interface for this activity has two buttons, Start and Stop, that start and stop the music service, respectively. (We omitted descriptions of two other buttons, Record and Exit, because they aren't relevant to the service.) Clicking the Start button starts the service by invoking startService(…). Clicking the Stop button stops the service by invoking stopService(…). Note that parameters to the service are passed via an Intent (which we described earlier in this chapter in the section “Starting activities using intents and intent filters”):
public class Audio extends Activity implements OnClickListener{
    private boolean notStarted=true;
    String audioFilePath=“/mnt/sdcard/SampleAudio.mp3”;
    Uri audioFileURI=null;
    …

    @Override
    protected void onCreate(Bundle savedInstanceState) {
        …
        Button buttonStart=(Button)findViewById(R.id.buttonAudioStart);
        buttonStart.setOnClickListener(this);
        Button buttonStop=(Button)findViewById(R.id.buttonAudioStop);
        buttonStop.setOnClickListener(this);
        …
        audioFileURI=Uri.fromFile(new File(audioFilePath));
     }

     public void onClick(View v) {
         switch(v.getId()){
             case R.id.buttonAudioStart:
                 if(notStarted){
                     Intent musicIntent=
                          new Intent(this, MyPlaybackService.class);
                     musicIntent.putExtra(“URIString”, audioFileURI.toString());
                     startService(musicIntent);
                     notStarted=false;
                 }
                 break;
                case R.id.buttonAudioStop:
                stopService(new Intent(this, MyPlaybackService.class));
                notStarted=true;
                break;
                        …
        }
     }
…
}
Managing Persistent Application Data
Now is a good time to talk about how to manage the persistent state of Android applications and services. Note that persistent data is data that needs to be preserved between uses of the application. For Tic-Tac-Toe this includes every user's game settings and game histories and all their user accounts (usernames and passwords). The Tic-Tac-Toe example illustrates how to save each of these three types of data in one of the three different ways in which persistent data can be saved:
- Shared preferences
- Files in the Linux file system
- The lightweight database known as SQLite
Using Shared Preferences to save persistent data
The first (and easiest) way to save application data persistently is to save the data as name-value pairs, using the shared preferences capability built into the Android development framework. In the “Setting application preferences” section, earlier in this chapter, we cover most of this topic except for how the preferences are saved. (In our example, it happens automatically.) Our explanation in this section goes a little deeper and adds to the example to show how preferences can be saved.
Android saved these preferences (or, more accurately, the name-value pairs of data that we're referring to as preferences) as a file on the Linux file system. You can specify a filename and the Android framework will either store it there, use a preference file per activity, or use a default preference file for the whole application. This last file is managed by the Android framework, and you don't know its name (so that you cannot corrupt it inadvertently). Note in all cases that the names of the different bits of data you want to store (the name-value pair) have to be unique within a file, or else you'll overwrite data that you might want to keep.
In the following code snippet from the Login activity, you set the login username as the name of the human player:
This example illustrates the following concepts:
- The PreferenceManager class in the Android framework has the static method getDefaultSharedPreferences(Context context), which returns a SharedPreferences object that represents the default preferences file.
- The settings.edit() method call creates an Editor object. The object is used to add or change name-value pairs via calls to putString(…) (which we just listed), putBoolean(…), and putInteger(…), for example.
- After the value has been set in the Editor object, it has to be committed by calling the commit() method.
To complete this example, we repeat the code (for the getName(..) method) from the Settings class that reads the player name from the Preferences area:
private final static String OPT_NAME=“name”;
private final static String OPT_NAME_DEF=“Player”;
…
public static String getName(Context context) {
        return PreferenceManager.getDefaultSharedPreferences(context)
                .getString(OPT_NAME, OPT_NAME_DEF);
}
Using files
Another way to save persistent application data is by writing it to a file. We haven't included examples of file usage in Tic-Tac-Toe because this is not Android-specific — just plain old Java coding. However we would like to point out a few things about how Android deals with files.
Files can be in either internal storage on the Linux file system or in external storage (for example, on an SD card). By default, files saved to internal storage are private to your application — other applications cannot gain access to them, and users cannot see them. When the user uninstalls your application, these files are removed.
Using external storage is similar except that you need to set File to a path inside the file system on the external storage device. Here's one way to do it:
Passing null to getExternalFilesDir(…) returns the root directory on the external storage device. Once you have a path to the file, writing to or reading from external storage is the same as writing to a file in internal storage.
You cannot assume that an external storage device is available. Also you must follow certain conventions in the pathnames of files if you want to share files with other applications or enable the automatic cleanup of an application's files on external storage when the application is uninstalled. We show you how to do this and more in Chapter 7, where we talk about making your applications scalable, maintainable, and reliable.
Employing SQLite
Another way of persisting application state is by using SQLite. To quote from the SQLite web page:
SQLite is a software library that implements a self-contained, server-less, zero-configuration, transactional SQL database engine. SQLite is the most widely deployed SQL database engine in the world.
In a nutshell, SQLite is a Java package that provides a collection of methods allowing you to create a local relational database, create tables in it, and read and write from those tables. Because the SQLite library is compactly written, its code occupies little space and is efficient and fast. It is therefore a suitable means of implementing rich relational database (RDBMS) functionality on a resource-constrained device while retaining most of the capability of an RDBMS to reliably read, write, and query data.
In the Tic-Tac-Toe application, you use SQLite to manage user accounts. We use a database named TicTacToe.db, in which we create a table named Accounts. Figure 3-9 shows what the Accounts table might look like.
Figure 3-9: Records in the Accounts table of the Tic-Tac-Toe SQLite database.
Most of the SQLite-specific code has been encapsulated into a Database Helper class, inside of which is a private inner class named TicTacToe OpenHelper. To see how database operations are implemented, we show you code from this class. To begin with, here's the private class TicTacToeOpenHelper:
private static class TicTacToeOpenHelper extends SQLiteOpenHelper {
    TicTacToeOpenHelper(Context context) {
        super(context, DATABASE_NAME, null, DATABASE_VERSION);
    }
    @Override
    public void onCreate(SQLiteDatabase db) {
        db.execSQL(“CREATE TABLE “ + TABLE_NAME +
                      “(id INTEGER PRIMARY KEY, name TEXT, password TEXT)”);
    }
    @Override
    public void onUpgrade(SQLiteDatabase db, int oldVersion, int newVersion) {
        Log.w(“Example”,
              “Upgrading database, this will drop and re-create the tables.”);
        db.execSQL(“DROP TABLE IF EXISTS “ + TABLE_NAME);
        onCreate(db);
    }
}
In these bits of code from the DatabaseHelper class, take a look at how the database is created:
private static final String
    INSERT=“insert into “ + TABLE_NAME + “(name, password) values (?, ?)” ;
public DatabaseHelper(Context context) {
    this.context=context;
    TicTacToeOpenHelper openHelper=new TicTacToeOpenHelper(this.context);
    this.db=openHelper.getWritableDatabase();
    this.insertStmt=this.db.compileStatement(INSERT);
}
A record is inserted into the database this way:
public long insert(String name, String password) {
    this.insertStmt.bindString(1, name);
    this.insertStmt.bindString(2, password);
    return this.insertStmt.executeInsert();
}
The following records that correspond to a username are queried and returned as a list:
public List<String> selectAll(String username, String password) {
    List<String> list=new ArrayList<String>();
    Cursor cursor=
        this.db.query(TABLE_NAME,
                      new String[] { “name”, “password” },
                      “name=’”+ username +”’ AND password= ‘”+
                         password+”’”, null, null, null, “name desc”);
    if (cursor.moveToFirst()) {
        do {
            list.add(cursor.getString(0));
            list.add(cursor.getString(1));
        } while (cursor.moveToNext());
    }
    if (cursor != null && !cursor.isClosed()) {
        cursor.close();
    }
    return list;
}
Finally, in the checkLogin() method in the Login activity, you test for a successful login by checking the size of the list returned in the selectAll method in the preceding code block:
private void checkLogin(){
    String username=this.userNameEditableField.getText().toString();
    String password=this.passwordEditableField.getText().toString();
    this.dh=new DatabaseHelper(this);
    List<String> names=this.dh.selectAll(username,password);
    if(names.size() >0){ // Login successful
    …
    }
…
}
Sharing data across applications through content providers
Suppose that you win a bunch of games against the computer and you're so excited that you just want to tell somebody. Wouldn't it be fun if the Tic-Tac-Toe application provided you with the capability to look up a friend's contact information in your address book so that you can call and gloat?
As your applications become richer in functionality, you generally find that you need to access data that's managed by other applications. Maybe you're writing a shared calendar application that lets you enter meetings and appointments. Being able to access the address book from your phone would be extremely useful, and much more convenient, so that the calendar can use these same entries rather than have to store its own addresses.
You can certainly share data using files by making them readable or writable by the world (by all other applications). In this all-or-nothing strategy, however, you share either the entire file or none of it, and you share it with every other application or with no application. Also, the format of the file has to be exposed and understood by all applications that are interested in it. Finally, the sharing application cannot enforce the management of the shared data in particular ways, such as enforcing the use of transactions. In other words, this means of sharing is easy but not optimum. To standardize, and hence make convenient, data sharing across applications, the Android SDK provides an abstraction, known as a content provider, which provides a standard interface for querying data and modifying and adding to it.
Android also makes available several built-in content providers for contacts in your address book, for various types of media, and for a dictionary of user-specified words. We use the Tic-Tac-Toe example to show you how to use the Contacts content provider while illustrating content provider concepts.
In Tic-Tac-Toe, you create a ContactsView activity, which implements browsing contacts. Here's the code for the onCreate method of that activity:
public void onCreate(Bundle savedInstanceState) {
    super.onCreate(savedInstanceState);
    setContentView(R.layout.contacts);
    TextView contactView=(TextView) findViewById(R.id.contactsView);
    Cursor cursor=getContacts();
    while (cursor.moveToNext()) {
        String displayName=
            cursor.getString(cursor.getColumnIndex(
            ContactsContract.Data.DISPLAY_NAME));
            contactView.append(“Name: ”);
            contactView.append(displayName);
            contactView.append(“
”);
    }
}
This method is calling a local method — getContacts — that's returning a data structure known as a cursor, which, as you might already know, is a reference to a collection of similar data elements (also known as records) identified via a query. Every time you request (that is, your code requests) a record from the cursor, it retrieves and provides a new (unprocessed) element so that you can process it.
This example illustrates a few concepts — some explicitly and some implicitly. The first, of course, is how to retrieve records by using a cursor. Implicit in the use of the cursor is that the (only) data model the content provider exposes (how it presents the data that it manages) is as a table with columns and that contains rows of records. Note: Internally, the content provider can store the data however it wants. Passing the constant ContactsContract.Data.DISPLAY_NAME to the cursor.getColumnIndex(…) method returns the column index corresponding to the column name that, in turn, corresponds to the display name of the contact.
Next, you have to know the type of data being retrieved. In this case, the data to be extracted is the display name of the contact, which is a string. The data is then extracted from the cursor by using getString, which takes the aforementioned index as a parameter.
The rest of the code in onCreate retrieves contact elements by using the cursor, extracting the display name of each contact, and displaying the name by appending it to the view of the ContactView activity, which is a TextView component.
Here's a look at getContacts to help you understand more about content providers and how the cursor was created in the first place:
private Cursor getContacts() {
    Uri uri=ContactsContract.Contacts.CONTENT_URI;
    String[] columns=new String[]{ContactsContract.Contacts._ID,
                                    ContactsContract.Contacts.DISPLAY_NAME};
    String selection=ContactsContract.Contacts.IN_VISIBLE_GROUP +
                           “='”+ (“1”)+“'”
    String[] selectionArgs=null;
    String sortOrder=ContactsContract.Contacts.DISPLAY_NAME+
                       “ COLLATE LOCALIZED ASC”;
    return this.managedQuery(uri, columns, selection, selectionArgs, sortOrder);
}
Please note the following about the above code:
- The class that manages phone contacts is named ContactsContract.Contacts.
- A content provider often manages many different collections of data, each of which must, of course, be exposed as a table. Every collection must be identified by using a unique URI.
 A URI, or Universal Resource Identifier, is a World Wide Web (WWW) standard for exposing a resource — such as a collection of data that is stored remotely on the web or locally on a computer. All URIs for content providers begin with the string “content://”.
Constants for standard URI on your Android device have been defined in the appropriate classes. The constant ContactsContract.Contacts.CONTENT_URI has therefore been set as the URI for the contacts on your computer.
- After you know the URI, you have to set the columns you need in an array of strings. In the following example, you're setting two columns in the string array Columns:
- _ID: The name of a special column that contains a unique identifier for each row
- DISPLAY_NAME:: The descriptive display name of each contact
- Next, you select the rows you need from this table by specifying a select condition that's similar to a WHERE class in a database query. To make contacts visible, you set this clause to be ContactsContract. Contacts.IN_VISIBLE_GROUP=1. Note how the query string is being formulated (by using string concatenations) in order to specify this line:
String selection=ContactsContract.Contacts.IN_VISIBLE_GROUP +
                                “='”+ (“1”) + “'”;
Essentially, = 1 means true. - This parameter selectionArgs may be used to specify additional selection arguments. In this example we have left it as null.
- We have specified COLLATE LOCALIZED ASC as the sort order as the fifth and final parameter. This means that the results of the query will be sorted in ASCII order, as per the local language setting.
- The query is invoked by using the statement this.managedQuery(…). It returns the cursor that is used in the onCreate(..) method to extract the display names of the contacts that are populated on the view.
- this.managedQuery(…) is doing more than executing the query and returning the cursor. It's putting the cursor under management of the activity. If the activity is paused, deactivated, or reactivated, therefore, so too is the cursor.
There is one last task to complete in order for the code to work properly. Note that Tic-Tac-Toe is reading the user's address book. This is private data for which the application must be granted access. So, in the AndroidManifest.xml file, we have added the following entry to request access to the content provider:
<uses-permission android:name=“android.permission.READ_CONTACTS”/>
When the Tic-Tac-Toe application is installed on the Android device, the user is prompted to allow the permission. If access is allowed, all is well and good. If not, this piece of functionality is disallowed.
The application is now ready to be run. When you enter the ContactsView activity, you see a display that looks like the one shown in Figure 3-10.
Figure 3-10: Displaying contacts in the Contacts View activity.