
9. Address Book App
Objectives
In this chapter you’ll:
![]() Use
Use FragmentTransactions and the back stack to dynamically attach Fragments to and detach Fragments from the GUI.
![]() Use a
Use a RecyclerView to display data from a database.
![]() Create and open databases with
Create and open databases with SQLiteOpenHelper.
![]() Use a
Use a ContentProvider and a SQLiteDatabase object to interact with data in a SQLite database.
![]() Use a
Use a ContentResolver to invoke methods of a ContentProvider to perform tasks with a database.
![]() Use a
Use a LoaderManager and Loaders to perform database access asynchronously outside the GUI thread.
![]() Use
Use Cursors to manipulate database query results.
![]() Define styles containing common GUI attributes and values, then apply them to multiple GUI components.
Define styles containing common GUI attributes and values, then apply them to multiple GUI components.
9.2 Test-Driving the Address Book App
9.3.1 Displaying Fragments with FragmentTransactions
9.3.2 Communicating Data Between a Fragment and a Host Activity
9.3.3 Manipulating a SQLite Database
9.3.4 ContentProviders and ContentResolvers
9.3.5 Loader and LoaderManager—Asynchronous Database Access
9.3.6 Defining Styles and Applying Them to GUI Components
9.3.7 Specifying a TextView Background
9.4 Building the GUI and Resource Files
9.4.2 Creating the App’s Classes
9.4.8 ContactsFragment’s Layout
9.4.10 AddEditFragment’s Layout
9.5 Overview of This Chapter’s Classes
9.7 AddressBookDatabaseHelper Class
9.8 AddressBookContentProvider Class
9.8.1 AddressBookContentProvider Fields
9.8.2 Overridden Methods onCreate and getType
9.8.4 Overridden Method insert
9.8.5 Overridden Method update
9.8.6 Overridden Method delete
9.9.1 Superclass, Implemented Interfaces and Fields
9.9.2 Overridden Method onCreate
9.9.3 ContactsFragment.ContactsFragmentListener Methods
9.9.5 Method displayAddEditFragment
9.9.6 DetailFragment.DetailFragmentListener Methods
9.9.7 AddEditFragment.AddEditFragmentListener Method
9.10.1 Superclass and Implemented Interface
9.10.2 ContactsFragmentListener
9.10.4 Overridden Fragment Method onCreateView
9.10.5 Overridden Fragment Methods onAttach and onDetach
9.10.6 Overridden Fragment Method onActivityCreated
9.10.7 Method updateContactList
9.10.8 LoaderManager.LoaderCallbacks<Cursor> Methods
9.12.1 Superclass and Implemented Interface
9.12.2 AddEditFragmentListener
9.12.4 Overridden Fragment Methods onAttach, onDetach and onCreateView
9.12.5 TextWatcher nameChangedListener and Method updateSaveButtonFAB
9.12.6 View.OnClickListener saveContactButtonClicked and Method saveContact
9.12.7 LoaderManager.LoaderCallbacks<Cursor> Methods
9.13.1 Superclass and Implemented Interface
9.13.4 Overridden Methods onAttach, onDetach and onCreateView
9.13.5 Overridden Methods onCreateOptionsMenu and onOptionsItemSelected
9.13.6 Method deleteContact and DialogFragment confirmDelete
9.13.7 LoaderManager.LoaderCallback<Cursor> Methods
Self-Review Exercises | Answers to Self-Review Exercises | Exercises
9.1 Introduction
The Address Book app (Fig. 9.1) provides convenient access to contact information that’s stored in a SQLite database on the device. You can:
• scroll through an alphabetical contact list
• view a contact’s details by touching a contact’s name in the contact list
• add new contacts
• edit or delete existing contacts.
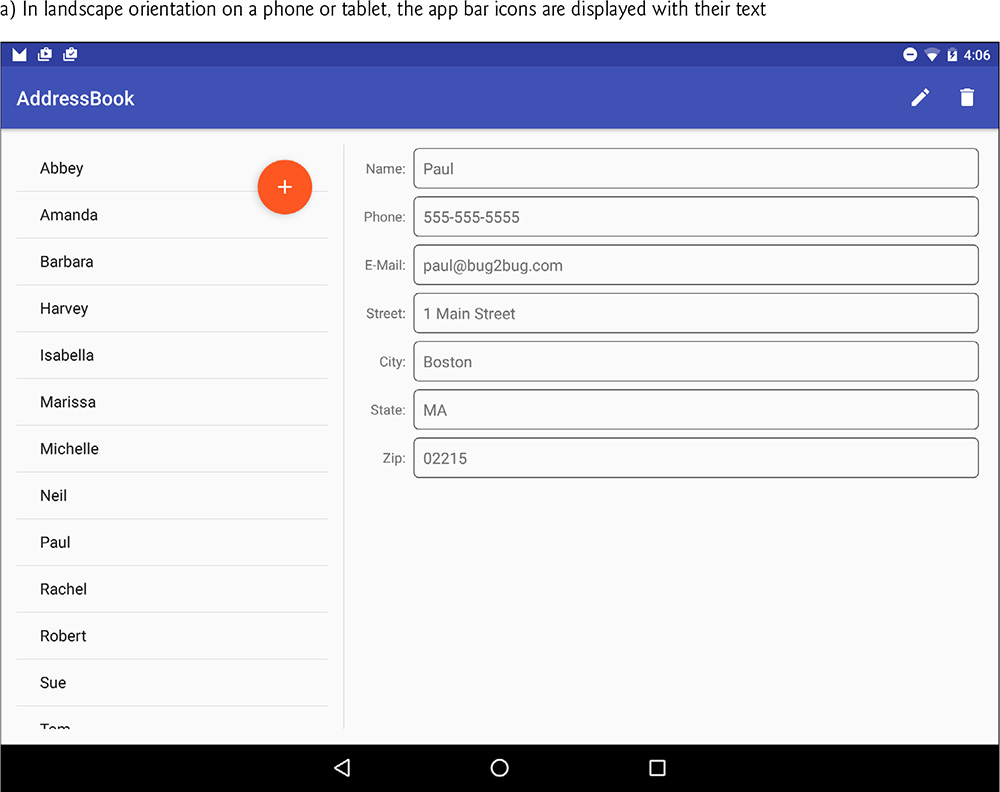
The app provides a separate tablet layout (Fig. 9.2) that always displays the contact list in one third of the screen and uses the screen’s remaining two thirds to display either the selected contact’s data or the screen for adding and editing a contact.

This app presents several new technologies:
• You’ll dynamically add Fragments to and remove Fragments from an Activity’s GUI using FragmentTransactions. You’ll also take advantage of the Fragment back stack to enable back-button support, so the user can navigate backward through the Fragments that have been displayed.
• You’ll display database data in a RecyclerView.
• You’ll create and open a database with a subclass of SQLiteOpenHelper.
• You’ll use a ContentProvider, a ContentResolver and a SQLiteDatabase object to perform database insert, update, delete and query operations.
• You’ll use a LoaderManager and Loaders to perform database access asynchronously outside the GUI thread and to receive those results in the GUI thread.
• Finally, you’ll define styles containing common GUI attributes and values, then apply them to multiple GUI components.
First, you’ll test-drive the app. Then we’ll overview the technologies we used to build it. Next, you’ll create the app’s GUI and resource files. Finally, we’ll present and walk through the app’s complete source code, discussing the app’s new features in more detail.
9.2 Test-Driving the Address Book App
Opening and Running the App
Open Android Studio and open the Address Book app from the AddressBook folder in the book’s examples folder, then execute the app in the AVD or on a device. This builds the project and runs the app.
9.2.1 Adding a Contact
The first time you run the app, the contact list will be empty. Touch the ![]()
FloatingActionButton to display the screen for adding a new entry (Fig. 9.3). The app requires each contact to have a name, so the save (![]() )
) FloatingActionButton appears only when the Name EditText is not empty. After adding the contact’s information, touch ![]() to store the contact in the database and return to the app’s main screen. If you choose not to add the contact, you can simply touch the device’s back button to return to the main screen. Add more contacts if you wish. On a tablet, after adding a contact, the new contact’s details are displayed next to the contact list (Fig. 9.2). Notice that on tablets, the contact list is always displayed.
to store the contact in the database and return to the app’s main screen. If you choose not to add the contact, you can simply touch the device’s back button to return to the main screen. Add more contacts if you wish. On a tablet, after adding a contact, the new contact’s details are displayed next to the contact list (Fig. 9.2). Notice that on tablets, the contact list is always displayed.

9.2.2 Viewing a Contact
On a phone or phone AVD, touch the name of the contact you just added to view that contact’s details (as you saw in Fig. 9.1). Again, on a tablet, the details are displayed automatically to the right of the contact list (Fig. 9.2).
9.2.3 Editing a Contact
While viewing the contact’s details, touch ![]() on the app bar to display a screen of
on the app bar to display a screen of EditTexts that are prepopulated with the contact’s data (Fig. 9.4). Edit the data as necessary, then touch the FloatingActionButton ![]() to store the updated contact in the database and return to the app’s main screen. If you choose not to edit the contact, you can simply touch the device’s back button (
to store the updated contact in the database and return to the app’s main screen. If you choose not to edit the contact, you can simply touch the device’s back button (![]() ) to return to the prior screen. On a tablet, after editing a contact, the updated contact details are displayed to the right of the contact list.
) to return to the prior screen. On a tablet, after editing a contact, the updated contact details are displayed to the right of the contact list.

9.2.4 Deleting a Contact
While viewing the contact’s details, touch ![]() on the app bar to delete the contact. A dialog will ask you to confirm this action (Fig. 9.5). Touching DELETE removes the contact from the database and the app will display the updated contact list. Touching CANCEL retains the contact.
on the app bar to delete the contact. A dialog will ask you to confirm this action (Fig. 9.5). Touching DELETE removes the contact from the database and the app will display the updated contact list. Touching CANCEL retains the contact.

9.3 Technologies Overview
This section introduces the features you’ll use to build the Address Book app.
9.3.1 Displaying Fragments with FragmentTransactions
In earlier apps that used Fragments, you declared each Fragment in an Activity’s layout or, for a DialogFragment, called its show method to create it. The Flag Quiz app demonstrated how to use multiple activities to host each of the app’s Fragments on a phone device, and a single Activity to host multiple Fragments on a tablet device.
In this app, you’ll use only one Activity to host all of the app’s Fragments. On a phone-sized device, you’ll display one Fragment at a time. On a tablet, you’ll always display the Fragment containing the contact list and display the Fragments for viewing, adding and editing contacts as they’re needed. To do this, you’ll use the FragmentManager and FragmentTransactions to dynamically display Fragments. In addition, you’ll use Android’s Fragment back stack—a data structure that stores Fragments in last-in-first-out (LIFO) order—to provide automatic support for Android’s back button (![]() ). This enables users to go back to prior
). This enables users to go back to prior Fragments via the back button. For more information on Fragments and FragmentTransactions, visit:
9.3.2 Communicating Data Between a Fragment and a Host Activity
To communicate data between Fragments and a host Activity or the Activity’s other Fragments, it’s considered best practice to do so through the host Activity—this makes the Fragments more reusable, because they do not refer to one another directly. Typically, each Fragment defines an interface of callback methods that are implemented in the host Activity. We’ll use this technique to enable this app’s MainActivity to be notified when the user:
• selects a contact to display,
• touches the contact-list Fragment’s add (![]() )
) FloatingActionButton,
• touches the contact details Fragment’s ![]() or
or ![]() actions,
actions,
• or touches ![]() to finish editing an existing contact or adding a new one.
to finish editing an existing contact or adding a new one.
9.3.3 Manipulating a SQLite Database
The contact information is stored in a SQLite database. According to www.sqlite.org, SQLite is one of the world’s most widely deployed database engines. You’ll use a subclass of SQLiteOpenHelper (package android.database.sqlite) to simplify creating the database and to obtain a SQLiteDatabase object (package android.database.sqlite) for manipulating the database’s contents. Database queries are performed with Structured Query Language (SQL). Query results are managed via a Cursor (package android.database). For more information on SQLite in Android, visit:
9.3.4 ContentProviders and ContentResolvers
A ContentProvider (package android.provider) exposes an app’s data for use in that app or in other apps. Android provides various built-in ContentProviders. For example, your apps can interact with data from the Android Contacts and Calendar apps. There are also ContentProviders for various telephony features, the media store (e.g., for images/video) and the user dictionary (used with Android’s predictive text-input capabilities).
In addition to exposing data to other apps, ContentProviders also enable your app to provide custom search suggestions when a user performs searches on a device and are used to support copy-and-paste operations between apps.
In this app, we use a ContentProvider to help access the database asynchronously outside the GUI thread—this is required when working with Loaders and the LoaderManager (introduced in Section 9.3.5). You’ll define a subclass of ContentProvider that specifies how to:
• query the database to locate a specific contact or all the contacts
• insert a new contact into the database
• update an existing contact in the database, and
• delete an existing contact from the database.
The ContentProvider will use a subclass of SQLiteOpenHelper to create the database and to obtain SQLiteDatabase objects to perform the preceding tasks. When changes are made to the database, the ContentProvider will notify listeners of those changes so data can be updated in the GUI.
Uris
The ContentProvider will define Uris that help determine the tasks to perform. For example, in this app the ContentProvider’s query method is used for two different queries—one that returns a Cursor for a single contact and one that returns a Cursor for the names of all contacts in the database.
ContentResolver
To invoke the ContentProvider’s query, insert, update and delete capabilities, we’ll use the corresponding methods of the Activity’s built-in ContentResolver (package android.content). The ContentProvider and ContentResolver handle communication for you—including between apps if your ContentProvider exposes its data to other apps. As you’ll see, the ContentResolver’s methods receive as their first argument a Uri that specifies the ContentProvider to access. Each ContentResolver method invokes the corresponding method of the ContentProvider, which uses the Uri to help determine the task to perform. For more information on ContentProviders and ContentResolvers, see:
9.3.5 Loader and LoaderManager—Asynchronous Database Access
As we’ve stated previously, long-running operations or operations that block execution until they complete (e.g., file and database access) should be performed outside the GUI thread. This helps maintain application responsiveness and avoid Activity Not Responding (ANR) dialogs that appear when Android determines that the GUI is not responsive. Loaders and the LoaderManager help you perform asynchronous data access from any Activity or Fragment.
Loaders
A Loader (package android.content) performs asynchronous data access. When interacting with a ContentProvider to load and manipulate data, you’ll typically use a CursorLoader—a subclass of AsyncTaskLoader that uses an AsyncTask to perform the data access in a separate thread. Loaders also:
• Watch for changes to the corresponding data source and make the updated data available to the corresponding Activity or Fragment.
• Reconnect to the last Loader’s Cursor, rather than perform a new query, when a configuration change occurs.
LoaderManager and LoaderManager.LoaderCallbacks
An Activity’s or Fragment’s Loaders are created and managed by its LoaderManager (package android.app), which ties each Loader’s lifecycle to its Activity’s or Fragment’s lifecycle. In addition, a LoaderManager invokes methods of the LoaderManager.LoaderCallbacks interface to notify an Activity or Fragment when a Loader
• should be created,
• finishes loading its data, or
• is reset and the data is no longer available.
You’ll use Loaders and LoaderManagers in several of this app’s Fragment subclasses. For more information about Loaders and LoaderManagers, see:
9.3.6 Defining Styles and Applying Them to GUI Components
You can define common GUI component attribute–value pairs as style resources (Section 9.4.5). You can then apply the styles to all components that share those values (Section 9.4.9) by using the style attribute. Any subsequent changes you make to a style are automatically applied to all GUI components that use it. We use this to style the TextViews that display a contact’s information. For more information on styles, visit:
9.3.7 Specifying a TextView Background
By default TextViews do not have a border. To define one, you can specify a Drawable as the value for the TextView’s android:background attribute. The Drawable could be an image, but in this app you’ll define a Drawable as a shape in a resource file (Section 9.4.6). Like an image, the resource file for such a Drawable is defined in one (or more) of the app’s drawable folders. For more information on drawable resources, visit:
9.4 Building the GUI and Resource Files
In this section, you’ll create the Address Book app’s additional Java source-code files, resource files and GUI layout files.
9.4.1 Creating the Project
Create a new project using the Blank Activity template. When configuring the project, check the Use a Fragment checkbox. Specify the following values in the Create New Project dialog’s New Project step:
• Application name: Address Book
• Company Domain: deitel.com (or specify your own domain name)
Follow the steps you used in earlier apps to add an app icon to your project. Follow the steps in Section 4.4.3 to configure Java SE 7 support for the project. Follow the steps in Section 8.4.3 to add the RecyclerView library to this project. In colors.xml, change the colorAccent color’s value to #FF4081.
9.4.2 Creating the App’s Classes
When you create this project, Android Studio defines the classes MainActivity and MainActivityFragment for you. In this app, we renamed MainActivityFragment as ContactsFragment. To do so:
1. Open class MainActivityFragment in the editor.
2. Right click the class name and select Refactor > Rename.... The IDE highlights the class name for editing.
3. Type ContactsFragment and press Enter. The IDE renames the class and its constructor, and changes class’s file name.
Package com.deitel.addressbook
This app consists of seven additional classes that you must add to the project (File > New > Java Class). The additional classes in package com.deitel.addressbook are:
• Class ContactsAdapter is a subclass of RecyclerView.Adapter that supplies data to the ContactsFragment’s RecyclerView.
• Class AddEditFragment is a subclass of Fragment that provides a GUI for adding a new contact or editing an existing one.
• Class DetailFragment is a subclass of Fragment that displays one contact’s data and provides menu items for editing and deleting that contact.
• Class ItemDivider is a subclass of RecyclerView.ItemDecoration that the ContactsFragment’s RecyclerView uses to draw a horizontal line between items. This class is identical to the one in Section 8.7, so you can simply copy this class from the Twitter Searches app’s project and paste it into the app > java > com.deitel.addressbook node in the Project window.
Package com.deitel.addressbook.data
This class also defines a nested package named com.deitel.addressbook.data that contains the classes used to manipulate this app’s database. To create the package:
1. In the Project window, right click the package com.deitel.addressbook and select New > Package.
2. Type data as the new package name to create the com.deitel.addressbook.data package.
Next add the following classes to the com.deitel.addressbook.data package:
• Class DatabaseDescription describes the database’s contacts table.
• Class AddressBookDatabaseHelper is a subclass of SQLiteOpenHelper that creates the database and is used to access the database.
• Class AddressBookContentProvider is a subclass of ContentProvider that defines how to manipulate the database. To create this class, use New > Other > Content Provider. For URI authorities specify com.deitel.addressbook.data and uncheck the Exported checkbox, then click Finish. Unchecking Exported indicates that this ContentProvider is for use only in this app. The IDE defines a subclass of ContentProvider and overrides its required methods. In addition, the IDE declares the ContentProvider AndroidManifest.xml as a <provider> element nested in the <application> element. This is required to register the ContentProvider with the Android operating system—not only for use in this app, but for use in other apps (when the ContentProvider is exported).
We overview all of the classes in Section 9.5 and discuss their details in Sections 9.6–9.13.
9.4.3 Add the App’s Icons
Use Android Studio’s Vector Asset Studio (Section 4.4.9) to add the material design save (![]() ), add (
), add (![]() ), edit (
), edit (![]() ) and delete (
) and delete (![]() ) icons to the project—this will be used as the
) icons to the project—this will be used as the FloatingActionButton’s icon. After adding the vector icons, go to the project’s res/drawable folder, open each icon’s XML file and change the <path> element’s android:fillColor to
"@android:color/white"
9.4.4 strings.xml
Figure 9.6 shows this app’s String resource names and corresponding values. Double click strings.xml in the res/values folder to display the resource editor for creating these String resources.


9.4.5 styles.xml
In this section, you’ll define the styles for the DetailFragment’s TextViews that display a contact’s information (Section 9.4.9). Like other resources, style resources are placed in the app’s res/values folder. When you create a project, the IDE creates a styles.xml file containing predefined styles. Each new style you create specifies a name that’s used to apply that style to GUI components and one or more items specifying property values to apply. To create the new styles, in the app’s res/values folder, open the styles.xml file then add the code in Fig. 9.7 before the file’s closing </resources> tag. When you’re done, save and close styles.xml.
1 <style name="ContactLabelTextView">
2 <item name="android:layout_width">wrap_content</item>
3 <item name="android:layout_height">wrap_content</item>
4 <item name="android:layout_gravity">right|center_vertical</item>
5 </style>
6
7 <style name="ContactTextView">
8 <item name="android:layout_width">wrap_content</item>
9 <item name="android:layout_height">wrap_content</item>
10 <item name="android:layout_gravity">fill_horizontal</item>
11 <item name="android:textSize">16sp</item>
12 <item name="android:background">@drawable/textview_border</item>
13 </style>
Fig. 9.7 | New styles for formatting the DetailFragment’s TextViews.
Lines 1–5 define a new style named ContactLabelTextView that defines values for the layout properties layout_width, layout_height and layout_gravity. You’ll apply this style to the DetailFragment’s TextViews displayed to the left of each piece of a contact’s information. Each new style consists of a style element containing item elements. The style’s name is used to apply it. An item element’s name specifies the property to set and its value is assigned to that property when the style is applied to a view. Lines 7–13 define another new style named ContactTextView that will be applied to the DetailFragment’s TextViews that display the contact’s information. Line 12 sets the property android:background to the drawable resource defined in Section 9.4.6.
9.4.6 textview_border.xml
The style ContactTextView that you created in the preceding section defines the appearance of the TextViews that are used to display a contact’s details. You specified a Drawable (i.e., an image or graphic) named @drawable/textview_border as the value for the TextView’s android:background attribute. In this section, you’ll define that Drawable in the app’s res/drawable folder. To define the Drawable:
1. Right click the res/drawable folder and select New > Drawable resource file.
2. Specify textview_border.xml as the File name and click OK.
3. Replace the file’s contents with the XML code in Fig. 9.8.
1 <?xml version="1.0" encoding="utf-8"?>
2 <shape xmlns:android="http://schemas.android.com/apk/res/android"
3 android:shape="rectangle">
4 <corners android:radius="5dp"/>
5 <stroke android:width="1dp" android:color="#555"/>
6 <padding android:top="10dp" android:left="10dp" android:bottom="10dp"
7 android:right="10dp"/>
8 </shape>
Fig. 9.8 | XML representation of a Drawable that’s used to place a border on a TextView.
The shape element’s android:shape attribute (line 3) can have the value "rectangle" (used in this example), "oval", "line" or "ring". The corners element (line 4) specifies the rectangle’s corner radius, which rounds the corners. The stroke element (line 5) defines the rectangle’s line width and line color. The padding element (lines 6–7) specifies the spacing around the content in the element to which this Drawable is applied. You must specify the top, left, bottom and right padding amounts separately. The complete details of defining shapes can be viewed at:
9.4.7 MainActivity’s Layout
By default, MainActivity’s layout contains a FloatingActionButton and includes the layout file content_main.xml. In this app, we provide FloatingActionButtons as needed in the app’s Fragments. For this reason, open activity_main.xml in the res/layout folder and remove the predefined FloatingActionButton. Also, set the CoordinatorLayout’s id to coordinatorLayout—we use this when displaying SnackBars. Remove the code that configures the FloatingActionButton from MainActivity’s onCreate method.
Phone Layout: content_main.xml
In this app, you’ll provide two content_main.xml layouts to be included into MainActivity—one for phone-sized devices and one for tablet-sized devices. For the phone layout, open content_main.xml in the res/layout folder and replace its contents with the XML in Fig. 9.9. MainActivity dynamically displays the app’s Fragments in the FrameLayout named fragmentContainer. This layout fills the available space in MainActivity’s layout with 16dp padding on all sides. The app:layout_behavior property (line 20) is used by activity_main.xml’s CoordinatorLayout to manage interactions between its views. Setting this property ensures that the contents of the FrameLayout scroll below the Toolbar defined in activity_main.xml.
9 <FrameLayout
10 android:id="@+id/fragmentContainer"
11 xmlns:android="http://schemas.android.com/apk/res/android"
12 xmlns:app="http://schemas.android.com/apk/res-auto"
13 xmlns:tools="http://schemas.android.com/tools"
14 android:layout_width="match_parent"
15 android:layout_height="match_parent"
16 android:paddingBottom="@dimen/activity_vertical_margin"
17 android:paddingLeft="@dimen/activity_horizontal_margin"
18 android:paddingRight="@dimen/activity_horizontal_margin"
19 android:paddingTop="@dimen/activity_vertical_margin"
20 app:layout_behavior="@string/appbar_scrolling_view_behavior"
21 tools:context=".MainActivity"/>
Fig. 9.9 | content_main.xml used on a phone device.
Tablet Layout: content_main.xml for Large Devices
Create the new tablet layout content_main.xml (as in Section 4.5.4). This layout should use a horizontal LinearLayout containing a ContactsFragment and an empty FrameLayout as shown in Fig. 9.10. Create the divider_margin resource (16dp) used in lines 24 and 32. This LinearLayout uses several properties that we have not discussed previously:
• divider (line 9)—This property specifies a drawable resource that’s used to separate items in the LinearLayout. In this case, we use the predefined Android drawable theme resource ?android:listDivider. The ?android: indicates that the LinearLayout should use the list divider defined in the current theme.
• showDividers (line 15)—This property is used with the divider property to specify where the dividers appear—in this case, middle indicates that the dividers should appear only between the LinearLayout’s elements. You can also display a divider before the first item in the layout (beginning) and after the last item (end), and you can combine these values using |.
• weightSum (line 16)—This helps allocate the horizontal space between the ContactsFragment and FrameLayout. Setting weightSum to 3, then setting the ContactsFragment’s and FrameLayout’s layout_weights to 1 and 2, respectively, indicates that the ContactsFragment should occupy one-third of the LinearLayout’s width and the FrameLayout should occupy the remaining two-thirds.
1 <?xml version="1.0" encoding="utf-8"?>
2 <LinearLayout
3 xmlns:android="http://schemas.android.com/apk/res/android"
4 xmlns:app="http://schemas.android.com/apk/res-auto"
5 xmlns:tools="http://schemas.android.com/tools"
6 android:layout_width="match_parent"
7 android:layout_height="match_parent"
8 android:baselineAligned="false"
9 android:divider="?android:listDivider"
10 android:orientation="horizontal"
11 android:paddingBottom="@dimen/activity_vertical_margin"
12 android:paddingLeft="@dimen/activity_horizontal_margin"
13 android:paddingRight="@dimen/activity_horizontal_margin"
14 android:paddingTop="@dimen/activity_vertical_margin"
15 android:showDividers="middle"
16 android:weightSum="3"
17 app:layout_behavior="@string/appbar_scrolling_view_behavior">
18
19 <fragment
20 android:id="@+id/contactsFragment"
21 android:name="com.deitel.addressbook.ContactsFragment"
22 android:layout_width="0dp"
23 android:layout_height="match_parent"
24 android:layout_marginEnd="@dimen/divider_margin"
25 android:layout_weight="1"
26 tools:layout="@layout/fragment_contacts"/>
27
28 <FrameLayout
29 android:id="@+id/rightPaneContainer"
30 android:layout_width="0dp"
31 android:layout_height="match_parent"
32 android:layout_marginStart="@dimen/divider_margin"
33 android:layout_weight="2"/>
34 </LinearLayout>
Fig. 9.10 | content_main.xml used on a tablet device.
9.4.8 ContactsFragment’s Layout
In addition to renaming class MainActivityFragment as ContactsFragment, we renamed the corresponding layout file as fragment_contacts.xml. We then removed the default TextView, changed the default layout from a RelativeLayout to a FrameLayout and removed the layout’s padding properties. Next, we added a RecyclerView named recyclerView and a FloatingActionButton named addButton. The layout’s final XML is shown in Fig. 9.11. Ensure that you set the RecyclerView and a FloatingActionButton properties as shown.
1 <FrameLayout
2 xmlns:android="http://schemas.android.com/apk/res/android"
3 android:layout_width="match_parent"
4 android:layout_height="match_parent">
5
6 <android.support.v7.widget.RecyclerView
7 android:id="@+id/recyclerView"
8 android:layout_width="match_parent"
9 android:layout_height="match_parent"/>
10
11 <android.support.design.widget.FloatingActionButton
12 android:id="@+id/addButton"
13 android:layout_width="wrap_content"
14 android:layout_height="wrap_content"
15 android:layout_gravity="top|end"
16 android:layout_margin="@dimen/fab_margin"
17 android:src="@drawable/ic_add_24dp"/>
18 </FrameLayout>
Fig. 9.11 | fragment_contacts.xml layout.
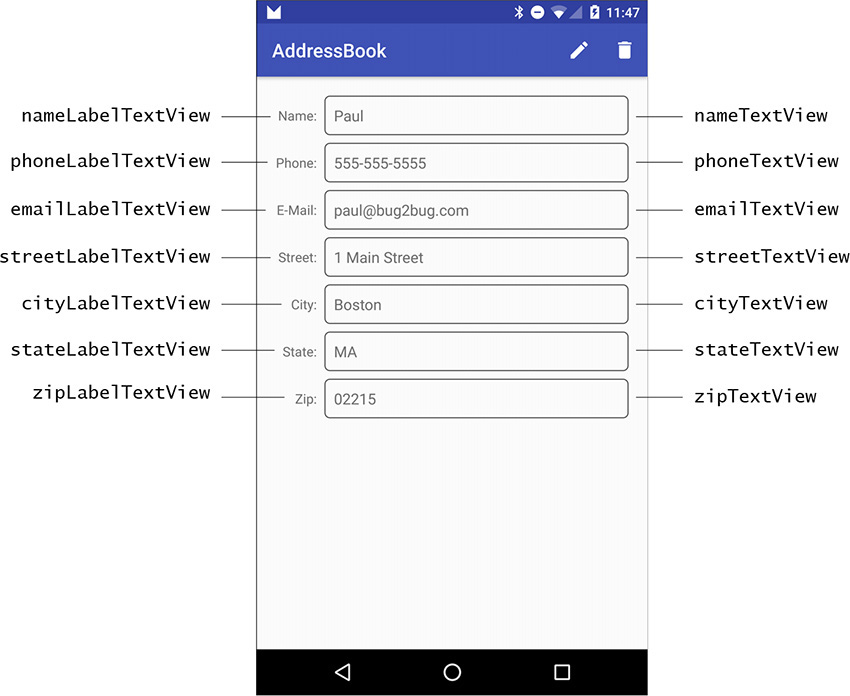
9.4.9 DetailFragment’s Layout
When the user touches a contact in the MainActivity, the app displays the DetailFragment (Fig. 9.12). This Fragment’s layout (fragment_details.xml) consists of a ScrollView containing a vertical GridLayout with two columns of TextViews. A ScrollView is a ViewGroup that provides scrolling functionality for a view with content too large to display on the screen. We use a ScrollView here to ensure that the user can scroll through a contact’s details if a device does not have enough vertical space to show all the TextViews in Fig. 9.12. For this fragment, create a new fragment_details.xml layout resource file and specify a ScrollView as the Root Element. After creating the file add a GridLayout to the ScrollView.
GridLayout Settings
For the GridLayout, we set the layout:width to match_parent, layout:height to wrap_content, columnCount to 2 and useDefaultMargins to true. The layout:height value enables the parent ScrollView to determine the GridLayout’s actual height and decide whether to provide scrolling. Add TextViews to the GridLayout as shown in Fig. 9.12.
Left Column TextView Settings
For each TextView in the left column set the TextView’s id property as specified in Fig. 9.12 and set:
• layout:row to a value from 0–6 depending on the row.
• layout:column to 0.
• text to the appropriate String resource from strings.xml.
• style to @style/ContactLabelTextView—style resources are specified using the syntax @style/styleName.
Right Column TextView Settings
For each TextView in the right column set the TextView’s id property as specified in Fig. 9.12 and set:
• layout:row to a value from 0–6 depending on the row.
• layout:column to 1.
• style to @style/ContactTextView.
9.4.10 AddEditFragment’s Layout
When the user touches the ![]()
FloatingActionButton in the ContactsFragment or the edit (![]() ) app bar item in the
) app bar item in the DetailFragment, the MainActivity displays the AddEditFragment (Fig. 9.13) with the layout fragment_add_edit.xml with a root FrameLayout that contains a ScrollView and a FloatingActionButton. The ScrollView contains a vertical LinearLayout with seven TextInputLayouts.
ScrollView Settings
For the ScrollView, we set the layout:width and layout:height to match_parent.
LinearLayout Settings
For the LinearLayout, we set the layout:width to match_parent, the layout:height to wrap_content and the orientation to vertical. We then added the seven TextInputLayouts with the ids in Fig. 9.13, each with its layout:width set to match_parent and layout:height to wrap_content.
EditText Settings
We placed an EditText in each TextInputLayout, then set its hint property to the appropriate String resource in strings.xml. We also set each EditText’s inputType and imeOptions properties. For devices that display a soft keyboard, the inputType specifies which keyboard to display for the corresponding EditText. This enables us to customize the keyboard to the specific type of data the user must enter in a given EditText. To display a next button (![]() ) on the soft keyboards for the
) on the soft keyboards for the EditTexts in the nameTextInputLayout, phoneTextInputLayout, emailTextInputLayout, streetTextInputLayout, cityTextInputLayout and stateTextInputLayout, we set the imeOptions property to actionNext. When one of these EditTexts has the focus, touching ![]() transfers the focus to the next
transfers the focus to the next EditText in the layout. If the EditText in the zipTextInputLayout has the focus, you can hide the soft keyboard by touching the keyboard’s ![]()
Button—for this EditText, set the imeOptions property to actionDone.

Fig. 9.13 | AddEditFragment’s GUI components labeled with their id property values. This GUI’s root component is a ScrollView that contains a vertical GridLayout.
Set the EditTexts’ inputType properties to display appropriate keyboards as follows:
• nameTextInputLayout’s EditText: check textPersonName and textCapWords—for entering names and starts each word with a capital letter.
• phoneTextInputLayout’s EditText: check phone—for entering phone numbers.
• emailTextInputLayout’s EditText: check textEmailAddress—for entering an e-mail address.
• streetTextInputLayout’s EditText: check textPostalAddress and textCapWords—for entering an address and starts each word with a capital letter.
• cityTextInputLayout’s EditText: check textPostalAddress and textCapWords.
• stateTextInputLayout’s EditText: check textPostalAddress and textCapCharacters—ensures that state abbreviations are displayed in capital letters.
• zipTextInputLayout’s EditText: check number—for entering numbers.
9.4.11 DetailFragment’s Menu
When you created the project, the IDE defined the menu resource menu_main.xml. The MainActivity in this app does not need a menu, so you can remove MainActivity’s onCreateOptionsMenu and onOptionsItemSelected methods, and rename this menu resource for use in the DetailFragment, which displays menu items on the app bar for editing an existing contact and deleting a contact. Rename the file menu_main.xml as fragment_details_menu.xml, then replace the Settings menu item with the menu items in Fig. 9.14. For each menu item’s android:icon value, we specified a drawable resource that you added in Section 9.4.3.
1 <?xml version="1.0" encoding="utf-8"?>
2 <menu xmlns:android="http://schemas.android.com/apk/res/android"
3 xmlns:app="http://schemas.android.com/apk/res-auto">
4
5 <item
6 android:id="@+id/action_edit"
7 android:icon="@drawable/ic_mode_edit_24dp"
8 android:orderInCategory="1"
9 android:title="@string/menuitem_edit"
10 app:showAsAction="always"/>
11
12 <item
13 android:id="@+id/action_delete"
14 android:icon="@drawable/ic_delete_24dp"
15 android:orderInCategory="2"
16 android:title="@string/menuitem_delete"
17 app:showAsAction="always"/>
18 </menu>
Fig. 9.14 | Menu resource file fragment_details_menu.xml.
9.5 Overview of This Chapter’s Classes
This app consists of nine classes in two packages. Due to the size of this app we overview the classes and their purposes here.
com.deitel.addressbook.data Package
This package contains the three classes that define this app’s SQLite database access:
• DatabaseDescription (Section 9.6)—This class contains public static fields that are used with the app’s ContentProvider and ContentResolver. The nested Contact class defines static fields for the name of a database table, the Uri used to access that table via the ContentProvider and the names of the database table’s columns, and a static method for creating a Uri that references a specific contact in the database.
• AddressBookDatabaseHelper (Section 9.7)—A subclass of SQLiteOpenHelper. that creates the database and enables AddressBookContentProvider to access it.
• AddressBookContentProvider (Section 9.8)—A ContentProvider subclass that defines query, insert, update and delete operations on the database.
com.deitel.addressbook Package
This package contains the classes that define this app’s MainActivity, Fragments and the adapter that’s used to display database contents in a RecyclerView:
• MainActivity (Section 9.9)—This class manages the app’s Fragments and implements their callback interface methods to respond when a contact is selected, a new contact is added, or an existing contact is updated or deleted.
• ContactsFragment (Section 9.10)—This class manages the contact-list RecyclerView and the FloatingActionButton for adding contacts. On a phone, this is the first Fragment presented by MainActivity. On a tablet, MainActivity always displays this Fragment. ContactsFragment’s nested interface defines callback methods implemented by MainActivity so that it can respond when a contact is selected or added.
• ContactsAdapter (Section 9.11)—This subclass of RecyclerView.Adapter is used by ContactsFragment’s RecyclerView to bind the sorted list of contact names to the RecyclerView. RecyclerView.Adapter was introduced in Sections 8.3.4 and 8.6.3, so we discuss only the database-specific operations in this class.
• AddEditFragment (Section 9.12)—This class manages the TextInputLayouts and a FloatingActionButton for adding a new contact or editing and existing one. AddEditFragment’s nested interface defines a callback method implemented by MainActivity so that it can respond when a new or updated contact is saved.
• DetailFragment (Section 9.13)—This class manages the styled TextViews that display a selected contact’s details and the app bar items that enable the user to edit or delete the currently displayed contact. DetailFragment’s nested interface defines callback methods implemented by MainActivity so that it can respond when a contact is deleted or when the user touches the app bar item to edit a contact.
• ItemDivider—This class defines the divider that’s displayed between items in the ContactsFragment’s RecyclerView. We do not present the class in the chapter, because it’s identical to the one presented in Section 8.7.
9.6 DatabaseDescription Class
Class DatabaseDescription contains static fields that are used with the app’s ContentProvider and ContentResolver, and a nested Contact class that describes the database’s only table and its columns.
9.6.1 static Fields
Class DatabaseDescription defines two static fields (Fig. 9.15; lines 12–17) that together are used to define the ContentProvider’s authority—the name that’s supplied to a ContentResolver to locate a ContentProvider. The authority is typically the package name of the ContentProvider subclass. Each Uri that’s used to access a specific ContentProvider begins with "content://" followed by the authority—this is the ContentProvider’s base Uri. Line 17 uses Uri method parse to create the base Uri.
1 // DatabaseDescription.java
2 // Describes the table name and column names for this app's database,
3 // and other information required by the ContentProvider
4 package com.deitel.addressbook.data;
5
6 import android.content.ContentUris;
7 import android.net.Uri;
8 import android.provider.BaseColumns;
9
10 public class DatabaseDescription {
11 // ContentProvider's name: typically the package name
12 public static final String AUTHORITY =
13 "com.deitel.addressbook.data";
14
15 // base URI used to interact with the ContentProvider
16 private static final Uri BASE_CONTENT_URI =
17 Uri.parse("content://" + AUTHORITY);
18
Fig. 9.15 | DatabaseDescription class declaration and static fields.
9.6.2 Nested Class Contact
The nested class Contact (Fig. 9.16) defines the database’s table name (line 21), the table’s Uri for accessing the table via the ContentProvider (lines 24–25) and the table’s column names (lines 28–34). The table name and column names will be used by the AddressBookDatabaseHelper class (Section 9.7) to create the database. Method buildContactUri creates a Uri for a specific contact in the database table (lines 37–39). Class ContentUris (package android.content) contains static utility methods for manipulating "content://" Uris. Method withAppendedId appends a forward slash (/) and a record ID to the end of the Uri in its first argument. For every database table, you’d typically have a class similar to class Contact.
19 // nested class defines contents of the contacts table
20 public static final class Contact implements BaseColumns {
21 public static final String TABLE_NAME = "contacts"; // table's name
22
23 // Uri for the contacts table
24 public static final Uri CONTENT_URI =
25 BASE_CONTENT_URI.buildUpon().appendPath(TABLE_NAME).build();
26
27 // column names for contacts table's columns
28 public static final String COLUMN_NAME = "name";
29 public static final String COLUMN_PHONE = "phone";
30 public static final String COLUMN_EMAIL = "email";
31 public static final String COLUMN_STREET = "street";
32 public static final String COLUMN_CITY = "city";
33 public static final String COLUMN_STATE = "state";
34 public static final String COLUMN_ZIP = "zip";
35
36 // creates a Uri for a specific contact
37 public static Uri buildContactUri(long id) {
38 return ContentUris.withAppendedId(CONTENT_URI, id);
39 }
40 }
41 }
Fig. 9.16 | DatabaseDescription nested class Contact.
In a database table, each row typically has a primary key that uniquely identifies the row. When working with ListViews and Cursors, this column’s name must be "_id"—Android also uses this for the ID column in SQLite database tables. This name is not required for RecyclerViews, but we use it here due to the similarities between ListViews and RecyclerViews, and because we’re using Cursors and a SQLite database. Rather than defining this constant directly in class Contact, we implement interface BaseColumns (package android.provider; line 20), which defines the constant _ID with the value "_id".
9.7 AddressBookDatabaseHelper Class
The AddressBookDatabaseHelper class (Fig. 9.17) extends abstract class SQLiteOpenHelper, which helps apps create databases and manage database version changes.
1 // AddressBookDatabaseHelper.java
2 // SQLiteOpenHelper subclass that defines the app's database
3 package com.deitel.addressbook.data;
4
5 import android.content.Context;
6 import android.database.sqlite.SQLiteDatabase;
7 import android.database.sqlite.SQLiteOpenHelper;
8
9 import com.deitel.addressbook.data.DatabaseDescription.Contact;
10
11 class AddressBookDatabaseHelper extends SQLiteOpenHelper {
12 private static final String DATABASE_NAME = "AddressBook.db";
13 private static final int DATABASE_VERSION = 1;
14
15 // constructor
16 public AddressBookDatabaseHelper(Context context) {
17 super(context, DATABASE_NAME, null, DATABASE_VERSION);
18 }
19
20 // creates the contacts table when the database is created
21 @Override
22 public void onCreate(SQLiteDatabase db) {
23 // SQL for creating the contacts table
24 final String CREATE_CONTACTS_TABLE =
25 "CREATE TABLE " + Contact.TABLE_NAME + "(" +
26 Contact._ID + " integer primary key, " +
27 Contact.COLUMN_NAME + " TEXT, " +
28 Contact.COLUMN_PHONE + " TEXT, " +
29 Contact.COLUMN_EMAIL + " TEXT, " +
30 Contact.COLUMN_STREET + " TEXT, " +
31 Contact.COLUMN_CITY + " TEXT, " +
32 Contact.COLUMN_STATE + " TEXT, " +
33 Contact.COLUMN_ZIP + " TEXT);";
34 db.execSQL(CREATE_CONTACTS_TABLE); // create the contacts table
35 }
36
37 // normally defines how to upgrade the database when the schema changes
38 @Override
39 public void onUpgrade(SQLiteDatabase db, int oldVersion,
40 int newVersion) { }
41 }
Fig. 9.17 | AddressBookDatabaseHelper subclass of SQLiteOpenHelper defines the app’s database.
Constructor
The constructor (lines 16–18) simply calls the superclass constructor, which requires four arguments:
• the Context in which the database is being created or opened,
• the database name—this can be null if you wish to use an in-memory database,
• the CursorFactory to use—null indicates that you wish to use the default SQLite CursorFactory (typically for most apps) and
• the database version number (starting from 1).
Overridden Methods
You must override this class’s abstract methods onCreate and onUpgrade. If the database does not yet exist, the DatabaseOpenHelper’s onCreate method will be called to create it. If you supply a newer version number than the database version currently stored on the device, the DatabaseOpenHelper’s onUpgrade method will be called to upgrade the database to the new version (perhaps to add tables or to add columns to an existing table).
The onCreate method (lines 22–35) specifies the table to create with the SQL CREATE TABLE command, which is defined as a String (lines 24–33) that’s constructed using constants from class Contact (Section 9.6.2). In this case, the contacts table contains an integer primary key field (Contact._ID), and text fields for all the other columns. Line 34 uses SQLiteDatabase’s execSQL method to execute the CREATE TABLE command.
Since we don’t need to upgrade the database, we simply override method onUpgrade with an empty body. Class SQLiteOpenHelper also provides the onDowngrade method that can be used to downgrade a database when the currently stored version has a higher version number than the one requested in the call to class SQLiteOpenHelper’s constructor. Downgrading might be used to revert the database back to a prior version with fewer columns in a table or fewer tables in the database—perhaps to fix a bug in the app.
9.8 AddressBookContentProvider Class
The AddressBookContentProvider subclass of ContentProvider defines how to perform query, insert, update and delete operations on this app’s database.

ContentProviders can be invoked from multiple threads in one process and multiple processes, so it’s important to note that ContentProviders do not provide any synchronization by default. However, SQLite does synchronize access to the database, so in this app it’s unnecessary to provide your own synchronization mechanisms.
9.8.1 AddressBookContentProvider Fields
Class AddressBookContentProvider (Fig. 9.18) defines several fields:
• Instance variable dbHelper (line 17) is a reference to an AddressBookDatabaseHelper object that creates the database and enables this ContentProvider to get readable and writable access to the database.
• Class variable uriMatcher (lines 20–21) is an object of class UriMatcher (package android.content). A ContentProvider uses a UriMatcher to help determine which operation to perform in its query, insert, update and delete methods.
• The UriMatcher returns the integer constants ONE_CONTACT and CONTACTS (lines 24–25)—the ContentProvider uses these constants in switch statements in its query, insert, update and delete methods.
1 // AddressBookContentProvider.java
2 // ContentProvider subclass for manipulating the app's database
3 package com.deitel.addressbook.data;
4
5 import android.content.ContentProvider;
6 import android.content.ContentValues;
7 import android.content.UriMatcher;
8 import android.database.Cursor;
9 import android.database.SQLException;
10 import android.database.sqlite.SQLiteQueryBuilder;
11 import android.net.Uri;
12
13 import com.deitel.addressbook.data.DatabaseDescription.Contact;
14
15 public class AddressBookContentProvider extends ContentProvider {
16 // used to access the database
17 private AddressBookDatabaseHelper dbHelper;
18
19 // UriMatcher helps ContentProvider determine operation to perform
20 private static final UriMatcher uriMatcher =
21 new UriMatcher(UriMatcher.NO_MATCH);
22
23 // constants used with UriMatcher to determine operation to perform
24 private static final int ONE_CONTACT = 1; // manipulate one contact
25 private static final int CONTACTS = 2; // manipulate contacts table
26
27 // static block to configure this ContentProvider's UriMatcher
28 static {
29 // Uri for Contact with the specified id (#)
30 uriMatcher.addURI(DatabaseDescription.AUTHORITY,
31 Contact.TABLE_NAME + "/#", ONE_CONTACT);
32
33 // Uri for Contacts table
34 uriMatcher.addURI(DatabaseDescription.AUTHORITY,
35 Contact.TABLE_NAME, CONTACTS);
36 }
37
Fig. 9.18 | AddressBookContentProvider fields.
Lines 28–36 define a static block that adds Uris to the static UriMatcher—this block executes once when class AddressBookContentProvider is loaded into memory. UriMatcher method addUri takes three arguments:
• a String representing the ContentProvider’s authority (DatabaseDescription.AUTHORITY in this app)
• a String representing a path—each Uri used to invoke the ContentProvider contains "content://" followed by the authority and a path that the ContentProvider uses to determine the task to perform
• an int code that the UriMatcher returns when a Uri supplied to to the ContentProvider matches a Uri stored in the UriMatcher.
Lines 30–31 add a Uri of the form:
content://com.deitel.addressbook.data/contacts/#
where # is a wildcard that matches a string of numeric characters—in this case, the unique primary-key value for one contact in the contacts table. There is also a * wildcard that matches any number of characters. When a Uri matches this format, the UriMatcher returns the constant ONE_CONTACT.
Lines 34–35 add a Uri of the form:
content://com.deitel.addressbook.data/contacts
which represents the entire contacts table. When a Uri matches this format, the UriMatcher returns the constant CONTACTS. As we discuss the rest of class AddressBookContentProvider, you’ll see how the UriMatcher and the constants ONE_CONTACT and CONTACTS are used.
9.8.2 Overridden Methods onCreate and getType
As you’ll see, you use a ContentResolver to invoke a ContentProvider’s methods. When Android receives a request from a ContentResolver, it automatically creates the corresponding ContentProvider object—or uses an existing one, if it was created previously. When a ContentProvider is created, Android calls its onCreate method to configure the ContentProvider (Fig. 9.19, lines 39–44). Line 42 creates the AddressBookDatabaseHelper object that enables the provider to access the database. The first time the provider is invoked to write to the database, the AddressBookDatabaseHelper object’s onCreate method will be called to create the database (Fig. 9.17, lines 22–35).
38 // called when the AddressBookContentProvider is created
39 @Override
40 public boolean onCreate() {
41 // create the AddressBookDatabaseHelper
42 dbHelper = new AddressBookDatabaseHelper(getContext());
43 return true; // ContentProvider successfully created
44 }
45
46 // required method: Not used in this app, so we return null
47 @Override
48 public String getType(Uri uri) {
49 return null;
50 }
51
Fig. 9.19 | Overridden ContentProvider methods onCreate and getType.
Method getType (Fig. 9.19, lines 47–50) is a required ContentProvider method that simply returns null in this app. This method typically is used when creating and starting Intents for Uris with specific MIME types. Android can use MIME types to determine appropriate activities to handle the Intents.
9.8.3 Overridden Method query
The overridden ContentProvider method query (Fig. 9.20) retrieves data from the provider’s data source—in this case, the database. The method returns a Cursor that’s used to interact with the results. Method query receives five arguments:
• uri—A Uri representing the data to retrieve.
• projection—A String array representing the specific columns to retrieve. If this argument is null, all columns will be included in the result.
• selection—A String containing the selection criteria. This is the SQL WHERE clause, specified without the WHERE keyword. If this argument is null, all rows will be included in the result.
• selectionArgs—A String array containing the arguments used to replace any argument placeholders (?) in the selection String.
• sortOrder—A String representing the sort order. This is the SQL ORDER BY clause, specified without the ORDER BY keywords. If this argument is null, the provider determines this sort order—the order in which results are returned to the app is not guaranteed unless you provide an appropriate sort order.
SQLiteQueryBuilder
Line 58 creates a SQLiteQueryBuilder (package android.database.sqlite) for building SQL queries that are submitted to a SQLite database. Line 59 uses method setTables to specify that the query will select data from the database’s contacts table. This method’s String argument can be used to perform table join operations by specifying multiple tables in a comma separated list or as an appropriate SQL JOIN clause.
52 // query the database
53 @Override
54 public Cursor query(Uri uri, String[] projection,
55 String selection, String[] selectionArgs, String sortOrder) {
56
57 // create SQLiteQueryBuilder for querying contacts table
58 SQLiteQueryBuilder queryBuilder = new SQLiteQueryBuilder();
59 queryBuilder.setTables(Contact.TABLE_NAME);
60
61 switch (uriMatcher.match(uri)) {
62 case ONE_CONTACT: // contact with specified id will be selected
63 queryBuilder.appendWhere(
64 Contact._ID + "=" + uri.getLastPathSegment());
65 break;
66 case CONTACTS: // all contacts will be selected
67 break;
68 default:
69 throw new UnsupportedOperationException(
70 getContext().getString(R.string.invalid_query_uri) + uri);
71 }
72
73 // execute the query to select one or all contacts
74 Cursor cursor = queryBuilder.query(dbHelper.getReadableDatabase(),
75 projection, selection, selectionArgs, null, null, sortOrder);
76
77 // configure to watch for content changes
78 cursor.setNotificationUri(getContext().getContentResolver(), uri);
79 return cursor;
80 }
81
Fig. 9.20 | Overridden ContentProvider method query.
Using the UriMatcher to Determine the Operation to Perform
In this app, there are two queries:
• select a specific contact from the database to display or edit its details, and
• select all contacts in the database to display their names in the ContactsFragment’s RecyclerView.
Lines 61–71 use UriMatcher method match to determine which query operation to perform. This method returns one of the constants that was registered with the UriMatcher (Section 9.8.1). If the constant returned is ONE_CONTACT, only the contact with the ID specified in the Uri should be selected. In this case, lines 63–64 use the SQLiteQueryBuilder’s appendWhere method to add a WHERE clause containing the contact’s ID to the query. Uri method getLastPathSegment returns the last segment in the Uri—for example, the contact ID 5 in the following Uri
content://com.deitel.addressbook.data/contacts/5
If the constant returned is CONTACTS, the switch terminates without adding anything to the query—in this case, all contacts will be selected because there is no WHERE clause. For any Uri that is not a match, lines 69–70 throw an UnsupportedOperationException indicating that the Uri was invalid.
Querying the Database
Lines 74–75 use the SQLiteQueryBuilder’s query method to perform the database query and get a Cursor representing the results. The method’s arguments are similar to those received by the ContentProvider’s query method:
• A SQLiteDatabase to query—the AddressBookDatabaseHelper’s getReadableDatabase method returns a read-only SQLiteDatabase object.
• projection—A String array representing the specific columns to retrieve. If this argument is null, all columns will be included in the result.
• selection—A String containing the selection criteria. This is the SQL WHERE clause, specified without the WHERE keyword. If this argument is null, all rows will be included in the result.
• selectionArgs—A String array containing the arguments used to replace any argument placeholders (?) in the selection String.
• groupBy—A String containing the grouping criteria. This is the SQL GROUP BY clause, specified without the GROUP BY keywords. If this argument is null, no grouping is performed.
• having—When using groupBy, this argument is a String indicating which groups to include in the results. This is the SQL HAVING clause, specified without the HAVING keyword. If this argument is null, all groups specified by the groupBy argument will be included in the results.
• sortOrder—A String representing the sort order. This is the SQL ORDER BY clause, specified without the ORDER BY keywords. If this argument is null, the provider determines this sort order.
Registering the Cursor to Watch for Content Changes
Line 78 calls the Cursor’s setNotificationUri method to indicate that the Cursor should be updated if the data it refers to changes. This first argument is the ContentResolver that invoked the ContentProvider and the second is the Uri used to invoke the ContentProvider. Line 79 returns the Cursor containing the query results.
9.8.4 Overridden Method insert
The overridden ContentProvider method insert (Fig. 9.21) adds a new record to the contacts table. Method insert receives two arguments:
• uri—A Uri representing the table in which the data will be inserted.
• values—A ContentValues object containing key–value pairs in which the column names are the keys and each key’s value is the data to insert in that column.
Lines 87–108 check whether the Uri is for the contacts table—if not, the Uri is invalid for the insert operation and lines 106–107 throw an UnsupportedOperationException.
If the Uri is a match, lines 90–91 insert the new contact in the database. First, we use the AddressBookDatabaseHelper’s getWritableDatabase method to get a SQLiteDatabaseObject for modifying data in the database.
82 // insert a new contact in the database
83 @Override
84 public Uri insert(Uri uri, ContentValues values) {
85 Uri newContactUri = null;
86
87 switch (uriMatcher.match(uri)) {
88 case CONTACTS:
89 // insert the new contact--success yields new contact's row id
90 long rowId = dbHelper.getWritableDatabase().insert(
91 Contact.TABLE_NAME, null, values);
92
93 // if the contact was inserted, create an appropriate Uri;
94 // otherwise, throw an exception
95 if (rowId > 0) { // SQLite row IDs start at 1
96 newContactUri = Contact.buildContactUri(rowId);
97
98 // notify observers that the database changed
99 getContext().getContentResolver().notifyChange(uri, null);
100 }
101 else
102 throw new SQLException(
103 getContext().getString(R.string.insert_failed) + uri);
104 break;
105 default:
106 throw new UnsupportedOperationException(
107 getContext().getString(R.string.invalid_insert_uri) + uri);
108 }
109
110 return newContactUri;
111 }
112
Fig. 9.21 | Overridden ContentProvider method insert.
SQLiteDatabase’s insert method (lines 90–91) inserts the values from the third argument’s ContentValues object into the table specified as the first argument—the contacts table in this case. The second parameter of this method, which is not used in this app, is named nullColumnHack and is needed because SQLite does not support inserting a completely empty row into a table—this would be the equivalent of passing an empty ContentValues object to insert. Instead of making it illegal to pass an empty ContentValues to the method, the nullColumnHack parameter is used to identify a column that accepts NULL values.
Method insert returns the new contact’s unique ID if the insert operation is successful or -1 otherwise. Line 95 checks whether the rowID is greater than 0 (rows are indexed from 1 in SQLite). If so, line 96 creates a Uri representing the new contact and line 99 notifies the ContentResolver that the database changed, so the ContentResolver’s client code can respond to the database changes. If the rowID is not greater than 0, the database operation failed and lines 102–103 throws a SQLException.
9.8.5 Overridden Method update
The overridden ContentProvider method update (Fig. 9.22) updates an existing record. Method update receives four arguments:
• uri—A Uri representing the rows to update.
• values—A ContentValues object containig the columns to update and their corresponding values.
• selection—A String containing the selection criteria. This is the SQL WHERE clause, specified without the WHERE keyword. If this argument is null, all rows will be included in the result.
• selectionArgs—A String array containing the arguments used to replace any argument placeholders (?) in the selection String.
113 // update an existing contact in the database
114 @Override
115 public int update(Uri uri, ContentValues values,
116 String selection, String[] selectionArgs) {
117 int numberOfRowsUpdated; // 1 if update successful; 0 otherwise
118
119 switch (uriMatcher.match(uri)) {
120 case ONE_CONTACT:
121 // get from the uri the id of contact to update
122 String id = uri.getLastPathSegment();
123
124 // update the contact
125 numberOfRowsUpdated = dbHelper.getWritableDatabase().update(
126 Contact.TABLE_NAME, values, Contact._ID + "=" + id,
127 selectionArgs);
128 break;
129 default:
130 throw new UnsupportedOperationException(
131 getContext().getString(R.string.invalid_update_uri) + uri);
132 }
133
134 // if changes were made, notify observers that the database changed
135 if (numberOfRowsUpdated != 0) {
136 getContext().getContentResolver().notifyChange(uri, null);
137 }
138
139 return numberOfRowsUpdated;
140 }
141
Fig. 9.22 | Overridden ContentProvider method update.
Updates in this app are performed only on a specific contact, so lines 119–132 check only for a ONE_CONTACT Uri. Line 122 gets the Uri argument’s last path segement, which is the contact’s unique ID. Lines 125–127 get a writeable SQLiteDatabase object then call its update method to update the specified contact with the values from the ContentValues argument. The update method’s arguments are:
• the String name of the table to update
• the ContentValues object containing the columns to update and their new values
• the String representing the SQL WHERE clause that specifies the rows to update
• a String array containing any arguments that should replace ? placeholders in the WHERE clause.
If the operation is successful, method update returns an integer indicating the number of modified rows; otherwise, update returns 0. Line 136 notifies the ContentResolver that the database changed, so the ContentResolver’s client code can respond to the changes. Line 139 returns the number of modified rows.
9.8.6 Overridden Method delete
The overridden ContentProvider method delete (Fig. 9.23) removes an existing record. Method delete receives three arguments:
• uri—A Uri representing the row(s) to delete.
• selection—A String containing the WHERE clause specifying the rows to delete.
• selectionArgs—A String array containing the arguments used to replace any argument placeholders (?) in the selection String.
142 // delete an existing contact from the database
143 @Override
144 public int delete(Uri uri, String selection, String[] selectionArgs) {
145 int numberOfRowsDeleted;
146
147 switch (uriMatcher.match(uri)) {
148 case ONE_CONTACT:
149 // get from the uri the id of contact to update
150 String id = uri.getLastPathSegment();
151
152 // delete the contact
153 numberOfRowsDeleted = dbHelper.getWritableDatabase().delete(
154 Contact.TABLE_NAME, Contact._ID + "=" + id, selectionArgs);
155 break;
156 default:
157 throw new UnsupportedOperationException(
158 getContext().getString(R.string.invalid_delete_uri) + uri);
159 }
160
161 // notify observers that the database changed
162 if (numberOfRowsDeleted != 0) {
163 getContext().getContentResolver().notifyChange(uri, null);
164 }
165
166 return numberOfRowsDeleted;
167 }
168 }
Fig. 9.23 | Overridden ContentProvider method delete.
Deletions in this app are performed only on a specific contact, so lines 147–159 check for a ONE_CONTACT Uri—any other Uri represents an unsupported operation. Line 150 gets the Uri argument’s last path segment, which is the contact’s unique ID. Lines 153–154 get a writeable SQLiteDatabase object then call its delete method to remove the specified contact. The three arguments are the database table from which to delete the record, the WHERE clause and, if the WHERE clause has arguments, a String array of values to substitute into the WHERE clause. The method returns the number of rows deleted. Line 163 notifies the ContentResolver that the database changed, so the ContentResolver’s client code can respond to the changes. Line 166 returns the number of deleted rows.
9.9 MainActivity Class
Class MainActivity manages the app’s fragments and coordinates the interactions between them. On phones, MainActivity displays one Fragment at a time, starting with the ContactsFragment. On tablets, MainActivity always displays the ContactsFragment at the left of the layout and, depending on the context, displays either the DetailFragment or the AddEditFragment in the right two-thirds of the layout.
9.9.1 Superclass, Implemented Interfaces and Fields
Class MainActivity (Fig. 9.24) uses class FragmentTransaction from the v4 support library to add and remove the app’s Fragments. MainActivity implements three interfaces:
• ContactsFragment.ContactsFragmentListener (Section 9.10.2) contains callback methods that the ContactsFragment uses to tell the MainActivity when the user selects a contact in the contact list or adds a new contact.
• DetailFragment.DetailFragmentListener (Section 9.13.2) contains callback methods that the DetailFragment uses to tell the MainActivity when the user deletes a contact or wishes to edit an existing contact.
• AddEditFragment.AddEditFragmentListener (Section 9.12.2) contains a callback method that the AddEditFragment uses to tell the MainActivity when the user saves a new contact or saves changes to an existing contact.
The constant CONTACT_URI (line 17) is used as a key in a key–value pair that’s passed between the MainActivity and its Fragments. The instance variable ContactsFragment (line 19) is used to tell the ContactsFragment to update the displayed list of contacts after a contact is added or deleted.
1 // MainActivity.java
2 // Hosts the app's fragments and handles communication between them
3 package com.deitel.addressbook;
4
5 import android.net.Uri;
6 import android.os.Bundle;
7 import android.support.v4.app.FragmentTransaction;
8 import android.support.v7.app.AppCompatActivity;
9 import android.support.v7.widget.Toolbar;
10
11 public class MainActivity extends AppCompatActivity
12 implements ContactsFragment.ContactsFragmentListener,
13 DetailFragment.DetailFragmentListener,
14 AddEditFragment.AddEditFragmentListener {
15
16 // key for storing a contact's Uri in a Bundle passed to a fragment
17 public static final String CONTACT_URI = "contact_uri";
18
19 private ContactsFragment contactsFragment; // displays contact list
20
Fig. 9.24 | MainActivity’s superclass, implemented interfaces and fields,
9.9.2 Overridden Method onCreate
Overridden Activity method onCreate (Fig. 9.25) inflates MainActivity’s GUI and, if the app is running on a phone-sized device, creates and displays a ContactsFragment. If the Activity is being restored after being shut down or recreated from a configuration change, savedInstanceState will not be null. In this case, lines 43–45 simply get a reference to the existing ContactsFragment—on a phone, it would have been saved by Android and on a tablet, it’s part of the MainActivity’s layout that was inflated in line 25.
21 // display ContactsFragment when MainActivity first loads
22 @Override
23 protected void onCreate(Bundle savedInstanceState) {
24 super.onCreate(savedInstanceState);
25 setContentView(R.layout.activity_main);
26 Toolbar toolbar = (Toolbar) findViewById(R.id.toolbar);
27 setSupportActionBar(toolbar);
28
29 // if layout contains fragmentContainer, the phone layout is in use;
30 // create and display a ContactsFragment
31 if (savedInstanceState != null &&
32 findViewById(R.id.fragmentContainer) != null) {
33 // create ContactsFragment
34 contactsFragment = new ContactsFragment();
35
36 // add the fragment to the FrameLayout
37 FragmentTransaction transaction =
38 getSupportFragmentManager().beginTransaction();
39 transaction.add(R.id.fragmentContainer, contactsFragment);
40 transaction.commit(); // display ContactsFragment
41 }
42 else {
43 contactsFragment =
44 (ContactsFragment) getSupportFragmentManager().
45 findFragmentById(R.id.contactsFragment);
46 }
47 }
48
Fig. 9.25 | Overridden Activity method onCreate.
If the R.id.fragmentContainer exists in MainActivity’s layout (line 32), then the app is running on a phone. In this case, line 34 creates the ContactsFragment, then lines 37–40 use a FragmentTransaction to add the ContactsFragment to the user interface. Lines 37–38 call FragmentManager’s beginTransaction method to obtain a FragmentTransaction. Next, line 39 calls FragmentTransaction method add to specify that, when the FragmentTransaction completes, the ContactsFragment should be attached to the View with the ID specified as the first argument. Finally, line 40 uses FragmentTransaction method commit to finalize the transaction and display the ContactsFragment.
9.9.3 ContactsFragment.ContactsFragmentListener Methods
Figure 9.26 contains MainActivity’s implementations of the callback methods in the interface ContactsFragment.ContactsFragmentListener. Method onContactSelected (lines 50–60) is called by the ContactsFragment to notify the MainActivity when the user selects a contact to display. If the app is running on a phone (line 52), line 53 calls method displayContact (Section 9.9.4), which replaces the ContactsFragment in the fragmentContainer (defined in Section 9.4.7) with the DetailFragment that shows the contact’s information. On a tablet, line 56 calls the FragmentManager’s popBackStack method to pop (remove) the top Fragment on the back stack (if there is one), then line 58 calls displayContact, which replaces the contents of the rightPaneContainer (defined in Section 9.4.7) with the DetailFragment that shows the contact’s information.
49 // display DetailFragment for selected contact
50 @Override
51 public void onContactSelected(Uri contactUri) {
52 if (findViewById(R.id.fragmentContainer) != null) // phone
53 displayContact(contactUri, R.id.fragmentContainer);
54 else { // tablet
55 // removes top of back stack
56 getSupportFragmentManager().popBackStack();
57
58 displayContact(contactUri, R.id.rightPaneContainer);
59 }
60 }
61
62 // display AddEditFragment to add a new contact
63 @Override
64 public void onAddContact() {
65 if (findViewById(R.id.fragmentContainer) != null) // phone
66 displayAddEditFragment(R.id.fragmentContainer, null);
67 else // tablet
68 displayAddEditFragment(R.id.rightPaneContainer, null);
69 }
70
Fig. 9.26 | ContactsFragment.ContactsFragmentListener methods.
Method onAddContact (lines 63–69) is called by the ContactsFragment to notify the MainActivity when the user chooses to add a new contact. If the layout contains the fragmentContainer, line 66 calls displayAddEditFragment (Section 9.9.5) to display the AddEditFragment in the fragmentContainer; otherwise, line 68 displays the Fragment in the rightPaneContainer. The second argument to displayAddEditFragment is a Bundle that the AddEditFragment uses to determine whether a new contact is being added or an existing contact is being edited—null indicates that a new contact is being added; otherwise, the bundle includes the existing contact’s Uri.
9.9.4 Method displayContact
Method displayContact (Fig. 9.27) creates the DetailFragment that displays the selected contact. You can pass arguments to a Fragment by placing them in a Bundle of key–value pairs—we do this to pass the selected contact’s Uri so that the DetailFragment knows which contact to get from the ContentProvider. Line 76 creates the Bundle. Line 77 calls its putParcelable method to store a key–value pair containing the CONTACT_URI (a String) as the key and the contactUri (a Uri) as the value. Class Uri implements the Parcelable interface, so a Uri can be stored in a Bundle as a Parcel object. Line 78 passes the Bundle to the Fragment’s setArguments method—the Fragment can then extract the information from the Bundle (as you’ll see in Section 9.13).
71 // display a contact
72 private void displayContact(Uri contactUri, int viewID) {
73 DetailFragment detailFragment = new DetailFragment();
74
75 // specify contact's Uri as an argument to the DetailFragment
76 Bundle arguments = new Bundle();
77 arguments.putParcelable(CONTACT_URI, contactUri);
78 detailFragment.setArguments(arguments);
79
80 // use a FragmentTransaction to display the DetailFragment
81 FragmentTransaction transaction =
82 getSupportFragmentManager().beginTransaction();
83 transaction.replace(viewID, detailFragment);
84 transaction.addToBackStack(null);
85 transaction.commit(); // causes DetailFragment to display
86 }
87
Fig. 9.27 | Method displayContact.
Lines 81–82 get a FragmentTransaction, then line 83 calls FragmentTransaction method replace to specify that, when the FragmentTransaction completes, the DetailFragment should replace the contents of the View with the ID specified as the first argument. Line 84 calls FragmentTransaction method addToBackStack to push (add) the DetailFragment onto the back stack. This allows the user to touch the back button to pop the Fragment from the back stack and allows MainActivity to programmatically pop the Fragment from the back stack. Method addToBackStack’s argument is an optional name for a back state. This can be used to pop multiple Fragments from the back stack to return to a prior state after multiple Fragments have been added to the back stack. By default, only the topmost Fragment is popped.
9.9.5 Method displayAddEditFragment
Method displayAddEditFragment (Fig. 9.28) receives a View’s resource ID specifying where to attach the AddEditFragment and a Uri representing a contact to edit. If the second argument is null, a new contact is being added. Line 90 creates the AddEditFragment. If the contactUri argument is not null, line 95 puts it into the Bundle that’s used to supply the Fragment’s arguments. Lines 100–104 then create the FragmentTransaction, replace the contents of the View with the specified resource ID, add the Fragment to the back stack and commit the transaction.
88 // display fragment for adding a new or editing an existing contact
89 private void displayAddEditFragment(int viewID, Uri contactUri) {
90 AddEditFragment addEditFragment = new AddEditFragment();
91
92 // if editing existing contact, provide contactUri as an argument
93 if (contactUri != null) {
94 Bundle arguments = new Bundle();
95 arguments.putParcelable(CONTACT_URI, contactUri);
96 addEditFragment.setArguments(arguments);
97 }
98
99 // use a FragmentTransaction to display the AddEditFragment
100 FragmentTransaction transaction =
101 getSupportFragmentManager().beginTransaction();
102 transaction.replace(viewID, addEditFragment);
103 transaction.addToBackStack(null);
104 transaction.commit(); // causes AddEditFragment to display
105 }
106
Fig. 9.28 | Method displayAddEditFragment.
9.9.6 DetailFragment.DetailFragmentListener Methods
Figure 9.29 contains MainActivity’s implementations of the callback methods in the interface DetailFragment.DetailFragmentListener. Method onContactDeleted (lines 108–113) is called by the DetailFragment to notify the MainActivity when the user deletes a contact. In this case, line 111 pops the DetailFragment from the back stack so that the now deleted contact’s information is no longer displayed. Line 112 calls the ContactsFragment’s updateContactList method to refresh the contacts list.
107 // return to contact list when displayed contact deleted
108 @Override
109 public void onContactDeleted() {
110 // removes top of back stack
111 getSupportFragmentManager().popBackStack();
112 contactsFragment.updateContactList(); // refresh contacts
113 }
114
115 // display the AddEditFragment to edit an existing contact
116 @Override
117 public void onEditContact(Uri contactUri) {
118 if (findViewById(R.id.fragmentContainer) != null) // phone
119 displayAddEditFragment(R.id.fragmentContainer, contactUri);
120 else // tablet
121 displayAddEditFragment(R.id.rightPaneContainer, contactUri);
122 }
123
Fig. 9.29 | DetailFragment.DetailFragmentListener methods.
Method onEditContact (lines 116–122) is called by the DetailFragment to notify the MainActivity when the user touches the app bar item to edit a contact. The DetailFragment passes a Uri representing the contact to edit so that it can be displayed in the AddEditFragment’s EditTexts for editing. If the layout contains the fragmentContainer, line 119 calls displayAddEditFragment (Section 9.9.5) to display the AddEditFragment in the fragmentContainer; otherwise, line 121 displays the AddEditFragment in the rightPaneContainer.
9.9.7 AddEditFragment.AddEditFragmentListener Method
Method onAddEditCompleted (Fig. 9.30) from the AddEditFragment.AddEditFragmentListener interface is called by the AddEditFragment to notify the MainActivity when the user saves a new contact or saves changes to an existing one. Line 128 pops the AddEditFragment from the back stack and line 129 updates the ContactsFragment’s contact list. If the app is running on a tablet (line 131), line 133 pops the back stack again to remove the DetailFragment (if there is one). Then line 136 displays the new or updated contact’s details in the rightPaneContainer.
124 // update GUI after new contact or updated contact saved
125 @Override
126 public void onAddEditCompleted(Uri contactUri) {
127 // removes top of back stack
128 getSupportFragmentManager().popBackStack();
129 contactsFragment.updateContactList(); // refresh contacts
130
131 if (findViewById(R.id.fragmentContainer) == null) { // tablet
132 // removes top of back stack
133 getSupportFragmentManager().popBackStack();
134
135 // on tablet, display contact that was just added or edited
136 displayContact(contactUri, R.id.rightPaneContainer);
137 }
138 }
139 }
Fig. 9.30 | AddEditFragment.AddEditFragmentListener method.