
8. Twitter® Searches App
Objectives
In this chapter you’ll:
![]() Use
Use SharedPreferences to store key–value pairs of data associated with an app.
![]() Use an implicit
Use an implicit Intent to open a website in a browser.
![]() Use an implicit
Use an implicit Intent to display an intent chooser containing a list of apps that can share text.
![]() Display a scrolling list of items in a
Display a scrolling list of items in a RecyclerView.
![]() Use a subclass of
Use a subclass of RecyclerView.Adapter to specify a RecyclerView’s data.
![]() Use a subclass of
Use a subclass of RecyclerView.ViewHolder to implement the view-holder pattern for a RecyclerView.
![]() Use a subclass of
Use a subclass of RecyclerView.ItemDecoration to display lines between a RecyclerView’s items.
![]() Use an
Use an AlertDialog.Builder object to create an AlertDialog that displays a list of options.
8.2.1 Adding a Favorite Search
8.2.2 Viewing Twitter Search Results
8.2.6 Scrolling Through Saved Searches
8.3.1 Storing Key–Value Data in a SharedPreferences File
8.3.2 Implicit Intents and Intent Choosers
8.3.4 RecyclerView.Adapter and RecyclerView.ViewHolder
8.3.5 RecyclerView.ItemDecoration
8.3.6 Displaying a List of Options in an AlertDialog
8.4 Building the App’s GUI and Resource Files
8.4.3 Adding the RecyclerView Library
8.4.8 Adding the Save Button Icon
8.4.11 RecyclerView Item’s Layout: list_item.xml
8.5.1 package and import Statements
8.5.3 Overriden Activity Method onCreate
8.5.4 TextWatcher Event Handler and Method updateSaveFAB
8.5.5 saveButton’s OnClickListener
8.5.7 Anonymous Inner Class That Implements View.OnClickListener to Display Search Results
8.6 SearchesAdapter Subclass of RecyclerView.Adapter
8.6.1 package Statement, import statements, Instance Variables and Constructor
8.6.2 Nested ViewHolder Subclass of RecyclerView.ViewHolder
8.6.3 Overridden RecyclerView.Adapter Methods
8.7 ItemDivider Subclass of RecyclerView.ItemDecoration
8.8 A Note on Fabric: Twitter’s New Mobile Development Platform
Self-Review Exercises | Answers to Self-Review Exercises | Exercises
8.1 Introduction
Twitter’s search mechanism makes it easy to follow trending topics being discussed by Twitter’s 300+ million active monthly users1 (there are over one billion total Twitter accounts2). Searches can be fine-tuned using Twitter’s search operators (Section 8.2), often resulting in lengthy search strings that are time consuming and cumbersome to enter on a mobile device. The Twitter® Searches app (Fig. 8.1) allows you to save your favorite search queries with easy-to-remember short tag names (Fig. 8.1(a)) that are displayed as a scrollable list. You can then scroll through your saved searches and simply touch a tag name to quickly view tweets on a given topic (Fig. 8.1(b)). As you’ll see, the app also allows you to share, edit and delete saved searches.
1. https://about.twitter.com/company.
2. http://www.businessinsider.com/twitter-monthly-active-users-2015-7?r=UK&IR=T.

The app supports both portrait and landscape orientations. In the Flag Quiz app, you did this by providing separate layouts for each orientation. In the Doodlz app, you did this by programmatically setting the orientation. In this app, we support both orientations by designing a GUI that dynamically adjusts, based on the current orientation.
First, you’ll test-drive the app. Then we’ll overview the technologies we used to build it. Next, we’ll design the app’s GUI. Finally, we’ll walk through the app’s complete source code, discussing the new features in more detail.
8.2 Test-Driving the App
Opening and Running the App
Open Android Studio and open the Twitter Searches app from the TwitterSearches folder in the book’s examples folder, then execute the app in the AVD or on a device. This builds the project and runs the app (Fig. 8.2).
8.2.1 Adding a Favorite Search
Touch the top EditText, then enter from:deitel as the search query—the from: operator locates tweets from a specified Twitter account. Figure 8.3 shows several Twitter search operators—multiple operators can be used to construct more complex queries. A complete list can be found at


In the bottom EditText enter Deitel as the tag for the search query (Fig. 8.4(a)). This will be the short name displayed in a list in the app’s Tagged Searches section. Touch the save button (![]() ) to save the search—the tag “Deitel” appears in the list under the Tagged Searches heading (Fig. 8.4(b)). When you save a search, the soft keyboard is dismissed so that you can see your list of saved searches (Section 8.5.5).
) to save the search—the tag “Deitel” appears in the list under the Tagged Searches heading (Fig. 8.4(b)). When you save a search, the soft keyboard is dismissed so that you can see your list of saved searches (Section 8.5.5).

8.2.2 Viewing Twitter Search Results
To view the search results, touch the tag “Deitel.” This launches the device’s web browser and passes a URL that represents the saved search to the Twitter website. Twitter obtains the search query from the URL, then returns the tweets that match the query (if any) as a web page. The web browser then displays the results page (Fig. 8.5). When you’re done viewing the results, touch the back button (![]() ) to return to the Twitter Searches app where you can save more searches, and edit, delete and share previously saved searches. For the
) to return to the Twitter Searches app where you can save more searches, and edit, delete and share previously saved searches. For the "from:deitel" query, Twitter shows relevant user accounts containing deitel in the account name and recent tweets from those accounts.

8.2.3 Editing a Search
You may also share, edit or delete a search. To see these options, long press the search’s tag—that is, touch the tag and keep your finger on the screen until the dialog containing Share, Edit and Delete options appears. If you’re using an AVD, click and hold the left mouse button on the search tag to perform a long press. When you long press “Deitel,” the AlertDialog in Fig. 8.6(a) displays the Share, Edit and Delete options for the search tagged as “Deitel.” If you don’t wish to perform any of these tasks, touch CANCEL.

To edit the search tagged as “Deitel,” touch the dialog’s Edit option. The app then loads the search’s query and tag into the EditTexts for editing. Let’s restrict our search to tweets only from the account @deitel since September 1, 2015. Add a space then
-deitel* since:2015-06-01
to the end of the query (Fig. 8.6(b)) in the top EditText. The -deitel* deletes from the results tweets from accounts that begin with "deitel" but followed by other characters. The since: operator restricts the search results to tweets that occurred on or after the specified date (in the form yyyy-mm-dd). Touch the save button (![]() ) to update the saved search, then view the updated results (Fig. 8.7) by touching Deitel in the Tagged Searches section of the app. [Note: Changing the tag name will create a new search, which is useful if you want to create a new query that’s based on a previously saved query.]
) to update the saved search, then view the updated results (Fig. 8.7) by touching Deitel in the Tagged Searches section of the app. [Note: Changing the tag name will create a new search, which is useful if you want to create a new query that’s based on a previously saved query.]

8.2.4 Sharing a Search
Android makes it easy for you to share various types of information from an app via e-mail, instant messaging (SMS), Facebook, Google+, Twitter and more. In this app, you can share a favorite search by long pressing the search’s tag and selecting Share from the AlertDialog that appears. This displays a so-called intent chooser (Fig. 8.8(a)), which can vary, based on the type of content you’re sharing and the apps that can handle that content. In this app we’re sharing text, and the intent chooser on our phone shows many apps capable of handling text. If no apps can handle the content, the intent chooser will display a message saying so. If only one app can handle the content, that app will launch without you having to select which app to use from the intent chooser. For this test-drive, we touched Gmail. Figure 8.8(b) shows the Gmail app’s Compose screen with the from address, e-mail subject and body pre-populated. We blurred the From email address for privacy in the screen capture.

Fig. 8.8 | Sharing a search via e-mail—the Gmail Compose window shows your email address by default (blurred for privacy here), positions the cursor in the To field so you can enter the recipient’s email address and prepopulates the email’s subject and content.
8.2.5 Deleting a Search
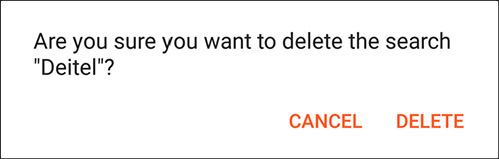
To delete a search, long press the search’s tag and select Delete from the AlertDialog that appears. The app prompts you to confirm that you’d like to delete the search (Fig. 8.9)—touching CANCEL returns you to the main screen without deleting the search. Touching DELETE deletes the search.
8.2.6 Scrolling Through Saved Searches
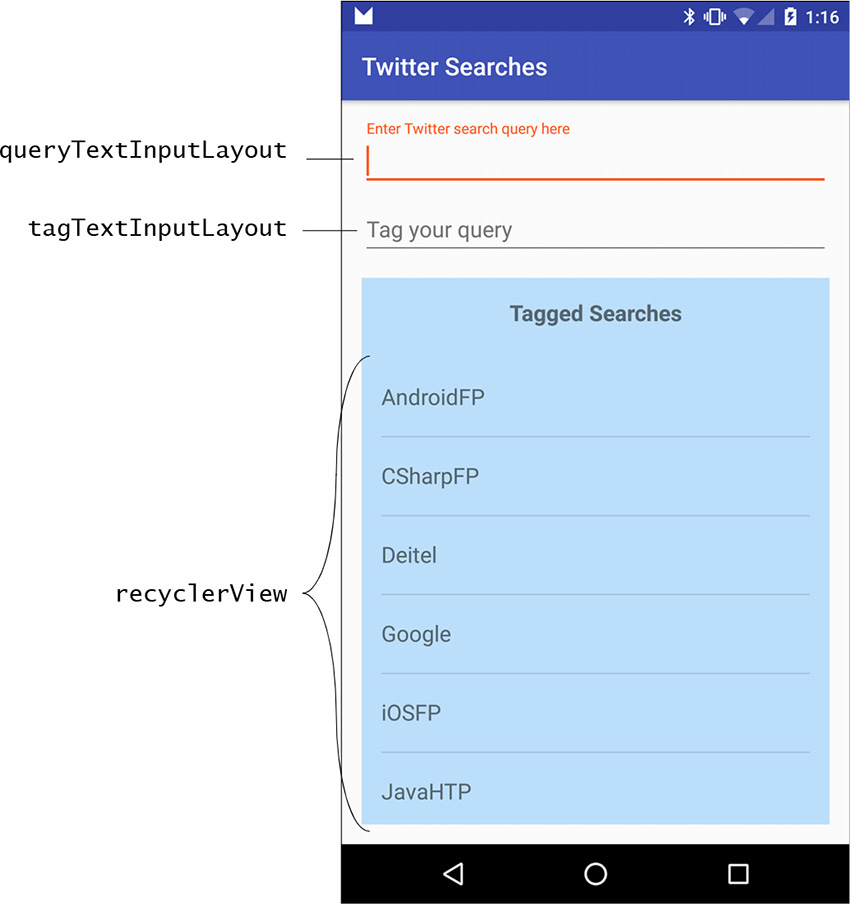
Figure 8.10 shows the app after we’ve saved several favorite searches—six of which are currently visible. The app allows you to scroll through your favorite searches if there are more than can be displayed on the screen at once. Unlike desktop apps, touch-screen apps do not typically display scrollbars to indicate scrollable areas of the screen. To scroll, simply drag or flick your finger (or the mouse in an AVD) up or down in the list of Tagged Searches. Also, rotate the device to landscape orientation to see that the GUI dynamically adjusts.

8.3 Technologies Overview
This section introduces the features you’ll use to build the Twitter Searches app.
8.3.1 Storing Key–Value Data in a SharedPreferences File
Each app can have SharedPreferences files containing key–value pairs associated with the app—each key enables you to quickly look up a corresponding value. Chapter 4’s Flag Quiz app stored the app’s preferences in a SharedPreferences file on the device. That app’s PreferenceFragment created the SharedPreferences file for you. In this app, you’ll create and manage a SharedPreferences file called searches in which you’ll store the pairs of tags (the keys) and Twitter search queries (the values) that the user creates. Once again, you’ll use a SharedPreferences.Editor to make changes to the tag–query pairs.

This app does not store a lot of data, so we read the saved searches from the device in MainActivity’s onCreate method. Lengthy data access should not be done in the UI thread; otherwise, the app will display an Application Not Responding (ANR) dialog—typically after five seconds of preventing the user from interacting with the app. For information on designing responsive apps, see http://developer.android.com/training/articles/perf-anr.html and consider using AsyncTasks as shown in Chapter 7.
8.3.2 Implicit Intents and Intent Choosers
In Chapter 4, you used an explicit Intent to launch a specific Activity in the same app. Android also supports implicit Intents for which you do not specify explicitly which component should handle the Intent. In this app you’ll use two implicit Intents:
• one that launches the device’s default web browser to display Twitter search results, based on a search query embedded in a URL, and
• one that enables the user to choose from a variety of apps that can share text, so the user can share a favorite Twitter search.
In either case, if the system cannot find an activity to handle the action, then method startActivity throws an ActivityNotFoundException. It’s a good practice to handle this exception to prevent your app from crashing. For more information on Intents, visit
When Android receives an implicit Intent, it finds every installed app containing an Activity that can handle the given action and data type. If there is only one, Android launches the appropriate Activity in that app. If there multiple apps that can handle the Intent, Android displays a dialog from which the user can choose which app should handle the Intent—for example, when this app’s user chooses a saved search and the device contains only one web browser, Android immediately launches that web browser to perform the search and display the results. If two or more web browsers are installed, however, the user must select which browser should perform this task.
8.3.3 RecyclerView
In Chapter 7, you used a ListView to display a weather forecast—a limited set of data. Many mobile apps display extensive lists of information. For example, an e-mail app displays a list of e-mails, an address-book app displays a list of contacts, a news app displays a list of headlines, etc. In each case, the user touches an item in the list to see more information—e.g., the content of the selected e-mail, the details of the selected contact or the text of the selected news story.
RecyclerView vs. ListView
In this app, you’ll display the scrollable list of tagged searches using a RecyclerView (package android.support.v7.widget)—a flexible, customizable view that enables you to control how an app displays a scrolling list of data. RecyclerView was designed as a better ListView. It provides better separation of the data’s presentation from the RecyclerView’s capabilities for reusing views (Section 8.3.4), as well as more flexible customization options (Section 8.3.5) for presenting the RecyclerView’s items. For example, a ListView’s items are always displayed in a vertical list, whereas a RecyclerView has layout managers that can display the items in a vertical list or in a grid. You can even define your own custom layout manager.
RecyclerView Layout Managers
For this app, the RecyclerView will use a LinearLayoutManager—a subclass of RecyclerView.LayoutManager—to specify that the items will appear in a vertical list, and the list items will each display a search’s tag as a String in a TextView. You also can design custom layouts for a RecyclerView’s items.
8.3.4 RecyclerView.Adapter and RecyclerView.ViewHolder
In Chapter 7, we used a subclass of Adapter to bind data to the ListView. We also introduced the view-holder pattern for reusing views that scroll off-screen. Recall that we created a class called ViewHolder (Section 8.6.2) that maintained references to the views in a ListView item. The Adapter subclass stored a ViewHolder object with each ListView item so that we could reuse the ListView item’s views. You’re not required to use this pattern, but doing so is recommended to increase the ListView’s scrolling performance.
RecyclerView formalizes the view-holder pattern by making it required. You’ll create a RecyclerView.Adapter subclass to bind the RecyclerView’s list items to data in a List (Section 8.6). Each RecyclerView item has a corresponding object of a subclass of class RecyclerView.ViewHolder (Section 8.6.2) that maintains references to the item’s view(s) for reuse. The RecyclerView and its RecyclerView.Adapter work together to recycle the view(s) for items that scroll off the screen.
8.3.5 RecyclerView.ItemDecoration
Class ListView automatically displays a horizontal line between items, but RecyclerView does not provide any default decorations. To display horizontal lines between the items, you’ll define a subclass of RecyclerView.ItemDecoration that draws divider lines onto the RecyclerView (Section 8.7).
8.3.6 Displaying a List of Options in an AlertDialog
This app enables the user to long touch a RecyclerView item to display an AlertDialog containing a list of options from which the user can select only one. You’ll use an AlertDialog.Builder’s setItems method to specify a String array resource containing names of the option to display and to set the event handler that’s called when the user touches one of the options.
8.4 Building the App’s GUI and Resource Files
In this section, you’ll build the Twitter Searches app’s GUI and resource files. Recall from Section 8.3.3 that RecyclerView does not define how to render its list items. So you’ll also create a layout that defines a list item’s GUI. The RecyclerView will inflate this layout as necessary when creating list items.
8.4.1 Creating the Project
Create a new project using the Blank Activity template. Fragments are not required for this app, so when you configure the Blank Activity, do not check the Use a Fragment checkbox. Specify the following values in the Create New Project dialog’s New Project step:
• Application name: Twitter Searches
• Company Domain: deitel.com (or specify your own domain name)
Follow the steps you used in earlier apps to add an app icon to your project. Delete the Hello world! TextView from the content_main.xml, as it’s not used. Also, follow the steps in Section 4.4.3 to configure Java SE 7 support for the project.
8.4.2 AndroidManifest.xml
Most users will launch this app so that they can perform an existing saved search. When the first focusable GUI component in an activity is an EditText, Android gives that component the focus when the activity is displayed. When an EditText receives the focus, its corresponding virtual keyboard is displayed unless a hardware keyboard is present. In this app, we want to prevent the soft keyboard from being displayed until the user touches one of the app’s EditTexts. To do so, follow the steps in Section 3.7 for setting the windowSoftInputMode option, but set its value to stateAlwaysHidden.
8.4.3 Adding the RecyclerView Library
This app uses new material-design user-interface components from the Android Design Support Library, including the TextInputLayout, FloatingActionButton, and the RecyclerView. Android Studio’s new app templates are already configured with Android Design Support Library support for TextInputLayout and FloatingActionButton. To use RecyclerView, however, you must update the app’s dependencies to include the RecyclerView library:
1. Right click the project’s app folder and select Open Module Settings to open the Project Structure window.
2. Open the Dependencies tab, then click the add icon (![]() ) and select Library Dependency to open the Choose Library Dependency dialog.
) and select Library Dependency to open the Choose Library Dependency dialog.
3. Select the recyclerview-v7 library in the list, then click OK. The library will appear in the Dependencies tab’s list.
4. In the Project Structure window, click OK.
The IDE updates the project’s build.gradle file—the one that appears in the project’s Gradle Scripts node as build.gradle (Module: app)—to specify the new dependency. The Gradle build tool then makes the libraries available for use in your project.
8.4.4 colors.xml
For this app, we changed the app’s default accent color (used for the EditTexts, TextInputLayouts and FloatingActionButton) and added a color resource for the background color in the Tagged Searches area of the screen. Open colors.xml and replace the hexadecimal value for the colorAccent resource with #FF5722, then add a new color resource named colorTaggedSearches with the value #BBDEFB.
8.4.5 strings.xml
Add the String resources in Fig. 8.11 to strings.xml.

8.4.6 arrays.xml
Recall from Chapter 4 that array resources are normally defined in arrays.xml. Follow the steps in Section 4.4.6 to create an arrays.xml file, then add the resource in (Fig. 8.12) to the file.

8.4.7 dimens.xml
Add the dimension resource shown in Fig. 8.13 to the dimens.xml file.

8.4.8 Adding the Save Button Icon
Use Android Studio’s Vector Asset Studio (Section 4.4.9) to add the material design save icon (![]() ; located in the Content group) to the project—this will be used as the
; located in the Content group) to the project—this will be used as the FloatingActionButton’s icon. After adding the vector icon, go to the project’s res/drawable folder, open the icon’s XML file and change the <path> element’s android:fillColor value to
"@android:color/white"
This will make the icon more visible against the app’s accent color, which is applied to the FloatingActionButton by the app’s theme.
8.4.9 activity_main.xml
In this section, you’ll customize the FloatingActionButton that’s built into Android Studio’s Blank Activity app template. By default, the button contains an email icon and is positioned the bottom-right of MainActivity’s layout. You’ll replace the email icon with the save icon ![]() that you added in Section 8.4.8 and reposition the button at the layout’s top right. Perform the following steps:
that you added in Section 8.4.8 and reposition the button at the layout’s top right. Perform the following steps:
1. Open activity_main.xml and, in Design view, select the FloatingActionButton in the Component Tree.
2. Set the contentDescription property to the save_description String resource and set the src property to the ic_save_24dp Drawable resource.
At the time of this writing, Android Studio does not display layout properties for components from the Android Design Support Library, so any changes to these properties must be implemented directly in the layout’s XML. Switch to Text view, then:
3. Change the layout_gravity property’s value from "bottom|end" to "top|end" so that the FloatingActionButton’s moves to the top of the layout.
4. Change the name of the layout_margin property to layout_marginEnd so it applies only to the FloatingActionButton’s right side (or left side for right-to-left languages).
5. Add the following line to the FloatingActionButton’s XML element to specify a new value for its top margin—this moves the button down from the top of the layout over the part of the GUI defined by content_main.xml:
android:layout_marginTop="@dimen/fab_margin_top"
8.4.10 content_main.xml
The RelativeLayout in this app’s content_main.xml contains two TextInputLayouts and a LinearLayout that, in turn, contains a TextView and a RecyclerView. Use the layout editor and the Component Tree window to form the layout structure shown in Fig. 8.14. As you create the GUI components, set their ids as specified in the figure. There are several components in this layout that do not require ids, as the app’s Java code does not reference them directly.
Step 1: Adding the queryTextInputLayout and Its Nested EditText
Add the queryTextInputLayout and its nested EditText as follows:
1. Insert a TextInputLayout. In the layout editor’s Design view, click CustomView in the Palette’s Custom section. In the dialog that appears, begin typing TextInputLayout to search the list of custom GUI components. Once the IDE highlights TextInputLayout, click OK, then in the Component Tree, click the RelativeLayout to insert the TextInputLayout as a nested layout. Select the TextInputLayout and set its id to queryTextInputLayout.
2. To add an EditText to the TextInputLayout, switch to the layout editor’s Text view, then change the TextInputLayout element’s closing /> to >, position the cursor to the right of the >, press Enter and type </. The IDE will auto-complete the closing tag. Between the TextInputLayout’s starting and ending tags, type <EditText. The IDE will show an auto-complete window with EditText selected. Press Enter to insert an EditText, then set its layout_width to match_parent and layout_height to wrap_content.
3. Switch back to Design view, then in the Component Tree, select the EditText and set its imeOptions to actionNext (the keyboard displays a ![]() button to jump to the next
button to jump to the next EditText), its hint to the String resource query_prompt and check its singleLine property’s checkbox. To view the imeOptions property, you must first click the Show expert properties button (![]() ) at the top of the Properties window.
) at the top of the Properties window.
Step 2: Adding the tagTextInputLayout and Its Nested EditText
Using the techniques from the previous step, add the tagTextInputLayout and its nested EditText, with the following changes:
1. After adding the TextInputLayout, set its id to tagTextInputLayout.
2. In Text view, add the following line to the tagTextInputLayout’s XML element to indicate that this TextInputLayout should appear below the queryTextInputLayout:
android:layout_below="@id/queryTextInputLayout"
3. In Design view, set the String resource tag_prompt as the tagTextInputLayout EditText’s hint.
4. Set the EditText’s imeOptions to actionDone—for this option, the keyboard displays a ![]() button to dismiss the keyboard.
button to dismiss the keyboard.
Step 3: Adding the LinearLayout
Next, add a LinearLayout below the tagTextInputLayout:
1. In Design view, drag a LinearLayout (vertical) onto the RelativeLayout node in the Component Tree.
2. In the Properties window, expand the layout:alignComponent property’s node, then click the value field to the right of top:bottom and select tagTextInputLayout. This indicates that the top of the LinearLayout will be placed below the bottom of the tagTextInputLayout.
Step 3: Adding the LinearLayout’s Nested TextView and RecyclerView
Finally, add the LinearLayout’s nested TextView and RecyclerView:
1. Drag a Medium Text onto the LinearLayout (vertical) node in the Component Tree, then set its layout:width to match_parent, its text to the String resource named tagged_searches, its gravity to center_horizontal and its textStyle to bold. Also, expand its padding property and set top and bottom to the dimension resource named activity_vertical_margin.
2. Next, you’ll insert a RecyclerView. In the layout editor’s Design view, click CustomView in the Palette’s Custom section. In the dialog that appears, begin typing RecyclerView to search the list of custom GUI components. Once the IDE highlights RecyclerView, click OK, then in the Component Tree, click the LinearLayout to insert the RecyclerView as a nested view.
3. Select the RecyclerView in the Component Tree, then set its id to recyclerView, its layout:width to match_parent, its layout:height to 0dp and its layout:weight to 1—the RecyclerView will fill all remaining vertical space in the LinearLayout. Also, expand the RecyclerView’s padding property and set left and right to the dimension resource named activity_horizontal_margin.
8.4.11 RecyclerView Item’s Layout: list_item.xml
When populating a RecyclerView with data, you must specify each list item’s layout. The list items in this app each display the tag name of one saved search. You’ll now create a new layout that contains only a TextView with the appropriate formatting. Perform the following steps:
1. In the Project window, expand the project’s res folder, then right click the layout folder and select New > Layout resource file to display the New Resource File dialog.
2. In the File name field, specify list_item.xml.
3. In the Root element field, specify TextView.
4. Click OK. The new list_item.xml file will appear in the res/layout folder.
The IDE opens the new layout in the layout editor. Select the TextView in the Component Tree window, set its id to textView, then set the following properties:
• layout:width—match_parent
• layout:height—?android:attr/listPreferredItemHeight—This value is a predefined Android resource that represents a list item’s preferred height for a touchable view.3
3. At the time of this writing, you must set this directly in the XML due to an Android Studio bug that erroneously appends dp to the end of this property value when you set it via the Properties window.

The Android design guidelines specify that the minimum recommended size for a touchable item on the screen is 48dp-by-48dp. For more information on GUI sizing and spacing, see https://www.google.com/design/spec/layout/metrics-keylines.html.
• gravity—center_vertical
• textAppearance—?android:attr/textAppearanceMedium—This is the predefined theme resource that specifies the font size for medium-sized text.
Other Predefined Android Resources
There are many predefined Android resources like the ones used to set the height and textAppearance for a list item. You can view the complete list at:
To use a value in your layouts, specify it in the format
?android:attr/resourceName
8.5 MainActivity Class
This app consists of three classes:
• Class MainActivity—which we discuss in this section—configures the app’s GUI and defines the app’s logic.
• Class SearchesAdapter (Section 8.6) is a subclass of RecyclerView.Adapter that defines how to bind the tag names for the user’s searches to the RecyclerView’s items. Class MainActivity’s onCreate method creates an object of class SearchesAdapter as the RecyclerView’s adapter.
• Class ItemDivider (Section 8.7) is a subclass of RecyclerView.ItemDecoration that the RecyclerView uses to draw a horizontal line between items.
Sections 8.5.1–8.5.10 discuss class MainActivity in detail. This app does not need a menu, so we removed the MainActivity methods onCreateOptionsMenu and onOptionsItemSelected, and the corresponding menu resource from the project’s res/menu folder.
8.5.1 package and import Statements
Figure 8.15 shows MainActivity’s package and import statements. We discuss the imported types in Section 8.3 and as we encounter them in class MainActivity.
1 // MainActivity.java
2 // Manages your favorite Twitter searches for easy
3 // access and display in the device's web browser
4 package com.deitel.twittersearches;
5
6 import android.app.AlertDialog;
7 import android.content.Context;
8 import android.content.DialogInterface;
9 import android.content.Intent;
10 import android.content.SharedPreferences;
11 import android.net.Uri;
12 import android.os.Bundle;
13 import android.support.design.widget.FloatingActionButton;
14 import android.support.design.widget.TextInputLayout;
15 import android.support.v7.app.AppCompatActivity;
16 import android.support.v7.widget.LinearLayoutManager;
17 import android.support.v7.widget.RecyclerView;
18 import android.support.v7.widget.Toolbar;
19 import android.text.Editable;
20 import android.text.TextWatcher;
21 import android.view.View;
22 import android.view.View.OnClickListener;
23 import android.view.View.OnLongClickListener;
24 import android.view.inputmethod.InputMethodManager;
25 import android.widget.EditText;
26 import android.widget.TextView;
27
28 import java.util.ArrayList;
29 import java.util.Collections;
30 import java.util.List;
31
Fig. 8.15 | MainActivity’s package and import statements.
8.5.2 MainActivity Fields
As in the WeatherViewer app, class MainActivity (Fig. 8.16) extends AppCompatActivity (line 32) so that it can display an app bar and use other AppCompat library features on devices running past or current Android versions. The static String constant SEARCHES (line 34) represents the name of a SharedPreferences file that will store tag–query pairs on the device.
32 public class MainActivity extends AppCompatActivity {
33 // name of SharedPreferences XML file that stores the saved searches
34 private static final String SEARCHES = "searches";
35
36 private EditText queryEditText; // where user enters a query
37 private EditText tagEditText; // where user enters a query's tag
38 private FloatingActionButton saveFloatingActionButton; // save search
39 private SharedPreferences savedSearches; // user's favorite searches
40 private List<String> tags; // list of tags for saved searches
41 private SearchesAdapter adapter; // for binding data to RecyclerView
42
Fig. 8.16 | MainActivity fields.
Lines 36–41 define MainActivity’s instance variables:
• Lines 36–37 declare EditTexts that we’ll use to access the queries and tags that the user enters as input.
• Line 38 declares a FloatingActionButton that the user touches to save a search. In the Blank Activity app template, this was declared as a local variable in method onCreate (Section 8.5.3)—we renamed it and made it an instance variable, so we can hide the button when the EditTexts are empty and show it when the EditTexts both contain input.
• Line 39 declares the SharedPreferences instance variable savedSearches, which we’ll use to manipulate the tag–query pairs representing the user’s saved searches.
• Line 40 declares the List<String> tags that will store the sorted tag names for the user’s searches.
• Line 41 declares the SearchesAdapter instance variable adapter, which will refer to the RecyclerView.Adapter subclass object that provides data to the RecyclerView.
8.5.3 Overriden Activity Method onCreate
Overridden Activity method onCreate (Fig. 8.17) initializes the Activity’s instance variables and configures the GUI components. Lines 52–57 obtain references to the queryEditText and tagEditText and, for each, register a TextWatcher (Section 8.5.4) that’s notified when the user enters or removes characters in the EditTexts.
43 // configures the GUI and registers event listeners
44 @Override
45 protected void onCreate(Bundle savedInstanceState) {
46 super.onCreate(savedInstanceState);
47 setContentView(R. layout.activity_main);
48 Toolbar toolbar = (Toolbar) findViewById(R.id.toolbar);
49 setSupportActionBar(toolbar);
50
51 // get references to the EditTexts and add TextWatchers to them
52 queryEditText = ((TextInputLayout) findViewById(
53 R.id.queryTextInputLayout)).getEditText();
54 queryEditText.addTextChangedListener(textWatcher);
55 tagEditText = ((TextInputLayout) findViewById(
56 R.id.tagTextInputLayout)).getEditText();
57 tagEditText.addTextChangedListener(textWatcher);
58
59 // get the SharedPreferences containing the user's saved searches
60 savedSearches = getSharedPreferences(SEARCHES, MODE_PRIVATE);
61
62 // store the saved tags in an ArrayList then sort them
63 tags = new ArrayList<>(savedSearches.getAll().keySet());
64 Collections.sort(tags, String.CASE_INSENSITIVE_ORDER);
65
66 // get reference to the RecyclerView to configure it
67 RecyclerView recyclerView =
68 (RecyclerView) findViewById(R.id.recyclerView);
69
70 // use a LinearLayoutManager to display items in a vertical list
71 recyclerView.setLayoutManager(new LinearLayoutManager(this));
72
73 // create RecyclerView.Adapter to bind tags to the RecyclerView
74 adapter = new SearchesAdapter(
75 tags, itemClickListener, itemLongClickListener);
76 recyclerView.setAdapter(adapter);
77
78 // specify a custom ItemDecorator to draw lines between list items
79 recyclerView.addItemDecoration(new ItemDivider(this));
80
81 // register listener to save a new or edited search
82 saveFloatingActionButton =
83 (FloatingActionButton) findViewById(R.id.fab);
84 saveFloatingActionButton.setOnClickListener(saveButtonListener);
85 updateSaveFAB(); // hides button because EditTexts initially empty
86 }
87
Fig. 8.17 | Overridden Activity method onCreate.
Getting a SharedPreferences Object
Line 60 uses the method getSharedPreferences (inherited indirectly from class Context) to get a SharedPreferences object that can read existing tag–query pairs (if any) from the searches file. The first argument indicates the name of the file that contains the data. The second argument specifies the file’s access-level and can be set to:
• MODE_PRIVATE—Accessible only to this app. In most cases, you’ll use this option.
• MODE_WORLD_READABLE—Any app on the device can read the file.
• MODE_WORLD_WRITABLE—Any app on the device can write to the file.
These constants can be combined with the bitwise OR operator (|).
Getting the Keys Stored in the SharedPreferences Object
We’d like to display the search tags alphabetically so the user can easily find a search to perform. First, line 63 gets the Strings representing the keys in the SharedPreferences object and stores them in tags (an ArrayList<String>). SharedPreferences method getAll returns all the saved searches as a Map (package java.util)—a collection of key–value pairs. We then call method keySet on the Map object to get all the keys as a Set<String> (package java.util)—a collection of unique values. The result is used to initialize tags.
Sorting the ArrayList of Tags
Line 64 uses Collections.sort to sort tags. Since the user could enter tags using mixtures of uppercase and lowercase letters, we perform a case-insensitive sort by passing the predefined Comparator<String> object String.CASE_INSENSITIVE_ORDER as the second argument to Collections.sort.
Configuring the RecyclerView
Lines 67–79 configure the RecyclerView:
• Lines 67–68 get a reference to the RecyclerView.
• A RecyclerView can arrange its items for display in difference ways. For this app, we use the LinearLayoutManager to display the items in a vertical list. The LinearLayoutManager’s constructor receives a Context object, which is the MainActivity in this case. Line 71 creates a LinearLayoutManager calls RecyclerView method setLayoutManager to set the new object as the RecyclerView’s layout manager.
• Lines 74–75 create a SearchesAdapter (Section 8.6)—a subclass of RecyclerView.Adapter—that will supply data for display in the RecyclerView. Line 76 calls RecyclerView method setAdapter to specify that the SearchesAdapter will supply the RecyclerView’s data.
• Line 79 creates a subclass of RecyclerView.ItemDecoration named ItemDivider (Section 8.7) and passes the object to RecyclerView method addItemDecoration. This enables the RecyclerView to draw a horizontal line decoration between list items.
Registering a Listener for the FloatingActionButton
Lines 82–85 obtain a reference to the saveFloatingActionButton and register its OnClickListener. Instance variable saveButtonListener refers to an anonymous-inner-class object that implements interface View.OnClickListener (Section 8.5.5). Line 85 calls method updateSaveFAB (Section 8.5.4), which initially hides the saveFloatingActionButton, because the EditTexts are empty when onCreate is first called—the button displays only when both EditTexts contain input.
8.5.4 TextWatcher Event Handler and Method updateSaveFAB
Figure 8.18 defines an anonymous inner class that implements interface TextWatcher (lines 89–103). The TextWatcher’s onTextChanged method calls updateSaveFAB when the contents change in either of the app’s EditTexts. Lines 54 and 57 (Fig. 8.17) register the instance variable textWatcher as the listener for the EditTexts events.
88 // hide/show saveFloatingActionButton based on EditTexts' contents
89 private final TextWatcher textWatcher = new TextWatcher() {
90 @Override
91 public void beforeTextChanged(CharSequence s, int start, int count,
92 int after) { }
93
94 // hide/show the saveFloatingActionButton after user changes input
95 @Override
96 public void onTextChanged(CharSequence s, int start, int before,
97 int count) {
98 updateSaveFAB();
99 }
100
101 @Override
102 public void afterTextChanged(Editable s) { }
103 };
104
105 // shows or hides the saveFloatingActionButton
106 private void updateSaveFAB() {
107 // check if there is input in both EditTexts
108 if (queryEditText.getText().toString().isEmpty() ||
109 tagEditText.getText().toString().isEmpty())
110 saveFloatingActionButton.hide();
111 else
112 saveFloatingActionButton.show();
113 }
114
Fig. 8.18 | TextWatcher event handler and method updateSaveFAB.
The updatedSaveFAB method (Fig. 8.18, lines 106–113) checks whether there’s text in both EditTexts (lines 108–109). If either (or both) of the EditTexts is empty, line 110 calls the FloatingActionButton’s hide method to hide the button, because both the query and tag are required before a tag–query pair can be saved. If both contain text, line 112 calls the FloatingActionButton’s show method, to display the button so the user can touch it to store a tag–query pair.
8.5.5 saveButton’s OnClickListener
Figure 8.19 defines instance variable saveButtonListener, which refers to an anonymous inner class object that implements the interface OnClickListener. Line 84 (Fig. 8.17) registered saveButtonListener as the saveFloatingActionButton’s event handler. Lines 119–135 (Fig. 8.19) override interface OnClickListener’s onClick method. Lines 121–122 get the Strings from the EditTexts. If the user entered a query and a tag (line 124):
• lines 126–128 hide the soft keyboard
• line 130 calls method addTaggedSearch (Section 8.5.6) to store the tag–query pair
• lines 131–132 clear the two EditTexts, and
• line 133 calls the queryEditText’s requestFocus method to position the input cursor in the queryEditText.
115 // saveButtonListener save a tag-query pair into SharedPreferences
116 private final OnClickListener saveButtonListener =
117 new OnClickListener() {
118 // add/update search if neither query nor tag is empty
119 @Override
120 public void onClick(View view) {
121 String query = queryEditText.getText().toString();
122 String tag = tagEditText.getText().toString();
123
124 if (!query.isEmpty() && !tag.isEmpty()) {
125 // hide the virtual keyboard
126 ((InputMethodManager) getSystemService(
127 Context.INPUT_METHOD_SERVICE)).hideSoftInputFromWindow(
128 view.getWindowToken(), 0);
129
130 addTaggedSearch(tag, query); // add/update the search
131 queryEditText.setText(""); // clear queryEditText
132 tagEditText.setText(""); // clear tagEditText
133 queryEditText.requestFocus(); // queryEditText gets focus
134 }
135 }
136 };
137
Fig. 8.19 | Anonymous inner class that implements the saveButton’s OnClickListener to save a new or updated search.
8.5.6 addTaggedSearch Method
The event handler in Fig. 8.19 calls method addTaggedSearch (Fig. 8.20) to add a new search to savedSearches or to modify an existing search.
138 // add new search to file, then refresh all buttons
139 private void addTaggedSearch(String tag, String query) {
140 // get a SharedPreferences.Editor to store new tag/query pair
141 SharedPreferences.Editor preferencesEditor = savedSearches.edit();
142 preferencesEditor.putString(tag, query); // store current search
143 preferencesEditor.apply(); // store the updated preferences
144
145 // if tag is new, add to and sort tags, then display updated list
146 if (!tags.contains(tag)) {
147 tags.add(tag); // add new tag
148 Collections.sort(tags, String.CASE_INSENSITIVE_ORDER);
149 adapter.notifyDataSetChanged(); // update tags in RecyclerView
150 }
151 }
152
Fig. 8.20 | MainActivity’s addTaggedSearch method.
Editing a SharedPreferences Object’s Contents
Recall from Section 4.6.7 that to change a SharedPreferences object’s contents, you must first call its edit method to obtain a SharedPreferences.Editor object (Fig. 8.20, line 141), which can add key–value pairs to, remove key–value pairs from and modify the value associated with a particular key in a SharedPreferences file. Line 142 calls SharedPreferences.Editor method putString to save the search’s tag (the key) and query (the corresponding value)—if the tag already exists in the SharedPreferences this updates the value. Line 143 commits the changes by calling SharedPreferences.Editor method apply to make the changes to the file.
Notifying the RecyclerView.Adapter That Its Data Has Changed
When the user adds a new search, the RecyclerView should be updated to display it. Line 146 determines whether a new tag was added. If so, lines 147–148 add the new search’s tag to tags, then sort tags. Line 149 calls the RecyclerView.Adapter’s notifyDataSetChanged method to indicate that the underlying data in tags has changed. As with a ListView adapter, the RecyclerView.Adapter then notifies the RecyclerView to update its list of displayed items.
8.5.7 Anonymous Inner Class That Implements View.OnClickListener to Display Search Results
Figure 8.21 defines instance variable itemClickListener, which refers to an anonymous inner-class object that implements interface OnClickListener (a nested interface of class View). Lines 156–168 override the interface’s onClick method. The method’s argument is the View that the user touched—in this case, the TextView that displays a search tag in the RecyclerView.
153 // itemClickListener launches web browser to display search results
154 private final OnClickListener itemClickListener =
155 new OnClickListener() {
156 @Override
157 public void onClick(View view) {
158 // get query string and create a URL representing the search
159 String tag = ((TextView) view).getText().toString();
160 String urlString = getString(R.string.search_URL) +
161 Uri.encode(savedSearches.getString(tag, ""), "UTF-8");
162
163 // create an Intent to launch a web browser
164 Intent webIntent = new Intent(Intent.ACTION_VIEW,
165 Uri.parse(urlString));
166
167 startActivity(webIntent); // show results in web browser
168 }
169 };
170
Fig. 8.21 | Anonymous inner class that implements View.OnClickListener to display search results.
Getting String Resources
Line 159 gets the text of the View that the user touched in the RecyclerView—this is the tag for a search. Lines 160–161 create a String containing the Twitter search URL and the query to perform. Line 160 calls Activity’s inherited method getString with one argument to get the String resource named search_URL, then we append the query String to it.
Getting Strings from a SharedPreferences Object
We append the result of line 161 to the search URL to complete the urlString. SharedPreferences method getString returns the query associated with the tag. If the tag does not already exist, the second argument ("" in this case) is returned. Line 161 passes the query to Uri method encode, which escapes any special URL characters (such as ?, /, :, etc.) and returns a so-called URL-encoded String. Class Uri (uniform resource identifier) of package android.net enables us to convert a URL into the format required by an Intent that launches the device’s web browser.4 This is important to ensure that the Twitter web server that receives the request can parse the URL properly to obtain the search query.
4. A Uniform Resource Identifier (URI) uniquely identifies a resource on a network. One common type of URI is a Uniform Resource Locator (URL) that identifies items on the Web, such as web pages, image files, web service methods and more.
Creating an Intent to Launch the Device’s Web Browser
Lines 164–165 create a new Intent, which we’ll use to launch the device’s web browser and display the search results. In Chapter 4, you used an explicit Intent to launch another activity in the same app. Here you’ll use an implicit Intent to launch another app. The first argument of Intent’s constructor is a constant describing the action to perform. Intent.ACTION_VIEW indicates that we’d like to display a representation of the Intent’s data. Many constants are defined in the Intent class describing actions such as searching, choosing, sending and playing:
The second argument (line 165) is a Uri representing the data for which to perform the action. Class Uri’s parse method converts a String representing a URL (uniform resource locator) to a Uri.
Starting an Activity for an Intent
Line 167 passes the Intent to the inherited Activity method startActivity, which starts an Activity that can perform the specified action for the given data. In this case, because we’ve specified to view a URI, the Intent launches the device’s web browser to display the corresponding web page. This page shows the results of the supplied Twitter search.
8.5.8 Anonymous Inner Class That Implements View.OnLongClickListener to Share, Edit or Delete a Search
Figure 8.22 defines instance variable itemLongClickListener, which refers to an anonymous inner-class object that implements interface OnLongClickListener. Lines 175–216 override interface OnLongClickListener’s onLongClick method.
171 // itemLongClickListener displays a dialog allowing the user to share
172 // edit or delete a saved search
173 private final OnLongClickListener itemLongClickListener =
174 new OnLongClickListener() {
175 @Override
176 public boolean onLongClick(View view) {
177 // get the tag that the user long touched
178 final String tag = ((TextView) view).getText().toString();
179
180 // create a new AlertDialog
181 AlertDialog.Builder builder =
182 new AlertDialog.Builder(MainActivity.this);
183
184 // set the AlertDialog's title
185 builder.setTitle(
186 getString(R.string.share_edit_delete_title, tag));
187
188 // set list of items to display and create event handler
189 builder.setItems(R.array.dialog_items,
190 new DialogInterface.OnClickListener() {
191 @Override
192 public void onClick(DialogInterface dialog, int which) {
193 switch (which) {
194 case 0: // share
195 shareSearch(tag);
196 break;
197 case 1: // edit
198 // set EditTexts to match chosen tag and query
199 tagEditText.setText(tag);
200 queryEditText.setText(
201 savedSearches.getString(tag, ""));
202 break;
203 case 2: // delete
204 deleteSearch(tag);
205 break;
206 }
207 }
208 }
209 );
210
211 // set the AlertDialog's negative Button
212 builder.setNegativeButton(getString(R.string.cancel), null);
213
214 builder.create().show(); // display the AlertDialog
215 return true;
216 }
217 };
218
Fig. 8.22 | Anonymous inner class that implements View.OnLongClickListener.
final Local Variables for Use in Anonymous Inner Classes
Line 178 assigns to final local variable tag the text of the item the user long pressed—final is required for any local variable or method parameter used in an anonymous inner class.
AlertDialog That Displays a List of Items
Lines 181–186 create an AlertDialog.Builder and set the dialog’s title to a formatted String (R.string.share_edit_delete_title) in which tag replaces the format specifier. Line 186 calls Activity’s inherited method getString that receives multiple arguments—a String resource ID representing a format String and the values that should replace the format specifiers in the format String. In addition to buttons, an AlertDialog can display a list of items. Lines 189–209 use AlertDialog.Builder method setItems to specify that the dialog should display the array of Strings R.array.dialog_items and to define an anonymous inner class object that responds when the user touches any item in the list.
Event Handler for the Dialog’s List of Items
The anonymous inner class in lines 190–208 determines which item the user selected in the dialog’s list and performs the appropriate action. If the user selects Share, shareSearch is called (line 195). If the user selects Edit, lines 199–201 display the search’s query and tag in the EditTexts. If the user selects Delete, deleteSearch is called (line 204).
Configuring the Negative Button and Displaying the Dialog
Line 212 configures the dialog’s negative button. When the negative button’s event handler is null, touching the negative button simply dismisses the dialog. Line 214 creates and shows the dialog.
8.5.9 shareSearch Method
Method shareSearch (Fig. 8.23) is called when the user selects to share a search (Fig. 8.22). Lines 222–223 create a String representing the search to share. Lines 226–232 create and configure an Intent that allows the user to send the search URL using an Activity that can handle the Intent.ACTION_SEND.
219 // allow user to choose an app for sharing URL of a saved search
220 private void shareSearch(String tag) {
221 // create the URL representing the search
222 String urlString = getString(R.string.search_URL) +
223 Uri.encode(savedSearches.getString(tag, ""), "UTF-8");
224
225 // create Intent to share urlString
226 Intent shareIntent = new Intent();
227 shareIntent.setAction(Intent.ACTION_SEND);
228 shareIntent.putExtra(Intent.EXTRA_SUBJECT,
229 getString(R.string.share_subject));
230 shareIntent.putExtra(Intent.EXTRA_TEXT,
231 getString(R.string.share_message, urlString));
232 shareIntent.setType("text/plain");
233
234 // display apps that can share plain text
235 startActivity(Intent.createChooser(shareIntent,
236 getString(R.string.share_search)));
237 }
238
Fig. 8.23 | MainActivity’s shareSearch method.
Adding Extras to an Intent
An Intent includes a Bundle of extras—additional information that’s passed to the Activity that handles the Intent. For example, an e-mail Activity can receive extras representing the e-mail’s subject, CC and BCC addresses, and the body text. Lines 228–231 use Intent method putExtra to add to the Intent’s Bundle key–value pairs representing the extras. The method’s first argument is a String key representing the purpose of the extra and the second argument is the corresponding extra data. Extras may be primitive type values, primitive type arrays, entire Bundle objects and more—see class Intent’s documentation for a complete list of the putExtra overloads.
The extra at lines 228–229 specifies an e-mail’s subject with the String resource R.string.share_subject. For an Activity that does not use a subject (such as sharing on a social network), this extra is ignored. The extra at lines 230–231 represents the text to share—a formatted String in which the urlString is substituted into the String resource R.string.share_message. Line 232 sets the Intent’s MIME type to text/plain—such data can be handled by any Activity capable of sending plain text messages.
Displaying an Intent Chooser
To display the intent chooser shown in Fig. 8.8(a), we pass the Intent and a String title to Intent’s static createChooser method (lines 235–236). The intent chooser’s title is specified by the second argument (R.string.share_search). It’s important to set this title to remind the user to select an appropriate Activity. You cannot control the apps installed on a user’s phone or the Intent filters that can launch those apps, so it’s possible that incompatible activities could appear in the chooser. Method createChooser returns an Intent that we pass to startActivity to display the intent chooser.
8.5.10 deleteSearch Method
The deleteSearch method (Fig. 8.24) is called when the user long presses a search tag and selects Delete from the dialog displayed by the code in Fig. 8.22. Before deleting the search, the app displays an AlertDialog to confirm the delete operation. Line 243 (Fig. 8.24) sets the dialog’s title to a formatted String in which tag replaces the format specifier in the String resource R.string.confirm_message. Line 246 configures the dialog’s negative button to dismiss the dialog. Lines 249–264 configure the dialog’s positive button to remove the search. Line 252 removes the tag from the tags collection, and lines 255–258 use a SharedPreferences.Editor to remove the search from the app’s SharedPreferences. Line 261 then notifies the RecyclerView.Adapter that the underlying data has changed so that the RecyclerView can update its displayed list of items.
239 // deletes a search after the user confirms the delete operation
240 private void deleteSearch(final String tag) {
241 // create a new AlertDialog and set its message
242 AlertDialog.Builder confirmBuilder = new AlertDialog.Builder(this);
243 confirmBuilder.setMessage(getString(R.string.confirm_message, tag));
244
245 // configure the negative (CANCEL) Button
246 confirmBuilder.setNegativeButton(getString(R.string.cancel), null);
247
248 // configure the positive (DELETE) Button
249 confirmBuilder.setPositiveButton(getString(R.string.delete),
250 new DialogInterface.OnClickListener() {
251 public void onClick(DialogInterface dialog, int id) {
252 tags.remove(tag); // remove tag from tags
253
254 // get SharedPreferences.Editor to remove saved search
255 SharedPreferences.Editor preferencesEditor =
256 savedSearches.edit();
257 preferencesEditor.remove(tag); // remove search
258 preferencesEditor.apply(); // save the changes
259
260 // rebind tags to RecyclerView to show updated list
261 adapter.notifyDataSetChanged();
262 }
263 }
264 );
265
266 confirmBuilder.create().show(); // display AlertDialog
267 }
268 }
Fig. 8.24 | MainActivity’s deleteSearch method.
8.6 SearchesAdapter Subclass of RecyclerView.Adapter
This section presents the RecyclerView.Adapter that binds the items in MainActivity’s List<String> named tags to the app’s RecyclerView.
8.6.1 package Statement, import statements, Instance Variables and Constructor
Figure 8.25 shows the beginning of class SearchesAdapter’s definition. The class extends generic class RecyclerView.Adapter, using as its type argument the nested class SearchesAdapter.ViewHolder (defined in Section 8.6.2). The instance variables in lines 17–18 maintain references to the event listeners (defined in class MainActivity) that are registered for each RecyclerView item. The instance variable in line 21 maintains a reference to MainActivity’s List<String> that contains the tag names to display.
1 // SearchesAdapter.java
2 // Subclass of RecyclerView.Adapter for binding data to RecyclerView items
3 package com.deitel.twittersearches;
4
5 import android.support.v7.widget.RecyclerView;
6 import android.view.LayoutInflater;
7 import android.view.View;
8 import android.view.ViewGroup;
9 import android.widget.TextView;
10
11 import java.util.List;
12
13 public class SearchesAdapter
14 extends RecyclerView.Adapter<SearchesAdapter.ViewHolder> {
15
16 // listeners from MainActivity that are registered for each list item
17 private final View.OnClickListener clickListener;
18 private final View.OnLongClickListener longClickListener;
19
20 // List<String> used to obtain RecyclerView items' data
21 private final List<String> tags; // search tags
22
23 // constructor
24 public SearchesAdapter(List<String> tags,
25 View.OnClickListener clickListener,
26 View.OnLongClickListener longClickListener) {
27 this.tags = tags;
28 this.clickListener = clickListener;
29 this.longClickListener = longClickListener;
30 }
31
Fig. 8.25 | SearchesAdapter package statement, import statements, instance variables and constructor.
8.6.2 Nested ViewHolder Subclass of RecyclerView.ViewHolder
Every item in a RecyclerView must be wrapped in its own RecyclerView.ViewHolder. For this app, we defined a RecyclerView.ViewHolder called ViewHolder (Fig. 8.26). The ViewHolder constructor (line 39–48) receives a View object and listeners for that View’s OnClick and OnLongClick events. The View represents an item in the RecyclerView, which is passed to the superclass’s constructor (line 42). Line 43 stores a reference to the TextView for the item. Line 46 registers the TextView’s OnClickListener, which displays the search results for that TextView’s tag. Line 47 registers the TextView’s OnLongClickListener, which opens the Share, Edit or Delete dialog for that TextView’s tag. The constructor is called when the RecyclerView.Adapter creates a new list item method onCreateViewHolder (Section 8.6.3).
32 // nested subclass of RecyclerView.ViewHolder used to implement
33 // the view-holder pattern in the context of a RecyclerView--the logic
34 // of recycling views that have scrolled offscreen is handled for you
35 public static class ViewHolder extends RecyclerView.ViewHolder {
36 public final TextView textView;
37
38 // configures a RecyclerView item's ViewHolder
39 public ViewHolder(View itemView,
40 View.OnClickListener clickListener,
41 View.OnLongClickListener longClickListener) {
42 super(itemView);
43 textView = (TextView) itemView.findViewById(R.id.textView);
44
45 // attach listeners to itemView
46 itemView.setOnClickListener(clickListener);
47 itemView.setOnLongClickListener(longClickListener);
48 }
49 }
50
Fig. 8.26 | SearchesAdapter nested ViewHolder subclass of RecyclerView.ViewHolder.
8.6.3 Overridden RecyclerView.Adapter Methods
Figure 8.27 defines the overridden RecyclerView.Adapter methods onCreateViewHolder (lines 52–61), onBindViewHolder (lines 64–67) and getItemCount (lines 70–73).
51 // sets up new list item and its ViewHolder
52 @Override
53 public ViewHolder onCreateViewHolder(ViewGroup parent,
54 int viewType) {
55 // inflate the list_item layout
56 View view = LayoutInflater.from(parent.getContext()).inflate(
57 R.layout.list_item, parent, false);
58
59 // create a ViewHolder for current item
60 return (new ViewHolder(view, clickListener, longClickListener));
61 }
62
63 // sets the text of the list item to display the search tag
64 @Override
65 public void onBindViewHolder(ViewHolder holder, int position) {
66 holder.textView.setText(tags.get(position));
67 }
68
69 // returns the number of items that adapter binds
70 @Override
71 public int getItemCount() {
72 return tags.size();
73 }
74 }
Fig. 8.27 | SearchesAdapter overridden RecyclerView.Adapter methods onCreateViewHolder, onBindViewHolder and getItemCount.
Overriding the onCreateViewHolder Method
The RecyclerView calls its RecyclerView.Adapter’s onCreateViewHolder method (lines 52–61) to inflate the layout for each RecyclerView item (lines 56–57) and wrap it in an object of the RecyclerView.ViewHolder subclass named ViewHolder (line 60). This new ViewHolder object is then returned to the RecyclerView for display.
Overriding the onBindViewHolder Method
The RecyclerView calls its RecyclerView.Adapter’s onBindViewHolder method (lines 64–67) to set the data that’s displayed for a particular RecyclerView item. The method receives:
• an object of our custom subclass of RecyclerView.ViewHolder containing the Views in which data will be displayed—in this case, one TextView—and
• an int representing the item’s position in the RecyclerView.
Line 66 sets the TextView’s text to the String in tags at the given position.
Overriding the getItemCount Method
The RecyclerView calls its RecyclerView.Adapter’s getItemCount method (lines 70–73) to obtain the total number of items that that the RecyclerView needs to display—in this case, the number of items in tags (line 72).
8.7 ItemDivider Subclass of RecyclerView.ItemDecoration
A RecyclerView.ItemDecoration object draws decorations—such as separators between items—on a RecyclerView. The RecyclerView.ItemDecoration subclass ItemDivider (Fig. 8.28) draws divider lines between list items. Lines 17–18 in the constructor obtain the predefined Android Drawable resource android.R.attr.listDivider, which is the standard Android list-item divider used by default in ListViews.
1 // ItemDivider.java
2 // Class that defines dividers displayed between the RecyclerView items;
3 // based on Google's sample implementation at bit.ly/DividerItemDecoration
4 package com.deitel.twittersearches;
5
6 import android.content.Context;
7 import android.graphics.Canvas;
8 import android.graphics.drawable.Drawable;
9 import android.support.v7.widget.RecyclerView;
10 import android.view.View;
11
12 class ItemDivider extends RecyclerView.ItemDecoration {
13 private final Drawable divider;
14
15 // constructor loads built-in Android list item divider
16 public ItemDivider(Context context) {
17 int[] attrs = {android.R.attr.listDivider};
18 divider = context.obtainStyledAttributes(attrs).getDrawable(0);
19 }
20
21 // draws the list item dividers onto the RecyclerView
22 @Override
23 public void onDrawOver(Canvas c, RecyclerView parent,
24 RecyclerView.State state) {
25 super.onDrawOver(c, parent, state);
26
27 // calculate left/right x-coordinates for all dividers
28 int left = parent.getPaddingLeft();
29 int right = parent.getWidth() - parent.getPaddingRight();
30
31 // for every item but the last, draw a line below it
32 for (int i = 0; i < parent.getChildCount() - 1; ++i) {
33 View item = parent.getChildAt(i); // get ith list item
34
35 // calculate top/bottom y-coordinates for current divider
36 int top = item.getBottom() + ((RecyclerView.LayoutParams)
37 item.getLayoutParams()).bottomMargin;
38 int bottom = top + divider.getIntrinsicHeight();
39
40 // draw the divider with the calculated bounds
41 divider.setBounds(left, top, right, bottom);
42 divider.draw(c);
43 }
44 }
45 }
Fig. 8.28 | ItemDivider subclass of RecyclerView.ItemDecoration for displaying a horizontal line between items in the RecyclerView.
Overriding the onDrawOver Method
As the user scrolls through the RecyclerView’s items, the RecyclerView’s contents are repeatedly redrawn to display the items in their new positions on the screen. As part of this process, the RecyclerView calls its RecyclerView.ItemDecoration’s onDrawOver method (lines 22–44) to draw the decorations on the RecyclerView. The method receives:
• a Canvas for drawing the decorations on the RecyclerView.
• the RecyclerView object on which the Canvas draws
• the RecyclerView.State—an object that stores information passed between various RecyclerView components. In this app, we simply pass this value to the superclass’s onDrawOver method (line 25).
Lines 28–29 calculate the left and right x-coordinates that are used to specify the bound’s of the Drawable that will be displayed. The left x-coordinate is determined by calling the RecyclerView’s getPaddingLeft method, which returns the amount of padding between the RecyclerView’s left edge and its content. The right x-coordinate is determined by calling the RecyclerView’s getWidth method and subtracting the result of calling the RecyclerView’s getPaddingRight method, which returns the amount of padding between the RecyclerView’s right edge and its content.
Lines 32–43 draw the dividers on the RecyclerView’s Canvas by iterating through all but the last item and drawing the dividers below each item. Line 33 gets and stores the current RecyclerView item. Lines 36–37 calculate one divider’s top y-coordinate, using the item’s bottom y-coordinate plus the item’s margin. Line 38 calculates the divider’s bottom y-coordinate, using the top y-coordinate plus the divider’s height—returned by Drawable method getIntrinsicHeight. Line 41 sets the divider’s bounds and line 42 draws it to the Canvas.
8.8 A Note on Fabric: Twitter’s New Mobile Development Platform
In Chapter 7, you used REST web services to obtain a weather forecast. Twitter provides extensive REST web services that enable you to integrate Twitter functionality into your apps. Using these web services requires a Twitter developer account and special authentication. The focus of this chapter is not on how to use Twitter’s web services. For this reason, the app performs searches as if you enter them directly on the Twitter website in the web browser. The Twitter website then returns the results directly to the device’s web browser for display.
Working with the Twitter web services directly using Chapter 7’s techniques can be challenging. Twitter recognized this and now offers Fabric—a robust mobile development platform for Android and iOS. Fabric encapsulates the Twitter web services’s details in libraries that you incorporate into your projects, making it easier for developers to add Twitter capabilities to their apps. In addition, you can add mobile identity management (called Digits; for user sign-in to websites and apps), advertising-based monetization capabilities (called MoPub) and app crash reporting (called Crashlytics).
To use Fabric, sign up at
and install the Android Studio plug-in. Once installed, click the plug-in’s icon on the Android Studio toolbar and the plug-in will walk you through the steps that add the Fabric libraries to your project. The Fabric website also provides documentation and tutorials.
8.9 Wrap-Up
In this chapter, you created the Twitter Searches app. You used a SharedPreferences file to store and manipulate key–value pairs representing the user’s saved Twitter searches.
We introduced the RecyclerView (from package android.support.v7.widget)—a flexible, customizable view that enables you to control how an app displays a scrolling list of data. You learned that RecyclerViews support different layout managers and arranged this app’s RecyclerView items vertically using a LinearLayoutManager—a subclass of RecyclerView.LayoutManager.
We once again used the view-holder pattern for reusing views that scroll off-screen. You learned that RecyclerView formalizes the view–holder pattern, making it required. You created a subclass of RecyclerView.Adapter to bind the RecyclerView’s list items to data. You also created a subclass of RecyclerView.ViewHolder to maintain references to each list item’s view for reuse. To display decorations between a RecyclerView’s items, you defined a subclass of RecyclerView.ItemDecoration to draw divider lines onto the RecyclerView.
You used two implicit Intents for which you did not specify the precise component that should handle each Intent. You used one to launch the device’s default web browser to display Twitter search results, based on a search query embedded in a URL, and that displayed an Intent chooser, enabling the user to select from a variety of apps that could share text.
Finally, you displayed an AlertDialog containing a list of options from which the user could select only one. You used an AlertDialog.Builder’s setItems method to specify a String array resource containing names of the option to display and to set the event handler that was called when the user touched one of the options.
In Chapter 9, we build the database-driven Address Book app, which provides quick and easy access to stored contact information and the ability to add contacts, delete contacts and edit existing contacts. You’ll learn how to dynamically swap Fragments in a GUI and provide layouts that optimize screen real estate on phones and tablets.
Self-Review Exercises
8.1 Fill in the blanks in each of the following statements:
a) ____________ are typically used to launch activities—they indicate an action to be performed and the data on which that action is to be performed.
b) A(n) ____________ (package android.support.v7.widget) is a flexible, customizable view that enables you to control how an app displays a scrolling list of data.
c) Lengthy data access should never be done in the UI thread; otherwise, the app will display a(n) ____________ dialog—typically after five seconds of inactivity.
d) An Intent is a description of an action to be performed with associated ____________.
e) ____________Intents specify an exact Activity class to run in the same app.
f) Class RecyclerView formalizes the view-holder pattern by requiring you to create a subclass of ____________.
g) ____________ is a subclass of RecyclerView.LayoutManager that can be used to display items in a vertical list.
8.2 State whether each of the following is true or false. If false, explain why.
a) Extensive input/output should be performed on the UI thread; otherwise, this will affect your app’s responsiveness.
b) RecyclerView was designed as a better ListView. It provides better separation of the data’s presentation from the RecyclerView’s capabilities for reusing views, as well as more flexible customization options for presenting the RecyclerView’s items.
c) An AlertDialog.Builder’s setList method receives a String array resource containing names of the options to display as a list in the dialog and an event handler that’s called when the user touches one of the options in the list.
d) Each RecyclerView item has a corresponding object of a subclass of class RecyclerView.ViewHolder that maintains references to the item’s view(s) for reuse.
Answers to Self-Review Exercises
a) Intents.
b) RecyclerView.
c) Application Not Responding (ANR).
d) data.
e) Explicit.
f) RecyclerView.ViewHolder.
g) LinearLayoutManager.
a) False. Extensive input/output should not be performed on the UI thread, since that would affect your app’s responsiveness.
b) True.
c) False. The AlertDialog.Builder’s setItems method does this.
d) True.
a) A layout fills the entire client area of the screen if the layout’s Width and Height properties (in the Layout Parameters section of the Properties window) are each set to ____________.
b) ____________ object stores key-value pairs.
c) ____________ (a static method of class Collections from package java.util) sorts the List in its first argument.
d) A(n) ____________ is a GUI that shows a list of apps that can handle a specified Intent.
e) A subclass of ____________ can be used to display a line between RecyclerView items.
8.2 State whether each of the following is true or false. If false, explain why.
a) An Algorithm specifies an action to be performed and the data to be acted upon—Android uses Algorithms to launch the appropriate activities.
b) You implement interface View.OnClickListener of package android.view to specify the code that should execute when the user touches a Button.
c) The first argument passed to Intent’s constructor is the data to be operated on.
d) An explicit Intent allows the system to launch the most appropriate Activity based on the type of data.
Project Exercises
8.3 (Favorite Websites App) Using the techniques you learned in this chapter, create a Favorite Websites app that allows a user to create a list of favorite websites.
8.4 (Twitter Searches App Enhancement) Use an AsyncTask to modify the Twitter Searches app so that it loads and saves the SharedPreferences in a separate thread of execution.
8.5 (Enhanced Twitter Searches App) Make the following enhancements to the Twitter Searches app—some of these require the Twitter web-service APIs:
a) Allow the user to add filters to searches (e.g., include only tweets with videos, images or links). Investigate the Twitter search operators in more detail to determine the filter options.
b) Create an option for following the top five Twitter trends—popular topics being discussed on Twitter.
c) Add the ability to retweet tweets that you find in your searches.
d) Add a feature that suggests people to follow based on the user’s favorite Twitter searches.
e) Add translation capabilities to read Tweets in other languages.
f) Share on Facebook.
g) View all replies related to a tweet.
h) Enable the user to reply to a tweet in the search results.
8.6 (Flickr Searches App) Investigate Flickr’s photo-search web-service API (https://www.flickr.com/services/api/flickr.photos.search.html), then reimplement this chapter’s Twitter Searches app as a Flickr Searches app.
8.7 (Enhanced Flickr Searches App) Enhance the Flickr Searches app from Exercise 8.6 to allow the user to add filters to searches (e.g., include only images containing a specific color, shape, object, etc.).
8.8 (Twitter App) Investigate the Twitter Fabric APIs at https://fabric.io, then use the APIs in an app that includes some of the following features:
a) Post a tweet from within the app to Twitter and Facebook simultaneously.
b) Group tweets from favorite twitterers into lists (e.g., friends, colleagues, celebrities).
c) Hide specific twitterers from the feed without “unfollowing” them.
d) Manage multiple accounts from the same app.
e) Color code tweets in the feed from favorite twitterers or tweets that contain specific keywords.
f) Geo tag tweets so readers can see the user’s location when the tweet was posted.
g) Reply to tweets from within the app.
h) Retweet from within the app.
i) Use the APIs from a URL shortening service to enable the user to shorten URLs to include in tweets.
j) Save drafts of tweets to post later.
k) Display updates when a favorite posts a new tweet.
8.9 (Enhanced Flag Quiz App) Enhance the Flag Quiz app from Chapter 4 so that after the user answers the question correctly, the app provides a link to the Wikipedia for that country, so the user can learn more about the country as they play the game. When the user touches the link, use an Intent to launch the device’s browser to request and display the web page. In this version of the app, you may want to allow the user to decide when to move to the next flag.
Advanced Project Exercises
8.10 (Blackjack App) Create a Blackjack card game app. Two cards each are dealt to the dealer and the player. (We provide card images with the book’s examples.) The player’s cards are dealt face up. Only the dealer’s first card is dealt face up. Each card has a value. A card numbered 2 through 10 is worth its face value. Jacks, queens and kings each count as 10. Aces can count as 1 or 11—whichever value is more beneficial to the player. If the sum of the player’s two initial cards is 21 (that is, the player was dealt a card valued at 10 and an ace, which counts as 11 in this situation), the player has “blackjack” and the dealer’s face-down card is revealed. If the dealer does not have blackjack, the player immediately wins the game; otherwise, the hand is a “push” (that is, a tie) and no one wins the hand. If the player does not have blackjack, the player can begin taking additional cards one at a time. These cards are dealt face up, and the player decides when to stop taking cards. If the player “busts” (that is, the sum of the player’s cards exceeds 21), the game is over, and the player loses. When the player stands (stops taking cards), the dealer’s hidden card is revealed. If the dealer’s total is 16 or less, the dealer must take another card; otherwise, the dealer must stay. The dealer must continue to take cards until the sum of the dealer’s cards is greater than or equal to 17. If the dealer exceeds 21, the player wins. Otherwise, the hand with the higher point total wins. If the dealer and the player have the same point total, the game is a “push,” and no one wins. The GUI for this app can be built using ImageViews, TextViews and Buttons.
8.11 (Enhanced Blackjack App) Enhance the Blackjack app in Exercise 8.10 as follows:
a) Provide a betting mechanism that allows the player to start with $1000 and adds or subtracts from that value based on whether the user wins or loses a hand. If the player wins with a non-blackjack hand, the bet amount is added to the total. If the player wins with blackjack, 1.5 times the bet amount is added to the total. If the player loses the hand, the bet amount is subtracted from the total. The game ends when the user runs out of money.
b) Locate images of casino chips and use them to represent the bet amount on the screen.
c) Investigate Blackjack rules online and provide capabilities for “doubling down,” “surrendering” and other aspects of the game.
d) Some casinos use variations of the standard Blackjack rules. Provide options that allow the user to choose the rules under which the game should be played.
e) Some casinos use different numbers of decks of cards. Allow the user to choose how many decks should be used.
f) Allow the user to save the game’s state to continue at a later time.
8.12 (Other Card Game Apps) Investigate the rules for any card game of your choice online and implement the game as an app.
8.13 (Solitaire Card Game App) Search the web for the rules to various solitaire card games. Choose the version of the game you like then implement it. (We provide card images with the book’s examples.)