
Chapter 11. Communicating with SMS and Emails
In This Chapter
• Understanding Broadcast Receivers
• Broadcasting and Receiving Intents
• Using the Notification System
• Notification via the Status Bar
• Creating Notifications, PendingIntent, and using NotificationManagers and Notification.Builder
• Sending SMS Messages via Java Code
• Working with the Telephony Manager
• Making Outgoing Calls and Listening for Phone State Changes
Communication with text messages is a popular way to send and receive information via cellular phones. Communicating through text messages not only consumes fewer network resources but also reduces network congestion, making it an inexpensive mode of communication. Moreover, users can respond to such messages at their leisure. We can make our application send and receive text messages via SMS (Short Message Service) automatically at periodic intervals or when a specific event occurs, such as when a button is clicked or when a task is complete.
All, three communication mediums—SMS, email, and voice calls—use the concept of broadcast receivers and notifications. So let’s first examine them.
Understanding Broadcast Receivers
A broadcast receiver is a component that responds to different messages that are broadcast by the system or other applications. Messages such as new mail, low battery, captured photo, or completed download require attention. Such messages are broadcast as an Intent object that is waiting for broadcast receivers to respond. The broadcast receiver responds to such broadcasted Intents and takes the necessary actions. The broadcast receivers can, for example, create a status bar notification to alert the user when a broadcast occurs.
Note
A broadcast Intent can invoke more than one receiver.
We cover two separate aspects of broadcast receivers:
• Receiving the broadcast Intent
Broadcasting an Intent
To broadcast an Intent, we first create an Intent object, assign a specific action to it, attach data or a message to the broadcast receiver, and finally broadcast it. We can optionally put an extra message or data on the Intent. Table 11.1 lists the methods involved in broadcasting an Intent.
Table 11.1. Methods Involved in Broadcasting an Intent
The following code broadcasts an Intent:
public static String BROADCAST_STRING = "com.androidunleashed.testingbroadcast";
Intent broadcastIntent = new Intent();
broadcastIntent.putExtra("message", "New Email arrived");
broadcastIntent.setAction(BROADCAST_STRING);
sendBroadcast(broadcastIntent);
We can see that an Intent object called broadcastIntent is created. The data or message to be passed along with the Intent is "New Email arrived", and the name or key assigned to this message is message. The action string is made unique by using a namespace similar to a Java class. We can see that the com.androidunleashed.testingbroadcast is assigned as an action to the Intent. Finally, the broadcastIntent is sent or broadcasted and received by the broadcast receivers.
Receiving the Broadcast Intent
A broadcast receiver is a class that extends the BroadcastReceiver. It also needs to be registered as a receiver in an Android application via the AndroidManifest.xml file or through code at runtime. The broadcast receiver class needs to implement the onReceive() method. The following is sample code of an onReceive() method:
public void onReceive(Context context, Intent intent) {
String actionName = intent.getAction();
if(actionName != null && actionName.equals("com.androidunleashed.testingbroad-
cast")) {
String msg = intent.getStringExtra("message");
Log.d("Received Message: ",msg);
}
}
The getAction() and getStringExtra() methods used here need some explanation:
• getAction()—Retrieves the action to be performed from the Intent object. It is the action that indicates what task has to be performed on the data passed along with the Intent.
Syntax:
getAction()
• getStringExtra()—Retrieves the extended data from the Intent.
Syntax:
getStringExtra(String name)
where name represents the key or the name assigned to the value while adding data to the Intent through the putExtra() method.
In the onReceive() method, we access the Intent object passed as a parameter. From the Intent object, we retrieve the action that is supposed to be performed. If the action to be performed is not null and matches the one that is sent by the sender activity, the message or data passed along with the Intent is extracted from the Intent and is logged.
Let’s create an Android project called BroadcastApp. In this application, a Button is displayed with the caption Send Broadcast. After we click the Button, an Intent with a message is broadcast. The broadcasted Intent is then received through a broadcast receiver, and the message sent with the Intent is extracted and logged. To define a Button control, write the code shown in Listing 11.1 into the activity_broadcast_app.xml layout file.
Listing 11.1. Code Written into activity_broadcast_app.xml
<LinearLayout xmlns:android="http://schemas.android.com/apk/res/android"
android:layout_width="match_parent"
android:layout_height="match_parent"
android:orientation="vertical" >
<Button
android:id="@+id/broadcast_button"
android:text="Send Broadcast"
android:layout_width="wrap_content"
android:layout_height="wrap_content"
android:layout_gravity="center" />
</LinearLayout>
We can see that the Button control is assigned the broadcast_button ID, which is used to identify it in the Java code. The caption assigned to the Button control is Send Broadcast. Next, we need to write code in the Java activity file to define an Intent object, assign action and add data to it, and then broadcast it. To do so, the code shown in Listing 11.2 is written into BroadcastAppActivity.java.
Listing 11.2. Code Written into BroadcastAppActivity.java
package com.androidunleashed.broadcastapp;
import android.app.Activity;
import android.os.Bundle;
import android.content.Intent;
import android.widget.Button;
import android.view.View;
public class BroadcastAppActivity extends Activity {
public static String BROADCAST_STRING = "com.androidunleashed.testingbroadcast";
@Override
public void onCreate(Bundle savedInstanceState) {
super.onCreate(savedInstanceState);
setContentView(R.layout.activity_broadcast_app);
Button broadcastButton = (Button) this.findViewById(R.id.broadcast_button);
broadcastButton.setOnClickListener(new Button.OnClickListener(){
public void onClick(View v) {
Intent broadcastIntent = new Intent();
broadcastIntent.putExtra("message", "New Email arrived");
broadcastIntent.setAction(BROADCAST_STRING);
sendBroadcast(broadcastIntent);
}
});
}
}
Here we can see that the Button control with the broadcast_button ID is accessed from the layout file and is mapped to the Button object broadcastButton. A ClickListener is associated with the Button control. When the Button control is clicked, the callback method onClick() is invoked. In the onClick() method, an Intent object called broadcastIntent is defined. A message, New Email arrived, is added to the broadcastIntent object with the key message. With the help of a static string, BROADCAST_STRING, a unique action, com.androidunleashed.testingbroadcast is assigned to the Intent object, broadcastIntent. Finally, the Intent is broadcasted by calling the sendBroadcast() method.
The next step is defining an Activity that acts as a broadcast receiver. So, to the package com.androidunleashed.broadcastapp of our application, add a Java file, ReceiveBroadcastActivity.java. To respond to the broadcasted Intent and to access the data passed along with it, write the code shown in Listing 11.3 in the Java file ReceiveBroadcastActivity.java.
Listing 11.3. Code Written into ReceiveBroadcastActivity.java
package com.androidunleashed.broadcastapp;
import android.content.BroadcastReceiver;
import android.content.Intent;
import android.content.Context;
import android.util.Log;
public class ReceiveBroadcastActivity extends BroadcastReceiver {
@Override
public void onReceive(Context context, Intent intent) {
String actionName = intent.getAction();
if(actionName != null && actionName.equals("com.androidunleashed.test-
ingbroadcast")) {
String msg = intent.getStringExtra("message");
Log.d("Received Message: ",msg);
}
}
}
As mentioned earlier, to receive the broadcasted Intent, the Java class needs to extend the BroadcastReceiver class. The class also overrides the onReceive() method. In the onReceive() method, we use the Intent parameter, which represents the received Intent object. From the Intent object, we access the action that needs to be performed on the data passed along with the Intent. We check to see whether the action is not null and match the action with the one that was supplied while broadcasting the Intent. Thereafter, the data from the Intent object is accessed and logged.
The ReceiveBroadcastActivity.java file, which is the broadcast receiver, has to be registered in the manifest file. The code for registering the activity is as follows:
<receiver android:name=".ReceiveBroadcastActivity">
<intent-filter>
<action android:name="com.androidunleashed.testingbroadcast"></action>
</intent-filter>
</receiver>
We can see that the <receiver> tag is used in the manifest file to register the broadcast receiver. The tag also designates the ReceiveBroadcastActivity.class as the recipient of the Intent whose action is com.androidunleashed.testingbroadcast. Listing 11.4 shows the code in the AndroidManifest.xml file. Only the code in bold is added; the rest is the default code that is auto-generated by the Android SDK.
Listing 11.4. Code in the AndroidManifest.xml File
<?xml version="1.0" encoding="utf-8"?>
<manifest xmlns:android="http://schemas.android.com/apk/res/android"
package="com.androidunleashed.broadcastapp"
android:versionCode="1"
android:versionName="1.0" >
<uses-sdk android:minSdkVersion="8"
android:targetSdkVersion="15" />
<application
android:icon="@drawable/ic_launcher"
android:label="@string/app_name"
android:theme="@style/AppTheme" >
<activity
android:name=".BroadcastAppActivity"
android:label="@string/title_activity_broadcast_app" >
<intent-filter>
<action android:name="android.intent.action.MAIN" />
<category android:name="android.intent.category.LAUNCHER" />
</intent-filter>
</activity>
<receiver android:name=".ReceiveBroadcastActivity">
<intent-filter>
<action android:name="com.androidunleashed.testingbroadcast"></
action>
</intent-filter>
</receiver>
</application>
</manifest>
After running the application, we see a Button with the caption Send Broadcast displayed on the screen, as shown in Figure 11.1 (left). After we click Send Broadcast, an Intent with the message New Email arrived is broadcast. The ReceiveBroadcastActivity.class receives the broadcasted Intent and extracts the message, New Email arrives from it and logs it. The logged message appears in the LogCat window, as shown in Figure 11.1 (right).

Figure 11.1. Application showing the Send Broadcast button on startup (left), and logged messages displayed in the LogCat window (right)
Note
We can have more than one receiver receive the broadcasted Intent.
Using the Notification System
The Android notification system provides us with several ways of alerting users. For example, the user can be notified with text, vibration, blinking lights, and sound indicators. Notifications are usually displayed on the status bar at the top of the screen.
Note
Not all notifications are supported by all devices.
Notification via the Status Bar
The simplest type of notification is status, which appears in the status bar as an icon along with some optional ticker text. Users can pull down the status bar to see the notification list and clear the notification by clicking the Clear button. After tapping the notification, the user navigates to the Intent defined by the notification. The status notification never launches an activity automatically, but simply notifies the user and launches the activity only when the notification is selected. Besides an icon and ticker text, the notification can have a title and body text displayed when the full notification is being displayed.
Note
The ticker text is briefly displayed in the status bar when the notification fires.
For creating notifications, the following two classes are used:
• Notification—The object that defines the information to be displayed, which can be text to be displayed on the status/expanded status bar, an icon displayed with the text, the number of times the notification is triggered, and so on.
• NotificationManager—The base object with which notifications are handled. It displays the information encapsulated in the Notification object, which is displayed via the notify() method.
Creating Notifications
The first step is to create a Notification object and configure it by defining notification properties. The following code shows how to do so:
Notification notification = new Notification();
notification.icon = R.drawable.ic_launcher;
notification.tickerText = "There is a new notification";
notification.when = System.currentTimeMillis();
notification.flags |= Notification.FLAG_AUTO_CANCEL;
Here, we see that a Notification object called notification is created and thereafter its public members are used to configure it:
• icon—Assigns the notification icon.
• tickerText—Assigns the small notification text.
• when—Assigns the time when the notification occurred. We use the system time to specify the time the notification occurred.
• flag—Assigns the constant that determines the subsequent action when the notification is selected from the notification window. We usually assign the FLAG_AUTO_CANCEL constant to this public variable, which specifies that the notification be automatically canceled after it is selected from the notifications.
We can also assign a notification icon, ticker text, and time of occurrence through the Notification object constructor, as shown here:
Notification notification = new Notification(R.drawable.ic_launcher, "There is a
new notification", System.currentTimeMillis());
Creating PendingIntent
After receiving the notification, we may choose to take a necessary action. We use the PendingIntent class to switch to the desired Intent when the notification is tapped.
The PendingIntent class enables us to create Intents that can be triggered by our application when an event occurs. The following code creates a PendingIntent called pendIntent:
Intent intent = new Intent(getBaseContext(), TargetActivity.class);
PendingIntent pendIntent = PendingIntent.getActivity(getBaseContext(), 0, intent, 0);
We can see that we create an Intent object by supplying the current application context and the activity name TargetActivity.class—the one that we want to launch. Thereafter, a PendingIntent object called pendIntent is created by supplying the following four parameters to the getActivity() method:
• The current application context in which the PendingIntent starts the activity.
• A request code for the sender. Because it is not used, we supply a value of 0 for this parameter.
• The Intent of the activity to be launched. We supply the Intent object for this parameter.
• Flags to specify the unspecified parts of the Intent to be sent. We supply a value of 0 for this parameter, as there is no unspecified part.
To display text after expanding the notification, and to specify the pending Intent that we want to launch, the setLatestEventInfo() method of the Notification class is used. The method is now deprecated. The syntax of the method is
setLatestEventInfo(application_context, title, text, pending_intent);
where application_context represents the current application context, title represents the title of the notification, and text represents the notification text displayed after expanding the status bar. The pending_intent represents the PendingIntent object to supply the activity information we want to launch when a notification is tapped.
Example:
notification.setLatestEventInfo(getBaseContext(), "New E-mail", "You have one unread
message.", pendInent);
The setLatestEventInfo() method is deprecated. The task of configuring a notification is done through Notification.Builder.
Instead of using the method shown here, we can use the Notification.Builder.
Using Notification.Builder
Notification.Builder is the Builder class for Notification objects and provides several methods to configure notification, as shown in Table 11.2.
Table 11.2. Notification.Builder Class Methods
The following code shows how to use the Notification.Builder methods shown in Table 11.2 to configure the notification:
Notification.Builder builder = new Notification.Builder(getBaseContext())
.setSmallIcon(R.drawable.ic_launcher)
.setAutoCancel(true)
.setTicker("There is a new notification")
.setWhen(System.currentTimeMillis())
.setContentTitle("New E-mail")
.setContentText("You have one unread message.")
.setContentIntent(pendIntent);
notification = builder.getNotification();
The preceding code configures a notification as shown here:
• Sets the ic_launcher.png image as the notification icon
• Makes the notification invisible when tapped
• Assigns the text There is a new notification as the ticker text of the notification
• Sets the current time as the time of occurrence of the notification
• Sets the title of the notification as New E-mail
• Sets the body text of the notification as You have one unread message
• Fires the specified pending Intent, pendIntent, when the notification is tapped
The configuration notification created through the Notification.Builder object is assigned to the Notification object called notification.
Obtaining a NotificationManager
The NotificationManager class executes and manages all status notifications. To obtain a valid NotificationManager, we use the getSystemService() method:
NotificationManager notificationManager = (NotificationManager)
getSystemService(NOTIFICATION_SERVICE);
After obtaining the NotificationManager object, we can invoke its notify() method to notify the user by displaying the notification.
Syntax:
notify(uniqueID, notficationObject)
where the uniqueID parameter represents the application unique identifier, and the notificationObject parameter represents the Notification object that we want to display.
Example:
notificationManager.notify(0, notification);
Let’s apply what you’ve learned so far and create an application that sends notifications to the user. Create a new Android project called NotificationApp. In this application, we create a Button with the caption Create Notification. When clicked, the Button creates a notification that displays ticker text in the status bar. When the user expands the status bar, the notification’s title and body text are displayed. After we tap the notification, the program jumps to an activity that displays a message indicating that a new activity is launched.
To define a Button control, write the code shown in Listing 11.5 into the activity_notification_app.xml layout file.
Listing 11.5. Code Written into activity_notification_app.xml
<LinearLayout xmlns:android="http://schemas.android.com/apk/res/android"
android:layout_width="match_parent"
android:layout_height="match_parent"
android:orientation="vertical" >
<Button
android:id="@+id/createbutton"
android:layout_width="wrap_content"
android:layout_height="wrap_content"
android:text="Create Notification"
android:layout_gravity="center" />
</LinearLayout>
We can see that the Button control is assigned the createbutton ID and a caption called Create Notification. The ID of the Button control identifies it in the Java code.
Because we want to launch an activity when the notification is tapped, let’s define the layout file for the new activity. Add an XML file called target.xml to the res/layout folder. Through the activity that is launched, we need to display a text message through the TextView control. To define the TextView control in a LinearLayout container, write the code shown in Listing 11.6 into the target.xml file.
Listing 11.6. Code Written into target.xml
<?xml version="1.0" encoding="utf-8"?>
<LinearLayout xmlns:android="http://schemas.android.com/apk/res/android"
android:layout_width="match_parent"
android:layout_height="match_parent"
android:orientation="vertical" >
<TextView
android:id="@+id/messageview"
android:layout_width="wrap_content"
android:layout_height="wrap_content"
android:text="This is target activity"
android:layout_gravity="center" />
</LinearLayout>
We can see that the TextView control is assigned the messageview ID, set to display This is target activity, and aligned to appear at the center of the View.
For the new Activity, add a Java file to the com.androidunleashed.notificationapp package of our project. Assign the name TargetActivity.java to the newly added Java file. The new Activity has nothing to do but display the TextView defined in its layout file target.xml. Write the code shown in Listing 11.7 into the Java file TargetActivity.java.
Listing 11.7. Code Written into TargetActivity.java
package com.androidunleashed.notificationapp;
import android.app.Activity;
import android.os.Bundle;
public class TargetActivity extends Activity {
@Override
protected void onCreate(Bundle savedInstanceState) {
super.onCreate(savedInstanceState);
setContentView(R.layout.target);
}
}
We can see that target.xml is set as the ContentView of the new Activity TargetActivity.java. Next, we need to write the code in the NotificationAppActivity.java main activity file to perform the following tasks:
• Create a Notification object and configure it to display an icon, title, and text.
• Create a PendingIntent to launch the activity when the notification is tapped.
• Create a NotificationManager object to display and manage the notification.
To perform these tasks, write the code shown in Listing 11.8 into the NotificationAppActivity.java main activity file.
Listing 11.8. Code Written into NotificationAppActivity.java
package com.androidunleashed.notificationapp;
import android.app.Activity;
import android.os.Bundle;
import android.view.View;
import android.app.NotificationManager;
import android.app.PendingIntent;
import android.content.Intent;
import android.app.Notification;
import android.widget.Button;
import android.view.View.OnClickListener;
public class NotificationAppActivity extends Activity {
@Override
public void onCreate(Bundle savedInstanceState) {
super.onCreate(savedInstanceState);
setContentView(R.layout.activity_notification_app);
Button createButton = (Button) findViewById(R.id.createbutton);
createButton.setOnClickListener(new OnClickListener() {
@Override
public void onClick(View arg0) {
Intent intent = new Intent(getBaseContext(), TargetActivity.class);
PendingIntent pendIntent = PendingIntent.
getActivity(getBaseContext(), 0, intent, 0);
NotificationManager notificationManager = (NotificationManager)
getSystemService(NOTIFICATION_SERVICE);
Notification notification = new Notification();
Notification.Builder builder = new Notification.
Builder(getBaseContext())
.setSmallIcon(R.drawable.ic_launcher)
.setAutoCancel(true)
.setTicker("There is a new notification")
.setWhen(System.currentTimeMillis())
.setContentTitle("New E-mail")
.setContentText("You have one unread message")
.setContentIntent(pendIntent);
notification = builder.getNotification();
notificationManager.notify(0, notification);
}
});
}
}
The Android application never recognizes the newly added activity until it is mentioned in the AndroidManifest.xml configuration file. So, add the statement shown in bold to AndroidManifest.xml (see Listing 11.9).
Listing 11.9. Code Written into AndroidManifest.xml
<?xml version="1.0" encoding="utf-8"?>
<manifest xmlns:android="http://schemas.android.com/apk/res/android"
package="com.androidunleashed.notificationapp"
android:versionCode="1"
android:versionName="1.0" >
<uses-sdk android:minSdkVersion="8"
android:targetSdkVersion="15" />
<application
android:icon="@drawable/ic_launcher"
android:label="@string/app_name"
android:theme="@style/AppTheme" >
<activity
android:name=".NotificationAppActivity"
android:label="@string/title_activity_notification_app" >
<intent-filter>
<action android:name="android.intent.action.MAIN" />
<category android:name="android.intent.category.LAUNCHER" />
</intent-filter>
</activity>
<activity android:name=".TargetActivity" android:label="@string/app_name" />
</application>
</manifest>
The Android project now can recognize the TargetActivity.java activity file. After we run the application, a Button control with the caption Create Notification is displayed (see Figure 11.2—top left). After we click the Create Notification button, a notification is created and its ticker text, There is a new notification, is displayed at the top of the screen in the status bar (Figure 11.2—top right). After we pull down the status bar, the title of the notification and its body text are displayed, as shown in Figure 11.2 (bottom left). We can see that the title of the notification is New E-mail, and the text reads You have one unread message. After we select the notification, a new activity is launched and is confirmed by the message This is target activity displayed via its TextView control (see Figure 11.2—bottom right).
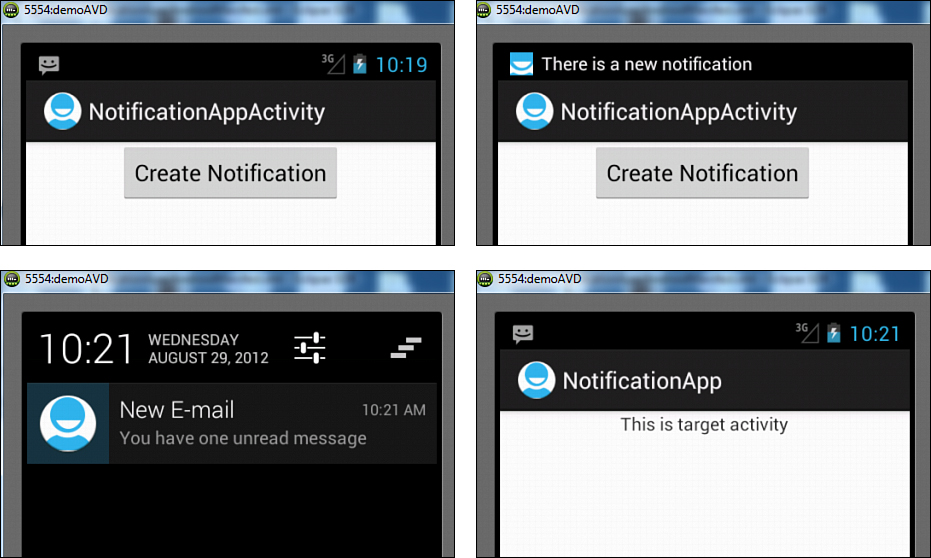
Figure 11.2. The application showing the Create Notification button on startup (top left), the ticker text of the notification (top right), the notification title and text displayed after expanding the status bar (bottom left), and the new activity launched after selecting the notification (bottom right)
Sending SMS Messages with Java Code
Sending and receiving SMS messages is considered as one of the most economical and popular modes of communication. To implement the SMS Messaging facility in our application, Android provides a built-in class known as SmsManager, which we can use to send and receive SMS messages. For testing SMS messaging, we don’t need a real device but can easily test it on the Android emulator.
To understand the concept, let’s create a new Android project called SendSMSApp. The first step is to design the user interface for sending messages via SMS. The user interface consists of three TextView, two EditText, and two Button controls. One of the TextView controls is for displaying the title of the screen, Message Sending Form. The other two TextView controls are used on the left of the EditText controls to display text that tells the user what has to be entered in the EditText controls. These two TextView controls are used to display To: and Message:. The two EditText controls are used to enter the phone number of the recipient and the message to be sent.
To define this interface, let’s modify the code of the activity_send_smsapp.xml layout file to appear as shown in Listing 11.10.
Listing 11.10. Code Written into activity_send_smsapp.xml
<LinearLayout xmlns:android="http://schemas.android.com/apk/res/android"
android:layout_width="match_parent"
android:layout_height="match_parent"
android:orientation="vertical" >
<TextView
android:layout_height="wrap_content"
android:text="Message Sending Form"
android:textStyle="bold"
android:textSize="18sp"
android:layout_width="match_parent"
android:gravity="center_horizontal"/>
<TextView
android:layout_width="wrap_content"
android:layout_height="wrap_content"
android:text="To:" />
<EditText
android:id="@+id/recvr_no"
android:layout_height="wrap_content"
android:layout_width="match_parent" />
<TextView
android:layout_width="wrap_content"
android:layout_height="wrap_content"
android:text="Message:" />
<EditText
android:id="@+id/txt_msg"
android:layout_width="match_parent"
android:layout_height="150dp" />
<RelativeLayout
android:layout_width="match_parent"
android:layout_height="match_parent"
android:orientation="horizontal">
<Button
android:id="@+id/send_button"
android:text="Send SMS"
android:layout_width="wrap_content"
android:layout_height="wrap_content"
android:layout_marginLeft="40dip"
android:paddingLeft="20dip"
android:paddingRight="20dip" />
<Button
android:id="@+id/cancel_button"
android:text="Cancel"
android:layout_width="wrap_content"
android:layout_height="wrap_content"
android:layout_toRightOf="@id/send_button"
android:layout_marginLeft="15dip"
android:paddingLeft="20dip"
android:paddingRight="20dip" />
</RelativeLayout>
</LinearLayout>
The two EditText controls are to be used to enter the phone number of the recipient and the text message; hence the IDs assigned to them are recvr_no and txt_msg. Because a text message can be long, the layout_height attribute of the txt_msg EditText control is set to 150dp. The height is large enough to enter long messages. Moreover, the text scrolls vertically within the given height to accommodate longer messages. The two Button controls are assigned the text Send SMS and Cancel to show the kind of task they perform when clicked. The Send SMS button is assigned to the send_button ID, and the Cancel button is assigned to the cancel_button ID. The code defined in the activity_send_smsapp.xml layout file makes the user interface screen appear as shown in Figure 11.3.
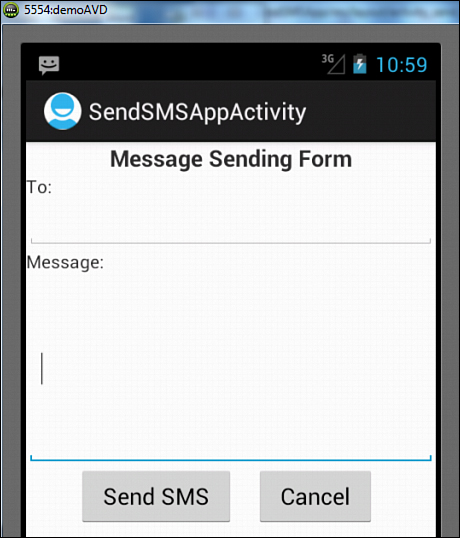
Figure 11.3. The screen to enter information about the new SMS
Getting Permission to Send SMS Messages
To send and receive SMS messages in an application, we need to use permissions. All the permissions our application uses are defined in the AndroidManifest.xml file, so that when the application is installed on a device, the user is informed of the access permissions that the application uses. We need to add permissions to the <manifest> element of our AndroidManifest.xml file:
<uses-permission android:name="android.permission.SEND_SMS"/>
Listing 11.11 shows the code in the AndroidManifest.xml file. The statement in bold is the added code; the rest is the default code.
Listing 11.11. Code Written into AndroidManifest.xml
<?xml version="1.0" encoding="utf-8"?>
<manifest xmlns:android="http://schemas.android.com/apk/res/android"
package="com.androidunleashed.sendsmsapp"
android:versionCode="1"
android:versionName="1.0" >
<uses-sdk android:minSdkVersion="8"
android:targetSdkVersion="15" />
<uses-permission android:name="android.permission.SEND_SMS"/>
<application
android:icon="@drawable/ic_launcher"
android:label="@string/app_name"
android:theme="@style/AppTheme" >
<activity
android:name=".SendSMSAppActivity"
android:label="@string/title_activity_send_smsapp" >
<intent-filter>
<action android:name="android.intent.action.MAIN" />
<category android:name="android.intent.category.LAUNCHER" />
</intent-filter>
</activity>
</application>
</manifest>
Writing Java Code
To add an action to the send_button and cancel_button, we need to write Java code into the SendSMSAppActivity.java activity file. Before we write code, let’s define what we want the two buttons to do. We want the button with the send_button ID to do the following tasks:
• Validate the content of the recvr_no and txt_msg EditText controls. Recall that the two EditText controls are meant for entering the phone number of the recipient and text message of the SMS. If either of the two EditText controls is empty, we want to suspend the process and prompt the user to enter data into both the controls.
• Send an SMS message to the recipient.
• Inform the user whether the SMS message was successfully sent and delivered. The difference between SMS Sent and SMS Delivered status is that the former means the SMS message was received by the server or SMSC (Short Message Service Center). The latter means that the SMS message was received by the recipient from the server. Remember that if the recipient is out of range or offline the SMS message still can be Sent. When the recipient actually receives the message, it is then successfully delivered.
As far as the cancel_button is concerned, we want it to cancel the operation and delete the content, if any, in the two EditText controls.
To perform these tasks, write the code shown in Listing 11.12 into the SendSMSAppActivity.java activity file.
Listing 11.12. Code Written into SendSMSAppActivity.java
package com.androidunleashed.sendsmsapp;
import android.app.Activity;
import android.os.Bundle;
import android.telephony.SmsManager;
import android.widget.Button;
import android.view.View;
import android.widget.EditText;
import android.widget.Toast;
import android.app.PendingIntent;
import android.content.BroadcastReceiver;
import android.content.Intent;
import android.content.Context;
import android.content.IntentFilter;
public class SendSMSAppActivity extends Activity {
EditText phoneNumber, message;
BroadcastReceiver sentReceiver, deliveredReceiver;
String SENT = "SMS_SENT";
String DELIVERED = "SMS_DELIVERED";
@Override
public void onCreate(Bundle savedInstanceState) {
super.onCreate(savedInstanceState);
setContentView(R.layout.activity_send_smsapp);
final PendingIntent sentPendIntent = PendingIntent.getBroadcast(this, 0, new
Intent(SENT), 0);
final PendingIntent delivered_pendintnet = PendingIntent.getBroadcast(this,
0, new Intent(DELIVERED), 0);
sentReceiver = new BroadcastReceiver(){
@Override
public void onReceive(Context arg0, Intent arg1) {
switch (getResultCode()) {
case Activity.RESULT_OK:
Toast.makeText(getBaseContext(), "SMS sent", Toast.LENGTH_
SHORT).show();
break;
case SmsManager.RESULT_ERROR_GENERIC_FAILURE:
Toast.makeText(getBaseContext(), "Generic failure", Toast.
LENGTH_SHORT).show();
break;
case SmsManager.RESULT_ERROR_NO_SERVICE:
Toast.makeText(getBaseContext(), "No service", Toast.
LENGTH_SHORT).show();
break;
case SmsManager.RESULT_ERROR_NULL_PDU:
Toast.makeText(getBaseContext(), "Null PDU", Toast.LENGTH_
SHORT).show();
break;
case SmsManager.RESULT_ERROR_RADIO_OFF:
Toast.makeText(getBaseContext(), "Radio off", Toast.LENGTH_
SHORT).show();
break;
}
}
};
deliveredReceiver = new BroadcastReceiver(){
@Override
public void onReceive(Context arg0, Intent arg1) {
switch (getResultCode()) {
case Activity.RESULT_OK:
Toast.makeText(getBaseContext(), "SMS successfully deliv-
ered", Toast.LENGTH_SHORT).show();
break;
case Activity.RESULT_CANCELED:
Toast.makeText(getBaseContext(), "Failure—SMS not deliv-
ered", Toast.LENGTH_SHORT).show();
break;
}
}
};
registerReceiver(sentReceiver, new IntentFilter(SENT));
registerReceiver(deliveredReceiver, new IntentFilter(DELIVERED));
Button sendBtn = (Button) this.findViewById(R.id.send_button);
sendBtn.setOnClickListener(new Button.OnClickListener(){
public void onClick(View v) {
phoneNumber = (EditText) findViewById(R.id.recvr_no);
message = (EditText) findViewById(R.id.txt_msg);
if(phoneNumber.getText().toString().trim().length() >0 && message.
getText().toString().trim().length() >0) {
SmsManager sms = SmsManager.getDefault();
sms.sendTextMessage(phoneNumber.getText().toString(), null,
message.getText().toString(), sentPendIntent, delivered_pendint-
net);
}
else {
Toast.makeText(SendSMSAppActivity.this, "Either phone number or
text is missing", Toast.LENGTH_SHORT).show();
}
}
});
Button cancelBtn = (Button) this.findViewById(R.id.cancel_button);
cancelBtn.setOnClickListener(new Button.OnClickListener(){
public void onClick(View v) {
phoneNumber.setText("");
message.setText("");
}
});
}
}
To send an SMS message with Java code, we use the SmsManager class. We cannot instantiate this class directly and must call the getDefault() static method to create its object. The method provided by the SmsManager class for sending SMS messages is the sendTextMessage() method.
The syntax for the sendTextMessage() method is
sendTextMessage(recipient_phoneno, service_centadd, sms_msg, sent_intent, deliv-
ery_intent)
where recipient_phoneno is the recipient’s phone number, and service_centadd is the Service center address. We use the value null for the default SMSC (Short Message Service Center). The sms_msg is the text message of the SMS, sentIntent is the pending Intent to invoke when the message is sent, and delivery_Intent is the pending Intent to invoke when the message is delivered.
To monitor the status of the SMS message and confirm if it was sent correctly, we create two PendingIntent objects that are then passed as arguments to the sendTextMessage() method.
The two PendingIntent objects are created with the following statements:
String SENT = "SMS_SENT";
String DELIVERED = "SMS_DELIVERED";
final PendingIntent sentPendIntent = PendingIntent.getBroadcast(this, 0, new
Intent(SENT), 0);
final PendingIntent delivered_pendintnet = PendingIntent.getBroadcast(this, 0, new
Intent(DELIVERED), 0);
The two PendingIntent objects are passed into the last two arguments of the sendTextMessage() method:
SmsManager sms = SmsManager.getDefault();
sms.sendTextMessage(phoneNumber.getText().toString(), null, message.getText().
toString(), sentPendIntent, delivered_pendintnet);
We are informed, via the two PendingIntent objects, whether the message was successfully sent, delivered, or failed. The SmsManager fires SENT and DELIVERED when the SMS messages are sent and delivered. The two PendingIntent objects are used to send broadcasts when an SMS message is sent or delivered. We also create and register two BroadcastReceivers, which listen for Intents that match SENT and DELIVERED as shown by the following statements:
registerReceiver(sentReceiver, new IntentFilter(SENT));
registerReceiver(deliveredReceiver, new IntentFilter(DELIVERED));
In the earlier section we saw how to define the BroadcastReceiver in the AndroidManifest.xml file, but here we are doing it dynamically. Within each BroadcastReceiver we override the onReceive() method and get the current result code via the getResultCode() method. Depending on the value of the result code, we display a successfully sent or failed message.
Note
On the Android emulator, only the sentPendIntent PendingIntent object is fired, but not the deliveredPendIntent PendingIntent object. On a real device, both PendingIntent objects fire.
To run the application and watch its output, we need to have two AVDs (Android Virtual Devices) running. From one AVD, we send the message. We use the other AVD for receiving the message. We already have one AVD created called demoAVD, which we have been using to watch application results. We only need to create one more AVD. Select the Window, AVD Manager option to open the AVD Manager dialog box. Select New to create a new AVD. A dialog box opens, prompting for the name and other configuration settings. Assign the name testSMSAVD with the configuration settings shown in Figure 11.4.
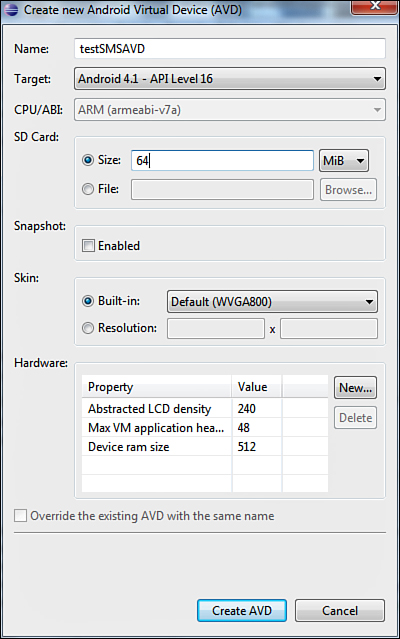
Figure 11.4. A dialog box showing configuration settings for the new AVD
Let’s designate the SD Card size as 64MB. The Skin and Hardware attributes are set by default. Keeping the default values, click the Create AVD button to create the AVD.
To test the SMS application, both the demoAVD and the testSMSAVD must be running. From the AVD Manager window, select each AVD, followed by the Start button (see Figure 11.5—left). We see a Launch Options dialog box displaying the Skin and Density values of the respective AVD (see Figure 11.5—right). The dialog box also asks whether we want to scale the AVD to real size or wipe user data. Click Launch to launch the AVD. Close the AVD Manager dialog box.
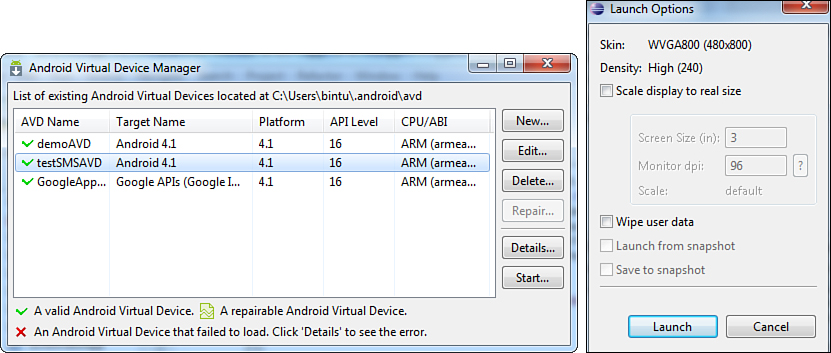
Figure 11.5. The AVD Manager window showing existing AVDs (left), and the Launch Options window showing different options (right)
Both the AVDs run in their respective windows. Android automatically assigns a unique number to each running AVD. For example, the first AVD has the title, 5554:demoAVD, and the other title displays 5556:testSMSAVD, as shown in Figure 11.6 (left and right). The numbers 5554 and 5556 are the unique numbers assigned to each running emulator. The numbers keep incrementing with every additional emulator that is run.
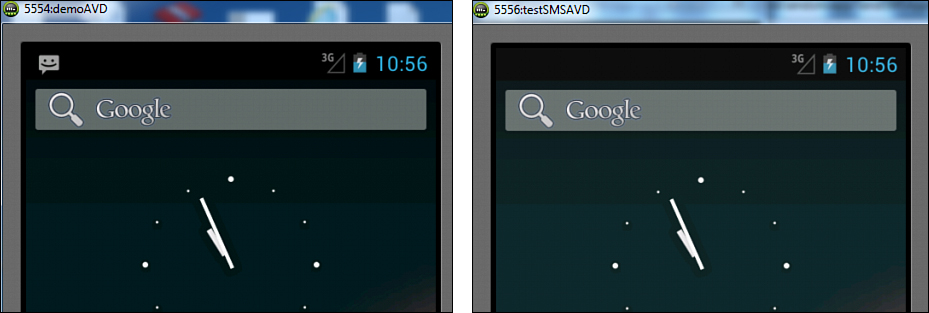
Figure 11.6. (left) An AVD with the title 5554:demoAVD, and (right) an AVD with the title 5556:testSMSAVD
Let’s select the Run icon from the Eclipse toolbar (or press Ctrl+F11) to run our SMS application. We see the Android Device Chooser dialog box, asking us to select one of the running AVDs on which we want to run our SMS application. Let’s select the 5554, that is, the demoAVD emulator, followed by the OK button. Our SMS application executes on the selected AVD, as shown in Figure 11.7 (left). The title bar of the AVD 5554:demoAVD confirms that our SMS application is running on the selected emulator. We have applied validation checks on the two EditText controls that accept the phone number of the recipient and the SMS message. If either of the EditText controls is left empty, an error message, Either phone number or text is missing, is displayed. When we click the Send SMS button after supplying the recipient phone number and a text message, the SMS message is sent to the specified phone number, and a message, SMS sent, is displayed, as shown in Figure 11.7 (middle). The SMS message is delivered to the 5556:testSMSAVD emulator, as shown in Figure 11.7 (right).
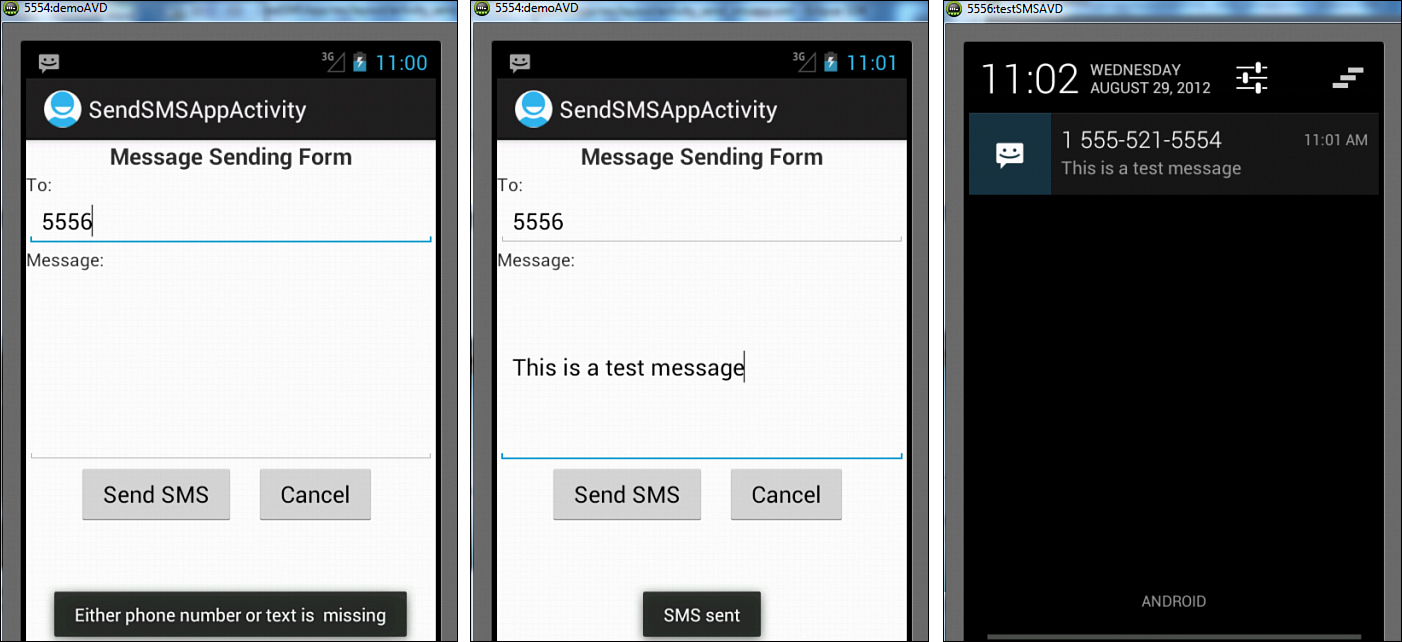
Figure 11.7. The error displayed when a field is missing, (left), an SMS message successfully delivered after delivery of the SMS message (middle), and notification of an SMS message being received (right)
Receiving SMS Messages
To understand the concept of receiving SMS messages, let’s create a new Android project called ReceiveSMSApp. When a device receives a new SMS message, a new broadcast Intent is fired with the android.provider.Telephony.SMS_RECEIVED action. To listen for this action, our application must register a BroadcastReceiver. That is, we need to create a receiver—a class that extends the BroadcastReceiver and then registers it in the manifest file. After we register the receiver, our application is notified whenever an SMS message is received. We see to the process of registering the receiver after creating it.
To create a receiver, add a class file in ReceiveSMSApp by right-clicking the src/com.androidunleashed.receivesmsapp folder in the Package Explorer window and select the New, Class option. Assign the name ReceiverSMS to the class file followed by clicking the Finish button. A Java file named ReceiverSMS.java is added to our project. To receive the incoming SMS message and display its details, write the code shown in Listing 11.13 into the Java file ReceiverSMS.java.
Listing 11.13. Code Written into ReceiverSMS.java
package com.androidunleashed.receivesmsapp;
import android.content.BroadcastReceiver;
import android.content.Intent;
import android.content.Context;
import android.os.Bundle;
import android.telephony.SmsMessage;
import android.widget.Toast;
public class ReceiverSMS extends BroadcastReceiver {
@Override
public void onReceive(Context context, Intent intent) {
Bundle bundle = intent.getExtras();
SmsMessage[] msg = null;
String str = "";
if (bundle != null) {
Object[] pdus = (Object[]) bundle.get("pdus");
msg = new SmsMessage[pdus.length];
for (int i=0; i<msg.length; i++){
msg[i] = SmsMessage.createFromPdu((byte[])pdus[i]);
str += "SMS Received from: " + msg[i].getOriginatingAddress();
str += ":";
str += msg[i].getMessageBody().toString();
str += "
";
}
Toast.makeText(context, str, Toast.LENGTH_SHORT).show();
}
}
}
The broadcast Intent that is fired after receiving a new SMS message includes a bundle containing information about the received message. The information exists in the bundle in the form of an array of SMS PDUs. PDU stands for Protocol Data Unit and is used to encapsulate the SMS message. Hence, the PDU key is used to extract the array of SMS PDUs from the bundle. The array of SMS PDUs is thereafter converted into an array of SmsMessage objects. To convert each PDU byte array into an SMS Message object, the SmsMessage.createFromPdu() method is called, passing in each byte array. This code snippet shows how it is done:
Bundle bundle = intent.getExtras();
SmsMessage[] msg = null;
if (bundle != null) {
Object[] pdus = (Object[]) bundle.get("pdus");
msg = new SmsMessage[pdus.length];
for (int i=0; i<msg.length; i++){
msg[i] = SmsMessage.createFromPdu((byte[])pdus[i]);
}
}
We can see that the information of all received messages is gathered in the SmsMessage array msg. Each array element represents the complete information of a single received SMS that includes the originating address—the phone number, timestamp, and the message body. The following methods are used to fetch the SMS information from the SmsMessage array elements:
• getOriginatingAddress()—Fetches the phone number of the SMS recipient
• getTimestampMillis()—Fetches the time at which the SMS is received
• getMessageBody()—Fetches the message body
The code in Listing 11.13 receives the SMS message and uses the getOriginatingAddress() and getMessageBody() methods to fetch the phone number and message body of the received message. The phone number and message body are then displayed on the screen.
To listen for incoming messages, we need to register our ReceiverSMS Broadcast Receiver class using an Intent Filter that listens for the android.provider.Telephony.SMS_RECEIVED action String. To do so, the following code is added in the AndroidManifest.xml file:
<receiver android:name=".ReceiverSMS">
<intent-filter>
<action android:name="android.provider.Telephony.SMS_RECEIVED" />
</intent-filter>
</receiver>
Besides registering a receiver, our application has to seek permission to receive incoming SMS messages. To do this, add the android.permission.RECEIVE_SMS permission to the manifest file:
<uses-permission android:name="android.permission.RECEIVE_SMS" />
After we add the preceding code, the code in the AndroidManifest.xml file appears as shown in Listing 11.14.
Listing 11.14. Code Written into AndroidManifest.xml
<manifest xmlns:android="http://schemas.android.com/apk/res/android"
package="com.androidunleashed.receivesmsapp"
android:versionCode="1"
android:versionName="1.0" >
<uses-sdk android:minSdkVersion="8"
android:targetSdkVersion="15" />
<uses-permission android:name="android.permission.RECEIVE_SMS" />
<application
android:icon="@drawable/ic_launcher"
android:label="@string/app_name"
android:theme="@style/AppTheme" >
<activity
android:name=".ReceiveSMSAppActivity"
android:label="@string/title_activity_receive_smsapp" >
<intent-filter>
<action android:name="android.intent.action.MAIN" />
<category android:name="android.intent.category.LAUNCHER" />
</intent-filter>
</activity>
<receiver android:name=".ReceiverSMS">
<intent-filter>
<action android:name="android.provider.Telephony.SMS_RECEIVED" />
</intent-filter>
</receiver>
</application>
</manifest>
After running the application, we see the output shown in Figure 11.8.

Figure 11.8. The output displayed on application startup
To see how an SMS message is received by this application, we need to first send a message using the SendSMSApp we just created. To run the SendSMSApp, let’s run one more AVD. Select the Window, AVD Manager option. From the AVD Manager dialog box that pops up, select the testSMSAVD AVD and click the Start button. A dialog box showing Launch Options opens; click the Launch button to start the AVD with the default options.
The AVD runs, as shown in Figure 11.9 (left). Close the AVD Manager window. Select SendSMSApp from the Project Explorer window and select the Run icon from the toolbar at the top. An Android Device Chooser dialog box opens, asking in which AVD we want to run the SentSMSApp, as shown in Figure 11.9 (right).
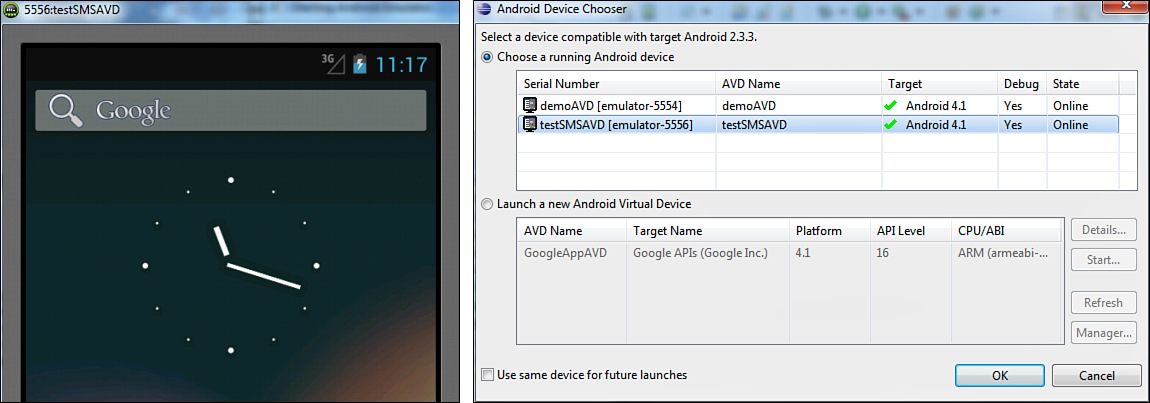
Figure 11.9. (left) A running AVD with the title 5556:testSMSAVD, and (right) the Android Device Chooser to select an AVD
The SendSMSApp application is launched in the 5556 AVD, as shown in Figure 11.10 (left). In the To box, write the ID of the AVD through which our ReceiveSMSApp is running, that is, 5554. Write some text in the multiline message box and click the Send SMS button. The SMS message is sent from the application and received by the 5554 AVD, as is confirmed by the Toast message displaying the originating phone number and its message body (see Figure 11.10—middle). The SMS message is received and displayed in the 5554 AVD (see Figure 11.10—right).
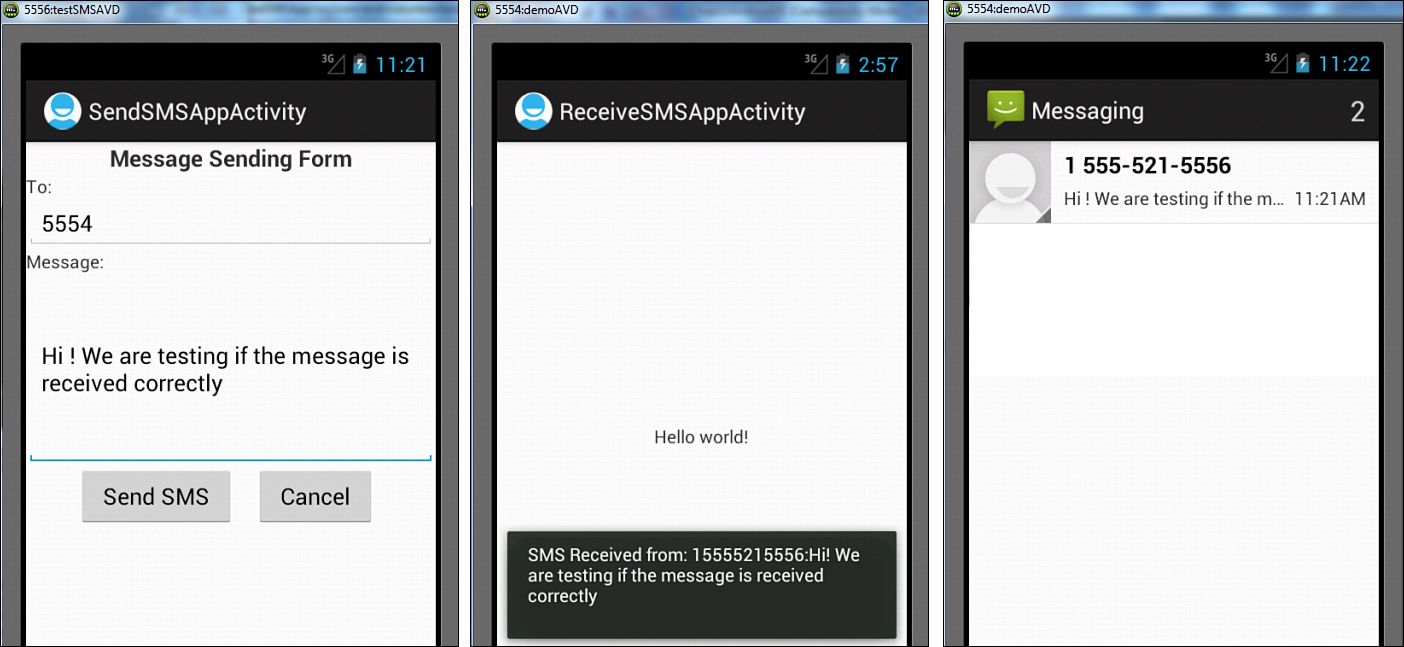
Figure 11.10. (left) Screen sending an SMS message, (middle) Toast displaying the sender information and received SMS body, and (right) the SMS message received by the receiver
Sending Email
To send an email with Android, we use the following Intent:
Intent.ACTION_SEND
The Intent.ACTION_SEND calls an existing email client to send an email. So, for sending email through the Android emulator, we need to first configure the email client. If the email client is not configured, the emulator does not respond to the Intent. Through the ACTION_SEND Intent, messages of different types, such as text or image, can be sent. The only thing we need to do is to set the type of the Intent through the setType() method. For example, the following statement declares that the text data type will be sent through the Intent:
emailIntent.setType("plain/text");
The emailIntent is the Intent.ACTION_SEND object. After we launch this Intent, any application on the device that supports plain text messaging may handle this request. To let a user choose the email client to handle the Intent, we call startActivity() with the createChooser() method. As the name suggests, the createChooser() method prompts the user to choose the application to handle the Intent. This statement shows how to call startActivity() with the createChooser() method:
startActivity(Intent.createChooser(emailIntent, "Sending Email"));
This statement displays all the applications that are eligible to handle the Intent, allowing the user to choose the application to launch. If there is only one application able to handle the Intent, it is launched automatically without prompting the user.
To supply data for the email message fields, we set certain standard extras for the Intent. For example, we can set the following:
• EXTRA_EMAIL—Sets the To: address (email address of the receiver)
• EXTRA_CC—Sets the Cc: address (email address of the carbon copy receiver)
• EXTRA_BCC—Sets the Bcc: address (email address of the blind carbon copy receiver)
• EXTRA_SUBJECT—Sets the Subject of the email
• EXTRA_TEXT—Sets the body of the email
After setting the desired Intent’s extras, launch the activity to initiate the sending email task.
Before we go ahead and create an application for sending email, let’s configure the email client of the Android emulator in these steps:
• Start the emulator and then click on the Menu button.
• Click on the System settings option.
• From the Accounts section, click on the Add account button (see Figure 11.11—left). From the two options, Corporate and Email (see Figure 11.11—middle), click the Email option. We get the Account setup form where we need to enter our existing Email ID and password (see Figure 11.11—right) followed by clicking the Next button.
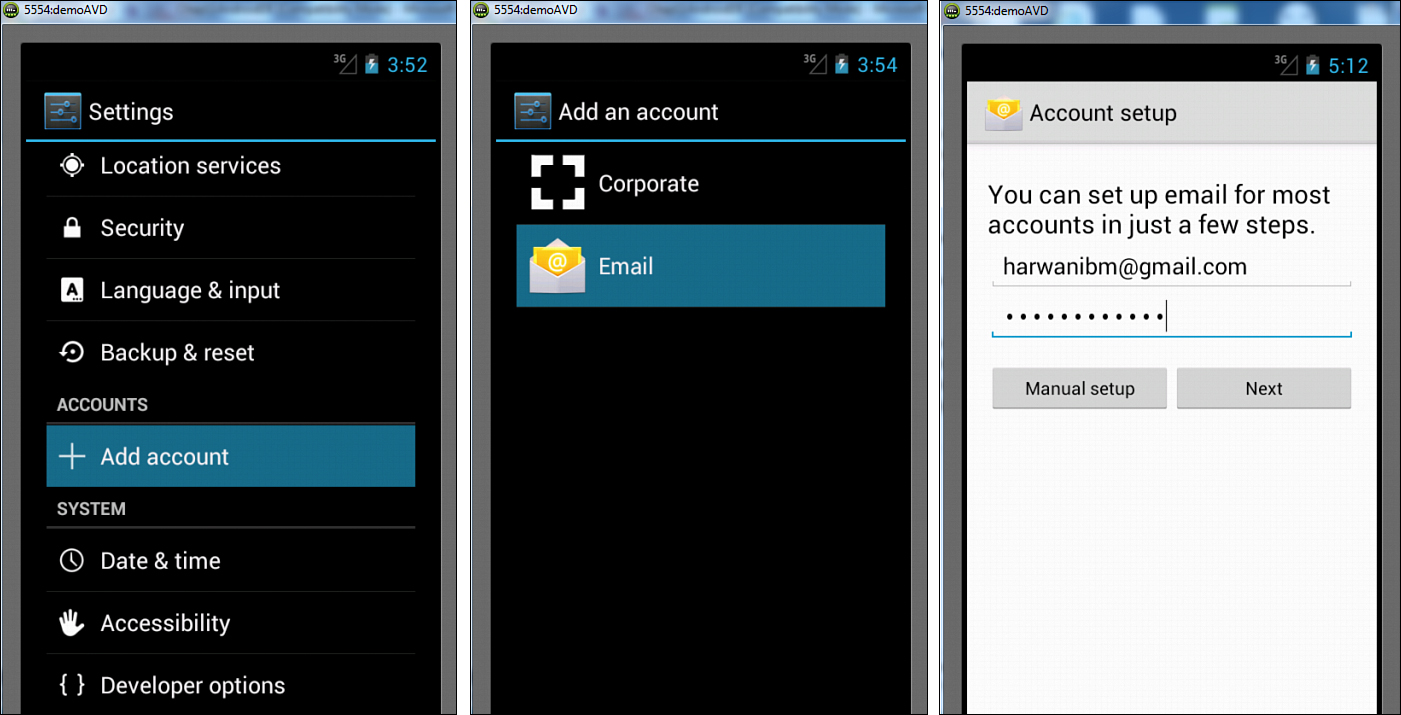
Figure 11.11. (left) Settings options in the Android emulator, (middle) two options of adding an account, and (right) account setup form to enter email ID and password
• The emulator checks for the incoming and outgoing servers and on finding them displays Account settings as shown in Figure 11.12 (left). Select the required check boxes and then click the Next button. Our email client is set up, and we are prompted to enter the name to be displayed on the outgoing messages (see Figure 11.12—right). Click the Next button to finish configuring the email client.
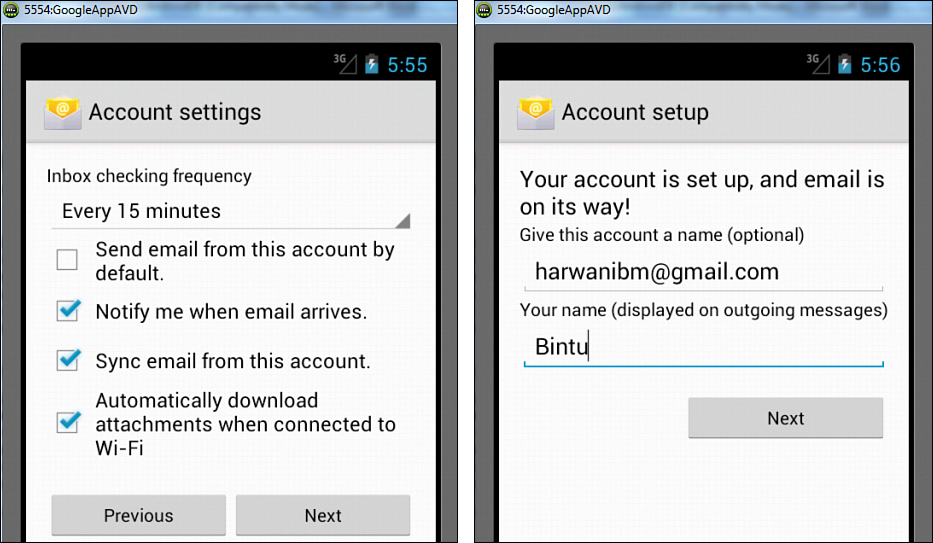
Figure 11.12. (left) The Account settings form, and (right) the Account setup form
Now the email client is successfully configured in the emulator, and we can go ahead and send mail. Let’s create an application to send an email. Create a new Android project called SendEmailApp. In this application, we provide a user interface to enter the To, Cc, and Bcc addresses of the email receivers; a Subject; and the body of the email. After we enter the required information, when the user clicks the Send button, the email client on the device is invoked. The email client page is auto-filled with the information entered through the application, and the email is sent after clicking the Send button from the email client.
To create the UI for entering email information, we need to use six TextView controls, five EditText controls, and a Button control. To define these controls, write the code shown in Listing 11.15 into the activity_send_email_app.xml layout file.
Listing 11.15. Code Written into activity_send_email_app.xml
<RelativeLayout
xmlns:android="http://schemas.android.com/apk/res/android"
android:layout_width="match_parent"
android:layout_height="match_parent" >
<TextView
android:id="@+id/email_form"
android:text = "Email Form"
android:layout_width="wrap_content"
android:layout_height="wrap_content"
android:typeface="serif"
android:textSize="18sp"
android:textStyle="bold"
android:padding="10dip"
android:layout_centerHorizontal="true"/>
<TextView
android:id="@+id/to_addressview"
android:text = "To:"
android:layout_width="wrap_content"
android:layout_height="wrap_content"
android:layout_margin="10dip"
android:layout_below="@id/email_form" />
<EditText
android:id="@+id/toaddresses"
android:layout_height="wrap_content"
android:layout_width="match_parent"
android:layout_below="@id/email_form"
android:layout_toRightOf="@id/to_addressview"
android:singleLine="true" />
<TextView
android:id="@+id/cc_addressview"
android:text = "Cc:"
android:layout_width="wrap_content"
android:layout_height="wrap_content"
android:layout_below="@id/to_addressview"
android:layout_margin="10dip" />
<EditText
android:id="@+id/ccaddresses"
android:layout_height="wrap_content"
android:layout_width="match_parent"
android:singleLine="true"
android:layout_below="@id/toaddresses"
android:layout_toRightOf="@id/cc_addressview" />
<TextView
android:id="@+id/bcc_addressview"
android:text = "Bcc:"
android:layout_width="wrap_content"
android:layout_height="wrap_content"
android:layout_below="@id/cc_addressview"
android:layout_margin="10dip" />
<EditText
android:id="@+id/bccaddresses"
android:layout_height="wrap_content"
android:layout_width="match_parent"
android:singleLine="true"
android:layout_below="@id/ccaddresses"
android:layout_toRightOf="@id/bcc_addressview" />
<TextView
android:id="@+id/subjectview"
android:text = "Subject:"
android:layout_width="wrap_content"
android:layout_height="wrap_content"
android:layout_below="@id/bcc_addressview"
android:layout_margin="10dip"
android:paddingTop="10dip"/>
<EditText
android:id="@+id/emailsubject"
android:layout_height="wrap_content"
android:layout_width="match_parent"
android:singleLine="true"
android:layout_below="@id/bccaddresses"
android:layout_toRightOf="@id/subjectview"
android:layout_marginTop="10dip" />
<TextView
android:id="@+id/emailtextview"
android:text = "Message:"
android:layout_width="wrap_content"
android:layout_height="wrap_content"
android:layout_below="@id/subjectview"
android:layout_margin="10dip" />
<EditText
android:id="@+id/emailtext"
android:layout_height="wrap_content"
android:layout_width="match_parent"
android:lines="5"
android:layout_below="@id/emailsubject"
android:layout_toRightOf="@id/emailtextview" />
<Button
android:id="@+id/send_button"
android:text="Send"
android:layout_width="wrap_content"
android:layout_height="wrap_content"
android:layout_centerHorizontal="true"
android:paddingLeft="25dip"
android:paddingRight="25dip"
android:layout_marginTop="10dip"
android:layout_below="@id/emailtext" />
</RelativeLayout>
We can see that the six TextView controls are set to display Email Form, To:, Cc:, Bcc:, Subject:, and Message. To identify these in the Java code, the five EditText controls are assigned the IDs toaddresses, ccaddresses, bccaddresses, emailsubject, and emailtext. The Button control is assigned the Send caption and is assigned the ID send_button. To read the addresses, subject, and email body entered by the user, and to use Intent.ACTION_SEND for sending email, write the code shown in Listing 11.16 into the SendEmailAppActivity.java Java activity file.
Listing 11.16. Code Written into SendEmailAppActivity.java
package com.androidunleashed.sendemailapp;
import android.app.Activity;
import android.os.Bundle;
import android.view.View;
import android.content.Intent;
import android.view.View.OnClickListener;
import android.widget.Button;
import android.widget.EditText;
public class SendEmailAppActivity extends Activity {
Button sendbutton;
EditText toAddress, ccAddress, bccAddress, subject, emailMessage;
String toAdds, ccAdds, bccAdds;
@Override
public void onCreate(Bundle savedInstanceState) {
super.onCreate(savedInstanceState);
setContentView(R.layout.activity_send_email_app);
sendbutton=(Button) findViewById(R.id.send_button);
toAddress=(EditText) findViewById(R.id.toaddresses);
ccAddress=(EditText) findViewById(R.id.ccaddresses);
bccAddress=(EditText) findViewById(R.id.bccaddresses);
subject=(EditText) findViewById(R.id.emailsubject);
emailMessage=(EditText) findViewById(R.id.emailtext);
sendbutton.setOnClickListener(new OnClickListener(){
@Override
public void onClick(View v) {
final Intent emailIntent = new Intent(Intent.ACTION_SEND);
if(toAddress.getText().length() >0) {
toAdds = '"'+toAddress.getText().toString()+'"';
emailIntent.putExtra(Intent.EXTRA_EMAIL, new String[]{ toAdds});
}
if(ccAddress.getText().length() >0) {
ccAdds = '"'+ccAddress.getText().toString()+'"';
emailIntent.putExtra(Intent.EXTRA_CC, new String[]{ ccAdds});
}
if(bccAddress.getText().length() >0) {
bccAdds = '"'+bccAddress.getText().toString()+'"';
emailIntent.putExtra(Intent.EXTRA_BCC, new String[]{ bccAdds});
}
emailIntent.putExtra(Intent.EXTRA_SUBJECT, subject.getText().
toString());
emailIntent.putExtra(Intent.EXTRA_TEXT, emailMessage.getText());
emailIntent.setType("plain/text");
startActivity(Intent.createChooser(emailIntent, "Sending Email"));
}
});
}
}
Here, the toaddresses, ccaddresses, bccaddresses, emailsubject, and emailtext EditText controls are accessed and mapped to their respective EditText objects. Similarly, the Button control with the send_button ID is accessed and assigned to the sendbutton Button object. The ClickListener event listener is associated with the Button control. After we click the Button, the onClick() callback method is invoked. In the onClick() method, an Intent object called emailIntent is created, with its action set to Intent.ACTION_SEND. Also, to auto-fill the email client’s fields, the Intent extras, EXTRA_EMAIL, EXTRA_CC, EXTRA_BCC, EXTRA_SUBJECT, and EXTRA_TEXT, are initialized with the data entered by the user in the EditText controls. Finally, the email is sent by launching the email client installed on the device.
After running the application, we see a user interface to enter addresses of the receiver(s), subject, and email body, as shown in Figure 11.13 (top left). When the user clicks the Send button, the email client is invoked. The fields of the email client are automatically filled with data entered in the EditText controls, as shown in Figure 11.13 (top right). The email is sent to the recipient after it pipes through the email client, as shown in Figure 11.13 (bottom).
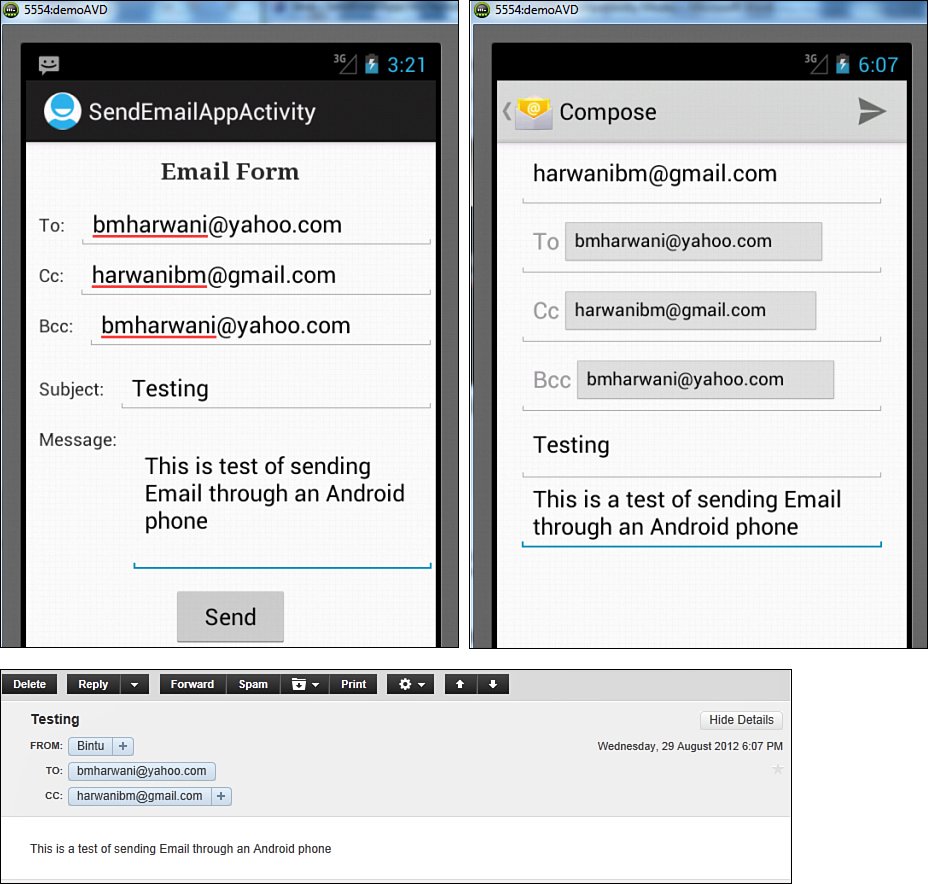
Figure 11.13. (top left) Information entered into the Email Form, (top right) information entered into the Email Form appears in the email client fields, and (bottom) email received by the recipient
Working with the Telephony Manager
The Android telephony APIs include the Telephony Manager that accesses the telephony services on the device and enables us to
• Provide a user interface for entering or modifying the phone number to dial.
• Implement call handling in the application.
• Register and monitor telephony state changes.
• Get subscriber information.
Making the Outgoing Call
The simplest way to make an outgoing call is to invoke the Dialer application by using the Intent.ACTION_CALL action. The sample code for doing so follows:
Intent callIntent = new Intent(Intent.ACTION_CALL);
callIntent.setData(Uri.parse("tel:1111122222"));
startActivity(callIntent);
The preceding code initiates a phone call to 1111122222 using the system in-call Activity. For making the phone call, the application must have the permission to invoke the Dialer application. That is, to use this action, the application must request the CALL_PHONE uses-permission by adding the following statement to the manifest file:
<uses-permission android:name="android.permission.CALL_PHONE"/>
Listening for Phone State Changes
To listen for phone state changes, that is, to see when the phone state is changed from idle to ringing, off-hook, and so on, we have to implement a broadcast receiver on android.intent.action.PHONE_STATE. That is, we need to implement a PhoneStateListener and call the listen() method of the TelephonyManager to receive notification whenever there is a change in the phone state. When a phone state changes, the onCallStateChanged() method of PhoneStateListener is called with the new phone state. The phone state is represented by the constants shown here:
• CALL_STATE_IDLE—The phone is in an idle state.
• CALL_STATE_RINGING—A phone call has arrived.
• CALL_STATE_OFFHOOK—The phone is off-hook.
To access the phone state information, the application must have permission for doing so. To ask permission, add following statement to the manifest file:
<uses-permission android:name="android.permission.READ_PHONE_STATE" />
Let’s see how to make a phone call and listen to the phone state. Create a new Android project called PhoneCallApp. In this application, there are two controls: Button and TextView. The Button control places the phone call, and the TextView displays the phone state. To define the Button and TextView controls, write the code shown in Listing 11.17 into the activity_phone_call_app.xml layout file.
Listing 11.17. Code Written into activity_phone_call_app.xml
<LinearLayout xmlns:android="http://schemas.android.com/apk/res/android"
android:layout_width="match_parent"
android:layout_height="match_parent"
android:orientation="vertical" >
<Button
android:id="@+id/callbutton"
android:layout_width="wrap_content"
android:layout_height="wrap_content"
android:text="Make Phone Call"
android:layout_gravity="center" />
<TextView
android:id="@+id/messageview"
android:layout_width="wrap_content"
android:layout_height="match_parent"
android:layout_gravity="center" />
</LinearLayout>
We can see that the Button control is assigned the caption Make Phone Call and assigned the ID callbutton. The TextView is assigned the ID messageview. The IDs are used to access these controls in the Java code.
To make the outgoing call and listen to the phone state changes, write the code shown in Listing 11.18 into PhoneCallAppActivity.java.
Listing 11.18. Code Written into PhoneCallAppActivity.java
package com.androidunleashed.phonecallapp;
import android.app.Activity;
import android.os.Bundle;
import android.content.Context;
import android.content.Intent;
import android.net.Uri;
import android.telephony.PhoneStateListener;
import android.telephony.TelephonyManager;
import android.view.View;
import android.widget.TextView;
import android.widget.Button;
import android.view.View.OnClickListener;
import android.util.Log;
public class PhoneCallAppActivity extends Activity {
@Override
public void onCreate(Bundle savedInstanceState) {
super.onCreate(savedInstanceState);
setContentView(R.layout.activity_phone_call_app);
MyPhoneCallListener phoneListener = new MyPhoneCallListener();
TelephonyManager telephonyManager = (TelephonyManager)
getSystemService(Context.TELEPHONY_SERVICE);
telephonyManager.listen(phoneListener,PhoneStateListener.LISTEN_CALL_STATE);
Button callButton = (Button) findViewById(R.id.callbutton);
callButton.setOnClickListener(new OnClickListener() {
@Override
public void onClick(View arg0) {
Intent callIntent = new Intent(Intent.ACTION_CALL);
callIntent.setData(Uri.parse("tel:1111122222"));
startActivity(callIntent);
}
});
}
class MyPhoneCallListener extends PhoneStateListener {
TextView messageview = (TextView)findViewById(R.id.messageview);
String msg;
@Override
public void onCallStateChanged(int state, String incomingNumber) {
super.onCallStateChanged(state, incomingNumber);
switch(state){
case TelephonyManager.CALL_STATE_IDLE:
msg= "Call state is idle";
Log.d("idle", msg);
break;
case TelephonyManager.CALL_STATE_RINGING:
msg = "Call state is Ringing. Number is "+ incomingNumber;
Log.d("ringing", msg);
break;
case TelephonyManager.CALL_STATE_OFFHOOK:
msg = "Call state is OFFHOOK";
Log.d("offhook", msg);
break;
default:
msg = "Call state is" + state + ". Number is " + incomingNumber;
Log.d("state", msg);
break;
}
messageview.setText(msg);
}
}
}
We can see that to make an outgoing call, an Intent object called callIntent is created with an Intent.ACTION_CALL action. The phone number to call is set to 1111122222. The PhoneStateListener class is implemented to listen for the phone state changes. When the phone state changes, the onCallStateChanged() method is called, which displays the phone state through the TextView control.
Before running the application, we need to add two permissions to the application. The first permission is for making phone calls, and the second is for accessing the phone state information. After we add the two permissions, AndroidManifest.xml appears as shown in Listing 11.19. Only the code in bold is added; the rest is the default code.
Listing 11.19. Code in AndroidManifest.xml
<manifest xmlns:android="http://schemas.android.com/apk/res/android"
package="com.androidunleashed.phonecallapp"
android:versionCode="1"
android:versionName="1.0" >
<uses-sdk android:minSdkVersion="8"
android:targetSdkVersion="15" />
<uses-permission android:name="android.permission.CALL_PHONE" />
<uses-permission android:name="android.permission.READ_PHONE_STATE" />
<application
android:icon="@drawable/ic_launcher"
android:label="@string/app_name"
android:theme="@style/AppTheme" >
<activity
android:name=".PhoneCallAppActivity"
android:label="@string/title_activity_phone_call_app" >
<intent-filter>
<action android:name="android.intent.action.MAIN" />
<category android:name="android.intent.category.LAUNCHER" />
</intent-filter>
</activity>
</application>
</manifest>
After running the application, we see the Button and TextView controls on the screen. Because no phone call has been made, the TextView shows the text Call state is idle (see Figure 11.14—top left). After we click the Make Phone Call button, the phone call is made to the phone number specified in the activity file, as shown in Figure 11.14 (top right). The log messages showing the phone state are displayed in Figure 11.14 (bottom).
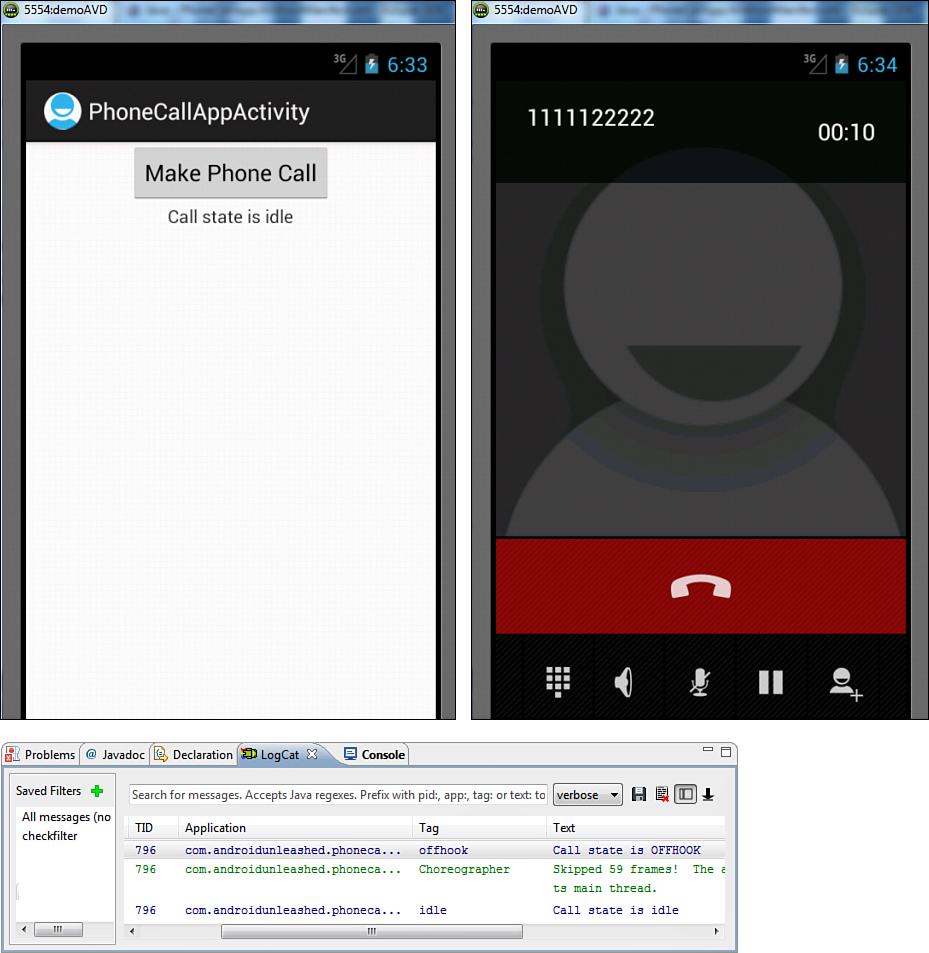
Figure 11.14. Screen displaying the Button and TextView showing that the phone state is idle (top left), screen when a phone call is made (top right), and log messages displayed (bottom)
Summary
In this chapter, we learned about broadcast receivers. We saw how to broadcast and receive the broadcasted Intent. We saw how the notification system is used, and how the notification is created, configured, and displayed in the status bar. We saw the procedure for sending and receiving SMS messages using Java code. Finally, we saw how to send email and use the Telephony Manager in making phone calls.
In the next chapter, we learn how to define, create, use, and register content providers. We also learn how to define a database, content URI, and MIME types. Also we learn to implement the getType, query, insert, update, and delete methods required to make a content provider functional.